
AC-123282.1 - Air Conditioning Emerio - Free user manual and instructions
Find the device manual for free AC-123282.1 Emerio in PDF.

| Product type | Air cooler (mobile air conditioner) |
| Brand | Emerio |
| Model | AC-123282.1 |
| Mains voltage | 220-240 V ~ 50 Hz |
| Power consumption | 80 W |
| Maximum air flow | 5.3 m³/min |
| Sound power level | 65 dB(A) |
| Maximum air speed | 8 m/s |
| Service value | 0.07 (m³/min)/W |
| Standby power consumption | Not measured (not specified) |
| Water tank | With MIN and MAX marks, capacity not specified |
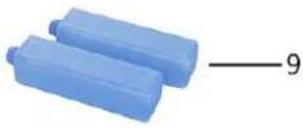
| Ice packs included | 2 (to fill and freeze) |
| Remote control | Yes (CR2025 battery not included) |
| Functions | On/off, speed (low/med/high), oscillation, cooling, timer (1-7h), modes (normal, sleep, natural) |
| Care and cleaning | Clean air filter and cooling pad with neutral detergent; clean water tank frequently; wipe casing |
| Safety | Unplug before cleaning/filling; do not immerse; do not cover air inlets/outlets; use on a flat surface |
| Spare parts | Ice packs available at spareparts.emerio.eu |
| Warranty | 2 years, subject to presentation of receipt |
Frequently Asked Questions - AC-123282.1 Emerio
User questions about AC-123282.1 Emerio
0 question about this device. Answer the ones you know or ask your own.
Ask a new question about this device
Download the instructions for your Air Conditioning in PDF format for free! Find your manual AC-123282.1 - Emerio and take your electronic device back in hand. On this page are published all the documents necessary for the use of your device. AC-123282.1 by Emerio.
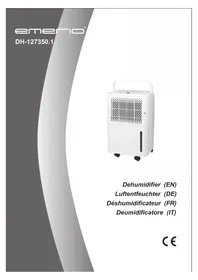
USER MANUAL AC-123282.1 Emerio
natural_image
White electric air conditioner unit with black ventilation slots and wheels (no visible text or symbols)Air cooler (EN)
Luftkühler (DE)
Instruction manual – English ...... - 2 -
Instruction manual – English
SAFETY INSTRUCTIONS
Before use make sure to read all of the below instructions in order to avoid injury or damage, and to get the best results from the appliance. Make sure to keep this manual in a safe place. If you give or transfer this appliance to someone else make sure to also include this manual.
In case of damage caused by user failing to follow the instructions in this manual the warranty will be void. The manufacturer/importer accepts no liability for damages caused by failure to follow the manual, a negligent use or use not in accordance with the requirements of this manual.
-
This appliance can be used by children aged from 8 years and above and persons with reduced physical, sensory or mental capabilities or lack of experience and knowledge if they have been given supervision or instruction concerning use of the appliance in a safe way and understand the hazards involved.
-
Children shall not play with the appliance.
-
Cleaning and user maintenance shall not be made by children without supervision.
-
If the supply cord is damaged, it must be replaced by the manufacturer, its service agent or similarly qualified persons in order to avoid a hazard.
-
Unplug the appliance during filling and cleaning.
-
Do not permit the area around the appliance to become damp or wet. If dampness occurs, turn the output of the appliance down. If the appliance output volume cannot be turned down, use the appliance intermittently. Do not allow absorbent materials, such as carpeting, curtains, drapes, or tablecloths, to become damp.
-
Never leave water in the reservoir when the appliance is not in use.
-
Empty and clean the appliance before storage. Clean the appliance before next use.
-
Before inserting the plug into the mains socket, please check that the voltage and frequency comply with the specifications on the rating label.
-
If an extension cord is used it must be suited to the power consumption of the appliance, otherwise overheating of the extension cord and/or plug may occur. There is a potential risk of injuries from tripping over the extension cord. Be careful to avoid dangerous situations.
-
Disconnect the mains plug from the socket when the appliance is not in use and before cleaning.
-
Ensure that the mains cable is not hung over sharp edges and keep it away from hot objects and open flames.
-
Do not immerse the appliance or the mains plug in water or other liquids. There is danger to life due to electric shock!
-
To remove the plug from the plug socket, pull the plug. Do not pull the power cord.
-
Do not plug or unplug the appliance from the electrical outlet with a wet hand.
-
Never attempt to open the housing of the appliance, or to repair the appliance yourself. This could cause electric shock.
-
Never leave the appliance unattended during use.
-
This appliance is not designed for commercial use.
-
Do not use the appliance for other than intended use.
-
Do not wind the cord around the appliance and do not bend it.
-
Never insert fingers, pencils or any other object through the holes of the plastic shell.
-
The appliance should be placed on a flat and stable surface when operating to avoid overturning.
-
Do not let the air inlet be too close to the wall, curtain and other objects. Otherwise, it will block the air flow and affect the wind effect.
-
Choose the socket that is up to more than 10A current. Do not use the same socket with other machines.
-
Please turn off the power before pulling out the plug. Do not pull the plug directly in order to avoid a short-circuit, fire or electric shock.
-
Do not use the appliance outdoors or around the bath, shower or pool.
-
At anytime, the water level of the water tank must be less than "MAX". When the cooling function is used, the water level of the water tank must be more than "MIN".
-
After the water tank is filled with water, please do not tilt or bump the appliance while moving it.
-
Do not put anything on the appliance. Do not cover the air inlet and air outlet of the appliance.
-
Pour out the water when the appliance is not in use.
-
Regarding the instructions for filling and cleaning, thanks to refer to the below paragraph of the manual.
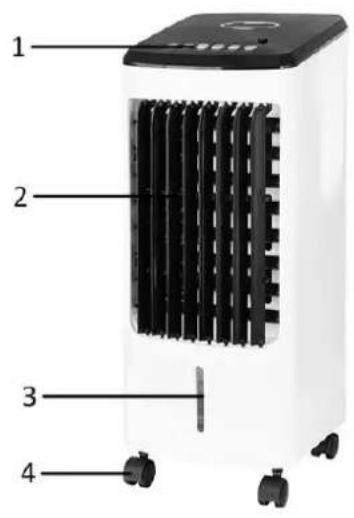
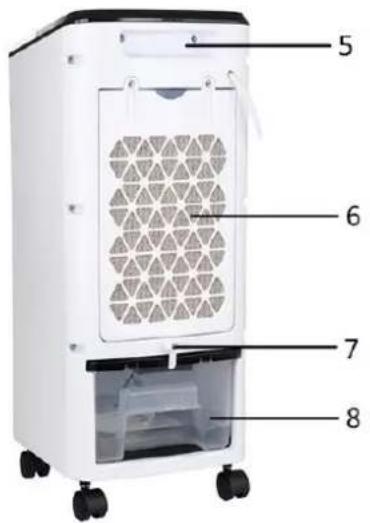
PARTS DESCRIPTION
natural_image
Two blue plastic cylindrical objects with a numbered line (9) pointing to one (no text or symbols on the objects themselves)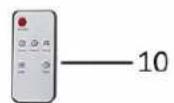
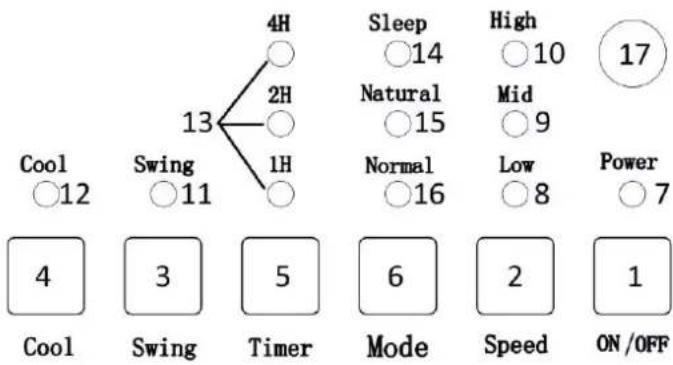
- Control panel
- Air outlet
- Water level window
- Wheels
- Handle
- Air inlet
- Water tank lock
- Water tank
- Ice boxes
- Remote control
Control panel
flowchart
graph TD
    A["4H"] --> B["2H"]
    A --> C["1H"]
    B --> D["13"]
    C --> E["1H"]
    D --> F["Sleep"]
    D --> G["Natural"]
    D --> H["Normal"]
    E --> I["High"]
    E --> J["Mid"]
    E --> K["Low"]
    E --> L["Power"]
    M["Cool"] --> N["4"]
    O["Cool"] --> P["3"]
    Q["Swing"] --> R["5"]
    S["Timer"] --> T["6"]
    U["Mode"] --> V["2"]
    W["Speed"] --> X["1"]
    Y["ON/OFF"] --> Z["7"]
- On/off button
- Wind speed button
- Swing button
- Cool button
- Timer button
- Mode button
- Indicator light of power
- Indicator light of low wind speed
-
Indicator light of medium wind speed
-
Indicator light of high wind speed
- Indicator light of swing function
- Indicator light of cooling function
- Indicator light of timer
- Indicator light of sleep mode
- Indicator light of natural mode
- Indicator light of normal mode
- Remote control receiver
Remote control
- On/off button
- Mode button
- Wind speed button
- Swing button
- Cool button
- Timer button
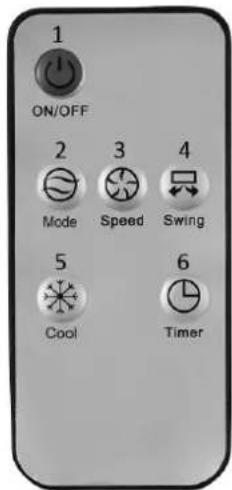
This unit has a remote control. One piece of CR2025 battery is to be used with the remote control (not included). If you want to change the battery, please refer to the instruction behind the remote control. If it is not in use for a long time, please take the battery out of the remote control. Keep button cell batteries out of reach of small children. The functions of the remote control buttons are the same as the functions of the buttons on the control panel.
During use, align the remote control to the control panel (the remote control receiver is on the control panel); the remote control will not work if the control panel is blocked.
BEFORE USE
- Pull the appliance out from the carton and place it on a solid heat-resistant horizontal surface.
- Check if the accessories are complete including: two ice boxes, one remote control and four wheels.
- Insert four wheels into the corner holes and ensure the wheels are assembled tightly.
HOW TO USE
- Turn the water tank lock to the horizontal position. Pull out the water tank slowly to leave 1/3 of the water tank in the appliance body. Add water into the water tank. If you need the air sent out much cooler, put the ice boxes (add water and freeze first) into the water. Make sure the water level is between the MIN and MAX line. Check the water level from the water level window in the front side of the appliance.
Important! Use of the ice boxes:
Add water into the ice boxes; do not exceed the MAX line on the ice box when adding water into it. Screw the cap tightly to make sure there is no leakage of water droplet. Keep the ice boxes away from children to prevent ingestion. Freeze the ice boxes by placing them horizontally instead of standing vertically in the freezer to avoid deformation.
Warning: the water level of the water tank must be less than "MAX" after the ice boxes are put into the water tank.
-
Plug the appliance into the appropriate power outlet. A beep sound will be heard and the indicator light of power will be on. The appliance is in standby mode.
-
On/off button:
Press the on/off button to start the appliance. The appliance will work at low wind speed in normal mode and the corresponding indicator lights will be on.
Press the button again to turn off the appliance. The appliance will enter into standby mode.
- Wind speed button:
Press the wind speed button to adjust the wind speed: "Low" = low wind speed; "Mid" = medium wind speed; "High" = high wind speed. The corresponding indicator light will be on.
- Swing button:
Press the swing button to turn on the swing function. The corresponding indicator light will be on. The air flow will swing left and right. Press the swing button again to cancel the swing and fix the air flow at a specific direction horizontally. To adjust the air flow direction vertically, just lift up or press down the louver outside.
- Cool button:
Press the cool button to turn on the cooling function. The corresponding indicator light will be on. This function is only effective when the water tank has ice box(es) inside. Do not activate this function when the water in the water tank is below the "MIN" level; add enough water into the water tank first.
- Timer button:
Press the timer button to set the shutdown time from 1 to 7 hours. Each time you press this button the timer value will be added by one hour and the corresponding indicator light will be on.
- Mode button:
Press the mode button to switch the working mode among normal, sleep and natural. The corresponding indicator light will be on.
- Normal mode: The appliance works with the same wind speed all the time.
- Sleep mode: The appliance changes wind generally from high to low with short time suspended.
- Natural mode: The appliance changes the wind randomly with short time suspended.
NOTES:
-
It is recommended to change water and clean water tank frequently.
-
Activating the cooling function with insufficient water may cause malfunction of the water pump inside the water tank.
-
Do not take out the water tank immediately after the appliance is just turned off. Wait several minutes to avoid the water dripping out from the cooling pad.
CLEANING AND MAINTENANCE
Unplug the appliance during filling and cleaning.
Make sure there is no water on the control panel.
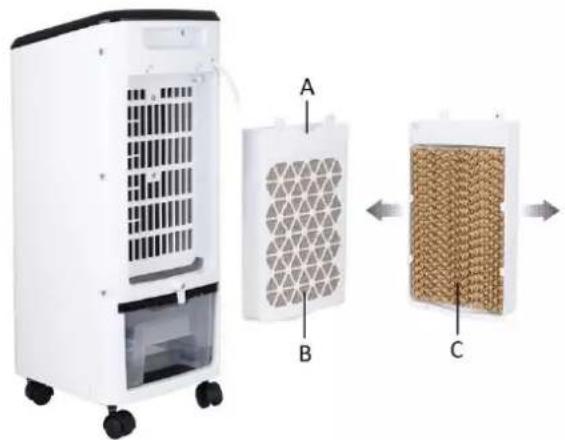
■ Clean the air filter and cooling pad
-
Loosen and take off the screws on the air filter.
-
Pull the tab (A) to take off the air filter (B) and the cooling pad (C). Pull the air filter outwards on both sides gently and then remove the cooling pad out.
-
Use a neutral cleaner and a soft brush to clean the air filter and the cooling pad. Rinse with clear water thoroughly.
-
Put back the cooling pad and air filter in place after cleaning. If you will not use the appliance immediately after cleaning, please dry them before putting back.
Important: in order to avoid leak, the cooling pad must be installed smoothly.
natural_image
Diagram showing three components of a white air purifier: front-mounted fan, side-mounted grid-patterned chamber, and side-mounted meshed chamber (no text or symbols present)Note: After long time operation, the cooling pad becomes clogged with dust and dirt, which will greatly affect the performance of the appliance. It is recommended to clean the cooling pad frequently. If the cooling pad gets worn out, please replace it by a new one, available at https://spareparts.emerio.eu
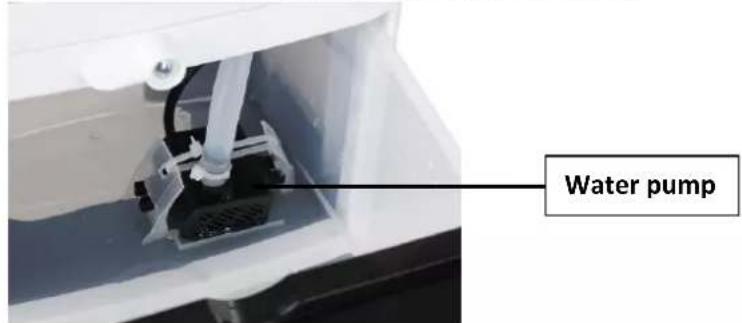
■ Clean the water tank (The water pump is fastened in the water tank. Under normal operation, there is no need to detach it from the water tank.)
- Pull out the water tank.
- Clean the water tank with a soft cloth and a little mild detergent, then clean it with clear water.
- Put back the water tank in place after cleaning.
Note: After some time of operation, the water tank may have dust and dirt. It is recommended to change water and clean the water tank frequently.
■ Clean the main body
- For slight dirt, wipe if off with a soft damp cloth. For greasy dirt, squeeze a little mild detergent on a soft damp cloth, then wipe the dirt off.
- Let the main body dry completely before next use.
TECHNICAL DATA
Mains voltage: 220-240V \~ 50Hz
Power consumption: 80W
GUARANTEE AND CUSTOMER SERVICE
Before delivery our devices are subjected to rigorous quality control. If, despite all care, damage has occurred during production or transportation, please return the device to your dealer.
For the purchased device we provide 2 years guarantee, commencing from the day of sale. If you have a defective product, you can directly go back to the point of purchase.
Defects which arise due to improper handling of the device and malfunctions due to interventions and repairs by third parties or the fitting of non-original parts are not covered by this guarantee. Always keep your receipt, without the receipt you can't claim any form of warranty. Damage caused by not following the instruction manual, will lead to a void of warranty, if this results in consequential damages then we will not be liable. Neither can we hold responsible for material damage or personal injury caused by improper use if the instruction manual is not properly executed. Damage to accessories does not mean free replacement of the whole appliance. In such case please contact our service department. Broken glass or breakage of plastic parts is always subject to a charge. Defects to consumables or parts subjected to wearing, as well as cleaning, maintenance, replacement of said parts or shipping and transportation costs to and from any place of repair are not covered by the warranty and are to be paid.
The crossed out wheelie bin symbol means that this product shall not be disposed of with normal household waste. Electronic and Electrical Equipment not included in the selective sorting process are potentially dangerous for the environment and human health due to the presence of hazardous substances. Please dispose of responsibly at an approved waste or recycling facility.
BATTERY MUST BE RECYCLED OR DISPOSED OF PROPERLY. DO NOT OPEN. DO NOT DISPOSE OR IN FIRE OR SHORT CIRCUIT.
Emerio Switzerland AG
Oberneuhofstrasse 1
6340 Baar
Switzerland
ERP information (EN)
Supplier: Emerio Switzerland AG
Oberneuhofstrasse 1
6340 Baar
Switzerland
Declare that the product detailed below:
Information requirements
| Information to identify the AC-123282.1 to which the information relates to[Air Cooler] | |||
| Description | Symbol | Value | Unit |
| Maximum fan flow rate | F | 5,3 | m^3/min |
| Fan power input | P | 80 | W |
| Service value | SV | 0,07 | (m^3/min)/W |
| Standby power consumption | P_SB | / | W |
| Fan sound power level | L_WA | 65 | dB(A) |
| Maximum air velocity | C | 8 | meters/sec |
| Measurement standard for service value | IEC 60879:1986 (corr. 1992) Performance and construction of electric circulating fans and regulators | ||
| Contact details for obtaining more information | Emerio Switzerland AGOberneuhofstrasse 16340 BaarSwitzerland | ||
Satisfies the requirement of the Council Directives:
COMMISSION REGULATION (EU) No 206/2012 of 6 March 2012 and Amending COMMISSION REGULATION (EU) 2016/2282 implementing Directive 2009/125/EC of the European Parliament and of the Council with regard to ecodesign requirements for air conditioners and comfort fans
Regarding information for consumers on how to install, use and maintain the product, WEEE information, please check the instruction manual provided with packaging.
natural_image
Diagram of a white air purifier with internal components and labeled parts A, B, C (no text or symbols beyond labels)Emerio Switzerland AG
Oberneuhofstrasse 1
6340 Baar
Switzerland
Lieferant: Emerio Switzerland AG
Oberneuhofstrasse 1
6340 Baar
Switzerland
natural_image
Diagram showing three components of an air purifier: a white air purifier, a mesh chamber with labeled parts A, B, and C, arranged in a row (no text or symbols on the main components)Emerio Switzerland AG
Oberneuhofstrasse 1
6340 Baar
Switzerland
Informations ERP (FR)
natural_image
Close-up of a white electronic device with a transparent tube inserted into a housing (no visible text or symbols)Pompa dell'acqua
natural_image
Diagram showing three components of an air purifier: a white air purifier, a meshed air filter with labeled parts A, B, and C, arranged in a row (no text or symbols on the devices themselves)Emerio Switzerland AG
Oberneuhofstrasse 1
6340 Baar
Switzerland
- Instruction manual – English
- SAFETY INSTRUCTIONS
- PARTS DESCRIPTION
- Control panel
- Remote control
- BEFORE USE
- HOW TO USE
- Important! Use of the ice boxes:
- NOTES:
- CLEANING AND MAINTENANCE
- ■ Clean the air filter and cooling pad
- ■ Clean the main body
- TECHNICAL DATA
- GUARANTEE AND CUSTOMER SERVICE
- ERP information (EN)
- Informations ERP (FR)
Brand : Emerio
Model : AC-123282.1
Category : Air Conditioning