
HEAT PH1S2000 - Heating WILFA - Free user manual and instructions
Find the device manual for free HEAT PH1S2000 WILFA in PDF.

| Product type | Heating umbrella (infrared heating) |
| Brand | Wilfa |
| Model | HEAT PH1S2000 |
| Maximum power | 2000 W |
| Heat levels | 3 (750 W, 1500 W, 2000 W) |
| Supply voltage | 220-240 V ~ (estimated) |
| Frequency | 50/60 Hz (estimated) |
| Structure material | Aluminum and tempered glass (estimated) |
| Dimensions (approx.) | H 80 cm x W 40 cm x D 30 cm (estimated) |
| Weight (approx.) | 4 kg (estimated) |
| Heating area | Up to 20 m² (estimated) |
| Usage | Indoor and outdoor (except near water) |
| Control | Remote control with on/off and power selection |
| Protection | Residual current device recommended on the plug |
| Power cord | Length 1.5 m (estimated) |
| Warranty | 5 years |
| Maintenance | Clean the reflector and filament with a soft cloth |
| Repairability | No user-repairable parts |
| Spare parts available | Reflector and filament |
| Installation | Wall-mounted, minimum height 1.8 m from the ground |
Frequently Asked Questions - HEAT PH1S2000 WILFA
User questions about HEAT PH1S2000 WILFA
0 question about this device. Answer the ones you know or ask your own.
Ask a new question about this device
Download the instructions for your Heating in PDF format for free! Find your manual HEAT PH1S2000 - WILFA and take your electronic device back in hand. On this page are published all the documents necessary for the use of your device. HEAT PH1S2000 by WILFA.
USER MANUAL HEAT PH1S2000 WILFA
IMPORTANT SAFETY INSTRUCTIONS
- Read this instruction manual thoroughly before use and save it for future reference. It is also available at our website; wilfa.com.
- This appliance can be used by children aged from 8 years and above and persons with reduced physical, sensory or mental capabilities or lack of experience and knowledge if they have been given supervision or instruction concerning use of the appliance in a safe way and understand the hazards involved. Children shall not play with the appliance. Cleaning and user maintenance shall not be made by children without supervision.
- If the supply cord is damaged, it must be replaced by the manufacturer, its service agent or similarly qualified persons in order to avoid a hazard.
- This product is intended for non-industrial, non-commercial, household use only.
SPECIAL INSTRUCTIONS FOR THE PATIO HEATER
- Do not leave this unit unattended when in use.
- This heater will get hot when in use. Do not touch hot surfaces.
- Caution: Some parts of this product can become very hot and cause burns. Particular attention has
to be given when children and vulnerable people are present.
EN
- Do not move the unit when in use. Wait until the heater is completely cool before moving and check that it has been unplugged from the power supply.
- Position the unit at least 1m away from highly combustible materials such as furniture, trees, leaves, dry grass and bushes.
- The heater must not face upwards with the heating element pointing towards a ceiling. The heating element must be facing the area it is to heat.
- Warning: In order to avoid overheating do not cover the heater. It is not for drying clothes.
- Do not operate the heater if any signs of damage or malfunction manifest themselves.
- Do not attempt to repair or adjust any electrical or mechanical functions on this unit. The unit does not contain any user serviceable parts. Only a qualified electrician should perform servicing or repairs. Attempting to repair the unit yourself will void your warranty.
- Do not handle the element with bare hands. If it is inadvertently touched, remove finger marks with
a soft cloth and methylated spirits or alcohol, otherwise the marks will burn into the element causing premature heater failure.
- Do not replace or attempt to replace the element in this product.
- This product is suitable for indoor and outdoor use. Do not use this heater in the immediate surroundings of a bath, shower or swimming pool.
- Do not touch the plug with wet or damp hands.
- Do not run the power cable under carpeting. Do not cover the power cable with rugs, runner, or similar coverings. Arrange the power cable away from foot traffic and where it will not be tripped over.
- Do not wind the power cable around the unit.
- Do not insert or allow foreign objects to enter any ventilation or opening on the heater, as this may result in electric shock, fire, or damage to the heater.
- To prevent a possible fire, do not block the air vents.
-
A heater has hot and arcing or sparking parts inside. Do not use in areas where petrol, paint, explosive and/or flammable liquids are used or stored. Keep unit away from heated surfaces and open flames.
-
Avoid the use of an extension cord as this may overheat and cause a fire. However, if you have to use an extension cord, ensure it is suitable for the purpose, has been tested for outdoor use and preferably has an residual-current device fitted or attached.
- Always ensure the heater is plugged into a suitable socket, one that is tested for outdoor use.
- The use of attachments on the heater is not recommended.
- Check exterior walls for areas of damage before installing the heater.
- Always use on a dry, suitably strong, stable, flat and level surface.
- Check exterior walls for communication and electrical cables and pipelines. Should any service lines be present in the immediate vicinity do not install your heater, find an alternative location to install this product.
- Do not position directly above or below an electrical socket.
- Do not remove any of the warning stickers or signs from the product.
INSTALLATION
BEFORE THE INSTALLATION, THESE MATTERS NEED ATTENTION
- The product should be put down gently.
- Installations in acid and alkaline environment is not recommended.
- The product must be grounded.
- The products are required to check the product brand mark on the voltage and the local voltage whether conform.
- Ensure the power rating should have sufficient current carrying capacity.
- The possible danger of installation close to curtains and other combustible materials.
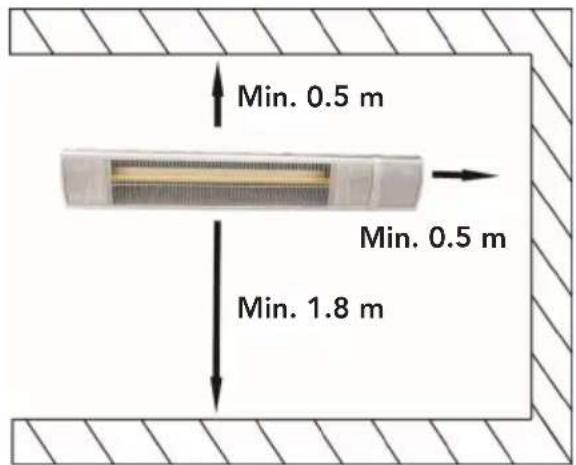
ENSURE THE PRODUCTION'S INSTALLATION SITE
For the safe use of the product, the product installation position should guarantee the bottom minimum height of 1.8m from the ground. Ceiling or other coverings minimum distance is 0.5m , minimum distance with both sides wall is 0.5m (as shown in figure 1).
INSTALLATION STEPS
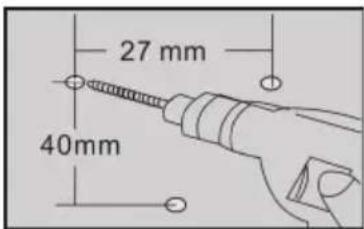
Step 1: According to the product installation location, use percussion drilling to make three diameter 8mm round holes
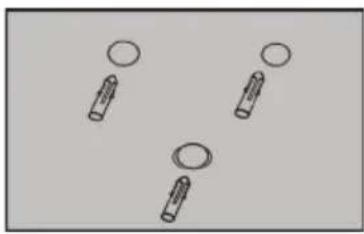
Step 2: Insert the three plastic wall anchors to the three holes
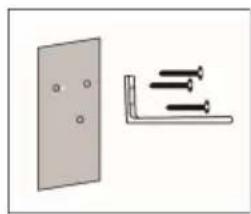
Step 3: Mount the bracket by three ST4*35 screws and make sure the installation points are secured. For mounting on concrete use two previous points prior to this point. For mounting on wood surface use only this point. For any mounting surface be sure to check that the bracket is securely mounted.

Step 4: Before fixed the heater, make sure the rocker power switch on the right side and then fixed the bracket and heater by two M6*14 screws and butterfly nuts
HOW TO USE
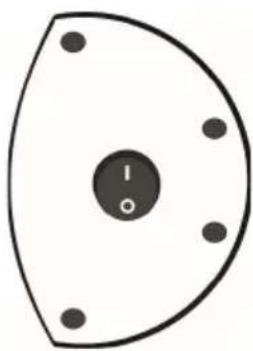
The power switch is on the right side of the unit.
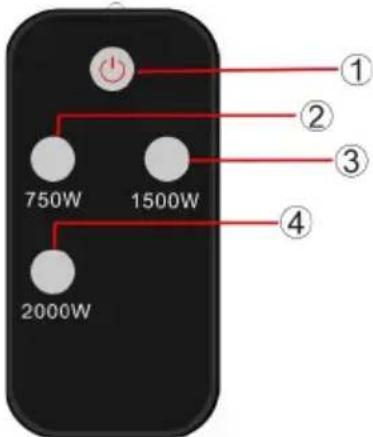
REMOTE CONTROL
- On / Off. Switches on or off the heater.
- 750W. After turning on the heater, you can choose low heating.
- 1500W. After turning on the heater, you can choose moderate heating.
- 2000W. After turning on the heater, you can choose high heating.
- To disconnect heater, switch to OFF, then remove plug from socket. Do not unplug by pulling on the power cable.
- Position the heater outside or in a large open area and well away from any obstructions such as branches or where the heater is near any objects that can be affected by heat, such as furniture, curtains or other inflammable objects (minimum distance 1 meter).
- Two dark points may exist on the surface of the heating elements during the first few minutes after it is turned on. This is normal and will not affect the performance of the unit.
- Warning: This heater is not equipped with a device to control the room temperature. Do not use this heater in small rooms when occupied by persons not capable of leaving a room on their own, unless constant supervision is provided.
EN
MAINTENANCE AND CLEANING
Attention! Careful and regular maintenance of Infrared Heater is required to attain a long and efficient operation of your appliance.
- Check the cleanliness of the Reflector and IR-Filament at least once a month. If necessary, apply cleaning and maintenance instructions.
- The number of checks may be increased considering the amount of the dust in the environment.
- Check the deformation of the reflector, wire and frame visually while cleaning the appliance. In case of any deformation, consult a qualified technician.
It is recommended to change the reflector every 2 years for more efficient operation. - This product must not be left outdoors exposed to the elements for long periods of time.
Attention! Regular and careful cleaning helps your heater operate for longer years and more efficiently.
- Always unplug the unit and ensure the unit is completely cold before moving, cleaning or storing.
- Take out the front grid wire through the inlets on the frame using a slotted screwdriver.
- The reflector and filament must be cleaned with a soft cloth, a smooth brush or cool or dry air. The cloth may be damp but never too wet and the cleaner should not include any chemical. Refrain from using cleaning material likely to damage the reflector (cleanser etc.).
- Insert the wire grid using a slotted screwdriver.
EN

GUARANTEE
Wilfa issues a 5 year guarantee on this product from the day of purchase is done. The guarantee covers production failure or defects that arise during the guarantee period. Your purchase receipt works as proof towards retailer if claiming your guarantee.
The guarantee is valid only for products that are bought and used in private households. The guarantee is not valid if the product is used commercially. The guarantee is not valid if the product is misused, used by negligence, if not following instructions given by Wilfa, if modified or if unauthorized reparation is done. The guarantee is also not valid for normal wear of the product, misuse, lack of maintenance, use of wrong electrical voltage or:
Overloading of product
- Parts which are normally worn down
- Parts you can expect being replaced regularly (e.g. filter, battery etc.)
Instructions manual is also available at our website wilfa.com
PRODUCT SPECIFICATIONS
AC220-240V~50/60Hz 2000W
EN
SUPPORT AND SPARE PARTS
For support please visit us at wilfa.com, and see our customer service/support page. Here you will find frequently asked questions, spare parts, tips and tricks and all our contact information.
RECYCLABILITY
This marking indicates that this product should not be disposed with other household wastes throughout the EU. To prevent possible harm to the environment or human health from uncontrolled waste disposal, recycle it responsibly to promote the sustainable reuse of material resources. To return your used device, please use the return and collection systems or
contact the retailer where the product was purchased. They can take this product for environmentally safe recycling free of charge.
NO
NO
INNHOld
18 VIKTIGE SIKKERHETSINSTRUKSJONER
18 SPESIELLE INSTRUKSJONER FOR TERRASSEVARMEREN
23 INSTALLASJON
25 BRUK
26 VEDLIKEHOLD OG RENGJØRING
28 GARANTI
29 PRODUKTSPESIFIKASJONER
29 SUPPORT OG RESERVEDELER
29 GJENVINNING
VIKTIGE SIKKERHETSINSTRUKSJONER
VEDLIKEHOLD OG RENGJØRING
CARACTERISTIQUES DU PRODUIT

- IMPORTANT SAFETY INSTRUCTIONS
- SPECIAL INSTRUCTIONS FOR THE PATIO HEATER
- INSTALLATION
- BEFORE THE INSTALLATION, THESE MATTERS NEED ATTENTION
- ENSURE THE PRODUCTION'S INSTALLATION SITE
- INSTALLATION STEPS
- HOW TO USE
- REMOTE CONTROL
- EN
- MAINTENANCE AND CLEANING
- GUARANTEE
- PRODUCT SPECIFICATIONS
- SUPPORT AND SPARE PARTS
- RECYCLABILITY
- INNHOld
- VIKTIGE SIKKERHETSINSTRUKSJONER
- VEDLIKEHOLD OG RENGJØRING
- CARACTERISTIQUES DU PRODUIT
Brand : WILFA
Model : HEAT PH1S2000
Category : Heating