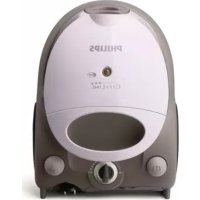
Triathlon FC6841 - Vacuum Cleaner PHILIPS - Free user manual and instructions
Find the device manual for free Triathlon FC6841 PHILIPS in PDF.
Download the instructions for your Vacuum Cleaner in PDF format for free! Find your manual Triathlon FC6841 - PHILIPS and take your electronic device back in hand. On this page are published all the documents necessary for the use of your device. Triathlon FC6841 by PHILIPS.
USER MANUAL Triathlon FC6841 PHILIPS
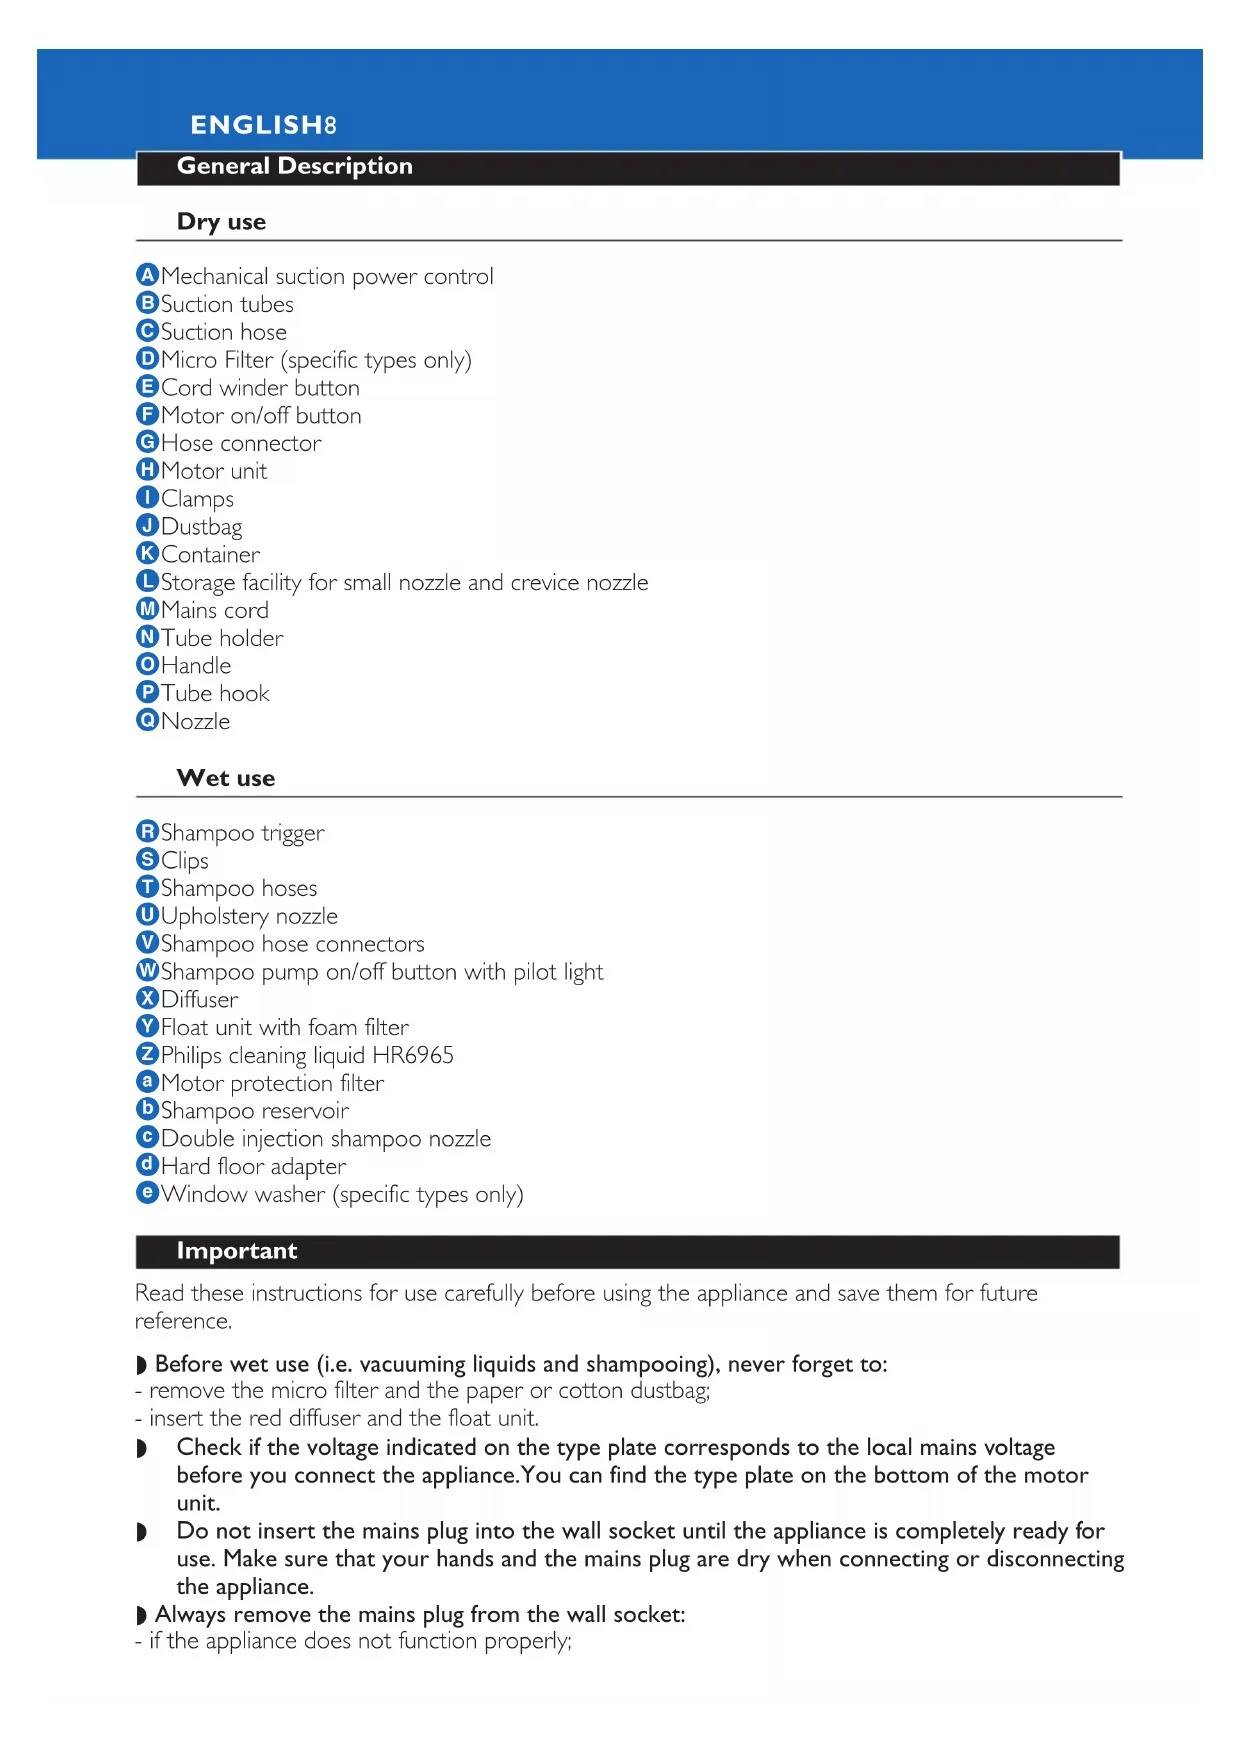
TRIATHLONGeneral Description Dry use A Mechanical suction power control B Suction tubes C Suction hose D Micro Filter (specific types only) E Cord winder button F Motor on/off button G Hose connector H Motor unit I Clamps J Dustbag K Container L Storage facility for small nozzle and crevice nozzle M Mains cord N Tube holder O Handle P Tube hook Q Nozzle Wet use R Shampoo trigger S Clips T Shampoo hoses U Upholstery nozzle V Shampoo hose connectors W Shampoo pump on/off button with pilot light X Diffuser Y Float unit with foam filter Z Philips cleaning liquid HR6965 a Motor protection filter b Shampoo reservoir c Double injection shampoo nozzle d Hard floor adapter e Window washer (specific types only) Important Read these instructions for use carefully before using the appliance and save them for future reference. ◗ Before wet use (i.e. vacuuming liquids and shampooing), never forget to: - remove the micro filter and the paper or cotton dustbag; - insert the red diffuser and the float unit. ◗ Check if the voltage indicated on the type plate corresponds to the local mains voltage before you connect the appliance.You can find the type plate on the bottom of the motor unit. ◗ Do not insert the mains plug into the wall socket until the appliance is completely ready for use. Make sure that your hands and the mains plug are dry when connecting or disconnecting the appliance. ◗ Always remove the mains plug from the wall socket: - if the appliance does not function properly; ENGLISH8- before cleaning the appliance; - before opening the container. ◗ Only vacuum dry materials and dust if the paper or cotton dustbag has been inserted into the appliance . ◗ Never vacuum ashes (from ashtrays and fireplaces) until they are completely cold. ◗ Never vacuum petrol, white spirit, gas oil, paraffin oil or other inflammable or explosive liquids. ◗ Do not use the appliance in rooms with explosive vapours (petrol, thinners, solvents). ◗ When vacuuming ashes, fine sand, lime, cement dust and similar substances, the pores of the paper dustbag may become clogged. In this case the paper dustbag must be replaced, even if is not full yet. ◗ Only use Athena paper dustbags or the cotton dustbag. Dustbags can be obtained from your dealer. For type numbers, see the table in 'Accessories' . ◗ Do not use the vacuum cleaner without the motor protection filter. ◗ Never immerse the motor unit in water. ◗ Never point the jet of shampoo at plugs, sockets or electrical appliances. ◗ Only switch the pump on if the shampoo reservoir has been filled, placed into the appliance and connected by means of the two shampoo hoses. Switch the pump off as soon as the shampoo reservoir is empty. The pump may get damaged if it runs dry. ◗ Keep the appliance and the cleaning liquid out of reach of children. ◗ Always switch the appliance off after use and remove the mains plug from the wall socket. ◗ Always empty, clean and dry the container after wet use. Let the appliance suck in dry air for few minutes to dry the inside of the tubes and hose.This prevents an unpleasant smell from occuring the next time you use the vacuum cleaner. It also prevents the paper dustbag from becoming wet. ◗ To extend its life, the shampoo pump should be cleaned with a mixture of water and white vinegar once a year. Follow the instructions in chapter 'Cleaning and maintenance'. ◗ Do not store the appliance at temperatures below 0cC to prevent it from freezing. ◗ Do not point the hose at the eyes or ears nor put it in your mouth when the vacuum cleaner is switched on and the hose is connected to the vacuum cleaner. ◗ If the mains cord or another part of this appliance is damaged, it must only be replaced by Philips or a service centre authorised by Philips in order to avoid hazardous situations. ◗ Noise level: Lc= 81 dB [A] Preparing for use Connecting and disconnecting accessories Hose 1 To connect the hose, insert it into the hose connector while turning it clockwise a little (fig. 1). 2 To disconnect the hose, pull it out of the hose connector while turning it anticlockwise a little (fig. 2). Tube 1 To connect the tube, press the spring-loaded button and insert the narrow section into the wider section.The button will pop up when inserted properly into the opening (fig. 3). 2 To disconnect the tube, press the spring-loaded button and pull the sections away from each other. Nozzle 1 You can connect the nozzle to the tube (fig. 30). 2 If you wish to have the nozzle close at hand (e.g. to clean stairs, upholstery, tapestries), you can connect the nozzle directly to the handgrip (fig. 4). ENGLISH 9Dry or wet vacuuming Prepare the vacuum cleaner for either dry vacuuming or wet vacuuming.
NB:The appliance is ready for wet use when you remove it from the box to start using it for the first time. Preparing for dry vacuuming Always remove the float unit and the diffuser and insert the micro filter (specific types only) and the paper or cotton dustbag before vacuuming dry substances. 1 Always remove the mains plug from the wall socket first. 2 Detach the shampoo hose by turning it clockwise (1) and pulling it (2) (fig. 5). 3 Remove the shampoo reservoir (fig. 6). 4 Undo the clamps (fig. 7). 5 Lift the motor unit from the container by means of the handle (fig. 8). 6 Turn the motor unit upside down (fig. 9). 7 Remove the diffuser (fig. 10). 8 Remove the float unit (fig. 11). 9 Insert a (new) dustbag. Press and hold the red lever when placing the cardboard front into the holder (fig. 12). 10 First insert the bottom edge (1).Then press the top edge into place (2) (fig. 13). Make sure that the two projections of the cardboard front point downwards and that the centre of the bottom edge rests on the ridge of the holder. 11 Slide the holder with dustbag into the appliance in such a way that the holder is kept in place by the two ridges in the container (fig. 14). 12 Put the motor unit back onto the appliance and close the clamps (you will hear a click) (fig. 15). 13 Put the micro filter into place (specific types only) (fig. 16). ◗ See chapter 'Replacement' for replacing the dustbag. Preparing for wet vacuuming Always remove the paper or cotton dustbag and the micro filter (specific types only). For vacuuming liquids, insert the float unit and the diffuser. For shampooing, insert the float unit, the diffuser, the shampoo reservoir (filled with shampoo and water), the double injection nozzle and the shampoo trigger. 1 Always remove the mains plug from the wall socket first. 2 Undo the clamps (fig. 7). 3 Lift the motor unit from the container by means of the handle (fig. 8). 4 Remove the dustbag (also see chapter 'Replacement', section 'Dustbags') (fig. 17). 5 Insert the float unit by means of the handle (fig. 18).
Note that the float unit only fits into the appliance in one way. 6 Turn the motor unit upside down (fig. 9). 7 Insert the diffuser (fig. 19). 8 Put the motor unit back onto the appliance and close the clamps (you will hear a click) (fig. 15). ENGLISH109 Remove the micro filter (specific types only) (fig. 20).
Note that the micro filter will lose its electrostatic properties if exposed to excessive air humidity. Now the appliance is ready for vacuuming liquids. If you want to shampoo floors, follow the rest of the instructions below to prepare the appliance for shampooing floors. 10 Fill the shampoo reservoir with cold water (fig. 21). 11 Add one measuring cup of cleaning liquid to the full reservoir (fig. 22). 12 Attach the shampoo reservoir to the appliance (fig. 23). 13 Attach the short shampoo hose to the connector on the vacuum cleaner by inserting the shampoo hose into the connector (1) and turning it anticlockwise (2) (fig. 24). 14 Attach the long shampoo hose to the shampoo trigger (fig. 25). 15 Fix the shampoo trigger to the handgrip of the suction hose (fig. 26). 16 Firmly insert the end of the long shampoo hose into the connector on the vacuum cleaner (you will hear a click) (fig. 27). ◗ To release the shampoo hose, push the ring towards the appliance (fig. 28). 17 Attach the long shampoo hose to the suction hose and suction tubes by means of the clips (fig. 29). 18 Attach the double injection nozzle (fig. 30). The appliance is now ready for shampooing soft floors, such as carpets and rugs. Using the appliance Switching the appliance on 1 Pull the mains cord out of the appliance and insert the mains plug into the wall socket (fig. 31). 2 Switch the appliance on (fig. 32). Dry vacuuming Convertible nozzle (specific types only) The convertible nozzle is active over its full width and even vacuums from its sides. It is therefore very suitable for vacuuming along skirting boards, furniture and thresholds. ◗ The convertible nozzle can be used for vacuuming hard and soft floors (fig. 33). - Brush strip out for cleaning hard floors (wooden, ceramic, stone and synthetic floors) - Brush strip in for cleaning soft floors (carpets and rugs) Reach & Clean nozzle (specific types only) ◗ The Reach & Clean nozzle can be used on either carpets or hard floors.The nozzle can be put in 4 different positions, allowing you to also vacuum clean hard-to-reach places in an easy way.The nozzle can be turned 360 degrees clockwise as well as anticlockwise.When the nozzle is positioned lengthwise, the suction power is concentrated at the front side of the nozzle (fig. 34). ◗ To adjust the nozzle to the type of floor and the area to be cleaned, put your foot on one of the indicated spots on the nozzle and then turn the tube until the nozzle is in the required position (fig. 35). ◗ With the nozzle positioned breadthwise and the brush strip folded out, you can clean large hard floor areas.Turn the tube until the brush strip pops out of the nozzle housing and the nozzle is positioned breadthwise (fig. 36). ENGLISH 11◗ With the nozzle positioned lengthwise and the brush strip folded out, you can vacuum clean small hard floor areas.Turn the tube 90 degrees anticlockwise until the nozzle is positioned lengthwise with the brush strip still folded out of the nozzle housing (fig. 37). ◗ With the nozzle positioned breadthwise and the brush strip folded in, you can vacuum clean large soft floor areas.Turn the tube 90 degrees anticlockwise again to position the nozzle breadthwise and to make the brush strip disappear into the nozzle housing (fig. 38). ◗ With the nozzle positioned lengthwise and the brush strip folded in, you can vacuum clean small soft floor areas.Turn the tube 90 degrees anticlockwise again until the nozzle is positioned lengthwise with the brush strip still folded in (fig. 39). Crevice nozzle Use the crevice nozzle to clean narrow corners and hard-to-reach places. Small nozzle The small nozzle is especially suitable for vacuuming stairs, upholstery, curtains, etc.
If necessary, remove fluff from the nozzle with your hand and then vacuum it. Shampooing floors 1 Start shampooing as far away from the door as possible and then work your way towards the door. 2 Apply shampoo by squeezing the trigger on the handgrip of the tube (fig. 40). 3 Make overlapping strokes to cover the entire area to be cleaned.
If there are still traces of liquid on the area you have just cleaned, pass the vacuum cleaner over this area once more without applying shampoo. 4 After shampooing, release the trigger and switch the pump off. Keep the motor running (fig. 41). 5 Lift the nozzle off the floor and simply let the appliance suck up dry air for some time to dry the inside of the suction hose and tubes (fig. 42). 6 Switch the appliance off. Carpet shampooing: three techniques Depending on the degree of soiling, you can use (and combine!) the following three carpet shampooing techniques. ◗ Freshening up If the carpet (or part of it) merely requires freshening up, you do not need to apply a lot of shampoo. It is probably sufficient if you only apply shampoo when making the first stroke towards you. Then release the trigger and move the nozzle over the cleaned area a few times without applying shampoo. ◗ Deep cleaning For thorough cleaning of (part of) a very dirty carpet, move the nozzle over the area to be cleanded a few times while applying shampoo. ◗ Extra thorough cleaning (fig. 43). For extra thorough cleaning (badly soiled areas, stubborn stains), switch the motor off but keep the pump running. Squeeze the trigger to apply shampoo. Allow the shampoo to act on the area for several minutes. Be careful not to apply too much shampoo, as this may damage the carpet. ENGLISH12Carpet shampooing tips: - Never shampoo floors which are not water-resistant. If you are in doubt, contact the supplier of the carpet. - Do not shampoo delicate fabrics and handwoven or non-colourfast carpets. - Test the colourfastness of your carpet by pouring some shampoo dissolved in water onto a white cloth and rubbing this onto a normally hidden part of the carpet. If there are no traces of dye on the cloth, it can be assumed that the carpet is colourfast. - However, if dye comes off onto the cloth, do not shampoo the carpet. If you are in doubt, contact a specialist. - Vacuum the whole area thoroughly before you start shampooing. - Make sure that the room is well-aired during and after shampooing to allow better and quicker drying. - Allow the carpet to dry well before walking on it again: freshened-up areas normally require 30 minutes to dry, whereas deep-cleaned sections require approximately 2 hours to dry. Of course, the drying times also depend upon the amount of shampoo applied, temperature, air humidity and ventilation. - The transparent nozzles, i.e. the double injection nozzle and the upholstery nozzle, enable you to determine if your carpet or hard floor is clean by looking at the colour of the extracted solution. Hard floor shampooing ◗ The 3-purpose click-on hard floor adapter for the double injection nozzle consists of three familiar cleaning tools: (fig. 44). 1: a brush (to release sticky dirt from the floor) 2: a sponge (to release, distribute and rub in the shampoo) 3: a squeegee (to collect the shampoo from the floor so that it can be vacuumed) ◗ Snap the hard floor adapter onto the double-injection shampoo nozzle (fig. 66). ◗ Do not make very long strokes. 1 For effective scrubbing, just make back-and-forth strokes as you would with a regular vacuum cleaner. Normally it is sufficient to only apply shampoo while moving the nozzle forwards (fig. 45). 2 To dry the floor, just move the nozzle backwards slowly. Make sure that only the squeegee touches the floor and do not apply shampoo (fig. 46). 3 To remove shampoo effectively, make overlapping strokes and finish off with one stroke across as shown in the figure (fig. 47). Window cleaning (specific types only) 1 Attach the window washer to the handgrip of the hose or to the end of the suction tube (fig. 48). 2 Connect the shampoo hose to the window washer (fig. 49). 3 Switch the appliance on (fig. 43). 4 Switch the shampoo pump on (fig. 50). 5 Spray cleaning liquid onto the window by sqeezing the shampoo trigger (fig. 51). 6 Wash the window (fig. 52). 7 Put the window washer in the drying position (fig. 53). 8 Wipe the window dry (fig. 54). ENGLISH 13◗ Splashing is minimised thanks to the efficient spraying system and the high suction power of the appliance. ◗ This nozzle is very convenient for cleaning windows and flat surfaces. ◗ You can clean the windows with standard cleaning liquid or with a solution of water and methylated spirits (1 part methylated spirits to 9 parts water). Shampooing furniture Shampooing of upholstery and tapestries 1 Attach the upholstery nozzle directly to the handgrip (fig. 55). 2 This nozzle is very convenient for shampooing furniture, tapestries, curtains, etc (fig. 56). Storage 1 Switch the appliance off and remove the mains plug from the wall socket. 2 Press the cord rewind button.The mains cord is wound up automatically inside the appliance (fig. 57).
NB:When the shampoo reservoir is attached to the appliance, the mains cord will not disappear completely into the appliance when the cord rewind button is pressed. 3 Store the small nozzles in the way shown in the figure (fig. 58). 4 The tube can be parked by inserting the clip in the slot on the side of the appliance (fig. 59).
Note: to avoid accidental damage to the appliance, the clip will be released from the tube or from the appliance when the tube is pulled or knocked fiercely.You can simply snap the clip back onto the tube when this happens. Cleaning and maintenance Always switch the appliance off and remove the mains plug from the wall socket before cleaning the appliance. All parts of the appliance, including the container, can be cleaned with a damp cloth and, if necessary, some detergent. Make sure no water enters the motor unit! After wet vacuum cleaning 1 Empty, clean and dry the container. 2 Let the appliance suck up dry air for a few minutes to dry the inside of the tubes and hose. Cotton dustbag (specific types only) If you are using the cotton dustbag, we advise you to clean the motor protection filter once a year in lukewarm water. Make sure the filter is completely dry before reinserting it into the vacuum cleaner. Float unit and foam filter 1 Rinse the float unit and the foam filter (fig. 60). ◗ To guarantee an optimal lifetime for the foam filter, carefully remove it from the float unit.. (fig. 61). ◗ ...and clean the filter separately (fig. 62).
You can squeeze the foam filter to remove excess water. Do not wring it! ENGLISH 14Motor protection filter 1 The motor protection filter can also be removed for cleaning (fig. 63). 2 Rinse the motor protection filter under the tap (fig. 64). Do not forget to put the motor protection filter back into place. Double injection nozzle 1 Rinse the double injection nozzle under the tap (fig. 65). 2 You can remove the hard floor adapter and clean it separately (fig. 66). 3 Fill the container with lukewarm fresh water. Pump the water out via the two shampoo hoses into a sink or toilet.This will prevent shampoo residues to cake inside the hoses and to clog them up. Shampoo pump To extend the lifetime of the shampoo pump, it should be cleaned with a mixture of water and white vinegar once a year. 1 Pour 1 litre of white vinegar into the shampoo reservoir and top it up with lukewarm fresh water. 2 Let the appliance run in shampooing mode until the shampoo reservoir is empty. Collect the vinegar solution in a bucket. 3 Repeat this procedure with 1 litre of fresh water to rinse out any vinegar residues. Replacement Dustbag Paper dustbag (specific types only) 1 To remove a (full) dustbag, lift the holder with the dustbag out of the appliance by means of their grips (fig. 17). 2 Press and hold the red lever to release the cardboard front of the dustbag (fig. 67). 3 Throw the used dustbag away and insert a new one (see chapter 'Preparing for use', section 'Preparing for dry vacuuming').