
Zipp! - Vacuum packaging machines Mellerware - Free user manual and instructions
Find the device manual for free Zipp! Mellerware in PDF.
| Product Type | Vacuum Packaging Machine |
| Brand | Mellerware |
| Model | Zipp! |
| Usage | Household only |
| Power Supply | Grounded mains plug, 10 A min |
| Power | 120 W (estimated) |
| Dimensions (L x W x H) | 40 x 20 x 10 cm (estimated) |
| Weight | 1.5 kg (estimated) |
| Material | Plastic |
| Main Functions | Vacuum sealing, sealing, automatic mode, dry/wet food selection |
| Vacuum Chamber | With sealing gasket and foam seals |
| Sealing Strip | Present |
| Safety | Automatic shut-off after 45 s if vacuum not achieved; grounded plug; do not immerse |
| Cleaning | Damp cloth with mild detergent; do not use solvents or abrasives |
| Included Accessories | Not specified (may vary) |
| Compatible Accessories | Vacuum sealing bags and rolls |
| Warranty | In accordance with applicable law; approved technical support |
| Ecology and Recycling | Complies with WEEE and RoHS directives; recyclable packaging |
| Certifications | Directives 2014/35/EU, 2014/30/EU, 2011/65/EU, 2009/125/EC |
| Cable Length | Not specified (estimated 1 m) |
Frequently Asked Questions - Zipp! Mellerware
User questions about Zipp! Mellerware
0 question about this device. Answer the ones you know or ask your own.
Ask a new question about this device
Download the instructions for your Vacuum packaging machines in PDF format for free! Find your manual Zipp! - Mellerware and take your electronic device back in hand. On this page are published all the documents necessary for the use of your device. Zipp! by Mellerware.
USER MANUAL Zipp! Mellerware
Many thanks for choosing to purchase a Mellerware brand product.
Thanks to its technology, design and operation and the fact that it exceeds the strictest quality standards, a fully satisfactory use and long product life can be assured.
Safety advice and warnings
- Read these instructions carefully before switching on the appliance and keep them for future reference. Failure to follow and observe these instructions could lead to an accident.
-
This appliance can be used by children aged from 8 years and above and persons with reduced physical, sensory or mental capabilities or lack of experience and knowledge if they have been given supervision or instruction concerning use of the appliance in a safe way and understand the hazards involved.
-
This appliance is not a toy. Children should be supervised to ensure that they do not play with the appliance.
- Cleaning and user maintenance shall not be made by children unless they are supervised.
- If the connection to the mains has been damaged, it must be replaced, take the appliance to an authorised technical support service. Do not attempt to disassemble or repair the appliance by yourself in order to avoid a hazard.
-
This appliance is for household use only, not professional, industrial use.
-
Ensure that the voltage indicated on the rating label matches the mains voltage before plugging in the appliance.
- Connect the appliance to a socket that can supply a minimum of 10 amperes.
-
The appliance's plug must fit into the mains socket properly. Do not alter the plug. Do not use plug adaptors.
-
Do not force the power cord. Never use the power cord to lift up, carry or unplug the appliance.
- Do not wrap the power cord around the appliance.
- Check the state of the power cord. Damaged or tangled cables increase the risk of electric shock.
- Do not touch the plug with wet hands.
- Do not use the appliance if the cable or plug is damaged.
- If any of the appliance casings breaks, immediately disconnect the appliance from the mains to prevent the possibility of an electric shock.
- Do not use the appliance if it has fallen on the floor, if there are visible signs of damage or if it has a leak.
- Do not place the appliance on hot surfaces, such as cooking plates, gas burners, ovens or similar.
- The appliance must be used and placed on a flat, stable surface.
USE AND CARE
- Fully extend the appliance's power cable before each use.
- Do not use the appliance if the on/off switch does not work.
- Do not move the appliance while in use.
-
Disconnect the appliance from the mains when not in use and before undertaking any cleaning task.
-
Store this appliance out of reach of children and/or persons with physical, sensory or reduced mental or lack of experience and knowledge.
Service
Any misuse or failure to follow the instructions for use renders the guarantee and the manufacturer's liability null and void.
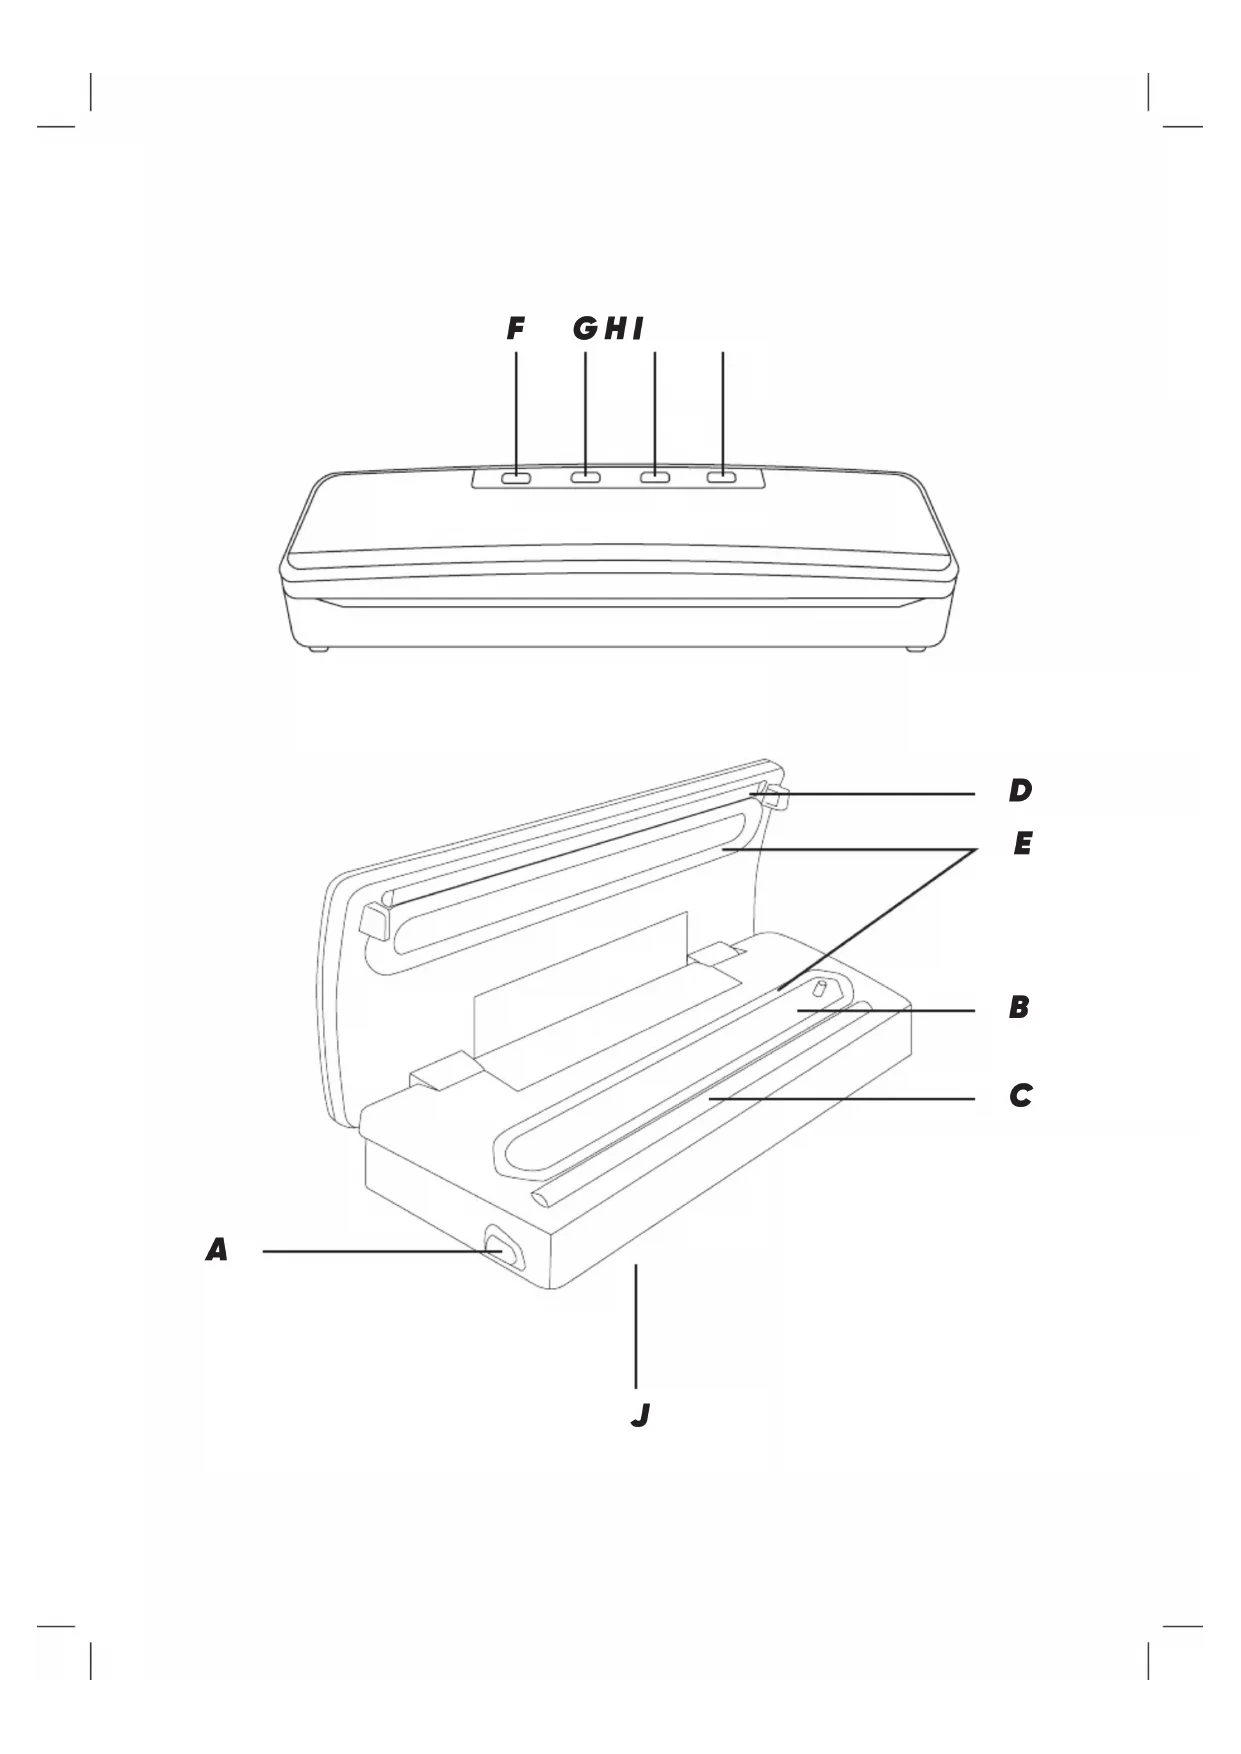
Description
A - Side opening buttons
B - Vacuum channel
C - Sealing band
D - Sealing gasket
E - Foam gasket
F - Vacuum function button
G - Sealing function button
H - Food selection
I - Cancel button/Vacuum + Sealing function
J-Cable housing
If the model of your appliance does not have the accessories described above, they can also be bought separately from the Technical Assistance Service.
Instructions before use
BEFOREUSE
- Make sure that all products' packaging has been removed.
USE
- Extend the cable completely before plugging it in.
- Connect the appliance to the mains.
HOW TO PRODUCE THE VACUUM USING A PACKAGING BAG
- Place the food to be packed inside the bag. Do not fill the bag to the limit; always leave a space of at least 5 cm.
- Open the cover of the vacuum packing machine by pressing the two side buttons.
- Insert the top part of the bag into the vacuum channel (B). To obtain good sealing, the bag must be free of creases.
- Close the cover by pressing the two ends of the appliance downwards until the packing machine is firmly closed.
- Select the type of food you have (Dry/Wet) by pressing the button (H).
- Press the button (F) for the vacuum function. When the blue light turns off, proceed to the next step.
- Press button (G) for the sealing function. When the blue light turns off, the sealing is complete.
- You can also perform the vacuum and sealing function automatically by pressing the button (l). When the blue light turns off, the operation is completed
- Open the cover by pressing the two side buttons.
HOW TO PROCEDURE THE VACUUM USING THE PACKAGING ROLLSS
- Cut to desired size.
- Make the seal at one of the ends to obtain the packing bag.
- Open the cover of the vacuum packing machine by pressing the two side buttons.
- Insert one of the open parts of the bag into the sealing band without the bag entering the vacuum channel. To achieve a good seal, the bag must be free of wrinkles.
- Close the lid by pressing the two ends of the appliance down until the packaging machine is tightly closed.
- Press button (G) for the sealing function. When the light turns off, the sealing is complete.
- You can keep your hands pressing the cap for a better seal.
- To vacuum pack, follow the instructions above.
TIP FOR MAKING A BETTER VACUUM
- Do not fill the bag to the limit; always leave a space of at least 5 cm.
- To obtain a good seal, the top of the bag must be clean and free of creases.
- Do not wet the open end of the bag.
- Do not leave too much air in the bag. Press on the bag so that the excess of air can escape before vacuum packing.
-
Do not vacuum pack sharply pointed objects as they can puncture and tear the bag.
-
We recommended vacuum packing and sealing only one bag per minute to allow the appliance to recover sufficiently.
- If for any reason the necessary vacuum is not obtained, the vacuum system will automatically disconnect after 45 seconds. In this case, check whether the bag has a leak or is not properly positioned.
ONCE YOU HAVE FINISHED USING THE APPLIANCE
- Unplug the appliance from the mains.
Put the cable back in the cable housing.
Clean the appliance.
Cleaning
- Disconnect the appliance from the mains and allow it to cool before undertaking any cleaning task.
Clean the equipment with a damp cloth with a few drops of washing-up liquid and then dry. - Do not use solvents, or products with an acid or base pH such as bleach, or abrasive products, for cleaning the appliance.
- Never submerge the appliance in water or any other liquid or place it under running water.
CLEANING THE VACUUM CHAMBER
-
Open the cover of the vacuum packing machine by pressing the two side buttons.
-
With a cloth or damped sponge and soap.
TROUBLESHOOTING IF NOTHING HAPPENS ON PRESSURISING THE PACKING MACHINE
- Make sure the electrical cord is properly plugged into the mains.
- Check the cord and the mains socket and make sure these are not damaged in any way.
- If you find any damage do not use the packing machine.
THE AIR HAS NOT BEEN COMPLETELY EXPELLED FROM THE BAG
- For correct packing the end of the bag must remain inside the vacuum chamber.
- Check for possible dirt on the sealing band or in the vacuum chamber. If there is any dirt, clean them and reposition them in their locations.
- The bag may be punctured. To check this, seal the bag with a little air inside, submerge it in water and apply pressure. If bubbles form, this means that there is a leak. Use another bag.
- Check that the cover is completely closed.
THE BAGS OF THE PACKING MACHINE LOSE VACUUM AFTER SEALING
- Creases, crumbs, grease or liquids may be released from the sealed
area. Before resealing, reopen the bag, clean the top part and smooth the area of the sealing band.
- Food with excess liquid may be frozen before vacuum packing.
- Check whether any article with sharp-pointed corners has been able to puncture the bag.
THE SEALING BAND DOES NOT SEAL THE BAG
- If the sealing band reheats and melts the bag, lift the cover and allow the packing machine to cool for a few minutes.
After 20 seconds have passed, try again.
Anomalies and repair
Take the appliance to an authorised technical support service if product is damaged or other problems arise. Do not attempt to disassemble or repair the appliance yourself as this may be dangerous.
For EU product versions and/or in case that it is requested in your country:
ECOLOGY AND RECYCLABILITY OF THE PRODUCT
- The materials of which the packaging of this appliance consists are included in a collection, classification and
recycling system. Should you wish to dispose of them, use the appropriate public recycling bins for each type of material.
- The product does not contain concentrations of substances that could be considered harmful to the environment.
- This symbol means that in case you wish to dispose of the product once its working life has ended; take it to an authorised waste agent for selective collection of Waste Electric and Electronic Moment (WEEE).
This appliance complies with Directive 2014/35/EU on Low Voltage, Directive 2014/30/EU on Electromagnetic Compatibility, Directive 2011/65/EU on the restrictions of the use of certain hazardous substances in electrical and electronic equipment and Directive 2009/125/EC on the ecodesign requirements for energy-related products.
Warranty and technical assistance
This product enjoys the recognition and protection bof the legal guarantee in accordance with current legislation. To enforce your rights or interests you must go to any of our offcial technical assistance services.
You can find the closest one by accessing the following web link: www.mellerware.com. You can also request related information by contacting us. You can download this instruction manual and its updates at www.mellerware.com
ESPANOL ES
Country Address Phone
| Algeria | Zone d'Activite, n°62, Constantine | 213770777756 |
| Argentina | Av. del Libertador 1298, (B1638BEY), Vicente López (Pcia. Buenos Aires) | 541153685223 |
| Belgium | Mariëndonstraße 5, 5154 EG, Elshout Benin 359 Av. Steinmetz, 1930, Cotonou | 31620401500 0299-21313798 |
| Bulgaria | 265, Okolovrasten Pat, Mladost 4, 1766, Sofia | 35929211120 35929211193 |
| Burkina Faso | Avenue Bassawarga, 01 BP915, Ouagadougou | 226 25301038 |
| Congo (Republic of) | 98 Blvd General Charles de Gaulle, Pointe Noire | 242066776656 |
| Cyprus | 20, Bethlehem Str. / P.O.Box 20430, 2033, Strovolo | 35722711300 |
| Czech Republic | Milady Horakove 357/4, 568 02, Svitavy 4 | 20 461 540 130 |
| Democratic Republic of the Congo | AV. Pont Canale N° 3440, Kinshasa | 00243-991223232 |
| Equatorial Guinea | SN Av Patricio Lumumba y C/ Jesus B, Bata | 00240 333 082958 00240 333 082453 |
| Equatorial Guinea | Calle de las Naciones Unidas, PO box 762, Malabo | 240333082958 240333082453 |
| Espana | Avda Barcelona, S/N, 25790 Oliana (Lleida) hi@mellerware.com | 900828911 |
Country Address
Phone
| Ethiopia | Lideta Sub City Kebele 10 H.NO 124, Addis Ababa | +251 11 5518300 |
| France | Za les bas musats 18, 89100, Malay-le-Grand | 03 86 83 90 90 |
| Gabon | BP 574, Port-Gentil Centre-ville | 24101552689 24101560698 |
| Ghana | Ederick Place, Accra-Ghana | 302682448 302682404 |
| Gibraltar | 11 Horse Barrack Lane, 54000, Gibraltar | 00350 200 75397 00350 200 41023 |
| Greece | Sapfous 7-9, 10553, Athens | +30 21 0373 7000 |
| Guinea | BP 206, GN, Conakry | (224) 622204545 |
| Hong Kong | Unit H,13/F., World Tech Centre, Hong kong | (852) 2448 0116 9197 3519 |
| Hungary | Késmárk utca 11-13, 1158, Budapest | +36 1 370 4519 |
| India | C-175, Sector-63, Noida, Gautam Budh Nagar - 201301, Delhi | (+91) 120 4016200 |
| Ivory Coast | 01 Rue Des Carrossiers-Zone 3, B.P 3747, Abidjan 01 (RCI) | 22521251820 225 21 353494 |
| Jordan | 28 Basman St Down town, Amman | +962 6 46 222 68 |
| Kuwait | P.O. BOX 3379 hawally, 32034, Hawally | +965 2200 1010 |
| Lebanon | Damascus Highway; Sciale Building, Jamhour | 9615922963 |
Country Address Phone
| Luxembourg | Mariëndonkstraat 5, 5154 EG, Elshout | 31620401500 |
| Mali | BP E2900, Dravela Bolibana | 223227216 / 223227259 |
| Marruecos | Avenue 2 Mars, Résidence Nassrallah, Appt n° 2 1er, Casablanca | (+212) 522 86 30 95 |
| Mauritania | 134 Avenue Gamal Abdener Ilot D, Nouakchott | 2225254469 / 2225251258 |
| Mexico | Rosas Moreno N° 4-203 Colonia de San Rafael C.P. 06470 - Delegación Cuauhtémoc, Ciudad de México | (+52) 55 55468162 |
| Montenegro | Rastovac bb, 81400, Niksic | +382 40 217 055 |
| Netherlands | Mariëndonkstraat 5, 5154 EG, Elshout | 31620401500 |
| Nigeria | 8, Isaac; John Str,G.R.A Ikeja Lagos | 23408023360099 |
| Paraguay | Denis Roa 155 c/ Guido Spano, Asunción | 21665100 |
| Peru | Calle los Negocios 428, Surquillo, Lima | (511) 421 6047 |
| Portugal | Avenida Rainha D. Amélia, n°12-B, 1600-677, Lisboa | +351 210966324 |
| Romania | Dudesti Pantelimon 23, 410554, Bucharest | 031.805.49.58 |
| Serbia | Rastovac bb, 81400, Niksic | +382 40 217 055 |
Country Address Phone
| Slovakia | Milady Horakove 357/4, 568 02, Svitavy | 420 461 540 130 |
| Southafrica | Unit 25 & 26, San Croy Office Park, Die Agora Road, Croydon, Kempton Park, 1619, Johannesburg | (+27) 011 392 5652 |
| Tunisia | 2, Rue de Turquie, Tunis | 21671333066 |
| Ukraine | Block 6, Ap Housing Estate Topol-2, B, 49000, Dnepropetrovsk | 380563704161 380563704161 |
| United Arab Emirates | P.O.BOX 8543, Dubai | 14506246200 |
| Uruguay | Luis Alberto de Herrera 3468, 11600, Montevideo | 598 2209 28 00 |
| Vietnam | Lot 7 Ind. Zone for, Ha Noi | 84437658111 84437658110 |
Durban
35 Adrain Road, Windermere
Durban, South Africa, 4001
Tel.: +27 31 303 3465
Fox: +27 31 303 8259
Johannesburg
Unit 25 & 26 San Croy office Park
Die Agora Road, Croydon, 1619
Tel.: +27 11 329 5652
Fax: +27 11 392 1694
creative housewares
20 Tekstiel St, Parrow. Cape Town. 7493, RSA
P.O.Box 6156 Parrow East,7501, RSA.
Tel.: +27 21 931 8117 / Helpline: 086 111 5006
Tel.: +27 63 014 0457
Fax: +27 21 931 4058
www.creativehousewares.co.za
mellerware®
Engineering Technology for life, S.L.
Av. Barcelona, s/n
25790, Oliana - Lleida - Spain
www.mellerware.com
- Safety advice and warnings
- USE AND CARE
- Service
- Description
- Instructions before use
- BEFOREUSE
- USE
- HOW TO PRODUCE THE VACUUM USING A PACKAGING BAG
- HOW TO PROCEDURE THE VACUUM USING THE PACKAGING ROLLSS
- TIP FOR MAKING A BETTER VACUUM
- ONCE YOU HAVE FINISHED USING THE APPLIANCE
- Cleaning
- CLEANING THE VACUUM CHAMBER
- TROUBLESHOOTING IF NOTHING HAPPENS ON PRESSURISING THE PACKING MACHINE
- THE AIR HAS NOT BEEN COMPLETELY EXPELLED FROM THE BAG
- THE BAGS OF THE PACKING MACHINE LOSE VACUUM AFTER SEALING
- THE SEALING BAND DOES NOT SEAL THE BAG
- Anomalies and repair
- For EU product versions and/or in case that it is requested in your country:
- ECOLOGY AND RECYCLABILITY OF THE PRODUCT
- Warranty and technical assistance
- ESPANOL ES
- Country Address
- Phone
- Durban
- Johannesburg
- creative housewares
Brand : Mellerware
Model : Zipp!
Category : Vacuum packaging machines