
LT24FD100 - Television JVC - Free user manual and instructions
Find the device manual for free LT24FD100 JVC in PDF.
| Product type | LED Television |
| Brand | JVC |
| Model | LT24FD100 |
| Screen size | 23.6 inches (60 cm) |
| Resolution | 1366 x 768 pixels |
| Backlight | LED |
| Energy efficiency class | F (SDR) |
| Power consumption (on) | 22 W |
| Power consumption (standby) | 0.25 W |
| Power supply | AC 100-240 V, 50/60 Hz |
| Dimensions with stand | 176 x 557 x 368 mm |
| Weight with stand | 2.5 kg |
| Connectivity | 1 x HDMI (ARC), 1 x VGA, 1 x USB, 1 x RF, 1 x CI+, 1 x coaxial, 1 x headphone, 1 x CVBS + L/R |
| Main functions | EPG, USB recording, time shift, teletext, parental control, hotel mode |
| Safety | Child lock, parental password, auto shutdown, sleep timer |
| Cleaning | Use a soft, dry cloth. Do not spray liquid directly. |
| Repairability | Technical support available via Darty (0 978 970 970) or Fnac (0 969 324 334). Technical documentation at www.madocumentationreparation.com |
| Warranty | 2 years |
Frequently Asked Questions - LT24FD100 JVC
User questions about LT24FD100 JVC
0 question about this device. Answer the ones you know or ask your own.
Ask a new question about this device
Download the instructions for your Television in PDF format for free! Find your manual LT24FD100 - JVC and take your electronic device back in hand. On this page are published all the documents necessary for the use of your device. LT24FD100 by JVC.
USER MANUAL LT24FD100 JVC
Operating Instructions

DVBCT
DVBIT
HDMI
Manufactured under license from Dolby Laboratories.
Dolby, Dolby Audio ,ProLogic and the double-D symbol are trademarks of Dolby Laboratories.

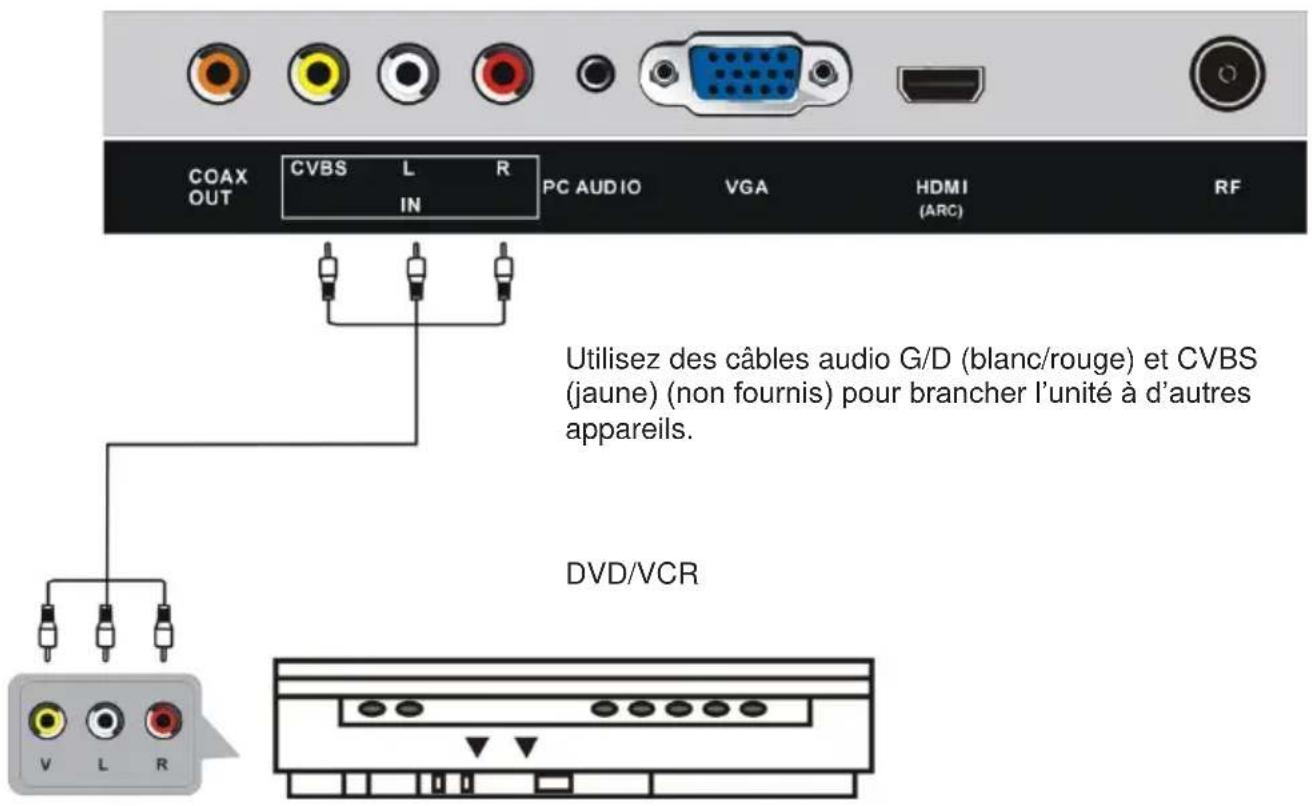
Branchement AV (video composite)
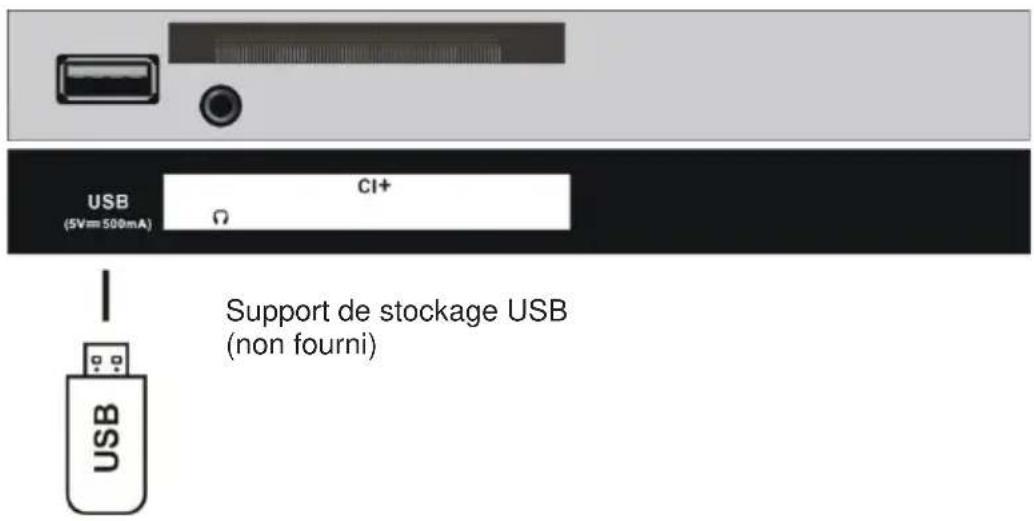
Branchement USB
Audiodescription (AD)
Hotline Darty France
This apparatus is in conformance with the valid European directives and standards regarding electromagnetic compatibility and electrical safety.
| DVB Digital Video Broadcasting | DVB and the DVB logo are trademarks of the DVB project. |
| HDMI® HIGH-DEFINITION MULTIMEDIA INTERFACE | The Adopted Trademarks HDMI, HDMI High-Definition Multimedia Interface, and the HDMI Logo are trademarks or registered trademarks of HDMI Licensing Administrator, Inc. in the United States and other countries. |
| DOLBY AUDIO™ | Manufactured under license from Dolby Laboratories. Dolby, Dolby Audio and the double-D symbol are trademarks od Dolby Laboratories Licensing Corporation |
WARNING
- Ventilation
- CAUTION
- This appliance is intended for domestic household use only and should not be used for any other purpose or in any other application, such as for non domestic use or in a commercial environment.
Allow at least a 10 cm gap all around the product. - The ventilation should not be impeded by covering the ventilation openings with items, such as newspapers, table-cloths, curtains, etc.
- No naked flame sources, such as lighted candles, should be placed on the apparatus.
- Attention should be drawn to the environmental aspects of battery disposal. Don't throw used batteries in dustbin. Please contact your retailer in order to protect the environment.
- This apparatus is intended for use in a tropical climate.
- The apparatus shall not be exposed to dripping or splashing and that no objects filled with liquids, such as vases, shall be placed on the apparatus.
- To protect the environment, use local recycling facilities for battery disposal.
- Batteries (battery pack or batteries installed) shall not be exposed to excessive heat such as sunshine, fire or the like.
Danger of explosion if battery is incorrectly replaced. Replace only with the same or equivalent type.
- The MAINS plug is used as the disconnect device, the disconnect device shall remain readily operable.
IMPORTANT SAFETY INSTRUCTIONS

TO REDUCE THE RISK OF ELECTRIC SHOCK DO NOT REMOVE COVER. NO USER SERVICEABLE PARTS INSIDE. REFER TO QUALIFIED SERVICE PERSONNEL.

This marking indicates that the unit
complies with the European radio equipment directive.

This symbol indicates that the unit has
double insulation.

This symbol indicates that there are
important operating and maintenance instructions in the documentation accompanying this unit.

This symbol indicates that dangerous
- Read these instructions and keep them for further reference. Follow all instructions.
- Do not use this apparatus near water.
- Clean only with a dry cloth.
- Do not install near any heat sources such as radiators, heat registers, stoves, or other apparatus (including amplifiers) that produce heat.
- Unplug this apparatus during lightning storms or when unused for long periods of time.
- When cleaning, unplug the power cord and wipe gently with a soft cloth to prevent scratching. Do not spray water or other liquids directly on the TV as electric shock may occur. Do not clean with chemicals such as alcohol, thinners or benzine.
- Install your TV where there is proper ventilation. Do not install in a confined space such as a bookcase. Do not cover the product with cloth or other materials while plugged. Do not install in excessively dusty places.
- Do not press strongly upon the panel with a hand or a sharp object such as a nail, pencil or pen, or make a scratch on it.
- Do not allow an impact shock or any objects to fall into the product, and do not drop anything onto the screen.
voltage constituting a risk of electric shock is present within this unit.
PRODUCT DESCRIPTION
Front and Side Views
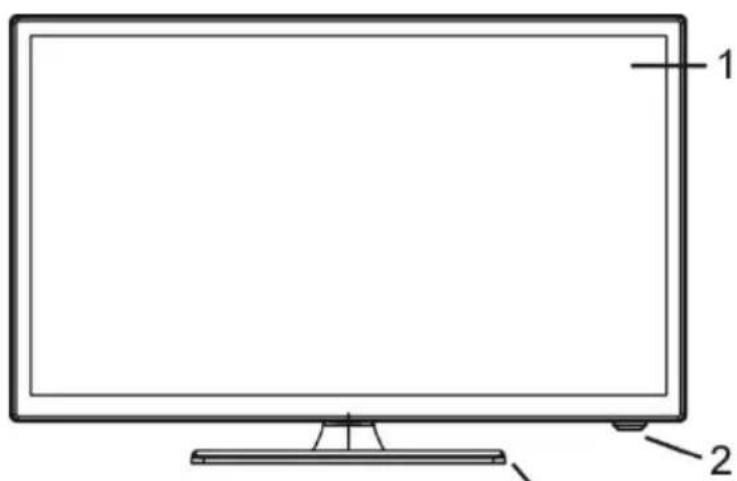
- Screen
- Remote control sensor / Power indicator
- Stand
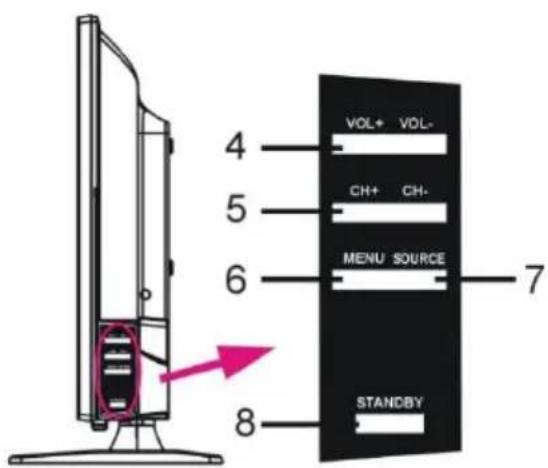
- VOL+/- button: Adjust the volume level
- CH_+/- button: Select previous/next channel or move up/down
- MENU button: Access the main menu.
- SOURCE button: Change the input source.
- STANDBY button: Turn the power on or off.

To prevent possible hearing damage, do not
listen at high volume levels for long periods.

Back View
- Power input
- COAXIAL output
port - CVBS & L/R port
- PC AUDIO port
- VGA port
6.HDMI port - RF port
- Cl+ port
- EARPHONE jack
- USB ports
ASSEMBLING
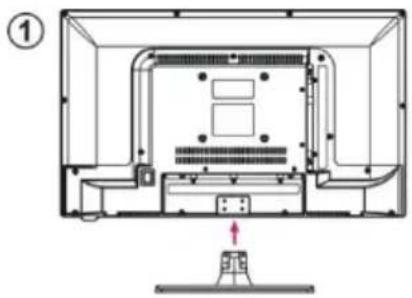
Attaching the Stand
CAUTION: When attaching the stand to the TV set, place the screen facing down on a cushioned table or flat surface to protect the screen from scratches.
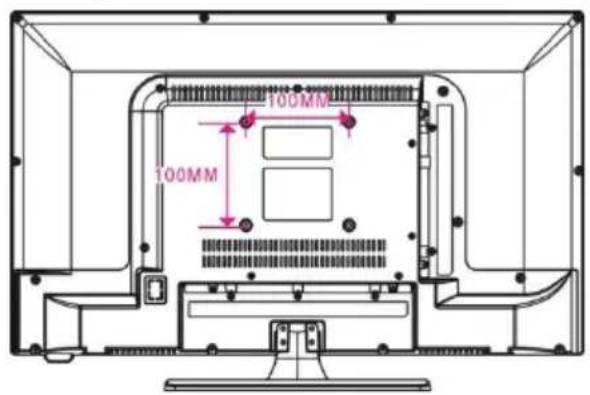
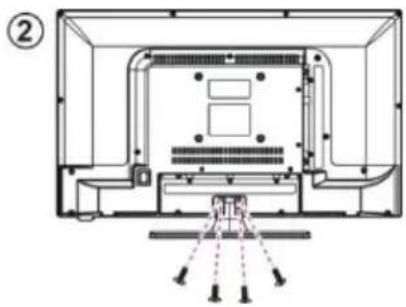
Mounting on a Wall
CAUTION:
- Remove the stand before installing the TV on a wall mount by performing the stand attachment in reverse.
- The distance between the holes is 100 × 100 mm in width and height.
- Tighten the screws (M4x10mm) firmly to prevent the TV from tilting forward. Do not over tighten.
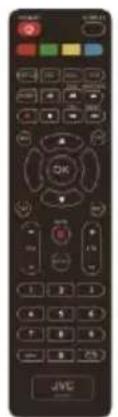
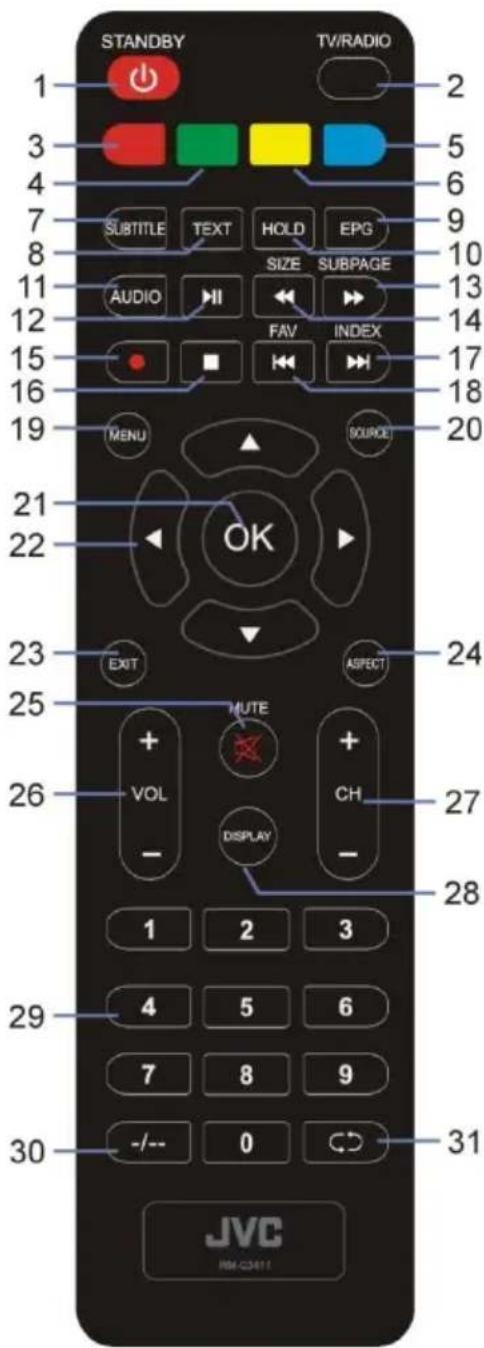
REMOTE CONTROL
Buttons
1 POWER/Standby
2 TV/RADIO
3 RED
4 GREEN
5 BLUE
6 YELLOW
7 SUBTITLE -Enable/disable subtitles
8 TEXT -Display the available Teletext.
9 EPG -Display the electronic program guide.
10 HOLD-Hold the Teletext.
11 AUDIO
12 Playback start/pause
13 SUBPAGE -Access Teletext sub-page.
Move fast forward
14 SIZE -Switch Teletext size.
Move fast backward.
15 (DTV) - Start recording when watching available digital programs
16 top playing.
17 By the next file. INDEX - Display the record list or Teletext index.
18 May the previous file.
FAV - Display the favorite channel list.
19 MENU
20 SOURCE - Select a desired input source.
21 OK - Confirm selection.
22 ▲/▼/▲
23 EXIT
24 ASPECT -Change aspect ratio.
25 MUTE
26 VOL + / - Adjust the volume level.
27 CH + / - : Scroll through the saved channels.
28 DISPLAY - Display the available program information.
29 Numeric buttons (0-9) - Change channels.
30 ---: Switch the digit when watching TV programs.
31 Return to previous channel.
Remote control operation
-
Open the battery cover.
-
Insert two AAA size batteries (not included), observing the proper polarity markings inside the battery compartment.
-
Close the battery cover.
-
CAUTION: Do not mix old and new batteries, as this may damage the remote control.
Be sure to point the remote control at the remote control sensor on the TV.
This logo means "positioning of cell".
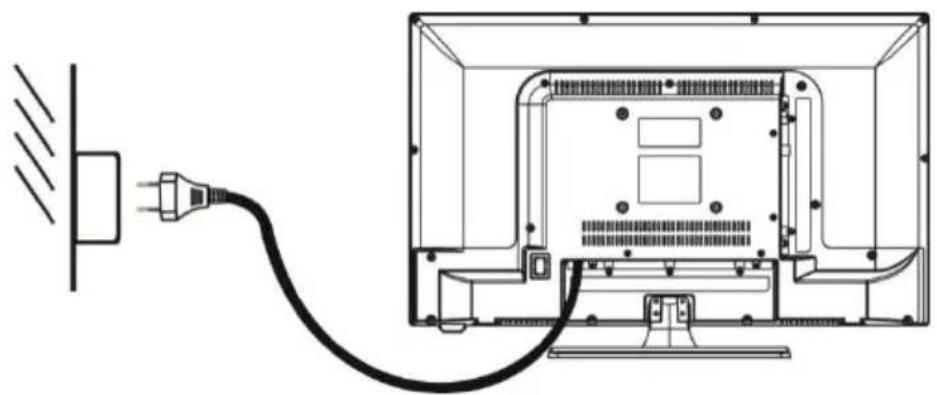
CONNECTIONS
Connecting to AC power source


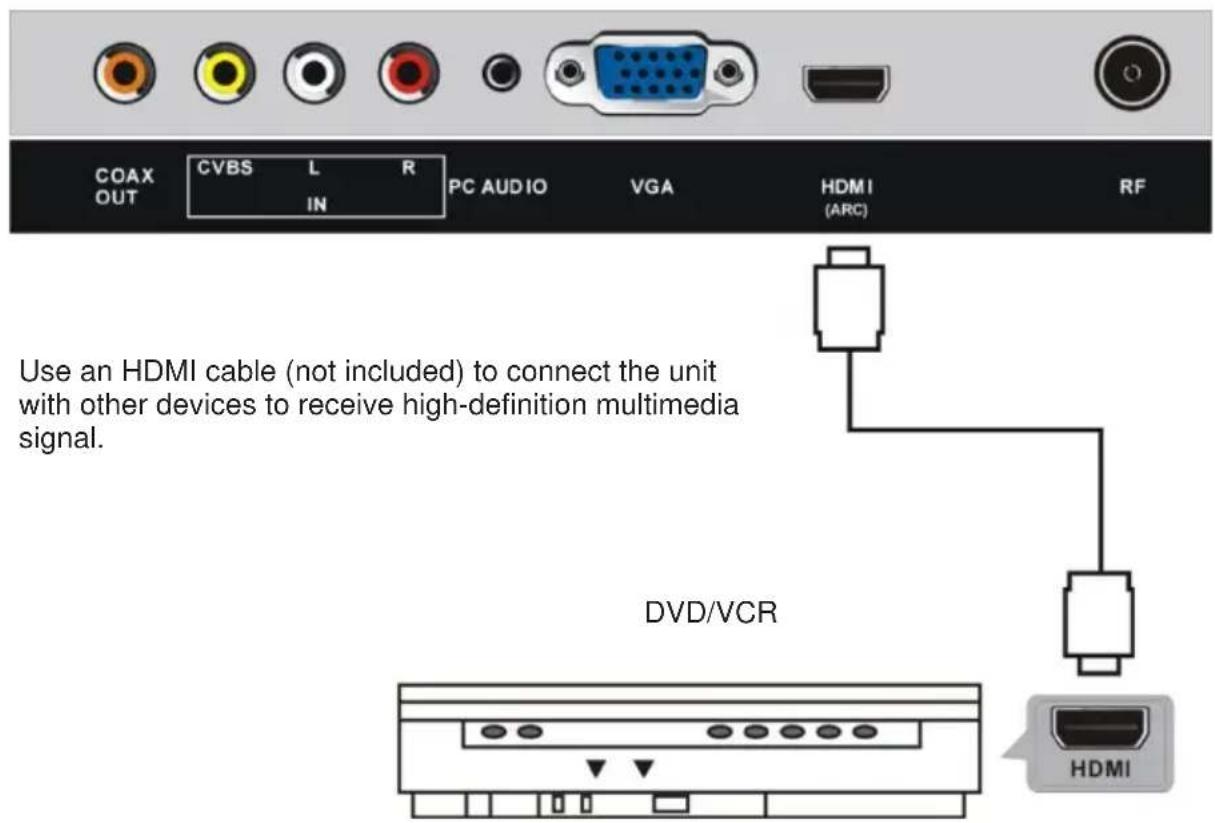
HDMI connection
EN-6
HDMI Connection

The HDMI ARC (Audio Return Channel) function allows you to send audio from your ARC-compliant TV to ARC-compliant audio devices (e.g. home theatre) through a single HDMI connection.
With the HDMI ARC connection, you do not need to connect the extra audio cable that sends the sound of the TV picture to the ARC-compliant audio devices. The HDMI ARC connection combines both signals.
Use an HDMI cable (not included) that supports the ARC function to connect your ARC-compliant audio devices with your ARC-compliant TV.
Ensure HDMI ARC is turned on in the SETUP menu (refer to page EN-15).
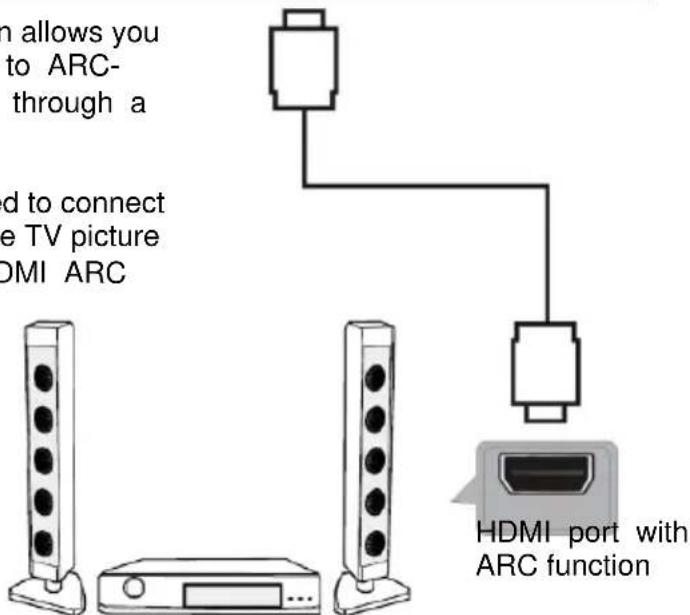
HDMI-ARC compliant device
PC/VGA connection
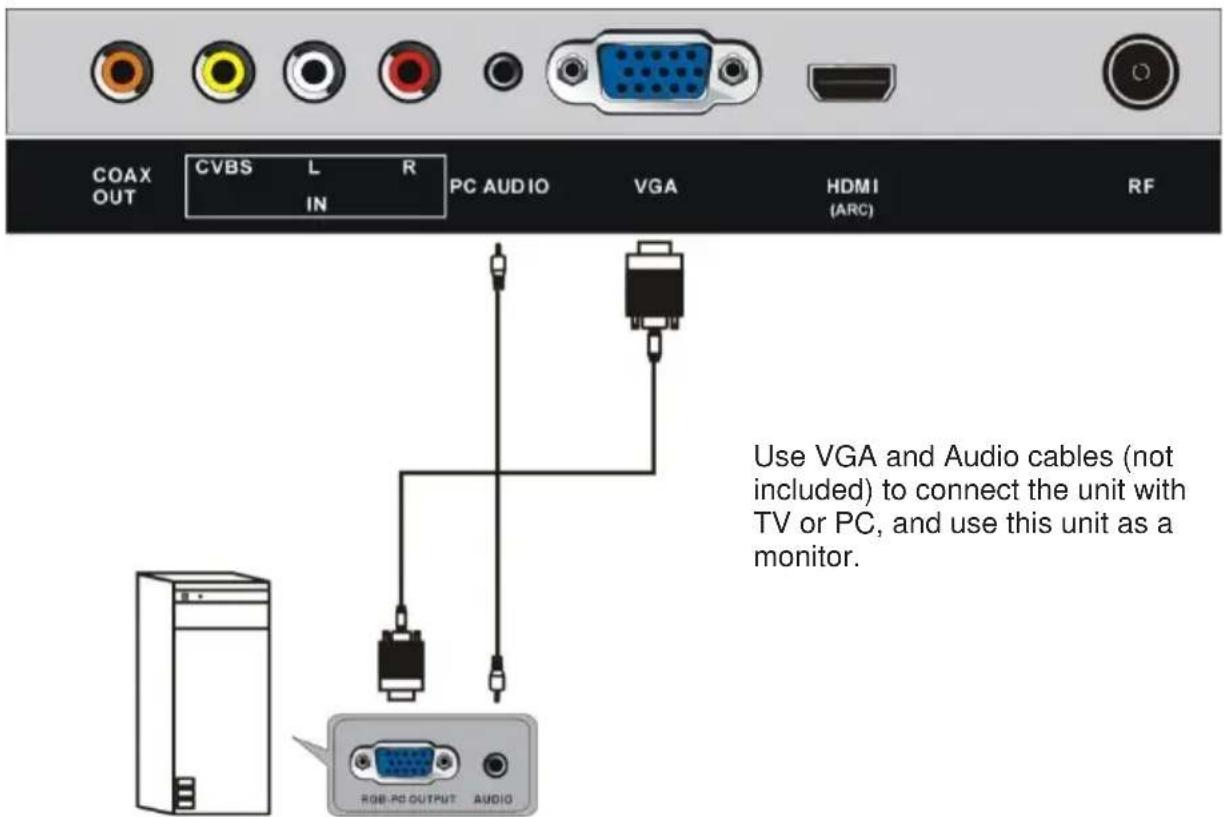
Use VGA and Audio cables (not included) to connect the unit with TV or PC, and use this unit as a monitor.
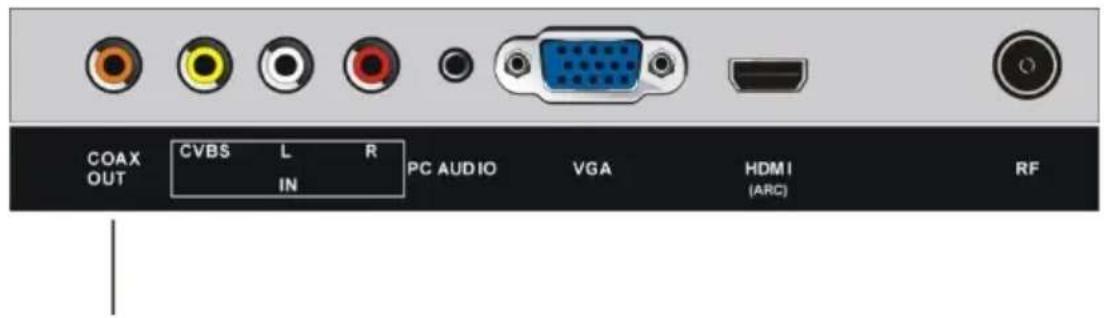
COAXIAL connection
Use a coaxial cable (not included) to connect the unit with an amplifier or other audio decoding devices for coaxial audio signal output.
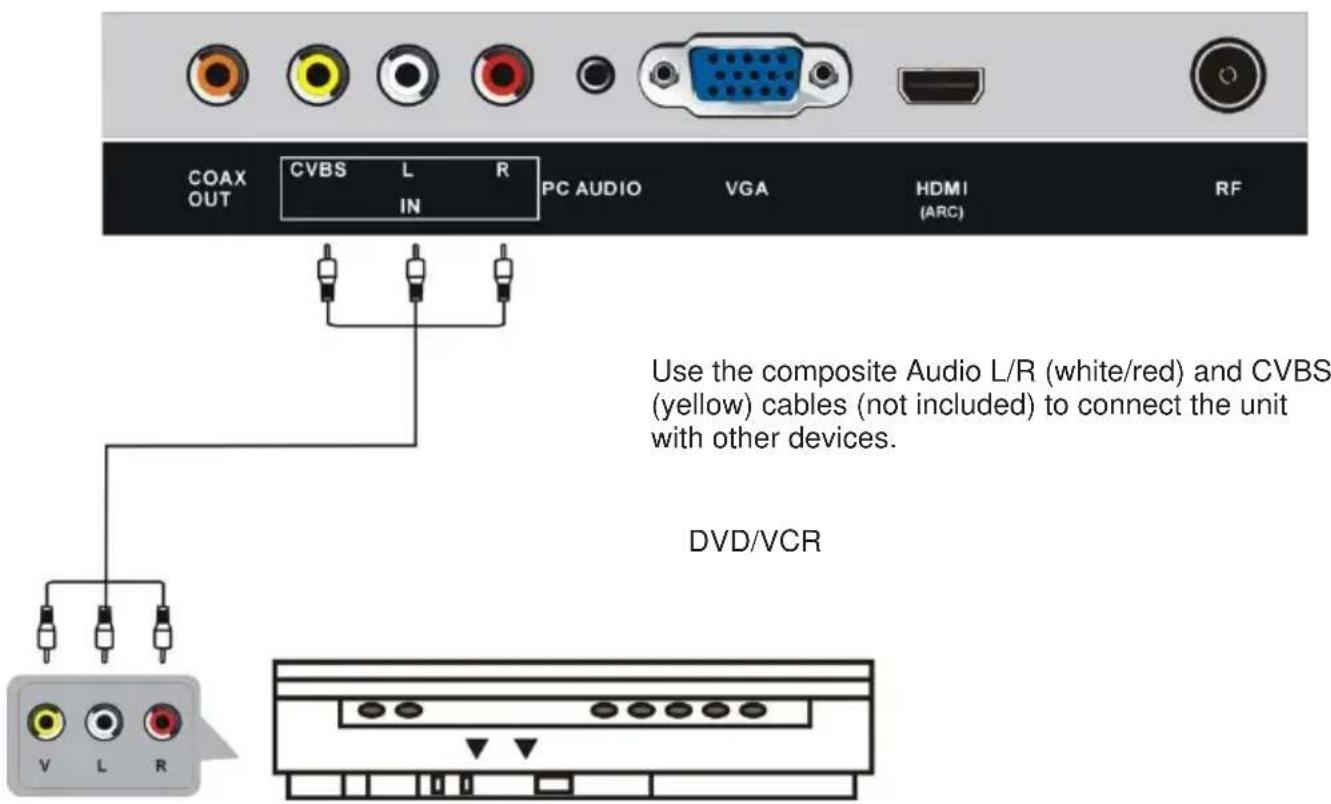
AV (Composite video) connection
USB connection

Insert a CI card
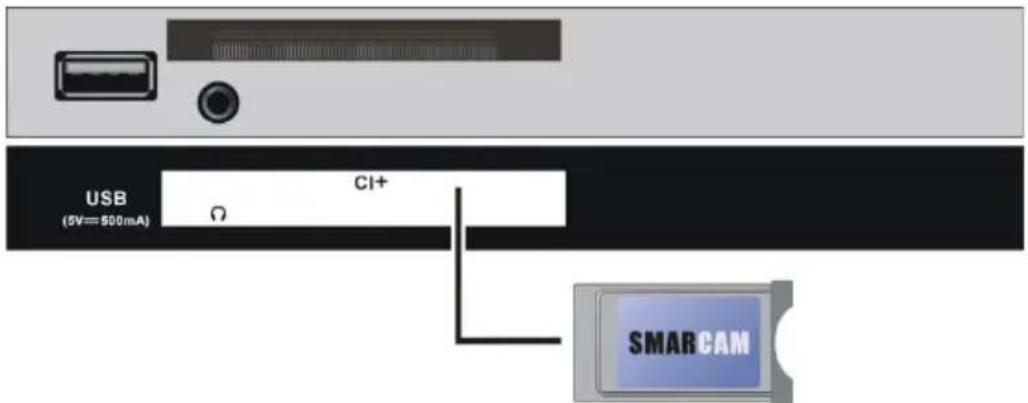
Insert your CI card (Conditional Access Module) to watch special digital channels in your area.
BASIC OPERATION
Make sure all necessary connections are correctly made before connecting the unit to the wall socket and turning on the power.
Watching TV
- Press the STANDBY button to power on the unit.
- Press the SOURCE button to select analog (ATV) or digital (DTV) as input source.
- Choose the channel by pressing CH + or CH- or by pressing the numeric buttons (combined [---] if necessary) to input the channel number directly.
Electronic Program Guide (EPG)
EPG stands for Digital Electronic Program Guide. It is supplied by the program providers and offers information about the programs to be broadcast. You can access it in digital mode by pressing the EPG button on the remote control, the menu will appear on the screen, as below:
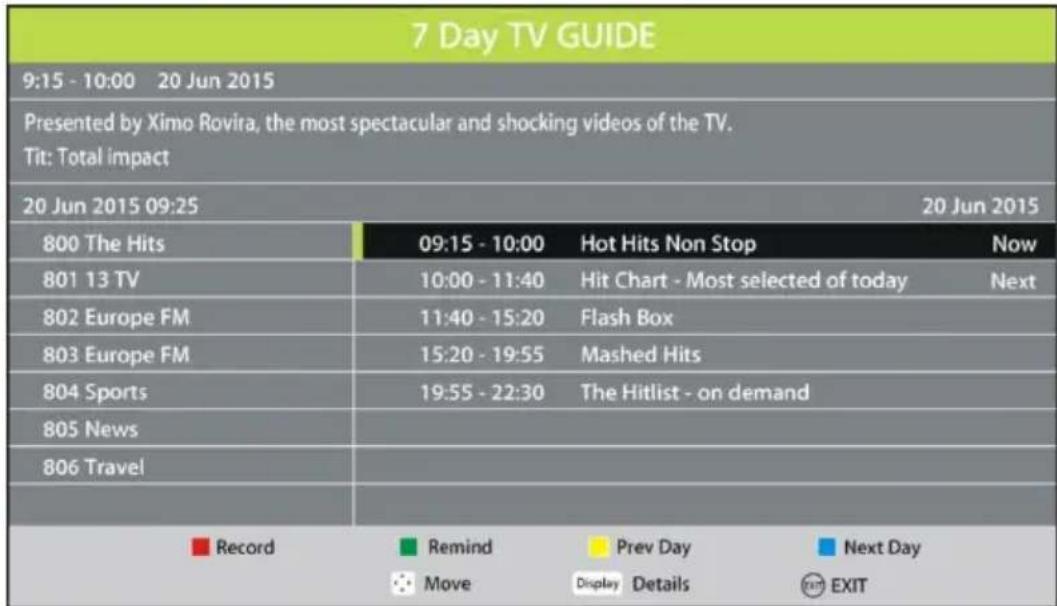
Press / navigation button to select preferred program
- Press / navigation button to switch between left column and right column.
- Press the RED button to set a recording.
- Press the GREEN button to set a reminder.
- Press the YELLOW button to display the program guide of the previous day.
- Press the BLUE button to display the program guide of the following day.
Recording
-
In DTV mode, insert a formatted USB storage device, then press to record the program you are watching.
-
The record menu will be showed on the screen.

If this menu disappears, press the EXIT or button to display it again.
- Press to move the cursor and press OK to confirm your setting.
- Press to initiate a dialog box and select [Yes] to stop recording. To dismiss the dialog box, select [No].
To watch recorded programs, press INDEX to initiate the Record List menu. Press / to select a recorded file and press OK to start playback.
Time-shift function
The time-shift function allows you to pause the live TV signal, then resume playback at your convenience.
- While in DTV mode, insert a formatted USB storage device to your TV.
- Press to initiate time-shift mode and pause the program.
- Press to stop playing and press again to initiate a dialog box. Select [Yes] to exit time-shift mode and return to live TV signal.

If this menu disappears, press the EXIT button to display it again.
USING THE MENUS
The MENU button allows you to access the variety of TV settings for you to customize the settings.
Navigating through TV Menus
Allow you to highlight options where applicable.
OK: Allow you to confirm the setting or advance to the next screen.
: Allow you to move back to the previous screen or adjust the value.
: Allow you to move to the next screen or adjust the value.
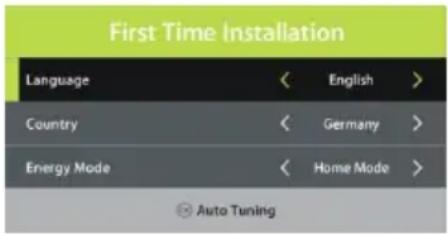
First time installation
When turning on the TV for the first time, the below installation menu will be displayed:
Language: select the on-screen menu language.
Country: select your country.
Energy Mode: select Home or Store mode. It will result in higher energy consumption if you leave Home mode.
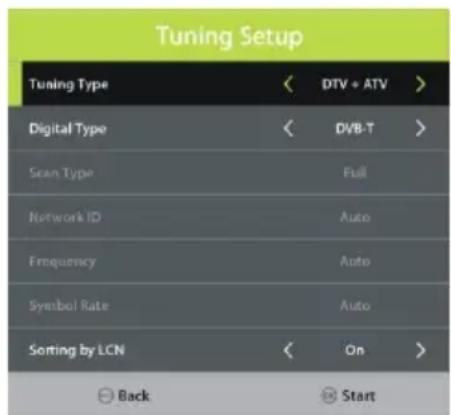
Tuning Setup
- If above selections are finished, press OK button to call out Tuning Setup.
- Select preferred Tune Type and Digital Type using navigation buttons and press OK button to start auto tuning.
Note: Items following Digital Type are adjustable only when Digital Type is DVB-C and these items vary for different digital type.
1. Channel

Antenna
- Press LEFT/RIGHT navigation button to select DVB-T or DVB-C.
Auto Tuning
- Press the OK or RIGHT navigation button.
- Use the navigation buttons to set the Country, Tune Type and LCN.
Note: Scan type and following items are adjustable only when "Antenna" is DVB-C.
- Then press OK to start program tuning.
ATV Manual Tuning
Scan available programs manually.
DTV Manual Tuning
Scan available programs manually.
Programme Edit
Edit a program that TV received. (delete, skip or set a favorite program).
Schedule List
Schedule a recording in DTV mode.
Recorded List
Show the list or Previously recorded programs
Signal information
This item is used to display signal details, for example: signal quality and strength.
CI information
When an available CAM (Conditional Access Module) card is connected to the CI slot, the users can view related information or manage your CAM card.
2. Picture

Picture Mode
- Press UP/DOWN/LEFT/RIGHT navigation buttons to select an option.
Picture Mode: available options: Standard, Mild, Personal, Dynamic.
Contrast / Brightness / Colour / Tint / Sharpness: adjustable value: 0-100.
Note: Contrast, Brightness, Colour and Sharpness are adjustable only when Picture Mode is
"Personal". Tint is adjustable only for NTSC system.
Color Temp
This item is used to adjust the optimum color temperature for suitable viewing.
Available options: Normal, Warm, Cold.
Noise Reduction
Available options: Off, Low, Medium, High
NOTE: Noise Reduction is not available when signal source is HD, such as 1080i in DTV & USB input source.
Dynamic CR
Turn on/off dynamic contrast ratio.
3. Sound

Sound Mode
- Press UP/DOWN/LEFT/RIGHT navigation buttons to select an option.
Sound Mode: available options: Standard, Music, Movie, Sports, Personal.
Treble / Bass: adjustable value: 0-100.
Note: Treble and Bass are adjustable only when Sound Mode is "User".
Balance
This item is used to adjust the audio output between left and right speaker from -50 to 50.
Auto Volume
This item is used to set Auto Volume ON or OFF.
Surround Sound
Turn on/off Surround Sound for better sound experience.
SPDIF Mode
Available options: Auto, PCM, Off.
AD Switch
This item is used to turn on/off Audio Description function. For Visually Impaired users, this function can help to know a certain scene or action through the narration, instead of see it.
Notes:
- AD Switch function works only when you are viewing programs that contain related narration information.
- The users can adjust AD Volume when AD Switch is on.
4. Time

Clock
It displays current system time when an available channel was saved.
Time Zone
This item is used to select desired time zone.
Off Time
Off Time: available options: Off / Once / Every Day / Mon~Fri / Mon~Sat / Sat~Sun / Sun. Hour / Minute: use navigation buttons to adjust the Hour / Minute when the Off Time is not "Off".
On Time
On Time: available options: Off / Once / Every Day / Mon~Fri / Mon~Sat / Sat~Sun / Sun.
Hour / Minute / Source / Channel / Volume: use navigation buttons to adjust these items when the Off Time is not "Off".
Sleep Timer
This item is used to set the automatic sleep time. Available options: Off, 10min, 20min, 30min, 60min, 90min, 120min, 180min, 240min
Auto Standby
This item is used to select a desired Auto Sleep (standby) duration when no operations are done through the remote control.
Available options: Off, 3/4/5 hours. (It will result in higher energy consumption if you select more than 4 hours)
OSD Timer
This item is used to select a desired OSD menu duration.
Available options: Off, 5/10/15/20/25/30/35 seconds.
5. Lock

- When entered "Lock", input the factory default password "0000" using number buttons on remote control.
- Press UP/DOWN navigation button to select preferred item.
Note: If you forget the password, please use the universal password "8899".
System Lock
This item is used to turn on/off Lock System.
Set Password
Input a new password twice using number buttons on remote control to set a new password.
Channel Lock
Lock / unlock a channel.
Parental Guidance
This item is used to select desired program rating.
Available options: Off, 4-18.
Hotel Mode
This item is used to setup Hotel Lock.

6. Setup
Language
This item is used to select desired on-screen display language.
TT Language
This item is used to select the default teletext language.
Audio Language
- Press the RIGHT navigation button.
- Then you can select the desired primary audio language and secondary audio language.
Subtitle Language
- Press the RIGHT navigation button.
- Then you can select the preferred primary subtitle language and secondary subtitle language.
Hearing Impaired
This item is used to turn on/off the Hearing Impaired function. For Hearing Impaired users, this function providescaptions to supplement the audio.
NOTE: Hearing Impaired function works only when you are viewing programs that contain related caption information.
Aspect Ratio
This item is used to adjust the video size.
Available options: Auto, 4:3, 16:9, Zoom1, Zoom2.
NOTE: The available video size may be different for different input sources and it is not available when signal source is HD, such as 1080i in DTV & USB input source.
PVR File System
- Press the UP/DOWN navigation button to select a desired option, and then press the LEFT/RIGHT navigation button to adjust the selected option.
- Press the OK button to enter the submenu or confirm the setting.
In this part, you can select a desired disk, check the PVR File System, format your USB memory device and set a desired Free Record Limit time.
Blue Screen
This item is used to turn on/off Blue Screen. The screen background will turn blue at very weak or no signal condition if Blue Screen is ON.
First Time Installation
This item is used to recall the First Time installation menu.
Energy Mode
This item is used to select Home or Store mode.
Reset
This item is used to recall factory default settings.
Software Update (USB)
This item is used to update software through the USB memory device.
HDMI CEC
To use the HDMI CEC function:
- Make sure the HDMI device which supports CEC function (Amplifier, etc.) is connected correctly.
- Press the SOURCE button on the remote control to select the HDMI input source.
HDMI CEC: turn on/off HDMI CEC.
HDMI ARC: turn on/off ARC function.
Auto Power: turn on/off Auto Power function.
Device Menu: display the setup menu of other device connected.
7. USB OPERATION
Plug in your USB device. Press the SOURCE button on remote control to open SOURCE list. Then press UP/DOWN navigation button to select USB (or Media) and press OK button to enter it.


Press / button to highlight Photo, Music, Movie and Text, press OK button to confirm selection. Press button on remote control to start playback.
SPECIFICATIONS
| TV Broadcasting | PAL, B/G, D/K, I, SECAM |
| Receiving Channels | ATV (48.25MHz ~ 863.25MHz) |
| Number of Preset Channels | 100 (ATV) |
| Channel Indicator | On Screen Display |
| RF Aerial Input | 75 Ohm (unbalanced) |
| Operating Voltage | AC 100-240V~50/60Hz( ~ means alternating current) |
| USB Output | 5V =500mA(- means direct current) |
| Audio Output Power (WRMS.) (10% THD) | 3 W |
| Dimensions DxLxH (with foot) | 176 x 557 x 368 mm |
| Weight (with foot) | 2.5 kg |
| Dimensions DxLxH (without foot) | 78 x 557 x 333 mm |
| Weight (without foot) | 2.2 kg |
| Surrounding temperature | Operation: 0°C ~ 35°CStorage: 5°C ~ 30°C |
| Operating Humidity | Less than 80 % RH |
| Standby Mode | After 3\4\5 hours |
Digital reception
| Reception range | 44MHz - 862MHz | |
| Input impedance | 75 Ω | |
| Channel bandwidth | 7 MHz / 8 MHz | |
| Modulation | DVB-T | COFDM 2K/8K, QPSK, 16QAM, 64QAM |
| DVB-C | 16QAM, 32QAM, 64QAM, 128QAM, 256QAM | |
| Video system | MPEG-2 MP@ML, MPEG-2 MP@HL, H.265 | |
| Sound system | MPEG-1 layer ½, MPEG-2 layer | |
| Basic functions | EPG, Subtitle, LCN, TELEXT (Europe) | |
| Max storage channels | 1000CH (DVB-T + DVB-C, dynamic) | |

Indoor Use only
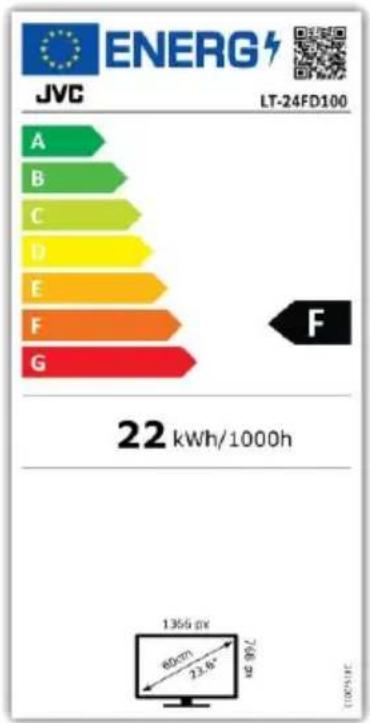
Product Information Sheet
| Parameter | Parameter value and precision | Unit | ||
| Supplier's name or trade mark | JVC | |||
| Supplier's address | Etablissements Darty & fils ©,9 Rue des Bateaux-Lavoirs,94200 Ivry-sur-Seine, France | |||
| Supplier's model identifier | LT-24FD100 | |||
| Energy efficiency class for standard Dynamic Range (SDR) | F | |||
| On mode power demand for Standard Dynamic Range (SDR) | 22 | W | ||
| Off mode, power demand | N/A | W | ||
| Standby mode power demand | 0,25 | W | ||
| Networked standby mode power demand | N/A | W | ||
| Electronic display category | television | |||
| Size ratio | 16 | : | 9 | integer |
| Screen resolution (pixels)Horizontal and vertical pixels | 1366 | x | 768 | pixels |
| Screen diagonal | 60 | cm | ||
| Screen diagonal | 23,6 | inches | ||
| Visible screen area | 1528,87 | cm2 | ||
| Panel technology used | LED LCD | |||
| Automatic Brightness Control(ABC) available | NO | |||
| Voice recognition sensor available | NO | |||
| Room presence sensor available | NO | |||
| Image refresh frequency rate | 60 | Hz | ||
| Minimum guaranteed availability of software and firmware updates(from the date of end of the placement on the market) | 8 | Years | ||
| Minimum guaranteed availability of spare parts (from the date of end of the placement on the market) | 7 | Years | ||
| Minimum guaranteed product support | 7 | Years | ||
| Minimum duration of the general guarantee offered by the supplier | 2 | Years | ||
| Power supply type: | Internal | |||
Technical repair assistance documents: www.madocumentationreparation.com
TROUBLESHOOTING
| Problem | Possible Solution |
| The screen does not appear/illuminate. | 1. Check that the power plug is securely into the mains socket. 2. Check the power is on. |
| The screen appears, but there is no sound. | 1. Press the MUTE button. 2. Increase the sound level by pressing the volume adjustment buttons 3. Check that the sound terminal of your external input is connected properly. 4. Check that the audio cables are connected properly. 5. Select and check any other input. |
| Noise or poor picture | Stop using wireless telephones, hair dryers or other electrical appliances near the TV. |
| The remote control does not work. | 1. Check if the TV is not switched on. 2. Check that the batteries of the remote control are inserted properly. 3. Check for any obstacles between the TV remote sensor and the remote control. Remove them if necessary. 4. If the batteries have no power, replace them with two new batteries off the same type. |

As a responsible retailer we care about the environment. As such we urge you to follow the correct disposal procedure for the appliance and packaging materials. This will help conserve natural resources and ensure that it is recycled in a manner that protects health and the environment.
You must dispose of this appliance and its packaging according to local laws and regulations. Because this appliance contains electronic components, the appliance and its accessories must be disposed of separately from household waste when the appliance reaches its end of life.
Contact your local authority to learn about disposal and recycling. The appliance should be taken to your local collection point for recycling. Some collection points accept appliance free of charge.
We apologise for any inconvenience caused by minor inconsistencies in these instructions, which may occur as a result of product improvement and development.
The object of the declaration described above is in conformity with the relevant Union harmonisation legislation:
Regulamento (UE) N. 2019/2013, N. 2019/2021, N. 2021/340, N. 2021/341
Software version: 20200901163702
EN62368-1:2014+A11:2017
EN 62479:2010
EN 50663:2017
EN 55032:2015+A1:2020, Class B
ENIEC61000-3-2:2019
EN61000-3-3:2013+A1:2019
EN55035:2017+A11:2020
EN303340V1.1.2(2016-09)
EN 303 372-2 V1.1.1 (2016-04)

This declaration of conformity is drawn up under the sole responsibility of the manufacturer.
The person responsible for this declaration is: