
Prime Air - Deep fryer Klarstein - Free user manual and instructions
Find the device manual for free Prime Air Klarstein in PDF.

| Product type | Air fryer / Hot air oven |
| Brand | Klarstein |
| Model | Prime Air |
| Power | 1500 W |
| Power supply | 220-240 V ~ 50 Hz |
| Item numbers | 10040025, 10040026 |
| Temperature range | 80 °C - 230 °C (depending on mode) |
| Timer | 1 minute to 2 hours (up to 12 hours in fermentation mode) |
| Cooking modes | Air frying, Air frying + rotisserie, Top heat, Bottom heat, Top + bottom heat, Fermentation, Defrosting, Reheating |
| Rotisserie function | Yes (optional in some modes) |
| Display | LED screen |
| Interior material | Non-stick coating |
| Safety | Auto shut-off, overheat protection |
| Error codes | E1 (open circuit), E2 (short circuit), E3 (overheat) |
| Cleaning | Accessories washable in soapy water, exterior with damp cloth |
| Usage | Household use only |
Frequently Asked Questions - Prime Air Klarstein
User questions about Prime Air Klarstein
0 question about this device. Answer the ones you know or ask your own.
Ask a new question about this device
Download the instructions for your Deep fryer in PDF format for free! Find your manual Prime Air - Klarstein and take your electronic device back in hand. On this page are published all the documents necessary for the use of your device. Prime Air by Klarstein.
USER MANUAL Prime Air Klarstein
Unit 6 Riverside Business Centre
Brighton Road
Shoreham-by-Sea
BN43 6RE
United Kingdom
Dear customer,
Congratulations on the purchase of your appliance. Please read the following instructions carefully and follow them to prevent potential damage. We accept no liability for damage caused by disregarding the instructions and improper use. Please scan the QR code to access the latest operating instructions and further information about the product.

CONTENTS
Safety Instructions 14
Device overview 16
Functions and modes 16
Cleaning and Care 20
Error codes 21
Disposal Considerations 22
Manufacturer & Importer (UK) 22
TECHNICAL INFORMATION
| Product code 10040025, 10040026 | |
| Power supply 220-240 V ~ 50 Hz | |
| Power 1500 W |
SAFETY INSTRUCTIONS
- Before using for the first time, check that the voltage of your socket corresponds to the voltage specified.
- To avoid electric shock, do not immerse the power cord or the device itself in water or other liquids.
- Keep children and pets away from the device while it is in operation.
- Switch off the device after use and pull the power plug out of the socket.
- The device should be operated on a power circuit separate from other devices. If the electrical circuit is overloaded with other devices, this device may not function properly.
- Use extreme caution when moving a container that contains hot food.
- Do not let the power cord hang over the edge of tables or work surfaces, and make sure that the power cord does not come into contact with the hot surfaces of the device.
- Always place the device securely in the centre of the table or work surface.
- Never touch hot device surfaces. Use the handles to move or lift.
The device may not be used by children. - The use of accessories that are not expressly recommended by the manufacturer can lead to injuries.
- Do not place or use the device on heat-sensitive glass surfaces, wooden surfaces or tablecloths. With these surfaces, it is essential to place a heat-insensitive plate with thermal protection under the device.
- Do not use the device if the power cord is damaged, the device is malfunctioning, or has been damaged in any other way.
- Before cleaning and when not using the device, switch it off and pull the power plug out of the socket. Let the device cool down first before removing or adding device parts.
- Do not place the device in the immediate vicinity of hot gas or electric ovens or in a heated oven.
- If the plug does not fit properly, be sure to consult a qualified electrician to reduce the risk of electric shock. Never attempt to tamper with the power plug in any way.
- Do not clean the device with metallic scouring pads. Small metal parts could break off and short out electrical components in the device, which could result in an electric shock and damage the device.
-
To minimise the risk of electric shock, prepare food only in the coated, non-stick container provided.
-
The device is designed for domestic use only.
- Only use the device for its intended purpose.
- Keep these operating instructions for future reference.
- Children over 8 years as well as mentally, sensory and physically impaired persons may only use the device if they have been informed in detail about the functions and safety precautions by a supervisor responsible for them beforehand and understand the associated risks.

CAUTION
Risk of burns! When hot air frying, hot steam is released through the air outlets. Keep your hands and face a safe distance from steam and air vents. Also watch out for hot steam and air when removing parts of the device from the device.
Special notes on the oven
- Never move baking trays and baking racks while they are hot, let them cool down first.
- Always switch off and unplug the appliance before cleaning and maintenance.
- This appliance is designed for household use and can be installed in standard kitchens or living units.
- All surfaces or furniture surrounding the oven and all materials used for installation must be able to withstand at least 85^ during use of the appliance.
- Do not place heavy objects on the oven door or lean against it while it is open, as this could cause damage to the hinges.
- Do not place pans, baking trays or aluminium foil directly on the bottom of the oven as this could cause heat to build up and damage the enamel.
- Make sure you select the appropriate temperature and function for all foods so that foods and liquids do not overflow or burn.
- Ensure that food is prepared in sufficiently large containers and that you use a drip tray where necessary.
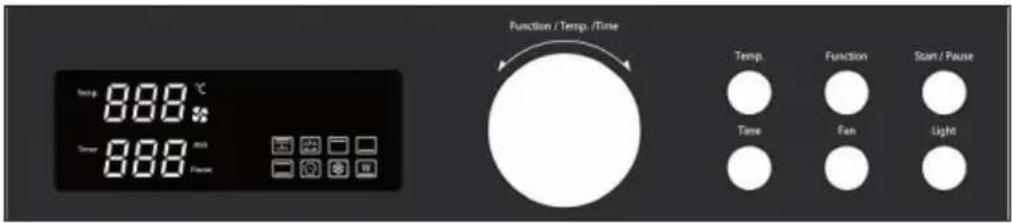
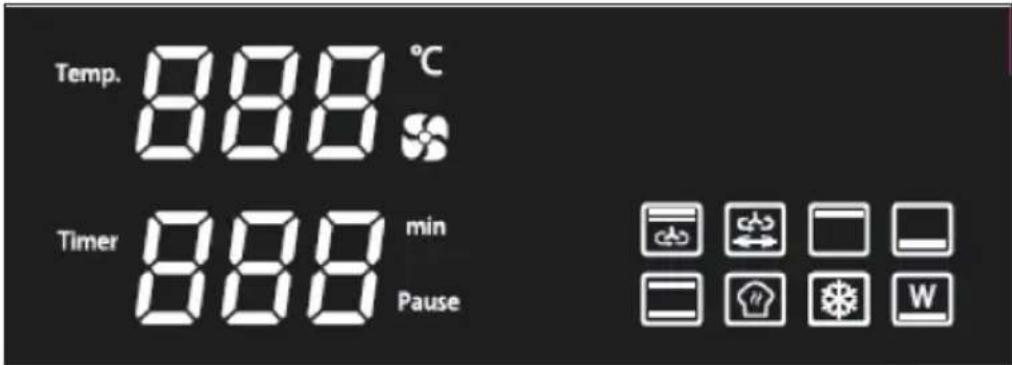
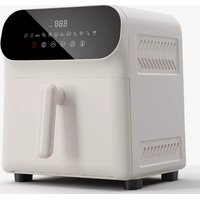
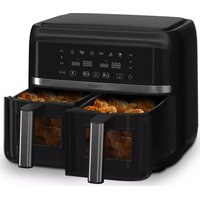
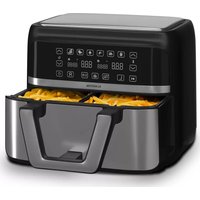
DEVICE OVERVIEW
Control panel
Display indications
FUNCTIONS AND MODES

Hot air frying
The factory-set temperature is 200^ . The factory-set operating time is 20 minutes. The temperature setting range is between 80^ and 230 ^ C . An operating time between 1 minute and 2 hours can be set. Fan is the default setting for this function. After you have made the desired settings, press the START/PAUSE button to start preparation. As soon as preparation is finished, the appliance beeps 3 times and the appliance returns to standby mode.
| Hot air frying + rotisserie | |
| The factory-set temperature is 200 °C. The factory-set operating time is 20 minutes. The temperature setting range is between 80 °C and 230 °C. An operating time between 1 minute and 2 hours can be set. Fan and rotisserie are the default setting for this function. After you have made the desired settings, press the START/PAUSE button to start preparation. As soon as preparation is finished, the appliance beeps 3 times and the appliance returns to standby mode. | |
| Upper heat | |
| The factory-set temperature is 180 °C. The factory-set operating time is one hour. The temperature setting range is between 80 °C and 230 °C. An operating time between 1 minute and 2 hours can be set. After you have made the desired settings, press the START/PAUSE button to start preparation. As soon as preparation is finished, the appliance beeps 3 times and the appliance returns to standby mode. | |
| Lower heat | |
| The factory-set temperature is 200 °C. The factory-set operating time is 50 minutes. The temperature setting range is between 80 °C and 230 °C. An operating time between 1 minute and 2 hours can be set. After you have made the desired settings, press the START/PAUSE button to start preparation. As soon as preparation is finished, the appliance beeps 3 times and the appliance returns to standby mode. | |
| Top heat and bottom heat | |
| The factory-set temperature is 160 °C. The factory-set operating time is 45 minutes. The temperature setting range is between 80 °C and 230 °C. An operating time between 1 minute and 2 hours can be set. After you have made the desired settings, press the START/PAUSE button to start preparation. As soon as preparation is finished, the appliance beeps 3 times and the appliance returns to standby mode. | |
| Fermenting | |
| The factory-set temperature is 38 °C. The factory-set operating time is one hour. The temperature setting range is between 30 °C and 60 °C. An operating time between 1 minute and 12 hours can be set. After you have made the desired settings, press the START/PAUSE button to start preparation. As soon as preparation is finished, the appliance beeps 3 times and the appliance returns to standby mode. | |
| Thawing | |
| The factory-set temperature is 50 °C. The factory-set operating time is 30 minutes. The temperature setting range is between 40 °C and 80 °C. The fan is the default setting for this function. An operating time between 1 minute and 2 hours can be set. After you have made the desired settings, press the START/PAUSE button to start preparation. As soon as preparation is finished, the appliance beeps 3 times and the appliance returns to standby mode. | |
| Keeping warm | |
| The factory-set temperature is 50 °C. The factory-set operating time is one hour. The temperature setting range is between 35 °C and 60 °C. An operating time between 1 minute and 4 hours can be set. After you have made the desired settings, press the START/PAUSE button to start preparation. As soon as preparation is finished, the appliance beeps 3 times and the appliance returns to standby mode. |
Function description
| Time range | Factory-set time | Temperature range | Factory-set temperature | |
| 0:01- 2:00 0:20 | 80 °C - 230 °C 200 °C | |||
| 0:01- 2:00 0:20 | 80 °C - 230 °C 200 °C | |||
| 0:01- 2:00 1:00 | 80 °C - 230 °C 180 °C | |||
| 0:01- 2:00 0:50 | 80 °C - 230 °C 200 °C | |||
| 0:01- 2:00 0:45 | 80 °C - 230 °C 160 °C | |||
| 0:01- 12:00 1:00 | 30 °C - 60 °C 38 °C | |||
| 0:01- 2:00 0:30 | 40 °C - 80 °C 50 °C | |||
| 0:01- 4:00 1:00 | 35 °C - 60 °C 60 °C |
| Upper heat | Medium heat | Lower heat | Circulating air | Rotary spit | |
| √ √ √ | √ X | ||||
| √ √ X | √ | ||||
| √ XX∅X | |||||
| XX √∅X | |||||
| √ X √∅X | |||||
| XX √∅X | |||||
| √ XX √X | |||||
| XX √∅X | |||||
| X means: not included / √ means: included / ∅ means: optional | |||||
CLEANING AND CARE
Note:
Before cleaning, make sure that the oven is switched off, the mains plug has been removed from the socket and the appliance has cooled down completely. After cleaning, dry all parts of the appliance carefully before putting it back into operation.
- Clean the outside of the oven with a damp cloth and then dry it carefully. A mild detergent can be used for stubborn stains. Then rub the outside of the device again with a damp cloth and dry it carefully. Do not use metal scouring pads or aggressive cleaning agents as this could scratch the surface of the appliance.
- Clean the glass door with a cloth or a sponge soaked in warm water. Dry carefully afterwards.
- Remove the baking tray, baking grid and guide grid. Clean them in soapy water and then dry them thoroughly.
- Do not use aggressive cleaning agents or metal scouring pads to clean the accessories. Remove stubborn stains with a nylon or polyester sponge and a mild detergent. Then rinse the accessories with clean water and dry them carefully.
Note: Do not use cleaning sprays or other oven cleaners for cleaning. If you use this type of cleaning agent, the electrical components of the appliance may be damaged.
Cleaning the appliance interior
- Always switch the device off before cleaning, pull the power plug out of the socket and let the device cool down completely.
- Clean the inside of the appliance with a mild, non-abrasive detergent and a sponge to avoid dirt build-up. Do not rub the surface too hard as it could be scratched.
- To remove caked-on food residues, apply a little oil to the food residues and let it soak in for 5 to 10 minutes. Then remove the softened residues with a soft cloth. Do not use steel wool, scouring pads or aggressive cleaning agents.
- Remove all cleaning agent residues and dry the inside of the appliance completely before closing the glass door.
Storage
Unplug the appliance from the wall outlet and allow it to cool completely. Clean the unit thoroughly before storing. Store the unit in its original packaging in a clean and dry place. Never store the unit when it is still hot or plugged in. Do not put any load on the cable where it enters the unit as this may damage the cable.
ERROR CODES
If an error is detected, the unit beeps 5 times and stops operation. The LED screen displays the corresponding error code.
| Error code Possible cause | |
| E1 Open circuit | |
| E2 Short circuit | |
| E3 Overheating | |
DISPOSAL CONSIDERATIONS
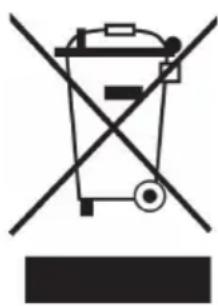
If there is a legal regulation in your country regarding the disposal of electrical and electronic equipment, this symbol on the product or on the packaging indicates that this product must not be disposed of with household waste. Instead, it must be taken to a collection point for the recycling of electrical and electronic equipment. By disposing of this product in accordance with the regulations, you protect the environment and the health of those around you from negative consequences. For information on recycling and disposal of this product, contact your local government or household waste disposal service.
MANUFACTURER & IMPORTER (UK)
Manufacturer:
Chal-Tec GmbH, Wallstraße 16, 10179 Berlin, Germany.
Importer for Great Britain:
Chal-Tec UK limited
Unit 6 Riverside Business Centre
Brighton Road
Shoreham-by-Sea
BN43 6RE
United Kingdom
Estimado cliente:
Chal-Tec UK limited.
Unit 6 Riverside Business Centre
Brighton Road
Shoreham-by-Sea
BN43 6RE
Reino Unido
Cher client, chere clientele,
Unit 6 Riverside Business Centre
Brighton Road
Shoreham-by-Sea
BN43 6RE
Royaume Uni
Gentile clientele,
PRODUTTORE E IMPORTATORE (UK)
Produtlore:
Chal-Tec GmbH, Wallstraße 16, 10179 Berlin, Germania.
Unit 6 Riverside Business Centre
Brighton Road
Shoreham-by-Sea
BN43 6RE
Regno Unito


KLARSTEIN

- CONTENTS
- SAFETY INSTRUCTIONS
- CAUTION
- Special notes on the oven
- DEVICE OVERVIEW
- FUNCTIONS AND MODES
- Hot air frying
- Function description
- CLEANING AND CARE
- Note:
- Cleaning the appliance interior
- Storage
- ERROR CODES
- DISPOSAL CONSIDERATIONS
- MANUFACTURER & IMPORTER (UK)
- Estimado cliente:
- Gentile clientele,
- PRODUTTORE E IMPORTATORE (UK)
Brand : Klarstein
Model : Prime Air
Category : Deep fryer