Karaoke Star 3 - Karaoke system Auna - Free user manual and instructions
Find the device manual for free Karaoke Star 3 Auna in PDF.

User questions about Karaoke Star 3 Auna
0 question about this device. Answer the ones you know or ask your own.
Ask a new question about this device
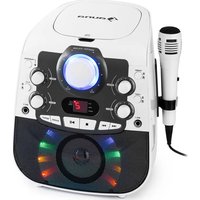
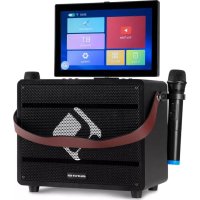
Download the instructions for your Karaoke system in PDF format for free! Find your manual Karaoke Star 3 - Auna and take your electronic device back in hand. On this page are published all the documents necessary for the use of your device. Karaoke Star 3 by Auna.
USER MANUAL Karaoke Star 3 Auna
Berlin Brands Group UK Ltd
PO Box 1145
Oxford, OX1 9UW
United Kingdom
Congratulations on purchasing this equipment. Please read this manual carefully and take care of the following hints to avoid damages. Any failure caused by ignoring the mentioned items and cautions mentioned in the instruction manual are not covered by our warranty and any liability. Scan the QR code to get access to the latest user manual and other information about the product.

CONTENT
Safety Instructions 16
Product Overview 18
Use and Operation 20
Troubleshooting 21
Cleaning and Care 22
Disposal Considerations 23
Declaration of Conformity 23
TECHNICAL DATA
| Item number 10032441 | |
| Power Supply 220-240 V AC ~ 50/60 Hz | |
| BT specifications Frequency band Maximum radio-frequency power | 2402-2480 MHz 2.3 dBm |
| Frequency Response 20 Hz - 20 KHz (±3 dB) | |
| Main channel output 75 W + 75 W | |
| Total Harmonic Distortion ≤ 0.5% | |
| S/N Ratio ≥ 80 dB | |
| Tone Control | Treible ±12 dB (10 KHz) |
| Bass ±12 dB (100 Hz) |
SAFETY INSTRUCTIONS
- Read Instructions - all the safety and operating instructions should be read before the appliance is operated.
- Retain Instructions - the safety and operating instructions should be retained for future reference.
- HeedWarnings - all warnings on the set and in the operating instructions should be adhered to.
- Cleaning – unplug the amplifier from the wall outlet before cleaning. The set should be cleaned only as recommended by the manufacturer using a dry cloth. Avoid solvents or other cleaning detergents.
- Attachments - do not use the set near water for example, near a bath tub, wash bowl, kitchen sink, or laundry tub, in a wet basement, or near a swimming pool and the like.
- Accessories - do not place or mount the set on an unsuitable and/or unstable stand, tripod, bracket, or table. Failure to adhere to this warning may result in the set falling, causing serious injury to a child or adult and serious damage to the set. Any mounting of the appliance should follow the manufacturer's instructions, and should use a mounting accessory recommended by the manufacturer.
- Ventilation slots and openings in the amplifier cabinet are provided for ventilation and to ensure reliable operation of the amplifier by protect it from overheating. These openings must not be blocked or covered. The amplifier should not be placed in a built in installation such as a bookcase or rack unless proper ventilation is provided. There should be free space of at least 20cm and an opening behind the appliance.
- Power Sources - the appliance should be operated only from AC 220-240V 50/60Hz mains power. If you are not sure of the type of power supply to your home, consult your appliance dealer or local power company.
- Power Cord Protection - power supply cords should be routed so that they are not likely to be walked on or pinched by items placed upon or against them. Pay particular attention to cords at plugs, convenience receptacles and the point where they exit from the appliance.
-
Lightning – for added protection for the appliance during a lightning storm, or when it is left unattended and unused for long periods of time, unplug it from the wall outlet and disconnect the antenna or cable system. This will prevent damage to the appliance due to lightning and power-line surges.
-
Overloading - Do not overload wall outlets, extension cords, or integral convenience receptacles as this can result in a risk of fire or electric shock.
- Object and Liquid Entry - never push objects of any kind into the appliance through openings as they may touch dangerous voltage points or short out parts that could result in a fire or electric shock. Never spill liquid of any kind on the appliance.
- Servicing - do not attempt to service the appliance yourself as opening or removing covers may expose you to dangerous voltage or other hazards. Refer all servicing to qualified service personnel.
- Replacement Parts - when replacement parts are required, be sure the service technician has used replacement parts specified by the manufacturer or have the same characteristics as the original part. Unauthorized substitutions may result in fire, electric shock, or other hazards.
- Safety Check - upon completion of any service or repairs to the appliance, ask the service technician to perform safety checks to determine that the appliance is in proper operation condition.
- Heat - the appliance should be situated away from heat sources such as radiators, heat registers, stoves, or other appliances (including amplifiers) that produce heat.
Important Notes on Operation
- As the product contains a transmission/reception system of VHF signals, it is exclusively meant for professional use. The user of the product is fully responsible for the use he makes of the product. The distributor cannot be held responsible for an eventual misuse by the user of the product.
- The symbol "!" that appears on the wireless transmitter, the packaging, the manual and on the product means that the product is only allowed to be used in some countries of the European Community (FR - BE - PT - D - NL - LU - GR - SP - RO).
PRODUCT OVERVIEW
Front Panel
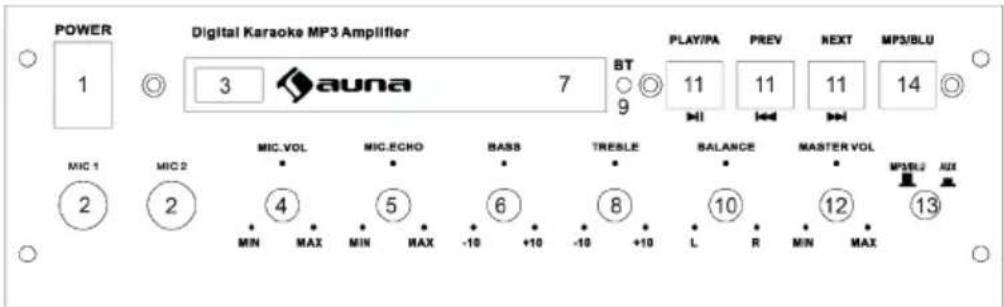
| 1 | POWER: Press to turn on or turn off the main unit. | 8 | TREBLE CONTROL: Adjust to strengthen or weaken treble response. |
| 2 | MIC1/MIC2 JACK: Plug the microphone into the jacks | 9 | BT LIGHT: Indicates the |
| 3 | USB JACK: Plug a USB stick into the jack. | 10 | BT working status. |
| 4 | MIC1/MIC2 VOL: Adjust the volume of MIC1/MIC2. | 11 | USB PLAY BUTTONS: PLAY/PAUSE PREV NEXT |
| 5 | M.ECHO: Adjust to increase or decrease the echo depth of the microphones. | 12 | MASTER VOLUME: Adjust the volume of the speaker system |
| 6 | BASS CONTROL: Adjust to strengthen or weaken bass response. | 13 | INPUT SIGNAL SELECTOR: Choose input signal: AUX, MP3/ BT |
| 7 | LED Screen: Display the MP3 music play time. | 14 | INPUT SIGNAL SELECTOR: Choose input signal: MP3, BT |
Back Panel
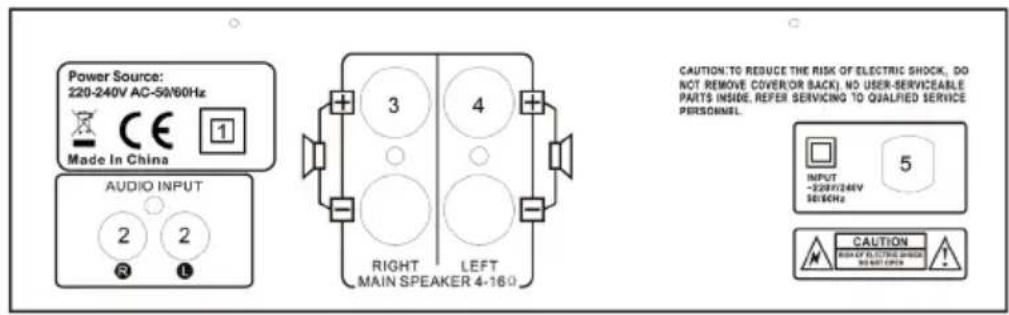
| 1 BT antenna |
| 2 AUX signal input |
| 3 FR speaker output |
| 4 FL speaker output |
| 5 Power: 220-240Vac 50/60Hz |
USE AND OPERATION
Select a sound source
1 Turn the VOLUME button to the lowest first. Switch the unit on. Use input signal button to select the sound source.
2 Turn the VOLUME butt on to adjust Left and Right channel to a suitable level.
3 Use the USD play buttons to adjust the MP3 music playback.
4 Use the TREBLE button to adjust the treble to a suitable level.
5 Use the BASS button to adjust the bass to a suitable level.
6 Use the BALANCE button to adjust the volume level of R/L CH.
Wiring the speakers
IMPORTANT: Turn off your amplifier before connecting or disconnecting speakers
- Ensure that you connect the positive speaker terminal (red) to the positive (red) amplifier speaker output. Take care to ensure that the polarity is preserved ie do not connect the negative speaker terminal to the positive amplifier speaker output.
- Repeat for the negative speaker terminal (black) and the negative (black) amplifier speaker output.
Function Test
Once connected, turn on system start at a low volume and increase gradually to a comfortable volume level. The system should sound balanced with good sound reproduction. If the set sounds distorted check to make sure that the speakers have been correctly wired with your amplifier.
Playing Karaoke
1 Turn the VOLUME button to the lowest first.
2 Switch the unit on.
3 Use the input signal button to select the sound source.
4 Turn the MIC1/2. VOL button to the lowest, plug 1 or 2 microphones into the MIC1 or MIC2 Jack, adjust the MIC1. VOL & MIC2. VOL controls to a suitable level.
5 You can adjust the microphone echo by using M. ECHO button.
TROUBLESHOOTING
| Problem Possible Reason | Examine & Repair | |
| No Power Unit is not plugged | in correctly | Check the power outlet |
| Fuse blown Check the power outlet | ||
| No sound | Cables connection not secure | Check all connection cables. |
| Speakers cables are not connected | Check the connection between amplifier & speakers. | |
| Volume is very low. Turn the volume button clockwise to a higher level. | VOLUME button clockwise to a higher level. | |
| Input source in MUTE mode. | Release the input source MUTE mode. | |
| Noise from Speakers Cables | damaged or contacts not secure | Change cables or check the connection jack. |
| Strong magnetic interference | Reposition the amplifier further away from the speakers | |
| No sound from Microphone | Microphone is OFF Turn on | the Microphone. |
| MIC volume is very low Switch | micromicrometer to a higher level. | |
| Howling Microphone too close to speakers | Move microphone further away from speakers or switch MIC VOL to a lower level. | |
CLEANING AND CARE
- Use a damp cloth to clean.
- Avoid any chemical materials and polishes on the cabinet and grill.
DISPOSALCONSIDERATIONS
If there is a legal regulation for the disposal of electrical and electronic devices in your country, this symbol on the product or on the packaging indicates that this product must not be disposed of with household waste. Instead, it must be taken to a collection point for the recycling of electrical and electronic equipment. By disposing of it in accordance with the rules, you are protecting the environment and the health of your fellow human beings from negative consequences. For information about the recycling and disposal of this product, please contact your local authority or your household waste disposal service.
This product contains batteries. If there is a legal regulation for the disposal of batteries in your country, the batteries must not be disposed of with household waste. Find out about local regulations for disposing of batteries. By disposing of them in accordance with the rules, you are protecting the environment and the health of your fellow human beings from negative consequences.
DECLARATION OF CONFORMITY
CE UK CA
Manufacturer:
Chal-Tec GmbH, Wallstrasse 16, 10179 Berlin, Germany.
Importer for Great Britain:
Berlin Brands Group UK Ltd
PO Box 1145
Oxford, OX1 9UW
United Kingdom
Hereby, Chal-Tec GmbH declares that the radio equipment type Karaoke Star is in compliance with Directive 2014/53/EU. The full text of the EU declaration of conformity is available at the following internet address: use.berlin/10032441
For Great Britain: Hereby, Chal-Tec GmbH declares that the radio equipment type Karaoke Star is in compliance with the relevant statutory requirements. The full text of the declaration of conformity is available at the following internet address: use.berlin/10032441
Cher client, chere clientele,
Berlin Brands Group UK Ltd
PO Box 1145
Oxford, OX1 9UW
United Kingdom
Berlin Brands Group UK Ltd
PO Box 1145
Oxford, OX1 9UW
United Kingdom