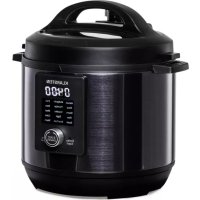
Quick Cook - Rice cooker Klarstein - Free user manual and instructions
Find the device manual for free Quick Cook Klarstein in PDF.


| Product type | Rice cooker / Multi-program pressure cooker |
| Brand | Klarstein |
| Model | Quick Cook |
| Article number | 10036468 |
| Power supply | 220-240 V ~ 50/60 Hz |
| Power | 1000 W |
| Capacity | 4.8 L |
| Cooking programs | 15 programs: Manual, Multigrain, Fish, Soup, Porridge, Stew, Beans, Noodles, Meat, Rice, Eggs, Cake, Sauté, Slow Cook, Warm |
| Delay start function | Yes, adjustable up to 24 hours |
| Keep warm function | Yes, up to 24 hours (recommended maximum 6 hours) |
| Pressure cooking | Yes (except Sauté, Slow Cook, Cake, Warm programs) |
| Depressurization methods | Natural (10-45 min) and quick |
| Inner pot material | Stainless steel (estimated) |
| Cleaning | Inner pot dishwasher safe; lid, gaskets, and valves hand washable |
| Safety | Pressure relief valve, float valve, safety lock, anti-blockage protection |
| Included accessories | Inner pot, lid, O-ring, pressure regulator, liquid collection container |
| Repairability | No user-serviceable parts |
| Maximum ambient temperature | 26 °C for delay start with perishable foods |
Frequently Asked Questions - Quick Cook Klarstein
User questions about Quick Cook Klarstein
0 question about this device. Answer the ones you know or ask your own.
Ask a new question about this device
Download the instructions for your Rice cooker in PDF format for free! Find your manual Quick Cook - Klarstein and take your electronic device back in hand. On this page are published all the documents necessary for the use of your device. Quick Cook by Klarstein.
USER MANUAL Quick Cook Klarstein
Unit 6 Riverside Business Centre
Brighton Road
Shoreham-by-Sea
BN43 6RE
United Kingdom
Dear Customer,
Congratulations on purchasing this device. Please read the following instructions carefully and follow them to prevent possible damages. We assume no liability for damage caused by disregard of the instructions and improper use. Scan the QR code to get access to the latest user manual and more product information

CONTENTS
Safety Instructions 22
Device Overview 24
Control Panel 26
Preset Cooking Programmes 27
Commissioning 29
Operation 31
Cooking Tips 35
Cleaning and Maintenance 36
Troubleshooting 37
Hints on Disposal 38
Producer 38
TECHNICAL DATA
| Item number 10036468 | |
| Power supply 220-240 V ~ 50/60 Hz | |
| Power consumption 1000 W | |
| Capacity 4.8 l |
SAFETY INSTRUCTIONS
- Read this entire manual before using the appliance, paying extra attention to these safety warnings and guidelines. Keep this manual in a safe place for future reference.
- The metal components on the top of the pressure cooker become very hot during cooking and can cause burns. Do not touch the metal components on the top of the pressure cooker during cooking and for at least 30 minutes after use.
- Intended for countertop use only.
- Food spillage can cause serious burns. Keep the appliance and the power cord away from children. Never let the cord hang down over the worktop. Never use a power socket under the worktop for the appliance. Do not use the appliance with an extension cord.
- Do not immerse the appliance in water for cleaning. If the appliance falls into water during use, never reach into the water to get the appliance out. Immediately disconnect the mains plug from the socket.
- Do not handle the appliance or the power cord with wet hands.
- Check the appliance and the power cord for visible damage before each use. Do not use the appliance if it is damaged.
- Do not expose the appliance to hot temperatures. Do not place the appliance or parts of the appliance near hot gas or electric cookers, on heated ovens or on hobs. Do not place it near heat sources such as fireplaces, heaters, etc. Do not expose it to direct sunlight.
- Use the appliance only in well-ventilated areas where steam and heat can escape and dissipate.
- Be careful not to expose your skin to escaping steam while using the appliance. The steam is very hot and can cause burns.
- Check the voltage specified on the rating plate before use. Only connect the appliance to sockets that match the voltage of the appliance.
- Unplug the appliance from the mains when it is not in use or when you want to clean it.
- Be careful not to damage the mains cable. The mains cable must not be kinked, pinched or knotted with other cables. Make sure that no one steps on the mains cable and ensure that the mains cable is laid in such a way that it cannot become a trip hazard.
- Always pull the mains plug out of the socket by the plug and not by the cable.
- Inspect and clean the pressure limit valve and release valve needle before use.
- Never open the lid when the float valve is up. This means that the inside of the pot is still under pressure.
- Do not touch the lid, the pressure limit valve or the float valve during use. Wait until the pot has cooled down completely before touching these parts.
- Do not move the pot by holding it only by the handle of the pot lid. Instead, use the handles on the sides of the pot.
- Take enormous care when moving the pot and there is still hot liquid in it.
-
Make sure there is a minimum of one cup of liquid in the pot to maintain pressure.
-
Before use, make sure that the pot lid is properly installed and seals properly. Never use the pressure cooker if the pot lid is not properly seated, except when using the Saute function.
- Do not open the pressure cooker until it has cooled down and the pressure inside the cooker has been released.
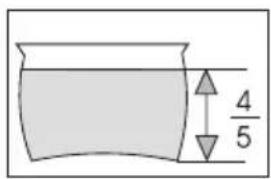
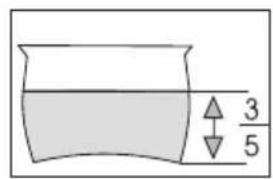
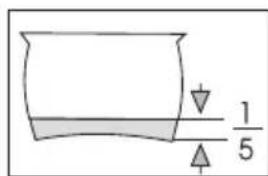
- Do not fill the pot with food and liquid higher than the 4/5 mark. For foods that expand during cooking, such as beans or rice, do not fill the pot higher than the 3/5 mark. The level of food and liquid must never be below the 1/5 mark when cooking with the pressure cooker.
- Only use the pot with the pot holder included in the delivery. Do not place the pot on a cooker or in an oven. Do not store the pot in the refrigerator.
- The maximum keep-warm time is 24 hours. However, it is recommended not to exceed a keep-warm time of 6 hours. The run time of the start timer can be set to a maximum of 24 hours.
- This appliance does not contain any user-serviceable components. Never attempt to repair or service the appliance yourself and do not make any modifications to the appliance.
- This appliance should only be operated by competent adults. Supervise children so that they do not play with the appliance.
DEVICE OVERVIEW
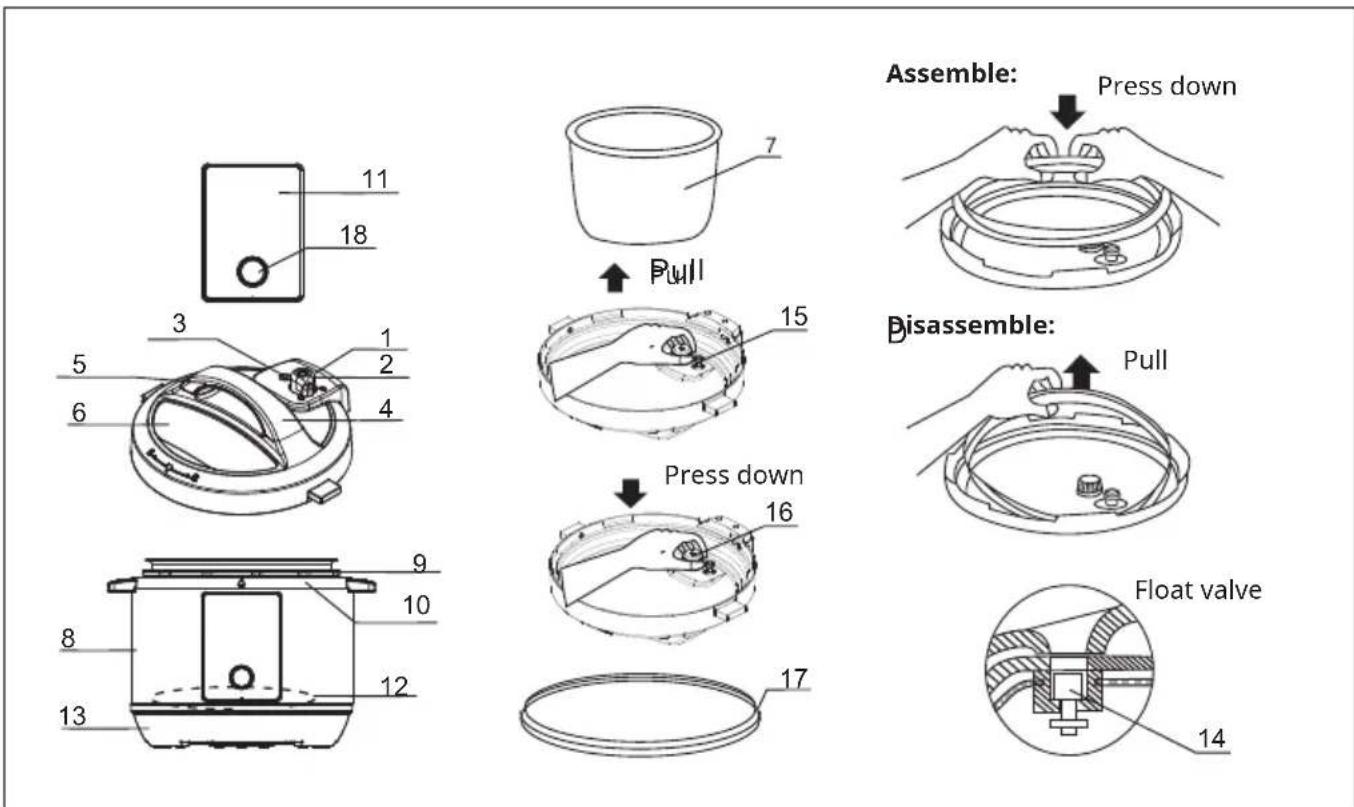
| 1 Pressure limit valve 10 Middle ring | ||
| 2 Release valve needle 11 Control panel | ||
| 3 Float valve 12 Heating plate | ||
| 4 Lid handle 13 Base | ||
| 5 Handle 14 Float | ||
| 6 Lid 15 Seal ring for float valve | ||
| 7 Inner pot 16 Anti-block shield | ||
| 8 Housing 17 Big seal ring | ||
| 9 Middle pot 18 Panel knob |
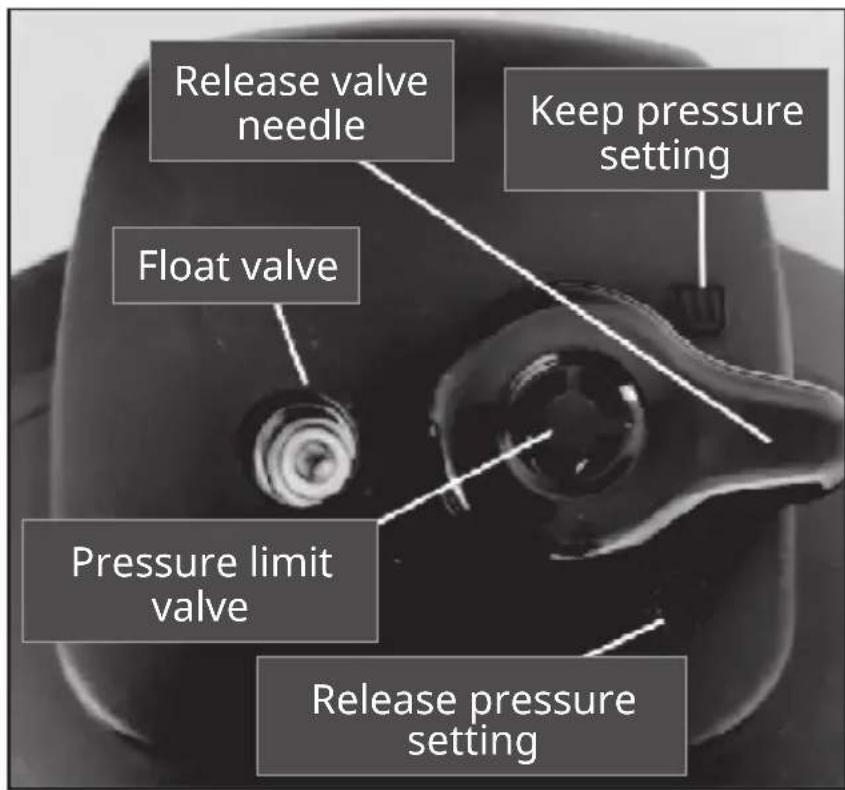
| Icon Function | |
| Keep pressure setting | |
| Release pressure setting | |
CONTROL PANEL
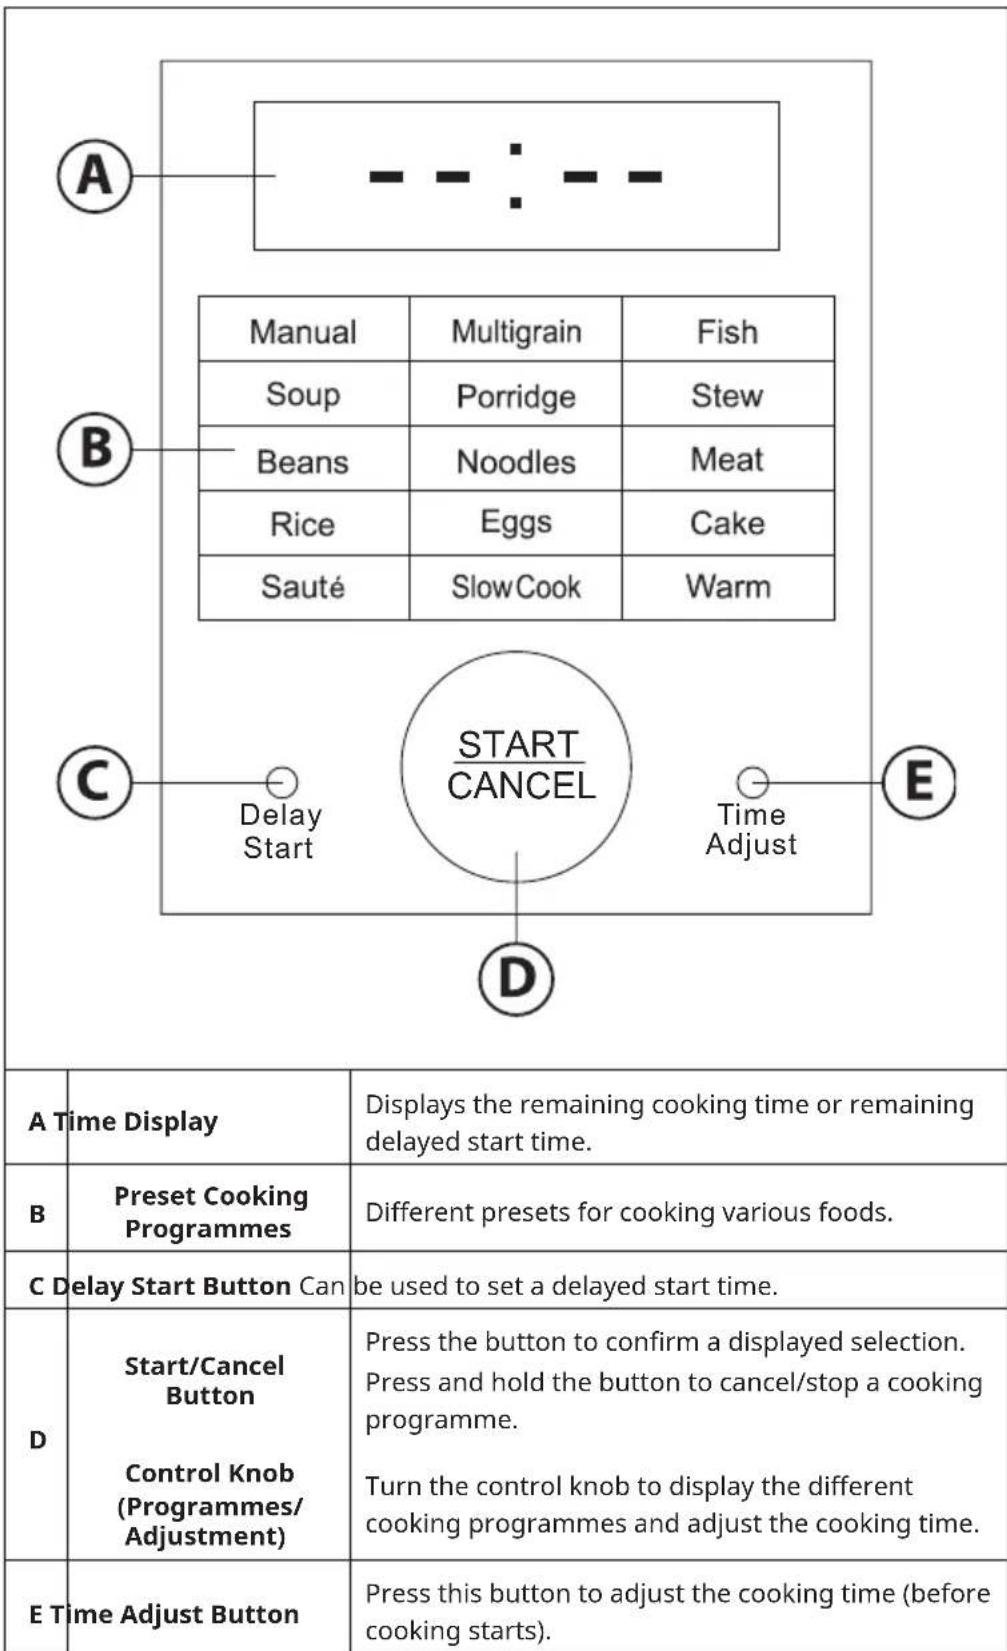
| Cooking programme | Default cooking time | Minimum cooking time | Maximum cooking time | Notes |
| Manual 1 minute 1 minute 99 minutes | Adjust the cooking time to suit the recipe. | |||
| Multigrain 15 minutes 8 minutes 30 minutes | Wild rice, brown rice, black rice, polenta, millet, mung beans. | |||
| Fish 5 minutes 5 minutes 15 minutes | Adjust the cooking time to the size of the fish. | |||
| Soup 20 Minutes 15 Minutes 40 minutes | Use longer cooking times for soups with meat. | |||
| Porridge 18 minutes 12 minutes 40 minutes | Do not use the Quick Pressure Release method to prevent splashing of thickened liquid. | |||
| Stew 35 minutes 25 minutes 45 minutes | A longer cooking time will soften the meat. | |||
| Beans 40 minutes 20 minutes 50 minutes | Black beans, pinto beans, navy beans, chickpeas, black-eyed peas. | |||
| Noodles | 5 minutes 3 minutes | 8 minutes | Cover dry pasta with water or broth. | |
| Meat 25 minutes 10 minutes 30 minutes | A longer cooking time will soften the meat. | |||
| Rice | 12 minutes 4 minutes | 25 minutes | Use the Quick Pressure Release method for white rice. | |
| Eggs (Hard/Soft Boiled) | 3 minutes | 1 minute | 8 minutes | Add 2 cups of water. After 3 minutes, the egg is hard-boiled. Choose a shorter cooking time for soft-boiled eggs. Choose a longer cooking time for harder-boiled eggs. |
| Cake 30 minutes 30 minutes 40 minutes | Adjust the cooking time to the recipe. (Cooking is done without pressure). | |||
| Sauté | 20 minutes 10 minutes 30 minutes | Do not attach the lid while using the Sauté programme. (Cooking is done without pressure). | ||
| Slow Cook | 4 hours 2 hours | 8 hours | Use just like a standard slow cooker. (Cooking is done without pressure). | |
| Warm N/A | N/A 24 hours | No cooking time needs to be set. The keep warm function can be used for up to 24 hours. After the cooking time has elapsed, all cooking programmes automatically switch to “Warm” mode. (Cooking is done without pressure). | ||
COMMISSIONING
Before First Use
- Read the entire manual, including all warnings.
- Remove all packaging material from the appliance.
- Clean the inner pot (7), the inside of the lid and all the accessories supplied with the appliance with a mild soap solution and a soft cloth.
Removing the Lid
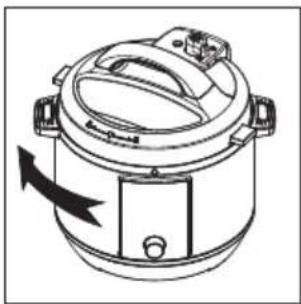
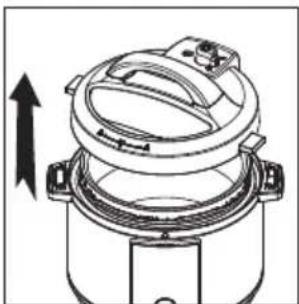
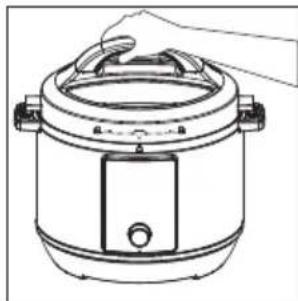
Grab the handle (5) and turn the lid (6) clockwise to unlock it. You can then carefully lift the lid off the base of the appliance.
Attaching the Lid
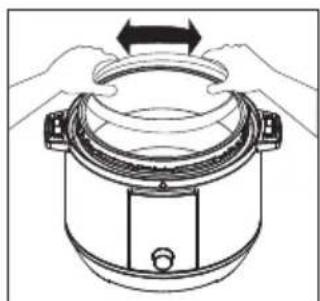
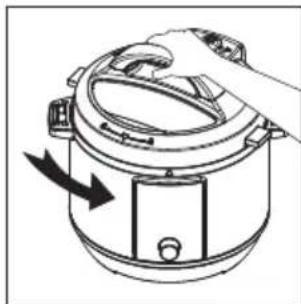
Grab the handle (5) and place the lid (6) on the top of the base. You may need to reposition the lid again so that it sits correctly on the base of the appliance. Once the lid is seated properly, turn it anticlockwise to lock it in place.
Preparing the pressure cooker
- Remove the inner pot (7) from the appliance housing.
- Fill the inner pot with food and liquid, depending on the recipe. Use enough food so that the inner pot is filled to at least the 1/5 mark inside the pot. For foods that expand during cooking, such as beans or rice, you should fill the pot to no more than the 3/5 mark. If you are cooking food that does not expand, fill the pot to a maximum of the 4/5 mark inside the pot.
- Ensure that the outside of the inner pot is clean. Then place it inside the appliance housing.
- Unless you are using the SAUTÉ programme, you must place the lid on the appliance housing, then turn it counterclockwise to lock it in place.
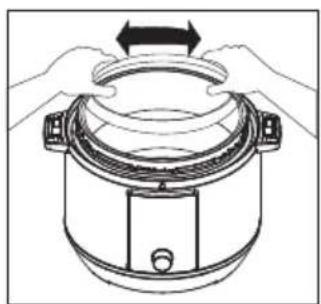
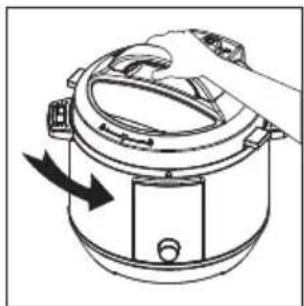
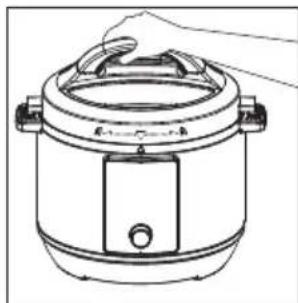
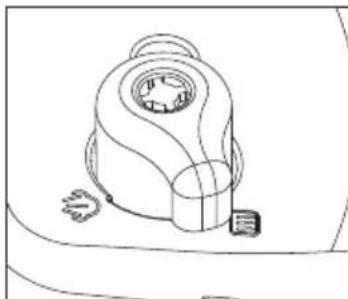
- Make sure the pressure limit valve (1) is in place with the needle pointing to the right. Make sure that the float valve (3) is in the down position. Turn the release valve needle (2) to the KEEP PRESSURE SETTING.
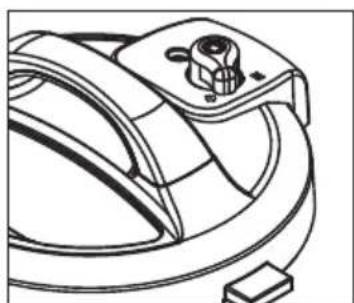
- Insert the mains plug of the appliance into a grounded socket. The control panel turns on. The control panel shows "----", which means the appliance is in standby mode.
OPERATION
Cooking with the Pressure Cooker
- Turn the pressure limit valve (1) to the KEEP PRESSURE SETTING
- Rotate the control knob (D). The control panel is unlocked and all available cooking programmes are displayed. The selected cooking programme flashes and the default cooking time is shown on the display. Continue rotating the control knob (D) until the desired cooking programme is selected.
- Press the TIME ADJUST button (E). The default cooking time flashes on the display. If you want to adjust the cooking time, keep rotating the control knob (D) until the desired cooking time appears on the display.
- Press the START/CANCEL button (D). The pressure cooker immediately starts to pressurizing process.
Note: The display will continue to show your selected time until the pressure cooker is pressurized. This takes a few minutes, depending on the amount of food and the cooking mode selected. Once the pressure cooker is pressurized the float valve (3) will rise to a higher position, and the timer will begin counting down from your selected time.
- Once the cooking time has elapsed, the appliance beeps and then automatically enters "WARM" mode. This keeps the food inside the appliance warm until you decide to release the pressure and remove the food. The maximum keep warm time is 24 hours. However, it is recommended that you do not exceed a keep-warm time of 6 hours to get the best possible taste from the food.
- Press and hold the START/CANCEL button (D) to exit the "WARM" mode and end the cooking process.
Cancelling or Stopping a cooking programme
- During programme setting, you may want to change your selection. To do so, press and hold the START/CANCEL (D) button.
- If you want to stop the cooking process, press and hold the START/CANCEL (D) button.
Pressure Release and Removing Cooked Food
When the cooking time has elapsed and you have exited the "WARM" mode, the cooking process is fi nished. Before you can unlock the lid, the pressure inside the pot must fi rst be released.

WARNING
Risk of explosion! Never try to open the lid by force. If the lid cannot be opened easily, it means that there is still pressure inside the pot. The pressure must be released before the lid can be opened. Before attempting to open the lid, always make sure that the float valve (3) has returned to the lower position first.
There are two methods of pressure release:
-
Natural Pressure Release: This is the default method for releasing pressure. No additional steps are required after exiting the "WARM" mode. With this method, the appliance cools down slowly while still in "WARM" mode and gradually releases the pressure on its own. This process may take a few minutes (usually between 10 and 45 minutes), depending on the amount of food inside the pot. During the natural pressure release, hot steam is slowly released through the openings in the pressure limit valve (1).
-
Quick Pressure Release: This method allows the pressure to be released more quickly. To do this, after exiting the "WARM" mode, turn the pressure limit valve (1) to the PRESSURE RELEASE SETTING.

CAUTION
Risk of burns! Hot steam is released directly through the openings in the pressure limit valve (1). Keep your hands and face away from the openings and use oven or rubber gloves to move the pressure limit valve (1) to avoid burns.
When the pressure cooker releases pressure, the fl oat valve (3) will begin to lower. As soon as all the pressure has been released, the fl oat valve (3) is back in the same low position as before the cooking process started. As soon as the fl oat valve (3) has lowered completely, the lid can be opened safely and the fi nished cooked food can be removed.
NOTE: For foods with a high liquid volume or starch content, the use of the Natural Pressure Release method is recommended. Using the Quick Pressure Release method in this case could cause liquid to spurt out of the openings of the pressure limit valve (1).
SAUTÉProgramme
Do not attach the lid during the SAUTÉ programme. This programme is used to saute or brown foods such as ground beef, ground turkey, etc. Use this programme as if you were using a frying pan on a stove or hot plate.
Put the food you want to cook in the inner pot. Then select the SAUTÉ programme on the control panel. Set the desired cooking time. Then press the START/CANCEL button (D) as described in the previous sections.
In this cooking programme the cooking is not done with pressure, so the steps for releasing pressure do not need to be followed here. When your food has finished cooking, simply press and hold the START/CANCEL button (D) to end the cooking process.
SLOW COOK Programme
With the SLOW COOK programme, food can be cooked as in a traditional slow cooker. This cooking programme does not use pressure to cook. When your food has finished cooking, simply press and hold the START/CANCEL button (D) to end the cooking process. Then remove the lid. The pressure release steps do not need to be followed for this cooking programme.
CAKEProgramme
With the CAKE programme, food can be cooked as in a traditional oven. This cooking programme does not use pressure to cook. Follow the steps described previously. When your food has finished cooking, simply press and hold the START/CANCEL button (D) to end the cooking process. Then remove the lid. The pressure release steps do not need to be followed for this cooking programme.
Cooking Using the Delayed Start Timer
You can use the start timer to set the start time of the cooking process in the future (up to 24 hours). To do this, proceed as described below.
Note: Perishable foods, such as meat, poultry, fish, cheese, dairy products, etc., must not be stored at room temperature for longer than 2 hours (no longer than one hour if the room temperature is more than 26^ ). When cooking these foods, the delayed start time should therefore be no later than a maximum of 1-2 hours in the future.
NOTE: No delayed start timer can be used in the CAKE and SAUTÉ programmes.
- Turn the pressure limit valve (1) to the KEEP PRESSURE SETTING
- Rotate the control knob (D). The control panel is unlocked and all available cooking programmes are displayed. The selected cooking programme flashes and the default cooking time is shown on the display. Continue rotating the control knob (D) until the desired cooking programme is selected.
- Press the TIME ADJUST button (E). The default cooking time flashes on the display. If you want to adjust the cooking time, continue rotating the control knob (D) until the desired cooking time appears on the display.
- Press the DELAY START button (C). The default time of 30 minutes flashes on the display. Rotate the control knob (D) to set the time until cooking starts. The delayed start timer can be adjusted in 30-minute increments.
- Press the START/CANCEL button (D). The display shows the time to start cooking and the countdown starts. Once the delayed time has elapsed the pressure cooker will immediately start the pressurizing process.
NOTE: After the delayed time has elapsed the time shown on the display will switch to your selected cooking time. It will continue to show your selected cooking time until the pressure cooker is pressurized. This process will take a few minutes depending on the type and amount of food being cooked as well as the chosen cooking programme. Once the pressure cooker is pressurized the float valve (3) will rise to a higher position. The timer starts counting down the set cooking time.
- As soon as the cooking time is up, the appliance beeps and then automatically goes into "WARM" mode. This keeps the cooked food warm in the appliance until you decide to release the pressure and take the food out. The maximum keep warm time is 24 hours. However, it is recommended not to exceed a keep warm time of 6 hours in order to preserve the best possible taste of the food.
- To exit the "WARM" mode and end the cooking process, press and hold the START/CANCEL button (D). After exiting the "WARM" mode, follow the previously mentioned instructions for releasing the pressure and removing the cooked food.
COOKING TIPS
- Use at least 2 cups of water or other liquid in your recipes. This will ensure that enough steam is produced to create the pressure needed for cooking.
- Fill the pot with food to at least the 1/5 mark inside the pot. For foods that expand during cooking, such as beans or rice, you should fill the pot to a maximum of the 3/5 mark. If you are cooking food that does not expand, fill the pot to a maximum of the 4/5 mark inside the pot.
- If you are unsure about the correct cooking time, it is always advisable to use a shorter cooking time or the default cooking time. Cook the food in the set time and, when the time is up, use the Quick Pressure Release method to release the pressure. If the food is not fully cooked, simply use another cooking programme until the food is fully cooked.
- Always rinse rice before cooking. Cook rice in water or broth. Different types of rice require different cooking times and a different rice to water ratio. The table below gives recommendations for cooking 1 cup of uncooked rice.
| Type of Rice Cooking Time (minutes) | Liquid (cups) | |
| White (long-grain) 4-5 1½ | ||
| White (short-grain) | 6-8 1½ | |
| Brown (long-grain) | 10-18 1½-2 | |
| Brown (short-grain) | 12-20 1½ | |
| Wild Rice 20-25 3-4 | ||
| Jasmine 4-7 1½ | ||
| Basmati 4-6 1½ | ||
CLEANING AND MAINTENANCE
Cleaning Instructions
Regular cleaning and maintenance of the appliance is essential to ensure product safety and effectiveness. Follow the steps below to ensure the best performance of the appliance:
- During cooking, excess liquid is collected in a small plastic reservoir attached to the back of the appliance. Empty this reservoir after each use. Pull out the plastic reservoir carefully to empty it.
- It can sometimes happen that small pieces of food get under the anti-block shield (16). The anti-block shield (16) is located on the underside of the lid directly below the pressure limit valve (1). Clean the anti-block shield (16) after each use with water and a dry, soft cloth.
- Check and clean the big seal ring (17) regularly. This is located on the underside of the lid. The big seal ring (17) is attached around a metal ring that is designed to hold the seal ring in place. You can remove the big seal ring (17) for cleaning by carefully pulling it off the metal ring. Clean the big seal ring (17) with water and a dry, soft cloth and then replace it by gently pressing it over the metal ring. Make sure that the big seal ring (17) is properly seated over the metal ring, otherwise the appliance will not be able to pressurize properly.
Cleaning

CAUTION
Risk of burns! Do not clean the appliance until it has cooled down completely. Allow the appliance to cool down for at least 30 minutes.
- Unplug the appliance from the mains before cleaning.
- Clean and dry the appliance after each use.
- Wipe the black inner housing rim and slots with a soft cloth and then dry everything to prevent rust.
- Remove the lid (6) and take out the inner pot (7). Clean the inner pot (7) with a mild soap solution and a soft cloth. The inner pot (7) can also be cleaned in the dishwasher.
- Clean the underside of the lid (6), including the big seal ring (17), the float valve (3) and the anti-block shield with a mild soap solution and a clean, damp cloth. Then dry all components with a soft cloth.
- Clean the appliance housing with a clean, damp cloth. Do not immerse the housing in water.
TROUBLESHOOTING
| Problem Possible Cause Solution | ||
| The lid is difficult to close. | The big seal ring (17) has not been installed properly. | Make sure that the big seal ring is properly seated and held in place by the metal ring on the underside of the lid. |
| The lid is difficult to open. | The pot is still under pressure. | Use the Quick Pressure Release method to release the pressure remaining in the pot. Make sure the float valve (3) is in the low position before attempting to open the lid. |
| Steam comes out of the lid. | The big seal ring (17) is uninstalled. | Install the big seal ring (17). |
| The big seal ring (17) is dirty and therefore does not seal completely. | Clean the big seal ring (17). | |
| The lid is unlocked. Lock the lid. | ||
| Steam comes out of the float valve. | The seal ring of the float valve (15) is dirty. | Clean the seal ring of the float valve (15). It is located around the float valve on the underside of the lid. |
DISPOSAL CONSIDERATIONS
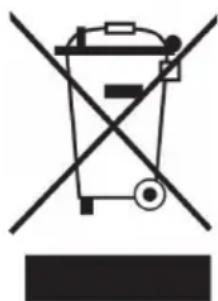
If there is a legal regulation for the disposal of electrical and electronic devices in your country, this symbol on the product or on the packaging indicates that this product must not be disposed of with household waste. Instead, it must be taken to a collection point for the recycling of electrical and electronic equipment. By disposing of it in accordance with the rules, you are protecting the environment and the health of your fellow human beings from negative consequences. For information about the recycling and disposal of this product, please contact your local authority or your household waste disposal service.
MANUFACTURER & IMPORTER (UK)
Manufacturer:
Chal-Tec GmbH, Wallstrasse 16, 10179 Berlin, Germany.
Importer for Great Britain:
Chal-Tec UK limited
Unit 6 Riverside Business Centre
Brighton Road
Shoreham-by-Sea
BN43 6RE
United Kingdom
Chere cliente, cher client,
Programme SLOW COOK (cuisson douce)
Unit 6 Riverside Business Centre
Brighton Road
Shoreham-by-Sea
BN43 6RE
United Kingdom
Estimado cliente:
Unit 6 Riverside Business Centre
Brighton Road
Shoreham-by-Sea
BN43 6RE
United Kingdom
Gentile Cliente,
PRODUTTORE E IMPORTATORE (UK)
Produtlore:
Chal-Tec GmbH, Wallstraße 16, 10179 Berlin, Germania.
Unit 6 Riverside Business Centre
Brighton Road
Shoreham-by-Sea
BN43 6RE
United Kingdom


KLARSTEIN


- Dear Customer,
- CONTENTS
- TECHNICAL DATA
- SAFETY INSTRUCTIONS
- DEVICE OVERVIEW
- CONTROL PANEL
- COMMISSIONING
- Before First Use
- Removing the Lid
- Attaching the Lid
- Preparing the pressure cooker
- OPERATION
- Cooking with the Pressure Cooker
- Cancelling or Stopping a cooking programme
- Pressure Release and Removing Cooked Food
- WARNING
- CAUTION
- SAUTÉProgramme
- SLOW COOK Programme
- CAKEProgramme
- Cooking Using the Delayed Start Timer
- COOKING TIPS
- CLEANING AND MAINTENANCE
- Cleaning Instructions
- Cleaning
- TROUBLESHOOTING
- DISPOSAL CONSIDERATIONS
- MANUFACTURER & IMPORTER (UK)
- Manufacturer:
- Importer for Great Britain:
- Programme SLOW COOK (cuisson douce)
- Estimado cliente:
- Gentile Cliente,
- PRODUTTORE E IMPORTATORE (UK)
- Produtlore:
Brand : Klarstein
Model : Quick Cook
Category : Rice cooker