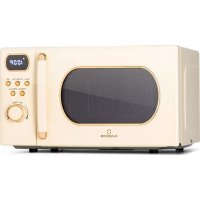
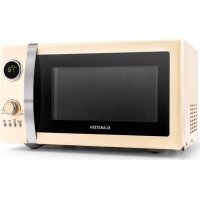
Luminance Prime - Microwave Oven Klarstein - Free user manual and instructions
Find the device manual for free Luminance Prime Klarstein in PDF.
| Product Type | Microwave with grill |
| Brand | Klarstein |
| Model | Luminance Prime |
| Article Number | 10012351 |
| Power Supply | 220-240 V ~ 50/60 Hz |
| Microwave Power | 800 W (estimated) |
| Grill Power | 1000 W (estimated) |
| Capacity | 25 L (estimated) |
| Main Functions | Microwave, Grill, Combi 1 (30% MO/70% Grill), Combi 2 (55% MO/45% Grill), Automatic Defrost, 9 Auto Cook programs, Quick Start |
| Control Type | Electronic with rotary and touch buttons |
| Display | Digital LED |
| Timer | Up to 60 minutes |
| Clock | 12h or 24h mode |
| Turntable | Yes, glass |
| Cooking Rack | Included |
| Safety | Child lock, automatic shutdown when door opened, protection against electric arcs |
| Care and Cleaning | Clean with a damp cloth after each use; do not use abrasive cleaners |
| Repairability | Do not open the casing; entrust repairs to a qualified professional |
| Supplied Accessories | Glass tray, rotating ring, cooking rack, instruction manual |
| Country of Manufacture | China (estimated) |
Frequently Asked Questions - Luminance Prime Klarstein
User questions about Luminance Prime Klarstein
0 question about this device. Answer the ones you know or ask your own.
Ask a new question about this device
Download the instructions for your Microwave Oven in PDF format for free! Find your manual Luminance Prime - Klarstein and take your electronic device back in hand. On this page are published all the documents necessary for the use of your device. Luminance Prime by Klarstein.
USER MANUAL Luminance Prime Klarstein
Unit 6 Riverside Business Centre
Brighton Road
Shoreham-by-Sea
BN43 6RE
United Kingdom
Dear Customer,
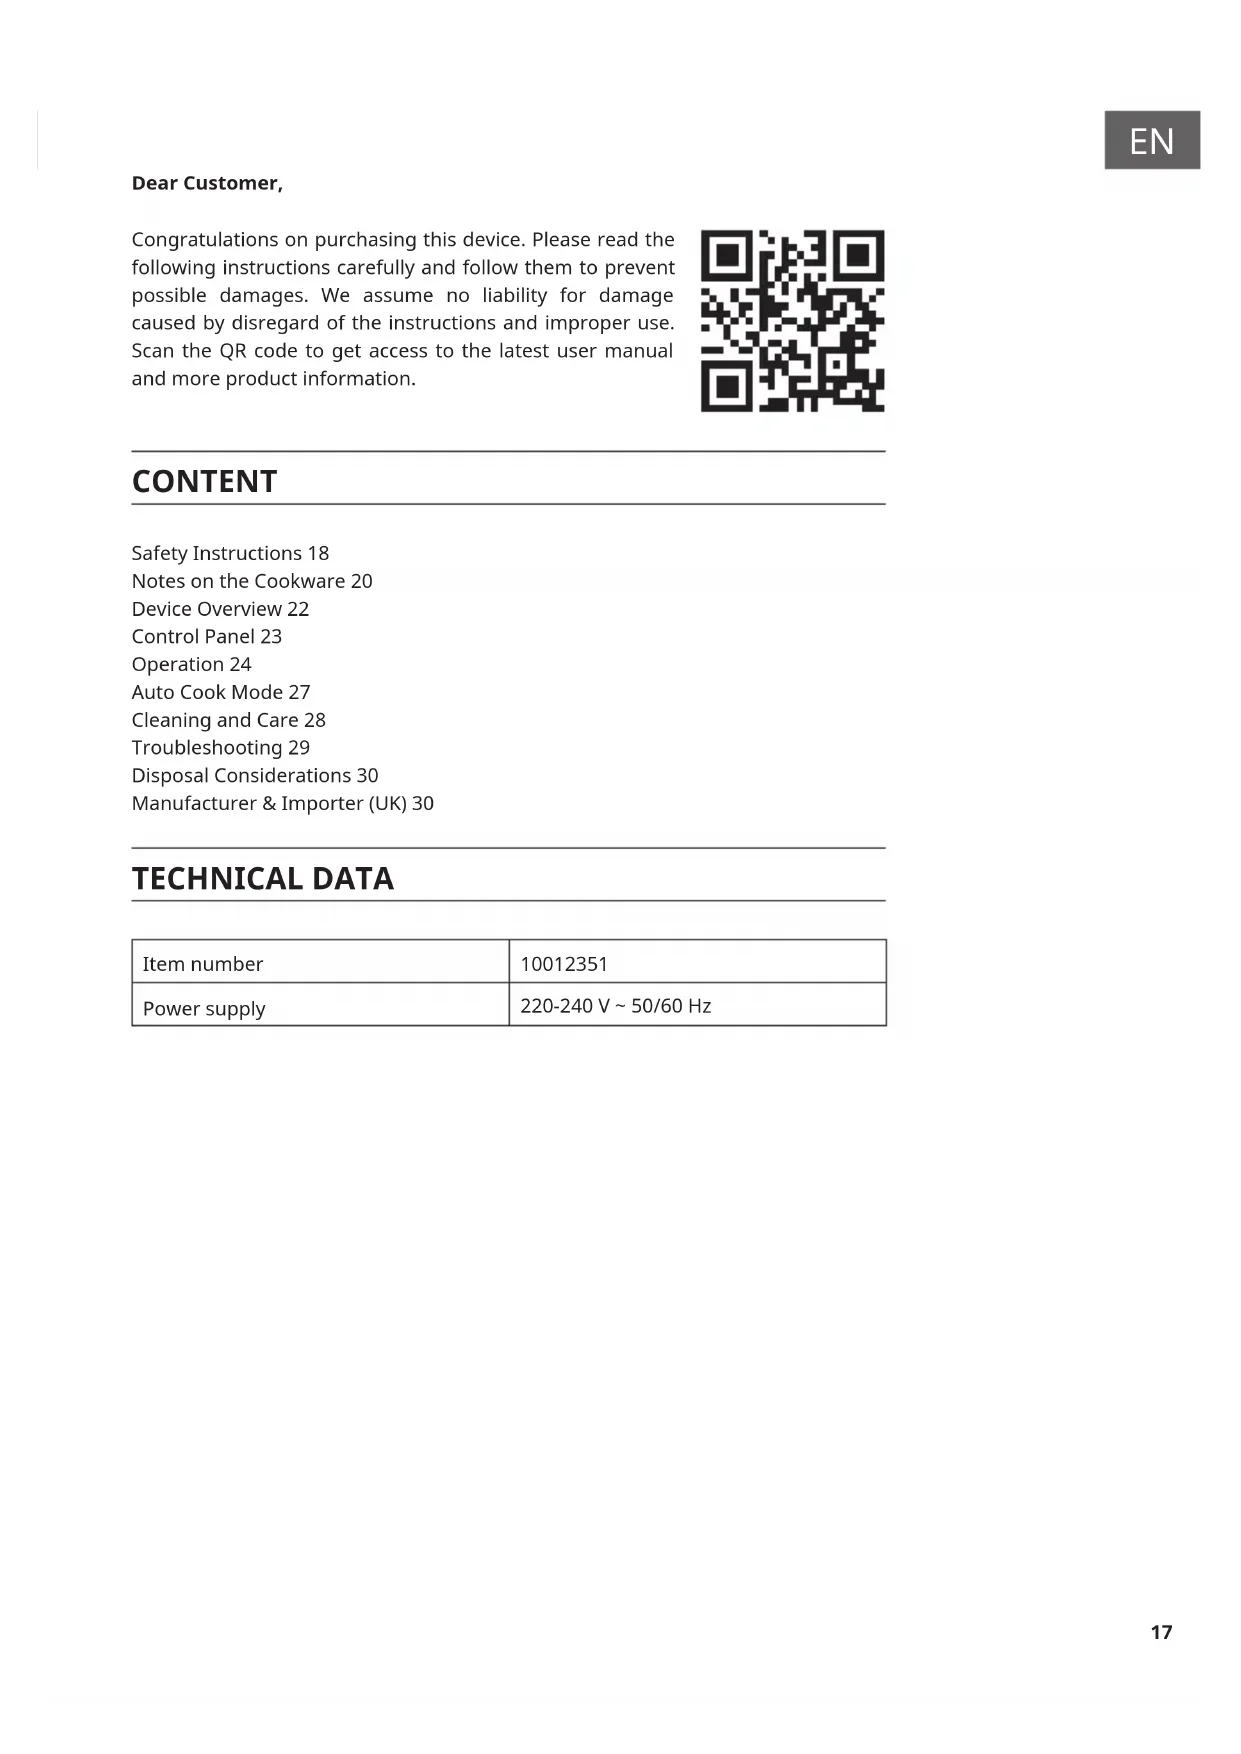
Congratulations on purchasing this device. Please read the following instructions carefully and follow them to prevent possible damages. We assume no liability for damage caused by disregard of the instructions and improper use. Scan the QR code to get access to the latest user manual and more product information.

CONTENT
Safety Instructions 18
Notes on the Cookware 20
Device Overview 22
Control Panel 23
Operation 24
Auto Cook Mode 27
Cleaning and Care 28
Troubleshooting 29
Disposal Considerations 30
Manufacturer & Importer (UK) 30
TECHNICAL DATA
| Item number | 10012351 |
| Power supply | 220-240 V ~ 50/60 Hz |
SAFETY INSTRUCTIONS
To reduce the risk of fire in the oven cavity:
- Do not overcook the food.
- Remove wire twist ties from paper or plastic bags before placing bags in the oven.
- Do not heat oil or fat for deep drying as the temperature of oil cannot be controlled.
- After use wipe the waveguide cover with a damp cloth, followed by dry cloth to remove any food splashes and grease.
Built up grease may overheat and begin to cause smoke or catch fire. - If materials inside the oven should smoke or ignite, keep oven door closed, turn oven off and disconnect the power supply.
- When heating food in plastic or paper containers, keep an eye on the oven due to the possibility of ignition.
To reduce the risk of explosion and sudden boiling:
- Liquids and other foods must not be heated in sealed container since they are liable to explode; Baby bottles fitted with a screw cap or teat are considered to be sealed containers.
- Use the wide mouthed container to cook liquid, and the cooked liquid should not be removed out immediately. Several moments should be waited before removing. In order to avoid possible hazards caused by delayed eruptive boiling of liquids.
- Potatoes, sausage and chestnut should be peeled or pierced before cooking. Eggs in their shell, whole hard boiled eggs should not be heated in microwave ovens since they may explode, even after microwave heating has ended.
- The contents of feeding bottles and baby food jars are to be stirred or shaken and the temperature is to be checked before consumption, in order to avoid burns.
- If the supply cord is damaged, it must be replaced by the manufacturer or its service agent or a qualified technician in order to avoid a shock hazard.
- After cooking, the container is very hot. Using gloves to take out the food and avoid steam burns by directing steam away from the face and hands.
- Slowly lift the furthest edge of dishes cover and microwave plastic wrap and carefully open popcorn and oven cooking bags away from the face.
To prevent the turntable from breaking:
- Let the turntable cool down before cleaning.
- Do not place hot foods or utensils on the cold turntable.
- Do not place frozen foods or utensils on the hot turntable.
General Instructions
- Make sure that the cookware does not touch the walls of the microwave.
- Only use containers that are suitable for microwave ovens.
- Do not store food or other items in the microwave.
- Do not use the microwave without contents, otherwise it may be damaged.
- If you use the microwave, do not leave it unattended in the presence of children.
- Only use accessories specified by the manufacturer.
- Only use the microwave indoors.
- If the door or seals are damaged, do not continue to use the microwave, have it repaired by a specialist company.
- Do not attempt to repair the appliance yourself. Repairs may only be carried out by trained specialists.
- If smoke is generated, pull the plug and keep the microwave door closed to prevent possible flames.
- Heating liquids may result in sudden boiling. Be careful when removing the container.
- Do not use abrasives or metal scrapers to clean the door to avoid scratching or shattering the glass.
- Do not use the unit with an external timer or remote-controlled power outlet.
- The unit is not intended for commercial use, but only for household and similar environments.
- The appliance is designed to heat food and beverages. Heating clothes, slippers, heat pads, and sponges may cause injury, fire, or fire.
- This device may be only used by children 8 years old or older and persons with limited physical, sensory and mental capabilities and / or lack of experience and knowledge, provided that they have been instructed in use of the device by a responsible person who understands the associated risks.
- Do not use a steam jet for cleaning.
- Do not touch any parts of the appliance, door or heating elements inside during operation, they can become very hot.
NOTES ON THE COOKWARE
Cookware suitable for microwave ovens
| Cookware Note | |
| Grill tray Follow the | instructions of the respective manufacturer. The underside of the grill tray must be at least 5 mm above the rotary plate. Incorrect use may cause the rotary plate to break. |
| Dinnerware Follow | the manufacturer's instructions and use only microwaveable dishes. Do not put cracked or splintered dishes in the microwave. |
| Glass jugs Always | remove the lid. Only use it until the food it contains is slightly warm. Most glass jugs are not heat-resistant and may break. |
| Glassware Only use | heat-resistant glassware. Make sure that they do not have a metal frame. Do not put damaged glassware in the microwave. |
| Cooking bag Follow | the manufacturer's instructions. Do not close the cooking bag with a metal clip. Leave the cook-in-bag open a little bit to allow the steam to escape. |
| Paper plates and paper cups | Use them only for short warming up. Never leave the microwave unattended during this time. |
| Paper towels Use it | to cover food that is being heated and to absorb fat. Use only for short heating and never leave the microwave unattended during this time. |
| parchment paper | Use it as a splash guard or as a cover when steaming. |
Cookware not suitable for microwave ovens
| Cookware Note | |
| Plastic Only use microwaveable plastic and follow the instructions of the respective manufacturer. The symbol "Suitable for microwave" should be printed on the respective utensil. Some plastic containers become soft when food inside becomes hot. Cooking bags and tightly closed plastic bags should be cut, punctured or ventilated as indicated on the packaging to allow steam to escape. | |
| Plastic foil Only use microwaveable plastic foil. Cover the food with it during heating to maintain moisture. Make sure that the foil does not touch the food. | |
| Thermometer Only use microwaveable cooking thermometers. | |
| Waxed paper Cover the food to protect it from splashing and to retain its moisture. | |
| Cookware Note | |
| Aluminium shell May cause arcing. Place the food in a container suitable for microwave ovens. | |
| Package with metal handle | May cause arcing. Place the food in a container suitable for microwave. |
| Metallic or metal-coated utensils | Metal shields the food from microwave energy. Metallic shielding can cause arcing. |
| Metal closure May cause arcing and could cause a microwave fire. | |
| Paper bags May cause a fire in the microwave oven. | |
| Foam Foam may melt or contaminate the liquid inside when exposed to high temperatures. | |
| Wood Wood dries out when used in the microwave and may splinter or burst. | |
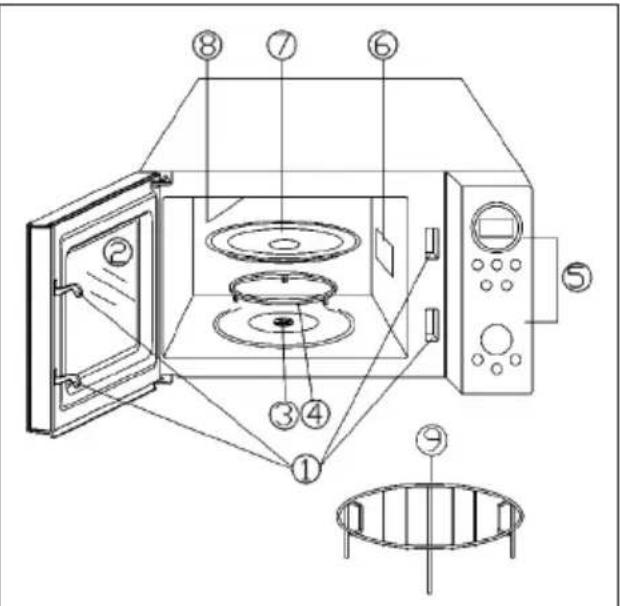
DEVICE OVERVIEW
1 Door Safety Lock System
2 Oven Window
3 Shaft
4 Roller Ring
5 Control Panel
6 Wave Guide
7 Glass Tray
8 Grill Heater
9 Metal Rack
- Menu Action Screen: Cooking time, power, action indicators, and clock time are displayed.
- Level: Touch this button a number of times to set microwave cooking power level.
- Clock: Start setting the oven clock and ending by touching it again.
- Wei.Adj.: After choosing an auto-cooking menu, use it to specify food weights or number of servings.
- Grill: Set a grill-cooking program.
- Combi.1/Combi.2: Cooking with combined microwave and grill power.
- Menu/Time: Turn the dial to set the oven clock time and input cooking time. Turn the dial to select an auto cook menu.
- Start/Quick Start: Touch to start a cooking program. Simply touch it a number of times to set cooking time and cook immediately at full power level.
- Stop/Cancel: Press to cancel setting or reset the oven before setting a cooking program. Press once to temporarily stop cooking, or twice to cancel cooking altogether. It is also used for setting child lock.

OPERATION
Note: Each time a button is touched, a beep will sound to acknowledge the touch.
Setting Clock Time
The clock works in 12- or 24-hour cycle, just press the CLOCK button to select. Suppose you want to set the oven clock time to 8:30.
1 In standby mode, press CLOCK button once or twice to set the clock in 12- or 24-hour cycle.
2 Turn the MENU/TIME dial to set 8 o'clock.
3 Press the CLOCK button.
4 Turn the MENU/TIME dial to set 30 min.
5 Press the CLOCK to confirm the setting.
Note: You can check the clock time during cooking by pressing CLOCK button.
Microwave Cooking
For microwave cooking, the longest cooking time is 60 minutes. You can select power level by pressing the POWER LEVEL button.
| Press Power Level Power | |
| 1 time 100 % | |
| 2 times 80 % | |
| 3 times 60 % | |
| 4 times 40 % | |
| 5 times 20 % | |
| 6 times 0 % |
For example, suppose you want to cook for 1 minute at 60% of microwave power.
1 In standby mode, press the POWER LEVEL button repeatedly to select cooking power.
2 Turn the MENU/TIME dial to 1:00.
3 Press START/QUICK START button.
Note: You can check the cooking power during cooking by pressing the POWER LEVEL button.
Grill
The longest cooking time is 60 minutes. The grill cooking is particularly useful for thin slices of meat, steaks, chops, kebabs, sausages of piece of chicken. It is also suitable for hot sandwiches and au gratin dishes. For example, suppose you want to grill for 12 minutes:
1 In standby mode, press the GRILL button.
2 Turn the MENU/TIME dial to 12:00.
3 Press START/QUICK START button.
Combination 1
The longest cooking time is 60 minutes. 30% of time for microwave cooking, 70% for grill cooking. Use for fish or au gratin. Suppose you want to set combination 1 cooking for 25 minutes:
1 In standby mode, press the COMBI.1 button.
2 Turn the MENU/TIME dial to 25:00.
3 Press the START/QUICK START button.
Combination 2
The longest cooking time is 60 minutes. 55% of time for microwave cooking, 45% for grill cooking. Use for puddings omelettes, baked potatoes and poultry. Suppose you want to set combination 2 cooking for 12 minutes:
1 In standby mode, press the COMBI.2 button.
2 Turn the MENU/TIME dial to 12:00.
3 Press the START/QUICK START button.
Quick Start
The oven will operate at 100% power output for Quick Start program. The longest cooking time is 10 minutes. In standby mode, press the START/QUICK START button a number of times to set cooking time, the oven starts working automatically at full power.
Auto Defrost
The oven can be used to defrost food based on the weight you entered. The defrosting time and power level are automatically set once the food category and the weight are programmed. The frozen food weight ranges from 100 g to 1800 g. Suppose you want to defrost 600 g of shrimp:
1 In standby mode, turn the MENU/TIME dial counterclockwise to select "10".
2 Press the WEIGHT ADJUST button repeatedly to indicate weight 600g
3 Press START/QUICK START button.
Note: The oven will pause and signal during defrosting process to remind user to turn over food.
Child Lock
The child lock prevents unsupervised operation by children.
- To set the child lock: In standby mode, without any operation within one minutes the oven will enter child lock mode. In the lock state, the oven can't be operated.
- To cancel the child lock: In child lock mode, open or close the oven door can cancel the program.
AUTO COOK MODE
For the following foods or cooking operation, you do not need to input cooking power and time. Try to focus on telling the oven what you want to cook and how much the food weighs. Steps:
1 In standby mode, turn the MENU/TIME dial counterclockwise to select food code.
2. Press the WEIGHT ADJUST button a number of times to indicate food weight or number of servings.
3 Press the START/QUICK START button.
| Code Program Notes | |
| 1 Milk/Coffee (200 ml) | 1 The result of automatic cooking depends on factors such as the shape and size of food, your personal preference for the cooking point and even on the successful placement of the food in the oven. If you find the result at any rate not quite satisfactory, please adjust the cooking time a little bit accordingly.2 For milk/coffee and potato, parameters on display are not weight but number of servings.3 For chicken, beef/mutton and steaks, the oven pauses and beeps during cooking to remind you to turn food over for uniform cooking. |
| 2 Rice(g) | |
| 3 Spaghetti(g) | |
| 4 Potato(each 230 g) | |
| 5 AutoReheat(g) | |
| 6 Fish(g) | |
| 7 Chicken(g) | |
| 8 Beef/Mutton(g) | |
| 9 Skewered Meat(g) |
CLEANING AND CARE
- The oven should be cleaned regularly and any food deposits removed.
- Remove the power cord from the wall outlet before cleaning. Don't immerse the appliance in water or other fluids when cleaning.
- Failure to maintain the oven in a clean condition could lead to deterioration of the surface that could adversely affect the life of the appliance and possibly result in a hazardous situation
- Never use hard detergent, gasoline, abrasive powder or metal brush to clean any part of the appliance
- Do not remove the waveguide cover
How get rid of strange odors
When the microwave oven has been used for a long time, there may be some strange odors exist in oven, Following 3 methods can get rid of them:
- Place several lemon slices in a cup, then heat with high Micro Power for 2-3 min.
- Place a cup of red tea in oven, then heat with high micro power.
- Put some orange peel into oven, and then heat them with high Micro Power for 1 minute.
Tips for Cleaning
| Exterior Wipe the enclosure with a dampened soft cloth |
| Door Using a dampenedsoft cloth, wipe clean the door andwindow Wipe the door seals and adjacent parts toremove any spill or spatter. |
| Control panel Wipe thecontrol panel with a slightly dampened softcloth. |
| Interior walls Wipe cleanthe cavity with a dampened soft cloth.Wipe clean the waveguide cover to remove any foodsplashed |
| Turntable, rotationring and rotationaxisWash with mild soap water. Rinse with clean water andallow drying thoroughly. |
TROUBLESHOOTING
| Problem Possible cause | Solution approach | |
| The device cannot be started. | The power plug is not properly plugged into the socket. | Pull the power plug completely out of the socket. Wait 10 seconds and plug it back in. |
| The fuse is out or the circuit breaker has tripped. | Contact customer service to replace the fuse or reset the circuit breaker. | |
| The power outlet is not working. | Test whether other equipment works when plugged into the same power outlet. | |
| The device does not heat. | The microwave door is not closed properly. | Close the door. |
| The appliance is overheating or the microwave generator is broken. | The appliance was started without food inside. | Never start the appliance without food inside, this may damage the appliance. |
DISPOSAL CONSIDERATIONS
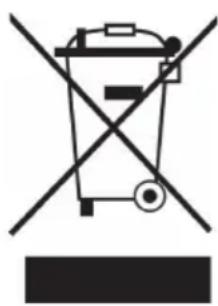
If there is a legal regulation for the disposal of electrical and electronic devices in your country, this symbol on the product or on the packaging indicates that this product must not be disposed of with household waste. Instead, it must be taken to a collection point for the recycling of electrical and electronic equipment. By disposing of it in accordance with the rules, you are protecting the environment and the health of your fellow human beings from negative consequences. For information about the recycling and disposal of this product, please contact your local authority or your household waste disposal service.
MANUFACTURER & IMPORTER (UK)
Manufacturer:
Chal-Tec GmbH, Wallstrasse 16, 10179 Berlin, Germany.
Importer for Great Britain:
Chal-Tec UK limited
Unit 6 Riverside Business Centre
Brighton Road
Shoreham-by-Sea
BN43 6RE
United Kingdom
Estimado cliente:
Unit 6 Riverside Business Centre
Brighton Road
Shoreham-by-Sea
BN43 6RE
United Kingdom
Chere cliente, cher client,
Unit 6 Riverside Business Centre
Brighton Road
Shoreham-by-Sea
BN43 6RE
United Kingdom
Gentile clientele,
PRODUTTORE E IMPORTATORE (UK)
Produtlore:
Chal-Tec GmbH, Wallstraße 16, 10179 Berlin, Germania.
Unit 6 Riverside Business Centre
Brighton Road
Shoreham-by-Sea
BN43 6RE
United Kingdom


KLARSTEIN