
GrandeGusto - Coffee machine Klarstein - Free user manual and instructions
Find the device manual for free GrandeGusto Klarstein in PDF.

| Product type | Filter coffee machine |
| Brand | Klarstein |
| Model | GrandeGusto |
| Article numbers | 10033088, 10033089 |
| Power supply | 220-240 V ~ 50/60 Hz |
| Maximum capacity | 8 cups (1200 ml) |
| Filter type | V-type filter size 4 (paper) |
| Recommended coffee amount | 6 to 9 g per cup (1 teaspoon) |
| Special features | Pre-infusion, keep warm (38 min), auto shut-off |
| Housing material | Plastic |
| Carafe material | Glass |
| Hot plate | Yes, keep warm |
| Descaling | Every 2 months with descaler or vinegar |
| Safety | Auto shut-off after 38 min, hot surface indicator |
| Intended use | Household, ground coffee |
| Cable length | Approx. 0.8 m (estimate) |
Frequently Asked Questions - GrandeGusto Klarstein
User questions about GrandeGusto Klarstein
0 question about this device. Answer the ones you know or ask your own.
Ask a new question about this device
Download the instructions for your Coffee machine in PDF format for free! Find your manual GrandeGusto - Klarstein and take your electronic device back in hand. On this page are published all the documents necessary for the use of your device. GrandeGusto by Klarstein.
USER MANUAL GrandeGusto Klarstein
INHALTSVERZEICHNIS
natural_image
Line drawing of a coffee maker with a side view showing a tray and a cylindrical container (no text or symbols)
natural_image
Technical line drawing of a coffee maker with directional arrows indicating flow or movement (no text or symbols present)
natural_image
Line drawing of a mechanical device with no visible text or symbolsnatural_image
Symbol of a trash bin crossed with a diagonal line, no text or numbers presentCongratulations on purchasing this equipment. Please read this manual carefully and take care of the following hints to avoid damages. Any failure caused by ignoring the items and cautions mentioned in the instruction manual is not covered by our warranty and any liability. Scan the QR code to get access to the latest user manual and other information about the product

CONTENT
Safety Instructions 12
Product Overview 13
Operation 14
Cleaning and Care 16
Troubleshooting 17
Hints on Disposal 18
TECHNICAL DATA
| Item number 10033088, 10033089 | |
| Power supply 220-240 V ~ 50/60 Hz |
DECLARATION OF CONFORMITY

Producer:
Chal-Tec GmbH, Wallstraße 16, 10179 Berlin, Germany.
This product is conform to the following European Directives:
2014/30/EU (EMC)
2014/35/EU (LVD)
2011/65/EU (RoHS)
SAFETY INSTRUCTIONS
- Read all the safety and operating instructions and retain them for future reference.
- The appliance is designed exclusively for private use and for the envisaged purpose. This appliance is not fit for commercial use.
- Don't use it outdoors. Keep it away from sources of heat, direct sunlight, humidity (never dip it into any liquid) and sharp edges. Do not use the appliance with wet hands. If the appliance is humid or wet, unplug it immediately.
- When cleaning or putting it away, switch off the appliance and always pull out the plug from the socket (pull the plug itself, not the lead) if the appliance is not being used and remove the attached accessories.
- Do not operate the machine without supervision Never leave the operating machine unattended. If you leave the room you should always turn the device off. Remove the plug from the socket.
- The device and the mains lead have to be regularly checked regularly for signs of damage. If damage is found the device must not be used.
- Do not try to repair the appliance on your own. Always contact an authorized technician. To avoid the exposure to danger, always have faulty cable be replaced only by the manufacturer, by our customer service or by qualified person and with a cable for the same type.
- In order to ensure your children's safety, please keep all packaging (plastic bags, boxes, polystyrene etc.) out of their reach.
- This device is not intended to be used by individuals (including children) who have restricted physical, sensory or mental abilities and/or insufficient knowledge and/or experience, unless they are supervised by and individual who is responsible for their safety or and have received instructions on how to use the device. Children should be supervised at all times in order to ensure that they do not play with device.
- Place the coffee machine on a firm and fl at surface. Position it so that it cannot tip over.
- Never apply accessory attachments which are not specified for this appliance.
- Do not touch hot parts of appliance.
- Do not place the device directly next to a gas or electric cooker or any other source of heat.
- The water tank must only be filled with cold water! Never open the filter cover during the boiling process, as otherwise this may cause burns.
- The appliance is only to be used as described in this user manual.
- Do not use the appliance for any commercial purposes.
- Any other use is not intended and can result in damages or personal injuries.
- The manufacturer assumes no liability for damages caused by improper use.
- This appliance is not intended for use by persons(including children) with reduced physical, sensory or mental capabilities, or lack of experience and knowledge, unless they have been given supervision or instruction concerning use of the appliance by a person responsible for their safety. Children should be supervised to ensure that they do not play with the appliance.
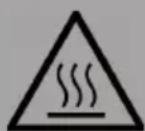
CAUTION
Danger of burns! To avoid burns, do not touch the surfaces during operation. The hot plate in particular can remain very hot for a long time during operation and even after switching off.
PRODUCT OVERVIEW
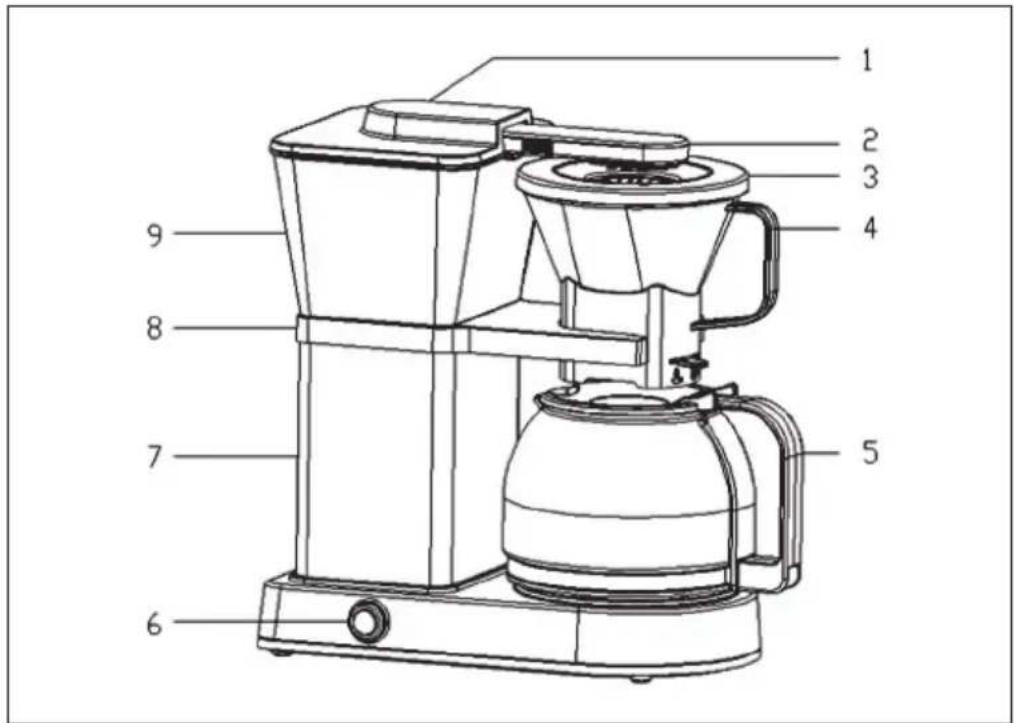
| 1 | Water tank lid | 6 | On/Off switch |
| 2 | Spray arm | 7 | Main body |
| 3 | Filter basket lid | 8 | Filter basket switch |
| 4 | Filter basket | 9 | Water tank |
| 5 | Glass carafe |
OPERATION
Before the first operation
- Remove all packaging materials, labels and stickers from the coffee machine.
- Clean the unit by filling the water tank with clear, cold water to the MAX mark. Switch on the coffee machine and let the water run through.
- Allow the unit to cool for 5 minutes before repeating the procedure. Run water at least 2 times before boiling coffee.
Initial operation
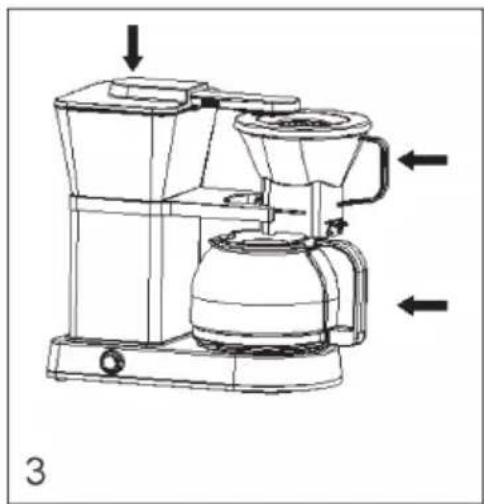
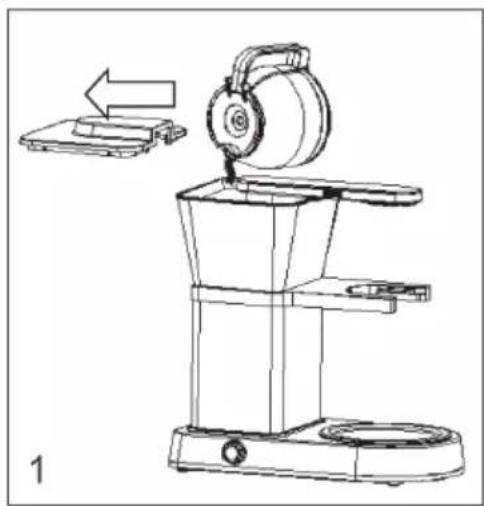
- Take the decanter out of the coffee machine, open the lid of the water tank and fill in the desired amount of cold water. Do not fill more than 8 cups (150 ml per cup).
- Place a type 4 V filter in the filter basket and add ground coffee to the filter. We recommend 6-9 grams of ground coffee per cup (about 1 level spoon of coffee per cup). Place the cover on the filter basket.
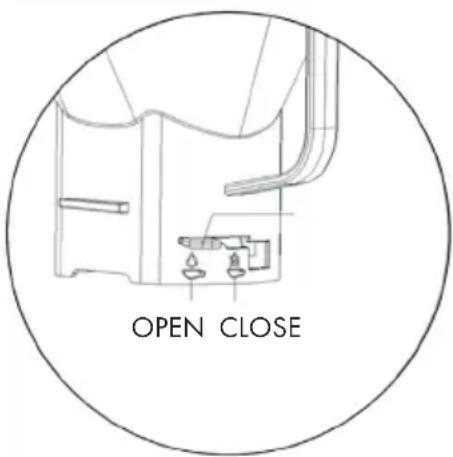
Note: Make sure that the switch on the filter basket is in the OPEN position so that the coffee does not overflow when brewing.
- Put on the water tank cover. Slide the filter basket into the holder and place the glass decanter on the hot plate.
- Plug the plug into the power outlet and press the On/Off switch (see Fig. 4). The red LED lights up and indicates that the coffee is being brewed. Do not remove the glass carafe during the brewing process. If you need to remove the decanter, turn the machine off and set the switch on the filter basket to CLOSE so that the coffee does not continue to run. Replace the glass decanter, set the switch to OPEN and press the On/Off switch to continue brewing.
natural_image
Line drawing of a coffee maker with a side view showing a tray and a cylindrical container (no text or symbols)

natural_image
Technical line drawing of a coffee maker with directional arrows indicating flow or movement (no text or symbols)
natural_image
Line drawing of a mechanical device with no visible text or symbols- When the brewing process is complete, a double alarm sounds. The machine automatically keeps the coffee warm for 38 minutes. Press the off button to stop the warm-up function and turn the unit off. Take out the decanter and enjoy it immediately.
Note: The unit can be switched off manually at any time using the On/Off switch. Remove the funnel after each brewing operation and dispose of the coffee powder and the filter. Clean the funnel and let it dry.
Pre-brew function
Freshly roasted coffee has more CO2 in the bean. If you want to cook with freshly roasted coffee or pre-brew the coffee, press and hold the On/Off switch for 5 seconds. The red LED flashes and indicates that you have activated the pre-brewing function. Press the power button again to start brewing. You can deactivate the pre-brewing function at any time by pressing the on/off switch until the red LED flashes.
CLEANING AND CARE
- Clean the unit after each use.
• Always unplug the power cord before cleaning. - Never immerse the housing in water or other liquids.
- Disconnect the coffee machine from the power supply and allow it to cool completely before cleaning.
- Clean the housing surface with a soft, damp cloth.
- Do not clean the hot plate with abrasive cleaner or steel wool.
- Descale the machine every two months with a commercially available descaler or a water-vinegar mixture. Fill the water tank with the mixture and let the mixture run through the machine once. Fill the tank with fresh, clean water up to the MAX mark and let the water run through as well.
- Clean the glass carafe and funnel with water and dry both parts carefully.
- Remove the spray arm and clean it as well.
TROUBLESHOOTING
| Problem Possible Cause Suggested Solution | ||
| Coffee runs over The switch | on the filter holder is set to CLOSE. | Slide the switch to the OPEN position. |
| Ground coffee clogs the outgoing of the funnel. | Clean the funnel. | |
| The ground coffee is so fine that block up the funnel. | Replace the current ground coffee. | |
| The unit is not running. The p | power cord is not plugged properly. | Plug the power word properly |
| Failure inside the appliance | Contacting professional services. | |
| There is little or no coffee dripping into the carafe. | No water in water tank. Fill in the tank with appropriate volume of water. | |
| Funnel clogs. Clean the funnel. | ||
| Ground coffee is too fine or compacted. | Use ground coffee less fine than the current one. Or avoid compacting. | |
| Coffee runs too fast. The ground coffee is too rough. | Replace it with a more fine one. We recommend ground coffee properly grounded. | |
HINTS ON DISPOSAL
natural_image
Symbol of a trash bin crossed with a diagonal line, no text or numbers presentAccording to the European waste regulation 2012/19/EU this symbol on the product or on its packaging indicates that this product may not be treated as household waste. Instead it should be taken to the appropriate collection point for the recycling of electrical and electronic equipment. By ensuring this product is disposed of correctly, you will help prevent potential negative consequences for the environment and human health, which could otherwise be caused by inappropriate waste handling of this product. For more detailed information about recycling of this product, please contact your local council or your household waste disposal service.
Estimado cliente:
ÍNDICE DE CONTENIDOS
natural_image
Line drawing of a coffee maker with a side view showing a tray and a cylindrical container (no text or symbols)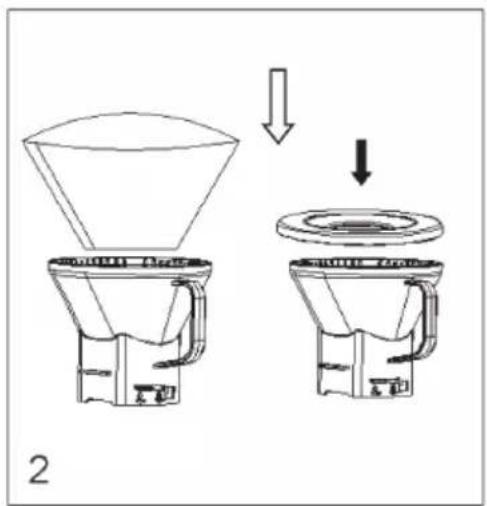

natural_image
Technical line drawing of a coffee maker with directional arrows indicating flow or movement (no text or symbols)
natural_image
Line drawing of a mechanical device with no visible text or symbolsnatural_image
Symbol of a trash bin crossed with a diagonal line, representing no waste or discharge (no text or labels)SOMMAIRE
DÉCLARATION DE CONFORMITÉ

Fabricant :
Chal-Tec GmbH, Wallstraße 16, 10179 Berlin, Allemagne.
natural_image
Line drawing of a coffee maker with a side view showing a tray and a cylindrical container (no text or symbols)

natural_image
Technical line drawing of a coffee maker with directional arrows indicating flow or movement (no text or symbols present)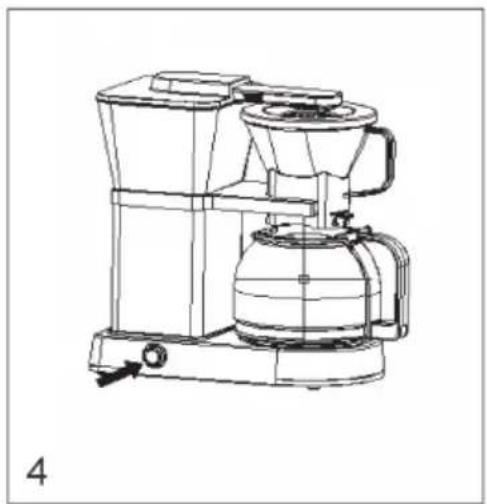
natural_image
Line drawing of a mechanical device with no visible text or symbolsnatural_image
Symbol of a trash bin crossed with a diagonal line, representing no waste or discharge (no text or labels)INDICE
natural_image
Line drawing of a coffee maker with a side view showing a tray and a cylindrical container (no text or symbols)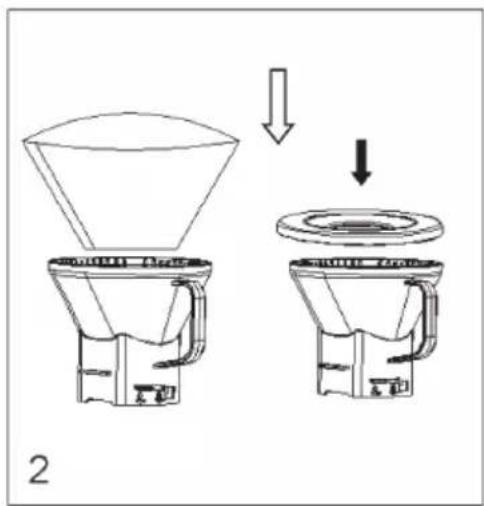

natural_image
Technical line drawing of a coffee maker with directional arrows indicating flow or movement (no text or symbols present)
natural_image
Line drawing of a mechanical device with no visible text or symbolsnatural_image
Symbol of a trash bin crossed with a diagonal line, no text or numbers present
- INHALTSVERZEICHNIS
- CONTENT
- TECHNICAL DATA
- DECLARATION OF CONFORMITY
- SAFETY INSTRUCTIONS
- CAUTION
- PRODUCT OVERVIEW
- OPERATION
- Before the first operation
- Initial operation
- Pre-brew function
- CLEANING AND CARE
- TROUBLESHOOTING
- HINTS ON DISPOSAL
- Estimado cliente:
- ÍNDICE DE CONTENIDOS
- SOMMAIRE
- DÉCLARATION DE CONFORMITÉ
- INDICE
Brand : Klarstein
Model : GrandeGusto
Category : Coffee machine