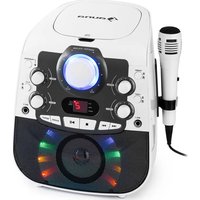
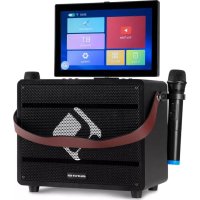
Superstarlet - Karaoke system Auna - Free user manual and instructions
Find the device manual for free Superstarlet Auna in PDF.

User questions about Superstarlet Auna
0 question about this device. Answer the ones you know or ask your own.
Ask a new question about this device
Download the instructions for your Karaoke system in PDF format for free! Find your manual Superstarlet - Auna and take your electronic device back in hand. On this page are published all the documents necessary for the use of your device. Superstarlet by Auna.
USER MANUAL Superstarlet Auna
natural_image
Black and white photo of a modern audio recording device with microphone and digital display (no visible text or symbols)Warnung
natural_image
Symbol of a trash bin crossed with a diagonal line, no text or labels presentImportant – Please read these instructions fully before installation
Safety Warnings
CAUTION: TO REDUCE THE RISK OF ELECTRIC SHOCK, DO NOT REMOVE ANY COVER. NO USER-SERVICEABLE PARTS INSIDE, REFER ANY SERVICING TO QUALIFIED SERVICE PERSONNEL.
Please read this owner's guide
- Please take the time to follow the instructions in this owner's guide carefully. It will help you set up and operate your system properly and enjoy all of its advanced features.
- Please save this owner's guide for future reference.
- The product label is located on the back of the product.
- This product must be used indoors. It is neither designed nor tested for use outdoors, in recreation vehicles, or on boats.
- Heed all warnings - on the product and in the owner's guide.
- Do not use this apparatus near water or moisture.
- Do not use this product near a bathtub, washbowl, kitchen sink, and laundry tub, in a wet basement, near a swimming pool, or anywhere else that water or moisture is present.
- Only use attachments/accessories specified by the manufacturer.
- Unplug this apparatus during lightning storms or when unused for long periods of time - to prevent damage to this product.
• Refer all servicing to qualified service personnel - Servicing is required when the apparatus has been damaged in any way: such as liquid has been spilled or objects have fallen into the apparatus; the apparatus has been exposed to rain or moisture, does not operate normally, or has been dropped -
- Do not attempt to service this product yourself.
- Opening or removing covers may expose you to dangerous voltages or other hazards.
- To prevent risk of fire or electric shock, avoid overloading wall outlets, extension cords, or integral convenience receptacles.
- Use proper power sources - Plug the product into a proper power source, as described in the operating instructions or as marked on the product.
- The mains plug is used as the disconnect device, the disconnect device shall remain readily accessible
CAUTION
RISK OF ELECTRIC SHOCK!
DO NOT OPEN!


This symbol means that this unit is double insulated. An earth connection is not required.
CAUTION : CLASS 1 LASER PRODUCT
Use of contents or adjustments of performance of procedures other than those specified Herein may result in hazardous radiation exposure.

LASER SAFETY
This unit employs a laser, only qualified service personnel should attempt repair.
DANGER: Invisible laser radiation when open and interlock failed or defeated avoid direct exposure to beam.
CAUTION: hazardous laser radiation when open and intelock defeated.
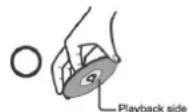
Disc handling
Do not touch the playback side of the disc. Do not attach paper or tape to disc.

Fingerprints and dust on the disc cause picture and sound deterioration. Wipe the disc from the centre outwards with a soft cloth. Always keep the disc clean.


If you cannot wipe off the dust with a soft cloth, wipe the disc lightly with a slightly moistened soft cloth and finish with a dry cloth.
Do not use any type of solvent such as thinner, benzene, commercially available cleaners or antistatic spray for vinyl. It may damage the disc.
Do not store discs in a place subject to direct sunlight or near heat source.
Do not store discs in a place subject to moisture and dust such as a bathroom or near a humidifier.
Store discs vertically in a case, stacking or placing object on discs outside or their case may cause warping.
Functions & controls
Please familiarize yourself with the parts and accessories listed below
Accessories included
- 1x1D-003308
- 1 x CDG Demo Disc
• 1 x Instruction Manual
- 1 x AV Cable • 1 x Microphone
- 1 x AC Power Adaptor
Overview of controls

text_image
1 2 3 4 5 6 7 8 MASTER VOLUME AIR ECHO - - - - - - - - - - - - - - - - - - - - - - - - - - - - - - - - - - - - - - - - - - - - - - - - - - - - - - - - - - - - - - - - - - - - - - - - - - - - - - - - - - - - - - - - - -19 18 17 16 15 14 11 12 13 0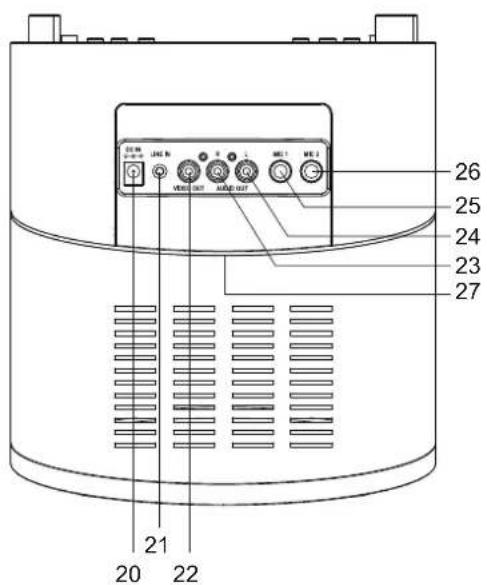
text_image
26 25 24 23 27 21 20 22Top Panel
1: CD Door
2: Master volume control
3: Auto voice control
4: Echo control
5: STANDBY button
6: SKIP button
7: SKIP button
8: REPEAT/PROGRAM button
9: PLAY/PAUSE indicator
10: CDG indicator
11: LED display
12: REPEAT indicator
13: PROGRAM indicator
14: STOP button
15: PLAY/PAUSE button
16: LIGHT button
18: MIC VOLUME control
19: BALANCE control
Rear Panel
20: DC Jack
21:LINE IN socket
22: VIDEO OUT socket
23: AUDIO OUT socket (Right)
24: AUDIO OUT socket (Left)
25: MIC 1 input
26: MIC 2 input
27: LED disco lights
Connections
Mains power using the supplied AC adaptor
1: Connect the mains adaptor to a UK mains outlet.
2: Connect the adaptor plug into the rear mains socket (20).
NOTE: Please ensure you only use the supplied mains adaptor with this unit.
3: Switch the mains power on.
CAUTION: The unit is designed to operate from a main supply of AC100-240V\~50/60Hz.
If the socket outlets in your home are not suitable for the plug supplied with the unit, the plug should be removed and an appropriate one fitted.
User instructions
Connections
An audio/video (AV) cable is supplied to give you the option of connecting the unit to an external amplifier and a TV to display lyrics on-screen.
The cable has three RCA jacks at each end. White and Red are for left and right audio connections and the yellow is for connecting the video.
Make sure that you have a CDG disc in the karaoke system and playing when you make this connection. You will know you have the proper settings on your TV as soon as you see the lyrics on the screen!
NOTE: Some projection TV sets do not display the standard blue background used on most CDGs properly. If the background colour is inconsistent or flashing, please try connecting your karaoke system to a standard television.
Display lyrics on your TV screen
Please follow the steps below to display CDG lyrics on a TV screen:
text_image
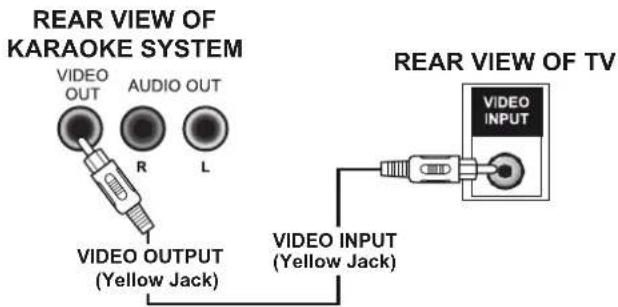
REAR VIEW OF KARAOKE SYSTEM VIDEO OUT AUDIO OUT R L VIDEO OUTPUT (Yellow Jack) REAR VIEW OF TV VIDEO INPUT VIDEO INPUT (Yellow Jack)1: Locate the multicoloured audio/video cable.
2: Connect the video cable (yellow) to the VIDEO OUT on the karaoke system.
3: Connect the other end of the video cable (yellow) to VIDEO INPUT on your TV.
4: Select the appropriate AV input mode on your TV to display the lyrics on-screen.
NOTE: If you don't have the manual for your TV, we suggest calling the manufacturer's customer service department.
TV connection for audio and video
Should you wish to send both lyrics & audio outputs to a TV follow the below connection diagram.
TV VIDEO/AUDIO INPUTSREAR VIEW

text_image
DC IN LINE IN VIDEO OUT AUDIO OUT MIC 1 MIC 2 VIDEO AUDIO INPUT R L1: Locate the multicoloured audio/video cable.
2: Connect the video cable (yellow) to the VIDEO OUT on the karaoke system.
3: Connect the other end of the video cable (yellow) to VIDEO INPUT on your TV.
4: Plug the white end of the cable into the white AUDIO OUT jack on the unit. Plug the red end of the cable into the red AUDIO OUT jack on the unit.
5: Now connect the other end of the red & white cables to the appropriate AUDIO INPUT on the TV. For example the red plug connects to the red input socket and the white plug connects to the white input socket.
6: Select the appropriate AV input mode on your TV to display the lyrics on-screen and hear the audio from the TV speakers.
User instructions
Audio connection to external amplifier
As an alternative to listen to the audio through your TV or internal speakers, you can listen through your home stereo system.
REAR VIEW OF 1D-003308
TV VIDEO INPUT

text_image
DC IN LINE IN VIDEO OUT AUDIO OUT MIC 1 MIC 2 AMPLIFIER AUDIO INPUTS VIDEO INPUT AUDIO INPUT R L AUDIO INPUT R L1: Connect the unit to your home stereo system using the White and Red connections on the supplied AV cable. You may require an additional red/white lead (not included) to reach your home stereo system.
2: Plug the w e cable into the white AUDIO
OUT jack on the unit. Plug the red end of the cable into the red AUDIO OUT jack on the unit. Now connect the other end of the cable's white (left) and red (right channel) plugs to your home stereo system's 'AUX IN' jacks.
Operation
WARNING: Tapping or dropping the microphone while it is on can permanently damage your microphone. Resist the urge to swing the microphone around by the cord!
Preparation
This unit is designed to play CD's bearing the identification logo. If CD's do not conform to the CD standard, they may not play properly.
- Fingerprints and dust should be carefully wiped off with a soft cloth. Wipe in a straight motion from the centre of the disc to the outside edge.
- Never use chemicals, such as record cleaning sprays, antistatic sprays or fluids, benzene or thinner to clean compact discs. These chemicals will permanently damage the plastic surface of the disc.
- Always place the compact disc on the disc tray with the label facing upward.
- Compact discs can be played on only one side.
- To remove a disc from its storage case, press down on the centre of the case and lift the disc out, holding it carefully by the edges.
- Discs should be returned to their cases after use to protect them from dust and scratches.
- To prevent warming the disc, do not expose it to direct sunlight, high humidity or high temperatures that for extended periods of time.
Do not apply paper or write anything on either side of the disc. The inks used in some felt-tips pens may damage the surfaces of the disc.
Turning ON/OFF
1: To turn on the karaoke system, press STANDBY button, the LED DISPLAY & light effects will illuminate.
2: To turn off the system, press STANDB button again, the LED DISPLAY & light effects will turn off.
Turn Light ON/OFF
1: Press light button, the light effect will illuminate.
2: Press light button again, the light effect will turn off.
User instructions
Loading a disc
1: Press the OPEN button to open CD/CDG compartment door. Place a disc in the compartment with the printed side facing upwards.
2: Gently close the CD door to the CD/CDG compartment. The karaoke system begins to read the disc.
3: Press PLAY/ PAUSE to play the disc. If no disc is loaded “--” will appear on the display.
NOTE: Refer to the Trouble Shooting Guide on page 8 if a disc is loaded but the total tracks do not appear.
Playing a CD or CD+G disc
1: Adjust the MASTER VOLUME control on your unit, TV or audio system to a comfortable level.
2: Adjust the MIC VOLUME/A.V.C/ECHO/BALANCE controls as needed to achieve the desired mix of music and vocals through your sound system.
3: Do not press the disc OPEN button of the CD compartment during playback.
4: Never place anything except a compact disc on the disc tray. Foreign objects can damage the unit.
5: Do not apply excessive force to disc cover.
6: Only place one disc on the disc tray at a time.
Play/Pause mode
1: To start playing, press the PLAY/PAUSE button. The first track [1] will be displayed on the LED display.
2: To temporarily stop playback, press the PLAY/PAUSE button.
3: To resume play, press the PLAY/PAUSE button again.
NOTE: Pressing pause when a CDG is playing may cause distorted lyrics on the monitor.
Any distortion will remain until the whole screen is refreshed during an instrumental break or you stop the song and start it from the beginning.
Stop mode
1: Pressing the STOP button during playback will cease playback and the total number of tracks will be shown on the LED display.
Skip (CD & CDG discs)
1: You can SKIPUP or DOWN to your desired track by pressing either SKIP ▶▶or SKIPI◀◀button.
Search (for audio CD disc only)
1: When playing any audio CD, press and hold either SKIP button (◀◀-SKIP-▶▶). The CD will search at high speed in the forward or backward direction. Normal play will continue when you release either SKIP button.
Repeat
1: To repeat the track currently playing, press the REPEAT button once. The REPEAT LED will blink.
2: To repeat all tracks, press the REPEAT button twice. The REPEAT LED will stay lit.
3: To clear the REPEAT function, press the REPEAT button again. The REPEAT LED will turn off.
Program
Use this button to program and play back songs in a preselected order.
1: Programming should be done in the stop mode only. Press the PROGRAM button. The PROGRAM LED will illuminate and the display will read [0].
2: Press the double arrow keys (◀◀ SKIP ▶▶) to select a desired track.
3: Press PROGRAM button to confirm entry. You can repeat the same steps up to a maximum of 20 tracks.
4: Press PLAY button when you have completed programming and you are ready to start singing.
5: Press the STOP button twice to clear all the programmed entries.
NOTE: the PROGRAM LED will go off when the programmed sequence is cleared.
User instructions
Karaoke function
Sing along with the music by plugging in the provided microphone into either one of the microphone sockets on the unit.
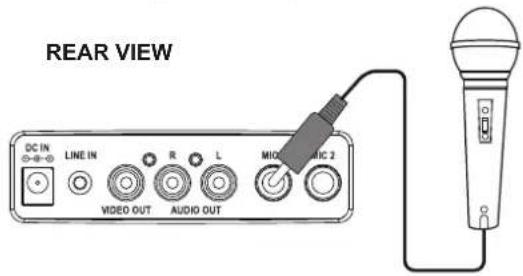
Microphone connections
Connect the supplied microphone as shown below.
text_image
REAR VIEW DC IN LINE IN R L MIO VIDEO OUT AUDIO OUT MIO MUSIC 2Echo
Adjust the ECHO control to enhance your voice for a concert hall effect.
Balance
Adjust the BALANCE control between the prerecorded singer's voice and the music when using a multiplex karaoke disc.
Auto voice control (AVC)
AUTO VOICE CONTROL can be activated by the AVC control. The vocals on the multiplex recording will be muted when the singer starts to sing through the microphone. When the singer stops singing, the vocals will resume to normal.
Line-In operation
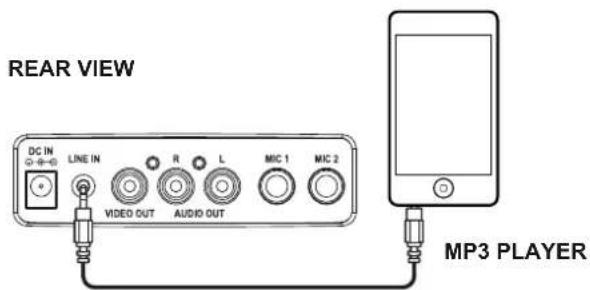
It is possible to connect an external audio source like an MP3 player using a 3.5mm audio cable (not supplied).
text_image
REAR VIEW DC IN LINE IN R L MIC 1 MIC 2 VIDEO OUT AUDIO OUT MP3 PLAYER1: Connect one end of the cable to the MP3 players headphone output and the other end to the LINE input (21) on the rear of the unit.
2: Press PLAY on the external audio source EG:-MP3 player to begin playback through the 1D-003308 internal speakers.
NOTE: the volume output is effected by the volume level on the source EG: MP3 player so make sure that is set to about 70-80% (not too loud to avoid distortion).
3: Adjust the VOLUME controls on the unit to the required listening level.
Care & maintenance
⚠️ Important: Always unplug the appliance from the power socket during cleaning and maintenance.
Never use any sharp instruments or abrasive substances, soap, household cleaner, detergent or wax polish for cleaning.
Clean the external surfaces with a damp soft cloth only. Never use abrasive products or solvents as it may damage the appliance.
User instructions
Troubleshooting
In the unlikely event of difficulties with your appliance please follow the trouble shooting guide below. If the problem persists, contact the retailer if the machine is still under guarantee.
PROBLEM POSSIBLE CAUSE SOLUTION
| No power when POWER is on. | No power plug connection at the AC outlet.Improper connection between the unit and the AC power adaptor. | Insert the power plug into the AC outletCheck the connection between the unit and the AC power adaptor. |
| No power when plugged in. | The AC outlet may not have power. | Check the outlet with a working lamp or other electrical appliance. |
| No sound from TV or amp | TV or PA system is set to minimum.TV or PA system is powered Off.Cables not connected securely. | Turn up the volume on the TV or amp.Power the TV or amp on.Ensure white and red AV cables are connected correctly into both the karaoke system and the TV/Amp. |
| CD Player does not work normally or the LED displays “NO”, “E”, or “00”. | Disc is inserted upside down.Disc is dirty.Disc is scratched.Disc is warped.A non standard disc is inserted.Moisture has formed inside the CD deck.Karaoke system need resetting. | Insert the disc correctly.Wipe clean with a soft cloth.Use a new disc.Use a new disc.Only use discs bearing the standard logo as described on page 6.Wait about 20 - 30 mins to let it dry out.Disconnect the machine from the power source for 30 seconds, then reconned. |
| No sound - If audio is going through TV | Source selection on TV is not correct.Cables are not connected securely. | Follow directions on page 4.Ensure white and red AV cables are connected correctly into both the karaoke system and the TV |
| No sound - when audio is connected to an amplifier | Source selection on your amp is not set correctly.Improper connection to amplifier.Cables are not connected securely. | Select the input you connected the red & white cables to on your amp.Follow direction on page 5 for connecting to an amplifier.Ensure white and red AV cables are connected correctly into both the karaoke system and the TV/Amp. |
| No song lyrics appear on the TV screen | Video cable is not connected properly to the TV.Input not set correctly on your TV.A CDG is loaded but the CD+G LED is not lit. | See page 4 for TV connection instructions.Check the yellow cables input (TV) andEnsure you are using a CDG disc. |
| No sound from mic | Mic volume control is set to minimum.Mic is off | Adjust the mic volume to MAX, and then re-adjust to a comfortable level.Turn on the mic with the ON/OFF switch located on the mic. |
User instructions
Technical specifications
| General | |
| Power | • AC 100-240V ~ 50/60Hz |
| Power Consumption | • 12 Watts |
| Dimensions | • Approx. 206mm(W) x 240mm(D) x 224mm(H) |
| AUX In | • 3.5mm stereo socket |
| CD Player | |
| Frequency response | • 100 Hz - 20KHz |
| S/N ratio | • 40 dB |
| Number of programs | • 20 steps random access programming |
| Sampling system | • 8 times over sampling |
| Audio | |
| Output Power | • 2W x 1 (RMS) |
| Speaker impedance | • 4ohms |
| Microphone | |
| • -73 dB 600 Ohms impedance with ∅ 6.3mm dynamic microphone | |
Hints on Disposal
natural_image
Symbol of a trash bin crossed with a diagonal line, no text or numbers presentAccording to the European waste regulation 2012/19/EU this symbol on the product or on its packaging indicates that this product may not be treated as household waste. Instead it should be taken to the appropriate collection point for the recycling of electrical and electronic equipment. By ensuring this product is disposed of correctly, you will help prevent potential negative consequences for the environment and human health, which could otherwise be caused by inappropriate waste handling of this product. For more detailed information about recycling of this product, please contact your local council or your household waste disposal service.
Declaration of Conformity
CE
Producer: Chal-Tec GmbH, Wallstraße 16, 10179 Berlin, Germany.
This product is conform to the following European Directives:
2014/30/EU (EMC)
2014/35/EU (LVD)
2011/65/EU (RoHS)