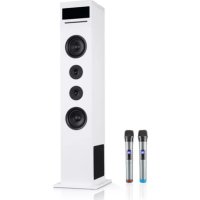
USER MANUAL Karaboom 100 Sing Auna
INHALTSVERZEICHNIS
Geräteübersicht 4
https://use.berlin/10033249
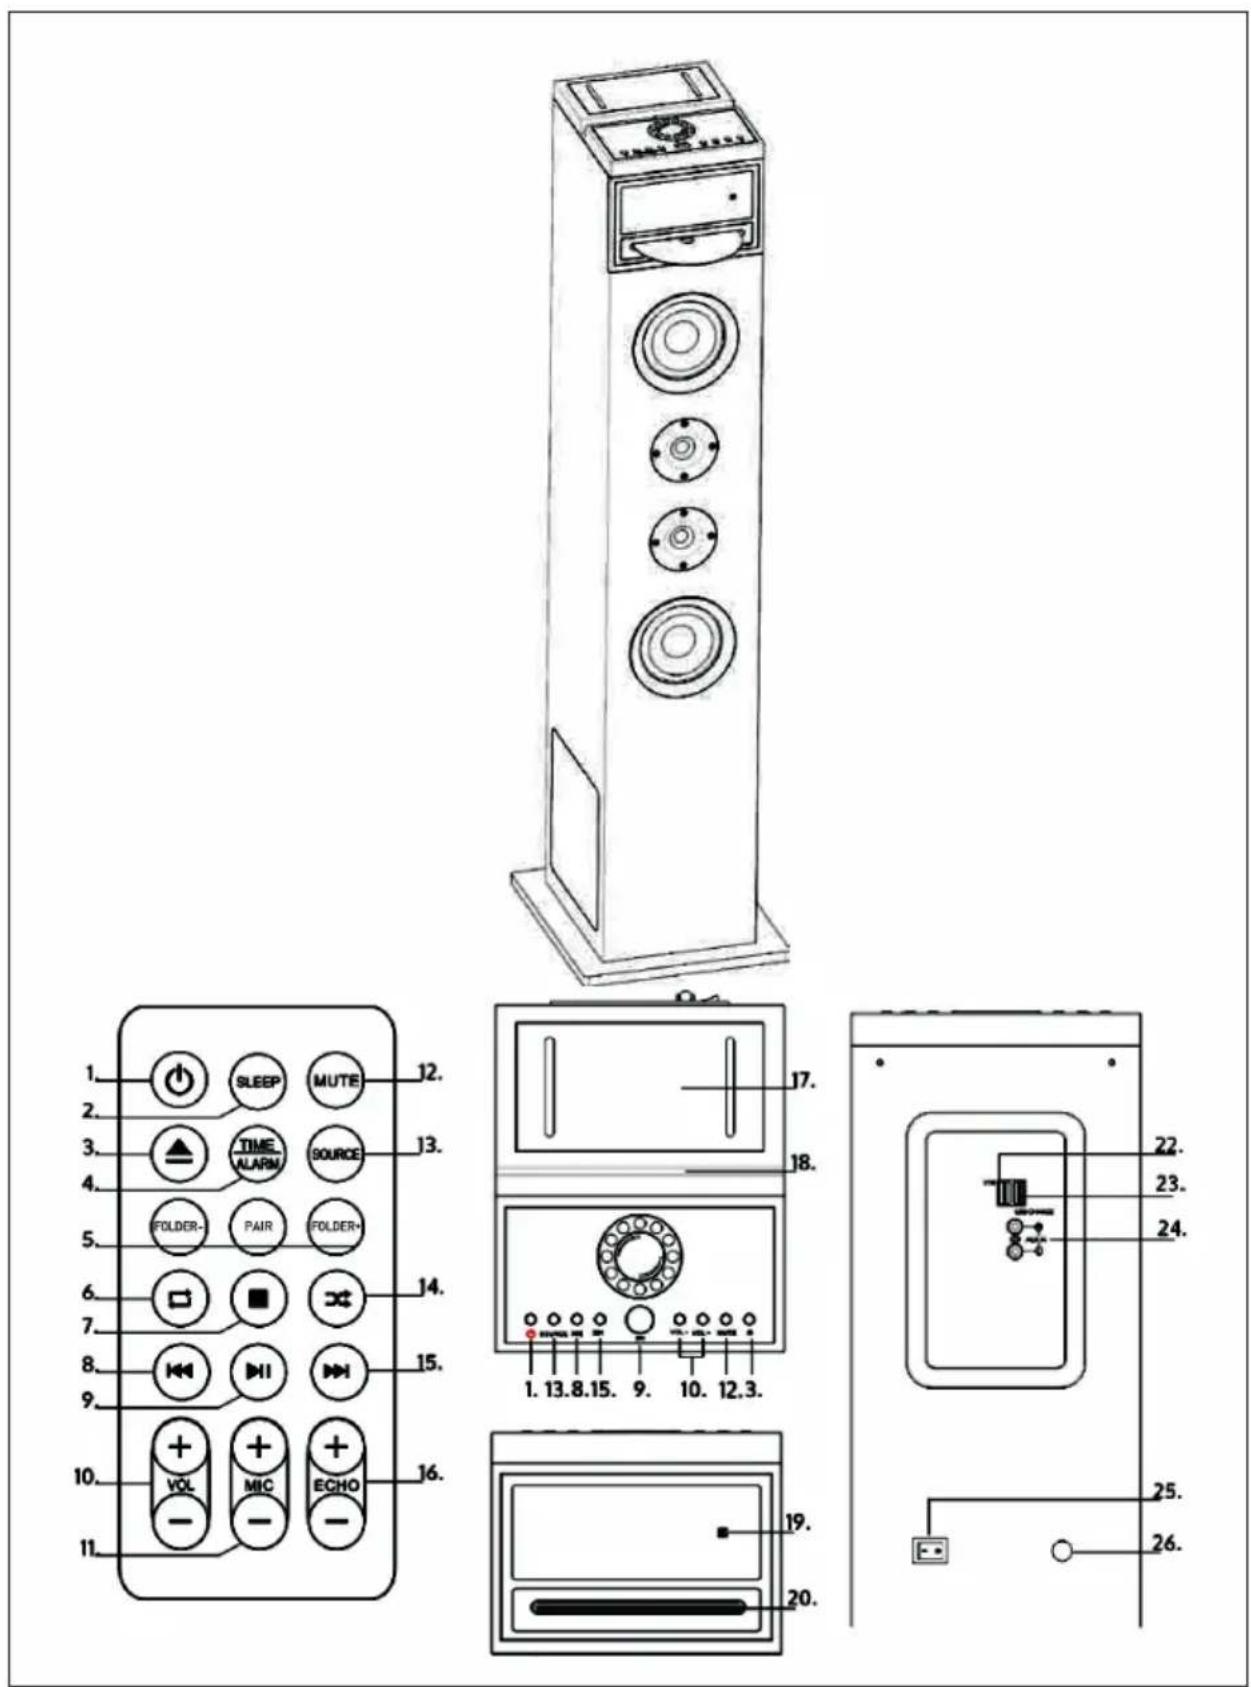
GERÄTEÜBERSICHT
natural_image
Symbol of a trash bin crossed with a diagonal line, representing no waste or discharge (no text or labels)
Congratulations on purchasing this equipment. Please read this manual carefully and take care of the following hints to avoid damages. Any failure caused by ignoring the items and cautions mentioned in the instruction manual is not covered by our warranty and any liability. Scan the QR code to get access to the latest user manual and other information about the product:

CONTENT
Product Overview 14
Safety Instructions 16
Basic Settings 17
CD Mode 19
AUX Mode 20
BT Mode 20
USB Mode 21
Karaoke Mode 21
Technical Data 21
Hints on Disposal 22

Producer:
Chal-Tec GmbH, Wallstraße 16, 10179 Berlin, Germany.
The complete declaration of conformity of the manufacturer can be found at the following link:
https://use.berlin/10033249
PRODUCT OVERVIEW
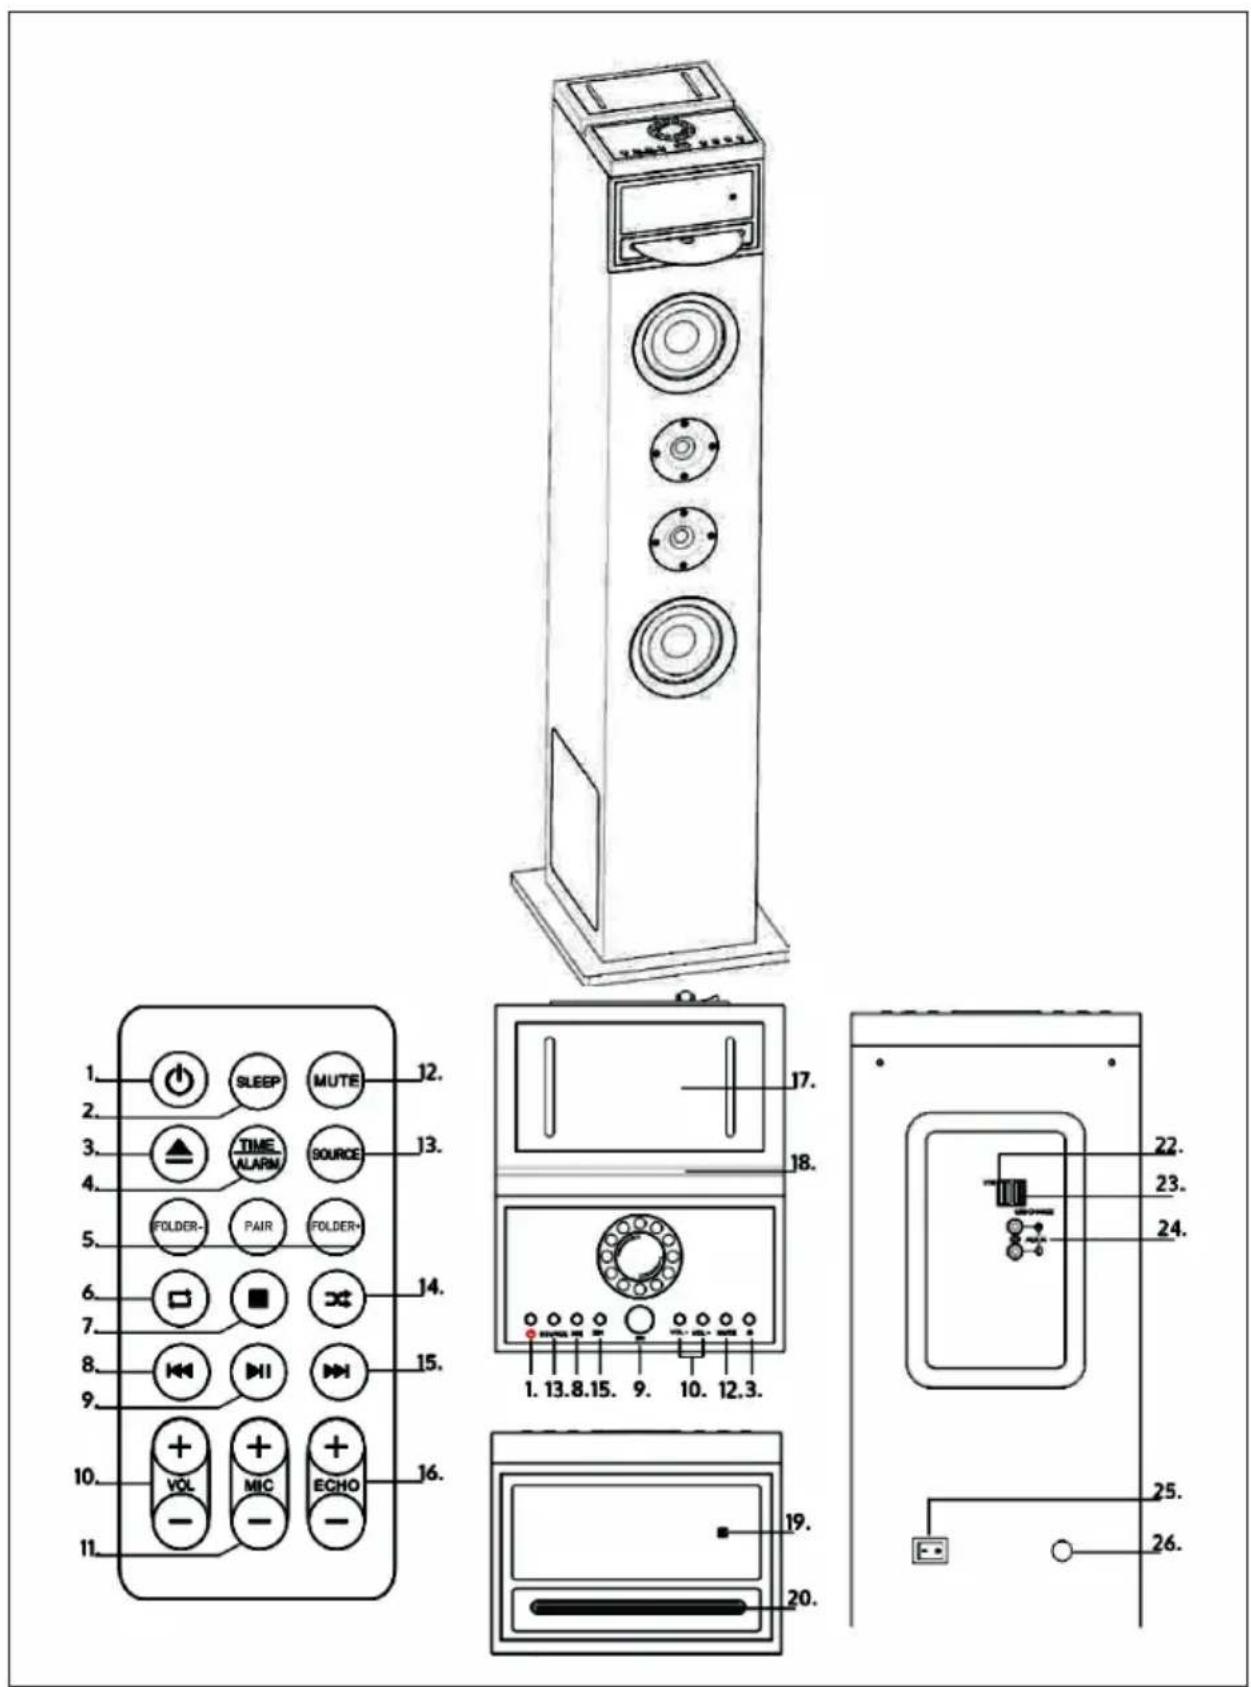
| 1 | SLEEP: Press repeatedly to set a sleep timer. After the timer expires, the tower is automatically switched off. |
| 2 | POWER/STANDBY: For switching the tower off and on |
| 3 | Eject CD |
| 4 | TIME/ALARM: Press this button to turn off an active alarm. |
| 5 | FOLDER- (folder down) / PAIR (connect in BT mode) / FOLDER+ (folder up) |
| 6 | Repeat track in CD mode. |
| 7 | STOP: Stop playback |
| 8 | BACK: Skip to previous track |
| 9 | PLAY/PAUSE: Start or pause playback |
| 10 | VOL- / VOL+: Adjusting the volume |
| 11 | MIC- / MIC+: Adjusting the microphone volume |
| 12 | MUTE: Press to mute. Press the button again to cancel the mute. |
| 13 | SOURCE: Select music source or mode: CD, BT, USB, FM or AUDIO. |
| 14 | Repeat tracks randomly in CD mode. |
| 15 | FORWARD: Skip to next track |
| 16 | ECHO/ ECHO+: Adjusting the Microphone Echo Effects |
| 17 | Smartphone cradle |
| 18 | Tablet holder |
| 19 | LED display |
| 20 | CD slot |
| 22 | USB port |
| 23 | USB charging port |
| 24 | AUX input |
| 25 | Power on/off |
| 26 | Power supply |
SAFETY INSTRUCTIONS
- Lightning - If you are not going to use the device for a long time or if there is a storm, disconnect the plug from the electrical outlet and disconnect the device from the antenna connector. This will avoid damage to the product that may be caused by lightning or overvoltage.
• Overload - Do not overload power outlets, extension cords, or built-in power outlets, as this may result in a fire or electric shock.
- Foreign objects and liquid - Never push objects of any kind through openings in the device as they may touch dangerous voltage points or short out parts, which could result in a fire or electric shock. Never spill liquids of any kind on the device.
- Repairs and maintenance - Do not attempt to service this product yourself, as opening or removing covers will expose you to dangerous voltages or other hazards. Leave all maintenance to qualified service personnel.
- Damage requiring service - Disconnect the power plug from the outlet and consult a qualified specialist if any of the following conditions occur:
a) If the power cord or plug is damaged.
b) If liquid has been spilled or objects have fallen onto the product.
c) If the product has been exposed to rain or water.
d) If the product has been dropped or damaged.
e) If the product has a markedly reduced performance.
- Replacement parts - When replacement parts are required, make sure that the service professional who replaces the parts only uses replacement parts that have been approved by the manufacturer or that have the same characteristics as the original part. Unauthorized replacement may result in fire, electric shock or other hazards.
- Heat - Do not place the unit near heat sources such as radiators, heaters, stoves or other products (including amplifiers).
BASIC SETTINGS
Connection to the mains supply
- Make sure that the power voltage corresponds to the voltage printed on the back label.
- Risk of electric shock! When you unplug the AC power cord always pull the plug from the socket. Never pull the cord.
- Before connecting the AC power cord, ensure you have completed all other connections.
- Place the unit in the desired position and unravel the mains cable. Insert the cable into the supply socket and switch on if applicable
Auto Standby
When playing media from a connected device, the Tower automatically switches to standby if:
- No button is pressed for 10 minutes,
- No audio from a connected device for 10 minutes.
Setting Clock
After the unit is plugged into a mains supply or mains power failure, the display will show the [00:00] on the LED display. The unit should be in standby mode to set the current clock.
1 Press TIME button, the digits for the display will blink.
2 Press the FORWARD/BACK button repeatedly until correct hour is set.
3 Press the TIME to confirm the hour setting, the minute digits on the display will blink.
4 Press the FORWARD/BACK button repeatedly until correct minute is set. Press the TIME/ALARM to confirm the minute setting.
Setting Alarm
This unit can be used as an alarm clock, USB is activated to play at a preset time.
1 Press the STANDBY switch to switch the unit to standby mode.
2 Make sure that you have set the clock correctly.
3 Press the ALARM button in shutdown state, the display will flash ON to select setting alarm and the display will blink.
4 Press the ALARM confirm, the time display will blink.
5 Press FORWARD/BACK button repeatedly to set hour. Press ALARM to confirm.
6 Press FORWARD/BACK to set minute.
7 Press ALARM to confirm, and then press FORWARD/BACK to select USB status. Press ALARM to confirm.
8 The volume would turn up from 0 to 20 gradually.
9 Press ALARM button in shutdown state, the display will flash ON to select setting alarm, and the display will blink.
10 Press the FORWARD/BACK button and select OFF to cancel alarm.
Setting Sleeptimer
Press and hold the SLEEP button, the display will blink. Press the button repeatedly until the display shows the minute you want to set. You can set 10 to 90 minutes. It blinks three times to confirm, and then return to the interface before. If you want to cancel the sleep mode, press to OFF, after blanking three times, the sleep mode will cancel.
CD MODE
Play a disc (CD, CD-R, CDR/W,)
1 Press SOURCE repeatedly to select DISC source
2 Slot in a disc with the printed side facing upward
3 Play starts automatically, if not, Press PLAY/PAUSE.
4 Press VOLUME +/- adjust the volume.
Pause / resume play
1 During play, press PLAY/PAUSE to pause/resume play.
2 During play, long press FORWARD/BACK button to fast forward/fast rewind.
Skip to a track
For CD
- Press FORWARD/BACK to select another track.
- Press the VOL+/VOL- to adjust the volume
For MP3 disc and USB
- Press FORWARD/BACK to select a track.
- Press FOLDER-/FOLDER+ to change the folder.
- Press the VOL+/VOL- to adjust the volume.
Search within a track
• During play, press and hold FORWARD/BACK.
- Release to resume normal play.
AUX MODE
You can play music from an external audio device, such as an MP3 player. For this you need a RCA cable (not included).
1 Connect an RCA cable to the Auxiliary Input. Connect the other end of the RCA cable to the audio output on your DVD player, stereo system, gaming system or television.
2 Press the power button to turn the unit on.
3 Press the SOURCE button to switch to Aux In mode.
4 Use the controls on the connected device to begin playing audio routed through the unit.
BT MODE
1 Press the SOURCE button to select BT mode.
2 Then press the PAIR button on the remote control. The LED indicator lights up blue.
3 Turn on BT connectivity and make your device discoverable. Choose [add a new BT device] or [setup BT device] on your device. It will start to search. Once [KARABOOM 100] shows on your device, select it. If your device prompts you for a pass code, please enter [0000]. If the pairing attempt fails or times out, please start pairing procedure again.
4 After your device and the tower speaker have connected each other, a sound can be heard.
5 Make sure the BT connection between the unit and the device is active.
6 Press the Play/Pause button to pause playback, press again to resume playback and press FORWARD/BACK button to skip forward to next track or to skip backward to previous track.
USB MODE
USB for MP3 playback
1 Plug your USB flash drive to the USB socket.
2 Press SOURCE button to select USB mode, the unit can play automatically. If not, press PLAY/PAUSE.
3. Press the FORWARD/BACK to select track.
4. Press the VOL+/VOL- to adjust the volume.
USB charging
There is a USB charger on the back of the unit to charge small devices such as smartphones that can be charged via USB
KARAOKE MODE
1 Unscrew the battery compartment lid from the lower side of the microphone and insert two batteries (type AA) in the correct polarity as indicated on the inside. Screw the compartment lid back on,
2 Slide the microphone switch to the ON position.
3 Adjust the microphone volume on remote control.
4 Press the echo +/- to adjusta the echo volume
5 Choose your preferred device mode and start play.
6 Start to sing.
7 When you have finished using the karaoke, remember to turn the microphone off by sliding the switch to the OFF position.
TECHNICAL DATA
| Item number 10033249, 10033250 | |
| Power supply 220-240 V ~ 50/60 Hz | |
| Total consumption 65 W | |
| RMS power 60 W | |
| Speakers impedance 8 Ω | |
| S/N (A) 75 dB | |

natural_image
Symbol of a trash bin crossed with a diagonal line, representing no waste or discharge (no text or labels)
According to the European waste regulation 2012/19/EU this symbol on the product or on its packaging indicates that this product may not be treated as household waste. Instead it should be taken to the appropriate collection point for the recycling of electrical and electronic equipment. By ensuring this product is disposed of correctly, you will help prevent potential negative consequences for the environment and human health, which could otherwise be caused by inappropriate waste handling of this product. For more detailed information about recycling of this product, please contact your local council or your household waste disposal service.
Your product contains batteries covered by the European Directive. 2006/66/EC, which cannot be dis-posed of with normal household waste. Please check local rules on separate collection of batteries. The correct disposal of batteries helps prevent potentially negative consequences on the environment and human health.
Estimado cliente:
ÍNDICE DE CONTENIDOS
Vista general del aparato 24
https://use.berlin/10033249
VISTA GENERAL DEL APARATO

natural_image
Symbol of a trash bin crossed out by a diagonal line, with no text or labels present.
SOMMAIRE

Fabricant :
Chal-Tec GmbH, Wallstraße 16, 10179 Berlin, Allemagne.
https://use.berlin/10033249
APERÇU DE L'APPAREIL

natural_image
Symbol of a trash bin crossed out by a diagonal line, with no text or labels present.
INDICE
https://use.berlin/10033249
DESCRIZIONE DEL DISPOSITIVO

natural_image
Symbol of a trash bin crossed with a diagonal line, representing no waste or discharge (no text or labels)
natural_image
Abstract white logo design on dark background, resembling stylized letter 'S' or wave form (no text or symbols)