Avent SCF394 - Breast pump PHILIPS - Free user manual and instructions
Find the device manual for free Avent SCF394 PHILIPS in PDF.
User questions about Avent SCF394 PHILIPS
0 question about this device. Answer the ones you know or ask your own.
Ask a new question about this device
Download the instructions for your Breast pump in PDF format for free! Find your manual Avent SCF394 - PHILIPS and take your electronic device back in hand. On this page are published all the documents necessary for the use of your device. Avent SCF394 by PHILIPS.
USER MANUAL Avent SCF394 PHILIPS
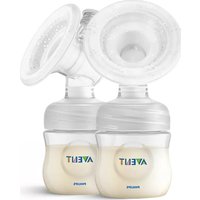
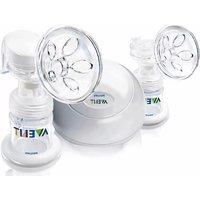
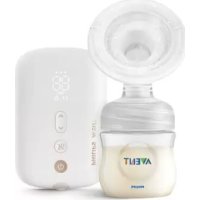
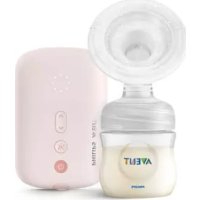
SCF394/62 SCF394/52 SCF392/62
natural_image
Simple line drawing of a stylized character with a circular head and rectangular body, no text or symbols present.
natural_image
Illustration of an open book with a grid pattern on the left and a closed page on the right, no text or symbols present.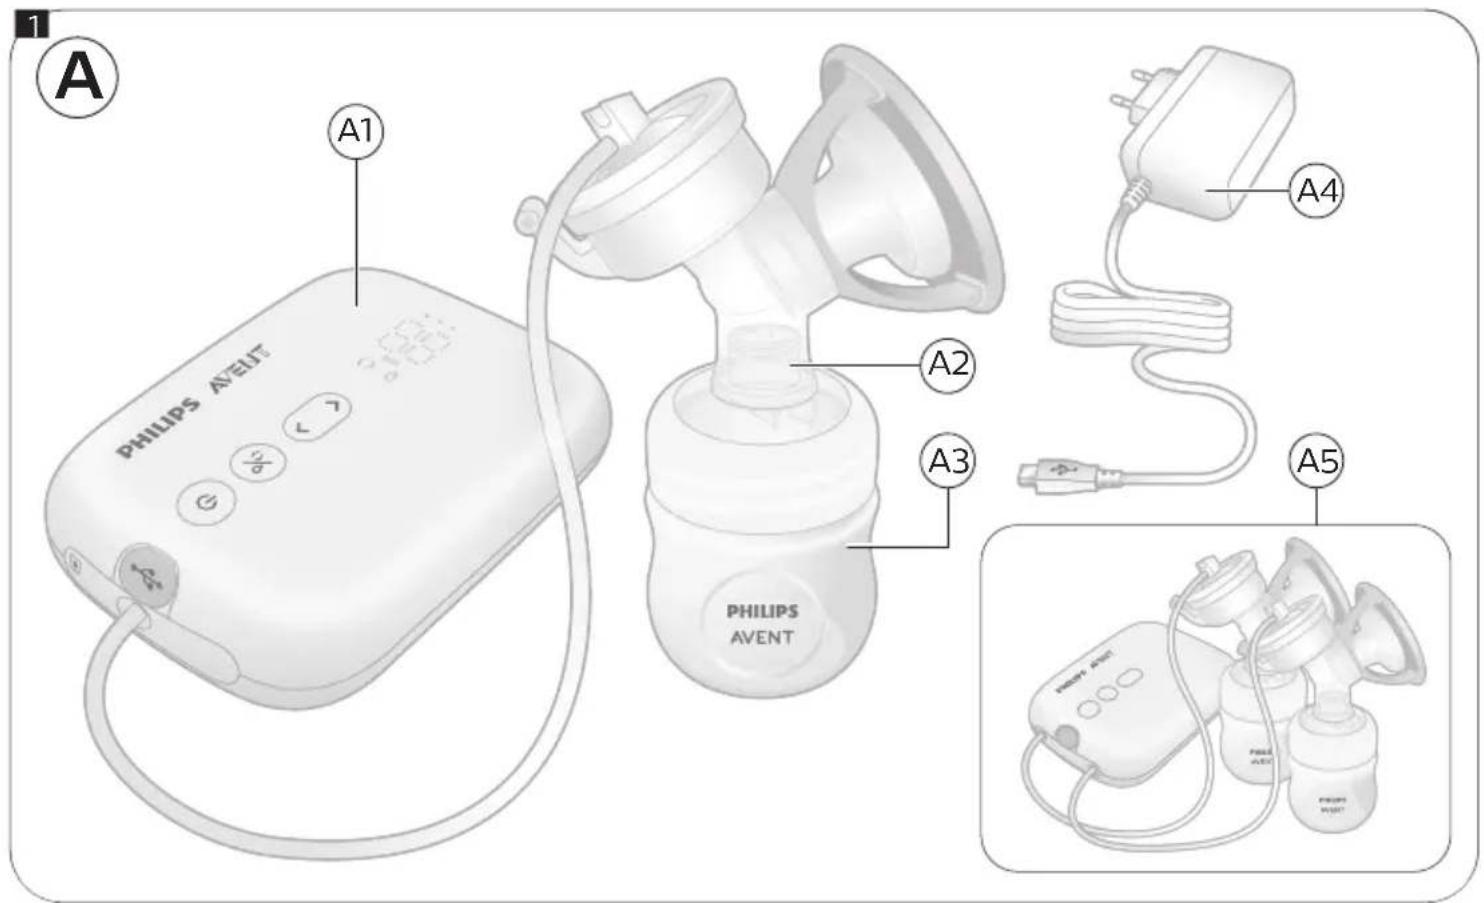
text_image
PHILIPS AVEUT A1 A2 A3 PHILIPS AVENT A4 A5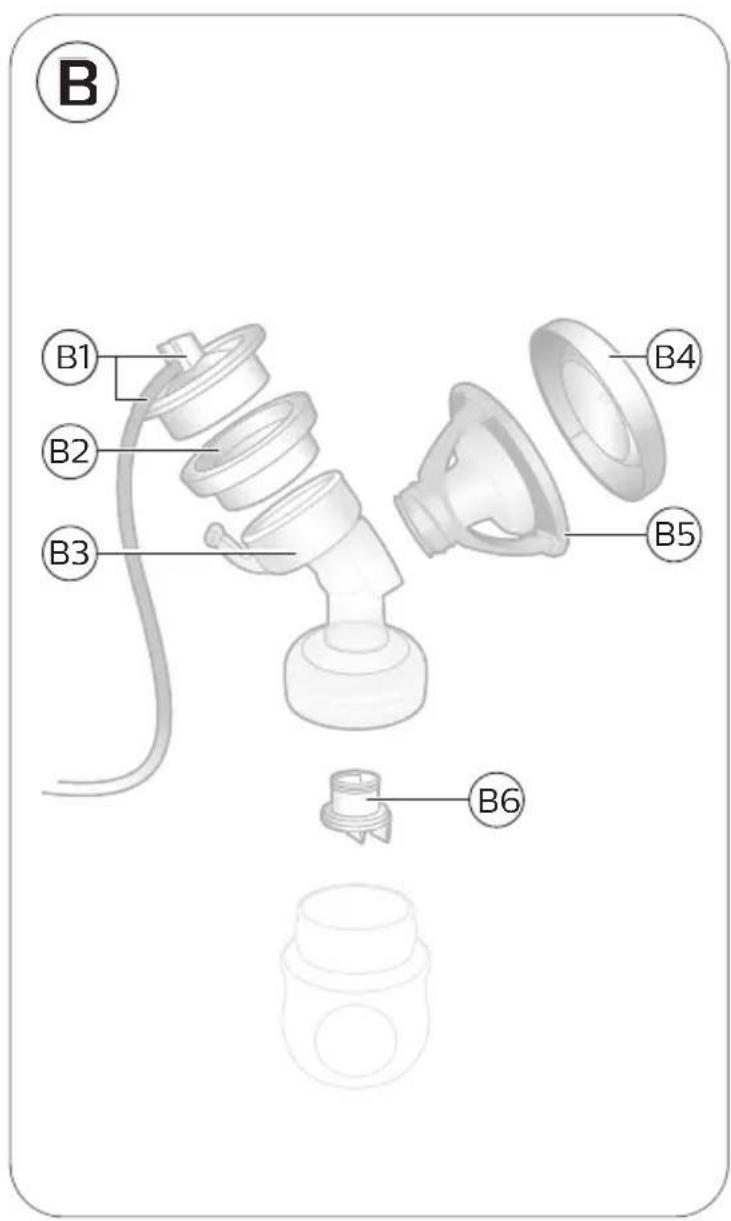
text_image
B B1 B2 B3 B4 B5 B6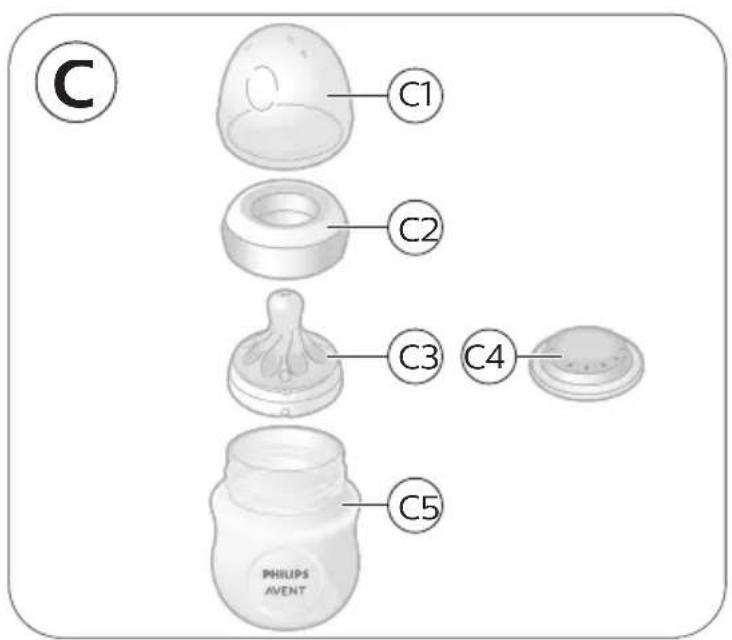
text_image
C C1 C2 C3 C4 C5 PHILIPS AVENT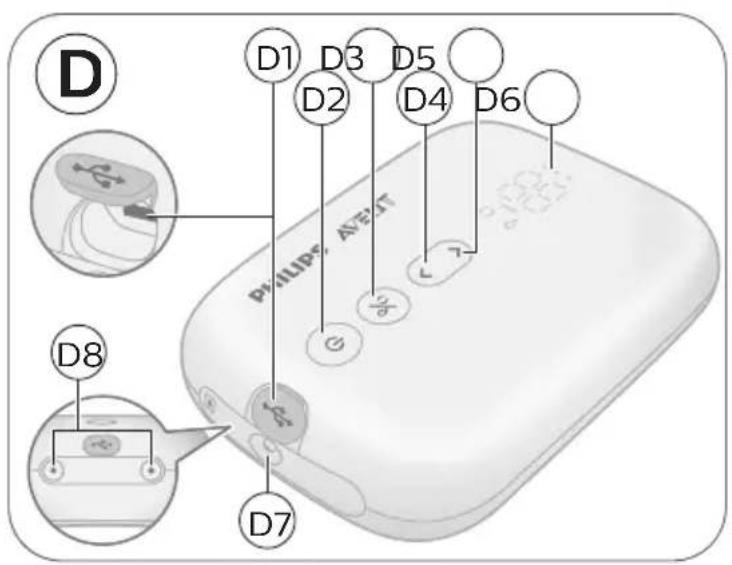
text_image
D D1 D3 D5 D2 D4 D6 PvLlPdE AVEHT D8 D7Contents
Introduction 5
General description 6
Indications for use 6
Important safety information ____ 7
Before first use 11
Cleaning and disinfecting 11
Using the breast pump 15
Using the breast pump when you have symptoms of engorgement 21
After use ____ 22
Feeding breast milk with the bottle 23
Compatibility 25
Ordering accessories 25
Disposal 26
Full Two-Year Warranty 26
Troubleshooting 26
Undesirable side effects 28
Storage conditions 29
Electromagnetic fields (EMF) 29
Technical information 29
Explanation of symbols 32
Introduction
Congratulations on your purchase and welcome to Philips Avent! To fully benefit from the support that Philips Avent offers, register your breast pump at www.philips.com/mybreastpump.
The Philips Avent single/double electric breast pump Advanced is inspired by babies and their natural suction movement. The soft silicone flange stimulates the nipple with gentle massaging movements, helping you to express milk comfortably and effectively. The combination of suction and nipple stimulation triggers fast milk flow. The no-lean-forward design enables you to sit in a relaxed, upright position while expressing.
To breastfeed longer, you can express and store your milk so that your baby can still enjoy the benefits of it, even if you cannot be there to provide it yourself. As the pump is compact, quiet and discrete to use, you can take it with you anywhere, allowing you to express milk at your own convenience and to maintain your milk supply.
If breastfeeding goes well, it is advisable (unless recommended otherwise by your healthcare professional) to wait until your milk supply and breastfeeding schedule are established (normally at least 2 to 4 weeks after giving birth) before you start expressing.
General description
Note: The numbers mentioned below refer to the numbers in the figure on the front foldout page of this user manual.
Note: The single breast pump (SCF392/62) includes one set and the double breast pump (SCF394/62) includes two sets of the breast pump kit and Philips Avent Natural bottle shown in Figures B and C.
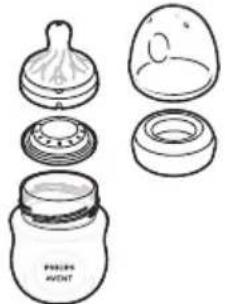
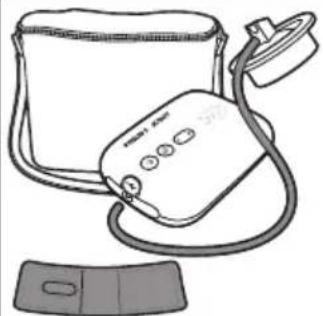
Product description (Fig. A)
A1 Motor unit
A5 Double breast pump
A2 Breast pump kit
* The adapter supplied may vary for different countries.
A3 Bottle
A4 Adapter*
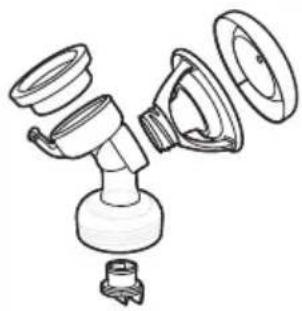
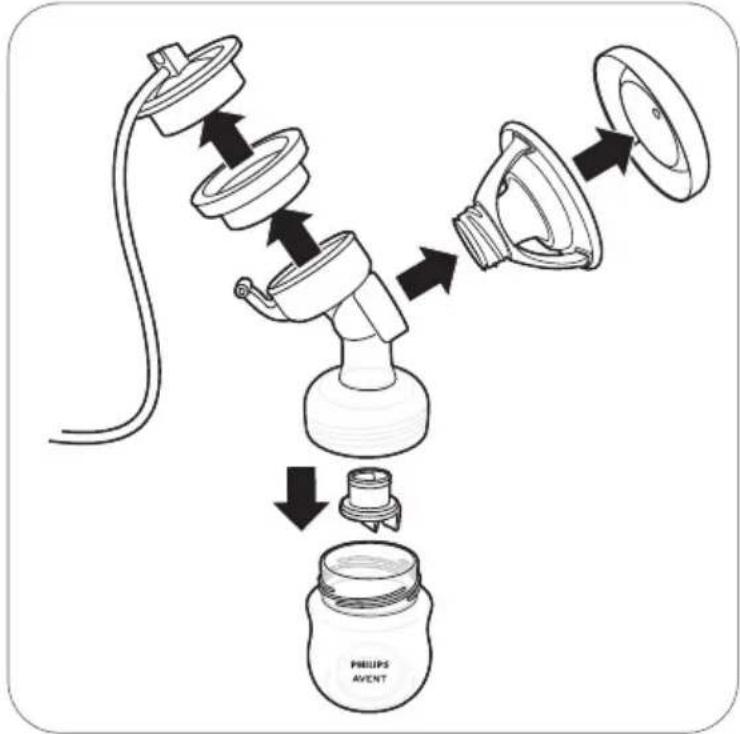
Breast pump kit (Fig. B)
B1 Silicone tube and cap
B4 Cover
B2 Silicone diaphragm
B5 Flange
B3 Pump body
B6 White valve
Philips Avent Natural bottle (Fig. C)
C1 Bottle cap
C4 Sealing disc
C2 Screw ring
C5 Bottle
C3 Feeding nipple
Motor unit part description (Fig. D)
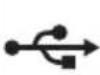
D1 USB power inlet
D5 'Level up' button
D2 On/off button with pause/play function
D6 LED display
D3 Mode selection button
D7 Tubing port for single breast pump
D4 'Level down' button
D8 Tubing ports for double breast pump
Accessories
There are multiple versions of this breast pump package, which all come with a different combination of the following Philips Avent accessories:
- Breast pads
- Storage cups with adapter*
- Travel bag
- Breast milk storage bags*
- Insulation pouch
- Natural bottles
- Cleaning brush
- Breast pump belt
* For these accessories, a separate user manual is provided.
Indications for use
The Philips Avent single/double electric breast pump Advanced is intended to express and collect milk from the breast of a lactating woman, and to alleviate engorgement of the breast. The device is intended for a single user.
Important safety information
Read this user manual carefully before you use the breast pump and save it for future reference.
This user manual can also be found online on the Philips Avent website: www.philips.com/avent.
This product is operated by the lactating woman herself.
You can use this breast pump in an everyday environment.
Contraindications

- Never use the breast pump while you are pregnant, as pumping can induce labor.
Warnings

Warnings to avoid choking, strangulation and injury:
- Do not allow children or pets to play with the motor unit, the adapter, packaging materials or accessories.
- Always unplug the breast pump after use and when fully charged. Store the breast pump when not in use.
- This breast pump is not intended for use by persons (including children) with reduced physical, sensory or mental capabilities, or lack of experience and knowledge. Such persons can only use this breast pump if they are supervised by or have received proper instruction concerning use of the appliance by a person responsible for their safety.
Warning to prevent transmitting infectious diseases:
- If you are a mother who is infected with Hepatitis B, Hepatitis C or Human Immunodeficiency Virus (HIV), expressing breast milk will not reduce or remove the risk of transmitting the virus to your baby through your breast milk.
Warnings to avoid electric shock:
- Inspect the breast pump, including the adapter, for signs of damage before each use. Do not use the breast pump if the adapter or plug is damaged, if it does not work properly or if it has been dropped or submerged in water.
- If the power adapter outer casings become loose or are separating, contact the device manufacturer immediately. Separation of the casing can result in electric shock.
- Only use the adapter (S009AHz050yyyy) provided with this breast pump.
- Always ensure that it is easy to disconnect the device from the mains in case of malfunction. The adapter is considered the disconnection device.
Warnings to avoid contamination and to ensure hygiene:
- For hygienic reasons, the breast pump is only intended for repeated use by a single user.
- Clean and disinfect all parts before first use and after each use.
- Do not use antibacterial or abrasive cleaning agents to clean the breast pump parts as this may cause damage.
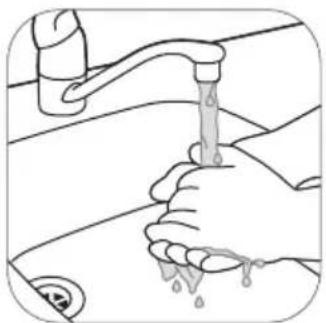
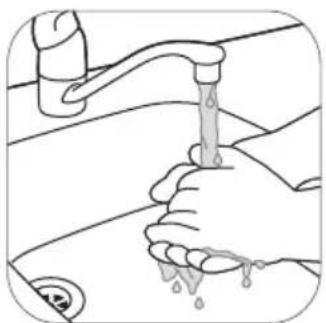
- Wash your hands thoroughly with soap and water before you touch breast pump parts and breasts to prevent contamination. Avoid touching the inside of containers or lids.
Warnings to avoid breast and nipple problems including pain:
- Do not use the breast pump if the silicone diaphragm appears to be damaged or broken. See chapter ‘Ordering accessories’ for information on how to obtain replacement parts.
- Only use accessories and parts recommended by Philips Avent.
- There are no user serviceable parts inside the motor unit of the breast pump.
- No modification of the breast pump is allowed. If you do so, your warranty becomes invalid.
- Never use the breast pump while you are sleepy or drowsy to avoid lack of attention during use.
- Always switch off the breast pump before you remove the pump body from your breast, in order to release the vacuum.
-
If the vacuum is uncomfortable or causes pain, switch off and remove the breast pump from your breast.
-
Do not continue pumping for more than five minutes at a time if you do not succeed in expressing any milk. Try to express at another time during the day.
- If the process becomes very uncomfortable or painful, stop using the pump and consult your healthcare professional.
Warnings to prevent damage and malfunction of the breast pump:
- Portable radio frequency (RF) communications equipment (including mobile phones and peripherals such as antenna cables and external antennas) should not be used closer than 30 cm (12 in) to any part of the breast pump, including adapter. This could have a negative effect on the performance of the breast pump.
- Use of this equipment adjacent to or stacked with other equipment should be avoided because it could result in improper operation.
Warnings to avoid increased electromagnetic emissions or decreased electromagnetic immunity of this device, resulting in improper operation:
- Do not use any other adapter or charging cable than supplied with the device.
- Use of accessories, transducers and cables other than those specified or provided by the manufacturer of this equipment could result in increased electromagnetic emissions or decreased electromagnetic immunity of this equipment and result in improper operation.
Battery safety instructions
- Only use this product for its intended purpose and follow the general and battery safety instructions as described in this user manual. Any misuse can cause electric shock, burns, fire and other hazards or injuries.
-
To charge the battery, only use the detachable adapter (S009AHz050yyyy) provided with the product. Do not use an extension cord.
-
Charge, use and store the product at the temperature ranges indicated in the technical specifications table in this user manual.
- Always unplug the product when it is fully charged.
- Do not burn products and their batteries and do not expose them to direct sunlight or to high temperatures (e.g. in hot cars or near hot stoves). Batteries may explode if overheated.
- If the product becomes abnormally hot, gives off an abnormal smell, changes color or if charging takes much longer than usual, stop using and charging the product and contact your local Philips dealer.
- Do not place products and their batteries in microwave ovens or on induction cookers.
- This product contains a rechargeable battery that is non-replaceable. Do not open the product to replace the rechargeable battery.
Cautions

Cautions to prevent damage to and malfunctioning of the breast pump:
- Prevent the adapter and motor unit from coming into contact with water.
- Never put the motor unit or the adapter in water or in a dishwasher, as this causes permanent damage to these parts.
- Keep the adapter and the silicone tubes away from heated surfaces to avoid overheating and deformation of these parts.
SAVE THESE INSTRUCTIONS.
Before first use
Disassemble, clean and disinfect all parts that come into contact with breast milk before you use the breast pump for the first time and after every use.
Fully charge the device before you use it for the first time or after a long period of non-use.
Cleaning and disinfecting
Overview
Clean and disinfect the parts that come into contact with the breast and breast milk as described below:
| When How | ||
 | Clean and disinfect before first use and after every use.* | Disassemble all parts and then clean them as described in chapter 'Cleaning' and disinfect them as described in chapter 'Disinfecting'. |
 |
* Note: Disinfecting is especially important if your baby is less than 3 months old, was born prematurely, or has a weakened immune system due to illness or medical treatment. To ensure hygiene, perform the disinfecting step at least once a day.
The following parts do not come into contact with the breast and breast milk; clean them as described below:
| When How | ||
 | Clean when needed. | Wipe with a clean, damp cloth with water and mild detergent.Clean the breast pump belt by hand wash with warm water and mild detergent or machine wash by selecting a cold, gentle cycle in a mesh laundry bag.Wipe the motor unit with a clean, soft cloth moistened with low-level disinfectant such as ethyl or isopropyl alcohol (70-90 %).Do not disinfect the tube. |
Caution: Inspect the tubing. If you find condensation in the air tube, wash and dry it immediately or replace the tubing. If you see breast milk inside the tubing or tubing connector, do not attempt to wash, clean or disinfect the tubing or tubing connector. Instead, contact the manufacturer.
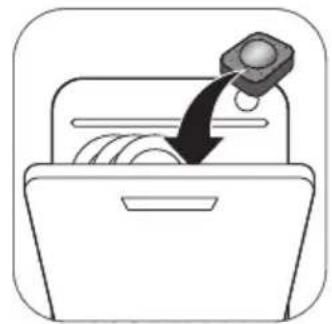
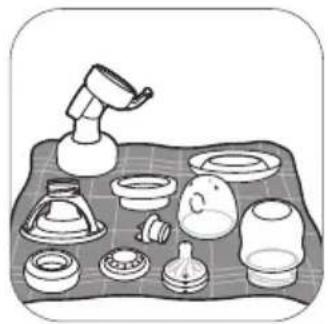
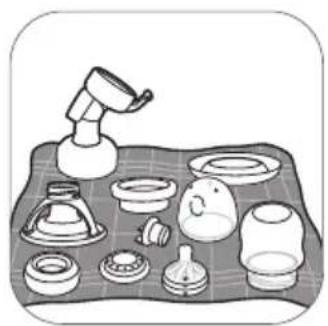
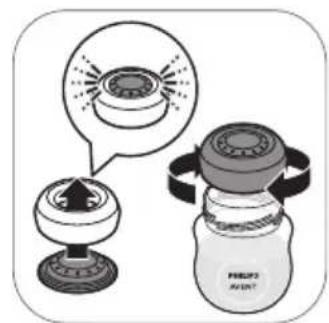
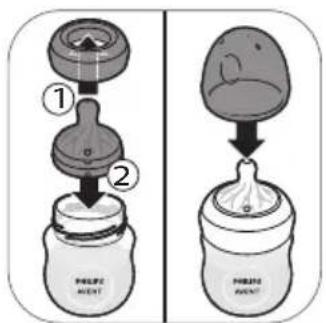
Step 1: Disassembling
text_image
PHILIPS AVENTDisassemble the breast pump, bottle and storage cup completely.
Also remove the white valve from the breast pump.
Step 2: Cleaning
The parts that come in contact with milk can be cleaned manually or in the dishwasher.
⚠ Warning: Do not use antibacterial or abrasive cleaning agents to clean the breast pump parts as this may cause damage.
Caution: Never put the motor unit or the adapter in water or in a dishwasher, as this causes permanent damage to these parts.
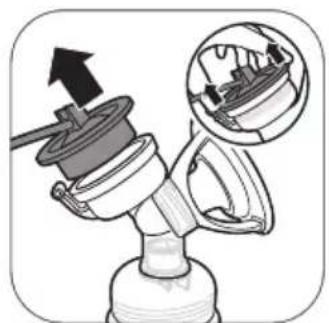
Caution: Be careful when you remove and clean the white valve. If it gets damaged, your breast pump does not function properly. To remove the white valve, gently pull at the ribbed tab on the side of the valve. To clean the white valve, rub it gently between your fingers in warm water with some dishwashing liquid. Do not insert objects into the white valve, as this may cause damage.
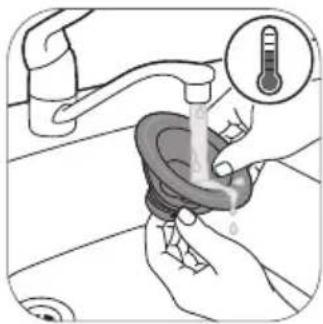
Step 2A: Manual cleaning
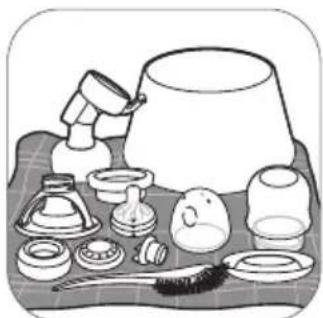
Supplies needed:
- Mild dishwashing liquid
- Drinking-quality water
-
Soft, clean brush used only for infant feeding items
-
Clean tea towel or drying rack
- Clean bowl used only for infant feeding items
natural_image
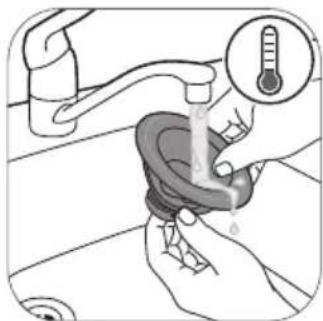
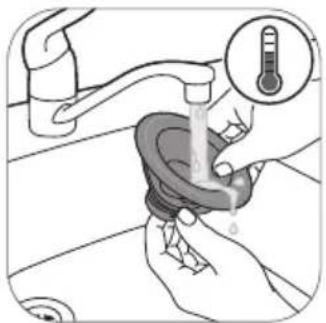
Illustration of hands washing a faucet with a thermometer icon (no text or symbols)- Rinse all parts under a running tap with lukewarm water. Do not place the parts in a sink to rinse.
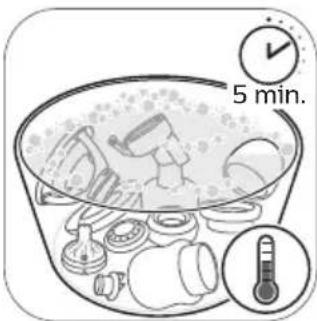
text_image
5 min.- Soak all parts for 5 minutes in warm water with some mild dishwashing liquid.
natural_image
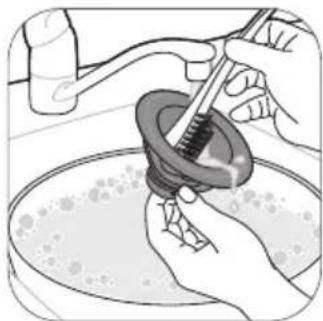
Illustration of hands using a tool to adjust or install a mechanical component in a bowl (no text or symbols visible)- Clean all parts with a cleaning brush. Clean the feeding nipple with a brush as carefully as possible, to avoid damage.
natural_image
Illustration of hands washing a shower with a thermometer above (no text or symbols)- Thoroughly rinse all parts under a running tap with cold clear water by holding them. Clean the bowl and the brush. Rinse them well and allow them to air-dry after each use. Wash them by hand or in a dishwasher at least every few days.
natural_image
Illustration of various laboratory glassware including a lamp, beaker, and dish items arranged on a table (no text or labels visible)- Leave all parts to air-dry on a clean, unused tea towel or drying rack in an area protected from dirt and dust. Do not use a tea towel to rub or to pat the items dry.
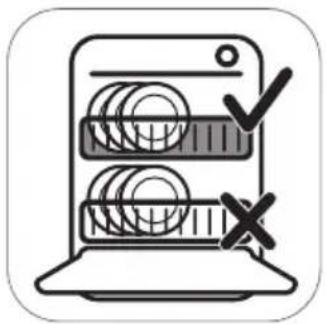
Step 2B: Cleaning in the dishwasher
Supplies needed:
- Mild dishwashing liquid or a dishwashing tablet
- Drinking-quality water
(i) Note: Food colorings may discolor parts.
natural_image
Illustration of a laptop with coins inside, marked by checkmarks and an 'X' symbol (no text or labels)- Place all parts on the top rack of the dishwasher.
natural_image
Simple line drawing of a hand inserting a coin into a folder (no text or symbols)- Put dishwashing liquid or a tablet in the machine. Run a standard program using hot water and a heated drying cycle (or sanitizing setting).
natural_image
Illustration of various kitchen utensils arranged on a patterned surface (no text or symbols)- Remove the parts from dishwasher with clean hands. If items are not completely dry, place items on a clean, unused tea towel or paper towel to air-dry thoroughly before storing. Do not use a tea towel to rub or pat the items dry.
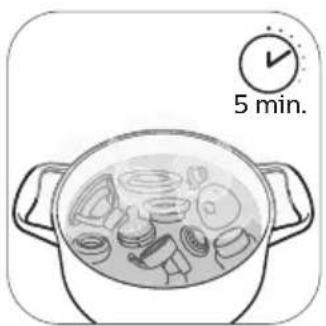
Step 3: Disinfecting
Supplies needed:
- A household pot
- Drinking-quality water
Caution: During disinfection with boiling water, prevent the bottle or other parts from touching the side of the pot. This can cause irreversible product deformation or damage that Philips cannot be held liable for.
natural_image
Illustration of a cooking pot with ingredients and a 5-minute timer (no text or symbols on the pot itself)- Fill a household pot with enough water to cover all parts and place all parts in the pot. Let the water boil for 5 minutes. Make sure the parts do not touch the side of the pot.
text_image
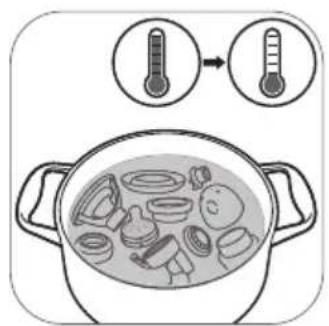
Illustration showing a cooking pot with ingredients being heated by two thermometer readings, indicating temperature change.- Allow the water to cool down.
natural_image
Illustration of various kitchen utensils and kitchenware arranged on a patterned tray (no text or symbols)- Gently remove the parts from the water. Place the parts on a clean surface/tea towel or drying rack to air-dry.
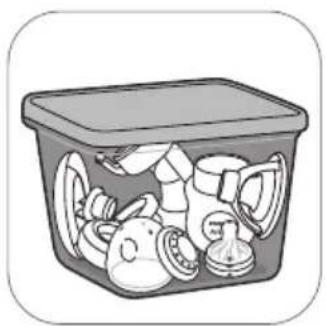
natural_image
Illustration of a plastic container filled with various items including bottles, gears, and containers (no text or symbols)- Store the dry items safely until needed. Ensure the clean pump parts, bottle brushes and wash bowls have air-dried thoroughly before storing. Items must be completely dry to help prevent germs and mold from growing. Store the dry items in a clean, protected area.
Using the breast pump
Flange size
The Philips Avent single/double electric breast pump Advanced has a soft, active flange. There is only one flange size. It gently stimulates your nipple to trigger milk flow. The flange is made of flexible silicone, fitting nipple sizes up to 30 mm/1.18 in.
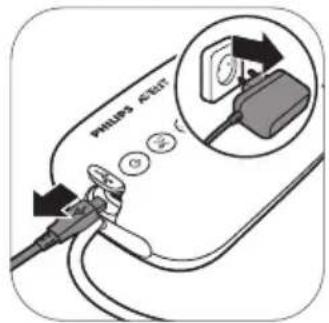
Charging the breast pump
Fully charge the battery before you use the breast pump for the first time and when the battery is low. Fully charging the battery takes up to 4 hours. Charged battery operates approximately 3 pumping sessions.
text_image
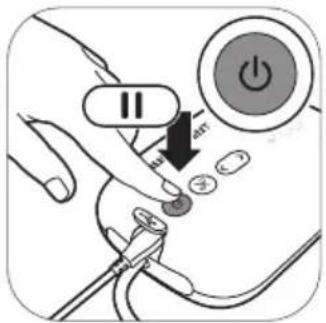
Diagram showing a hand pressing a button on a power switch with a double-headed arrow indicating left-hand rule.- Switch off the device.
text_image
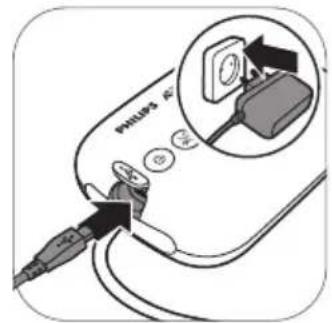
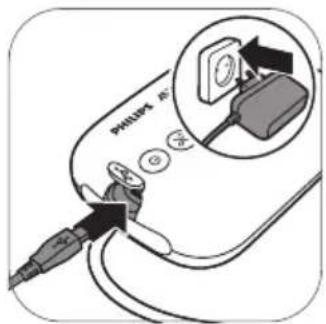
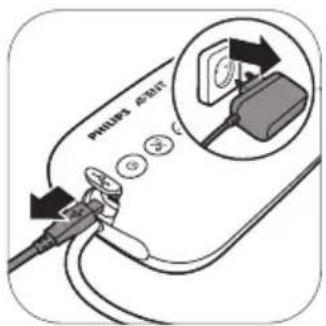
PHILIPS 4C- Insert the adapter into the power outlet and insert the small plug at the other end into the motor unit.
flowchart
graph TD
    A[" "] --> B[" "]
    B --> C[" "]
    C --> D[" "]
    D --> E[" "]
    E --> F[" "]
    F --> G[" "]
    G --> H[" "]
    H --> I[" "]
    I --> J[" "]
    J --> K[" "]
    K --> L[" "]
    L --> M[" "]
    M --> N[" "]
    N --> O[" "]
    O --> P[" "]
    P --> Q[" "]
    Q --> R[" "]
    R --> S[" "]
    S --> T[" "]
    T --> U[" "]
    U --> V[" "]
    V --> W[" "]
    W --> X[" "]
    X --> Y[" "]
- The battery is charging.
text_image
PHILIPS A387- When the battery is fully charged, remove the adapter from the power outlet and pull the small plug out of the motor unit.
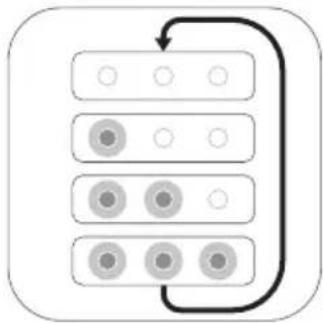
Battery indicator light description
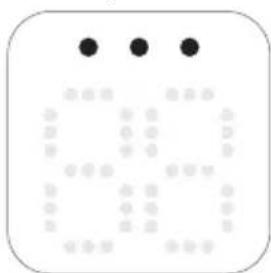
text_image
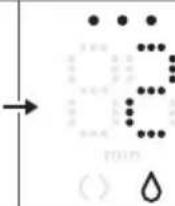
Digital display showing three dots above the digit '8' with a dotted pattern below, likely for digital status or data entry.All lights are steady on. The battery is fully charged. Charged battery operates approximately 3 pumping sessions.*
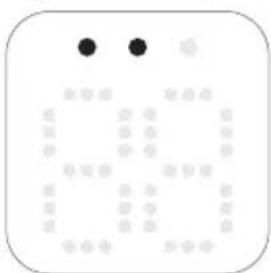
text_image
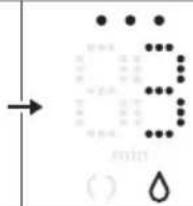
39Two lights are steady on.
The battery is charged sufficiently for maximum two sessions.*

text_image
16First light flashes slowly.
The battery is charged sufficiently for maximum one session.*
natural_image
Abstract pattern of dots and a star-like shape on a white background (no text or symbols)First light flashes quickly.
The battery is very low, the device will soon stop operating, charging is needed.
flowchart
graph TD
    A[" "] --> B[" "]
    B --> C[" "]
    C --> D[" "]
    D --> E[" "]
    E --> F[" "]
    style A fill:#f9f,stroke:#333
    style B fill:#ccf,stroke:#333
    style C fill:#cfc,stroke:#333
    style D fill:#fcc,stroke:#333
    style E fill:#cff,stroke:#333
    style F fill:#ffc,stroke:#333
Battery lights light up one by one and go out all together. The battery is charging.
Assembling the breast pump
Make sure you have cleaned and disinfected the parts of the breast pump that come into contact with milk.
Warning: Be careful, when you have disinfected the breast pump parts by boiling them, they can be very hot. To prevent burns, only start assembling the breast pump when disinfected parts have cooled down.
⚠ Warning: Wash your hands thoroughly with soap and water before you touch breast pump parts and breasts to prevent contamination. Avoid touching the inside of containers or lids.
Caution: Before each use, visually inspect the individual components for cracks, chips, tears, discoloration or deterioration. In the event that damage to the device is observed, discontinue use until the parts have been replaced.
Caution: Inspect the tubing. If you find condensation in the air tube, wash and dry it immediately or replace the tubing. If you see breast milk inside the tubing or tubing connector, do not attempt to wash, clean or disinfect the tubing or tubing connector. Instead, contact the manufacturer.
Note: Correct placement of the flange, silicone diaphragm and silicone tube is essential for the breast pump to form a proper vacuum.
natural_image
Illustration of hands using a faucet to clean water, showing liquid drops (no text or symbols)- Wash your hands thoroughly with soap and water.
natural_image
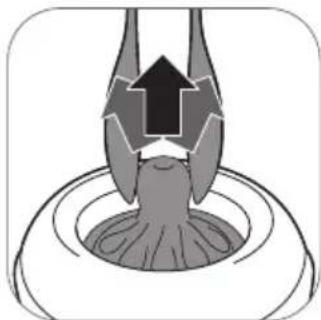
Simple line drawing of a mechanical device with a lever and base, no text or symbols present.- Push the white valve in the pump body as far as possible.
natural_image
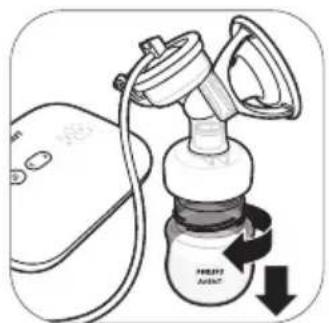
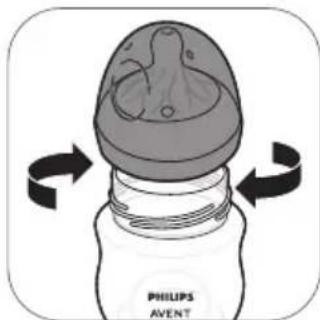
Diagram of a spray bottle with a nozzle and directional arrows indicating motion (no text or symbols)- Screw the pump body onto the bottle.
natural_image
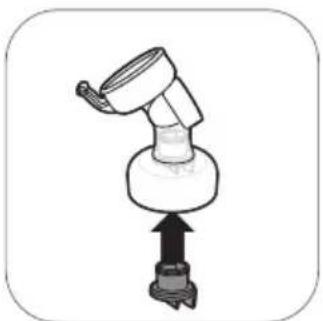
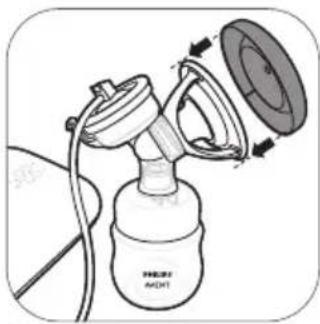
Illustration of a medical or laboratory device with a label 'PHO2A' and a circular component (no readable text beyond label)- Screw the flange onto the pump body.
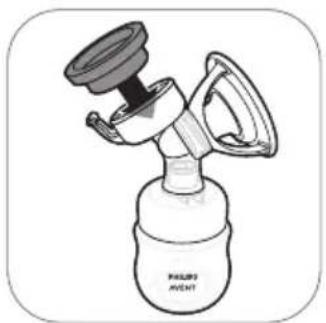
natural_image
Line drawing of a handheld air purifier with a valve and bulb (no text or symbols)- Place the silicone diaphragm in the pump body.

natural_image
Illustration of a hand holding a curved object with arrows indicating motion or force (no text or symbols)- Make sure that the silicone diaphragm fits securely around the rim by pressing it down with your thumbs.
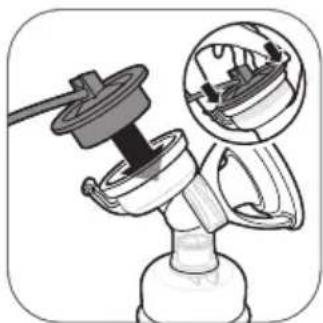
natural_image
Mechanical assembly diagram showing a valve and housing with a magnified inset (no text or symbols)- Attach the silicone tube and cap onto the diaphragm. Push down the cap until it is securely in place.
text_image
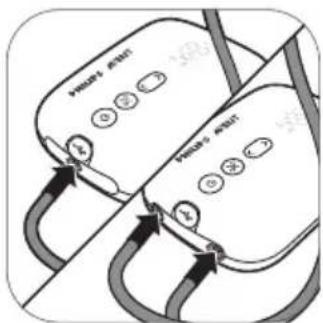
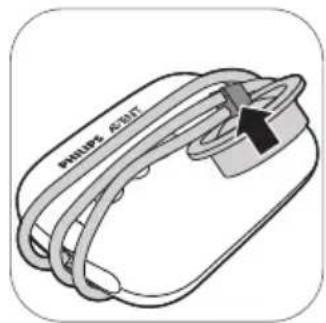
Piano's insert Piano's insert- Connect the tube(s) to the motor unit.
text_image
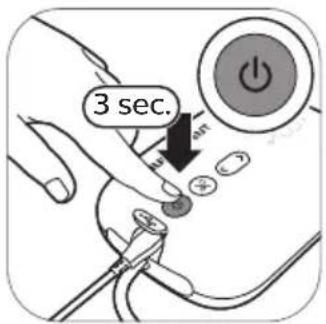
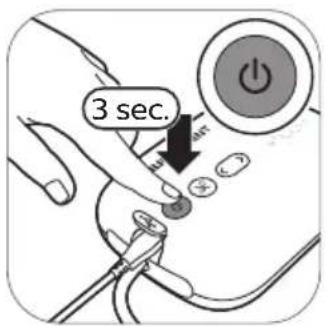
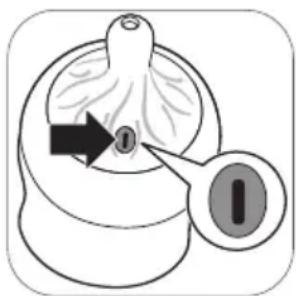
3 sec.9A. When the breast pump is charged, you can use it cordless. Press and hold the on/off button until the device switches on.
text_image
PHILIPS A ① X9B. You can also use the breast pump connected to the power outlet. If the battery is low, insert the adapter into the power outlet and insert the small plug at the other end into the motor unit.
natural_image
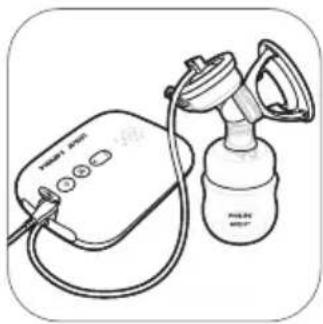
Line drawing of a handheld air purifier with attached device (no text or symbols)- The breast pump is now ready for use.
natural_image
Diagram of a medical or laboratory device with tubing and a central component, no visible text or symbolsNote: You can place the cover over the flange to keep the breast pump clean when you take it with you and while you prepare for expressing.
Breast pump belt
The breast pump belt is intended to carry the motor unit of the electric breast pump while it is used to express and collect breast milk. The breast pump belt allows the electric breast pump to be used hands-free. The breast pump belt is intended to be worn over clothes.
Note: Pumping bra is not included in this product.
Using the breast pump belt
Charge the motor unit before using it in combination with the breast pump belt. Assemble and use the breast pump belt as follows:

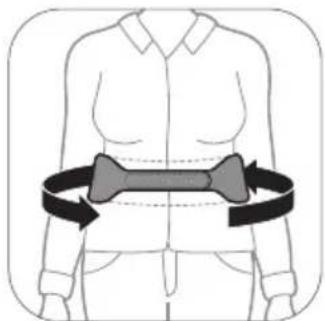
- Place the breast pump belt around your waist and close it with the hook and loop fastener.
natural_image
Illustration of a human torso with a horizontal bandage and directional arrows indicating motion or movement (no text or symbols)- Turn and adjust the belt as necessary.

natural_image
Line drawing of a person wearing a belt with a checkmark (no text or symbols)3A. Make sure the pockets of the breast pump belt are in the front.
natural_image
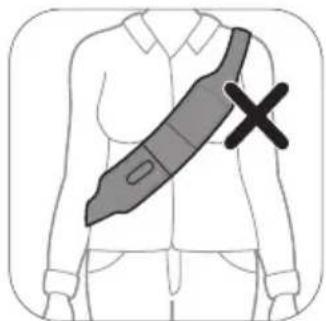
Illustration of a person wearing a garment with a bandage and a cross mark (no text or symbols)3B. Do not wear the breast pump belt across your body.
text_image
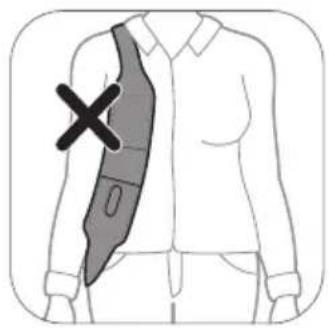
Diagram showing a cross symbol on a shaded band with a 'X' mark, likely indicating a medical or safety hazard.3C. Do not wear the breast pump belt across your shoulder.
text_image
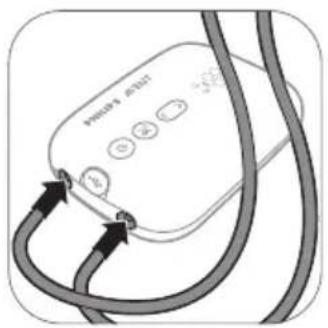
PHOEN 1.0001- Connect the tube(s) to the motor unit.
natural_image
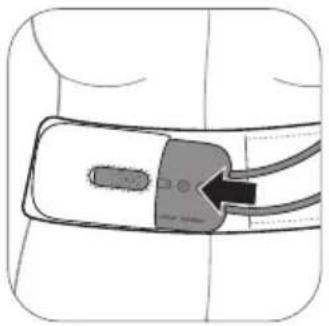
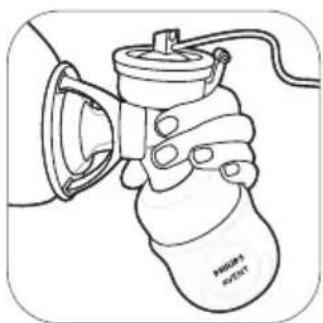
Diagram of a medical device with a black arrow pointing to a component, no text or symbols present- Place the motor unit in the pocket of the breast pump belt with the buttons facing forwards.
natural_image
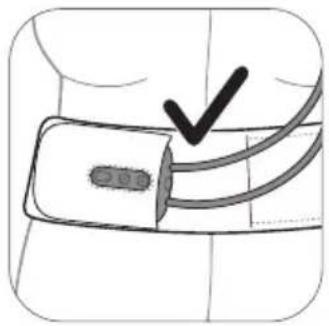
Illustration of a medical device with a checkmark indicating a specific point (no text or symbols present)- Make sure that the motor unit is placed in the pocket fully.
natural_image
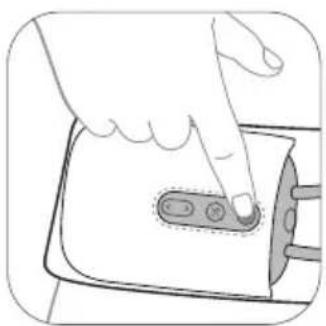
Hand pressing a button on a device (no text or symbols visible)- You can now operate the motor unit from the belt while you are expressing.
⚠ Warning: If you experience skin irritation and/or skin redness when wearing the breast pump belt, stop using it immediately.
Motor unit part description

text_image
1 3 5 2 4 6 P-### AN-AT 8 71 USB power inlet
2 On/off button with pause/play function
3 Mode selection button
4 'Level down' button
5 'Level up' button
6 LED display
7 Tubing port for single breast pump
8 Tubing ports for double breast pump
LED display description
text_image
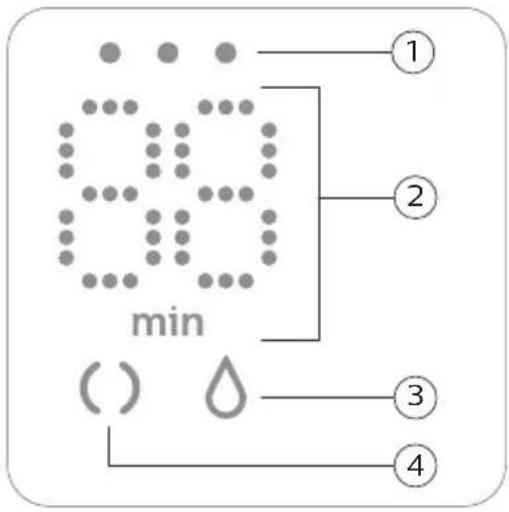
min () 水1 Battery indicator lights
2 Timer (minutes) and vacuum level indication
3 Expression icon
4 Stimulation icon
Explanation of modes
The breast pump has two modes. Below you find an explanation of these modes.
| Mode icons M | Mode Explanation | No. of suction levels | ||
 | Stimulation mode M | Mode to stimulate the breast to start up the milk flow. | 8 suction levels | |
 | Expression mode M | Mode for efficient milk removal after milk has started flowing. After 90 sec. of stimulation, the device automatically switches to the expression mode. | 16 suction levels | |
 |  |  | The number on the display shows the running time in minutes. | |
 |  |  | When you change the suction level, the display shows the selected suction level for a few seconds and then shows the running time again. | |
Pumping instructions
⚠ Warning: Before you remove the pump body from your breast, always switch off the breast pump to release the vacuum.
Warning: Do not continue pumping for more than 5 minutes at a time if you do not succeed in expressing any milk. Try to express at another time during the day.
⚠ Warning: If the process becomes very uncomfortable or painful, stop using the pump and consult your healthcare professional.
Caution: If discomfort is felt, then suction can be broken by inserting a finger between the breast and the flange.
Note: If you regularly express more than 125 ml/4 fl oz per session, you can purchase and use a 260 ml/9 fl oz Philips Avent Natural bottle to prevent overfilling and spillage.
Note: The breast pump can be used cordless if it is sufficiently charged, but you can also use it connected to the power outlet.
natural_image
Illustration of hands washing a faucet with water droplets (no text or symbols)- Wash your hands thoroughly with soap and water and make sure that your breast is clean.
natural_image
Line drawing of a hand holding a medical device with a label 'PONION ELECTR' (no other text or symbols)- Place the breast pump kit onto your breast. Make sure that you center your nipple.

text_image
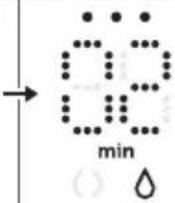
3 sec.- Press and hold the on/off button until the device switches on. The indicator lights go on to indicate that the device is in stimulation mode.
text_image
08 min ()- The breast pump starts in stimulation mode and slowly increases its vacuum to the last used stimulation suction level (or level 5 when used for the first time).

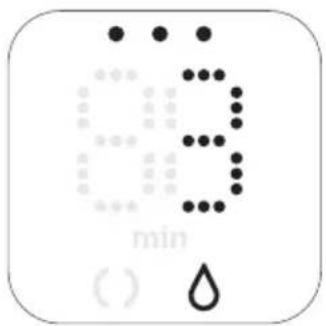
text_image
0:10 min ()- The display shows the running time.
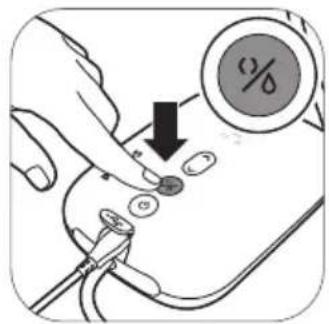
text_image
Medical diagram showing finger placement on a patient's abdomen with a magnified view of the right side of the device.- Use the 'level up' and 'level down' buttons to change the suction level to your preference.
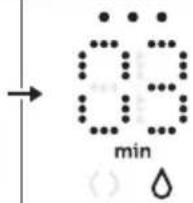
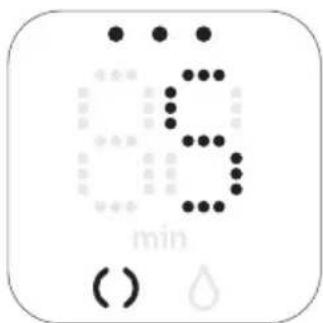
text_image
03 min ()- After 90 seconds the breast pump will switch smoothly to expression mode and slowly increase its vacuum to the last used expression suction level (or level 11 when used for the first time).
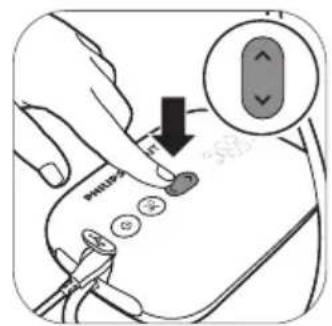
text_image
Medical procedure image showing a hand using a stethoscope to adjust a percentage value, with an arrow indicating the process.- If your milk starts flowing earlier or if you want to switch from expression to stimulation mode, you can switch modes with the mode selection button.
text_image
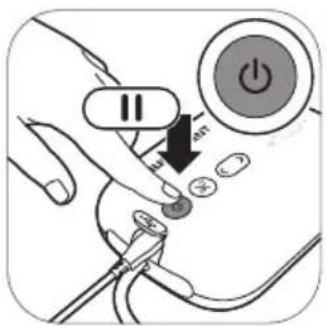
Diagram showing a hand pressing a button on a power switch with labeled buttons and a 'Power' icon- Briefly press the on/off button if you want to pause. To continue, briefly press the on/off button again.
text_image
3 sec.- Press and hold the on/off button to switch off.
text_image
PHILIPS 2017 ① ② ③- Unplug the adapter from the power outlet and pull the small plug out of the motor unit.
Tip: For optimal expression, choose the highest setting that still feels comfortable. This setting may differ across different sessions.
Tip: You can use the double breast pump as a single breast pump by connecting only the tube of one pump kit to the motor unit.
Using the breast pump when you have symptoms of engorgement
Breast engorgement means your breasts are overfilled with milk. This is a painful and unpleasant condition. Frequent extraction of milk and completely emptying the breasts of milk can reduce engorgement. When you have symptoms of engorgement, make sure you use a lower vacuum level to minimize stretching of breast tissue.
Note: When symptoms of engorgement are present, make sure you empty your breasts completely during each expression session.
After use
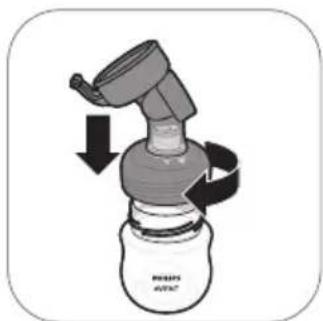
natural_image
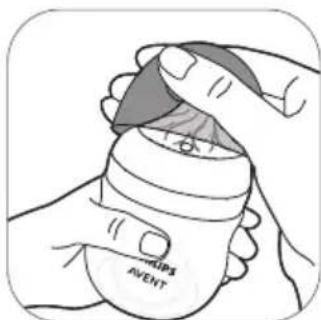
Illustration of a medical or laboratory device with a hand operating the valve, showing internal components and a downward arrow indicating rotation (no text or symbols present)- Unscrew the bottle. 2A.
text_image
Diagram showing a spray bottle with a droplet inside, illustrating the process of cleaning or cooling.To store the breast milk: close the bottle with the sealing disc and screw ring.
text_image
① ② PHILIPS AVENT PHILIPS AVENT2B. To prepare the bottle for feeding your baby: place a nipple in a screw ring and screw the assembled screw ring onto the bottle. Seal the nipple with the bottle cap (see 'Assembling the bottle').
natural_image
Diagram of a mechanical device with a magnified view showing internal components (no text or symbols)- Remove the silicone tube and cap from the breast pump kit.
natural_image
Illustration of a hand washing a shower with a thermometer icon (no text or symbols)- Disassemble and clean all parts that have been in contact with breast milk as soon as possible after pumping (see 'Cleaning and disinfecting').
text_image
PHILIPS 3.017- Clean all parts that do not come into contact with the breast and breast milk (see 'Cleaning and disinfecting'). For easy storage, wrap the silicone tube around the motor unit and clip the cap onto the tube.
Warning: Refrigerate or freeze expressed breast milk immediately, label with date and time, or keep it at a room temperature of up to 77 °F (25 °C) for a maximum of 4 hours before you feed your baby.
Note: For more information about the breast pump and tips for expressing milk, visit www.philips.com/avent.
Instructions for storing breast milk
- Write the date on the storage container. Include your child's name if you are giving the milk to a child care provider.
- Gently swirl the container to mix the cream part of the breast milk that may rise to the top back into the rest of the milk. Do not shake the milk. This can make some of the milk's valuable parts break down.
- Refrigerate or chill milk right after it is pumped, if possible. You can put it in the refrigerator, place it in a cooler or insulated cooler pack, or freeze it in small (2 to 4 ounce) batches for later feedings. Pumped milk at room temperature is fine without being refrigerated for up to 4 hours after pumping.
Below you find guidelines for storing breast milk:
Storage location and temperaturesType of breast milk
| Countertop 77 °F(25 °C) or colder (room temperature) | Refrigerator 40 °F (4 °C) Freezer 0 °F (-18 °C) or colder | |
| Freshly expressed or pumped | Up to 4 hours Up to 4 days Within 6 months is best | Up to 12 months is acceptable |
| Thawed, previously frozen | 1–2 hours Up to 1 day (24 hours) NEVER refreeze human | milk after it has been thawed |
| Leftover from a feeding (baby did not finish the bottle) | Use within 2 hours after the baby is finished feeding |
Source: https://www.cdc.gov/breastfeeding/recommendations/handling_breastmilk.htm
Warning: Never refreeze thawed breast milk to avoid a decrease in milk quality.
⚠ Warning: Never add fresh breast milk to frozen breast milk to avoid a decrease in milk quality and unintended thawing of the frozen milk.
Feeding breast milk with the bottle
Warning: For your child's safety and health

- Always use this bottle with adult supervision.
- Never use feeding nipples as a pacifier, to prevent choking hazard.
- Continuous and prolonged sucking of fluids will cause tooth decay.
- Always check the food temperature before you feed your baby.
- Keep all components not in use out of the reach of children.
- Keep the bottle cap away from children to avoid suffocation.
-
Do not allow children to play with small parts or walk/run while using bottles.
-
Inspect all parts before use and pull the feeding nipple in all directions. Throw away any part at the first signs of damage or weakness.
- Always discard any breast milk that is left over at the end of a feed.
Caution: To avoid damage to the bottle

- Do not place in a heated oven, plastic can melt.
- Plastic material properties may be affected by disinfection and high temperatures. This can affect the fit of the bottle cap.
- Do not leave a feeding nipple in direct sunlight or heat, or leave in disinfectant for longer than recommended because this may damage the product.
Before using the bottle
- Inspect the bottle and feeding nipple before each use and pull the feeding nipple in all directions to prevent a choking hazard. Throw away at the first signs of damage or weakness.
- Clean and disinfect the bottle before first use and after every use (see 'Cleaning and disinfecting').
Assembling the bottle
natural_image
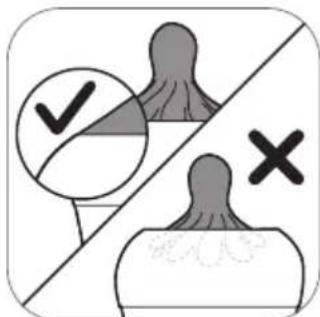
Diagram of a biological structure with an arrow indicating direction, no text or symbols present- The nipple is easier to assemble if you move it back-and-forth while pulling it upwards instead of pulling it up in a straight line.
text_image
Diagram showing a checkmark and cross symbols on a divided background, possibly indicating approval or rejection actions.- Make sure you pull the nipple through until its lower part is aligned with the screw ring.
natural_image
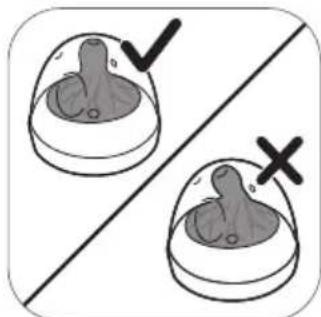
Two identical 3D-rendered objects with checkmarks and X marks, separated by a diagonal line (no text or symbols)- Make sure you place the cap vertically onto the bottle so that the nipple sits upright.
natural_image
Illustration of a baby bottle with internal components and rotation arrows indicating movement (no text or symbols)- Screw the screw ring with nipple and cap on the bottle.
text_image
MIPS AVENT- To remove the cap, place your hand over the cap and your thumb in the dent of the cap.
Instructions for safe thawing and heating of breast milk
- If you use frozen breast milk, let it defrost completely before you heat it.
- Always thaw the oldest breast milk first. Remember first in, first out. Over time, the quality of breast milk can decrease.
-
There are several ways to thaw your breast milk:
-
In the refrigerator overnight.
- Set in a container of warm or lukewarm water.
-
Under lukewarm running water.
-
Never thaw or heat breast milk in a microwave. Microwaving can destroy nutrients in breast milk and create hot spots, which can burn a baby's mouth.
- Use breast milk within 24 hours of thawing in the refrigerator (this means from the time it is no longer frozen or completely thawed, not from the time when you took it out of the freezer).
- Once breast milk is brought to room temperature or warmed after storing in the refrigerator or freezer, it should be used within 2 hours.
- Never refreeze breast milk once it has been thawed.
- Heat the bottle with defrosted or refrigerated breast milk in a bowl of hot water or in a bottle warmer. Remove the screw ring and sealing disc from the bottle.
- Always stir heated breast milk to ensure even heat distribution and test the temperature before serving.
Choosing the right nipple for your baby
text_image
Diagram showing a labeled anatomical or biological structure with arrows and a magnified inset highlighting a numbered point.Philips Avent Natural feeding nipples are available with different flow rates. The breast pump comes with nipple number 1. This is a 0m+ nipple, ideal for newborn and breastfed babies of all ages.
Use a lower flow rate if your baby chokes often, if milk drips out of its mouth during feeding or if it has trouble adjusting to the drinking speed. Use a higher flow rate if your baby falls asleep during feeding, gets frustrated or if feeding takes very long.
Philips Avent Natural feeding nipples are clearly numbered on the side, to indicate flow rate. For more information, see www.philips.com/avent.
Storing the bottles
- Store all parts in a dry, clean and covered container.
- Do not leave a feeding nipple in direct sunlight or heat, or leave in disinfectant for longer than recommended because this may damage the product.
- For hygiene reasons, we recommend replacing the feeding nipples after 3 months.
Compatibility
The Philips Avent single/double electric breast pump Advanced is compatible with all baby bottles in the Philips Avent Natural range and Philips Avent Storage cups with adapter. We do not recommend using the Philips Avent Natural Glass bottles with the breast pump.
Ordering accessories
To buy accessories or spare parts, visit www.philips.com/support or go to your Philips dealer. You can also contact the Philips Consumer Care Center in your country.
When you order spare feeding nipples, make sure that you use a nipple with the correct flow rate for your baby (see 'Choosing the right nipple for your baby') and do not mix Philips Avent Anti-colic bottle parts and nipples with parts of the Philips Avent Natural bottles. They do not fit and could cause leakage or other issues.
Disposal
- This product contains a rechargeable lithium-ion battery which must be disposed of properly.

text_image
RECYCLE RBRC 7.800.822.8837- Contact your local town or city officials for battery disposal information. In the US, you can also call 1-800-822-8837 or visit www.call2recycle.org for battery drop-off locations. In Canada, you can also call 1-888-224-9764 or visit www.call2recycle.ca for battery drop-off locations.
- For assistance, visit our website www.philips.com/support or call 1-800-542-8368 toll free.
- Your product is designed and manufactured with high quality materials and components, which can be recycled and reused. For recycling information, please contact your local waste management facilities or visit www.recycle.philips.com.
Full Two-Year Warranty
Philips North America LLC (USA) and Philips Electronics Ltd. (Canada) warrant this product against defects in materials or workmanship for a period of two years from the date of purchase, and agree to repair or replace any defective product without charge.
Important: This warranty does not cover damage resulting from accident, misuse or abuse, lack of reasonable care, the affixing of any attachment not provided with the product or loss of parts or subjecting the product to any but the specified voltage or batteries.
No responsibility is assumed for any special, incidental or consequential damages. In order to obtain warranty service, simply call toll-free 1-800-54-AVENT (1-800-542-8368).
Your appliance has been designed and developed with the greatest possible care and has an expected service life of 500 hours.
Troubleshooting
This chapter summarizes the most common problems you could encounter with the breast pump. If you are unable to solve the problem with the information below, visit www.philips.com/support for a list of frequently asked questions or contact the Consumer Care Center in your country.
| Problem Solution | |
| I experience pain when I use the breast pump. | - Choose a suction level that is comfortable for you.- Check if the silicone diaphragm is not damaged (does not have small cracks, holes etc.).- Make sure that your nipple is placed in the center of the flange.- If the pain persists, stop using the breast pump and consult your healthcare professional. |
Problem Solution
| The breast pump does not switch on while it is connected to power outlet. | - Only use the adapter supplied.- Make sure that the adapter has been inserted correctly into the power outlet and that the small plug has been inserted correctly into the motor unit.- Connect the adapter to another power outlet. Then press and hold the on/off button to check if the breast pump can be switched on.- If the problem persists, contact the Consumer Care Center via www.philips.com/support. |
| The breast pump does not switch on (indicator lights do not go on). | - Make sure that the battery is charged (see 'Charging the breast pump') or connect the breast pump to the power outlet. |
| The breast pump is not charging. | - Only use the adapter supplied.- Make sure that the adapter has been inserted correctly into the power outlet and that the small plug has been inserted correctly into the motor unit.- The breast pump is too cold or too hot for charging. Let the breast pump acclimatize to room temperature for 30 minutes.- If the problem persists, contact the Consumer Care Center via www.philips.com/support. |
| Charging the breast pump takes a very long time. | - Only use the adapter supplied.- Make sure that the adapter has been inserted correctly into the power outlet and that the small plug has been inserted correctly into the motor unit.- The breast pump is too cold or too hot. It is recommended to charge the breast pump at room temperature.- If the problem persists, contact the Consumer Care Center via www.philips.com/support. |
| I do not feel any suction/the suction level is too low. | - If possible, try a higher suction level.- Check if the silicone diaphragm is assembled correctly (see 'Assembling the breast pump').- Check if the white valve is not damaged and assembled correctly (see 'Assembling the breast pump').- Check if the other parts of breast pump are intact and assembled correctly (see 'Assembling the breast pump').- Make sure that the pump is positioned correctly on the breast to allow a seal between breast pump and breast.- If you still do not feel any suction, please contact the Consumer Care Center via www.philips.com/support. |
| Problem Solution | |
| The suction of the breast pump is too strong. | - If possible, try a lower suction level. When you express for the first time, start with the default suction level (level 5 in stimulation mode, level 11 in expression mode) and increase/decrease the level when needed. During different expression sessions, different levels may feel most comfortable for you.- Make sure that you only use the breast pump parts provided with this breast pump.- Check if the silicone diaphragm is not damaged (does not have small cracks, holes etc.).- If the problem persists, contact the Consumer Care Center via www.philips.com/support. |
| I express little/no milk when I use my breast pump. | - If you do not feel enough suction, please check Troubleshooting item 'I do not feel any suction/the suction level is too low'.- If you are using the Philips Avent breast pump for the first time, you may need some practice before you are able to express any milk. More expressing tips can be found on the Philips website www.philips.com/mybreastpump. |
| When I switch on the breast pump after storage, it does not start working immediately. | - Make sure that the battery is fully charged (see 'Charging the breast pump') or connect the breast pump to the power outlet.- Perhaps you stored the breast pump at a temperature below the minimum storage temperature or above the maximum storage temperature. Let the breast pump acclimatize in a room of 20 °C/68 °F for 30 minutes to adjust its temperature to the operating range (5 °C/41 °F to 40 °C/104 °F). |
| The display shows 'Er' and the device switches off automatically. | - If you are operating the breast pump on battery power, let it cool down for 30 minutes and try to switch it on again.- If you are operating the breast pump with the adapter connected to the power outlet, check if you are using the adapter that was supplied with the device.- If the problem persists, contact the Consumer Care Center via www.philips.com/support. |
Undesirable side effects
When using the breast pump, the below undesirable side effects may occur. If you experience any of these symptoms, contact a healthcare professional or breastfeeding specialist.
| Undesirable side effect | Description |
| Pain sensation Pain felt on the breast or nipple, or felt as a response to the suction being above a comfortable level. | |
| Sore nipples Persistent pain in the nipples at the beginning of the pumping session, or that lasts throughout the entire pumping session, or pain between sessions. | |
| Erythema (redness) Redness of the skin of the breast. | |
| Bruise, thrombus A reddish-purple discoloration that does not fade when pressed. When a bruise fades, it may become green and brown. | |
| Injured tissue on nipple (nipple trauma) | - Fissures or cracked nipples.- Skin tissue peeling off the nipple. Normally occurs in combination with cracked nipples and/or blisters.- Nipple tear.- Blister. Looks like small bubbles on the surface of the skin.- Bleeding. Cracked or torn nipples can lead to bleeding of the affected area. |
Storage conditions
Keep the breast pump out of direct sunlight as prolonged exposure may cause discoloration. Store the breast pump and its accessories in a safe, clean and dry place.
If the device has been stored in a hot or cold environment, place it in an environment with a temperature of 20 °C ( 68 °F ) for 30 minutes to let it reach a temperature within the usage conditions ( 5 °C to 40 °C/41 °F to 104 °F ) before you use it.
Fully charge the battery before storing your breast pump for an extended period of time.
Electromagnetic fields (EMF)
This Philips device complies with all applicable standards and regulations regarding exposure to electromagnetic fields.
This breast pump contains a battery that is non-replaceable.
Technical information
| Single electric breast pump Double electric breast pump | ||
| Vacuum level | Stimulation: -60 to -200 mbar (-45 to -150 mmHg)Expression: -60 to -360 mbar (-45 to -270 mmHg)Adjustable in steps of 20 mbarIntermittent vacuum | |
| Cycle speed | Stimulation: 105-120 cycles/min, depending on vacuum levelExpression: 53-85 cycles/min, depending on vacuum level | |
| Motor unit rated input 5 V d.c. / 1.1 A 5 V d.c. / 1.8 A | ||
| Mains adapter rated input | External mains adapter 100-240 V a.c.50/60 Hz400 mA | |
| Mains adapter rated output 5 V d.c. / 1.1 A 5 V d.c. / 1.8 A | ||
| Adapter type number | S009AHz050yyyy The letters "yyyy" represent the output current from 0100 (1000 mA) to 0180 (1800 mA), increments in steps of 100 mA. The letter "z" denotes type of plug, it can be: U, V, B, S, C, A, D, K, T, I, E, F. | |
| Battery | Rechargeable battery: 3.6 V 2600 mAh (non-replaceable) | |
| Power port | Micro-USB | |
| Operating conditions | Temperature: 5 °C to 40 °C (41 °F to 104 °F)Relative humidity: 15 to 90 % (non-condensing) | |
| Storage and transportation conditions | Temperature: -20 °C to 45 °C (-4 °F to 113 °F)Relative humidity: up to 90 % (non-condensing) | |
| Operating pressure 700-1060 | hPa (<3000 m/9842 ft. altitude) | |
| Net weight 230 g 310 g | ||
| External dimensions | Motor unit: 145 mm x 95 mm x 45 mm (LxWxH) | |
| Device classification | Applicable classifications:Degree of protection against electric shock;- Class II ME equipment-Type BF applied partThe breast pump and the adapter are specified as medical electrical system according to IEC 60601-1. | |
| Materials | ABS, silicone (motor unit)Polyester, nylon, polypropylene, rubber (breast pump belt)Polypropylene, PBT, silicone (other parts) | |
| Service life 500 hours | ||
| Mode of operation Continuous | operation Non-continuous operation | 55 minon, 180 min off at 22 °C (72 °F) (duty cycle 23 %) 20 min on, 90 min off at 40 °C (104 °F) (duty cycle 18 %) |
| Ingress protection IP22 (motor unit), IP20 (adapter) | ||
Electromagnetic compatibility - compliance information
This device has been tested and found to comply with IEC 60601-1-2:2014 Ed 4.0 for electromagnetic compatibility (EMC) as Class B according to CISPR 11:2009. Tests levels are listed in the accompanying tables. Only use this Philips Avent single/double electric breast pump Advanced in combination with the adapter supplied.
Emissions Compliance Electromagnetic environment – guidance
| RF emissions | Group 1 The device does not use RF energy for its intended function. Therefore, its RF emissions are very low and are not likely to cause any interference in nearby electronic equipment. |
| CISPR 11 |
Emissions Compliance Electromagnetic environment – guidance
| RF emissionsCISPR 11 | Class B | The device is suitable for use in locations in residential environments and in establishments directly connected to a low voltage power supply network which supplies buildings used for domestic purposes. |
| Harmonic emissionsIEC 61000-3-2 | CompliesClass A Category | |
| Voltage fluctuations / flicker emissionsIEC 61000-3-3 | Complies |
Guidance and manufacturer's declaration – electromagnetic immunity
The Philips Avent single/double electric breast pump Advanced is intended for use in the electromagnetic environment specified below. The customer or the user of the breast pump should assure that it is used in such an environment. The essential performance functions are the accuracy of the vacuum pressure and the backflow protection to withstand milk leakage into the motor unit. The Philips Avent single/double electric breast pump Advanced was tested for immunity to electromagnetic disturbances and passed using the criteria of no change in modes, vacuum accuracy ( ±20% ), backflow protection and operation of the breast pump.
Immunity test Immunity test level Electromagnetic environment - guidance
| Electrostatic discharge (ESD)IEC 61000-4-2 | ±8 kV contact±15 kV air | Floors can be a source of static electricity. When the air is very dry (<20 % RH) the user is advised to prefer to use the device in a room with concrete or wooden floor (instead of using it in a room with a synthetic floor). |
| Radiated RF EM fieldsIEC 61000-4-3 | 10 V/m80 MHz – 2.7 GHz80 % AM at 1 kHz | |
| Proximity fields from RF wireless communications equipmentIEC 61000-4-3 | 385 (27), 450 (28), 710 (9), 745 (9), 780 (9), 810 (28), 870 (28), 930 (28), 1720 (28), 1845 (28), 1970 (28), 2450 (28), 5240 (9), 5500 (9), 5785 (9) MHz (V/m) | The device is immune against any RF wireless communication device such as smart phone, Wi-Fi or Bluetooth device at a distance of 30 cm (11.8 in) or more. Avoid a closer distance as this may result in improper operation. |
| RATED power frequency magnetic fields IEC 61000-4-8 | 30 A/m50 Hz or 60 Hz | |
| Electrical fast transient/ burstIEC 61000-4-4 | ±2 kV100 kHz repetition frequency | Mains power quality expected of a typical commercial or residential environment. |
| SurgesIEC 61000-4-5 | ±1 kV Line-to-line±2 kV Line-to-ground | Mains power quality expected of a typical commercial or residential environment. |
Immunity test Immunity test level Electromagnetic environment - guidance
| Conducted disturbances induced by RF fieldsIEC 61000-4-6 | 3 Vrms, before modulation is applied0.15 MHz – 80 MHz6 Vrms, before modulation is applied, in ISM and amateur radio bands between 0.15 MHz and 80 MHz80 % AM at 1 kHz | |
| Voltage dips, short interruptions and voltage variations on power supply input linesIEC 61000-4-11 | 0 % UT; 0.5 cycle at 0°, 45°, 90°, 135°, 180°, 225°, 270° and 315°0 % UT; 1 cycle and 70 % UT; 25/30 cycles single phase at 0°0 % UT; 250/300 cycle | Mains power quality expected of a typical commercial or residential environment. At power interruptions the breast pump will automatically switch-over to battery mode without interruption of the function. |
Note: UT is the AC mains voltage prior to application of the test level. If in the unlikely event the Philips Avent single/double electric breast pump Advanced is locked inoperative in a function by disturbances from other devices beyond the levels stated in the table above, the device will shut-off completely and restart. In that case make sure the distance to the other device causing this disturbance is enlarged.
FCC compliance information
This device has been tested and found to comply with the limits for a Class B digital device, pursuant to Part 15 of the FCC Rules. These limits are designed to provide reasonable protection against harmful interference in a residential installation. This device generates, uses and can radiate radio frequency energy and, if not installed and used in accordance with the instructions, may cause harmful interference to radio communications. However, there is no guarantee that interference will not occur in a particular installation. If this device does cause harmful interference to radio or television reception, which can be determined by turning the device off and on, the user is encouraged to try to correct the interference by one or more of the following measures:
- Reorient or relocate the receiving antenna.
- Increase the separation between the device and the receiver.
- Connect the device into an outlet on a circuit different from that to which the receiver is connected.
- Consult the dealer or an experienced radio/TV technician for help.
Explanation of symbols
The warning signs and symbols are essential to ensure that you use this device safely and correctly and to protect you and others from injury. Below you find the meaning of the warning signs and symbols on the label and in the user manual.
| Symbol Explanation | |
 | Indicates to follow the instructions for use.1 |
| Symbol | Explanation |
 | Indicates important information such as warnings and cautions.2 |
 | Indicates usage tips, additional information or a note.3 |
 | Indicates the serial number of the breast pump.4 |
 | Indicates the manufacturer.5 |
 | Indicates the manufacturing date.6 |
 | Indicates that the part of the appliance that comes into physical contact with the user (also known as the applied part) is of type BF (Body Floating) according to IEC 60601-1. The applied part is the breast pump kit.7 |
 | Indicates 'Class II Equipment'. The adapter is double-insulated (Class II).8 |
 | Indicates manufacturer's catalog number of the breast pump.9 |
 | Indicates 'direct current'.10 |
 | Indicates 'alternating current'.11 |
 | Indicates the protection against ingress of solid foreign objects greater than 12.5 mm and against harmful effects due to the ingress of dripping water when tilted at 15 degrees.12 |
 IFZU IFZU | Indicates the protection against ingress of solid foreign objects greater than 12.5 mm and no protection against ingress of water.13 |
 | |
 | Indicates the batch number of the medical device.14 |
 | Indicates the manufacturer's serial number of the medical device.15 |
 | Indicates that the product is certified by UL.16 |
 | Indicates USB.17 |
 | Indicates the relative humidity upper limits to which the device can be safely exposed: up to 90 %.18 |
 | Indicates the storage and transportation temperature limits to which the medical device can be safely exposed: -20 °C to 45 °C/-4 °F to 113 °F.19 |
 | Indicates the Forest Stewardship Council (FSC).20 |
 | Indicates that the breast pump must be kept out of direct sunlight.21 |
 | Indicates that the breast pump must be kept dry.22 |
 | Indicates the operating pressure range: 700 to 1060 hPa.23 |
 | Indicates that this device contains a rechargeable battery which must be disposed of properly. See chapter 'Disposal' for more information.24 |
 | Indicates that the adapter is certified by Intertek.25 |
1 IEC 60601-1, Medical electrical equipment – Part 1: General requirements for basic safety and essential performance, Table D.2 Symbol 10 Refer to instruction manual/booklet
2 ISO 15223-1, Medical devices – Symbols to be used with medical device labels, labelling and information to be supplied, Part 1: General requirements, Clause 5.4.4 Caution
3 This symbol is not contained in a standard that is recognized by the FDA
4 ISO/IEC 16022, Information technology - Automatic identification and data capture technologies - Data Matrix barcode symbology specification
5 ISO 15223-1, Medical devices – Symbols to be used with medical device labels, labelling and information to be supplied, Part 1: General requirements, Clause 5.1.1 Manufacturer
6 ISO 15223-1, Medical devices – Symbols to be used with medical device labels, labelling and information to be supplied, Part 1: General requirements, Clause 5.1.3 Date of manufacture
7 IEC 60601-1, Medical electrical equipment – Part 1: General Requirements for basic safety and essential performance, Table D.1 Symbol 20 Type BF applied parts
8 IEC 60601-1, Medical electrical equipment – Part 1: General Requirements for basic safety and essential performance, Table D.1 Symbol 9 Class II equipment
9 ISO 15223-1, Medical devices – Symbols to be used with medical device labels, labelling and information to be supplied, Part 1: General requirements, Clause 5.1.6 Catalogue number
10 IEC 60601-1, Medical electrical equipment – Part 1: General Requirements for basic safety and essential performance, Table D.1 Symbol 1 Direct current
11 IEC 60601-1, Medical electrical equipment – Part 1: General Requirements for basic safety and essential performance, Table D.1 Symbol 4 Alternating current
12 IEC 60601-1, Medical electrical equipment – Part 1: General Requirements for basic safety and essential performance, Table D.3 Symbol 2 IP Code IEC 60529:1989+A1:1999+A2:2013, Degrees of protection provided by enclosures (IP Code)
13 IEC 60601-1, Medical electrical equipment – Part 1: General Requirements for basic safety and essential performance, Table D.3 Symbol 2 IP Code IEC 60529:1989+A1:1999+A2:2013, Degrees of protection provided by enclosures (IP Code)
14 ISO 15223-1, Medical devices – Symbols to be used with medical device labels, labelling and information to be supplied, Part 1: General requirements, Clause 5.1.5 Batch Code
15 ISO 15223-1, Medical devices – Symbols to be used with medical device labels, labelling and information to be supplied, Part 1: General requirements, Clause 5.1.7 Serial number
16 The 'UL Certified' mark indicates that the product is certified by UL to meet the applicable safety standards for the USA and Canada
17 This symbol is not contained in a standard that is recognized by the FDA
18 ISO 15223-1, Medical devices – Symbols to be used with medical device labels, labelling and information to be supplied, Part 1: General requirements, Clause 5.3.8 Humidity limitation
19 ISO 15223-1, Medical devices – Symbols to be used with medical device labels, labelling and information to be supplied, Part 1: General requirements, Clause 5.3.7 Temperature limit
20 The FSC trademarks enable consumers to choose products that support forest conservation, offer social benefits, and enable the market to provide an incentive for better forest management
21 ISO 15223-1, Medical devices – Symbols to be used with medical device labels, labelling and information to be supplied, Part 1: General requirements, Clause 5.3.2 Keep away from sunlight
22 ISO 15223-1, Medical devices – Symbols to be used with medical device labels, labelling and information to be supplied, Part 1: General requirements, Clause 5.3.4 Keep dry
23 ISO 15223-1, Medical devices – Symbols to be used with medical device labels, labelling and information to be supplied, Part 1: General requirements, Clause 5.3.9 Atmospheric pressure limitation
24 This symbol is not contained in a standard that is recognized by the FDA
25 The 'ETL Verified' mark indicates that the adapter is certified by Intertek to meet the applicable safety standards for the USA and Canada
Contenido
Introducción 36
flowchart
graph TD
    A["Wire"] --> B["Coiled Pin"]
    B --> C["Coiled Ring"]
    C --> D["Coiled Jacket"]
    D --> E["Final Product"]
    style A fill:#f9f,stroke:#333
    style E fill:#bbf,stroke:#333
natural_image
Illustration of a hand washing a faucet with a thermometer gauge (no text or symbols)natural_image
Illustration of hands using a tool to clean or wash a circular object in a bowl (no text or symbols visible)natural_image
Illustration of a hand washing a shower with a thermometer icon (no text or symbols)natural_image
Illustration of various traditional ceramic tools and containers arranged on a tray (no text or symbols visible)natural_image
Illustration of a laptop with coins and checkmark symbols (no text or labels)natural_image
Simple line drawing of a kitchen appliance with a hand holding a button (no text or symbols)natural_image
Illustration of various kitchen utensils and dish items arranged on a grid tray (no text or labels)natural_image
Illustration of a cooking pot with ingredients in a pan, no text or symbols presenttext_image
Illustration showing a cooking pot with ingredients being heated by two temperature indicators, likely for cooking or heating.natural_image
Illustration of various kitchen utensils arranged on a tray (no text or symbols)natural_image
Illustration of a plastic container filled with various food items (no text or symbols)text_image
Diagram showing a hand pressing a button labeled 'II' with an arrow pointing to a power button, indicating action or operation.flowchart
graph TD
    A[" "] --> B[" "]
    B --> C[" "]
    C --> D[" "]
    D --> E[" "]
    E --> F[" "]
    style A fill:#fff,stroke:#000
    style B fill:#fff,stroke:#000
    style C fill:#fff,stroke:#000
    style D fill:#fff,stroke:#000
    style E fill:#fff,stroke:#000
    style F fill:#fff,stroke:#000
natural_image
Abstract geometric pattern with dots and a star-like shape (no text or symbols)natural_image
Abstract pattern of dots and a star-like shape on a white background (no text or symbols)natural_image
Illustration of hands using a faucet to clean water, showing liquid drops (no text or symbols)natural_image
Diagram of a mechanical device with a lever and base, showing upward motion (no text or symbols)natural_image
Diagram of a bottle with a cap and arrow indicating rotation or movement (no text or symbols)natural_image
Illustration of a nasal gas pump device with a label 'PHELPS ANENT' (no other text or symbols)natural_image
Line drawing of a handheld air purifier with a valve and bulb (no text or symbols)natural_image
Illustration of a hand holding a curved object with arrows indicating motion or force (no text or symbols)natural_image
Mechanical assembly diagram showing a valve and housing with a magnified inset of internal components (no text or symbols)text_image
Piano's device Piano's devicenatural_image
Line drawing of a portable air purifier with a digital device and connector (no text or symbols)natural_image
Diagram of a portable air purifier with attached fan and bulb (no text or symbols)natural_image
Illustration of a human torso with a belt and curved arrows indicating motion or pressure (no text or symbols)natural_image
Illustration of a person wearing a button-based belt with a checkmark pointing to the belt (no text or symbols present)natural_image
Illustration of a person wearing a garment with a bandage and a cross mark (no text or symbols)natural_image
Illustration of a person wearing a shirt with a shaded bandage and a cross mark, no text or symbols present.natural_image
Diagram of a medical device with a black arrow pointing to a component, no text or symbols presentnatural_image
Illustration of a human torso with a medical device and a checkmark overlay (no text or symbols)natural_image
Hand pointing at a button on a device (no text or symbols visible)natural_image
Illustration of hands washing a faucet with liquid, no text or symbols presentnatural_image
Line drawing of a hand holding a device with a bulb and cable (no text or symbols)text_image
Medical procedure diagram showing finger placement on a patient's abdomen with a magnified view of the right side of the device.text_image
Medical illustration showing a hand using a stethoscope to adjust a percentage symbol with an arrow and droplet symbol.text_image
Diagram showing a hand pressing a button labeled 'Power' with a double-headed arrow indicating left-hand rule, surrounded by buttons and cables.natural_image
Illustration of a portable air purifier with a digital device and black arrow indicating rotation (no text or symbols)text_image
Diagram illustrating a cooking process with a pot and a spray bottle, showing a reaction step and product label 'PHILIPS ALIMENT'text_image
① ② PHELPE AVENT PHELPE AVENTnatural_image
Diagram of a mechanical device with an arrow indicating direction, showing internal components (no text or symbols)natural_image
Illustration of a hand washing a sink with a thermometer and droplet symbol (no text or labels)Fuente: https://www.cdc.gov/breastfeeding/recommendations/handling_breastmilk.htm
natural_image
Diagram of a biological structure with an arrow indicating direction, no text or symbols presenttext_image
Diagram showing a checkmark and cross symbols on a divided background, likely indicating approval or rejection actions.natural_image
Two identical 3D-rendered objects with checkmarks and X marks, separated by a diagonal line (no text or symbols)natural_image
Illustration of a bottle with internal components and directional arrows indicating rotation (no text or symbols)text_image
HOURS EVENTtext_image
Diagram showing a biological or anatomical structure with an arrow pointing to a labeled point '0' and a circular icon containing the number '1'.text_image
RECYCLE RBRC 1.800.822.8837natural_image
Illustration of a hand washing a car with a thermometer and water droplets (no text or symbols)natural_image
Illustration of hands using a tool to clean or wash a circular object in a bowl (no text or symbols visible)natural_image
Illustration of a hand washing a shower with a thermometer icon (no text or symbols)natural_image
Illustration of various laboratory glassware including a lamp, beakers, and containers (no text or labels)natural_image
Illustration of a laptop with coins and checkmark symbols (no text or labels)natural_image
Simple line drawing of a box with a hand inserting a coin into it (no text or symbols)natural_image
Illustration of various kitchen utensils and containers arranged on a tray (no text or symbols)natural_image
Illustration of a cooking pot with ingredients being cooked, accompanied by a 5-minute timer (no text or symbols on the pot itself)text_image
Illustration showing a cooking pot with food items and two thermometer images above it, likely indicating temperature measurement.natural_image
Illustration of various household appliances and containers arranged on a patterned tray (no text or symbols)natural_image
Illustration of a plastic container filled with various food items (no text or symbols visible)text_image
Diagram showing a hand interacting with a device with power button and switch, labeled with 'II' and 'ON'text_image
PHIOPS PCnatural_image
Simple icon of a calendar with three dots above and below, no text or symbols present.natural_image
Simple icon of a stylized number 20 with dots and two dots above, no text or symbols present.natural_image
Abstract pattern of dots and a star-like shape on a rounded square background (no text or symbols)natural_image
Illustration of hands using a faucet to clean water, showing liquid dripping from the faucet (no text or symbols)natural_image
Simple line drawing of a mechanical device with a lever and base mount (no text or symbols)natural_image
Diagram of a spray bottle with a funnel and rotating mechanism, no text or symbols presentnatural_image
Illustration of a medical or laboratory device with a funnel and bulb, labeled 'PHIAPH ANENT' (no other text or symbols)natural_image
Line drawing of a handheld air purifier with a label 'PHILIPS AVEY' on the base (no other text or symbols)natural_image
Illustration of a hand holding a curved object with arrows indicating motion or force (no text or symbols)natural_image
Mechanical assembly diagram showing a valve and housing with a magnified inset (no text or symbols)text_image
Pensin's Start Pensin's Startnatural_image
Line drawing of a hair dryer with a hand pump and digital device (no text or symbols)natural_image
Technical line drawing of a spray gun with attached component (no text or symbols)natural_image
Illustration of a human torso with a bone wrapped around it, showing motion arrows (no text or symbols)natural_image
Illustration of a person wearing a medical-style bandage with a checkmark indicating a specific point (no text or symbols present)natural_image
Illustration of a person wearing a garment with a bandage and a cross mark (no text or symbols)text_image
Diagram showing a cross symbol on a shaded garment sleeve, indicating a medical or safety hazard.text_image
PHOEN 1.0003natural_image
Diagram of a medical device with a black arrow pointing to a component, no text or symbols presentnatural_image
Illustration of a human torso with a medical device and a checkmark overlay (no text or symbols)natural_image
Hand pressing a button on a device (no text or symbols visible)natural_image
Illustration of hands washing a faucet with liquid, no text or symbols presentnatural_image
Line drawing of a hand holding a medical device with tubing (no text or symbols)text_image
Medical diagram showing finger placement on a patient's abdomen with a magnified view of the right side of the device.text_image
Medical illustration showing a hand using a stethoscope to address percentage values, with an arrow indicating the process.text_image
Diagram showing a hand pressing a button labeled 'II' with an arrow pointing to a button labeled 'SST', alongside a power button and plug-in buttons.natural_image
Illustration of a portable air purifier with a valve and bulb, showing internal components and a downward arrow (no text or symbols)natural_image
Diagram of a mechanical device with an arrow indicating upward motion, showing internal components (no text or symbols)natural_image
Illustration of a hand washing a shower with a thermometer icon (no text or symbols)Source : https://www.cdc.gov/breastfeeding/recommendations/handling_breastmilk.htm
natural_image
Diagram of a biological structure with a central arrow and surrounding circular patterns (no text or symbols)text_image
Medical or healthcare symbol image showing a checkmark and a cross with an X, overlaid on a divided figure silhouette.natural_image
Two identical 3D-rendered objects with checkmarks and X marks, separated by a diagonal line (no text or symbols)natural_image
Illustration of a bottle with internal components and arrows indicating rotation (no text or symbols)text_image
HOURS EVENTtext_image
Diagram illustrating a medical or anatomical procedure with labeled parts and directional arrows, including a circled 'I' marker.text_image
RECYCLE RBRC 7.800.822.8837Philips Personal Health
United States of America
1875 Buckhorn Gate, 5th Floor, Mississauga,
Ontario, L4W 5P1
Canada
www.philips.com/avent