
MT10 - Measuring equipment Amprobe - Free user manual and instructions
Find the device manual for free MT10 Amprobe in PDF.
| Product type | Hygrometer |
| Brand | Amprobe |
| Model | MT10 |
| Display | LCD with 3 LEDs |
| Measuring range - Wood | 8 to 60% |
| Resolution - Wood | 0.1% |
| Accuracy - Wood | ± 2% |
| Measuring range - Building materials | 0.3 to 2.0% |
| Resolution - Materials | 0.01% |
| Accuracy - Materials | ± 0.1% |
| Measuring range - Temperature | 0 °C to 40 °C / 32 °F to 99 °F |
| Resolution - Temperature | 0.1 °C / 0.2 °F |
| Accuracy - Temperature | ± 2 °C / ± 4 °F |
| Power supply | 9 V battery (type 6F22) |
| Low battery indicator | "+" symbol on display |
| Auto power off | After 1 minute of inactivity |
| Backlight | Yes, turns off after 15 seconds |
| Humidity LED | Green (dry), Yellow (damp), Red (wet) |
| Measurement modes | Wood, Materials, Temperature (°C/°F) |
| Dimensions (approximate) | Not specified in the manual |
| Weight (approximate) | Not specified in the manual |
| Care and cleaning | Clean with a soft cloth and mild detergent solution; do not use solvents |
| Battery replacement | Standard 9 V battery, compartment under the device |
| Safety | Do not use in presence of explosive gases; keep dry |
| Warranty | 1 year against defects in materials and workmanship |
| Compliance | CE, Australian standards |
Frequently Asked Questions - MT10 Amprobe
User questions about MT10 Amprobe
0 question about this device. Answer the ones you know or ask your own.
Ask a new question about this device
Download the instructions for your Measuring equipment in PDF format for free! Find your manual MT10 - Amprobe and take your electronic device back in hand. On this page are published all the documents necessary for the use of your device. MT10 by Amprobe.
USER MANUAL MT10 Amprobe
Limited Warranty and Limitation of Liability
Your Amprobe product will be free from defects in material and workmanship for 1 year from the date of purchase. This warranty does not cover fuses, disposable batteries or damage from accident, neglect, misuse, alteration, contamination, or abnormal conditions of operation or handling. Resellers are not authorized to extend any other warranty on Amprobe's behalf. To obtain service during the warranty period, return the product with proof of purchase to an authorized Amprobe Test Tools Service Center or to an Amprobe dealer or distributor. See Repair Section for details. THIS WARRANTY IS YOUR ONLY REMEDY. ALL OTHER WARRANTYES - WHETHER EXPRESS, IMPLIED OR STAUTORY - INCLUDING IMPLIED WARRANTY OF FITNESS FOR A PARTICULAR PURPOSE OR MERCHANTABILITY, ARE HEREBY DISCLAIMED. MANUFACTURER SHALL NOT BE LIABLE FOR ANY SPECIAL, INDIRECT, INCIDENTAL OR CONSEQUENTIAL DAMAGES OR LOSSES, ARISING FROM ANY CAUSE OR THEORY. Since some states or countries do not allow the exclusion or limitation of an implied warranty or of incidental or consequential damages, this limitation of liability may not apply to you.
Repair
All test tools returned for warranty or non-warranty repair or for calibration should be accompanied by the following: your name, company's name, address, telephone number, and proof of purchase. Additionally, please include a brief description of the problem or the service requested and include the test leads with the meter. Non-warranty repair or replacement charges should be remitted in the form of a check, a money order, credit card with expiration date, or a purchase order made payable to Amprobe® Test Tools.
In-Warranty Repairs and Replacement – All Countries
Please read the warranty statement and check your battery before requesting repair. During the warranty period any defective test tool can be returned to your Amprobe® Test Tools distributor for an exchange for the same or like product. Please check the "Where to Buy" section on www.amprobe.com for a list of distributors near you. Additionally, in the United States and Canada In-Warranty repair and replacement units can also be sent to a Amprobe® Test Tools Service Center (see address below).
Non-Warranty Repairs and Replacement - US and Canada
Non-warranty repairs in the United States and Canada should be sent to a Amprobe® Test Tools Service Center. Call Amprobe® Test Tools or inquire at your point of purchase for current repair and replacement rates.
In USA In Canada
Amprobe Test Tools Amprobe Test Tools
Everett, WA 98203 Mississauga, ON L4Z 1X9
Tel: 877-AMPROBE (267-7623) Tel: 905-890-7600
Non-Warranty Repairs and Replacement - Europe
European non-warranty units can be replaced by your Amprobe® Test Tools distributor for a nominalv charge. Please check the "Where to Buy" section on www.amprobe.com for a list of distributors near you.
European Correspondence Address*
Amprobe® Test Tools Europe
In den Engematten 14
79286 Glottertal, Germany
Tel.: +49 (0) 7684 8009 - 0
^* (Correspondence only – no repair or replacement available from this address. European customers please contact your distributor.)
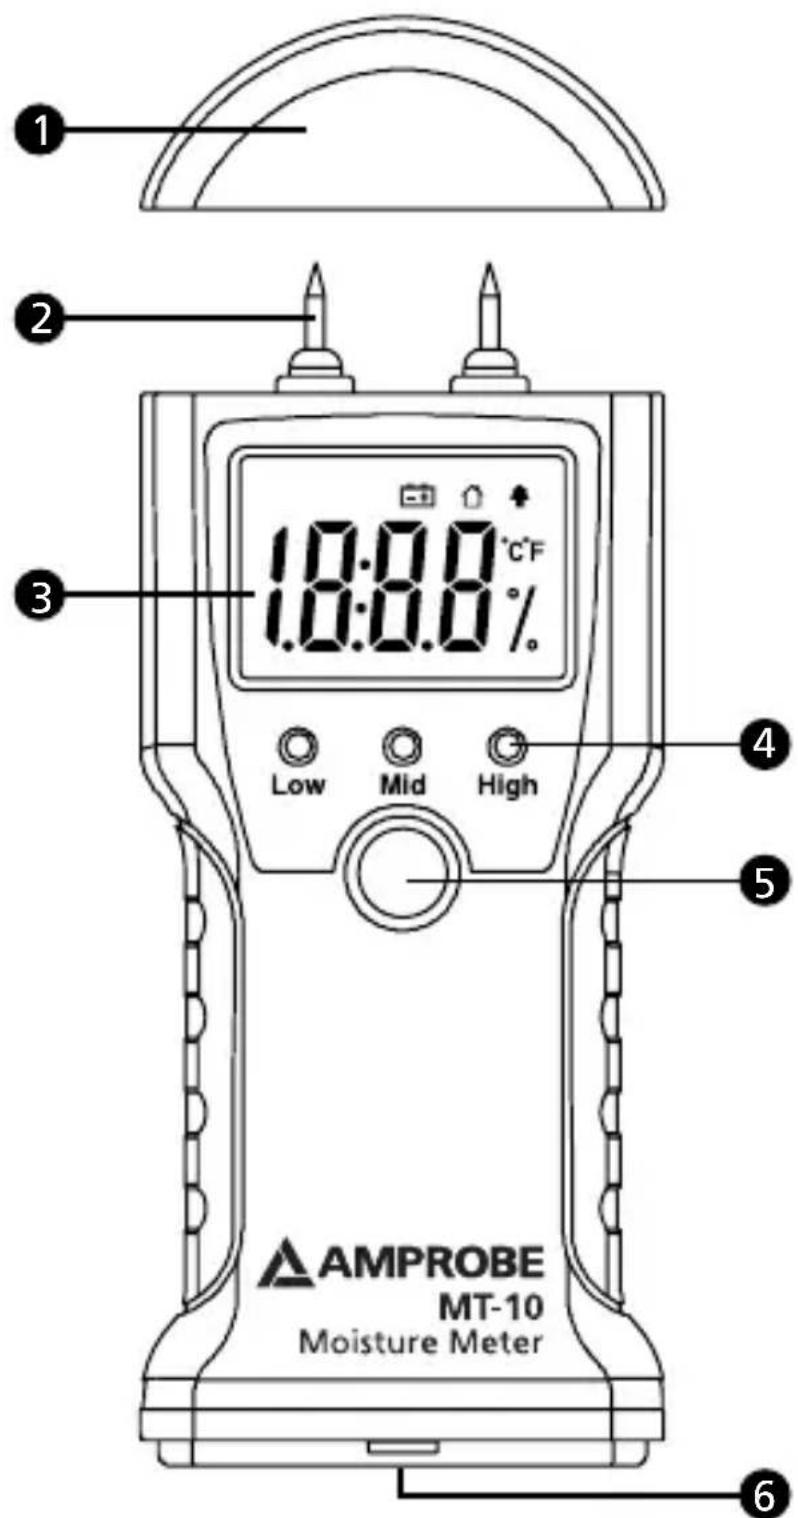
Test Probes Cover
3 Display (LCD)
Function Button / Power on /off
2 Pin
4 LED
6 Battery Cover
LCD Display
18:0.8°C F 16:0.8%
| Batteries are low and should be replaced. | |
| Wood moisture measurement mode is selected. In this mode, you can measure the moisture level of sawn timber, paper or cardboard. | |
| Material moisture measurement mode is selected. In this mode, you can measure the moisture level of hardened material (mortar concrete or plaster). | |
| % Percent (moisture unit) | |
| °C Celsius degree | |
| °F Fahrenheit degree | |
MT-10 Moisture Meter
CONTENTS
SYMBOLS 2
UNPACKING AND INSPECTION 2
INTRODUCTION 3
OPERATION 3
SPECIFICATION 5
MAINTENANCE AND REPAIR 6
Battery Replacement 6
SYMBOLS
| A | Caution! Refer to the explanation in this Manual |
| C | Conforms to relevant Australian standards |
| CE | Complies with European Directives |
| × | Do not dispose of this clamp meter as unsorted municipal waste. Contact a qualified recycler for disposal. |
WARNING and PRECAUTIONS
- Do not operate the meter in explosive gas (material), combustible gas (material) steam or filled with dust.
- Keep the instrument dry.
- Keep the probe clean.
- Keep the instrument and battery out of reach of infant and child.
- Some factors (such as material type and temperature) can affect moisture measurement result and may make it necessary to correct the displayed value.
UNPACKING AND INSPECTION
Your shipping carton should include:
1 MT-10 moisture meter
1 9 volt battery
1 Users manual
If any of the items are damaged or missing, return the complete package to the place of purchase for an exchange.
INTRODUCTION
Moisture meters MT-10 can be used to measure the amount of water in the wood or building material so that the woodworker can determine if it is suitable for the intended purpose. Building inspectors, carpenters, hobbyists, and other woodworkers often are required to have moisture meters. Wood flooring installers, for example, have to verify that the moisture of the wood matches the relative humidity in the air of the building. If this step is skipped, a vast array of problems may present itself: cracking, cupping, crowning, buckling, sunken joints, and cracked finishes.
OPERATION
- Press the POWER ON/OFF button once to turn on the instrument
- Selecting desired Measurement Mode
a) After the instrument has been turned on, press and hold down the button for about 3 seconds to enter Setting Mode (reading disappears, symbol starts flickering on the display).
b) While symbol is flickering on the display, press the button until the meter is in the desired measurement mode and the corresponding symbol flickers on the display. The four modes are as follows: Wood moisture measurement mode ("flickers), material moisture measurement mode ("flickers), Celsius temperature measurement mode ("C"flickers), Fahrenheit temperature measurement mode ("F"flickers).
c) After the desired measurement mode is selected, don't operate the instrument. About 3 seconds later, the instrument exits Setting Mode automatically. Now you can start measurement.
3. Performing Measurement
a) For temperature measurements, the display shows the present environment temperature directly.
b) To perform moisture measurements, drive the probes into the wood or material to be measured, read the reading on the display.
4. Automatic Power-Off Feature
a) In wood moisture or material moisture measurement mode, if you don't operate the instrument (or the reading does not change) for about 1 minute, the instrument will turn off automatically.
b) In Celsius or Fahrenheit temperature measurement mode, the instrument will turn off automatically about 1 minute later. After the instrument is turned on, pressing the button turns on the backlight. About 15 seconds later, the backlight turns off automatically.
5. MOISTURE READINGS (LED)
Green - indicates "air-dry" conditions.
Yellow - indicates increased moisture.
Red - indicates excess moisture.
SPECIFICATION
Display: LCD and 3 LED's
| Measurement Range | Resolution Accuracy | ||
| Wood 8 | ~ 60% 0.1% ±2% | ||
| Building Material | 0.3 ~ 2.0% 0.01% ±0.1% | ||
| Temp. 0° | C ~ 40°C or 32°F ~ 99°F | 0.1°C / 0.2°F ±2°C / ±4°F | |
Low Battery Indication : Symbol “+” shown on the display
Automatic Power-Off
Battery:9V,6F22
| Operating Environment | Storage Environment | |
| Temp. 0°C ~ 40°C -10°C ~ -50°C | ||
| Relative Humidity | < 85% < 85% |
Compliance : Complied with CE Regulation
MAINTENANCE AND REPAIR
If there appears to be a malfunction during the operation of the meter, the following steps should be performed in order to isolate the cause of the problem.
- Check the battery. Replace the battery immediately when the " + " symbol appears on the LCD.
- Review the operating instructions for possible mistakes in operating procedure.
Except for the replacement of the battery, repair of the meter should be performed only by a Factory Authorized Service Center or by other qualified instrument service personnel. The front panel and case can be cleaned with a mild solution of detergent and water. Apply sparingly with a soft cloth and allow to dry completely before using. Do not use aromatic hydrocarbons or chlorinated solvents for cleaning.
BATTERY REPLACEMENT
Requires one standard 9V battery. Battery compartment is located on the bottom of the meter
- Lift clip to access the battery compartment.
- Connect a new 9V battery.
- Replace the cover and securely snap in place. The meter is now ready for use.
AMPROBE
MT-10
Hygromètre
Mode d'emploi
Amprobe Test Tools Amprobe Test Tools
Everett, WA 98203 Mississauga, ON L4Z 1X9
Tél.: 877-AMPROBE (267-7623) Tél.: 905-890-7600
Amprobe Test Tools Amprobe Test Tools
Everett, WA 98203 Mississauga, ON L4Z 1X9
Tel.: 877-AMPROBE (267-7623) Tel.: 905-890-7600
Amprobe Test Tools Amprobe Test Tools
Everett, WA 98203 Mississauga, ON L4Z 1X9
Tel.: 877-AMPROBE (267-7623) Tel.: 905-890-7600
Visit www.Amprobe.com for
- Catalog
Application notes - Product specifications
- User manuals


- Limited Warranty and Limitation of Liability
- Repair
- In-Warranty Repairs and Replacement – All Countries
- Non-Warranty Repairs and Replacement - US and Canada
- Non-Warranty Repairs and Replacement - Europe
- LCD Display
- MT-10 Moisture Meter
- CONTENTS
- SYMBOLS
- WARNING and PRECAUTIONS
- UNPACKING AND INSPECTION
- INTRODUCTION
- OPERATION
- Performing Measurement
- Automatic Power-Off Feature
- MOISTURE READINGS (LED)
- SPECIFICATION
- MAINTENANCE AND REPAIR
- BATTERY REPLACEMENT
- AMPROBE
- MT-10
- Hygromètre
- Mode d'emploi
- Visit www.Amprobe.com for
Brand : Amprobe
Model : MT10
Category : Measuring equipment