
RFZ 327 IN - Oven ROSIERES - Free user manual and instructions
Find the device manual for free RFZ 327 IN ROSIERES in PDF.
| Product type | Built-in oven |
| Brand | Rosieres |
| Model | RFZ 327 IN |
| Dimensions (HxWxD) | 59.5 x 59.5 x 55.7 cm (estimated) |
| Net weight | 35 kg (estimated) |
| Power supply | 220-240 V, 50/60 Hz |
| Maximum power | 3000 W (estimated) |
| Capacity | 70 L (estimated) |
| Control type | Touch sensitive |
| Timer | Yes, up to 120 min |
| Child safety | Yes, control lock |
| Lighting | Integrated U-SEE LED |
| Cooking functions | Fan-assisted bottom heat, Bottom heat, Natural convection, Fan-assisted heat, Grill, Turbo grill, Ventilated rotisserie, Defrosting, Steaming, Pizza, Soft Cook |
| Cleaning mode | Manual (hand cleaning) |
| Door gasket | Removable for cleaning |
| Inner glass | Removable for cleaning |
| Supplied accessories | Grid, drip pan, rotisserie (depending on model), pizza stone (depending on model) |
| Rotisserie | Yes |
Frequently Asked Questions - RFZ 327 IN ROSIERES
User questions about RFZ 327 IN ROSIERES
0 question about this device. Answer the ones you know or ask your own.
Ask a new question about this device
Download the instructions for your Oven in PDF format for free! Find your manual RFZ 327 IN - ROSIERES and take your electronic device back in hand. On this page are published all the documents necessary for the use of your device. RFZ 327 IN by ROSIERES.
USER MANUAL RFZ 327 IN ROSIERES
- During cooking, moisture may condense inside the oven cavity or on the glass of the door. This is a normal condition. To reduce this effect, wait 10-15 minutes after turning on the power before putting food inside the oven. In any case, the condensation disappears when the oven reaches the cooking temperature.
Cook the vegetables in a container with a lid instead of an open tray. - Avoid leaving food inside the oven after cooking for more than 15/20 minutes.
- WARNING: the appliance and accessible parts become hot during use. Be careful not to touch any hot parts.
-WARNING: the accessible parts can become hot when the oven is in use. Children must be kept at a safe distance. - WARNING: ensure that the appliance is switched off before replacing the bulb, to avoid the possibility of electric shocks.
-WARNING: before initiating the automatic cleaning cycle: - Clean the oven door;
- Remove large or coarse food residues from the inside of the oven using a damp sponge. Do not use detergents;
- Remove all accessories and the sliding rack kit (where present);
- Do not place tea towels
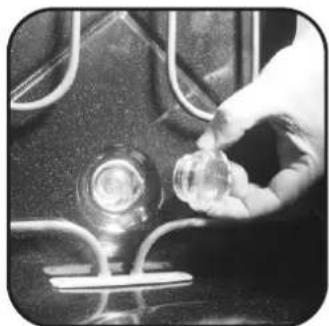
- In ovens with meat probe it is necessary, before making the cleaning cycle, close the hole with the nut provided. Always close the hole with the nut when the meat probe is not used.
Children under 8 must be kept at a safe distance from the appliance if not continuously supervised.
Children must not play with the appliance. The appliance can be used by those aged 8 or over and by those with limited physical, sensorial or mental capacities, without experience or knowledge of the product, only if supervised or provided with instruction as to the operation of the appliance, in a safe way with awareness of the possible risks. - Cleaning and maintenance should not be carried out by unsupervised children.
- Do not use rough or abrasive materials or sharp metal scrapers to clean the oven door glasses, as they can scratch the surface and cause the glass to shatter.
The oven must be switched off before removing the removable parts and, after cleaning, reassemble them according the instructions.
-Only use the meat probe recommended for this oven. - Do not use a steam cleaner for cleaning operations.
- Connect a plug to the supply cable that is able to bear the voltage, current and load indicated on the tag and having the earth contact. The socket must be suitable for the load indicated on the tag and must be having the earth contact connected and in operation. The earth conductor is yellow-green in colour. This operation should be carried out by a suitably qualified professional. In case of incompatibility between the socket and the appliance plug, ask a qualified electrician to substitute the socket with another suitable type. The plug and the socket must be conformed to the current norms of the installation country. Connection to the power source can also be made by placing an omnipolar breaker between the appliance and the power source that can bear the maximum connected load and that is in line with current legislation. The yellow-green earth cable should not be interrupted by the breaker. The socket or omnipolar breaker used for the connection should be easily accessible when the appliance is installed.
- The disconnection may be achieved by having the plug accessible or by incorporating a switch in the fixed wiring in accordance with the wiring rules.
- If the power cable is damaged, it must be substituted with a cable or special bundle available from the manufacturer or by contacting the customer service department.
The type of power cable must be H05V2V2-F. - Failure to comply with the above can compromise the safety of the appliance and invalidate the guarantee.
- Any excess of spilled material should be removed before cleaning.
- During the pyrolytic cleaning process, surfaces can heat up more than usual, children must therefore be kept at a safe distance.
The appliance must not be installed behind a decorative door in order to avoid overheating. - When you place the shelf inside, make sure that the stop is directed upwards and in the back of the cavity. The shelf must be inserted completely into the cavity
- WARNING: Do not line the oven walls with aluminum foil or single-use protection available from stores. Aluminum foil or any other protection, in direct contact with the hot enamel, risk melting and deteriorating the enamel of the insides.
- WARNING: Never remove the oven door seal.
- No additional operation/setting is required in order to operate the appliance at the rated frequencies
Safety Instructions
4
- General warnings
1.1 Declaration of compliance
1.2 Safety hints
1.3 Recommendations
1.4 Installation
1.5 Electrical connection
Accessories
5
2.1 Oven equipment
2.2 Rotisserie
2.3 U-SEE
2.4 Removing and cleaning wire racks
Cleaning the oven
6
Description of the display
7
4.1 Before using the oven for the first time
4.2 Using the end of cooking timer
4.3 Setting The Correct Time
4.4 Use Of Touch Control Clock Programmer
4.5 How to use the oven
4.6 Cooking tips
Service centre
9
1. GeneralWarnings
Read the instructions carefully to make the most of your oven. We recommend you keep the instructions for installation and use for later reference, and before installing the oven, note its serial number in case you need to get help from the after-sales service.
When you have unpacked the oven, make sure that it has not been damaged in any way. If you have any doubts at all, do not to use it. Contact a professionally qualified person. Keep packing materials such as plastic bags, polystyrene, or nails out of the reach of children because they are dangerous to children.
The company shall not be liable if the instructions provided in this document are not complied with.
! NOTE: Functions, properties and accessories of ovens which are mentioned in this manual, can be change depending on oven models.
1.1 Declaration of Compliance
By placing the C mark on this product, we are confirming compliance to all relevant European safety, health and environmental requirements which are applicable in legislation for this product.
1.2 Safety Hints
- The oven must be used only for the purpose for which it was designed. It must only be used for cooking food. Any other use, e.g. as a form of heating, is an improper use of the oven and is therefore dangerous.
The manufacturers cannot be held responsible for any damage caused by improper, incorrect or unreasonable use.
When using any electrical appliance you must follow a few basic rules.
-
Do not pull on the power cable to remove the plug from the socket.
-
Do not touch the oven with wet or damp hands or feet.
-
Do not use the oven unless you are wearing something on your feet.
-
It is not generally a good idea to use adapters, multiple sockets for several plugs or cable extensions.
-
If the oven breaks down or develops a fault switch it off at the mains and do not touch it.
-
If the cable is damaged it must be replaced promptly.
When replacing the cable, follow these instructions.
Remove the power cable and replace it with one of the H05VV-F type. The cable must be able to bear the electrical current required by the oven.Cable replacement must be carried out by properly qualified technicians.
The earthing cable (yellow-green) must be 10mm longer than the power cable.
Use only an approved service centre for repairs and ensure that only original parts are used. If the above instructions are not adhered to the manufacturers cannot guarantee the safety of the oven.
The oven you have just acquired has the described technical characteristics and you must not make any modifications to it.
-
Do not store flammable products in the oven; they can catch fire if the oven comes on accidentally.
-
Do not press on and do not let children sit on the oven door.
-
Use kitchen oven gloves, when putting into or removing a dish from the oven.
1.3 Recommendations
-
After each use of the oven, a minimum of cleaning will help keep the oven perfectly clean.
-
Do not line the oven walls with aluminium foil or single-use protection available from stores. Aluminium foil or any other protection, in direct contact with the hot enamel, risks melting and deteriorating the enamel of the insides.
-
In order to prevent excessive dirtying of your oven and the resulting strong smokey smells, we recommend not using the oven at very high temperature. It is better to extend the cooking time and lower the temperature a little.
Identification plate
In addition to the
accessories supplied with the oven, we advise you only use dishes and baking moulds resistant to very high Temperatures.

1.4 Installation
The manufacturers have no obligation to carry this out. If the assistance of the manufacturer is required to rectify faults arising from incorrect installation, this assistance is not covered by the guarantee. The installation instructions for professionally qualified personnel must be followed. Incorrect installation may cause harm or injury to people, animals or belongings. The manufacturer cannot be held responsible for such harm or injury.
The kitchen unit in which the oven is to be fitted must be made of material resistant to temperatures of at least 70^ .
The oven can be located high in a column or under a worktop. Before fixing, you must ensure good ventilation in the oven space to allow proper circulation of the fresh air required for cooling and protecting the internal parts. Make the openings specified on last page according to the type of fitting.
1.5 Electrical Connection
THE ELECTRICAL CONNECTION SHOULD BE CARRIED OUT BY AN APPROVED CONTRACTOR OR TECHNICIAN WITH SIMILAR QUALIFICATIONS.
The installation receiving the appliance must comply with the standard in force in the installation country.
The manufacturer does not accept any responsibility if this provision is not complied with.
Connection to the network must be by earthed socket outlet, or by means of a multipole circuit-breaker, in compliance with the installation country.
The installation must be protected by suitable fuses, and have wires with a large enough cross-section to supply the oven normally.
CONNECTION:
The oven is fitted with a power lead for connecting exclusively to a voltage of 220-240 V AC across the phases or across phase and neutral.
Connection must be carried out having first checked:
-the supply voltage indicated on the meter,
The lead protection wire (green/yellow) connected to the earth terminal of the oven must be connected to the earth terminal of the installation.
Caution:
- Have the earth continuity of the installation checked by an electrician before making the connection.
The manufacturer will not be liable for any incident, or the possible consequences that may arise from the use of the oven not earthed, or connected to an earth with defective continuity.
NB: Do not forget that the oven may require after-sales service. Also, locate the socket outlet so that the oven can be connected once it is removed from its space.
Power supply cable: If the power supply cable has to be changed,
please have this done by the after-sales service or by someone with similar qualifications.
2.1 Oven Equipment 2.3
It is necessary to do an initial cleaning of the equipment before the first use of each of them. Wash them with a sponge. Rinse and dry off.
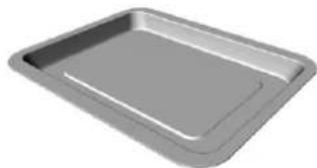
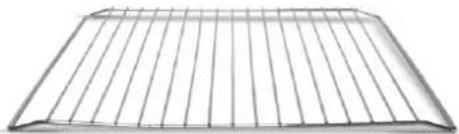
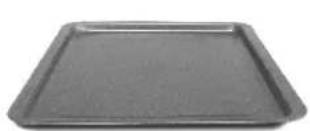
The shelf can take moulds and dishes.

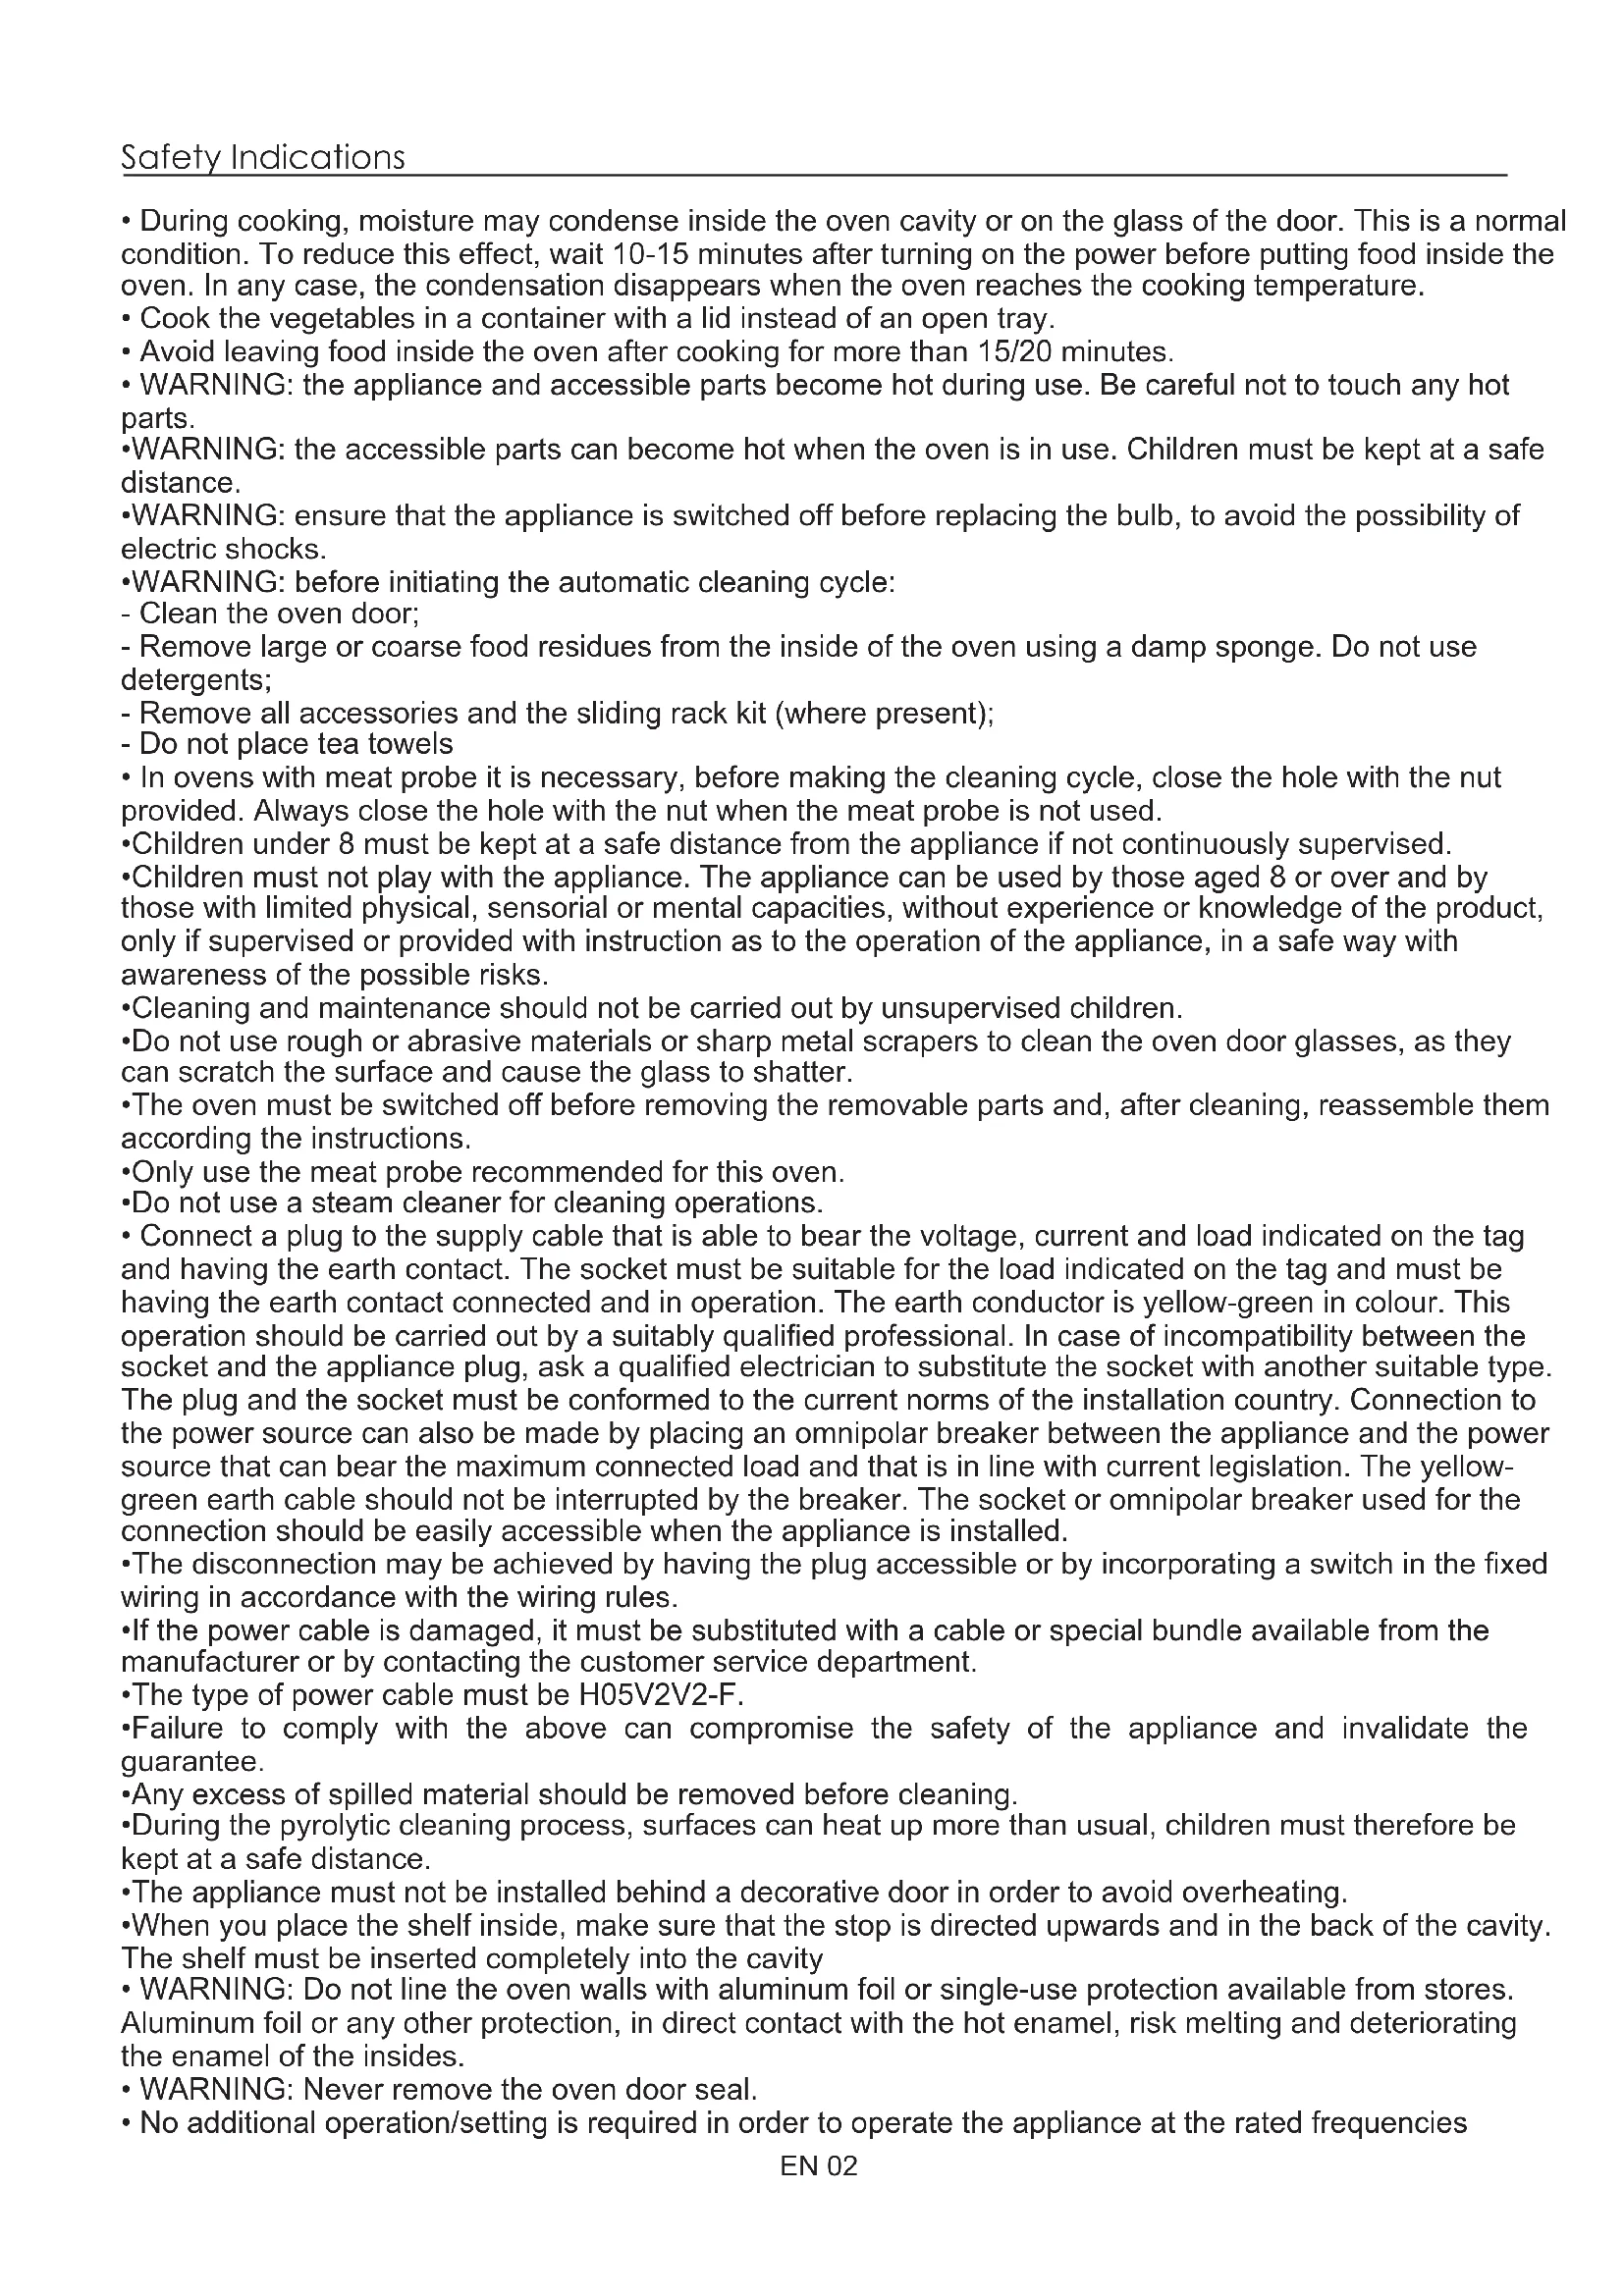
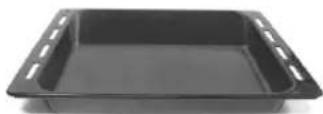
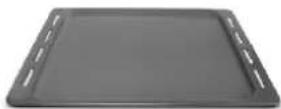
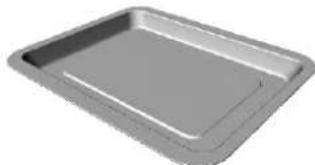
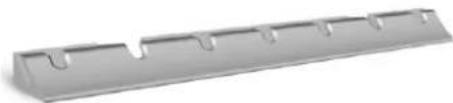
The drip tray catches the juices from grilled foods.

Never use he drip tray as a roasting tray as fat deposits can be quickly spread throughout the oven, which produces excess smoke. Never place the drip tray directly on the oven bottom.
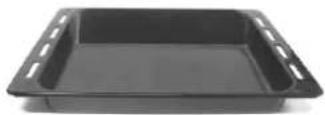
The pizza stone for a risper pizza equipped according to the model with its stand and the pizza roller.
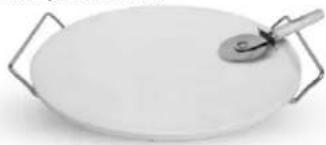
The pastry tray must be placed on the shelf. It is for cooking small pastries like choux, biscuits, meringues, etc... Never place the pastry tray directly on the oven bottom.
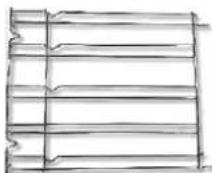
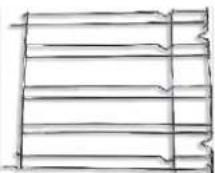
Lateral wire grid if included.
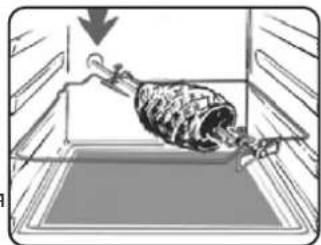
2.2. Rotisserie
No pre-heating is required for rotisserie cooking. Cooking with the door closed. The energy consumption is 90 - 95% less than traditional system.
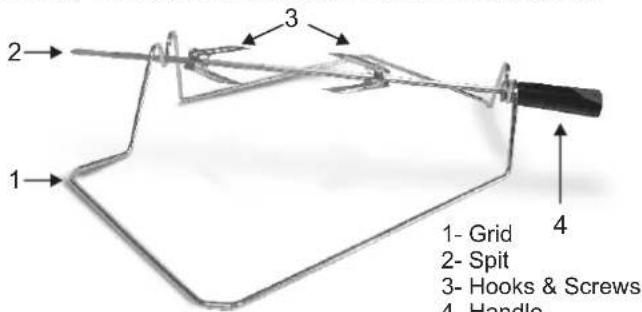
HOW TO USE TURNSPIT
- Unscrew the hooks
- Put the spit into the meat
- Fix the meat with the hooks
- Tighten the screws
- Insert the spit into the motor hole
- The handle
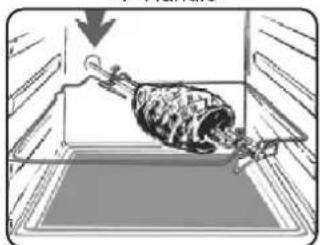
When the oven is in use, any unused accessories should be removed from the oven.
U·see
Is an illumination system which replaces the traditional « light bulb ». 14 LED lights are integrated within the door. These produce white high quality illumination which enables to view the inside of the oven with clarity without any shadows on all the shelves.
Advantages :
U·seeSystem, besides providing excellent illumination inside the oven, lasts longer than the traditional light bulb its easier and to maintain and most of all saves energy.
Optimum view
- Long life illumination
- Very low energy consumption, -95% in comparison with the traditional illumination High
"Appliance with white light LED of the 1M Class according to IEC 60825-1:1993 + A1:1997 + A2:2001 (equivalent to EN 60825-1:1994 + A1:2002 + A2:2001); the maximum light power emitted _A459nm < 150uW .
Not observed directly with optical instruments.
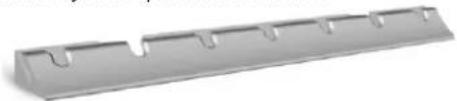
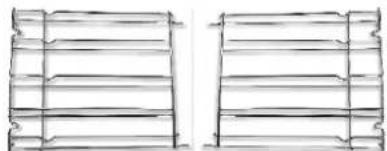
2.4 Removing And Cleaning Wire Racks
1- Remove the wire racks by pulling them in the direction of the arrows (see below)
2- To clean the wire racks either put them in the dishwasher or use a wet sponge, ensuring that they are dried afterwards.
3- After the cleaning process install the wire racks in reverse order.
3. Cleaning The Oven
- Wait for the oven to cool down before doing any cleaning by hand.
- Never clean your oven with abrasive cleaners, wire wool or sharp objects, or the enamel may be damaged beyond repair.
- Only use soapy water or bleach (ammonia) cleaners.
- Never line the oven sides with aluminium foil.
GLASS PARTS
We recommend you wipe clean the glass door with absorbent kitchen paper every time you use the oven. If the spattering is heavy, then you can clean with a well squeezed sponge and detergent, and rinse. Do not use harsh abrasive cleaners or sharp metal scrapers to clean the oven door glass since they can scratch the surface, which may result in shattering of the glass.
OVENDOOR SEAL
If this gets dirty, clean the oven seal with a slightly damp sponge.
ACCESSIONS
Clean them with a sponge soaked in soapy water. Rinse with clean water and dry off. Avoid abrasive cleaners.
DRIP TRAY
After grilling, remove the drip tray from the oven. Take care to pour the warm grease into a container. Wash and rinse the drip tray in hot water with a sponge soaked in washing up liquid.
If residues remain attached, soak them off in water and detergent. It can also go in a dishwasher or be cleaned with a commercial oven cleaner.
Never place a soiled drip tray in the oven.
Self-cleaning Oven With Catalytic
Special self-cleaning panels covered in a micro-porous coating are available as optional extras for all models. If they are fitted, the oven no longer needs to be cleaned by hand.
The fat that is splattered onto the sides of the oven during roasting is eliminated by the microporous coating which breaks the fat down by catalysis and transforms it into gas.
Excessive splattering may nevertheless block the pores and therefore hinder self-cleaning. The self-cleaning capacity may be restored by switching on the empty oven to maximum for about 10-20 minutes. Do not use abrasive products, metal cleaning wads, sharp objects, rough cloths, or chemical products and detergents that may permanently damage the catalytic lining.
It is a good idea to use deep roasting trays to roast fatty foods such as joints of meat etc. and to put a tray underneath the grill to catch surplus fat. If the walls of the oven are so thickly coated in grease that the catalytic lining is no longer effective remove surplus grease with a soft cloth or sponge soaked in hot water.
The lining must be porous for self-cleaning to be effective.
N.B.: All catalytic linings currently on the market have a working life of about 300 hours. They should therefore be replaced after about 300 hours.
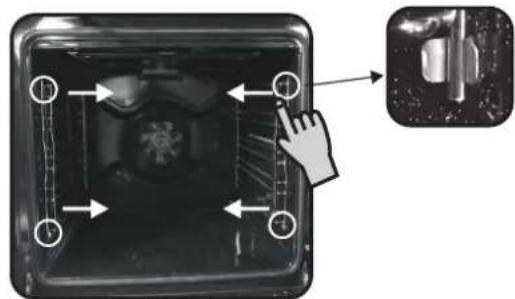
OVEN LIGHTING
Disconnect the power supply from the oven before cleaning or replacing the lamp.
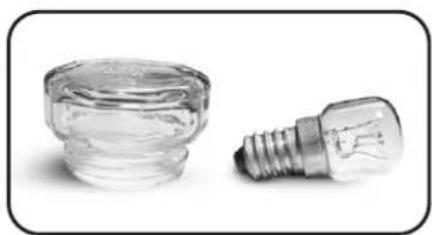
The bulb and its cover are made of material resistant to high temperatures.
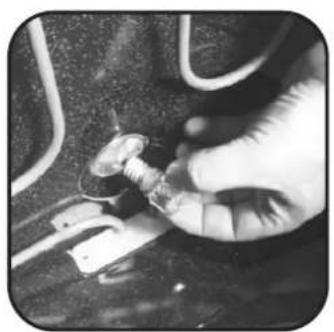
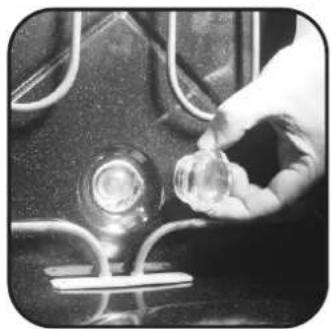
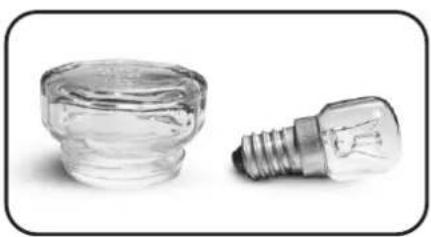
Bulb characteristics:
230 V AC - 25W-E 14 base Temperature 300^ to change a defective bulb, just:
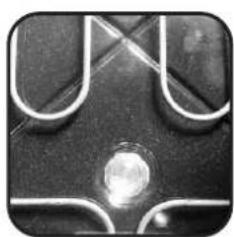
- Unscrew the glass cover,
-Unscrew the bulb,
-Replace it with the same type: see characteristics above,
After replacing the defective bulb, screw back the glass cover.
CLEANING THE DOOR GLASS
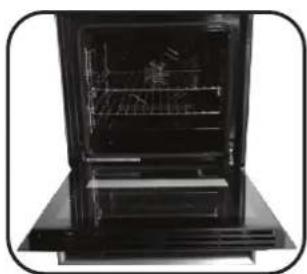
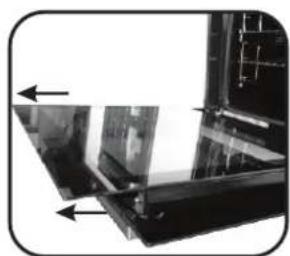
Internal door glass of this oven can be removed and cleaned. In order to clean the internal glass follow these instructions;
- Open the door of the oven. (Picture1)
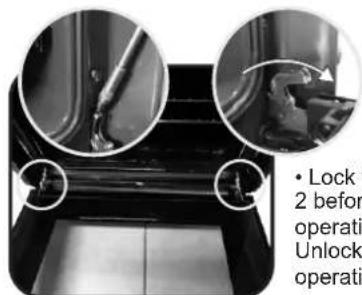
Picture 2
Picture 1
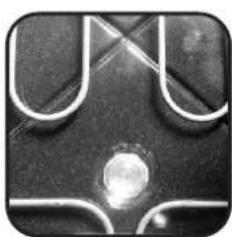
- Lock the hinges as shown in Picture 2 before starting the cleaning operation.
Unlock the hinges when the cleaning operation is finished. (Picture 2)
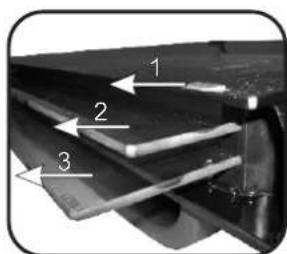
- Remove the screws as shown in Picture (Picture 3)

Picture 3

Picture 4
- Remove the top metallic cover by pulling it upwards. (Picture 4)
Picture 5
- Remove the glass by gently pulling it out of the door frame (Picture 5)
*For Pyrolytic ovens, please remove also 2^nd and 3 glasses. (Picture 6)
Picture 6
Picture 7
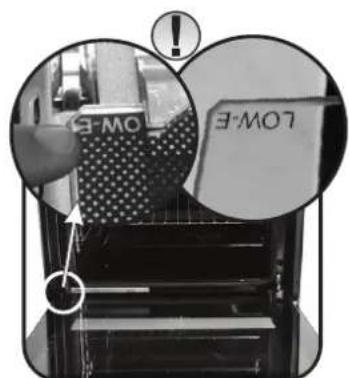
After cleaning the glass reassemble the parts in the reverse order of removal.
- ON ALL GLASES LOW-E sign must be properly readable and must be positioned on the left corner of the door, close to the left side hinge. In this way the printed surface of the 1^st glass will remain INSIDE the door.
4.Description Of The Display


4.1 Before Using The Oven For The First Time 4.2 Using The End Of Cooking Timer
PRELIMINARY CLEANING
-Clean the oven before using for the first time:
-Wipe over external surfaces with a damp soft cloth.
-Wash all accessories and wipe inside the oven with a solution of hot water and washing up liquid.
-Set the empty oven to the maximum temperature and leave on for about 1 hour, this will remove any lingering smells of newness. Ensure that the room is well ventilated while this is being done.
- THINGS TO REMEMBER
Confirmation of operation on timer
Modification must be confirmed by pressing the button.
Stopping the oven:
This may be necessary if you have input an incorrect instruction.
To stop the oven .... turn back the function selector knob to the Stop Position.
Child safety device:
To lock the oven controls, select the child safety device. Refer to the section entitled "Programming - The child safety device".
The cooling fan :
This protects the control panel and electronics from heat damage.
It begins and then stops automatically even when the oven is switched off.
Oven lighting :
By turning to the light symbol, you can switch on the oven light when it is not in use.
When the oven is in use, the light stays on during all of the oven functions and when the door is opened.
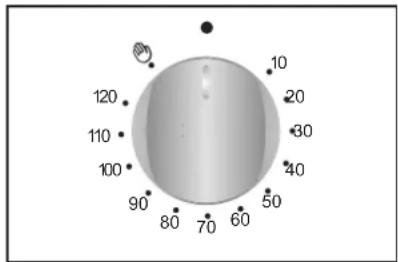
This control enables to set the desired cooking time (max. 120 min.) the oven will automatically switch off at the end of the set time.
The timer will count down from the set time return to the O position and switch off automatically.
For normal use of oven set the timer to the position.
To set the oven ensure the timer is not on the O position.
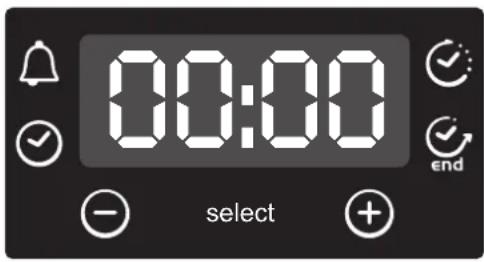
WARNING: the first operation to carry out after the oven has been installed or following the interruption of power supply (this is recognizable the display pulsating and showing 12:00) is setting the correct time. This is achieved as follows.
-Push the central button 4 times
-Set time with "-"+"+" buttons.
- Release all buttons.
ATTENTION: The oven will only operate providing the clock is set.
4.4 Use Of Touch Control Clock Programmer
| FUNCTION | HOW TO ACTIVATE IT | HOW TO SWITCH ITOFF | WHAT IT DOES WHAT | IT IS FOR |
| KEY LOCK | •Child Lock function is activated by touching Set (+) for a minimum of 5 seconds. From this moment on all other function are locked and the display will flash STOP and preset time intermittently. | •Ch ld Lock function is deactivated by touching touchpad Set (+) again for a minimum of 5 seconds. From this moment on all functions are selectable again. | ||
| MINUTE MINDER | •Push the central button 1 times•Press the buttons "-" "+" to set the required time•Release all the buttons | •When the set time as elapsed an audible alarm is activated (this alarm will stop on its own, however it can be stopped immediately by pressing the button) SELECT. | •Sounds an alarm at the end of the set time.•During the process, the display shows the remaining time. | •Allows to use the oven as alarm clock (could be activated either with operating the oven or with out operating the oven) |
| COOKING TIME | •Push the central button 2 times•Press the buttons "-" or "+"to set the lenght of cooking required•Release all buttons•Set the cooking function with the oven function selector | •When the time is elapsed the oven will switch off automatically.Should you wish to stop cooking earlier either turn the function selector to 0, or set time to 0:00 (SELECT and "-" "+"buttons) | •It allows to preset the cooking time required for the recipe chosen.•To check how long is left to run press the SELECT button 2 Times•To alter/change the preset time press SELECT and "-" "+"buttons. | •Push any button to stop the signal. Push the central button to return to the clock function |
| END OF COOKING END | •Push the central button 3 times•Press the buttons "-" "+" to set the time at which you wish the oven to switch off•Release the buttons•Set the cooking function with the ovenfunction selector | •At the time set, the oven will switch off. To switch off manually, turn the oven function selector to position O. | •Enables you to set the end of cooking time•To check the preset time push the central button 3 times•To modify the preset time press buttons SELECT + "-" "+" | •This function is typically used with "cooking time" function.For example if the dish has to be cooked for 45 minutes and needs to be ready by 12:30, simply select the required function, set the cooking time to 45 minutes and the end of cooking time to 12:30.•At the end of the cooking set time, the oven will switch of automatically and an audible alarm will ring.•Cooking will start automatically at 11:45 (12:30 minus 45 mins) and will continue until the pre-set end-of-cooking-time, when the oven will switch itself off automatically.WARNING.If the END of cooking is selected without setting the length of cooking time, the oven will start cooking immediately and it will stop at the END of cooking time set. |
4.5 How To Use The Oven 4.6 Cooking Tips
COOKING MODE
All cooking should be carried out with the door closed.
3
-
BOTTOM + FAN - The combination of the bottom heating unit and fan is ideal for fruit flans, tarts, quiches and pastries. It also helps food from becoming too dry and encourages bread dough to solidify the shelf in the bottom position in the oven.
-
BOTTOM - Using the lower element. Ideal for cooking all pastry based dishes. Use this for flans, quiches, tarts, pâté and any cooking that needs more heat from below.
TTOM + TOP - Both top and bottom heating elements are
in use. This method is ideal for all traditional roasting and baking. When cooking red meat, roast beef, leg of lamb, game, bread or foil wrapped foods.
3
BOTTOM + TOP + FAN - Both top and bottom heating
elements are used in conjunction with the fan, which circulates hot air throughout the oven. We recommend this method for poultry, pastries, fish and vegetables. By using this method better heat penetration is achieved and cooking and preheating times are also reduced. The fan cooking option allows you to cook different foods together at different positions in the oven all at the same time, providing even heat distribution but without the risk of mingling tastes and smells. When cooking different foods at the same time allow a further 10 minutes.
CIRCULAR HEATING ELEMENT + FAN - Air that has been used and is blown by the fan onto the different levels. It is ideal for cooking in different types of food at the same time (e.g. Meet and fish) without losing tastes and smell. It cooks very gently and is ideal for sponge dishes, pastries, etc.
GRILL - Using the top heating element. Success is ranted for mixed grills, kebabs and gratin dishes. The grill should be- heated to a high temperature for 5 minutes. White meats should lays be placed at some distance from the grill element, the cooking is slightly longer but the meat will be more succulent. Red meat and fillets can be placed directly onto the shelf with the drip tray placed death on lower shelf position.
3
GRILL + FAN - The top heating element is used in conjunction
with the fan which circulates the hot air around the oven. Pre heating is recommended for red meats but is not necessary for white meats. Grilling is ideal for cooking thicker food items such as pork or poultry. Food to be grilled should be placed directly at the centre of the middle shelf.
By sliding the drip tray underneath the shelf it will ensure that any juices are collected. For best results always make sure that the food is not too close to the grill element and turn the food over half way through the cooking time.
3
GRILL + TURNSPIT + FAN - The advantage of using the top
oven element at the same time as the fan and rotisserie is that the food is evenly cooked, preventing it from becoming dry and tasteless. The rotisserie is programmed to continue rotating for approximately five minutes after cooking, making full use of the residual oven heat. No preheating is required for rotisserie cooking.
51 + u + 4q = 1 + u + uq dH
FROST - When the dial is set to this position. The fan
circulates hot air around the frozen food so that it defrosts in a few minutes without the protein content of the food being changed or altered.
The temperature is preset in 40^ constant, no regulation is possible.
EP WARM - This is recommended to reheat precooked
foodstuff, positioning the shelf on the second level from top, or to defrost bread pizza or pastry by positioning the shelf on the lower level.
The temperature is preset in 60^ constant, no regulation is possible.
Z
CA - With this function hot air circulated in the oven to
ensure perfect result for dishes such as pizza or cake.
5
COOK - Soft cook is the function for the confectionery
and the bread. Thanks to its reduced fan speed, this function increases oven internal damp. The increased damp creates the ideal conditions of cooking for those foods that need to maintain an elastic consistence while they are cooking (ex. cakes, bread, biscuits) avoiding surface breakages.
- Tested in accordance with the CENELEC EN 60350-1 used for definition of energy class.
It is better not to salt meats until after cooking as salt encourages the meat to spatter fat. This will dirty the oven and make a lot of smoke.
Joints of white meat, pork, veal, lamb and fish can be put into the oven cold. The cooking time is longer than in a preheated oven, but it cooks through to the centre better as the heat has more time to penetrate the joint.
Correct preheating is the basis of successful red meat cookery.
GRILLS
Before loading the grill:
Remove the meat from the refrigerator a few hours before grilling. Lay it on several layers of kitchen paper. This improves seizing, making it tastier and avoids it staying cold at the centre.
Add pepper and spices to the meat before grilling, but add any salt after cooking. This way it will seize better and stay juicy. Baste all the food to be cooked with a little oil. This is best done with a wide flat basting brush. Then sprinkle with more pepper and herbs (thyme, etc.).
- During cooking:
Never pierce the food during cooking even when you turn it. This lets the juice out and it becomes dry.
BAKING
Avoid using shiny tins, they reflect the heat and can spoil your cakes. If your cakes brown too quickly, cover them with greaseproof paper or aluminium foil.
Caution: The correct way to use foil is with the shiny side in towards the cake. If not the heat is reflected by the shiny surface and does not penetrate the food.
Avoid opening the door during the first 20 to 25 minutes of cooking: Souffles, brioches, sponge cakes, etc. will tend to fall. You can check if cakes are done by pricking the centre with a knife blade or metal knitting needle. If the blade comes out nice and dry, your cake is ready and you can stop cooking. If the blade comes out moist or with bits of cake attached, continue baking but slightly lower the thermostat so that it is finished off without burning.
5. Service Centre
Before calling the Service Centre.
If the oven is not working, we recommend that:
- Check that, if the oven is properly plugged into the power supply.
If the cause of the fault cannot be detected:
- Disconnect the oven from the mains, do not touch the oven and call the after sales service.
Before calling the Service Centre remember to make a note of the serial number on the serial number specifications plate.
The oven is supplied with a guarantee certificate that ensures that it will be repaired free of charge by the Service Centre whilst under guarantee.
This appliance is marked according to the European directive 2012/19/EU on Waste Electrical and Electronic Equipment (WEEE). WEEE contains both polluting substances (which can cause negative consequences for the environment) and basic components (which can be reused). It is important to have WEEE subjected to specific treatments, in order to remove and dispose properly all pollutants, and recover and recycle all materials.
Individuals can play an important role in ensuring that WEEE does not become an environmental issue; it is essential to follow some basic rules:
WEEE shall not be treated as household waste.
-
WEEE shall be handed over to the relevant collection points managed by the municipality or by registered companies. In many countries, for large WEEE, home collection could be present.
-
When you buy a new appliance, the old one may be returned to the retailer who has to collect it free of charge on a one-to-one basis, as long as the equipment is of equivalent type and has the same functions as the supplied equipment.
ENERGY SAVING AND RESPECTING THE ENVIRONMENT
Where possible, avoid pre-heating the oven and always try to fill it. Open the oven door as infrequently as possible, because heat from the cavity disperses every time it is opened. For a significant energy saving, switch off the oven between 5 and 10 minutes before the planned end of the cooking time, and use the residual heat that the oven continues to generate. Keep the seals clean and in order, to avoid any heat dispersal outside of the cavity. If you have an electric contract with an hourly tariff, the "delayed cooking" programme makes energy saving more simple, moving the cooking process to start at the reduced tariff time slot.
1.2 MEPbI INPEIOCTOPOXHOCTN
2. TEXHOJIOJNA PRO/EXP'R
2.1 PUNHADNEKHOCTN DYXOBKN
IpeepnepBbIM nCNoB3oBAHnEM DxyOBKn BbIMOnTe ee npHaJnEJXHOCTn R6KO. CNOIOChNTe BOO IN BbICyUInTe. HaONKMyMOXHO CTaBtBΦOpMOHKn IIN BbINECKN KkyOHHyIO nocdy.
IJIc6opa cokOB, BbIDeJIaIOUxxCra npn pnpiroTOBHeHn NIIuHa rpnne, nCNoNb3yETcnaDOnH.
Huko2da He uonb3yume nodoh 8 kauecmee npomuehra npuzomoeu Hua, mak KAK omloxeu Hupa moaym b6icmpo pacnpocmpaHmbc no o6bemy dyxoeku, ymo npueodum K co3daHuo cunbHOO dbima.
B KOMIJIeK TnOCTaBKn HeKOtOpbIX MoJTeN BxOJNT KaMeHb IIN npriTOBHeHna XpCTaJe NIIcUb, a TaXKe NODCTaBka IIN Hero n poJIK DnA pa3pe3aHn NIIcUbl.

PpOtnBHeH DnA BbIeueKn DoJnxEn yctaHaBnBaTbcn Ha nOly. OH npEpaHa3HaueH DnA npNroTOBHeHnMeNKoB bIeueKn, Tako KaK, HAnpMep, 3Knepebl, NeeyHbe, 6e3e, nT. n. HnkOrda He cTaBbTe npOTuBHeH DnA BbIeueKn npMaHO dNo dYxOBKn.
EokobIe npoBOIoHy oTeKy,ecNn BKnIOueHbI.
2.2 BEPTEN
ДлпnpuroToBneHЯ ПИи Ha BepTeNe He Tpe6yETc npEeBapnteJIbHoro pa3orpeBa DxyOBKn.Пр nTOM DBepca DxyOBKn DoJxHa 6bIb 3akpbIta. Iotpe6nHe 3JIeKtpOaHepmHa 90-95% MeHbIe, Yem npICNoIb3OBAHm TpaDnUHOHOn CnCTEmbl.

KAK INCIONB3OBATB BEPTEN
- OTKpyTne KpOyKn
- HacaTe Mco Ha BepTeI
- 3aФнксчуTe MЯcoHa BepTeNe C NOMOUsbKpKOB
4.3aTnHTe KpOouKn
5.YctahOBHTeBepTeB CnueaIbHbIe KpyTAAuEOTBepCTN - OToCoeDnHInTe pyuKy
Korda dyxOBka pa6oTaet, B Hei He DoJHKHO 6bITb HEnCNoB3yEmbIX npHaJaNExKHOCTeI.
2.3 U.SEE
B dyxOBKe BMeCTO obiHNoI JAMnOuKn HakaINBaHnNcNOb3yeTcra CBeToDIOHna CnCTema OCBeUeHn. B DBepydyxOBKn BCToeHO14 CBeToDIOoB (JnMoJeIe63 CnCTEmblnpOnITuecko OUnCTKn) nnn 10 MoUhBix CBeToDIOoB (JnMoJeIe c CnCTEMoN pOnlntuecko OUnCTKn). 3TO oBeCneuBAeT BHyTpN DYxOBKn BBICOKKaueCTBeHHoeOCBeUeHn 6eJIbIM CBetom 6e3 TeHeI OT NOnK.
IpeMMyuectBa:
DaanHaa CnCTema, Kpome TOrO, YTO OHa oBecneuBaet npeBOxCoJHOe OCBeUeHHe BHyTpN DxyOBKn, NMeet 60JIee dIINTeNbHbI cPOK cnYXbI, Yem ObbyHaa NaMNoUka HakaINBaHnI NOTpeSJIeT Rop3do MeHbIe 3NeKTPo3Heprnn.
-ONTImaJIbHoeOCBeUeHne
-BoBbOo cpoK cnYk6bl
-OueHb Hn3Koe NoTppe6JIeHne 3JIeKtpo3Heprnn (Ha 95% MeHbUe Yem O6bUHAR JAMNoUka HakaJIuBaHn)
2.4 DEMOHTAKI ONUCTKA METALJIINUECKNX HANPABJIIOUX
1-CHNMMTeMeTAnJIuYeCKHeHnPaBnIOUeNoTMyBnxB HnPaBnEHmYkA3aHHbIXCTpeKNaMnHa pncyHke.
2-Pon3BeNTeOChTkyMeTALNueckxHnnpABnHOxNOMbINXB NOCYDOMOEHNO MaUNHe NIO OCHTNB PnN NOMOuBNaXHOHy6Kn.PpocyWTe MeTALNueckne HnnpabnHOUne NOCNEOCHTKN.
3-Pocne oucTkn yctahOBHTe MeTaNNueckne HnpaBnIOuIe B o6paTHOMnopAKe.

3. UNCTKA JYXOBKN
-HepeBbIOnHHeMpyH0uNCTKn daTe DyXOBKe OcTbHyTb.
HkoRa He NOnb3yIteCb dJa YnCTKn DyXOBKn abpa3nBbIMn
YnCTaUIMn CpeDCTAMn, MeTaNNuYeCKMN MoaKamn, n
OCTpbMn PpeDMaMn. 3To MoKet npNBecTN
HEBOC cTAHOBIM Omy NOBpeKdeHIO MaIIPOBaHHbIX
NOBepxHOCTe DyXOBKn.
-ICnoIb3yTe ToIbKO MbIbHyO BODy IIN OT6eINBaIOUne YnCTaIuNE CpeDCTBa (Ha OCHOBe aMMnaka).
HkoIa He NOKpbBaTe 6OKBbIe CTeHKn DyXOBKn aIOMHHueBO fonbro.
CTEKJIHHbIE DETAJIN
Iocne kaxdoRo nCnoB3ObaHnryDyXOBKn peKOMeHnyETcR OuHuaTb CTKeJIaHHyIO DBepy DxyOBKn C NOMoUbBnTbBaHOue KxOHHO Bymar. B cnuae CnBHorO 3aRpa3HeHnry DBePcBi DxyOBKn Bbl MoKeTe NcNoJb3ObaTb DnA ee OuchTK CmoeHHyIO B pactBOpe DeTepeHTa N XopoWTo OTKaTyO ry6ky.
*Hikorda He noIb3yItec b abpa3nBbIMN uCTraUMn CpeCTBaMn, n OCTpbIMN ppeMetAMn, TAK KaK OHN MOrYT NoIapapanatb CTeKNo, YTO MoXeT PpNBecTN K erO pactpeckuBaHHo.
YIINOTHINIELHAR IPOKIAKA DBEPUbl DYXOBKN
Ecn npoklaKa 3aqrpa3HnIacb, ouNCTIe ee c NOMOuBIO CnerKa CMOeHHo ry6Kn.
ПИHAДLEЖHOCTN
OuHCTNe npHaJnEJXHOCTN C NOMOJIbIy6Kn, CMOeHHoB MblbHO BOE. CNOIOCHNTe INX UcHToB OBOIN BBICUHTe. He NOJIb3yITecb abpa3NBbIMN UcTraUMC pEdCTBaMn.
PONDOH
Iocne npirotoBnHnna HnHa rpnne n3BnKeNTe NDoHn 3 dYxOBKn. OctopoxKHe CneTe TEnbI XnP B KOHTeHep. BbMoTe NoDOnr y6kO, CMOeHHoB B rOpAeM BoDHOM pactBoTe moUeJ XnKOCtN.
EcnHaNoDoHeOCTaNcB PnropeBwne OCTaTKXnpa, 3AMoHTe NoDIOH B BODE C MOUIMCpeCTBOM.
IOnDoTH TaKKe MOXHO BbIMbITb NOCyDOMOeHNO MaUNHe NIOUCHNTb C NMOUcBIO CNEuNbHOrO YnCTraEero CpeCTBa DnA dyXOBOK.
HnKoIa He yctHaBnBaIe Te B dyXOBky rpa3HbI noDIOH.
OCBEUHEHIEBUXOBKE
Ipeed BbINOJIHeHEm YnCTKn Nn 3aMeHbI JaMIOUKN 063aTeNbHO OTCOeDHHTE DyXOBKY OTJNEKTPOCeTN.
JaAMnOuKa H ee 3aUHTbI KOnNaUOK N3rOToBNeHb I3 JapocToKOro MaTePnAna.

XapakTeepntKn lamnoquK:
230B nepemehHoro Toka-25BT-koKbE 14,tempepatya 300^ 7ro6blaMeHnTb lamnoHQy:
BbIePNHTe CTeKJIHHbIKoJNaQOK.
BbIePNHe IaMnOouKy,
BBePHHTe HOByIO lamNoCHy TORO He Tnna (CM. npeCTaBHeHHbIe Bblwe xapaKTePcTnK),
-Поссе заменин Н ecnpabHол amnoOун BвернTe 3aunTHbI CTeKJIHHbI KONNaQK.
YNCCTKA CTEKJIHHOI DBEPUbI DYXOBORO WKAΦA DBepua dyxoboro wkaopa moKeT 6bItb ChraTn pa3o6pana dIy OuNCTKn ee BHeUHNx IN BHyTppeHHN NOBepxHocTe. IJRA TORO YTObI pOns3BecTN ONUCTKY BHyTppeHrero CTekna, cNeDyIte KcneDuoum INHCtpyKlunM:
- OTKpoTe IBepu IyXOBoro 1kaΦa.PncyHok 1 (Figure 1)
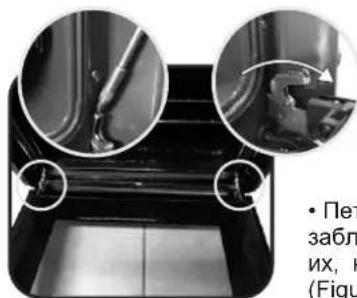
Figure 2
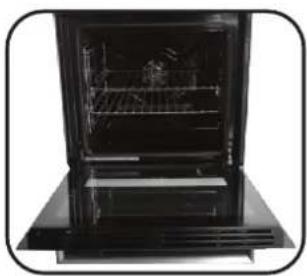
Figure 1
-
PTeTIN DBePbI dyXOBOrO uKaΦa 3a6NoKIpObaHbI. Pa36NoKpUyTe nX, KaK yKa3aHO Ha pncyHke 2 (Figure 2), dIra TORo, YTO6bI cHrTb DBepeu.
-
YdaInTe BnHTbI KaK Noka3aHo Ha pncyHke 3 (Figure 3)
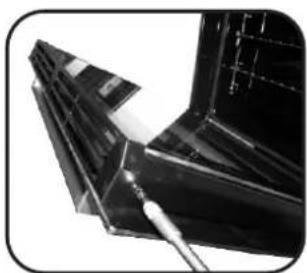
Figure 3
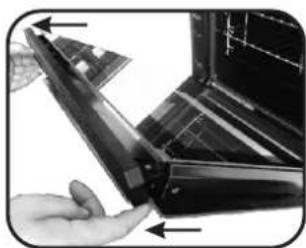
Figure 4
- CHIMMTE BepXHIO MeTaNIIeCKyIO KpbIiKy,NotaHyB ee BBepx, KaK yka3aHO Ha pncyHke 4 (Figure 4)
CHMMTe cTeKIO,OCToPOXHO NOTAHyB erO n3 paMKn DBePcbl,KaYka3aHo Ha pncyHke 5 (Figure 5).
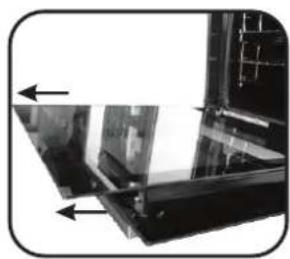
Figure 5

Figure 6
*ДяДухOBbIX WkaФOB C ПирОЛТИчЕСКОУСТКОД, нOKаЛуNTа,СHIMЛTeТAKKE ВТОроe N TpeTbe CTEKNa,ΚΑK уka3aHHo Ha pncyHKe 6 (Figure 6)
EcnnyxOBKa He pa6oTaet:
- PpOBepbTe, yTo OHa npaBnJIbHNo IOKnJIIOueHa K 3JIeKTPoCeTn.
EcnBbHe MoKeTe cMoCToTeNbHO onpeDenHb npuHy HeNCnPaBHocTH: - OToeDInHTe DxyOBky OT 3JNeKTpOceTn, He npNkacaTecb K Hei, N o6paTntEcB 3a NOMoCbBO B cepBnCbH ueHTp.
Ipeed TEM KAK NO3BOHHTB B cepBnCHbI CEHTp 3aNNiTe cepHHbH HOpE IN3DeJIINy, yka3aHHbI B erO nacNopTHo Ta6NIuKe. EcIn He nCTeK cPOK DeINCTBnRA rapaHTn, yka3aHHbI B rapaHTnHOM TaHOHe, peMOHT IN3DeJIINB C cepBnCHom CEHTpe 6ydet BBINOHNBeCnJNaTHo.

DaHHbI npBOp mEeT mApKnPobKy B COOTBeTCTBnC EbponeckOJNpeKTNB01 2012/19/EC o6 OTxodax npOn3BODCTBa 3JIeKTPuChecko n3JIeKTPoHOrO obOpyDoBaHn (WEEE). OToXobI npOn3BODCTBA 3JIeKTPuChecko n3JIeKTPoHOrO obOpyDoBaHn coDepxaT 3aPr3HAnouche BeUeCTBa (KOtOpbie MOyT HeratINBHO BNInrTa Ha OKpyKaIoUyIO CpeNy) N OCHOBHbIE KOMNoHEHTbl (KOtOpbie NOndexkAT
noBTOpHOMy nCNoIb3ObaHHo).BaKHo, yTo6bl OTXoDbI npOn3BOcTBA 3neKtpnueckOrn 3neKtpoHHoro o6OpyIOBaHnI NOBBeprAaNcB CneuNaIbHoI Opa6OTke C cJeIbU ydaJIeHnI UyniN3aun BCex 3arpy3HraHouix BeueCTB,a TAKKe
perhepaun IN NOBTOPHORIO NCNOb3OBAHnB CEX MaTePnaNoB. KaJdbm MoKet cEnaTb cyEcTBeHHb B KJaB npeoTbpaueHne 3KOONruecknx npo6JIeM, Bbl3bIbaembx OTXoAMN pOni3BOcCTBa 3JIeKTpUeCKoro N 3JIeKTPOHHoro o6OpyDoBAHn; dIpy 3TORBOaxHo npuDePKuBaTbc HekOTopbIX OCHOBhix npabIN:
- Henb3a o6paata b c OTxOdaMn npo n3BODCTBa 3Jektpnueckoro n 3JektpoHnHO obOpydoBAnH, kak C 6bITOBbIMN OTXOdaMn.
- OTxOdbI npOn3BOoDCTBa 3JIeKTPnueckoro n 3JIeKTPoHnHO
6OpOpDobAHnra CneDyET nepeDaBaTb B nyHKtBc60pa,
KOH TpONIPyeMbIe OopraHaMnMeCTHoBnActn NII
3apeRnCTPnpoBAHbIMn KOMnAHHaMn.Bo MHOrnx cTpaHax npn
HaJIuHn 6OJbWOrO KOJIuYeCTBa OTxOoB nPOn3BOoDCTBa
3JIeKTPnueckoro n 3JIeKTPoHnHO 6OpOpDobAHnna 6Op OTxOoB
OCUeCTBnreTcRa HdOMy. - Pn nokynke HOBOro npnbopa cTapbI npnbop MOxHO BO3BpaTntb po3HNHOMy TOPROMY npednpaTHIO, KOtOpoe 683aHO npnHaTB erO 6ecnPaTHo HA OCHOBe B3aUMHOODHO3NaHORO COOTBETCTBnE, ecn 3TO npnbOpby aHaIoruHoro Tnna, IN BO3BpaUaembI np6Op IMeet Te Xe cyHKun, YTO IN npodabaembI.
3HEPROCBEPEXEHNE IN 3AUINTA OKPYKAIOUEN CPEB1I No BO3MOKHOCTN cneDyET n36eRaTb npedBapntbHOrO harpeBa dYxOBORO ukaΦa n Bcerda 3aONNHbTe ero NOnHOCbTO. OTKpbBAHTe DBepuy dYxOBORO ukaΦa Ka KMOKHOpeKe, TAK Ka npn KaXDM ee OTkpBTIN TeNlO paccenBaetc. Jnra cyueCTBeHHo 3KOHOMm 3JIeKTPo3Heprnn BblKnIOuayTe dYxOBOI ukaΦa 3a 5-10 MInHyT do PAnHpyE moR OkOHauHHa BpemeH nprTOBHeHn, TaKIM Obpa3OM nCNOJb3yeTcOCTaTOHoe TEnllo, BbPa6aTBiBaEMOE dYxOBBI m UkaΦom. YIIOTHNTEN CneDyET CoepKaTb B YnCTOTE n B HAdNeXaUeM COCTOHN BO n36ExAHne pacnPoCTpAHen TEnla 3a npdeJIb KaMEbp. B CnUYae eCN n B BaWem DOrOBope Ha 3JIeKTPo3HBeHnpeDyCMaTPnBaETc NOacOBoT aTpNΦ, TO nporpaMMa "OTcpOCHkeHnpeDyCMaTPnBaETc NOACOBt TaPnΦ, TO npoPAMMa "OTcpOCHePRn 6NaIgApA oTCpOcKe HauJa npoCecca nprirotOBHeHn Do HauJa DaeCTBn JaBrotHOTo TaPnΦa.
Varnostna Navodila
52
2. TEHNOLOGIJA PRO/EXP'R
2.1 OPREMA PEČICE (odvisno od modela)
USTEDA ENERGIJE I BRIGA ZA OKOLIS
Ukoliko je moguce, izbegavaje nepotrebno zagrijavanje prazne pečnice. Vrata otravarjste ste je manje moguce, kako biste smanjili gubitak topline iz unutrasnjosti. Za značajnu ušedu energije, iskličite pečnicić 5 do 10 minuta prije planiranog završetka pečenja i iskoristite preostalu toplinu pečnice. Održavajte brvice cistima i prižanje da su pravilno učvṛşcene, kako biste izbjugeli gubitak topline. Ukoliko imate dvotarifnovo brojilo, iskoristite funkciju odgode početka pečenja za period jeftinijé elektrickene energije.
Tel: 039.2086.1 Fax: 039.2086.403
www.candy-group.com
CANDY
GARANTI BELGESI
ANKASTRE FIRIN
Accessories (According to model)
87
Assistance technique
91
1.1 DECLARATION DE CONFORMITE:
2.1 EQUIPEMENT DU FOUR
The manufacturer will not be responsible for any inaccuracy resulting from printing or transcript errors contained in this brochure. We reserve the right to carry out modifications to products as required, including the interests of consumption, without prejudice to the characteristics relating to safety or function.
IT
- GeneralWarnings
- Declaration of Compliance
- Safety Hints
- Recommendations
- Installation
- Electrical Connection
- CONNECTION:
- Caution:
- Oven Equipment 2.3
- Rotisserie
- HOW TO USE TURNSPIT
- U·see
- Advantages :
- Removing And Cleaning Wire Racks
- Cleaning The Oven
- GLASS PARTS
- OVENDOOR SEAL
- ACCESSIONS
- DRIP TRAY
- Self-cleaning Oven With Catalytic
- OVEN LIGHTING
- Bulb characteristics:
- CLEANING THE DOOR GLASS
- 4.Description Of The Display
- Before Using The Oven For The First Time 4.2 Using The End Of Cooking Timer
- PRELIMINARY CLEANING
- - THINGS TO REMEMBER
- Confirmation of operation on timer
- Stopping the oven:
- Child safety device:
- The cooling fan :
- Oven lighting :
- How To Use The Oven 4.6 Cooking Tips
- COOKING MODE
- GRILLS
- BAKING
- Service Centre
- MEPbI INPEIOCTOPOXHOCTN
- TEXHOJIOJNA PRO/EXP'R
- PUNHADNEKHOCTN DYXOBKN
- BEPTEN
- U.SEE
- IpeMMyuectBa:
- DEMOHTAKI ONUCTKA METALJIINUECKNX HANPABJIIOUX
- UNCTKA JYXOBKN
- CTEKJIHHbIE DETAJIN
- YIINOTHINIELHAR IPOKIAKA DBEPUbl DYXOBKN
- ПИHAДLEЖHOCTN
- PONDOH
- OCBEUHEHIEBUXOBKE
- XapakTeepntKn lamnoquK:
- TEHNOLOGIJA PRO/EXP'R
- OPREMA PEČICE (odvisno od modela)
- USTEDA ENERGIJE I BRIGA ZA OKOLIS
- CANDY
- GARANTI BELGESI
- ANKASTRE FIRIN
- DECLARATION DE CONFORMITE:
- EQUIPEMENT DU FOUR
- IT
Brand : ROSIERES
Model : RFZ 327 IN
Category : Oven