PTEP13 - Camera OLYMPUS - Free user manual and instructions
Find the device manual for free PTEP13 OLYMPUS in PDF.
User questions about PTEP13 OLYMPUS
0 question about this device. Answer the ones you know or ask your own.
Ask a new question about this device
Download the instructions for your Camera in PDF format for free! Find your manual PTEP13 - OLYMPUS and take your electronic device back in hand. On this page are published all the documents necessary for the use of your device. PTEP13 by OLYMPUS.
USER MANUAL PTEP13 OLYMPUS
©2014 OLYMPUS IMAGING CORP.
Printed in China
WC506101
OLYMPUS
PT-EP12
natural_image
Line drawing of a DSLR camera with mounting holes and lens (no text or symbols)Instruction ManualPT-EP12
Olympus
■ Thank you for buying the Underwater Case PT-EP12 (hereinafter Case).
■ Please read this instruction manual carefully and use the product safely and correctly. Please keep this instruction manual for reference after reading it.
■ Wrong usage may cause damage to the camera inside the Case due to water leakage, and repair may not be possible.
■ Before use, perform an advance check as described in this manual.
Introduction
- Unauthorized copying of this manual in part or in full, except for private use, is prohibited. Unauthorized reproduction is strictly prohibited.
- OLYMPUS IMAGING CORP. shall not be responsible in any way for lost profits or any claims by third parties in case of any damage occurring from improper use of this product.
Please read the following items before use
- This Case is a precision device designed for use at a water depth within 45 m. Please handle it with sufficient care.
- Please use the Case correctly after sufficient understanding of the contents of this manual in regard to handling of the Case, checks before use, maintenance, and storage after use.
- OLYMPUS IMAGING CORP. shall in no way be responsible for accidents involving immersion of a digital camera in water. In addition, expenses incurred for damage of internal materials or loss of recorded contents due to water entering the camera will not be compensated.
Please address these possible damages by insuring your camera at your own discretion before use. - OLYMPUS IMAGING CORP. shall not pay any compensation for accidents (injuries or material damage) at the time of use.
For safe use
This instruction manual uses various pictographs for correct use of the product and to prevent danger to the user and other person, as well as property damage. These pictographs and their meanings are shown below.
| WARNING | This shows the content regarding assumption of possibility of human death or severe injury in case of handling with disregard of this indication. |
| CAUTION | This shows the contents regarding assumption of possibility of injury or damage to property in case of handling with disregard of this indication. |

WARNING
① Keep this product out of the reach of babies, infants, and children. There is the possibility of occurrence of the following types of accidents.
- Injury by dropping onto the body from heights.
- Injury from parts of the body getting caught in parts which open and close.
- Swallowing of small parts, O-ring, silicone grease and silica gel. Please consult a physician immediately if any parts have been swallowed.
②Do not store digital camera with batteries inserted in this product.
Storage with a battery inserted may lead to leakage of the battery liquid and fire hazard.
③ If leakage of water should occur with a camera installed in this product, quickly remove the battery from the camera. There is the possibility of ignition and explosion from generation of hydrogen gas.
④ This product is made of resin. There is the possibility that injuries may be caused when it becomes broken due to strong impact with a rock or other hard objects. Please handle it with sufficient care.

CAUTION
① Do not disassemble or modify this product. This may cause water leakage or defect. In case of the loss of image data caused by disassembly, repair or modification etc. by any party other than those appointed by OLYMPUS IMAGING CORP., we shall bear no responsibility for damage.
② Use or storage of the product at the following locations may cause defective operation, defects, damage, fire, internal fogging, or water leakage. This should be avoided.
- Locations reaching high temperatures such as those under direct sunlight, in an automobile, etc.
- Locations close to fire
• A water depth in excess of 45 m
- Locations subject to vibrations
- Locations with high temperature and humidity or with extreme temperature changes
- Locations with volatile substances
③ Opening and closing at locations with much sand, dust, or dirt may impair the waterproof characteristic and cause water leakage. This should be avoided.
④ This product is not a case to soften impacts to the camera inside the product. When this product with a digital camera inside is subjected to impacts or heavy objects are placed onto it, the digital camera may be damaged. Please handle it with sufficient care.
⑤ Do not use the following chemicals for cleaning, corrosion prevention, prevention of fogging, repair or other purposes. When these are used for the Case directly or indirectly (with the chemicals in vaporized state), they may cause cracking under high pressure or other problems.
| Chemicals which cannot be used | Explanation |
| Volatile organic solvents, chemical detergents | Do not clean the Case with alcohol, gasoline, thinner or other volatile organic solvents or with chemical detergents etc. Pure water or lukewarm water is sufficient for cleaning. |
| Anticorrosion agent | Do not use anticorrosion agents. Pure water is sufficient when washing the metal parts as stainless steel and brass are used. |
| Commercial defogging agents | Do not use commercial defogging agents. Always use the specified desiccant silica gel. |
| Grease other than specified silicone grease | Use only the specified silicone grease for the O-ring, as otherwise the O-ring surface may deteriorate and water leakage may occur. |
| Adhesive | Do not use adhesive for repairs or other purposes. When repair is required, please contact a dealer or a service station of OLYMPUS IMAGING CORP. |
⑥ Jumping into the water with the Case in your hand, throwing the Case from a boat or ship into the water, and other rough handling may cause water leakage. Please handle with sufficient care, when handing it over from hand to hand etc.
⑦ If the Case interior or the camera should become wet because of water leakage, etc., immediately wipe off all moisture and contact your local service station or dealer.
⑧ Be careful not to apply excessive force to the projection parts, such as the zoom dial or tripod seat.
⑨ Please remove the O-ring when traveling by air. Otherwise air pressure may make it impossible to open the Case.
⑩ For safe use of the digital camera in this product, please read the “Instruction Manual” for the digital camera carefully.
⑪ When sealing this product, take sufficient care that no foreign matter gets caught at the O-ring and the contact surface. It is caused for water leakage.
⑫The lens port cannot be removed.
Contents
Introduction 1
Please read the following items before use .... 1
For safe use .... 1
1.Preparations....6
Check the contents of the package....6
Names of the parts....7
Using the accessories....8
Installing and removing of the monitor hood 8
Mounting and removing the body cap....8
Using the diffuser....9
Removing diffuser (with port adapter) from the Case body 9
Check the digital camera.... 10
2. Advance check of the Case ....11
Advance check before use.... 11
Remove the O-ring.... 11
Remove any sand, dirt, etc. 11
How to Apply Grease to the O-ring 12
Install the O-ring.... 12
3. Installing the digital camera ....13
Open the Case 13
Attach the flash to the camera and raise the light emitting part 13
Load the digital camera 14
Make sure the camera is loaded properly 14
Seal the Case.... 15
Attach the diffuser 15
Check the operation of the loaded camera 15
Water Leakage Test.... 16
4. Connecting the underwater flash....17
5. Installing the underwater conversion lens....18
6.Taking Pictures Under Water 19
How to select the shooting modes 19
Underwater shooting modes 19
7. Handling After Shooting ....20
Wash the Case with pure water 20
Wipe off any waterdrops 20
Unload the digital camera 20
Dry the Case 20
8.Maintaining the Waterproof Function....21
Remove the O-ring....21
Remove any sand, dirt, etc. 21
How to Apply Grease to the O-ring 21
Install the O-ring 21
Replace consumable products 21
9. Appendix ...... 22
Specifications 22
Supplied accessories for PT-EP12 22
Optional accessories.... 22
1. Preparations
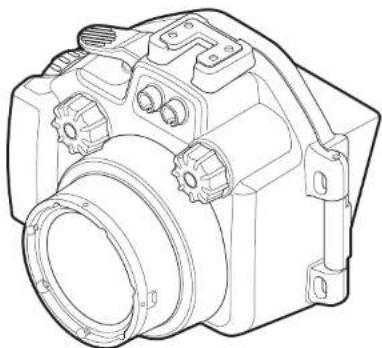
Check the contents of the package
Check that all accessories are in the box.
Contact your dealer if accessories are missing or damaged.
• Instruction manual (this manual)
CAUTION:
• After purchase, be sure to do maintenance even in brand-new condition. Neglecting the maintenance may become the cause of water leakage.
For how to maintenance the case, refer to P.21.
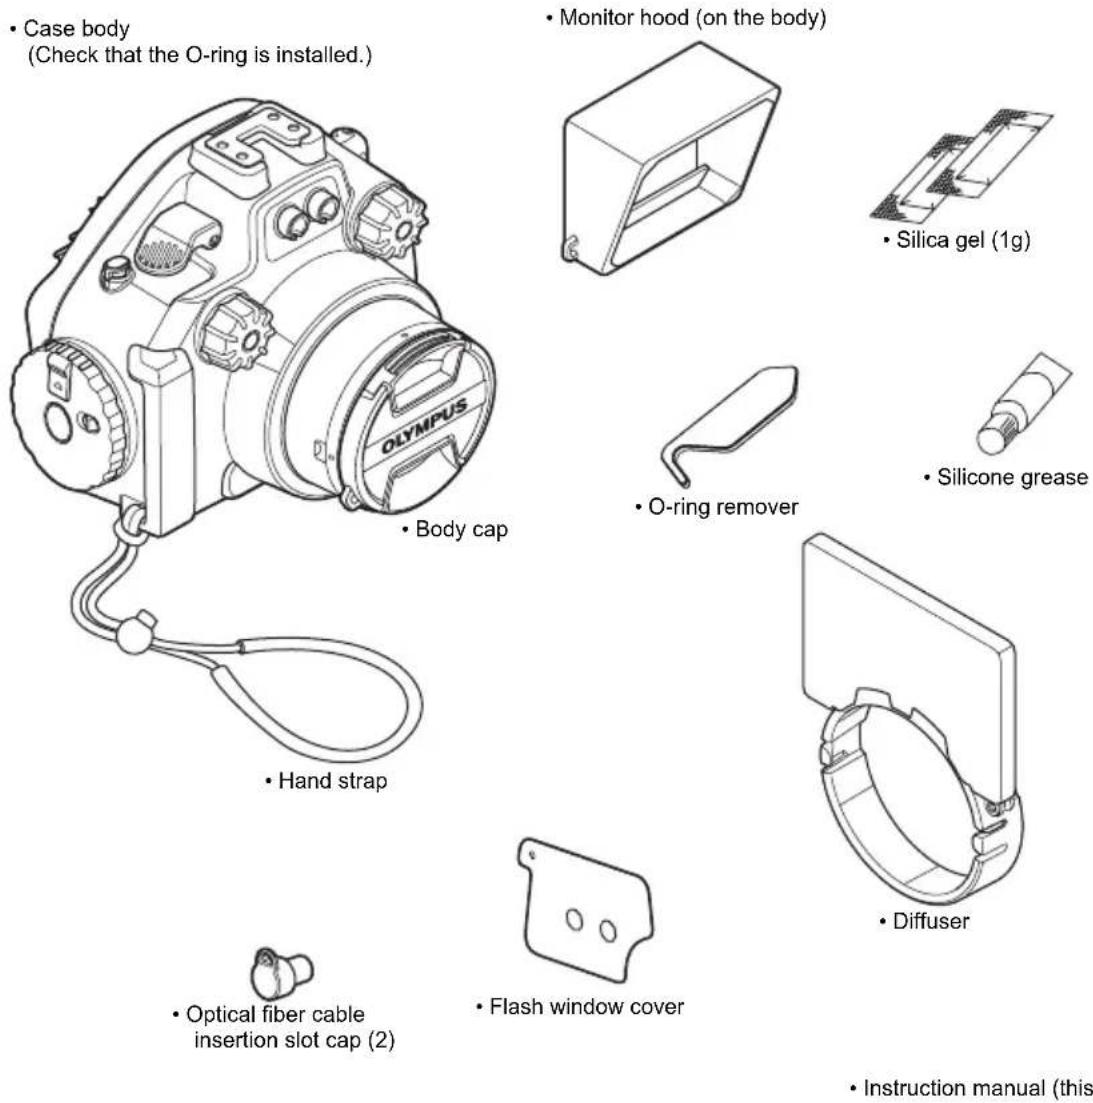
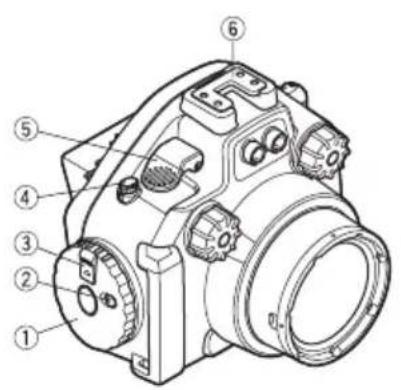
Names of the parts
text_image
Technical diagram of a camera module with numbered parts for identification
text_image
Technical diagram of a DSLR camera with numbered parts labeled 7, 8, and 9
text_image
Labeled diagram of a camera module with numbered parts for identification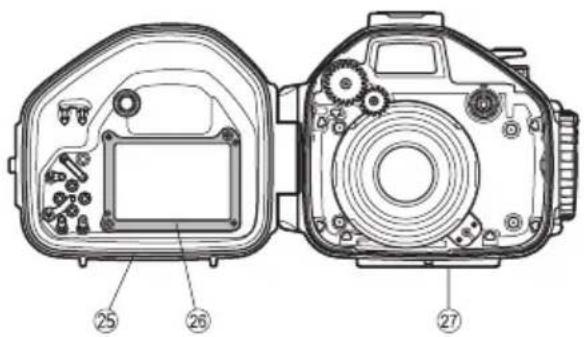
text_image
Technical diagram of a camera with labeled parts, showing front and side views with numbered annotations.①Open/close dial
②Lock knob
③Slide lock
*④ON/OFF button
*⑤Shutter lever
⑥Accessory mount
*⑦Control dial
⑧Optical fiber cable insertion slots
⑨Zoom dial
*⑩Mode dial
*⑪/Fn button
*⑫Q button
*⑬ ● (REC) button
*⑭MENU button
*⑮INFO (Info display) button
*⑯ (Exposure correction) button/Cross-cursor button ▲
*⑰ button/Cross-cursor button ▶
*⑱OK button
*⑲(Play) button
*⑳ button/Cross-cursor button ▼
*②1 (Erase) button
*⑳ [■■] button/Cross-cursor button ◀
⑳Monitor window
⑳Monitor hood
⑳O-ring
⑳Monitor inner hood
⑳Tripod seat
Note:
Case operation parts marked by * corresponds to the operation parts of the digital camera. When the operation parts of the Case are operated, the corresponding functions of the digital camera will operate. For details of the functions, refer to the instruction manual for the digital camera.
Using the accessories
Installing and removing of the monitor hood
Installation
Fit the monitor hood as shown in the figure into the rails above and below the monitor window one after the other.
Removal
Remove the monitor hood from the rails above and below the monitor window one after the other by widening the monitor hood.
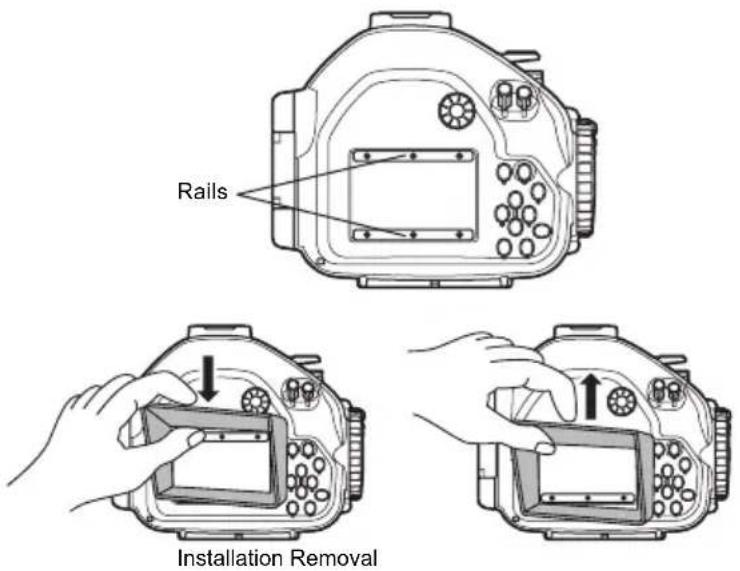
text_image
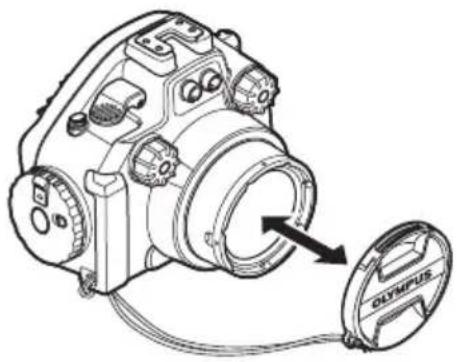
Rails Installation RemovalMounting and removing the body cap
Fit the body cap onto the lens ring as shown in the figure. Be sure to remove the body cap before shooting.
natural_image
Technical line drawing of a camera module with an Olympus lens, showing no text or symbols on the device itself.EN
Using the diffuser
① Install the strap of the port adapter to the Case body.
②Attach the diffuser to the port adapter.
③Install the diffuser on the Case.
Install to fit together the convex part of the port adaptor on the diffuser and the concave part of the port on the Case.
Make sure that push until it clicks, and confirm it installed firmly.
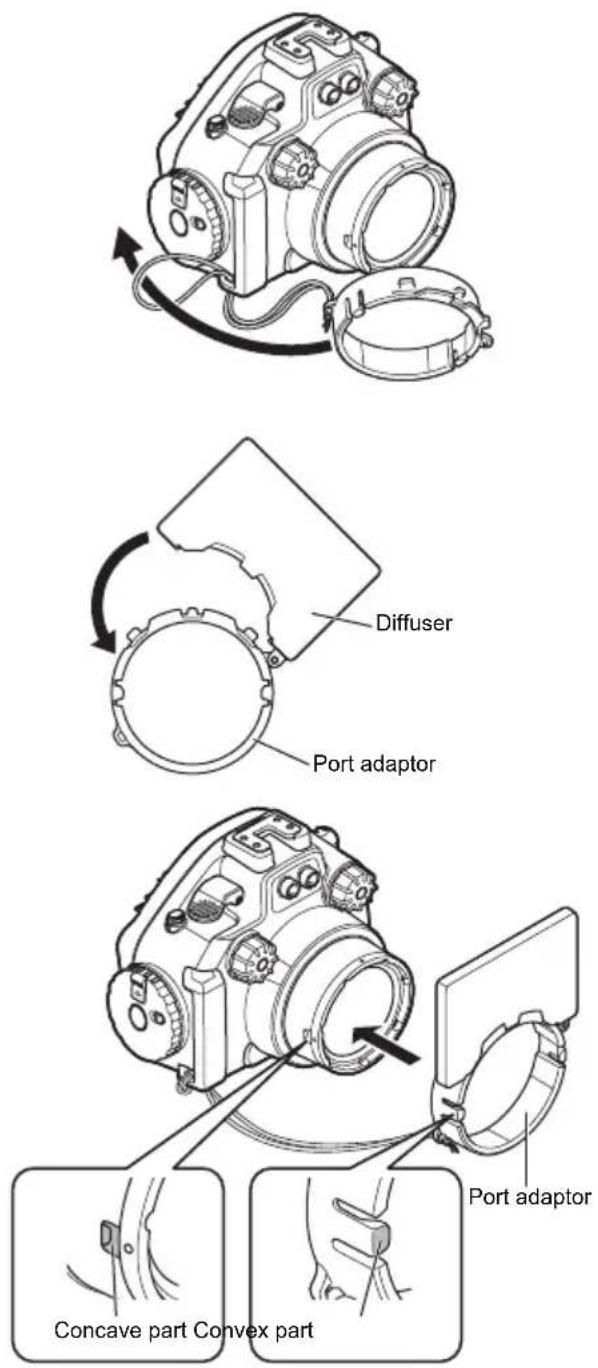
text_image
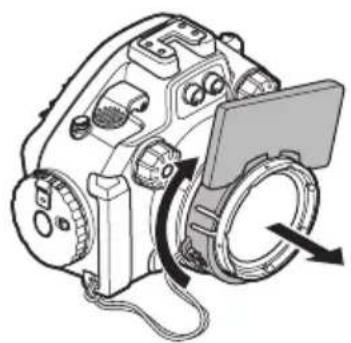
Diffuser Port adaptor Port adaptor Concave part Convex partRemoving diffuser (with port adapter) from the Case body
To remove the diffuser, pull the port adapter from the Case body by rotating the diffuse 30°clockwise and sliding the convex part.
natural_image
Technical line drawing of a camera module with no visible text or symbolsCheck the digital camera
Check the digital camera before loading it in the Case.
1. Battery Confirmation
It is impossible to change the batteries when using the Case. Make sure that you have sufficient remaining battery capacity before use.
2. Check the remaining number of pictures
Check that the image storage medium has enough room for the number of pictures you want to take.
3. Remove the strap, lens cap and filter from the camera.
If the digital camera is loaded without removing the strap, lens cap and filter, the Case cannot be sealed properly and may leak.
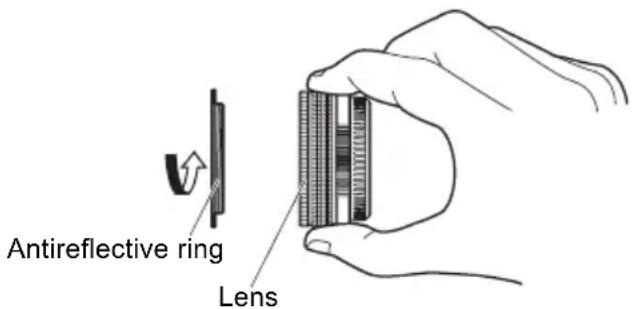
4. Attach the antireflective ring (optional) to the lens filter thread part.
text_image
Antireflective ring Lens| Antireflective ring | |
| M.ZUIKO DIGITAL ED14-42mm f3.5-5.6 EZ POSR-EP07 | |
| M.ZUIKO DIGITAL 45mm f1.8 POSR-EP05 | |
| M.ZUIKO DIGITAL 25mm f1.8 POSR-EP09 | |
| M.ZUIKO DIGITAL 17mm f1.8 POSR-EP08 | |
| M.ZUIKO DIGITAL ED 12mm f2.0 POSR-EP08 | |
2. Advance check of the Case
Advance check before use
This Case has been the subject of thorough quality control for the parts during the manufacturing process and thorough function inspections during the assembly. In addition, a water pressure test is performed with a water pressure tester for all products to confirm that the performance conforms to the specifications.
However, depending on the carrying and storage conditions, the maintenance status, etc., the waterproof function may be damaged.
Before using, always perform the following advance checks.

CAUTION:
If the advance test should show water leakage with normal handling, stop using the Case and contact your dealer or an Olympus service station.
Remove the O-ring
Open the Case and remove the O-ring.
Procedure
①Insert the O-ring remover into the gap between the O-ring and O-ring groove wall.
② Bring the tip of the inserted O-ring remover below the O-ring. (Be careful not to damage the groove with the tip of the O-ring remover.)
③ Lift the O-ring, pinch it with your fingertips and pull it out of the Case.
Remove any sand, dirt, etc.
After visually checking that dirt has been removed from the O-ring, check for attached sand and other foreign matter, as well as for damage and cracks by squeezing the entire circumference of the O-ring lightly with your fingertips.
Remove attached foreign matter from the O-ring groove with a clean cloth or a cotton swab. Also remove any sand or dirt attached to any part of the Case that comes into contact with the O-ring.

CAUTION:
- When a sharp object is used to remove the O-ring or to clean the inside of the O-ring groove, the Case and the O-ring may be damaged and water leakage may be caused.
- When the O-ring is checked with the fingertips, take care not to stretch the O-ring.
- Never use alcohol, thinner, benzene or similar solvents or chemicals detergents to clean the O-ring. When such chemicals are used, it is likely that the O-ring will be damaged or that its deterioration will be accelerated.
How to Apply Grease to the O-ring
| 1Apply only Olympus exclusive lubricant to each O-ring. | 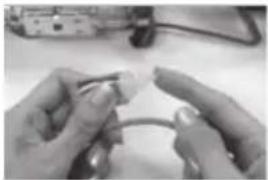 | Make sure that your fingers and the O-ring are free of dirt, then squeeze the appropriate amount of exclusive lubricant onto a finger to spread onto the entire circumference of the O-ring (approx. 15 mm is adequate). |
| 2Spread the lubricant onto the entire circumference of the O-ring. | 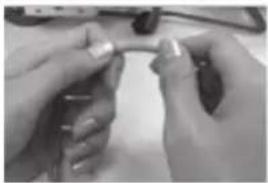 | Spread the grease onto the entire circumference of the O-ring using 3 fingers. Be careful not to use excessive force as this may stretch the O-ring. |
| 3Check that the O-ring is free of scratches or unevenness. | 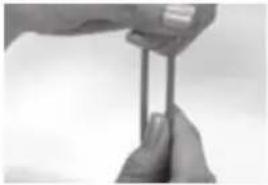 | After spreading the lubricant, check visually and by touch that the O-ring is not scratched and that its surface is flat. If it is damaged in any way, replace it with a brand-new O-ring. |

CAUTION:
• Always perform maintenance of the waterproof function even when the Case has been opened every shooting. Neglecting this maintenance may become the cause of water leakage.
- When the Case is not to be used for a long time, remove the O-ring from the groove to prevent deformation of the O-ring, apply a thin coat of silicone grease, and store it in a clean plastic bag or the like.
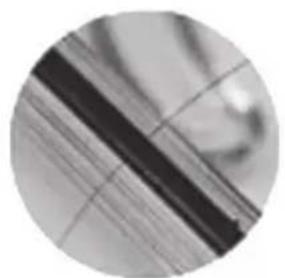
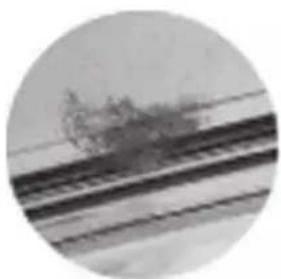
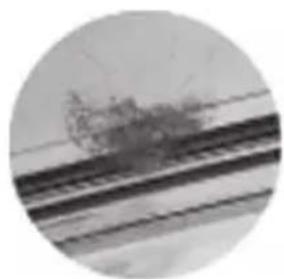
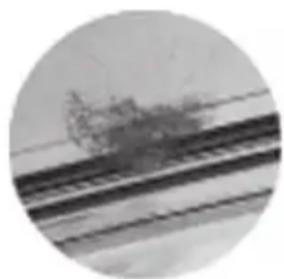
Examples of foreign matter sticking to the O-ring
natural_image
Close-up of a textured surface with diagonal dark bands and faint linear markings (no text or symbols)Hair Fibers Grains of sand
natural_image
Circular cropped image showing a railway track with overhead power lines (no visible text or symbols)
natural_image
Circular cropped image showing a dark smudge or smudge above a horizontal line, with no visible text or symbols.Install the O-ring
Confirm that no foreign matter is in the gap and then fit the O-ring. At this time, confirm that the O-ring does not stick out from the groove.
When sealing this product, make sure that no hairs, fibers, sand particles or other foreign matter stick not only to the O-ring, but also to the contact surface (front cover). Even a single hair or a single grain of sand may cause water leakage. Please check with special care.
3. Installing the digital camera
Open the Case
①Slide the lock knob towards the arrow direction (1 of figure below).
② Slide and hold the slide lock towards the arrow direction (2 of figure below) and turn the open/close dial clockwise (3 of figure below).
③Turn the open/close dial to the position where it cannot be turned further.
④Open the rear lid of the Case gently.

text_image
Slide lock Open Open/close dial 2 3 1 Lock knob
CAUTION:
- Do not exert too much force while turning the open/close dial. Doing so may damage the dial.
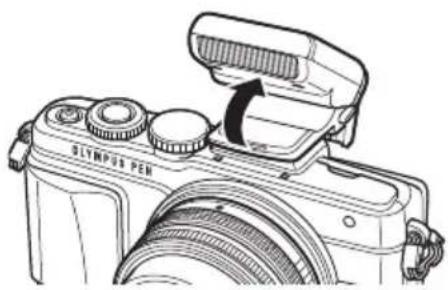
Attach the flash to the camera and raise the light emitting part
Attach the flash supplied with the camera.
Make sure to raise the light emitting part.
natural_image
Line drawing of a DSLR camera with a rotary knob and scroll wheel (no text or symbols)Load the digital camera
①Confirm that the digital camera is OFF.
②Do not pull out the monitor (closed).
③Gently load the digital camera into the Case.
④Insert a silica gel bag (1g) between the bottom of the digital camera and the Case.
The silica gel bag provided for prevention of fogging.

text_image
Diagram of a camera module showing internal components with numbered labels (③, ④) indicating parts of the device.
CAUTION:
- If the silica gel bag is caught when the Case is sealed, water leakage will occur.
- Once silica gel has been used, the moisture absorption performance will be impaired. Always replace the silica gel when the Case is opened and closed.
- Clean the surface of the dials of the Case and the camera. The dials may slip if there is grease or foreign matter on them.
Make sure the camera is loaded properly
Check the following points before sealing the Case.
• Is the digital camera loaded properly?
- Is silica gel inserted all the way at the specified location?
• Is the grease applied to O-ring?
- Is the O-ring attached properly to the opening on the Case?
- Is there any dirt or foreign matter on the O-ring or the O-ring contact surface on the front lid?
Seal the Case
① Close the Case gently while aligning the mounting projection of the rear lid and groove.
②Turn the open/close dial counter clockwise (1 of figure below) until lock.
• The Case is sealed.
③Slide the lock knob towards the LOCK side (2 of figure below).
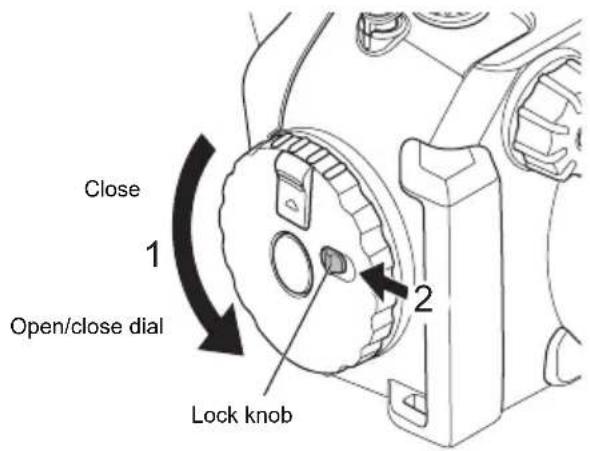
text_image
Close 1 Open/close dial 2 Lock knob
CAUTION:
- If the open/close dial is not fully turned, the Case will not be sealed. This will cause water leakage.
- Close the rear lid of the Case so that the lens cap, silica gel or monitor hood strap doesn't catch. If it catches, water leaks may result.
Attach the diffuser
- Do not cap to optical fiber cable insertion slot.
- For details of how to attach the diffuser, refer to "Using the diffuser" (P.9).
Check the operation of the loaded camera
After sealing the Case, check that the camera operations normally.
- Push the ON/OFF button on the Case and confirm that the camera turns ON/OFF.
- Turn the mode dial on the Case and confirm that the camera mode switches properly.
- Press the shutter lever on the Case and confirm that the camera shutter releases.
- Operate other control buttons on the Case and confirm that the camera functions properly as intended.
Water Leakage Test
The final test after loading the camera is explained below. Always perform this test. It can be performed easily in a water tank or a bathtub. Confirm the operation of the different buttons. The required time is about 5 minutes.
- At first, immerse the Case for only 3 seconds and check that no water enters the Case.
- Next, immerse the Case for 30 seconds and check that no water enters the Case.
- Then, immerse the Case for 3 minutes, operate all buttons and levers, and check the following:
- check that no water drops have the entered the Case.
- check that the Case is not fogged internally.
- check that no water has entered the Case.
- If the inside of the Case becomes fogged or there are water drops in the Case, repeat the maintenance of the O-ring (P.11) and perform the water leakage test again.
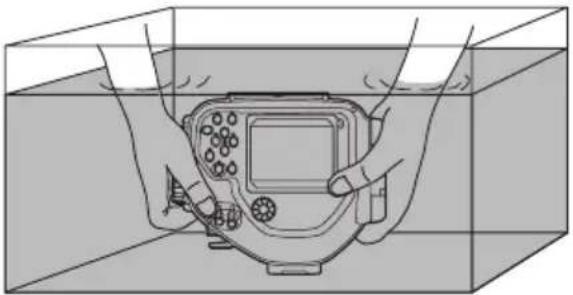
natural_image
Illustration of hands operating a handheld device inside a transparent container (no text or symbols visible)EN
4. Connecting the underwater flash
To connect the underwater flash (optional) to the Case using an underwater optical fiber cable (optional: PTCB-E02), follow the procedures below.
Connecting the underwater optical fiber cable
①Put the underwater optical fiber cable plug into the optical fiber cable insertion slot. Insert firmly until it stops next to the flash window cover.
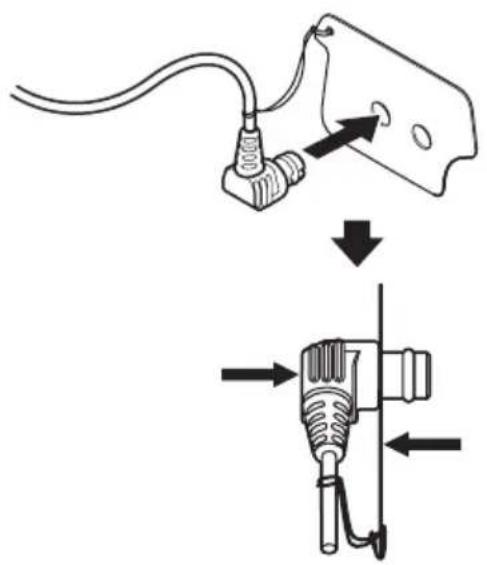
text_image
Diagram showing cable installation process with labeled components and directional arrows indicating assembly steps②Put the cap to the optical fiber cable insertion slot when not in use.
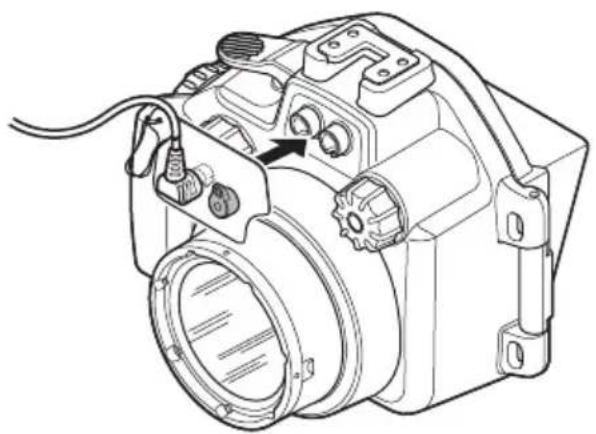
natural_image
Line drawing of a DSLR camera with attached components and cable (no text or symbols)Setting of the digital camera
Set the RC mode of the camera to ON so that the camera's built-in flash is activated.
In the case of flash with the RC mode, turn the RC mode to ON. For details, refer to the instruction manual of the flash.
In case of UFL-1, plug the optical fiber cable in the same way. Turn the RC mode of the camera to OFF.
5. Installing the underwater conversion lens
Attaching the conversion lens.
The underwater macro conversion lens PTMC-01 (optional) and underwater wide conversion lens PTWC-01 (optional) are supported.

natural_image
Technical line drawing of a DSLR camera with two views showing internal components and a circular component being rotated (no text or symbols present)The camera built-in flash cannot be used with the underwater wide conversion lens.
EN
6. Taking Pictures Under Water
How to select the shooting modes
You can easily set the underwater mode by assigning ☒ (Underwater Wide-Angle)/☐ (Underwater Macro) to Fn button of the digital camera.
Select [FmTMENU]-[Custom Menu]-[Button/Dal]-[Button Function]-[Fn Button Function], then press OK button
Note:
- Press the Fn button to switch between Underwater Wide-Angle and Underwater Macro modes.
- When using the f3.5-5.6EZ ED14-42mm lens, is the wide-angle end and the telephoto end of the zoom automatically set in conjunction with the switching of (Underwater Wide-Angle) and (Underwater Macro).
- Turn the mode dial knob to temporarily exit the underwater mode. Press the Fn button again to return to the underwater mode.
- Press and hold down the Fn button to return to the original shooting mode.
• However, in SCN, iAUTO, PHOTO STORY and movie modes, pressing the Fn button will not set the camera in underwater mode. - In the Underwater Wide-Angle/ (Underwater Macro) mode, (Underwater White Balance) is automatically set.
For details, see the instruction manual of the digital camera.
Underwater shooting modes
■ Underwater Wide-Angle
Suitable for shooting a scene that extends across a wide range such as a school of fish swimming through the water. Background blues are vividly reproduced.
■ Underwater Macro
Suitable for close-up shooting of small fish and other underwater creatures. Natural colors of the underwater are accurately reproduced.
Note:
Operation sound of camera may be recorded when recording the movies.
Memo:
- When using the camera in the P, A, S, M and "PHOTO STORY" mode, the 📂 (underwater white balance) can be selected in each mode.
- To zoom with ED14-42mm f3.5-5.6EZ lens, assign electric zoom operation to ▶ or ▼ buttons and operate zoom function by pressing ◀ and ▶ or ▲ and ▼ buttons.
- Select [Electric Zoom] in [MENU]-[Custom Menu]-[Button/Dial]-[Button Function]-[Button Function] or [▼ button], the press the OK button.
7. Handling After Shooting
Wash the Case with pure water
①After use, clean the protector thoroughly with pure water as soon as possible.
After use in sea water, soak it in pure water for a fixed time (30 minutes to an hour) to remove any salt.
② Operate the shutter lever and various buttons of the product in pure water to clean and remove the salt attached to the shaft.
③Take it out of the water and rinse with pure water.

CAUTION:
- Never disassemble the Case for cleaning.
- The functions may be impaired when the Case is dried with the salt still adhered to it. Make sure to wash away the salt after use.
Wipe off any waterdrops
Remove any drops of water from the case. Use pressurized air or a soft, lint-free cloth to carefully wipe away any moisture from the hinge between the front and rear lids, the shutter release lever and the open/close dial.

CAUTION:
Water left between the front and rear lids can get inside the case once it is opened. Please dry these areas carefully.
Unload the digital camera
Open the Case carefully and take the digital camera out.

CAUTION:
- When opening the case, make sure no water from outside (e.g. drops from your hair or the diving suit) gets inside the case and/or on the camera!
- Before opening the case, ensure that your hands or gloves are completely clean (free of sand, loose fibers, etc.).
- Never open the case in areas where water could splash or spray or where sand or dust could be blown in the air. When this cannot be avoided, for example if the battery or memory card needs to be changed, the case and camera should be protected from the wind or spray with a plastic sheet or similar object.
- Never touch the digital camera and/or battery when your hands are wet with sea water.
Dry the Case
After washing with pure water, use a lint-free soft cloth without any salt on it to wipe off any waterdrops and dry the Case completely at a well ventilated location in the shade.

CAUTION:
Do not use hot air from a hair drier or the like for drying and do not expose the Case to direct sunlight, as this may accelerate deterioration and deformation of the Case and deterioration of the O-ring, leading to leakage of water.
When wiping the Case, take care not to cause scratches.
8. Maintaining the Waterproof Function
The O-ring is a consumable product. Before each use, perform proper maintenance. Always be sure to perform the O-ring maintenance operation as described below. Neglecting this maintenance may become the cause of water leakage.
Perform at the location without sand or dust, after washing and drying your hands.
Remove the O-ring
Refer to P.11.
Remove any sand, dirt, etc.
Refer to P.11.
How to Apply Grease to the O-ring
Refer to P.12.
Install the O-ring
Refer to P.12.
Replace consumable products
- The O-ring is a consumable product. Independent of the number of times the Case is used, it is recommended that the O-ring should be replaced by a new piece after a year has passed.
- Deterioration of the O-ring is accelerated by the usage conditions and the storage conditions. Replace the O-ring even before a year has passed if it shows signs of damage, cracking or loss of elasticity.

CAUTION:
- Please use genuine Olympus silicone grease, silica gel and O-ring.
- Do not try to replace the O-ring by yourself.
- We recommend to perform the check periodically.
9. Appendix
Specifications
■ Underwater Case PT-EP12
| Available models Olympus Digital Camera E-PL7 | |
| Pressure resistance Depth of down to 45 m (147 feet) | |
| Main materials Main body: PolycarbonateO-rings: Silicone rubber | |
| Dimensions Width 168 mm x Height 142 mm x Depth 133 mm | |
| Weight Approx. 790 g (not including camera and accessories) | |
| Buoyancy under water | Approx. 80 g (in the freshwater) (including camera (with flash), ED14-42mm f3.5-5.6 EZ lens, battery and media card) |
* We reserve the right to change the external appearance and the specifications without notice.
Supplied accessories for PT-EP12
O-ring: POL-054
Silica gel: SILCA-5S
Body cap: PRLC-15
Silicone grease: PSOLG-2
Monitor hood: PFUD-EP12
Optional accessories
Silicone grease: PSOLG-3
Bracket: PTBK-E01/PTBK-E02
Underwater flash: UFL-1/UFL-2/UFL-3
Macro lens for underwater cases: PTMC-01
Antireflective ring : POSR-EP05/POSR-EP07/POSR-EP08/POSR-EP09
Balance weight: PWT-1BA/PWT-1AD
Underwater optical fiber cable: PTCB-E02
Short arm: PTSA-02/PTSA-03
* When use combining PTBK-E01 and the Case, the dedicated washers are necessary in the screw part. If you have PTBK-E01 to which dedicated washers are not bundled, please contact to customer support center.
OLYMPUS
http://www.olympus.com/
OLYMPUS IMAGING AMERICA INC.
3500 Corporate Parkway, P.O. Box 610, Center Valley, PA 18034-0610, U.S.A. Tel. 484-896-5000
Technical Support (U.S.A. / Canada)
24/7 online automated help:
http://www.olympusamerica.com/support
Phone customer support:
Tel. 1-800-260-1625 (Toll-free)
Our phone customer support is available from
9 am to 9 pm (Monday to Friday) ET
http://olympusamerica.com/contactus
Olympus software updates can be obtained at:
http://www.olympusamerica.com/digital
OLYMPUS EUROPA SE & CO. KG
Premises: Consumer Product Division
Wendenstrasse 14-18, 20097
Hamburg, Germany
Tel: +49 40-23 77 3-0 / Fax: +49 40-23 07 61
Goods delivery: Modul H, Willi-Bleicher Str. 36,
52353 Düren, Germany
Letters: Postfach 10 49 08, 20034 Hamburg,
Germany
European Technical Customer Support:
Please visit our homepage http://www.olympus-europa.com or call our TOLL FREE NUMBER*: 00800 - 67 10 83 00
for Austria, Belgium, Czech Republic, Denmark, Finland, France, Germany, Luxemburg,
Netherlands, Norway, Poland, Portugal, Russia, Spain, Sweden, Switzerland, United Kingdom.
* Please note some (mobile) phone services / provider do not permit access or request an additional prefix to +800 numbers.
For all not listed European Countries and in case that you can't get connected to the above mentioned number, please make use of the following CHARGED NUMBERS +49 40 - 237 73 899
MEMO
Retirer le joint....11
Installer le joint 12
Installer le joint 21
natural_image
Line drawing of a 3D rectangular box with internal slots and mounting feet (no text or symbols)
• Gel de silice (1g)
natural_image
Technical line drawing of a mechanical clamp or bracket (no text or symbols)- Diffuseur
text_image
Technical diagram of a mechanical device with numbered parts for identification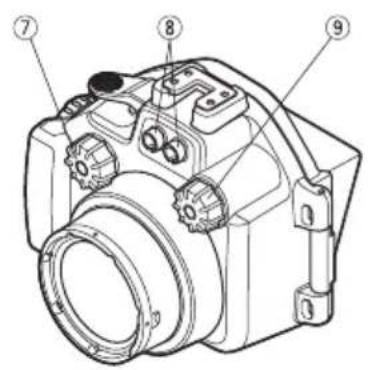
text_image
Technical diagram of a DSLR camera with numbered parts labeled 7, 8, and 9
text_image
Labeled diagram of a digital camera with numbered parts for identification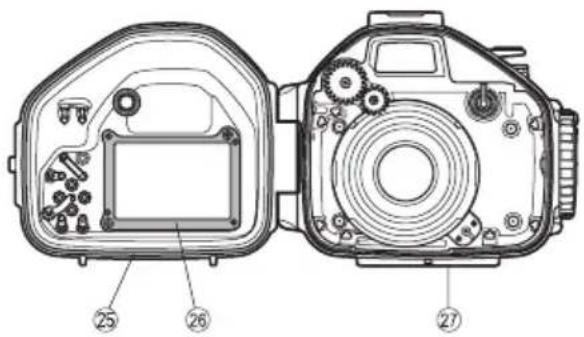
text_image
Technical diagram of a camera module with numbered parts labeled 25, 26, and 27*⑲ Touche ▶ (Lecture)
*②1Touche 📋 (Effacement)
natural_image
Technical line drawing of a camera module with an Olympus lens attached (no text or symbols present)FR
natural_image
Technical line drawing of a camera module with no visible text or symbolsnatural_image
Close-up of a textured surface with diagonal dark bands and faint linear patterns (no text or symbols)Cheveu Fibres Grains de sable
natural_image
Circular cropped image showing a train on tracks with overhead power lines (no visible text or symbols)
natural_image
Circular cropped image showing a dark smoky or smoky object above a horizontal line, with no visible text or symbols.Installer le joint
natural_image
Line drawing of a DSLR camera with a rotary knob and lens (no text or symbols)text_image
Diagram of a DSLR camera showing internal components with numbered labels (③, ④) indicating parts of the body and interior.
ATTENTION:
natural_image
Illustration of hands operating a digital device inside a transparent container (no text or symbols visible)FR
text_image
Diagram illustrating the process of a cable or plug being inserted into a motor, with arrows indicating direction of movement.natural_image
Line drawing of a DSLR camera with attached wiring and mounting brackets (no text or symbols)FR
natural_image
Technical line drawing of a DSLR camera with two views showing internal components and a circular component being rotated (no text or symbols present)Support: PTBK-E01/PTBK-E02
natural_image
Isometric line drawing of a rectangular mechanical housing or enclosure with internal compartments (no text or symbols)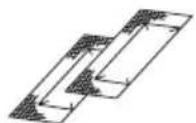
• Silicagel (1g)
• O-Ring-Entferner
natural_image
Technical line drawing of a mechanical clamp or bracket (no text or symbols)text_image
Technical diagram of a camera module with numbered parts for identification
text_image
Technical diagram of a DSLR camera with numbered parts labeled 7, 8, and 9
text_image
Labeled diagram of a camera module with numbered parts for identification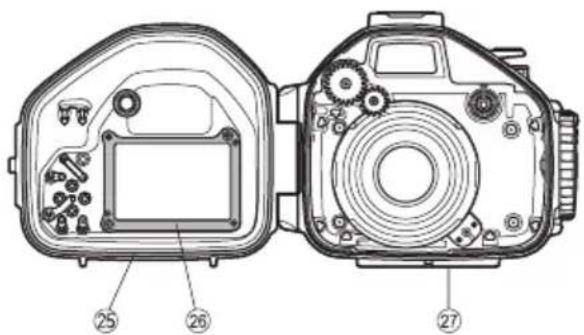
text_image
Technical diagram of a DSLR camera showing internal components with numbered labels 25, 26, and 27.natural_image
Diagram of a camera module with an Olympus lens and cable, showing no text or symbolsDE
natural_image
Line drawing of a DSLR camera with attached housing and cable (no text or symbols)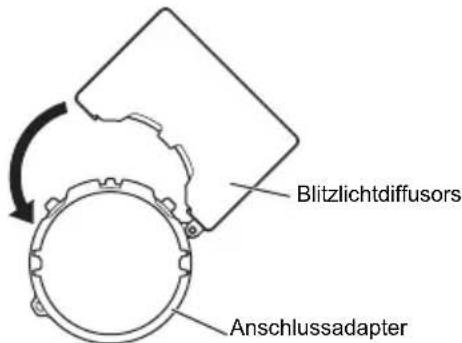
natural_image
Technical line drawing of a camera module with rotating components and wiring (no text or symbols)natural_image
Three circular grayscale images showing abstract textures and patterns, no visible text or symbols.natural_image
Line drawing of a DSLR camera with a scroll wheel and a handle, showing no text or symbols.text_image
Diagram of a DSLR camera showing internal components with numbered labels (③, ④) indicating parts of the body and interior.
VORSICHT:
natural_image
Illustration of hands operating a handheld device inside a transparent container (no text or symbols visible)DE
text_image
Diagram illustrating the installation of a plug into a motor, showing cable connection and mechanical assembly steps.natural_image
Line drawing of a DSLR camera with attached wiring and mounting bracket (no text or symbols)natural_image
Technical line drawing of a DSLR camera with two views showing internal components and a circular component being rotated (no text or symbols present)text_image
Technical diagram of a camera module with numbered parts for identification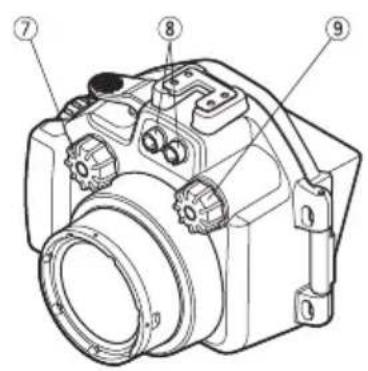
text_image
Technical diagram of a DSLR camera with numbered parts labeled 7, 8, and 9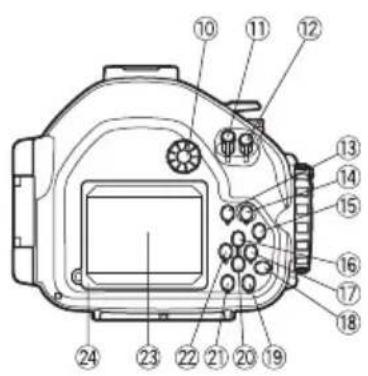
text_image
Labeled diagram of a camera module with numbered parts for identification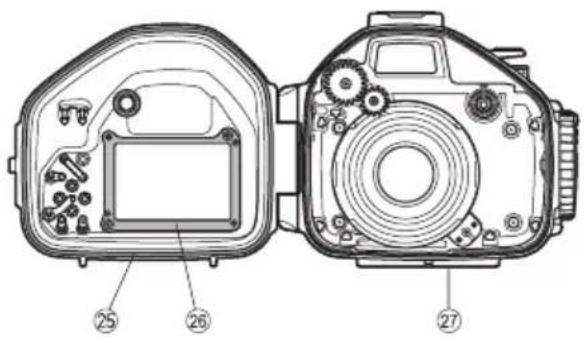
text_image
Technical diagram of a camera with labeled parts, showing front and side views with numbered annotations.natural_image
Technical line drawing of a camera module with an Olympus lens, showing no text or symbols on the device itself.ES
Uso del difusor
natural_image
Line drawing of a camera with attached housing and cable (no text or symbols)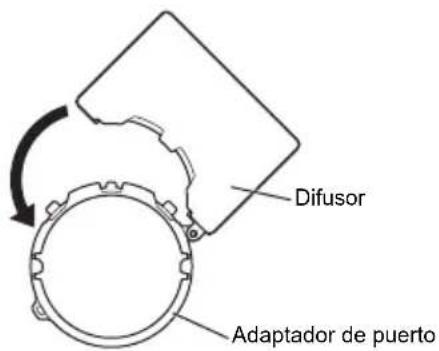
text_image
Difusor Adaptador de puerto
text_image
Parte cóncava Parte convexa Adaptador de puertonatural_image
Technical line drawing of a mechanical device with rotating components and a curved arrow indicating rotation (no text or symbols)natural_image
Close-up of a textured surface with diagonal dark bands and faint linear markings (no text or symbols)Pelo Fibras Granos de arena
natural_image
Circular cropped image showing a blurred industrial scene with machinery and wires (no visible text or symbols)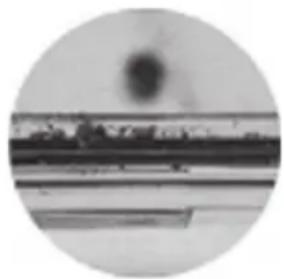
natural_image
Circular cropped image showing a dark smudge on a surface with faint horizontal lines and no visible text or symbols.Coloque la junta tórica
natural_image
Line drawing of a DSLR camera with a scroll wheel and top handle (no text or symbols)text_image
Technical diagram of a camera module showing internal components and labeled parts (③, ④)
PRECAUCIÓN:
natural_image
Illustration of hands operating a handheld device inside a transparent container (no text or symbols visible)ES