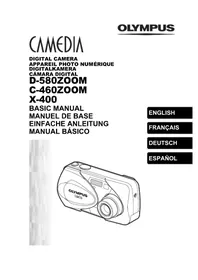
X-400 - Camera OLYMPUS - Free user manual and instructions
Find the device manual for free X-400 OLYMPUS in PDF.


| Product type | Compact digital camera |
| Brand | Olympus |
| Model | X-400 (also D-580ZOOM/C-460ZOOM) |
| Sensor | CCD 1/2.5", 4.23 million pixels (gross), 4.0 million effective |
| Lens | Olympus 5.8-17.4 mm f/3.1-5.2 (35-105 mm equivalent in 35 mm) |
| Optical zoom | 3x |
| Digital zoom | Up to 12x (with optical zoom) |
| Maximum resolution | 2288 x 1712 pixels |
| Storage | xD-Picture Card (16 to 512 MB) |
| LCD screen | 1.8" color TFT, 85,000 pixels |
| Viewfinder | Real image optical |
| Power supply | 1 CR-V3 lithium battery or 2 AA batteries (alkaline or NiMH) |
| Dimensions (W x H x D) | 108 x 57.5 x 36.5 mm |
| Weight | 165 g (without batteries or card) |
| Shutter speed | 1 to 1/1000 s (up to 2 s in night scene mode) |
| Built-in flash | Auto, red-eye reduction, fill-in, off |
| Self-timer | 10 seconds |
| Video recording | Yes, with sound (QuickTime Motion JPEG) |
| Connectivity | Mini-B USB, A/V OUT, DC-IN |
| Menu languages | French, English, German, Spanish, Japanese, and others |
| Maintenance | Clean the lens with a soft, dry cloth. Avoid moisture and shocks. |
| Safety | Do not expose to extreme temperatures. Use only recommended batteries. |
| Spare parts and repairability | Consult the Olympus website for accessories and authorized service centers. |
| General information | Full user manual available on the included CD-ROM. |
Frequently Asked Questions - X-400 OLYMPUS
User questions about X-400 OLYMPUS
0 question about this device. Answer the ones you know or ask your own.
Ask a new question about this device
Download the instructions for your Camera in PDF format for free! Find your manual X-400 - OLYMPUS and take your electronic device back in hand. On this page are published all the documents necessary for the use of your device. X-400 by OLYMPUS.
USER MANUAL X-400 OLYMPUS
natural_image
Line drawing of a Olympus CanMedi digital camera (no text or symbols on body)ENGLISH
FRANÇAIS
DEUTSCH
ESPAÑOL
CONTENTS/TABLE DES MATIÉRES/INHALT/CONTENIDO
ENGLISH....2
FRANÇAIS. 46
DEUTSCH 90
ESPAÑOL....134
CONTENTS
GETTING STARTED 4
MENU FUNCTIONS 16
SHOOTING BASICS 23
ADVANCED SHOOTING 31
PLAYBACK 32
PRINT RESERVATION /DIRECT PRINT 38
DOWNLOADING PICTURES TO A COMPUTER ..... 40
ERROR CODES 42
SPECIFICATIONS 43
These instructions are only for quick reference. For more details on the functions described here, refer to the "Reference Manual" on CD-ROM.
For connection to the PC or installation of provided software, refer to the Software Installation Guide included in the CD-ROM package.
■ Before using your camera, read this manual carefully to ensure correct use.
We recommend that you take test shots to get accustomed to your camera before taking important photographs.
These instructions are only a basic manual. For more details on the functions described here, refer to the Reference Manual on the CD-ROM.
For customers in North and South America
For customers in USA
Declaration of Conformity
Model Number : D-580ZOOM/C-460ZOOM/X-400
Trade Name : OLYMPUS
Responsible Party : Olympus America Inc.
Address : 2 Corporate Center Drive, Melville, New York 11747-3157 U.S.A.
Telephone Number : 1-631-844-5000
Tested To Comply With FCC Standards FOR HOME OR OFFICE USE
This device complies with Part 15 of the FCC rules. Operation is subject to the following two conditions:
(1) This device may not cause harmful interference.
(2) This device must accept any interference received, including interference that may cause undesired operation.
For customers in Canada
This Class B digital apparatus meets all requirements of the Canadian Interference-Causing Equipment Regulations.
For customers in Europe
“CE” mark indicates that this product complies with the European requirements for safety, health, environment and customer protection. “CE” mark cameras are intended for sales in Europe.
Trademarks
• IBM is a registered trademark of International Business Machines Corporation.
- Microsoft and Windows are registered trademarks of Microsoft Corporation.
• Macintosh is a trademark of Apple Computer Inc.
- All other company and product names are registered trademarks and/or trademarks of their respective owners.
- The standards for camera file systems referred to in this manual are the “Design Rule for Camera File System/DCF” standards stipulated by the Japan Electronics and Information Technology Industries Association (JEITA).
GETTING STARTED
NAMES OF PARTS
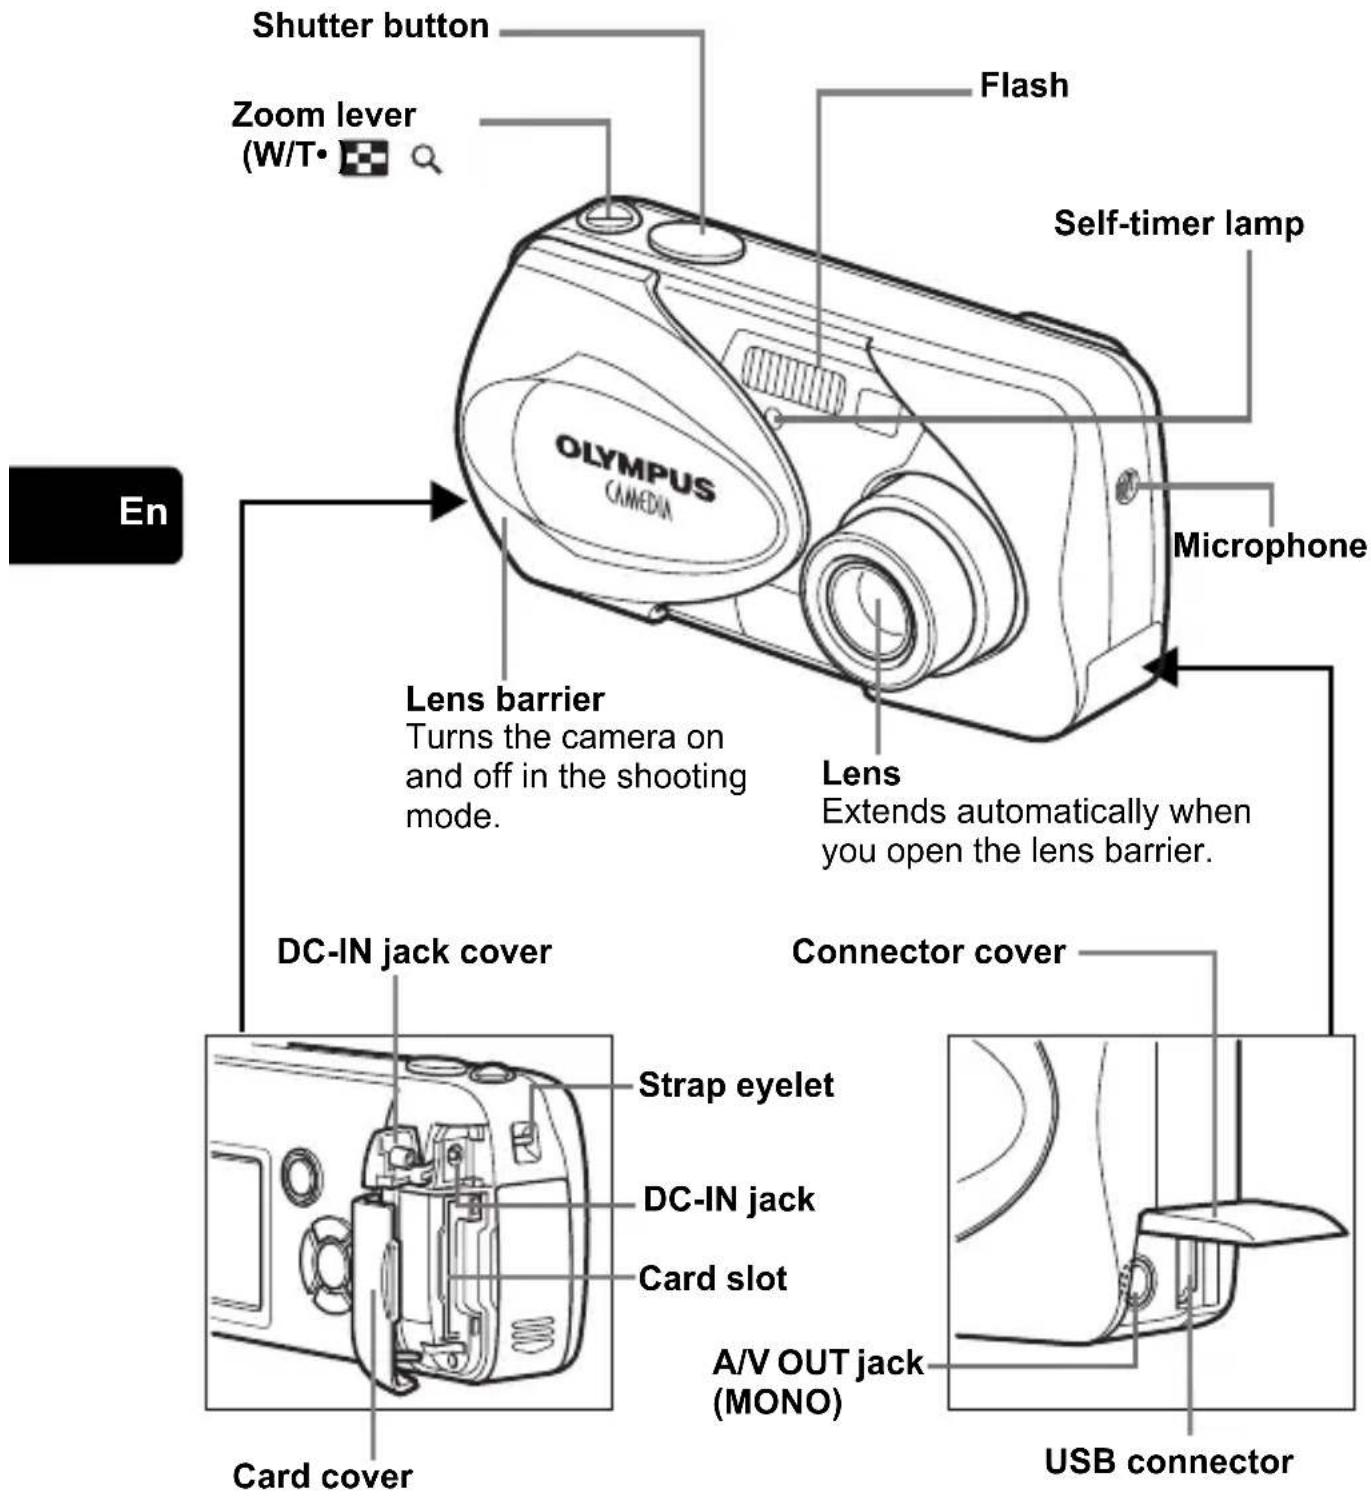
En
Arrow pad
Buttons on the arrow pad have their respective functions. They are also used as direction buttons. , , and indicate which button to be pressed.
Shooting mode button (Virtual dial)


Viewfinder

MONITOR INDICATIONS
Shooting mode

Still picture

Movie
| Items Indications | ||
| 1 | Shooting mode , , , , , | [08TC] [1054]  [H6SZ] [K9BT] [HEZT] [H6SZ] [K9BT] [HEZT]  |
| 2 | Battery check , | [SHXD]  |
| 3 | Green lamp | [SK6A] |
| 4 | Flash standbyCamera movement warning/Flash charge | [BACK] (Lit)[OS83] (Blinks) |
| 5 | Macro mode , | [443S]  |
| 6 | Flash mode , , |  [6460] [6460] |
| 7 | Sequential shooting , | [8OWE] [70WE] |
| 8 | Self - timer |  |
| 9 | Record mode SHQ, HQ, SQ1, SQ2 | |
| 10 | Sound record |  |
| 11 | Resolution | 2288×1712, 1600×1200, 640×480, etc. |
| 12 | Metering | [KATO] |
| 13 | Exposure compensation | -2.0, -1.5, -1.0, -0.5, +0.5, +1.0, +1.5, +2.0 |
| 14 | White balance |   , ,   |
| 15 | AF target mark | [ ] |
| 16 | Memory gauge |   |
| 17 | Number of storable still picturesRemaining recording time | 1500:36 |
Playback mode
Screens when the Information display is set to ON are shown below.
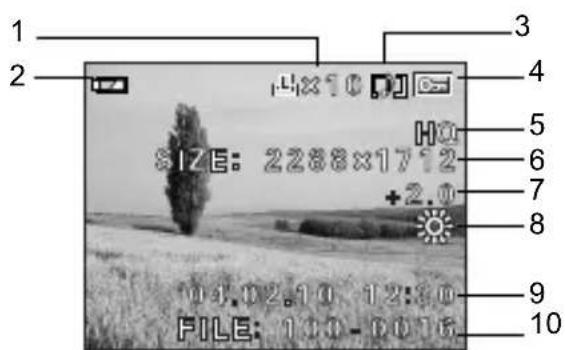
Still picture Movie

| Items Indications | ||
| 1 | Print reservation,Number of prints | × 10 |
| 2 | Battery check , | |
| 3 | Sound record | |
| 4 | P ro t e c t | |
| 5 | Record mode SHQ, HQ, SQ1, SQ2 | |
| 6 | Resolution | 2288 × 1712, 1600 × 1200, 640 × 480, etc |
| 7 | Exposure compensation | -2.0, -1.5, -1.0, -0.5, +0.5, +1.0, +1.5, +2.0 |
| 8 | White balance WB AUTO, , , , | |
| 9 | Date and time '04.02.10 12:30 | |
| 10 | File number (still picture),Number of framesElapsed time/Total recording time (movie) | 100-0016,1600:00/00:15 |
| 11 | Movie |
Memory gauge
The memory gauge lights up when you take a still picture. While the gauge is lit, the camera is storing the picture on the card. The memory gauge indication changes as shown below depending on the shooting status. The indication is not displayed during movie recording.

flowchart
graph LR
    A["Before shooting (Gauge is off)"] --> B["One picture taken (Lit)"]
    B --> C["Two or more taken (Lit)"]
    C --> D["Wait"]
    D --> E["No more pictures can be taken (Fully lit). Wait until the gauge returns to the status on the left to take the next shot."]
    A <--> B
    B <--> C
    C <--> D
En
Battery check
If the remaining battery power is low, the battery check indication on the monitor changes as follows while the camera is turned on.
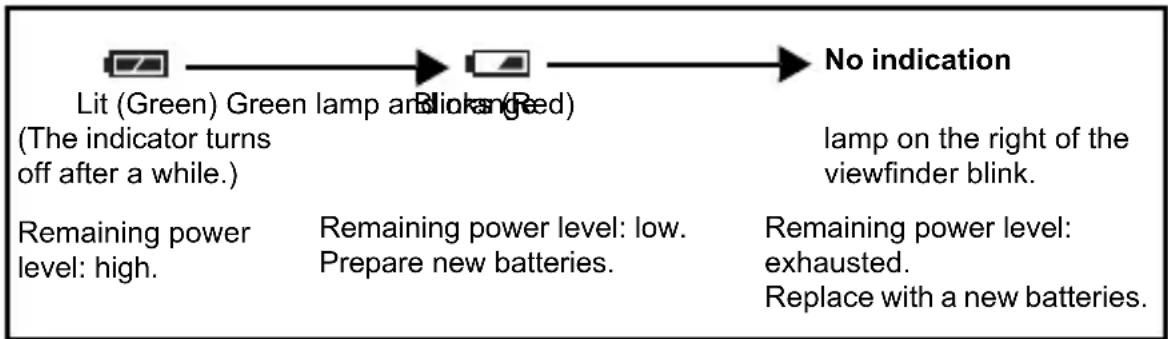
flowchart
graph LR
    A["Lit (Green) Green lamp and red flash"] --> B["No indication"]
    C["(The indicator turns off after a while.)"] --> D["lamp on the right of the viewfinder blink."]
    E["Remaining power level: high."] --> F["Remaining power level: low. Prepare new batteries."] --> G["Remaining power level: exhausted. Replace with a new batteries."]
ATTACHING THE STRAP
1 Thread the short end of the strap through the strap eyelet.
2 Thread the long end of the strap through the loop that has already gone through the eyelet.
3 Pull the strap tight, making sure that it is securely fastened and does not come loose.

LOADING THE BATTERIES
En
1 Make sure that:
• The lens barrier is closed.
• The monitor is off.
- The lamp on the right of the viewfinder is off.
2 Slide the battery compartment cover in the direction of Ⓐ
- The battery compartment cover is unlocked and opened in the direction of B
- Use the ball of your finger to slide the cover. Do not use your fingernail as this could result in injury.
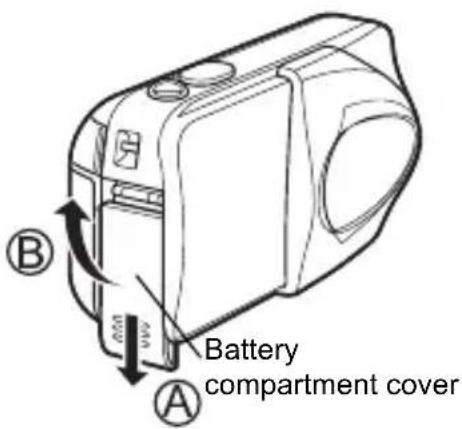
3 Insert the batteries, making sure that they are correctly oriented as shown in the illustration.
The battery insertion direction mark is provided inside of the battery compartment.
When using AA (R6) batteries When using CR-V3 lithium battery pack

There is a mark showing the correct way to insert the AA batteries on the bottom of the camera.

natural_image
Diagram of a device with an open lid and battery, showing internal components (no text or symbols)When using a lithium battery pack, insert it in the direction as shown in the illustration.
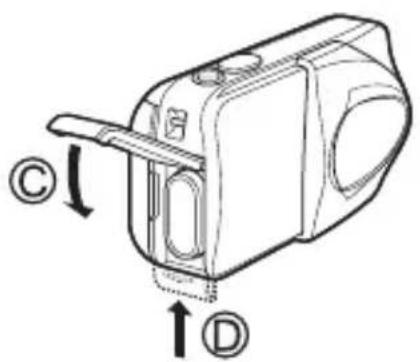
4 Close the battery compartment cover, then press it down Ⓒ and slide it in the direction shown Ⓓ.
- If the battery compartment cover seems hard to close, do not force it. With the battery compartment cover shut, press the mark firmly and push it in the direction indicated by D.
Important
- CR-V3 lithium battery cannot be recharged.
- Do not peel off the label from a CR-V3 lithium battery pack.
- Manganese (zinc-carbon) batteries cannot be used.
INSERTING A CARD
"Card" in this manual refers to the xD-Picture Card. The camera uses the card to record pictures.
1 Make sure that:
• The monitor is off.
• The lens barrier is closed.
- The lamp on the right of the viewfinder is off.
2 Open the card cover.
3 Face the card the correct way and insert it into the card slot as shown in the illustration.
- Insert the card while keeping it straight.
- The card stops with a click when it is inserted all the way.
- Inserting the card the wrong way or at an angle could damage the contact area or cause the card to jam.
- If the card is not inserted all the way, data may not be written to the card.
Index area side of the card

En

natural_image
Line drawing of a camera module with no visible text or symbolsThe position of the card inserted correctly
4 Close the card cover securely.
Removing the card
Make sure that:
• The lens barrier is closed.
• The monitor is off.
- The lamp on the right of the viewfinder is off.
- Push the card all the way in to unlock it, then let it return slowly. The card is ejected a short way and then stops. Hold the card straight and pull it out.
Note
Releasing your finger quickly after pushing the card all the way in may cause it to eject forcefully out of the slot.
When shooting pictures (Shooting mode)
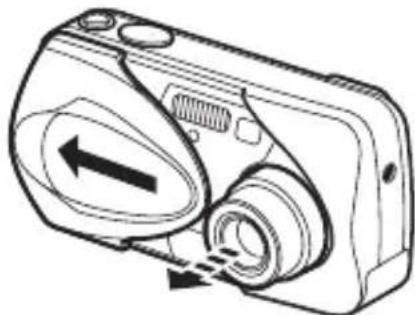
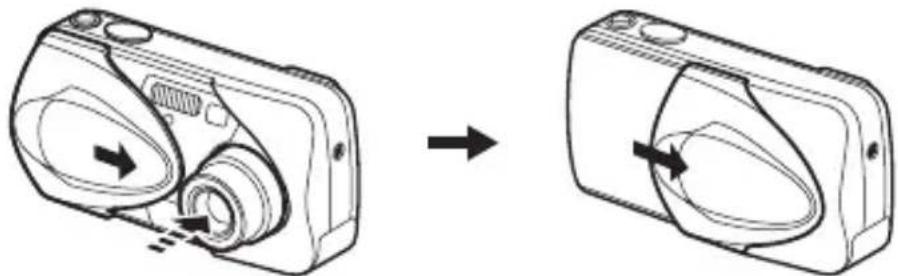
Power on: Open the lens barrier fully.
The camera turns on in the shooting mode. The lens extends and the subject is displayed on the monitor.
If the lens does not extend when the lens barrier is opened, there is a possibility that the barrier is not fully open. Open the lens barrier fully until you feel it click.
natural_image
Line drawing of a digital camera with directional arrows indicating motion (no text or symbols)En
Power off: Close the lens barrier slightly until it almost touches the lens barrel.
The lens barrier stops just before it touches the lens and the lens retracts. Wait until the lens is fully retracted before closing the lens barrier completely.
The camera turns off. (The monitor also turns off.)
natural_image
Diagram showing a device being opened into a closed camera, with arrows indicating the process (no text or symbols present)
- Do not push the lens barrier forcefully against the lens as this may damage the lens or cause it to malfunction.
When playing back pictures (Playback mode)
Power on: Press (Playback) with the lens barrier closed.
The camera turns on in the playback mode. The monitor turns on and the last picture taken is displayed.
If no pictures have been taken yet, or the xD-Picture card is empty, the message "NO PICTURE" is displayed on the monitor.

Power off: Press.
The monitor and the camera turn off.

En
SELECTING A LANGUAGE
1 Open the lens barrier fully.
2 Press
- The top menu is displayed.
3 Press on the arrow pad to select MODE MENU.
4 Press to select the SETUP tab, and press.
5 Press to select, and press.
- The green frame moves to the selected item.
6 Press to select a language, and press.
7 Press again to exit the menu.
8 Close the lens barrier to turn the camera off.
SETTING THE DATE AND TIME
1 Open the lens barrier fully.
2 Press
- The top menu is displayed.
3 Press on the arrow pad to select MODE MENU.
4 Press to select the SETUP tab, and press.
5 Press to select, and press.
- The green frame moves to the selected item.
6 Press to select one of the following date formats: Y-M-D (Year/Month/Day), M-D-Y (Month/Day/Year), D-M-Y (Day/Month/Year). Then press
- Move to the year setting.
- The following steps show the procedure used when the date and time settings are set to Y-M-D.
7 Press to set the year, and press to move to the month setting.
• To move back to the previous setting, press
• The first two digits of the year are fixed.
8 Repeat this procedure until the date and time are completely set.
- The camera only displays the time in 24-hour time system ("2 p.m." would be "14:00").
9 Press

- For a more accurate setting, press when the time signal hits 00 seconds. The clock starts when you press the button.
10 Close the lens barrier to turn the camera off.

Note
- The date and time settings will be returned to the factory default settings if the camera is left without the battery for approximately 3 days.
MENU FUNCTIONS
TYPE OF MENUS
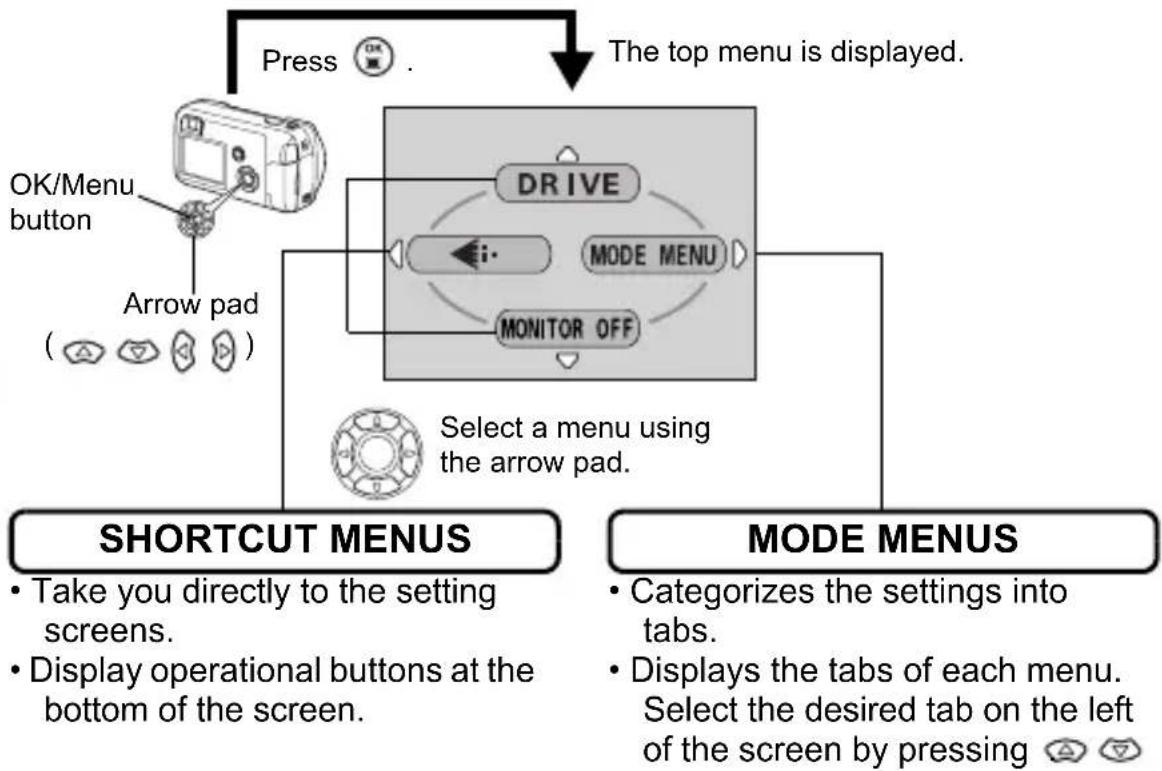
When you turn on the camera and press ,the top menu is displayed on the monitor. The functions of this camera are set from the menus. This chapter explains how the menus work, using the shooting mode screens.
flowchart
graph TD
    A["Press"] --> B["The top menu is displayed."]
    C["OK/Menu button"] --> D["Arrow pad (图标)"]
    D --> E["DRIVE"]
    E --> F["MODE MENU"]
    F --> G["MONITOR OFF"]
    G --> H["Select a menu using the arrow pad."]
    I["SHORTCUT MENUS"] --> J["Take you directly to the setting screens."]
    I --> K["Display operational buttons at the bottom of the screen."]
    L["MODE MENUS"] --> M["Categorizes the settings into tabs."]
    L --> N["Displays the tabs of each menu. Select the desired tab on the left of the screen by pressing"]
How to use the menus
1 Press to display the top menu. Press.
2 Press to select a tab, and press.
3 Press to select an item, and press.
4 Press to select a setting. Press to complete setting.
Press again to exit the menu and return to shooting status.
Shooting mode
DRIVE
Selects a shooting mode from (Single-frame shooting) and (Sequential shooting).


(movies)
Selects whether to record sound when shooting a movie.

Sets the image quality and resolution.
Still picture : SHQ, HQ, SQ1, SQ2
Movie : HQ, SQ
MONITOR OFF (MONITOR ON)
Sets whether or not the monitor is turned on when the camera is turned on. If the monitor is set not to turn on, the top menu displays MONITOR ON when the camera is turned on.
Playback mode
Runs through all saved pictures one after another. It is displayed when the camera is playing back still pictures.
MOVIE PLAYBACK
Plays back movies. It is displayed when a movie is selected.
INFO
Displays all the shooting information on the monitor.

ERASE
Erases the selected still picture or movie.
The MODE MENU has 4 tabs. Press to select a tab and display the associated menu items.
These instructions are only for quick reference. For more details on the functions described here, refer to the "Reference Manual" on CD-ROM.
Shooting mode

En
| CAMERA tab | |
| ESP/ Selects the | metering method from ESP and . |
| Adjusts the brightness of the image (Exposure compensation). | |
| DIGITAL ZOOM | Enables the zoom shooting at larger magnification than the maximum optical zoom. |
| (still pictures) | Sound can be recorded when taking still pictures. |
| Allows pictures to be taken as close as 7 cm/2.8" from the subject. | |
| PANORAMA Allows panorama pictures to be taken with Olympus CAMEDIA-brand cards. | |
| 2 IN 1 Combines | two still pictures taken in succession and stores them as a single picture. |
PICTURE tab
WB Sets the appropriate white balance according to the light source.
CARD tab
CARD SETUP Formats a card.
| SETUP tab | |
| ALL RESET Selects whether to keep the current camera settings when you turn off the power. | |
 | Selects a language for on-screen display. |
| PW ON/OFF SETUP | Sets the picture that is displayed on the monitor when the power is turned on and off. |
 | Selects whether the beep sound (used for warnings, etc.) should be turned on or off. |
| REC VIEW Selects whether to display pictures on the monitor while saving them to a card. | |
| FILE NAME Changes how file names are assigned. | |
| PIXEL MAPPING | Checks the CCD and image processing functions for errors. |
 | Adjusts the brightness of the monitor. |
 | Sets the date and time. |
| VIDEO OUT Selects NTSC or PAL according to your TV's video signal type. TV video signal types differ depending on the region. | |

| PLAY tab | |
| Protects pictures from accidental erasure. | |
| Rotates pictures 90 degrees clockwise or counterclockwise. | |
| Stores print reservation information on the card. | |
| Adds sound to a still picture already taken. |
| EDIT tab | |
| BLACK&WHITE | Creates a black and white picture and saves it as a new picture. |
| SEPIA Creates a sepia-toned picture and saves it as a new picture. | |
| Makes the file size smaller and saves it as a new file. | |
| INDEX Creates an index picture of a movie in 9 frames. | |
| EDIT Edits a movie. | |
| CARD tab |
| CARD SETUP Erases all image data stored on the card. (ALL ERASE, FORMAT) |
| SETUP tab | |
| ALL RESET Selects whether to keep the current camera settings when you turn off the power. | |
| Selects a language for on-screen display. | |
| PW ON/OFF SETUP | Sets the picture that is displayed on the monitor when the power is turned on and off. |
| SCREEN SETUP | Registers a picture you took to be displayed on the startup/shutdown screen. |
| Selects whether the beep sound (used for warnings, etc.) should be turned on or off. | |
| Adjusts the brightness of the monitor. | |
| Sets the date and time. | |
| VIDEO OUT Selects NTSC or PAL according to your TV’s video signal type. TV video signal types differ depending on the region. | |
| Selects the number of frames in the index display. | |
SHOOTING BASICS
Shooting mode
This camera allows you to take still pictures and record movies. This camera has 7 shooting modes to choose from depending on the shooting conditions and the effect you want to achieve.
The factory default setting of the shooting mode is PROGRAM AUTO. For normal shooting which does not require any special setting or effect, you do not need to follow this procedure.
1 Open the lens barrier fully.
• The lens extends and the monitor turns on.
2 Press Ⓜ (○).
- The screen for selecting the shooting mode (virtual dial) is displayed.

Virtual dial screen
En
3 Select the mode best suited to your purpose from the following.
- Press to select the mode.
4 Press OK
- The shooting mode is set, and the virtual dial screen disappears. Even if the button is not pressed, the mode will be set and the screen will disappear.
P PROGRAM AUTO (Factory default setting)
Used for regular photography. The camera automatically makes the settings for natural color balance. Other functions, such as the flash mode and metering, can be adjusted manually.
(Portrait)
Suitable for taking a portrait-style shot of a person. The camera automatically sets the optimal shooting conditions.
(Landscape + Portrait)
Suitable for taking photos of both your subject and the landscape. The camera automatically sets the optimal shooting conditions.
(Landscape)
Suitable for taking photos of landscapes and other outdoor scenes. The camera automatically sets the optimal shooting conditions.
(Night scene)
Suitable for shooting pictures in the evening or at night. The camera sets a slower shutter speed than is used in normal shooting. If you take a picture of a street at night in any other mode, the lack of brightness will result in a dark picture with only dots of light showing. In this mode, the true appearance of the street is captured. The camera automatically sets the optimal shooting conditions. If you use the flash, you can take pictures of both the subject and the background.
(Self portrait)
Enables you to take a picture of yourself while holding the camera. Point the lens towards yourself and the focus will be locked on you. The camera automatically sets the optimal shooting conditions. The zoom is fixed in the Wide position and cannot be changed.
(Movie)
Lets you record movies. Sound is recorded at the same time. The focus and zoom are locked. If the distance to the subject changes, focus may be compromised.
TAKING STILL PICTURES
You can take still pictures using either the monitor or the viewfinder. Both methods are easy as all you have to do is to press the shutter button.
Taking still pictures using the monitor
1 Open the lens barrier fully.
- Slide the lens barrier fully open until it clicks.
- The lens extends and the monitor turns on.
2 Decide the composition while looking at the image on the monitor.
3 Press the shutter button gently (halfway) to adjust the focus.
- Focus and exposure are locked, when the green lamp lights steadily. (Focus Lock)
- When the flash is ready to fire, the mark lights.
4 Press the shutter button all the way (fully).
- The camera takes the picture, and a beep sounds.
- When the green lamp stops blinking, you can take the next picture.
- The orange lamp on the right of the viewfinder blinks while the picture is stored on the card.
Taking still pictures using the viewfinder
1 Open the lens barrier fully.
- Slide the lens barrier open until it clicks.
- The lens extends and the monitor turns on.
2 Decide the composition while looking at the image in the viewfinder.
3 Take the picture by following the same procedure as for shooting using the monitor.
IF CORRECT FOCUS CANNOT BE OBTAINED (FOCUS LOCK)
When correct focus cannot be obtained on the subject you want to shoot, you can focus the camera on another point at roughly the same distance (focus lock) and take the picture as explained below.
1 Open the lens barrier fully.
• The camera turns on in the shooting mode.
• The lens extends and the monitor turns on.
2 Position the AF target mark on the subject you want to focus on.
- When shooting a hard-to-focus subject, point the camera at an object about the same distance away as the subject.

AF target mark
3 Press the shutter button halfway until the green lamp lights.
- When the green lamp lights steadily, the focus and the exposure are locked.
- When the green lamp blinks, the focus and exposure are not locked. Release your finger from the shutter button, re-position your subject and press the shutter button halfway again.
4 Keeping the shutter button pressed halfway, recompose your shot.
![P [ ] HD 2288x171230](/content/2026/04/634835/images/63bb8c15b32ef5e34221f4d9d7764fd4899019648cdf4e2364848046d126ed04.jpg)
Green lamp
5 Press the shutter button fully.
RECORDING MOVIES
You can record movies with this camera. Sound is recorded at the same time. The focus and zoom are locked. If the distance to the subject changes, focus may be compromised.
1 Open the lens barrier fully.
- The lens extends and the monitor turns on.
2 Press (A) to display the virtual dial screen.
3 Press to select, then press.
- Movie recording is set and the camera returns to the shooting mode.
- On the monitor, the mark and the remaining recording time of the current memory card are displayed.
4 Decide the composition while looking at the image on the monitor.
5 Press the shutter button halfway.
6 Press the shutter button fully to start recording.
- The orange lamp on the right of the viewfinder lights.
- While recording a movie, the camera fixes its focus and zoom.
- During movie recording, lights red.
7 Press the shutter button again to stop recording.
- The orange lamp blinks while the movie is stored on the card.
- When the remaining recording time has been used up, recording stops automatically.

Note
- During movie recording, the flash is disabled.
- It takes longer to store movies than still pictures.
Notes for recording movies over a long time
- Recording will continue until the card is full unless stopped by pressing the shutter button.
• A long recorded movie cannot be edited. - If a single movie recording uses up all of the card's memory, create space on the card by deleting the movie or downloading it to a PC.
En
ZOOMING IN ON A SUBJECT (OPTICAL ZOOM)
Telephoto and wide-angle shooting are possible at 3× magnification (the optical zoom limit, equivalent to 35 mm - 105 mm on a 35 mm camera). By combining the optical zoom with the digital zoom, zoom magnification can be increased to a maximum of approximately 12×.
1 Open the lens barrier fully.
- The lens extends and the monitor turns on.
2 Push/pull the zoom lever while observing the subject in the monitor.
3 Take the picture.

Note
- Pictures taken with the digital zoom may appear grainy.
En
USING THE FLASH
1 Open the lens barrier fully.
- The lens extends and the monitor turns on.
2 Press 🏠 (⚡).
- The current flash setting is displayed.
3 Press Ⓔ() to change the flash mode to your desired setting.
• Each time you press the flash mode changes in the following sequence: AUTO - 📄 - . ↘
4 Press the shutter button halfway.
- When the flash is set to fire, the orange lamp remains lit.
5 Press the shutter button fully to take the picture.
Auto-flash (No indication)
The flash fires automatically in low light or backlight conditions.
Red-eye reduction flash ( )
The red-eye reduction flash mode significantly reduces this phenomenon by emitting pre-flashes before firing the regular flash.
Fill-in flash ( )
The flash fires regardless of the available light.
Flash off ( )
The flash does not fire even in low light conditions.
USING THE SELF-TIMER
This function is useful for taking pictures where you want to be included in the photograph. Fix the camera securely on a tripod on set it on a level surface for self-timer shooting.
En
1 Open the lens barrier fully.
- The lens extends and the monitor turns on.
2 Press 🙏 ⏻ ).
- The current self-timer setting is displayed.
3 Press 🤖 ( ) to switch the self-timer mode on or off.
- The setting changes between ON and OFF each time is pressed. When the self-timer mode is selected, is displayed on the monitor.
4 Take the picture.
- The self-timer lamp lights up for approximately 10 seconds, and starts blinking. After blinking for approximately 2 seconds with a beep sound, the picture is taken.
- The self-timer mode is automatically canceled after one shot.
ADVANCED SHOOTING
SEQUENTIAL SHOOTING
This function allows you to take a rapid succession of still pictures by pressing and holding the shutter button (approximately 8 pictures at 1.3 frames per second by Sequential shooting in HQ mode). As you can choose the best picture from a series of sequential shots, you are recommended to use this mode when taking pictures of a moving subject. Focus, exposure and white balance are locked at the first frame. You can also erase the unwanted shots afterwards.

MENU FUNCTIONS - Mode menus
SELECTING THE METERING AREA
In a backlight situation, your subject may appear dark if the picture is taken with the normal metering value (Digital ESP metering). In this case, by changing the metering area to the center of the viewfinder screen (Spot metering), a subject can be shot with optimal exposure regardless of the background light.
ESP (Digital ESP) : Meters the center of the viewfinder and the area around it separately to obtain the optimum exposure.

(Spot metering): Meters only the center of the viewfinder to obtain the appropriate exposure for the subject.

MENU FUNCTIONS - Mode menus
MACRO MODE SHOOTING
The macro mode allows you to shoot at a distance of 20 cm to 50 cm (0.7 ft. to 1.6 ft.) from your subject.
1 Open the lens barrier fully.
2 Press (△)
3 Press ( ) to switch the macro mode on or off.
4 Take a picture.
PLAYBACK
VIEWING STILL PICTURES
1 Press with the lens barrier closed.
- The monitor turns on and displays the last picture taken. (Single-frame playback)
2 Use the arrow pad to play back other pictures.
Jumps to the picture 10 frames back.
Displays the previous picture.

Displays the next picture.
Jumps to the picture 10 frames ahead.
3 Press to cancel playback.
- The monitor and camera turn off.
QUICK VIEW
This function lets you play back pictures while the camera is in the shooting mode. This is useful when you want to check shooting results and resume shooting quickly.
1 Press (QUICK VIEW) while in the shooting mode.
2 Press the shutter button halfway or to return to the shooting mode.
Close-up playback
Pictures displayed on the monitor can be enlarged in steps up to 4 times the original size.
1 Press with the lens barrier closed.
- The monitor turns on and displays the last picture taken.
2 Use the arrow pad to display the still picture you want to enlarge.
- You cannot enlarge pictures with

3 Pull the zoom lever toward .T ^Q
- The magnification increases each time the zoom lever is pulled.
- To return the picture to the original size (1x), push the zoom lever toward w .
Index display
This function lets you show several pictures at the same time on the monitor. The number of pictures shown can be 4, 9 or 16.
1 Press with the lens barrier closed.
- The monitor turns on and displays the last picture taken. (Single-frame playback)
2 Push the zoom lever toward to enter the index display mode.
- Use the arrow pad to select the picture.
• To return to single-frame playback, pull the zoom lever toward T^Q
MOVIE PLAYBACK VIEWING MOVIES
1 Press with the lens barrier closed.
• The monitor turns on.
2 Use the arrow pad to display the picture with .
3 Press OK
- The top menu is displayed.
4 Press to select MOVIE PLAYBACK.
5 Press to select PLAYBACK, and press.
- The movie is played back. When playback ends, the display automatically returns to the beginning of the movie.
- Fast forward/fast rewind functions are available during playback.
: Fast forward. Each press switches the speed between ×1, ×2 and ×20.
: Fast rewind. Each press switches the speed between ×1, ×2 and ×20.
- The MOVIE PLAYBACK menu is displayed again after playback ends. PLAYBACK : Plays back the entire movie again.
FRAME BY FRAME :
Plays back the movie manually one frame at a time.
EXIT : Leaves the movie playback mode.
Press to select from PLAYBACK, FRAME BY FRAME or EXIT,
and press OK
When FRAME BY FRAME is selected

: Displays the first frame of the movie.

: Displays the last frame of the movie.

: Displays the next frame. The movie can be played continuously by holding the button down.

: Displays the previous frame. The movie can be played continuously in reverse by holding the button down.

: Displays the MOVIE PLAYBACK menu.
PROTECTING PICTURES
You are recommended to protect important pictures to avoid accidentally erasing them.
1 Press with the lens barrier closed.
• The monitor turns on.
2 Use the arrow pad to display the picture you want to protect.
3 Press

- The top menu is displayed.
4 In the top menu, select MODE MENU → PLAY → oₙ, and press ⏻.
5 Press 🔒 to select ON, and press OK.
- To cancel protection, select OFF.
- Press again to exit the menu.

- Protected pictures cannot be erased by the single-frame/all-frame erase function, but they are all erased when you execute format.
ERASING PICTURES
This function enables you to erase recorded pictures. You can choose the single-frame erase or the all-frame erase.

Note
- You cannot erase pictures that are protected. Cancel the protection before erasing such pictures.
- Once erased, pictures cannot be restored. Be careful not to accidentally erase pictures you want to keep.
Single-frame erase
This function erases only the picture displayed on the monitor. The all-frame erase function can be used to erase all the pictures on the card at once.
1 Press with the lens barrier closed.
• The monitor turns on.
2 Use the arrow pad to display the picture you want to erase.
3 Press.
- The top menu is displayed.
4 Press to select ERASE.
5 Press to select YES, and press.
- The picture is erased and the menu is closed.
All-frame erase
1 In the playback mode top menu, select MODE MENU → CARD → CARD SETUP, and press 🔒
2 Press to select ALL ERASE, and press.
3 Press to select YES, and press.
- All the pictures are erased.
CARD SETUP FORMATTING CARDS
This function lets you format a card. Formatting prepares cards to receive data. Before using non-Olympus cards or cards which have been formatted on a PC, you must format them with this camera.
All existing data, including protected pictures, are erased when the card is formatted. Make sure that you transfer important data to a PC before formatting a card in use.
1 In the top menu, select MODE MENU → CARD → CARD SETUP, and press 🔒
- Shooting mode The FORMAT screen is displayed.
- Playback mode The CARD SETUP screen is displayed.
2 If the FORMAT screen is displayed, press to select YES.
If the CARD SETUP screen is displayed, press to select FORMAT, and press.
When the FORMAT screen appears, press to select YES.
3 Press
- The BUSY bar is displayed and the card is formatted.
PLAYBACK ON A TV
Use the AV cable provided with the camera to play back recorded images on your TV. Both a still picture and a movie can be played back. For a movie, the recorded sound is also played back along with the movie.
1 Make sure that the TV and camera are turned off. Connect the A/V OUT jack on the camera to the video input terminal on the TV using the AV cable.

En
2 Turn the TV on and set it to the video input mode.
- For details of switching to video input, refer to your TV's instruction manual.
3 Press.
- The last picture taken is displayed on the TV. Use the arrow pad to select the picture you want to display.
- The close-up playback, index display and slideshow functions can also be used on a TV screen.

Note
- You are recommended to use the optional AC adapter when using the camera with a TV.
- Make sure that the camera's video output signal type is the same as the TV's video signal type.
PRINT RESERVATION /DIRECT PRINT
WITH PRINT RESERVATION (DPOF)
DPOF is short for Digital Print Order Format. DPOF is the format used to record automatic print information from digital cameras.
If a card containing print reservation data is taken to a print shop that supports the DPOF format, the pictures can be printed according to the DPOF reservations. Or pictures can be printed out at home on a personal DPOF-compatible printer.
All-frame reservation
Use this feature to print all the pictures stored on the card. Select the desired number of prints and whether you want the date and time included.
Single-frame reservation
Use this feature to print only selected pictures. It is also used to change the reserved number of prints and the date/time settings. Display the frame to be printed and select the desired number of prints.
Resetting the print reservation data
This function allows you to reset all the print reservation data for pictures stored on the card.
DIRECT PRINT (PictBridge)
By connecting the camera to a PictBridge-compatible printer with the USB cable, you can print out recorded pictures directly without the use of a computer.
PictBridge is the standard for connecting digital cameras and printers of different makers and printing out pictures directly.
PRINT Prints the selected picture.
ALL PRINT Prints all the pictures stored on the card.
MULTI PRINT Prints one picture in multiple layout format.
ALL INDEX Prints an index of all the pictures stored on the card.
PRINT ORDER Prints the pictures according to the print reservation data on the card. If no print reservations have been made, this option is not available.
Options for the print mode and other settings
• Available options for some settings such as the print mode and paper size may differ depending on the type of printer. For details, refer to the instruction manual of your printer.
For more details, refer to the "Reference Manual" on CD-ROM.
DOWNLOADING PICTURES TO A COMPUTER
By connecting the camera to a computer with the provided USB cable, images on a card can be transferred to the computer. Some OS's (operating systems) may need a special setup before connecting to the camera for the first time. Follow the chart below. For details of the procedures in the chart, refer to the "Reference Manual" on the software CD. Also refer to the "Software Installation Guide" included in the CD-ROM package.

flowchart
graph TD
    A["Identifying the OS"] --> B["Windows 98/98 SE (Second Edition)"]
    A --> C["Windows Me/2000/XP"]
    A --> D["Mac OS 9.0 - 9.2/OSX * For OS 8.6, see below."]
    B --> E["Installing the USB driver for Windows 98"]
    C --> F["Connecting the camera to the computer using the provided USB cable"]
    D --> G["Confirming the computer recognizes the camera"]
    E --> H["Downloading image files"]
    F --> I["Disconnecting the USB cable"]
    G --> I
    H --> I
    I --> J["Disconnecting the USB cable"]
* Even if your computer has a USB connector, data transfer may not function correctly if you are using one of the operating systems listed below or if you have an add-on USB connector (extension card, etc.).
- Windows 95/NT 4.0
• Windows 98/98 SE upgrade from Windows 95
• Mac OS 8.6 or lower (except Mac OS 8.6 equipped with USB MASS Storage Support 1.3.5 installed at the factory)
- Data transfer is not guaranteed on a home-built PC system or PCs with no factory installed OS.

- You can view images using: graphics applications that support the JPEG file format (Paint Shop Pro, Photoshop, etc.); Internet browsers (Netscape Communicator, Microsoft Internet Explorer, etc.); CAMEDIA Master software; or other software. For details on using commercial graphics applications, refer to their instruction manuals.
- QuickTime is needed for playing back movies. QuickTime is included on the provided software CD.
- If you want to process images, make sure to download them to your computer first. Depending on the software, image files may be destroyed if the images are processed (rotated, etc.) while they are on the card.
FOR OTHER OS USERS
Users running other OS cannot use the provided USB cable to connect the camera directly to a computer.
● Windows 95 ● Windows NT ● Mac OS before OS 9
You can download images directly to your computer using a PC card adapter.
Does your computer have a USB interface?
Is there a port marked on your computer?

flowchart
graph TD
    A["No"] --> B{Is your OS one of the following?}
    B --> C["Windows 98"]
    B --> D["Windows 2000"]
    B --> E["Windows Me"]
    B --> F["Windows XP"]
    B --> G["Mac OS 9"]
    B --> H["X"]
    I["Yes"] --> J["Yes"]
    K["No"] --> L["Yes"]
Connect the camera directly to your computer using the
provided USB cable.

Use the optional USB reader/writer.
*Certain card readers may not be compatible with Mac OS X. Check the Olympus website for the most up-to-date compatibility information.
Does your computer have a built-in PC card slot?

flowchart
graph TD
    A["No"] --> B
    C["Yes"] --> D
Use the optional PC card adapter.
*Not supported by Windows NT4.0 or lower.
Consult your nearest Olympus representative.
For more details, refer to the "Reference Manual" on CD-ROM.
For connection to the PC, refer to the "Software Installation Guide" included in the CD-ROM package.
ERROR CODES
| Monitor indication P | Possible cause Corrective action | |
 NO CARD NO CARD | The card is not inserted, or it cannot be recognized. | Insert a card or insert a different card.If the problem persists, format the card. If the card cannot be formatted, it cannot be used. |
| [4ZYA]CARD ERROR | There is a problem with the card. | This card cannot be used. Insert a new card. |
 WRITE-PROTECT WRITE-PROTECT | Writing to the card is prohibited. | Read-only setting is applied to the card by a PC. Cancel the setting using the PC. |
| [CYA0]CARD FULL | The card is full. No more pictures can be taken or no more information such as print reservation can be recorded. | Replace the card or erase unwanted pictures. Before erasing, download important images to a PC. |
| [T2Y3]NO PICTURE | There are no pictures on the card. | The card contains no pictures. Record pictures. |
 PICTUREERROR PICTUREERROR | The selected picture has a problem, therefore it cannot be played back on this camera. | Use image processing software to view the picture on a PC. If that cannot be done, the image file is damaged. |
 CARD-COVER OPEN CARD-COVER OPEN | The card cover is open. Close the | card cover. |
 | The card is not formatted. Format | the card.All data on the card is deleted. |
SPECIFICATIONS
Product type : Digital camera (for shooting and displaying)
Recording system
Still picture : Digital recording, JPEG (in accordance with Design rule for Camera File system (DCF))
Applicable : Exif 2.2, Digital Print Order Format (DPOF), standards PRINT Image Matching II, PictBridge
Movie : QuickTime Motion JPEG support
Memory : xD-Picture Card (16 - 512MB)
No. of storable pictures
When a 16MB card used : Approx. 5 frames (SHQ: 2288 × 1712) Approx. 16 frames (HQ: 2288 × 1712) Approx. 32 frames (SQ1: 1600 × 1200) Approx. 165 frames (SQ2: 640 × 480)
No. of effective pixels : 4,000,000 pixels
Image pickup device : 1/2.5" CCD solid-state image pickup, 4,230,000 pixels (gross)
Lens : Olympus lens 5.8 mm to 17.4 mm, f3.1 to 5.2, 5 elements in 3 groups (equivalent to 35 mm to 105 mm lens on 35 mm camera)
Photometric system : Digital ESP metering, spot metering
Shutter speed : 1 to 1/1000 sec. (Night Scene mode: 2sec)
Shooting range : 50 cm (1.6 ft.) to (normal) 20 cm to 50 cm (0.7 ft. to 1.6 ft.) (macro mode)
Viewfinder : Optical real image viewfinder
Monitor : 1.8" TFT color LCD display, 85,000 pixels
Outer connector : DC-IN jack, USB connector (mini-B), A/V OUT jack (MONO)
Automatic calendar : 2000 up to 2099 system
Operating environment
Temperature : 0°C to 40°C (32°F to 104°F) (operation) -20°C to 60°C (-4°F to 140°F) (storage)
Humidity : 30% to 90% (operation)/10% to 90% (storage)
Power supply : 1 CR-V3 lithium battery pack, or 2 AA (R6)
alkaline batteries or NiMH batteries.
AC adapter (optional)
Manganese (zinc-carbon) batteries cannot
be used.
Dimensions : 108 mm (W) × 57.5 mm (H) × 36.5 mm (D)
(4.2" × 2.2" × 1.4")
(excluding protrusions)
Weight : 165 g (0.4 lb.) (without batteries or card)
SPECIFICATIONS ARE SUBJECT TO CHANGE WITHOUT ANY NOTICE OR OBLIGATION ON THE PART OF THE MANUFACTURER.
En
TABLE DES MATIÈRES
GUIDE RAPIDE DE DÉMARRAGE 48
FONCTIONS DU MENU 60
PRISE DE VUES – INSTRUCTIONS DE BASE ..... 67
PRISE DE VUE ÉLABORÉE 75
AFFICHAGE 76
RÉSERVATION D'IMPRESSION/
IMPRESSION DIRECTE....82
TRANSFERT DES PHOTOS VERS UN ORDINATEUR. . . . 84
CODES D'ERREUR 86
CARACTÉRISTIQUES 87
Fr
natural_image
Line drawing of a battery holder with a hand inserting a plug into the housing (no text or symbols)
Important
natural_image
Line drawing of a device interior showing internal components and housing (no text or symbols)MISE EN MARCHE/ARRÊT
natural_image
Line drawing of a digital camera with directional arrows indicating left and right motion (no text or symbols)Fr
Mise hors-tension:
natural_image
Diagram showing a device being processed from a left-side and right-side views (no text or symbols present)
Remarque
SI UNE MISE AU POINT SATISFAISANTE EST IMPOSSIBLE (MÉMORISATION DE LA MISE AU POINT)
Voyant vert
flowchart
graph TD
    A["Non"] --> B
    C["Oui"] --> D
Adresse : 2 Corporate Center Drive, Melville, New York11747-3157, USA
Telefonnummer : 1-631-844-5000
natural_image
Line drawing of a handheld device with an attached battery labeled 'MEMS' (no text or symbols on the device itself)natural_image
Line drawing of a camera module with no visible text or symbolsnatural_image
Line drawing of a digital camera with directional arrows indicating movement (no text or symbols)natural_image
Diagram showing a device being processed from a left-side and right-side views (no text or symbols present)
natural_image
Circular mechanical component with symmetrical slots and central hub (no text or symbols)natural_image
Line drawing of a hand holding a tool with an arrow indicating direction (no text or symbols)Enganche de la correa
natural_image
Diagram of a battery being inserted into a device, showing internal components and an arrow indicating insertion (no text or symbols present)Importante
natural_image
Line drawing of a camera module with no visible text or symbolsnatural_image
Line drawing of a digital camera with directional arrows indicating left and right motion (no text or symbols)natural_image
Diagram showing a device being processed from a left-side and right-side views (no text or symbols present)
flowchart
graph TD
    A["No"] --> B["Sí"]
Conector exterior : Jack DC-IN, conector USB (mini-B), jack A/V OUT (MONO)
Shinjuku Monolith, 3-1 Nishi-Shinjuku 2-chome, Shinjuku-ku, Tokyo, Japan
OLYMPUS AMERICA INC.
Two Corporate Center Drive, Melville, NY 11747-3157, U.S.A. Tel. 631-844-5000
Technical Support (USA)
24/7 online automated help: http://www.olympusamerica.com/support
Phone customer support: Tel. 1-888-553-4448 (Toll-free)
Our phone customer support is available from 8 am to 10 pm
(Monday to Friday) ET
E-Mail: distec@olympus.com
Olympus software updates can be obtained at: http://www.olympus.com/digital
Olympus Europa GmbH
Premises/Goods delivery: Wendenstrasse 14-18, 20097 Hamburg, Germany
European Technical Customer Support:
Please visit our homepage http://www.olympus-europa.com
or call our TOLL FREE NUMBER*: 00800 - 67 10 83 00
for Austria, Belgium, Denmark, Finland, France, Germany, Italy, Luxemburg, Netherlands, Norway, Portugal, Spain, Sweden, Switzerland, United Kingdom
* Please note some (mobile) phone services/provider do not permit access or request an additional prefix to +800 numbers.
For all not listed European Countries and in case that you can't get connected to the above mentioned number please make use of the following
CHARGED NUMBERS: +49 180 5 - 67 10 83 or +49 40 - 237 73 899
Our Technical Customer Support is available from 9 am to 6 pm MET (Monday to Friday)
© 2004 OLYMPUS CORPORATION
Printed in Japan
1AG6P1P1996-- VT737301
- CONTENTS/TABLE DES MATIÉRES/INHALT/CONTENIDO
- CONTENTS
- For customers in North and South America
- For customers in USA
- For customers in Canada
- For customers in Europe
- Trademarks
- GETTING STARTED
- Arrow pad
- MONITOR INDICATIONS
- Playback mode
- Memory gauge
- En
- Battery check
- ATTACHING THE STRAP
- LOADING THE BATTERIES
- Insert the batteries, making sure that they are correctly oriented as shown in the illustration.
- Close the battery compartment cover, then press it down Ⓒ and slide it in the direction shown Ⓓ.
- Important
- INSERTING A CARD
- Make sure that:
- Open the card cover.
- Face the card the correct way and insert it into the card slot as shown in the illustration.
- Close the card cover securely.
- Removing the card
- Make sure that:
- Note
- When shooting pictures (Shooting mode)
- Power on: Open the lens barrier fully.
- Power off: Close the lens barrier slightly until it almost touches the lens barrel.
- When playing back pictures (Playback mode)
- Power on: Press (Playback) with the lens barrier closed.
- Power off: Press.
- SELECTING A LANGUAGE
- SETTING THE DATE AND TIME
- Press to set the year, and press to move to the month setting.
- Repeat this procedure until the date and time are completely set.
- Press
- Close the lens barrier to turn the camera off.
- MENU FUNCTIONS
- TYPE OF MENUS
- How to use the menus
- Shooting mode
- DRIVE
- (movies)
- MONITOR OFF (MONITOR ON)
- MOVIE PLAYBACK
- INFO
- ERASE
- PICTURE tab
- CARD tab
- SHOOTING BASICS
- Open the lens barrier fully.
- Press Ⓜ (○).
- Select the mode best suited to your purpose from the following.
- Press OK
- P PROGRAM AUTO (Factory default setting)
- (Portrait)
- (Landscape + Portrait)
- (Landscape)
- (Night scene)
- (Self portrait)
- (Movie)
- TAKING STILL PICTURES
- Taking still pictures using the monitor
- Decide the composition while looking at the image on the monitor.
- Press the shutter button gently (halfway) to adjust the focus.
- Press the shutter button all the way (fully).
- Taking still pictures using the viewfinder
- Decide the composition while looking at the image in the viewfinder.
- Take the picture by following the same procedure as for shooting using the monitor.
- IF CORRECT FOCUS CANNOT BE OBTAINED (FOCUS LOCK)
- Position the AF target mark on the subject you want to focus on.
- Press the shutter button halfway until the green lamp lights.
- Keeping the shutter button pressed halfway, recompose your shot.
- Press the shutter button fully.
- RECORDING MOVIES
- Notes for recording movies over a long time
- ZOOMING IN ON A SUBJECT (OPTICAL ZOOM)
- USING THE FLASH
- Auto-flash (No indication)
- Red-eye reduction flash ( )
- Fill-in flash ( )
- Flash off ( )
- USING THE SELF-TIMER
- Press 🙏 ⏻ ).
- Press 🤖 ( ) to switch the self-timer mode on or off.
- Take the picture.
- ADVANCED SHOOTING
- SEQUENTIAL SHOOTING
- SELECTING THE METERING AREA
- MACRO MODE SHOOTING
- PLAYBACK
- VIEWING STILL PICTURES
- Press with the lens barrier closed.
- Use the arrow pad to play back other pictures.
- Press to cancel playback.
- QUICK VIEW
- Close-up playback
- Index display
- MOVIE PLAYBACK VIEWING MOVIES
- When FRAME BY FRAME is selected
- PROTECTING PICTURES
- ERASING PICTURES
- Single-frame erase
- All-frame erase
- CARD SETUP FORMATTING CARDS
- PLAYBACK ON A TV
- PRINT RESERVATION /DIRECT PRINT
- WITH PRINT RESERVATION (DPOF)
- All-frame reservation
- Single-frame reservation
- Resetting the print reservation data
- DIRECT PRINT (PictBridge)
- Options for the print mode and other settings
- DOWNLOADING PICTURES TO A COMPUTER
- FOR OTHER OS USERS
- ERROR CODES
- SPECIFICATIONS
- TABLE DES MATIÈRES
- Fr
- MISE EN MARCHE/ARRÊT
- Mise hors-tension:
- SI UNE MISE AU POINT SATISFAISANTE EST IMPOSSIBLE (MÉMORISATION DE LA MISE AU POINT)
- Importante
- OLYMPUS AMERICA INC.
- Technical Support (USA)
- Olympus Europa GmbH
- European Technical Customer Support:
Brand : OLYMPUS
Model : X-400
Category : Camera