E2 - Robot vacuum ROBOROCK - Free user manual and instructions
Find the device manual for free E2 ROBOROCK in PDF.
Download the instructions for your Robot vacuum in PDF format for free! Find your manual E2 - ROBOROCK and take your electronic device back in hand. On this page are published all the documents necessary for the use of your device. E2 by ROBOROCK.
USER MANUAL E2 ROBOROCK
User Manual of Xiaowa Robotic Vacuum Cleaner Please read this user manual carefully before use and keep it well for future referenceIMPORTANT SAFETY INSTRUCTIONS When using an electrical appliance, basic precautions should always be followed, including the following: READ ALL INSTRUCTIONS BEFORE USING (THISAPPLIANCE), Failure to follow the warnings and instructions may result in electric shock, fire and/or serious injury. WARNING To reduce the risk of fire, electric shock, or injury: Do not use outdoors or on wet surfaces Do not allow to be used as a toy. Close attention is necessary when used by or near children, pets or plants. Use only as described in this manual. Use only manufacturer’s recommended attachments Do not use with damaged cord or plug. If appliance is not working as it should, has been dropped, damaged, left outdoors, or dropped into water, return it to a service center. Do not pull or carry by cord, use cord as a handle, close a door on cord, or pull cord around sharp edges or corners. Do not run appliance over cord. Keep cord away from heated surfaces. Do not unplug by pulling on cord. To unplug, grasp the plug, not the cord. Do not handle charger, including charger plug, and charger terminals with wet hands Do not put any object into openings. Do not use with any opening blocked; keep free of dust, lint, hair, and anything that may reduce air flow. Keep hair, loose clothing, fingers, and all parts of body away from openings and moving parts. Do not use to pick up flammable or combustible liquids, such as gasoline, or use in areas where they may be present. Do not pick up anything that is burning or smoking, such as cigarettes, matches, or hot ashes. Do not use without dust bag. Prevent unintentional starting. Ensure the switch is in the off-position before connecting to battery pack, picking up or carrying the appliance. Carrying the appliance with your finger on the switch or energizing appliance that have the switch on invites accidents. Safety Information 1For use only with xiaowa CDZ03RR or CDZ04RR charger.Recharge only with the charger specified by the manufacturer. A charger that is suitable for one type of battery pack may create a risk of fire when used with another battery pack. Use appliances only with specifically designated battery packs. Use of any other battery packs may create a risk of injury and fire. Under abusive conditions, liquid may be ejected from the battery; avoid contact. If contact accidentally occurs, flush with water. If liquid contacts eyes, additionally seek medical help. Liquid ejected from the battery may cause irritation or burns. Do not use a battery pack or appliance that is damaged or modified. Damaged or modified batteries may exhibit unpredictable behavior resulting in fire, explosion or risk of injury. Do not expose a battery pack or appliance to fire or excessive temperature. Exposure to fire or temperature above 130°C may cause explosion. Follow all charging instructions and do not charge the battery pack or appliance outside of the temperature range specified in the instructions. Charging improperly or at temperatures outside of the specified range may damage the battery and increase the risk of fire. Have servicing performed by a qualified repair person using only identical replacement parts.This will ensure that the safety of the product is maintained. Do not modify or attempt to repair the appliance or the battery pack except as indicated in the instructions for use and care. Place the cords from other appliances out of the area to be cleaned. Do not operate the vacuum in a room where an infant or child is sleeping. Do not operate the vacuum in an area where there are lit candles or fragile objects on thefloor to be cleaned. Do not operate the vacuum in a room that has lit candles on furniture that the vacuum may accidentally hit or bump into. Do not allow children to sit on the vacuum. Safety Information 2Do not use the vacuum cleaner on a wet surface. Risk Of Injury. Brush May Start Unexpectedly.Disconnect the main Brush Before Cleaning or Servicing. Do not use the product when the temperature is higher than 40℃ or lower than 4℃, or there is any liquid or sticky substance on the floor
SAVE THESE INSTRUCTIONS
Household use only Safety Information
Usage Domestique seulement Laser Safety Class I Laser Product, complies with FDA 21 CFR 1040.10 and 1040.11, except for deviations pursuant to Laser Notice. No.50, dated June 24, 2007.FCC Statement
Any changes or modifications to this unit not expressly approved by the party responsible for compliance could void the user's authority to operate the equipment. Le présent appareil est conforme aux CNR d'Industrie Canada applicables aux appareils radio exempts de licence. L'exploitation est autorisée aux deux conditions suivantes : (1) l'appareil ne doit pas produire de brouillage, et (2) l'utilisateur de l'appareil doit accepter tout brouillage radioélectrique subi, même si le brouillage est susceptible d'en compromettre le fonctionnement. Compliance Information Correspondence of the responsible party in USA Product Name Robotic Vacuum Cleaner with Dock Charger Company Roborock Technology Co. Email support@roborock.com Address 108 West 13th Street, Wilmington, Delaware 19801. Compliance Statement This device complies with part 15 of the FCC Rules. Operation is subject to the following two conditions: (1) This device may not cause harmful interference, and (2) this device must accept any interference received, including interference that may cause undesired operation Produce Model E2 ,E3 ( can ***** ***** * Robotic Vacuum Cleaner Model: be 0 to 9, A to Z, a to z, "-", "_", "\", "/" or blank, for marketing purpose.) Dock Charger Model: CDZ03RR , CDZ04RRChanges or modifications not expressly approved by the party responsible for compliance could void the user's authority to operate the equipment. This equipment has been tested and found to comply with the limits for a Class B digital device, pursuant to part 15 of the FCC Rules. These limits are designed to provide reasonable protection against harmful interference in a residential installation. This equipment generates uses and can radiate radio frequency energy and, if not installed and used in accordance with the instructions, may cause harmful interference to radio communications. However, there is no guarantee that interference will not occur in a particular installation. If this equipment does cause harmful interference to radio or television reception, which can be determined by turning the equipment off and on, the user is encouraged to try to correct the interference by one or more of the following measures: —Reorient or relocate the receiving antenna. —Increase the separation between the equipment and receiver. —Connect the equipment into an outlet on a circuit different from that to which the receiver is connected. —Consult the dealer or an experienced radio/TV technician for help. FCC Statement MPE Requirements To satisfy FCC / IC RF exposure requirements, a separation distance of 20 cm or more should be maintained between the antenna of this device and persons during device operation. To ensure compliance, operations at closer than this distance is not recommended. L’antenne installée doit être située de facon à ce que la population ne puissey être exposée à une distance de moin de 20 cm. Installer l’antenne de facon à ce que le personnel ne puisse approcher à 20 cm ou moins de la position centrale de l’antenne.La FCC des éltats-unis stipule que cet appareil doit être en tout temps éloigné d’au moins 20 cm des personnes pendant son functionnement. CAN ICES-3 (B)/NMB-3(B) 7Battery and Charging Please keep the dock charger away from heat (such as heating plates) The battery must be removed from the appliance before it is scrapped Do not wipe or clean the chargers shrapnel with a piece of wet cloth or wet hands Please make sure the cleaner is powered off in shipment and original packaging is advised If left unused for a long period, please store the cleaner in a cool and dry place after having it fully charged and switched off, charge it at least every three months to avoid the battery being over discharged Please do not use the product when the temperature is higher than 40℃ or lower than 4℃, or there is any liquid or sticky substance on the floor The battery is to be disposed of safely.Please do not discard waste batteries. Leave them to a professional recycling organization The appliance must be disconnected from the supply mains when removing the battery
Battery pack charging temperature Battery pack using temperature 4℃~40℃ @Max Charging Current:0.5C 4℃~40℃ @Max Discharge Current:0.5C Battery pack storage temperature Storage(1month) -20℃~60℃ @Less than 70% RH If the battery pack store at 25℃over the 3 months period, it should be recharged. Long Storage(3months) -20℃~45℃ @Less than 70% RH Long Storage(1year) -20℃~20℃ @Less than 70% RHMachine Introduction Cover lift POWER light White: battery capacity ≥ 20% Red: battery capacity < 20% Slow flashing: Charging or starting up Flashing in red: Faulty state Clean/ON&OFF Press to start cleaning Press and hold to power on or off Spot cleaning Press to start spot cleaning Note: press any key to pause cleaning, recharging or spot cleaning midway Recharge Press to start recharging
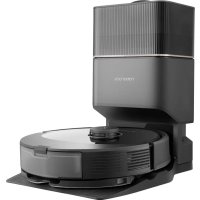
Power cable Mopping cloth Dock charger Water tank Moistureproof mat Main brush cleaning toolDust bin Introduction Machine
WIFI indicator Slow flashing: Waiting for connection Fast flashing: Connecting Glowing: WIFI is connected Strainer Dust bin buckle Speaker Air outlet Dust bin coverMachine and sensor Introduction
Side brush Omni-directional wheel Bumper Charging contact pieces Motion tracking sensor Main brush Main wheel Main brush cover buckle Cliff Sensor IR decelerate sensor Omni-directional recharge sensor Dock charger Dock charger indicator Charge tab Power connector Charge tab Signal transmitting areaInstallation
Power on and charge3 Press and hold the key to power on, wait until the power light is normally on, and then dock the machine body to the dock charger for charging The machine is equipped with a built-in high performance lithium-ion rechargeable battery pack. To maintain battery performance, please keep the machine charged for normal use. Clip the dock charger into the groove of the waterproof mat and install it in place
Notes: Ensure that 0.5 m or above in two sides and 1.5 m in the front are retained for the dock charger The power cable, when being vertical to the floor, may be dragged by the machine body, thereby resulting in displacement or disconnection of the dock charger The dock charger indicator is normally on when the dock charger is electrified, and off when the dock charger works Place the dock charger against a wall on a level floor and connect it to the power supply
Connect your mobile phone client (this can be skipped)4 Note: The machine may not be powered on when the battery is low. Please directly dock the machine body to the dock chargerMore than 0.5 mMore than 0.5 mMore than 1.5 m The color of the POWER light indicates the battery level White: battery capacity ≥ 20% Red: battery capacity < 20%Installation
The product is compatible with Mi Home intelligent platform and could be controlled by Mi Home app. It supports the MIUI system and can be interconnected with other Mi Home intelligent products Quick Setup Download App Search "Mi Home" in App store/Google play or scan the QR code below to download and install the Mi Home app. If anything is wrong with WIFI connection, you could try to reset WIFI to default. Open upper cover to check the WIFI indicator status next to reset button. Press and hold the key and key until you hear the voice "Reset WIFI ". The resetting is completed when the WIFI indicator starts to flash slowly and the cleaner will enter a pending connection state.
Go to "My Device" page of Mi Home app and tap "+" on the top right corner of the page to add a device. You could find newly added device on "My Device" list Add Device
Note: When your mobile phone fails to connect to the machine, please refer to "User Manual" - "Reset WIFI" Slow flashing: Waiting for connection Fast flashing: Connecting Glowing: WIFI is connected WIFI indicator Install the mopping module5
Install the module: push the module in parallel along the alignment signs on the rear of the machine and on the mopping module. It is installed in place when you hear a "click" sound. Note: Do not use the mopping module when there is nobody at home Note: To get better mopping effect, it is recommended to install the mopping module after cleaning for 3 times Refill the water tank: open the water tank and reinstall the water tank cover after refilling with tap water Note: Please be aware that some floor cleaners or disinfectants may cause blockage of the water tank filter Install the mopping cloth: dampen the mopping cloth and squeeze it dry. Insert it to the end along the slot of the water tank and stick it firmly
3Installation When the power light changes from white breathing flash to normally on, charging completes. Press the key or use your mobile phone client to start cleaning Start cleaning6
Note: Do not use the mopping module when there is nobody at home It is recommended to clean the mopping cloth every 30 minutes to ensure water flow rate and cleaning effect After the machine completes cleaning and returns to the dock charger, use your hands to push two buckles in two sides, drag the mopping module backwards and remove it Remove the mopping module7 Note: Remove the mopping module when the machine is charging or left unused. Empty water residue in the water tank and clean the mopping cloth to prevent mildew or undesirable odor When the dock charger is placed on a wooden floor, always place a moisture-proof mat thereunder to avoid moisture on the floor Routine Maintenance Note: It is recommended to replace the main brush every 6-12 months to ensure the cleaning effect Main brush Clean weekly
1. Flip the machine over and push the buckle to remove
the main brush cover
2. Lift the main brush up and clean its bearing
3. Use the supplied main brush cleaning tool to cut off
hair entangled onto the main brush
4. Reinstall the main brush and clamp tightly the buckle
on the main brush cover Use of main brush cleaning tool Buckle Main brush cover Main brush Main brush bearing *Routine Maintenance
Dust bin and strainer Clean weekly
1. Remove the top cover of the machine and press the
dust bin buckle to lift up and remove the dust bin
2. Open the dust bin cover as indicated by arrow, and empty trash out
Clean the washable strainer Clean every two weeks
1. Open the dust bin cover as indicated by arrow
2. Fill the dust bin with clean water and close the cover. Shake the
dust bin and then pour out the dirty water Note: Please rinse with clean water without adding any detergents *18 Routine Maintenance
3. Remove the filter and rinse with water
4. Rinse repeatedly and lightly pat the filter to remove any dirt.
Continue until it is clean
5. Dry the filter thoroughly and reinstall it before use
Note: Do not touch the surface of the filter with hands, brushes or sharp objects so as to avoid damaging the filter Note: Always dry the filter thoroughly before use (dry for at least 24 hours) It is recommended to alternate between two strainers Note: flush it with tap water and reinstall after drying
1. Flip the machine over and lift the omni-directional wheel up
2. Remove hair and dirt on the wheel body and axle
3. Reinstall the wheel body and press tightly
Omni-directional wheel Clean monthly Wheel body Axle Rack Side brush Clean monthly
1. Flip the machine over to remove the fixing screw on the side brush
2. Remove and clean the side brush
3. Reinstall the side brush and tighten the screw
Note: It is recommended to replace the side brush every 3-6 months to ensure the cleaning effect
Mopping cloth Clean after use
1. Remove the mopping cloth from the mopping module
2. Clean the mopping cloth and dry it
Note: Always remove the mopping cloth for cleaning and avoid backflow of dirty water that may block the filter If the mopping cloth is too dirty, the mopping effect may be affected. Please clean it before use It is recommended to replace the mopping cloth every 3-6 months to ensure the cleaning effect Filter assembly Replace every 1-3 months
1. Use your finger to remove the filter assemblies on the
left and right along the notch
2. Install a new filter assembly in place
Note: It is recommended to replace a filter assembly every 1-3 months to ensure the cleaning effect, depending on the quality of water and frequency of use. The machine is internally provided with a high performance lithium-ion rechargeable battery pack. To maintain battery performance, please keep the machine charged in normal use Note: If the machine is left unused for a prolonged period of time, please power it off before storage and charge it at least every 3 months to avoid degradation due to over-discharge Battery
Machine sensor Clean monthly Use soft dry cloth to wipe and clean each sensor, including:
1. Four cliff sensors on the bottom of the machine
2. IR decelerate sensor in front of the machine
3. Charging contact on the bottom of the machine
Omni-directional wheel Charging contact Motion tracking sensor Side brush Cliff Sensor Dock charger Clean monthly Use soft dry cloth to clean the charging contact of the dock charger Reset system Firmware update When pressing keys makes no response or the machine cannot be shut down, please try to reset the system by pressing the key; the machine will be restarted automatically after resetting You can use your mobile phone client to update firmware for the machine. Please connect it to the dock charger and ensure that the battery capacity is more than 20% before update. The power indicatoris fast flashing in white during firmware update IR decelerate sensor Restoring to Factory Defaults If the system still doesn't work after resetting, please press and hold the button simultaneously, until the system prompts for "Start restoring initial version". The machine will be restored to factory defaults in this way
Machine 353x350x90.5mm 353x350x90.5mmOutline Dimension Model Battery Power rating Weight Wireless connection Voltage rating WIFI Smart Connect WIFI Smart Connect 14.4VDC 14.4VDC Name Specs Specs Dock charger 42W 100-240VAC 50-60Hz 151x130x98mm Outline Dimension Model CDZ03RR or CDZ04RR Power rating Input rating Output rating Frequency rating 20VDC 1.8A Name Specs About 3.0kg About 3.2kg E2 , ( can be 0 to 9, A to Z, a to z, "-", "_", "\", "/" or blank,for marketing purpose.)
E3 , ( can be 0 to 9, A to Z, a to z, "-", "_", "\", "/" or blank,for marketing purpose.)
Model to z, "-", "_", "\", "/" or blank, for marketing purpose.) ( can be 0 to 9, A to Z, *23
¡Robotic Vacuum Cleaner Manufacturer: Beijing Roborock Technology Co., Ltd. Product Model: E2 ,E3 ( can be 0 to 9, A to Z, a to z, "-", "_", "\", "/" or blank, for marketing purpose.) Address of Manufacturer: Floor 6, Suite 6016, 6017, 6018, Building C, Kangjian Baosheng Plaza, No. 8 Heiquan Road, Haidian District, Beijing, P.R. CHINA ***** ***** * For more product information, please visit our website: www.roborock.com For after-sales support, please email our after-sales service team: US/Non-Europe Support: support@roborock.com Europe Support: support@roborock-eu.com