
W7 D93SB EE - Tumble drier WHIRLPOOL - Free user manual and instructions
Find the device manual for free W7 D93SB EE WHIRLPOOL in PDF.
| Brand | Whirlpool |
| Model | W7 D93SB EE |
| Product type | Heat pump dryer |
| Maximum load capacity | 9 kg (cotton, spun-dried) |
| Installation type | Freestanding (non built-in) |
| Dimensions (height × width × depth) | 85 × 60 × 60 cm (estimated) |
| Net weight | Approximately 50 kg (estimated) |
| Power supply | 230 V, 50 Hz, 16 A |
| Energy consumption (off mode) | 0.50 W |
| Energy consumption (left-on mode) | 2.00 W |
| Main programmes | Cotton Eco, Synthetics, Wool, Delicate, Colours, Quick 30', Refresh, etc. |
| Options | Drying level, Drying time, Delayed start, FreshCare+, Quick, Lock, Cycle end alert |
| Drying system | Heat pump with R134a gas (0.18 kg, GWP 604) |
| Filter maintenance | Primary filter (after each cycle), secondary filter (according to indicator), automatic lower filter |
| Water tank | Empty after each cycle |
| Anti-crease function | Yes, periodic drum rotation up to 6 hours after cycle end |
| Child lock | Yes (by long pressing the Confirm button) |
| Drum light | Yes, adjustable in settings |
| Repairability index | Parts available at parts-selfservice.whirlpool.com |
Frequently Asked Questions - W7 D93SB EE WHIRLPOOL
User questions about W7 D93SB EE WHIRLPOOL
0 question about this device. Answer the ones you know or ask your own.
Ask a new question about this device
Download the instructions for your Tumble drier in PDF format for free! Find your manual W7 D93SB EE - WHIRLPOOL and take your electronic device back in hand. On this page are published all the documents necessary for the use of your device. W7 D93SB EE by WHIRLPOOL.
USER MANUAL W7 D93SB EE WHIRLPOOL
THANK YOU FOR BUYING A WHIRLPOOL PRODUCT.
In order to receive a more complete assistance, please register your product on www.whirlpool.eu/register

Before using the appliance carefully read the Safety Instruction.
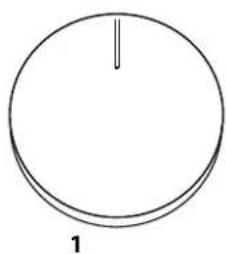
CONTROL PANEL
1 Programme selection knob
2 On/Off button
3 Start/Pause button
4 FreshCare+
5 Cycle End Signal
6 Rapid
7 Cycle Options (hold for Settings)
8 Dryness Level
9 Timed Drying
10 Start Delay
Options buttons
Navigation buttons and Key Lock
11 UP
12 DOWN
13 CONFIRM ☑(hold for Key Lock)
natural_image
Simple circular diagram with a vertical line and the number 1 below it (no text or symbols within the circle)
INDICATORS
Cycle phase: Drying - Cool Down
Empty water tank - Clean secondary filter - Clogged door filters - Autoclean - Eco Monitor
Refer to Troubleshooting section: 📋 Failure call After-sales Service - DEMO Demo Mode
FIRST TIME USE
When starting the appliance the first time, the control panel will automatically show the set language menu. The UP and DOWN buttons are used to show the languages available in the machine. Press the ☑ button to confirm. The machine cannot be used without having selected the language.
Make sure that the water tank is correctly inserted.
The dryer must be installed in a room with a temperature ranging between 5°C and 35°C to ensure proper operation. Before using the dryer make sure it has been in an upright position for at least 6 hours.
Should you wish to change the opening side of the door, please contact our After-sales Service. (See phone number in the warranty booklet).
DAILY USE
Doing this will keep your machine working at its BEST:
- remember to empty your water tank after each drying cycle.
- remember to clean your filters after each drying cycle.
Refer to the Care & Maintenance section.
- Plug the dryer into the power supply socket.
- Open the door and load garments; always refer to instructions on clothing labels and the max loads indicated in the programme section. Empty pockets. Make sure garments do not get caught between the door and/or the door filter. Do not load items that are dripping wet. Do not tumble dry large, very bulky items.
- Close the door.
- Press the "On/Off" button.
- Select the most suitable programme for the type of fabric in that load.
- Select the options, if necessary.
- Press the "Start/Pause" button to begin drying.
- At the end of the drying cycle, a buzzer will beep. An indicator on the control panel signals the end of the cycle. Pull the load out immediately to prevent the formation of creases on laundry.
- Turn the machine off by pressing the "On/Off" button, open the door and pull the clothing out. If the machine is not switched off manually, after about a quarter of an hour from the end of the cycle, the appliance turns off automatically to save energy. Note that some programme/option accords with "Crease Care" system. This means that for some hours, after the end of the drying cycle, the drum rotates at regular intervals to prevent the formation of creases.
In case of power failure, it is necessary to press the "Start/Pause" button to restart the cycle.
Eco Monitor
This indicator shows the energy consumption level according to the programme and the options set. The consumption is proportional to the lines on the display, by the ecomonitor icon.
OPENING THE DOOR DURING THE CYCLE
Laundry can be checked while the drying cycle runs and any garments already dry can be removed, while drying continues for the remaining items. After closing the door, press the "Start/Pause" button to resume machine operation.
Keep the door closed until the cycle end to save time and energy.
NAVIGATION
The "UP" and "DOWN" buttons are used to navigate the available menus.
- Press the button to confirm the selection.
- Press the option button at the symbol, where present on the display, to return to the previous screen.
If no selection is confirmed, after about 10 seconds, the display return to the main screen.
SETTINGS
To access the Settings menu, press and hold the relevant button for a few seconds.
- Set language shows the available languages on the display.
- Sounds allows to enable or disable the sounds (some sounds, as warnings, will remain active anyway).
- Brightness allows to modify the display brightness.
- Factory Default allows to reset the default settings. After having selected the setting, press and hold the ☑ button for a few seconds.
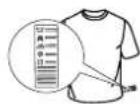
CARE LABEL
Always check the care labels, especially when placing garments in the tumble dryer for the first time. Below are the most commonly used symbols:
☐ May be tumble dried.
Do not tumble dry.
Tumble dry – high heat.
Tumble dry – low heat.
PROGRAMS
The duration of these programs will depend on the size of the load, types of textiles, the spin speed used in your washer and any extra options selected. In machines equipped with display, the duration of the cycles is shown on the control panel. The remaining time is constantly checked and adjusted during the drying cycle to show the best possible estimate. Option to use - If all your loads on Automatic Cycles are consistently less dry or more dry than you would like, you may increase or decrease the dryness level using the specific option.

Eco Cotton kg Max\*
This is the most efficient programme in terms of energy consumption and is suitable for drying normal wet cotton laundry. The values on the Energy Label are based on this programme.
NOTE: for optimal energy efficiency, select "Cupboard Dry" using dryness level option. To increase the dryness level, select "Extra Dry".

Mixed kg 4
This programme is ideal for drying cotton and synthetic fabrics together.

Synthetics kg 4
For drying synthetic fabrics.

Wool kg 1
Programme for drying wool clothes. It is advisable to turn the items inside out before drying. If heavy edges remain damp, leave them to dry naturally.

Delicates
kg 2
For drying delicate laundry requiring gentle treatment.

Mixed Colors kg 3
Programme for the gentle drying of coloured fabrics.

Bed Linen kg Max\*
This programme is intended for drying cotton sheets.

Duvet
Programme intended to dry bulky items, such as a single duvet.

Easy Ironing
This cycle relaxes fibres, thus making ironing and folding easier. Suitable for small load of damp or dry cotton and cotton blend fabrics. Not for wet items.

More Cycles

Microfiber kg 2
Gentle drying for microfiber.

Towels kg Max\*
For drying sturdy cotton laundry, such as terry towels.

Tecnical Wear kg 4
For drying synthetics or cotton technical wear.

Down Jackets kg 2
To dry down jackets, restoring their natural softness (2 jackets).

Mats kg 3
To dry small bath or kitchen mats. Do not dry mats with tic parts, as this could cause a fire hazard.

Lingerie kg 2
To dry very delicate underwear. Close all hooks before drying.

Cuddly Toys
This cycle preserves the appearance of cuddly toys, keeping them at their best. Remove all accessories before proceeding with drying. Each single piece must not exceed 600 gr.

Sport kg 4
For drying synthetics or cotton sports garments.

Jeans kg 3
For drying sturdy cotton including denim trousers and jackets.

Shirts kg 3
This is a programme for cotton or cotton blend/synthetics shirts.

Rapid 30' kg 0.5
Ideal for drying cotton garments spun at high speed in the hing machine.

Refresh
A short programme suitable for refreshing fibres and garments through the emission of fresh air. Do not use on wet items. It can be used on with any load size but is more effective with small loads. It lasts about 20 minutes.
*MAX LOAD 9 Kg (Dry load)
OPTIONS
These buttons allow you to personalise the selected programme according to personal requirements.
Not all options are available for all programmes. Some options may be incompatible with ones you have previously set; if so, you will be alerted by the buzzer and/or blinking indicators. If the option is available, the option indicator will stay on. The programme may retain some options selected in previous drying cycles.

Dryness Level
Press the relevant button several times to obtain a different level of residual moisture on your laundry. The display signals the level being selected. After few seconds of inactivity, the display returns to the main menu.

Iron Dry: very delicate drying. Items will be more easily ironed immediately after the cycle.

Hanger Dry: a level intended for delicate garments ready to be hanged.

Cupboard Dry: the laundry is ready to be folded and put away.

Extra Dry: for laundry intended to be worn at the end of the cycle.

Timed Drying
This option is to manually set the drying time. Press the corresponding button to set the required time for drying. An indicator on the control panel signals the time being selected.

Start Delay
This option is for delaying the start of the cycle. Press the corresponding button several times to find the required delay. Once the max time is reached, the option is reset by pressing the button again. An indicator on the control panel signals the time being selected. After pressing the "Start/Pause" button, the machine signals the time remaining to the start of the cycle. If the door is opened, press the "Start/Pause" button once the door has been closed.
FRESH FreshCare+
CARE+ If laundry is left inside of the drum once the cycle has ended, it can be subjected to bacterial proliferation. This option helps to prevent this from happening by controlling the temperature and gently rotating the drum. This will continue for up to 6 hours after the end of the cycle. This setting will remain in the memory of the previous cycle. If this is used alongside Start Delay, a crease treatment will be performed during this phase by periodic rotations of the drum.

Rapid
Enables quicker drying.

Key Lock
This option makes all machine controls inaccessible, except the "On/Off" button. When the machine is on:
- to activate the option, keep the button pressed until the machines signals that the option has been enabled.
- to disable the option, keep the button pressed until the machine signals that the option has been disabled.
This option remains in memory if selected in previous drying.

Cycle End Signal
This option activates a prolonged buzzer at the end of the cycle. Enable it if you do not think you will hear the normal sound at the end of the cycle. After having pressed the option button, it can be enabled or disabled using the "UP" and "DOWN" buttons. Press the ☑ button to confirm. This option remains in memory, if selected in previous drying.
□— Cycle Option
This button provides access to the menu of options below. Scroll the options with the "UP" and "DOWN" buttons and press the button to confirm the selection.

Gentle
Enables a more gentle treatment of the laundry by
reducing the drying temperature.

Anti Tangle
This option performs a special drum movement that reduces tangling and knotting of your clothes. It gives best results when used with smaller loads.
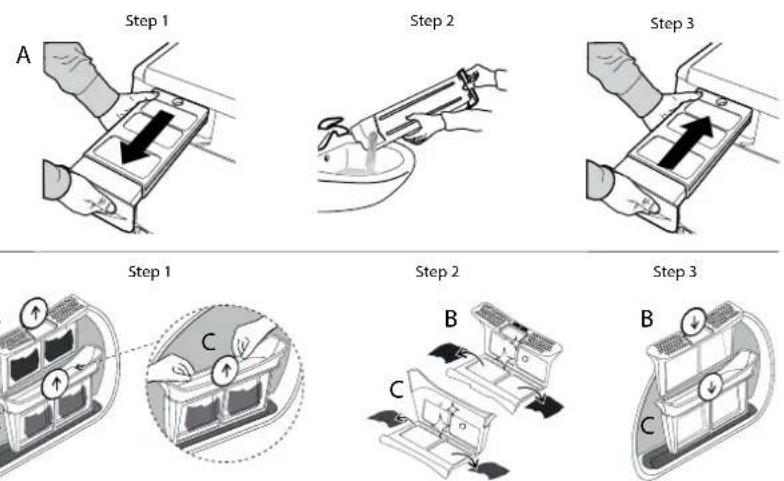
CARE AND MAINTENANCE
WARNING: unplug the dryer during the cleaning and maintenance procedures.
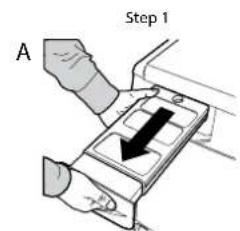
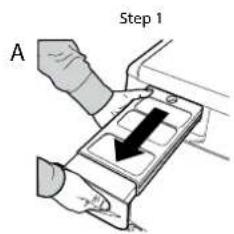
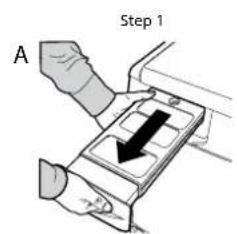
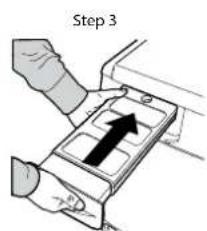
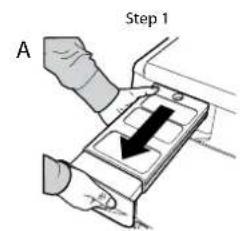
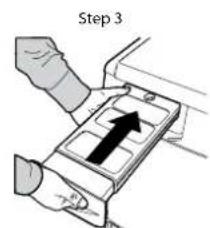
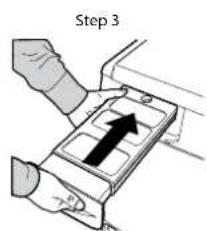
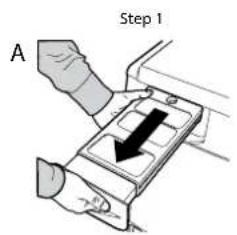
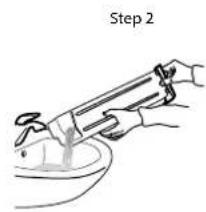
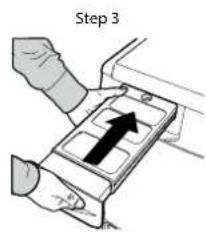
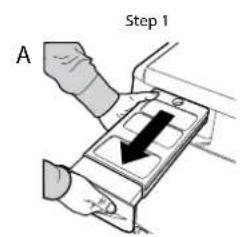
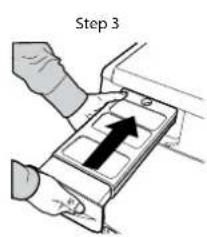
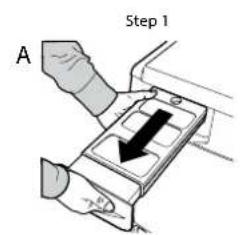
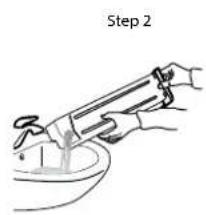
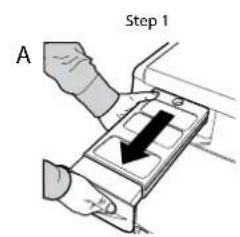
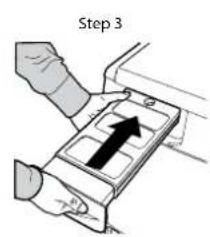
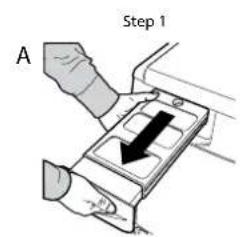
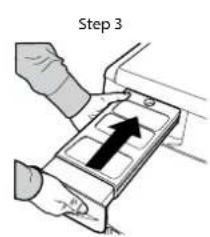
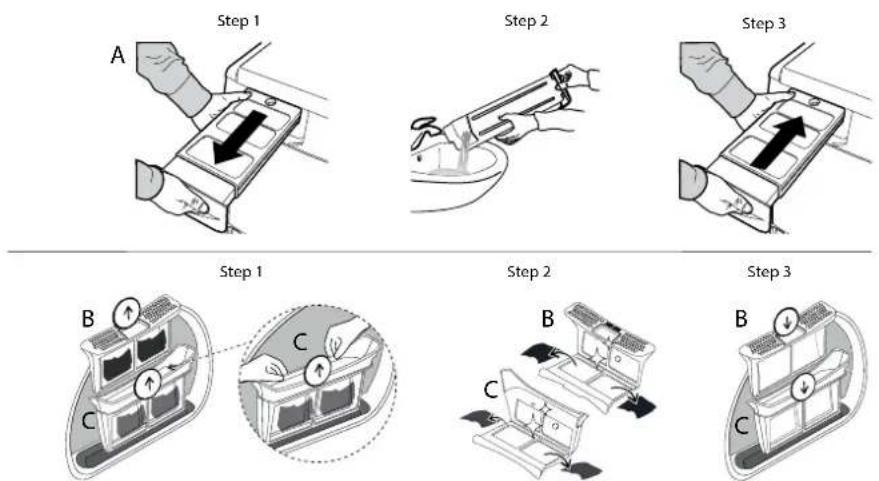
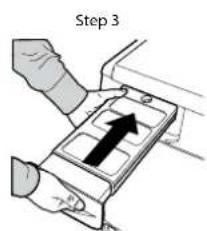
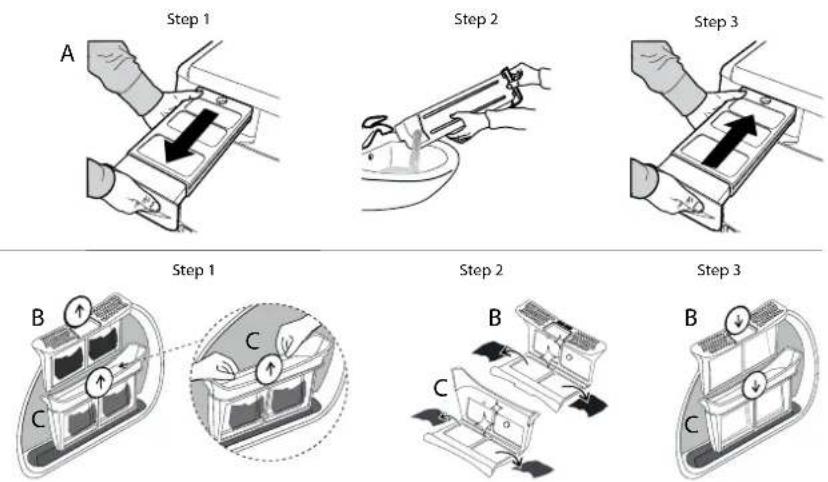
Emptying the water tank after each cycle (see Fig. A).
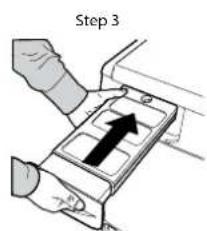
Pull the container out of the dryer and empty it into a sink or other suitable drain, then place it back properly. Do not use the dryer without having inserted the container back in place.
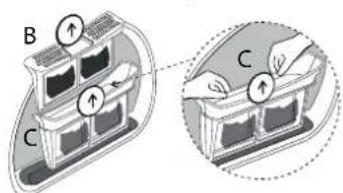
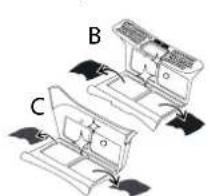
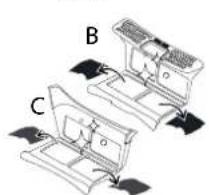
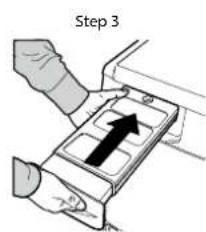
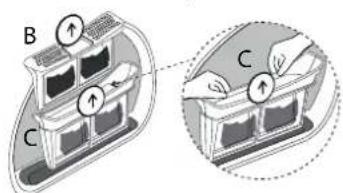
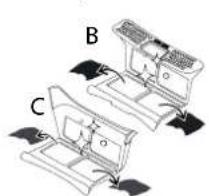
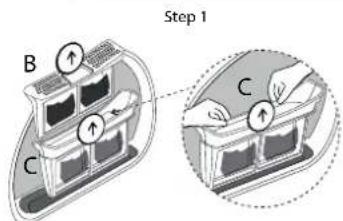
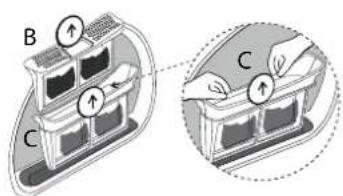
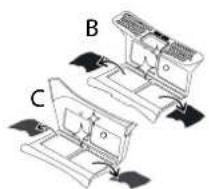
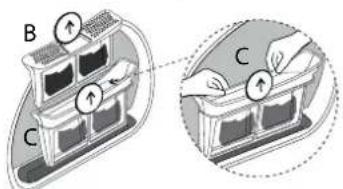
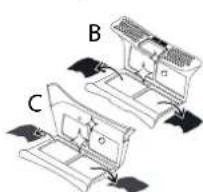
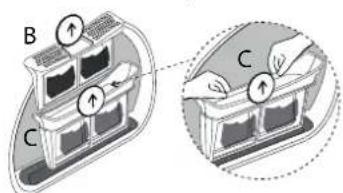
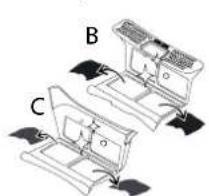
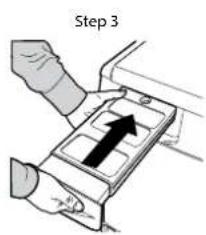
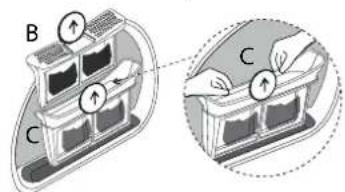
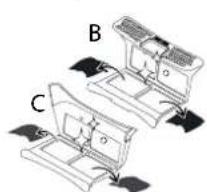
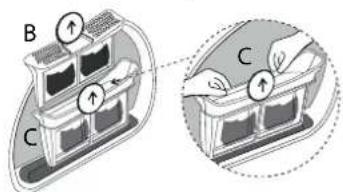
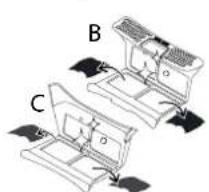
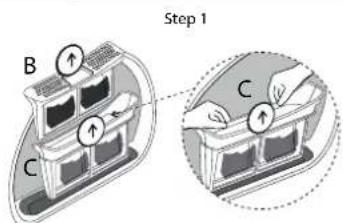
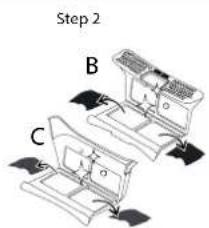
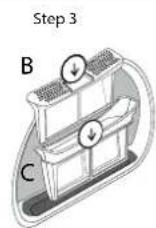
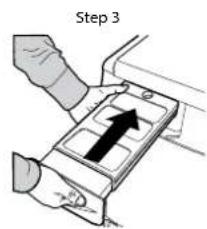
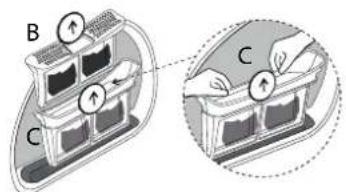
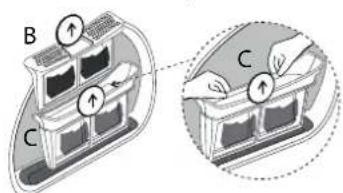
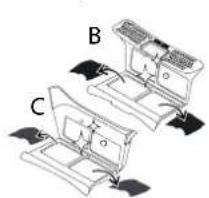
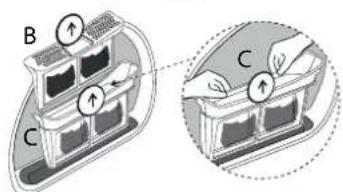
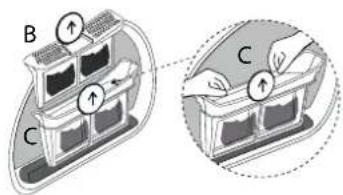
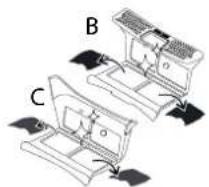
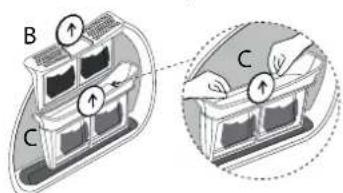
Cleaning the primary door filter after each cycle (see Fig. B).
Pull the primary door filter out and clean it by removing the lint from the filter surface under running water or using a vacuum cleaner.
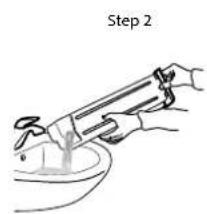
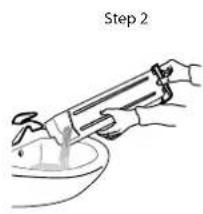
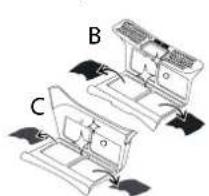
Cleaning the secondary door filter when the relevant indicator turns on (see Fig. C).
Pull the secondary door filter out and clean it in all its parts by washing it under running water or using a vacuum cleaner.
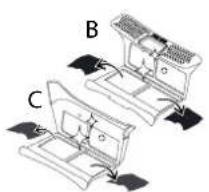
Clogged filters - clean both door filters (see Fig. B, Fig. C).
For optimal performance, dry the filters before inserting them back in place.
Do not use the dryer without having inserted all filters back in place properly first.
The filters are essential parts for drying. They are intended to collect the lint formed during the drying process. In case of clogged filters, the air flow inside the dryer would be seriously affected: the drying time would be longer, the energy consumption would increase and the dryer could be damaged. If these procedures are not carried out properly, the dryer may not start.

Autoclean
The maintenance of the bottom filter of this model is automatic. The dryer carries out cleaning when the sensors signal the need to do so. In this case, the machine goes on working even when the drying cycle is completed. An indicator on the control panel will signal the maintenance. Do not switch the machine off during this phase.
Cleaning the tumble dryer
- The external metal, plastic and rubber parts can be cleaned with a damp cloth.
- Clean the front air intake grille regularly (every 6 months) with a vacuum cleaner to remove any lint, fluff or dust deposits. Furthermore, remove any lint deposits from the filters area, using a vacuum cleaner every so often.
- Do not use solvents or abrasives.
TRANSPORT AND HANDLING
Never lift the dryer by holding on to its top side.
- Unplug the dryer
- Remove the water from the water tank completely.
- Make sure that door and water tank are properly closed.
| Power consumption | |||
| off-mode (Po) - Watts 0.50 | |||
| left-on mode (PI) - Watts 2.00 | |||
| Programmes kg kWh Minutes | |||
| Eco Cotton * □ | 9 2.12 250 | ||
| Eco Cotton □ | 4.5 1.20 160 | ||
| Synthetics 4 0.63 90 | |||
| *This is the reference programme for the energy label and suitable to dry normal wet cotton laundry. This is the most efficient programme in terms of energy consumption for drying wet cotton laundry.(Standard/Default starting configuration) | |||
Heat Pump System
The heat pump contains fluorinated greenhouse gases, contained in a hermetically sealed unit. This sealed unit contains 0.18 kg of the gas R134a. GWP = 604 (1 t CO _2 ).
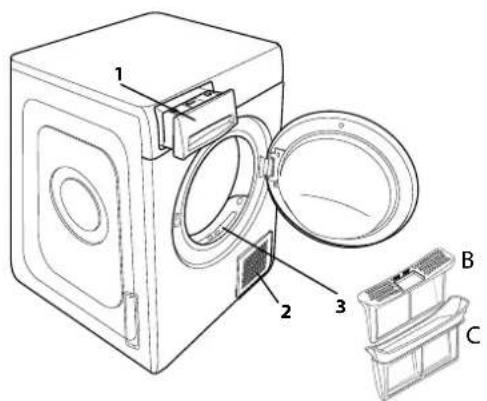
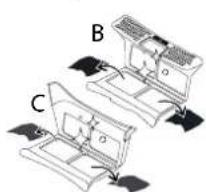
PRODUCT DESCRIPTION
- Water Tank (A)
- Air Intake grille
- Door filter: primary (B), secondary (C)

natural_image
Technical diagram of two mechanical components labeled B and C, showing internal parts with arrows indicating motion (no text or symbols beyond labels)
TROUBLESHOOTING
EN
Before contacting the After-sales Service, refer to the table below. Often the malfunctions are minor and can be solved in few minutes.
| Malfunction | Possible cause | Solution |
| The tumble dryer does not turn on. | The plug is not inserted into the socket. | Insert the plug into the socket. |
| The plug is faulty. | Try to plug another appliance in the same socket. Do not use connecting electrical devices to the socket, such as adapters or extensions. | |
| A power failure occurred. | Wait for the power supply to be restored and switch the fuse on again if necessary. | |
| The tumble dryer does not start. | The door has not been closed properly. | Close the door. |
| A time delay was set to the start of the cycle. | For machines equipped with this function: wait for the set delay to end or switch the machine off to reset it. Refer to the Options section. | |
| The "Start/Pause" button was not pressed in order to start the programme. | Press the "Start/Pause" button. | |
| The Key Lock function was enabled (for machines equipped with this option). | Refer to the Options section. If Key Lock was selected, disable it. Switching the machine off will not disable this option. | |
| Garments are wet at cycle completion. | Small load. | The automatic programme has not sensed the required final moisture so that the dryer completes the programme and stops. If this happens simply select an additional short period of drying or select Extra Dry option if available. |
| Large loads or heavier fabrics. | Dryness levels can be modified to the specific dryness desired. Extra Dry is recommended for ready to wear items. | |
| The drying times are very long. | An appropriate maintenance was not carried out. | Refer to the Care & Maintenance section and perform the operations described. |
| The programme, the time and/or the drying level set are not suitable for the type and the amount of load inserted into the dryer. | Refer to Programmes and Options sections to find the programme and options most suitable for the type of load. | |
| The garments are too wet. | Carry out a washing cycle with higher spin speed to remove as much water as possible. | |
| The dryer may be overloaded. | Refer to the Programmes section to check the max load for each programme. | |
| Room temperature. | The drying time may be longer if the room temperature falls outside the 14–30°C range. | |
| The programme did not end. | A power failure occurred might have occurred. | In case of power failure, it is necessary to press the "Start/Pause" button to restart the cycle. |
Lights on or flashing
| Water tank | The water tank is full. | Empty the water tank. Refer to the Care & Maintenance section. |
| Door filter | Failure of the air flow necessary for machine operation. | Clean the door filter and check whether air intake is free. Carrying out these operations improperly may cause damages. Refer to Care & Maintenance section. |
| Bottom filter* | The bottom filter requires cleaning. | Clean the bottom filter. Refer to Care & Maintenance section. |
| DEMOThe cycle lasts few minutes. | The dryer is in DEMO mode. The DEMO indicator is on. | Disable the DEMO mode. The following actions must be carried out in sequence, without breaks. Switch the machine on and then switch it off again. Press the "Start/Pause" button until the buzzer is heard. Switch the machine on again. The machine signals that the function was disabled. |
| The presence of wrench symbol signals a malfunction. | The machine sensors detected a failure. | Switch the dryer off and unplug it. Open the door immediately and pull laundry out, to allow the heat to dissipate. Wait for about 15 minutes. Reconnect the dryer to the power supply, load the laundry and restart the drying cycle. If the problem still occurs, contact the After-Sales Service Centre and communicate the letters and digits fl ashing on the display.For instance: F3 and E2. |
*Note: some models are auto-cleaning and not equipped with bottom filter. Please refer to the Care & Maintenance section.

Policies, standard documentation, ordering of spare parts and additional product information can be found by:
- Visiting our website docs.whirlpool.eu and parts-selfservice.whirlpool.com
- Using QR Code
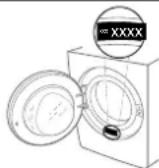
- Alternatively, contact our After-sales Service (See phone number in the warranty booklet). When contacting our After-sales Service, please state the codes provided on your product's identification plate.

БЛАГОДАРИМ ВИ, ЧЕ ЗАКУПИХТЕ ПРОДУКТ НА WHIRLPOOL.
natural_image
Simple circular diagram with a vertical line and the number 1 below it (no text or symbols within the circle)
ИНДИКАТОРИ


natural_image
Technical diagram of two mechanical components labeled B and C, with no visible text or symbols.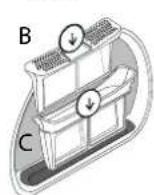
ОТСТРАНЯВАНЕ НА НЕИЗПРАВНОСТИ
BG
natural_image
Simple circular diagram with a vertical line and the number 1 below it (no text or symbols within the circle)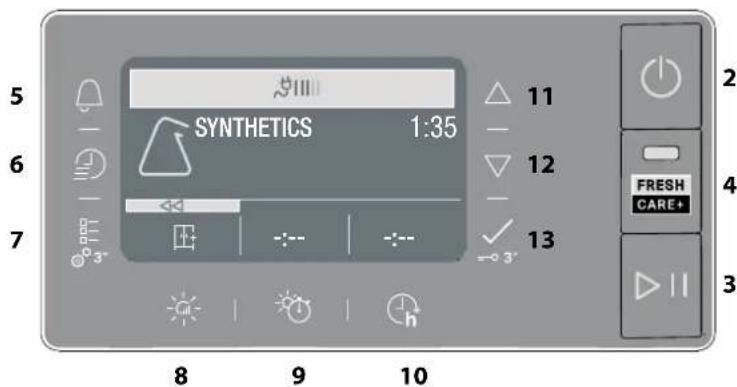
UKAZATELE

natural_image
Technical diagram of two mechanical components labeled B and C, showing internal structure with no visible text or symbols.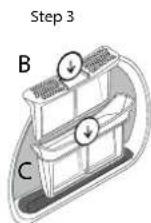
PROBLÉMY A JEJICH ŘEŠENÍ
CS
DANKE, DASS SIE SICH FÜR EIN WHIRLPOOL PRODUKT ENTSCHIEDEN HABEN.
natural_image
Simple circular diagram with a vertical line and the number 1 below it (no text or symbols within the circle)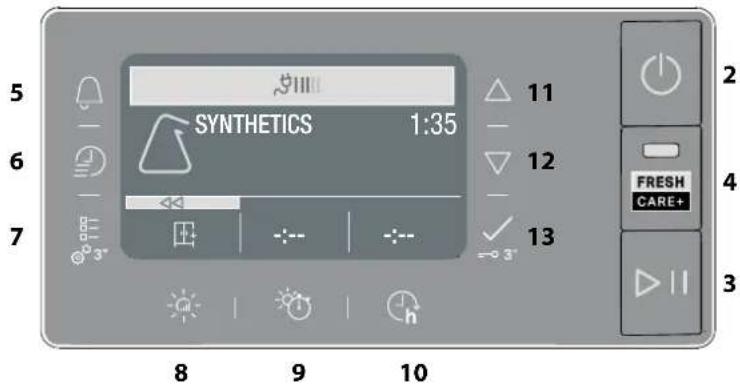
ANZEIGEN
Programmphase: -Örocknen - Köhlen


natural_image
Technical diagram of two mechanical components labeled B and C, showing internal parts with no visible text or symbols.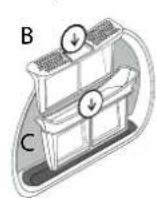
FEHLERSUCHE
DE
TÄNAME, ET OSTSITE WHIRLPOOL TOOTE.
natural_image
Simple circular diagram with a vertical line and the number 1 below it (no text or symbols within the circle)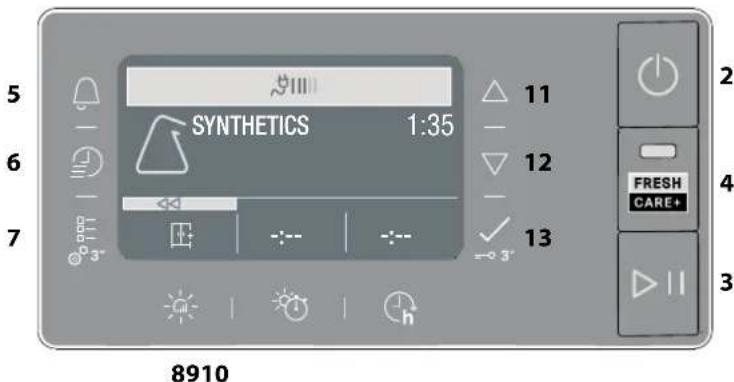
MÄRGUTULED
Tsükli faas: - Kuivatamine - Jamutamine
PROGRAMMID
natural_image
Technical diagram of two mechanical components labeled B and C, showing assembly or assembly steps without any text or symbols.
TÖRKEOTSING
ET
natural_image
Simple circular diagram with a vertical line and the number 1 below it (no text or symbols within the circle)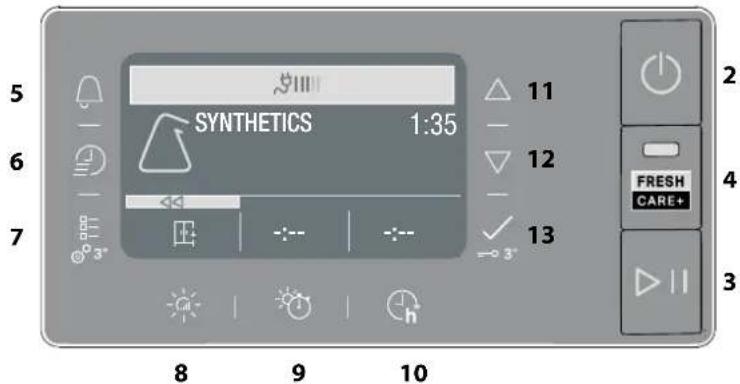
VOYANTS
Auto - Cleaning (Auto-Nettoyage)


natural_image
Technical line drawing of two mechanical components labeled B and C, with no visible text or symbols.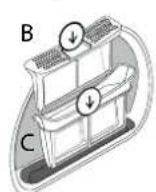
natural_image
Simple circular diagram with a vertical line and the number 1 below it (no text or symbols within the circle)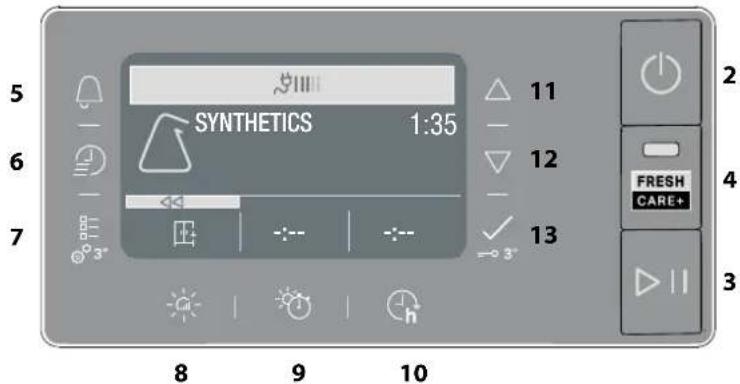
INDIKATORI
Faza ciklusa: Sušenje - Hlađenje
Isprazniti spremnik za vodu - Čišćenje sekundarnog filtra- Začepljeni filtri - Autoclean - Ekomonitor
Pogledati odjeljak problemi i rješenja: Kvar nazovi servis - DEMO DEMO način rada
PRVA UPOTREBA


natural_image
Technical line drawing of two mechanical components labeled B and C, with no visible text or symbols.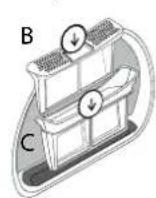
PROBLEMI I RJEŠENJA
HR
natural_image
Simple circular diagram with a vertical line and the number 1 below it (no text or symbols within the circle)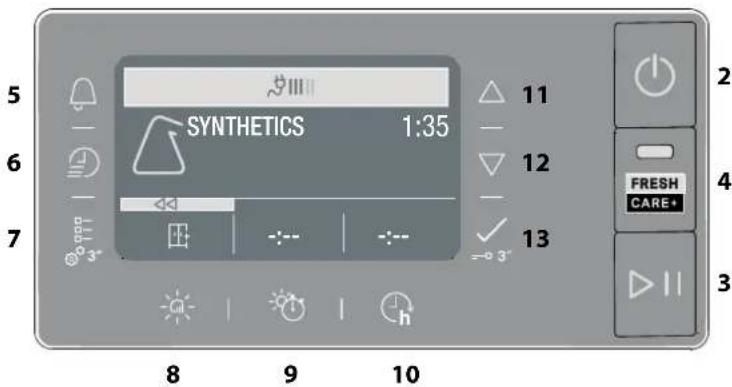
KIJELZÉSEK

natural_image
Technical line drawing of two mechanical components labeled B and C, showing internal parts and motion indicators (no text or symbols)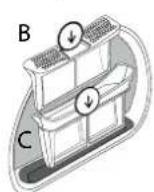
natural_image
Simple circular diagram with a vertical line and the number 1 below it (no text or symbols within the circle)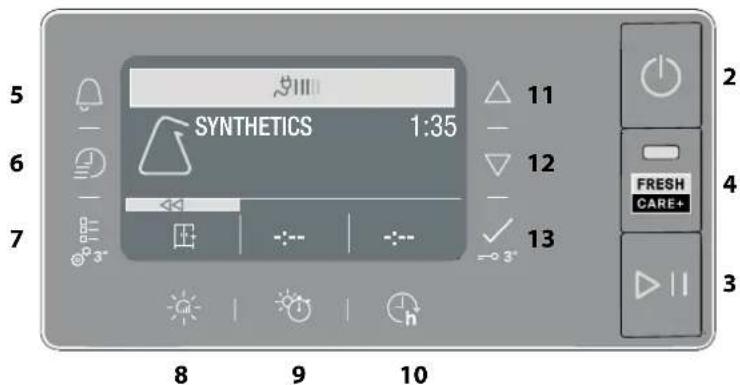
INDIKATORIAI
Ciklo etapas: - Ōžiovinimas - Vesinimas

natural_image
Technical line drawing of two mechanical components labeled B and C, with no visible text or symbols.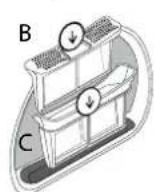
TRIKČIŲ ŠALINIMAS
LT
natural_image
Simple circular diagram with a vertical line and the number 1 below it (no text or symbols within the circle)
INDIKATORI
lest. sausuma pakāpi

PROBLÉMU NOVĚRŠANA
LV
natural_image
Simple circular diagram with a vertical line and the number 1 below it (no text or symbols within the circle)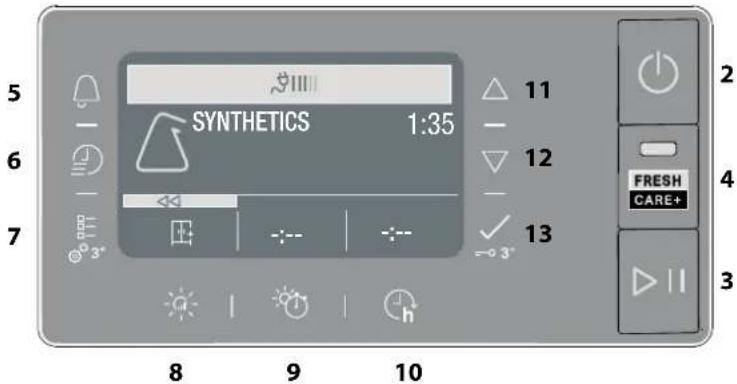
INDICATOREN
Cyclusfase: - Drogen - Afkoelen
Watertank Leegmaken - Secundaire filter schoonmaken - Verstopte filters - Autoclean - Ecomonitor
natural_image
Technical diagram of two mechanical components labeled B and C, showing internal parts and directional arrows (no text or symbols beyond labels)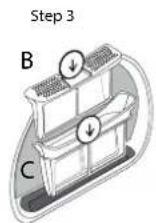
PROBLEMEN EN OPLOSSINGEN
NL
natural_image
Simple circular diagram with a vertical line and the number 1 below it (no text or symbols within the circle)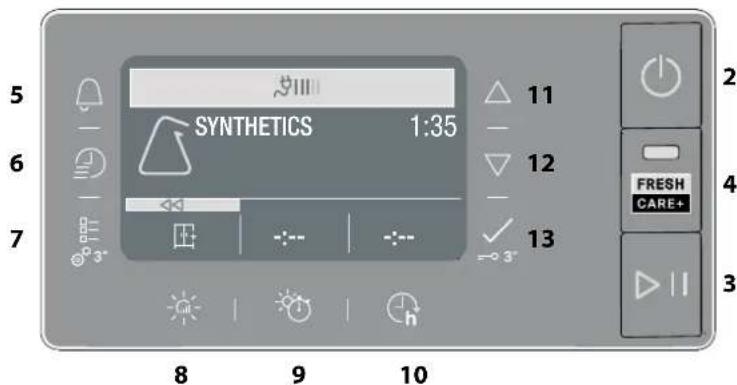
WSKAŹNIKI

natural_image
Technical line drawing of two mechanical components labeled B and C, with no visible text or symbols.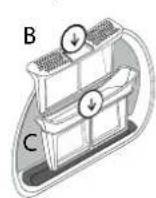
ROZWIAZYWANIE PROBLEMÓW
PL
natural_image
Simple circular diagram with a vertical line and the number 1 below it (no text or symbols within the circle)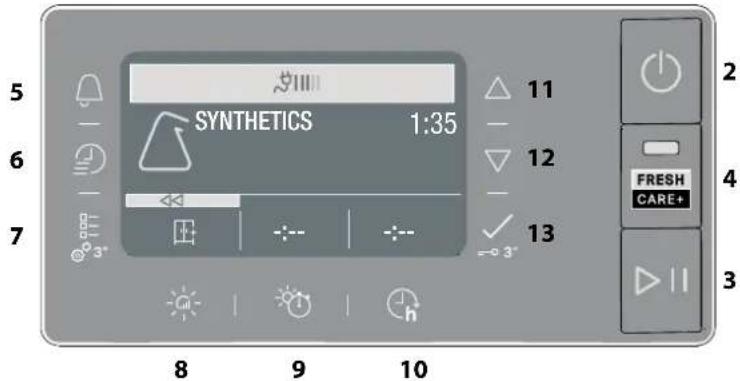
INDICADORES


natural_image
Technical diagram of two mechanical components labeled B and C, showing internal parts and mounting points (no text or symbols beyond labels)
PROBLEMAS E SOLUÇÕES
PT
natural_image
Simple circular diagram with a vertical line and the number 1 below it (no text or symbols within the circle)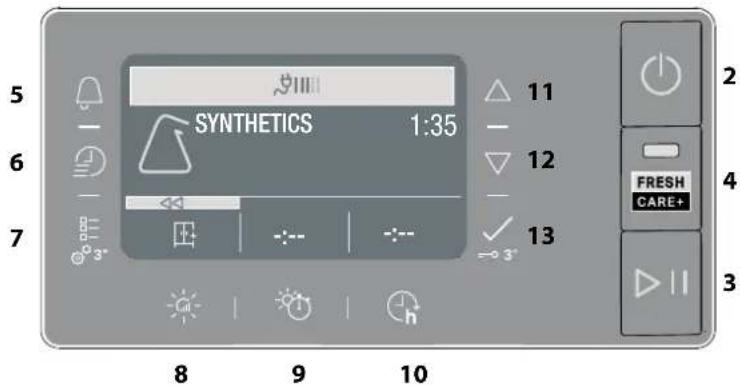
INDICATORI
flowchart
graph TD
    A["Step 1"] --> B["Step 2"]
    B --> C["Step 3"]
    C --> D["Step 3"]
    D --> E["Step 3"]
    E --> F["Step 3"]
    F --> G["Step 3"]
    G --> H["Step 3"]
    H --> I["Step 3"]
    I --> J["Step 3"]
    J --> K["Step 3"]
    K --> L["Step 3"]
    L --> M["Step 3"]
    M --> N["Step 3"]
    N --> O["Step 3"]
    O --> P["Step 3"]
    P --> Q["Step 3"]
    Q --> R["Step 3"]
    R --> S["Step 3"]
    S --> T["Step 3"]
    T --> U["Step 3"]
    U --> V["Step 3"]
    V --> W["Step 3"]
    W --> X["Step 3"]
    X --> Y["Step 3"]
    Y --> Z["Step 3"]
REMEDIEREA DEFECTIUNILOR
RO
natural_image
Simple circular diagram with a vertical line and the number 1 below it (no text or symbols within the circle)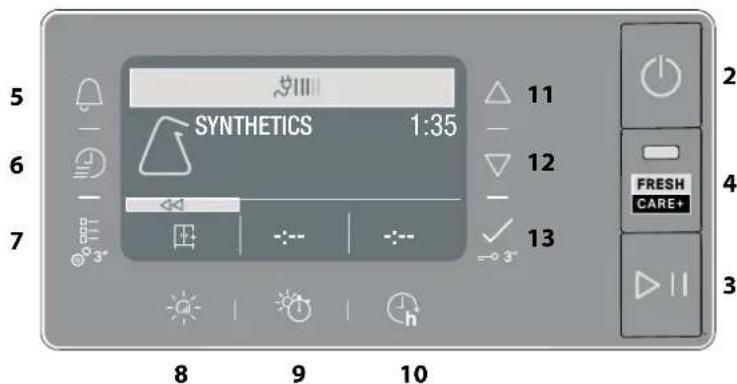
UKAZOVATELE
PROBLÉMY A ICH RIEŠENIA
SK
natural_image
Simple circular diagram with a vertical line and the number 1 below it (no text or symbols within the circle)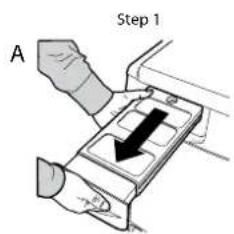


ODPRAVLJANJE TEŽAV
SL
natural_image
Simple circular diagram with a vertical line and the number 1 below it (no text or symbols within the circle)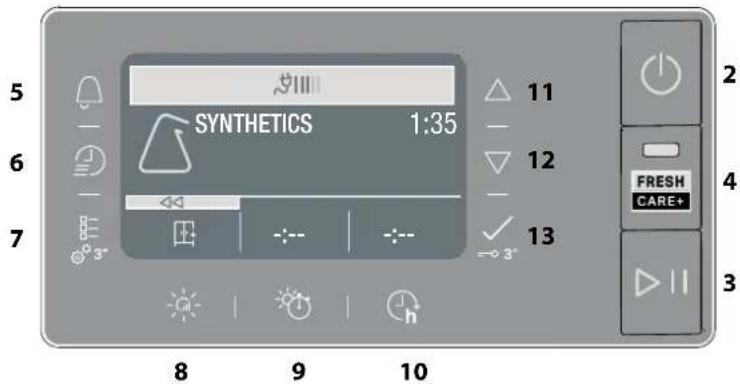
ΔΕΙΚΤΕΣ


natural_image
Technical diagram of two mechanical components labeled B and C, showing internal structure with no visible text or symbols.
HVALA ŠTO STE KUPILI WHIRLPOOL PROIZVOD.
natural_image
Simple circular diagram with a vertical line and the number 1 below it (no text or symbols within the circle)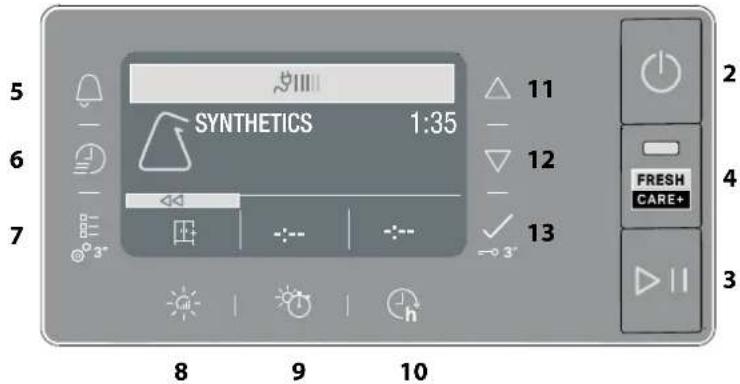
INDIKATORI
Faza Ciklusa: - Sušenje - Hlađenje
Ispraznite rezervoar za vodu - 📋 Očistite sekundarni filter - 📋 Začepljeni filteri - 📋 Autoclean - 🌐 Ekomonitor
flowchart
graph TD
    A["Step 1"] --> B["Step 2"]
    B --> C["Step 3"]
    subgraph Step 1
        D["Step 1"] --> E["Step 2"]
        E --> F["Step 3"]
    end
    subgraph Step 2
        G["Step 2"] --> H["Step 3"]
    end
    subgraph Step 3
        I["Step 3"] --> J["Step 3"]
    end
REŠAVANJE PROBLEMA
SR
- THANK YOU FOR BUYING A WHIRLPOOL PRODUCT.
- CONTROL PANEL
- Options buttons
- Navigation buttons and Key Lock
- INDICATORS
- FIRST TIME USE
- DAILY USE
- Doing this will keep your machine working at its BEST:
- Refer to the Care & Maintenance section.
- OPENING THE DOOR DURING THE CYCLE
- NAVIGATION
- SETTINGS
- CARE LABEL
- PROGRAMS
- Eco Cotton kg Max\*
- Mixed kg 4
- Synthetics kg 4
- Wool kg 1
- Delicates
- kg 2
- Mixed Colors kg 3
- Bed Linen kg Max\*
- Duvet
- Easy Ironing
- More Cycles
- Microfiber kg 2
- Towels kg Max\*
- Tecnical Wear kg 4
- Down Jackets kg 2
- Mats kg 3
- Lingerie kg 2
- Cuddly Toys
- Sport kg 4
- Jeans kg 3
- Shirts kg 3
- Rapid 30' kg 0.5
- Refresh
- OPTIONS
- Dryness Level
- Timed Drying
- Start Delay
- FRESH FreshCare+
- Rapid
- Key Lock
- Cycle End Signal
- □— Cycle Option
- Gentle
- Anti Tangle
- CARE AND MAINTENANCE
- Autoclean
- Cleaning the tumble dryer
- TRANSPORT AND HANDLING
- Heat Pump System
- PRODUCT DESCRIPTION
- TROUBLESHOOTING
- EN
- БЛАГОДАРИМ ВИ, ЧЕ ЗАКУПИХТЕ ПРОДУКТ НА WHIRLPOOL.
- ИНДИКАТОРИ
- ОТСТРАНЯВАНЕ НА НЕИЗПРАВНОСТИ
- BG
- UKAZATELE
- PROBLÉMY A JEJICH ŘEŠENÍ
- CS
- ANZEIGEN
- FEHLERSUCHE
- DE
- MÄRGUTULED
- PROGRAMMID
- TÖRKEOTSING
- ET
- VOYANTS
- Auto - Cleaning (Auto-Nettoyage)
- INDIKATORI
- PRVA UPOTREBA
- PROBLEMI I RJEŠENJA
- HR
- KIJELZÉSEK
- INDIKATORIAI
- TRIKČIŲ ŠALINIMAS
- LT
- lest. sausuma pakāpi
- PROBLÉMU NOVĚRŠANA
- LV
- INDICATOREN
- PROBLEMEN EN OPLOSSINGEN
- NL
- WSKAŹNIKI
- ROZWIAZYWANIE PROBLEMÓW
- PL
- INDICADORES
- PROBLEMAS E SOLUÇÕES
- PT
- INDICATORI
- REMEDIEREA DEFECTIUNILOR
- RO
- UKAZOVATELE
- PROBLÉMY A ICH RIEŠENIA
- SK
- ODPRAVLJANJE TEŽAV
- SL
- ΔΕΙΚΤΕΣ
- HVALA ŠTO STE KUPILI WHIRLPOOL PROIZVOD.
- REŠAVANJE PROBLEMA
- SR
Brand : WHIRLPOOL
Model : W7 D93SB EE
Category : Tumble drier