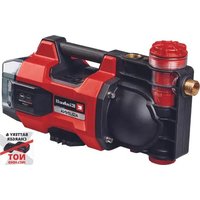
GESP 18 LL Li - Surface pump EINHELL - Free user manual and instructions
Find the device manual for free GESP 18 LL Li EINHELL in PDF.
| Product type | Cordless surface pump |
| Brand | Einhell |
| Model | GESP 18 LL Li |
| Power supply | Li-ion battery 18 V (Power X-Change) |
| Battery capacity | 4.0 Ah |
| Max. flow rate | 4500 l/h |
| Max. delivery head | 8 m |
| Max. delivery pressure | 0.8 bar (0.08 MPa) |
| Max. immersion depth | 4 m |
| Max. water temperature | 35 °C |
| Flexible connection | Approx. 33.3 mm (1") external thread |
| Max. foreign body | Ø 1 mm |
| Min. suction height | 1 mm |
| Min. water level (start-up) | 5 mm |
| Protection type (pump) | IPX8 |
| Protection type (battery housing) | IPX4 |
| Battery charge indicator | 3 LEDs on battery |
| Main functions | Dry-run protection (mode I), continuous operation (mode II), flat suction |
| Maintenance and cleaning | Clean the inlet filter with a water jet; disassemble the suction basket to access the impeller |
| Safety | Do not immerse battery housing in water; use in dry locations; protection class II |
| Spare parts and repairability | Wear parts: rotor, battery; after-sales service via www.Einhell-Service.com |
| General information | Cordless pump from the Power X-Change series; delivered without battery or charger (ref. 41.815.60) |
Frequently Asked Questions - GESP 18 LL Li EINHELL
User questions about GESP 18 LL Li EINHELL
0 question about this device. Answer the ones you know or ask your own.
Ask a new question about this device
Download the instructions for your Surface pump in PDF format for free! Find your manual GESP 18 LL Li - EINHELL and take your electronic device back in hand. On this page are published all the documents necessary for the use of your device. GESP 18 LL Li by EINHELL.
USER MANUAL GESP 18 LL Li EINHELL
GB Original operating instructions Cordless clean water pump
natural_image
Two electrical connectors with wires, one marked with a 'X' and the other with a checkmark (no text or symbols on the devices themselves)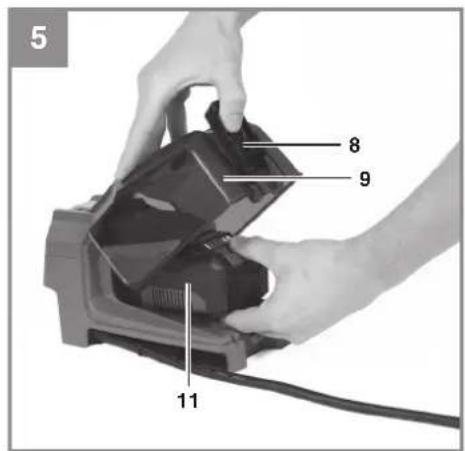
D
Gefahr!
When using the equipment, a few safety precautions must be observed to avoid injuries and damage. Please read the complete operating instructions and safety regulations with due care. Keep this manual in a safe place, so that the information is available at all times. If you give the equipment to any other person, hand over these operating instructions and safety regulations as well. We cannot accept any liability for damage or accidents which arise due to a failure to follow these instructions and the safety instructions.
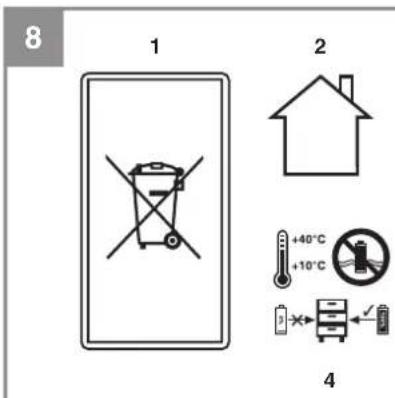
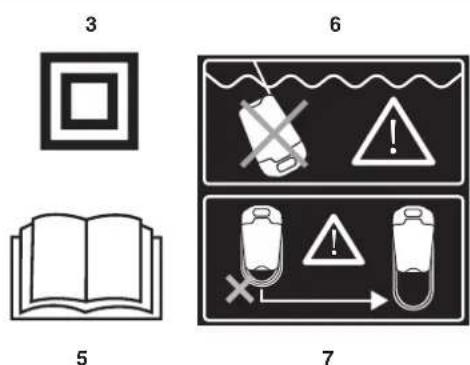
Explanation of the symbols used (see Fig. 8)
- Dispose of batteries correctly
- For use in dry rooms only
- Safety class II
- Store the batteries only in dry rooms with an ambient temperature of +10°C to +40°C. Place only charged batteries in storage (charged at least 40%).
- "Hazard - Read the operating instructions to reduce the risk of injury"
- Do not immerse the battery box in the water!
- Only wind up the power cable loosely during operation.
1. Safety regulations
Warning!
Read all the safety information, instructions, illustrations and technical data provided on or with this power tool. Failure to adhere to the following instructions may result in electric shock, fi re and/or serious injury.
Keep all the safety information and instructions in a safe place for future use.
This equipment can be used by children of 8 years and older and by people with limited physical, sensory or mental capacities or those with no experience and knowledge if they are supervised or have received instruction in how to use the equipment safely and understand the dangers which result from such use. Children are not allowed to play with the equipment. Unless supervised, children are not allowed to clean the equipment and carry out user-level maintenance work.
The equipment is not designed for use in swimming pools and paddling pools of any kind or other bodies of water in which people or animals may be present during operation.
It is prohibited to operate the equipment if a person or animal is in the danger area. Ask your electrician!
Danger!
- Before you put the equipment into operation, arrange for a specialist to check that the earthing, protective multiple earthing or residual-current operated circuit-breaker circuit comply with the safety regulations of the power supply company and work correctly.
- The electrical plug-in connections must be protected from wet conditions.
- If there is a risk of flooding, place the plug-in connections in an area which is safe from flooding.
- Strictly avoid pumping aggressive liquids and abrasive substances.
• Protect the equipment from frost.
• Protect the equipment from dry running.
• Take suitable measures to keep the equipment out of the reach of children.
General safety information for lithium-ion rechargeable batteries:
For the special safety information on lithium-ion rechargeable batteries please refer to the booklet included in delivery.
2. Layout and items supplied
2.1 Layout (Figs. 1 and 2)
- Pump
- Hose connection
- Suspension eye
- Power cable
- Intake cage
- Battery box
- Pump mode selector switch
- Battery cover
- Locking hook
- Fastening hook
2.2 Items supplied
Please check that the article is complete as specified in the scope of delivery. If parts are missing, please contact our service center or the sales outlet where you made your purchase at the latest within 5 working days after purchasing the product and upon presentation of a valid bill of purchase. Also, refer to the warranty table in the service information at the end of the operating instructions.
GB
- Open the packaging and take out the equipment with care.
- Remove the packaging material and any packaging and/or transportation braces (if available).
- Check to see if all items are supplied.
- Inspect the equipment and accessories for transport damage.
- If possible, please keep the packaging until the end of the guarantee period.
Danger!
The equipment and packaging material are not toys. Do not let children play with plastic bags, foils or small parts. There is a danger of swallowing or suff ocating!
• Cordless clean water pump with battery box
- Fastening hook
- Battery (in the case of Art. No.: 41.815.60 it is not included in delivery)
- Charger (in the case of Art. No.: 41.815.60 it is not included in delivery)
• Original operating instructions
3. Proper use
The equipment you have purchased is designed to pump water with a maximum temperature of 35 °C . This equipment must never be used for other liquids, especially not for engine fuels, cleaning agents and other chemically-based products!
The equipment can be used wherever you want to move water, e.g. in the house, in the garden, and for many other applications. It must not be used to operate swimming pools!
If you want to use the equipment in bodies of water with a natural, muddy bottom, place the equipment in a slightly elevated position, e.g. on bricks.
The equipment is not designed for continuous operation, e.g. as a circulating pump in a pond. In this case the equipment's anticipated life will be greatly shortened because the equipment was not designed for continuous loading.
The equipment is to be used only for its prescribed purpose. Any other use is deemed to be a case of misuse. The user / operator and not the manufacturer will be liable for any damage or inju-
ries of any kind caused as a result of this.
Please note that our equipment has not been designed for use in commercial, trade or industrial applications. Our warranty will be voided if the machine is used in commercial, trade or industrial businesses or for equivalent purposes.
The water may be contaminated by escaping lubricating oil/lubricant.
4. Technical data
Voltage.....18Vd.c.
Max. pumping rate 4,500 l/h
Delivery head maximum 8 m
Max. delivery pressure ....0.08 MPa (0.8 bar)
Max. immersion depth 4 m
Water temperature maximum 35°C
Hose connection ....approx. 33.3 mm (1") male thread
Max. size of foreign bodies: ....∅ 1 mm
Suction height ......min. approx. 1 mm
Minimum water level when starting up ..... 5 mm
Type of protection of pump: IPX8
Type of protection of battery box: IPX4
Power-X-Change lithium-ion battery
Voltage: 18 V DC
Capacity: 4.0 Ah
Number of cells: 10
Power X-Charger charger
Input voltage: 200-250 V \~ 50-60 Hz
Output voltage: 20 V DC
Output current: 3.0 A
Protection class: .....II /回
5. Before starting the equipment
Before you connect the equipment to the mains supply make sure that the data on the rating plate are identical to the mains data.
5.1 Installation
The equipment can be installed either:
• Stationary with a rigid pipe line
or
• Stationary with a flexible hose line
GB
The maximum pumping rate is possible only with the largest possible line diameter; if smaller hoses or pipes are connected, the pumping rate will be reduced.
Venting:
Water might escape from the vent opening during operation.
Please note!
When installing, never hang the equipment by the discharge line or by the power cable. The equipment must be hung up by the provided carry handle or suspension eyelet, or it must rest on the bottom of the shaft. To ensure that the equipment works properly, the bottom of the shaft always must be free of sludge and other accumulations of dirt. If the water level is too low, the sludge in the shaft can quickly dry out and hinder the equipment from starting. It is necessary therefore to check the equipment regularly (carry out trial start-ups).
The pump shaft should be large enough.
5.2 Fitting the battery box (Fig. 3)
Important! Do not immerse the battery box in the water!
The battery box can be fitted in various different ways:
- Wall mounting: There are two mounting holes at the back of the battery box (10 cm apart). Screw two screws securely into the wall and attach the battery box to them.
- Container mounting: Fasten the fastening hook to the mounting holes provided for the purpose at the back of the battery box. You can then attach the battery box to the outside of a container.
- The battery box does not have to be permanently fastened. You can also set it down outside the water.
You can wind the power cable up on the integrated cable rewind of the battery box (Fig. 4).
- Caution! - Only wind up the power cable loosely during operation.
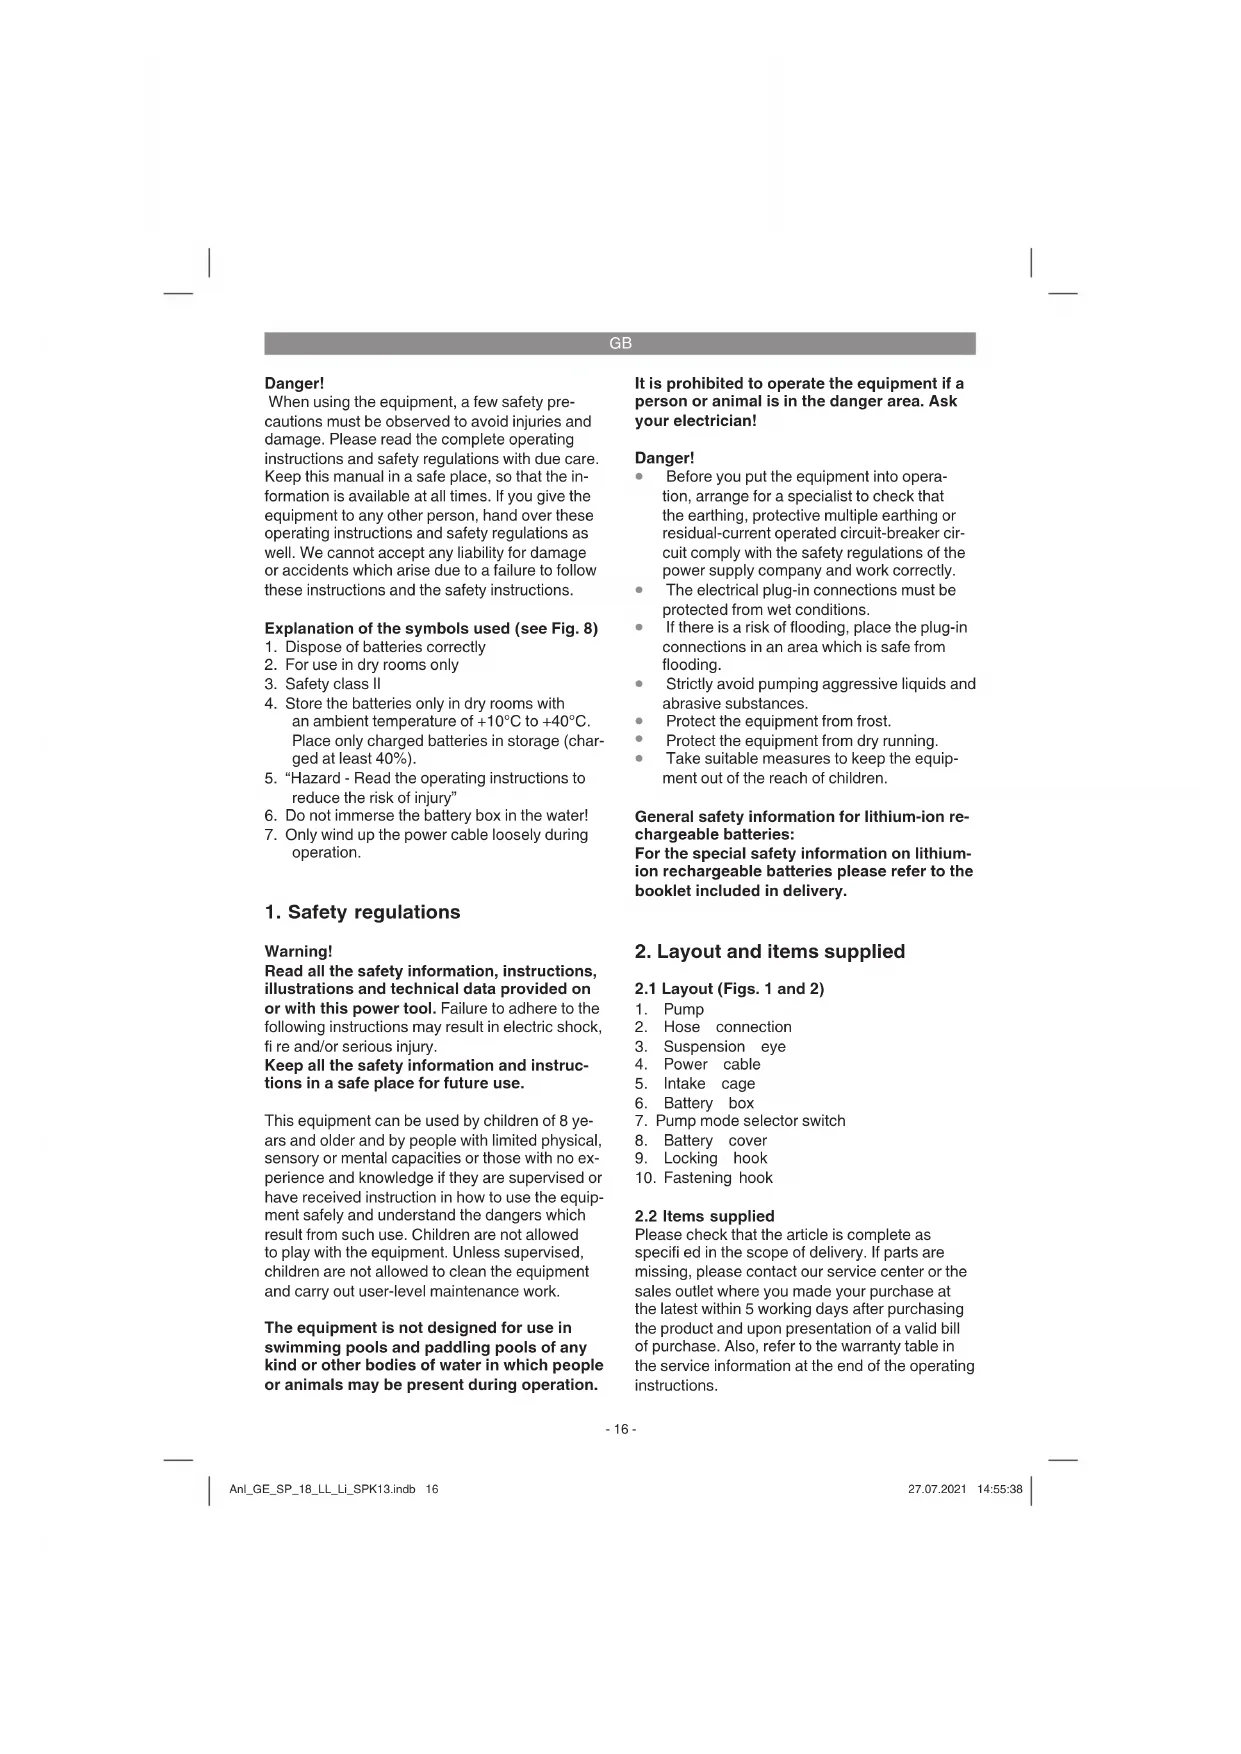
5.3 Fitting the battery (Fig. 5)
Open the battery cover. To do so, open the locking hook on the battery cover and swing up the cover.
Press the side pushlock button of the battery pack as shown in Fig. 5 and push the battery pack into the mount provided. Make sure that the pushlock button engages properly. To remove the
battery pack, proceed in reverse order. Close the battery cover by swinging the cover down and close the locking hook.
5.4 Charging the battery (Figure 6)
- Take the battery pack out of the equipment. Do this by pressing the pushlock button.
- Check that your mains voltage is the same as that marked on the rating plate of the battery charger. Insert the power plug of the charger (12) into the socket outlet. The green LED will then begin to flash.
- Insert the battery pack (11) into the battery charger (12).
- In the section entitled „Charger indicator“ you will find a table with an explanation of the LED indicator on the charger.
The battery pack can become a little warm during the charging. This is normal.
If the battery pack fails to charge, check:
• whether there is voltage at the socket outlet
- whether there is good contact at the charging contacts
If the battery pack still fails to charge, send
• the charging unit
• and the battery pack
to our customer service center.
To ensure that items are properly packaged and delivered when you send them to us, please contact our customer service or the point of sale at which the equipment was purchased.
When shipping or disposing of batteries and cordless tools, always ensure that they are packed individually in plastic bags to prevent short circuits and fi res.
To ensure that the battery pack provides long service, you should take care to recharge it promptly. You must recharge the battery pack when you notice that the performance of the device drops. Never allow the battery pack to become fully discharged. This will cause it to develop a defect.
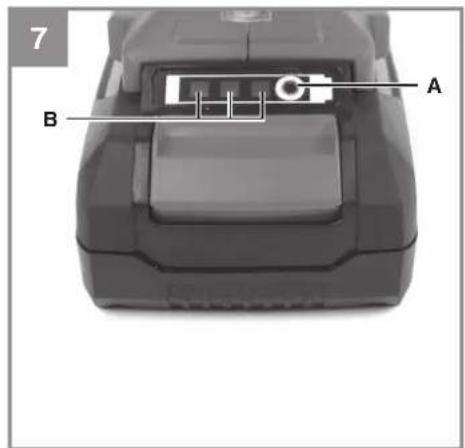
5.5 Battery capacity indicator (Fig. 7)
Press the button for the battery capacity indicator (Item A). The battery capacity indicator (Item B) shows the charge status of the battery using 3 LEDs.
GB
All 3 LEDs are lit:
The battery is fully charged.
2 or 1 LED(s) are lit:
The battery has an adequate remaining charge.
1 LED fl ashes:
The battery is empty, recharge the battery.
All LEDs blink:
The battery temperature is too low. Remove the battery from the equipment, keep it at room temperature for one day. If the fault reoccurs, this means that the rechargeable battery has undergone exhaustive discharge and is defective. Remove the battery from the equipment. Never use or charge a defective battery.
6. Operation
You can put the equipment into operation after you have thoroughly read the installation and operating instructions. Pay attention to the following points:
• Make sure that the equipment is set up securely.
- Check that the discharge line is fitted correctly.
- Lower the pump into the well or shaft using a securing cable, or hang it inside the rainwater barrel.
- The pump will start automatically after you have pressed the selector switch (7) in the corresponding pump mode.
• Take care that the pump does not run dry.
- To switch off the pump, press the pump mode selector switch so that it is in "0" position.
Switching on the pump
The pump has a pump mode selector switch (7) on the battery box (6).
Mode "I": Dry-run safeguard
Set the pump mode selector switch (7) to "I". The pump has a dry-run safeguard when pump mode is activated. The pump will be switched off automatically if no liquid medium is detected for longer than 20 seconds. The dry-run safeguard has tripped. The pump will make no further priming attempts. Set the pump mode selector switch to "0" in order to reset the pump.
Mode "II": No dry-run safeguard
Set the pump mode selector switch (7) to "ll". When the pump is used in shallow suction mode, the dry-run safeguard might trip if the flow rate is too low. To use the pump without the dry-run safeguard, select mode "ll". This will deactivate the dry-run safeguard and the pump will run continuously. – Caution! Take care that the pump does not run dry; operate the pump only under supervision.
7. Cleaning, maintenance and ordering of spare parts
Danger!
• Always pull out the battery pack before starting any cleaning work.
- For mobile applications, the equipment should be cleaned with clear water after every usage.
- Use a water jet to remove any lint or fibrous particles that may have become trapped in the housing.
- Remove sludge from the shaft bottom and clean the shaft walls every 3 months.
7.1 Cleaning the paddle wheel
If a lot of deposits collect in the housing, the bottom part of the equipment must be dismantled as follows:
- Disconnect the intake cage from the housing.
- Clean the paddle wheel with clear water. Important! Do not put down or rest the equipment on the paddle wheel!
- Assemble in reverse order.
7.2 Maintenance
There are no parts inside the equipment which require additional maintenance.
7.3 Ordering replacement parts:
Please quote the following data when ordering replacement parts:
• Type of machine
• Article number of the machine
• Identification number of the machine
- Replacement part number of the part required For our latest prices and information please go to www.Einhell-Service.com
GB
8. Disposal and recycling
The equipment is supplied in packaging to prevent it from being damaged in transit. The raw materials in this packaging can be reused or recycled. The equipment and its accessories are made of various types of material, such as metal and plastic. Never place defective equipment in your household refuse. The equipment should be taken to a suitable collection center for proper disposal. If you do not know the whereabouts of such a collection point, you should ask in your local council offices.
9. Storage
Store the equipment and accessories in a dark and dry place at above freezing temperature. The ideal storage temperature is between 5 and 30 °C. Store the electric tool in its original packaging.
GB
10. Charger indicator
| Indicator status Explanations and actions | ||
| Red LED Green LED | ||
| Off | Flashing | Ready for useThe charger is connected to the mains and is ready for use; there is no battery pack in the charger |
| On Off Charging | The charger is charging the battery pack in quick charge mode. The charging times are shown directly on the charger.Important! The actual charging times may vary slightly from the stated charging times depending on the existing battery charge. | |
| Off | On | The battery is charged and ready for use.The unit then changes over to gentle charging mode until the battery is fully charged.To do this, leave the rechargeable battery on the charger for approx. 15 minutes longer.Action:Take the battery pack out of the charger. Disconnect the charger from the mains supply. |
| Flashing Off | Adapted charging | The charger is in gentle charging mode.For safety reasons the charging is performed less quickly and takes more time. The reasons can be:- The rechargeable battery has not been used for a very long time.- The battery temperature is outside the ideal range.Action:Wait for the charging to be completed; you can still continue to charge the battery pack. |
| Flashing Flashing Fault | Charging is no longer possible. The battery pack is defective.Action:Never charge a defective battery pack.Take the battery pack out of the charger. | |
| On On Temperature fault | The battery pack is too hot (e.g. due to direct sunshine) or too cold (below 0^ ).Action:Remove the battery pack and keep it at room temperature (approx. 20^ ) for one day . | |
11. Troubleshooting guide
| Faults Cause | Remedy | |
| Theequipment does not start | - Battery is not correctly inserted - Remove battery and insert again | |
| Theequipment does not pump | - Intake sieve clogged- Discharge hose kinked | - Clean intake sieve with water jet- Unkink the hose |
| Insufficient pumping rate | - Intake sieve clogged- Performance reduced due to heavily contaminated and abrasive water impurities- Battery performance decreasing | - Clean intake sieve- Clean equipment and replace wear parts- Check the battery performance and charge the battery if necessary |
| The equipment switches off after briefly running | - Motor circuit-breaker switches the equipment off due to excessive water contamination- Water temperature too high; motor circuit-breaker switches the equipment off | - Take out the battery and clean the equipment and the shaft.- Ensure that maximum permissible water temperature (35 °C) is not exceeded |
GB

For EU countries only
Never place any electric power tools in your household refuse.
To comply with European Directive 2012/19/EC concerning old electric and electronic equipment and its implementation in national laws, old electric power tools have to be separated from other waste and disposed of in an environment-friendly fashion, e.g. by taking to a recycling depot.
Recycling alternative to the return request:
As an alternative to returning the equipment to the manufacturer, the owner of the electrical equipment must make sure that the equipment is properly disposed of if he no longer wants to keep the equipment. The old equipment can be returned to a suitable collection point that will dispose of the equipment in accordance with the national recycling and waste disposal regulations. This does not apply to any accessories or aids without electrical components supplied with the old equipment.
The reprinting or reproduction by any other means, in whole or in part, of documentation and papers accompanying products is permitted only with the express consent of the Einhell Germany AG.
Subject to technical changes
GB
Service information
We have competent service partners in all countries named on the guarantee certificate whose contact details can also be found on the guarantee certificate. These partners will help you with all service requests such as repairs, spare and wearing part orders or the purchase of consumables.
Please note that the following parts of this product are subject to normal or natural wear and that the following parts are therefore also required for use as consumables.
| Category Example | |
| Wear parts* Impeller, rechargeable battery | |
| Consumables* | |
| Missing parts |
* Not necessarily included in the scope of delivery!
In the effect of defects or faults, please register the problem on the internet at www.Einhell-Service.com. Please ensure that you provide a precise description of the problem and answer the following questions in all cases:
• Did the equipment work at all or was it defective from the beginning?
• Did you notice anything (symptom or defect) prior to the failure?
• What malfunction does the equipment have in your opinion (main symptom)?
Describe this malfunction.
GB
Warranty certifi cate
Dear Customer,
All of our products undergo strict quality checks to ensure that they reach you in perfect condition. In the unlikely event that your device develops a fault, please contact our service department at the address shown on this guarantee card. You can also contact us by telephone using the service number shown. Please note the following terms under which guarantee claims can be made:
- These guarantee terms apply to consumers only, i.e. natural persons intending to use this product neither for their commercial activities nor for any other self-employed activities. These warranty terms regulate additional warranty services, which the manufacturer mentioned below promises to buyers of its new products in addition to their statutory rights of guarantee. Your statutory guarantee claims are not affected by this guarantee. Our guarantee is free of charge to you.
- The warranty services cover only defects due to material or manufacturing faults on a product which you have bought from the manufacturer mentioned below and are limited to either the rectification of said defects on the product or the replacement of the product, whichever we prefer. Please note that our devices are not designed for use in commercial, trade or professional applications. A guarantee contract will not be created if the device has been used by commercial, trade or industrial business or has been exposed to similar stresses during the guarantee period.
-
The following are not covered by our guarantee:
-
Damage to the device caused by a failure to follow the assembly instructions or due to incorrect installation, a failure to follow the operating instructions (for example connecting it to an incorrect mains voltage or current type) or a failure to follow the maintenance and safety instructions or by exposing the device to abnormal environmental conditions or by lack of care and maintenance.
- Damage to the device caused by abuse or incorrect use (for example overloading the device or the use or unapproved tools or accessories), ingress of foreign bodies into the device (such as sand, stones or dust, transport damage), the use of force or damage caused by external forces (for example by dropping it).
-
Damage to the device or parts of the device caused by normal or natural wear or tear or by normal use of the device.
-
The guarantee is valid for a period of 24 months starting from the purchase date of the device. Guarantee claims should be submitted before the end of the guarantee period within two weeks of the defect being noticed. No guarantee claims will be accepted after the end of the guarantee period. The original guarantee period remains applicable to the device even if repairs are carried out or parts are replaced. In such cases, the work performed or parts fitted will not result in an extension of the guarantee period, and no new guarantee will become active for the work performed or parts fitted. This also applies if an on-site service is used.
-
To make a claim under the guarantee, please register the defective device at: www.Einhell-Service.com. Please keep your bill of purchase or other proof of purchase for the new device. Devices that are returned without proof of purchase or without a rating plate shall not be covered by the guarantee, because appropriate identification will not be possible. If the defect is covered by our guarantee, then the item in question will either be repaired immediately and returned to you or we will send you a new replacement.
Of course, we are also happy offer a chargeable repair service for any defects which are not covered by the scope of this guarantee or for units which are no longer covered. To take advantage of this service, please send the device to our service address.
Also refer to the restrictions of this warranty concerning wear parts, consumables and missing parts as set out in the service information in these operating instructions.
F
Danger!
Nabiječka Power X-Charger
Punjač Power X-Charger
Ulazni napon: 200-250 V \~ 50-60 Hz
Izlazni napon: 20 V d. c.
Izlazna struja: 3,0 A
Klasa zaštite: ....II /回
5. Pre puštanja u pogon
Pre uključivanja proverite odgovaraju li podaci na tipskoj pločici podacima o mreži.
5.1 Instalacija
X 2006/42/EC
□ Annex IV
Notified Body:
Reg. No.:
□2000/14/EC_2005/88/EC
□ Annex V
□ Annex VI
Noise: measured L_WA = dB (A) ; guaranteed L_WA = dB (A)
P = kW; L/∅ = cm
Notified Body:
□2012/46/EU_(EU)2016/1628
Emission No.
Standard references: EN 60335-1; EN 60335-2-41; EN 62233; EN 55014-1; EN 55014-2
Mark Wang MarkWang/Product-ManagementAndreas We
First CE: 21
Art.-No.: 41.815.60 / 41.815.61 I.-No.: 21011
Subject to change without notice
Archive-File/Record: NAPR024538
Documents registrar: Thomas Fischer
Wiesenweg 22, D-94405 Landau/Isar
- SR Cordless clean water pump - P Pompe a seu alaire sensi 15 - Pompia per eogue chava a betsaria - DVN Aku-kleihendaspure - S Betterdrinden klanatheimpump - ZZ Akumulotereve čopadno na štouv voda - SK Akumulatorove čopadno naštú vodu - NL Aku heidnerwatopore - E Ilomai inavimbrta de agua limpe - FI Nkka-kriseaspitumpor - SLO Akumulatoske črspaka zaštú voda - H Akkus-lezteve szitelyu - RO Pompia penra apá impede ou acusolimar - GR Antalo sebojové pevo, je juzanapó - P Bemto de agua limpa sam loo - HRDN Akumulatoske pumpa zaštú vodu - RS Akumulatorove čopadno na štú voda - SL Akumulatorove čopadno naštú vodu - LV Akumulatorove čopadno na štú voda - SL Akumulatorove čopadno na štú voda - SL Akumulatorove čopadno na štú voda - SL Akumulatorove čopadno na štú voda - SL Akumulatorove čopadno na štú voda - SL Akumulatorove čopadno na štú voda - SL Akumulatorove čopadno na štú vada - SL Akumulatorove čopadno na štú vada - SL Akumulatorove čopadno na štú vada - SL Akumulatorove čopadno na štú vada - SL Akumulatorove čopadno na štú vada - SL Akumulatorove čopadno na štú vada - SL Akumulatorove čopadno na štún voda - SL Akumulatorove čopadno na štún voda - SL Akumulatorove čopadno na štún voda - SL Akumulatorove čopadno na štún voda - SL Akumulatorove čopadno na štún voda - SL Akumulatorove čopadno na štún voda - SL Akumulatorove čopadno na štú voda - SL Akumulatorove čopadno na štú voda - SL Akumulatorove čopadno na štú voda - SL Akumulatorove čopadno na štú voda - SL Akumulatorove čopadno na štú voda - SL Akumulatorove čopadno naš tú voda - SL Akumulatorove čopadno na štú voda - SL Akumulatorove čopadno na štú voda - SL Akumulatorove čopadno na štú voda - SL Akumulatorove čopadno na štú voda - SL Akumulatorove čopadno na štú voda - SL Akumulatorove čopadnona sítú voda - SL Akumulatorove čopadno na štú voda - SL Akumulatorove čopadno na štú voda - SL Akumulatorove čopadno na štú voda - SL Akumulatorove čopadno na štú voda - SL Akumulatorove čopadno na štú voda - SL Akumulatorove čopadno ná sítú voda - SL Akumulatorove čopadno na štú voda - SL Akumulatorove čopadno na štú voda - SL Akumulatorove čopadno na štú voda - SL Akumulatorove čopadno na štú voda - SL Akumulatorove čopadno na štú voda - SL Akumulatorove čopade no sítú voda - SL Akumulatorove čopade no sítú voda - SL Akumulatorove čopade no sítú voda - SL Akumulatorove čopade no sítú voda - SL Akumulatorove čopade no sítú voda - SL Akumulatorove čopade no sítú voda - SL Akumulatorove čopade no sítú voda + SL Akumulatorove čopade no sítú voda + SL Akumulatorove čopade no sítú voda + SL Akumulatorove čopade no sítú voda + SL Akumulatorove čopade no sítú voda + SL Akumulatorove čopade no sítú voda + SL Akumulatorove čopade no sítú voda + SL AkumULatoruveč oskarne sítú voda + SL AkumULatoruveč oskarne sítú voda + SL AkumULatoruveč oskarne sítú voda + SL AkumULatoruveč oskarne sítú voda + SL AkumULatoruveč oskarne sítú voda + SL AkumULatoruveč oskarne sítú voda + SL AkumULatoruveč o skarne sítú voda + SL AkumULatoruveč o skarne sítú voda + SL AkumULatoruveč o skarne sítú voda + SL AkumULatoruveč o skarne sítú voda + SL AkumULatoruveč o skarne sítú voda + SL AkumULatoruveč o skarne sítú voda + SL AkumULatoruvež oskarne sítú voda + SL AkumULatoruvež oskarne sítú voda + SL AkumULatoruvež o skarne sítú voda + SL AkumULatoruvež o skarne sítú voda + SL AkumULatoruvež o skarne sítú voda + SL AkumULatoruvež o skarne sítú voda + SL AkumULatoruvež o skarne sítú voda + SL AkumULatoruvež o skarne sítú voda + SL AkumULatoruveč o skarne sítú voda + SL AkumULatoruveč o skarne sítú voda + SL AkumULatoruveč o skarne sítú voda + SL AkumULatoruveč o skarne sítú voda + SL AkumULatoruveč o skarne sítú voda + SL AkumULatveč o skarne sítú voda + SL AkumULatveč o skarne sítú voda + SL AkumULatveč o skarne sítú voda + SL AkumULatveč o skarne sítú voda + SL AkumULatveč o skarne sítú voda + SL AkumULatveč o skarne sítú voda + SL AkumUlatveč o skarne sítú voda + SL AkumUlatveč o skarne sítú voda + SL AkumUlatveč o skarne sítú voda + SL AkumUlatveč o skarne sítú voda + SL AkumUlatveč o skarne sítú voda + SL AkunUlatveč o skarne sítú voda + SL AkunUlatveč o skarne sítú voda + SL AkunUlatveč o skarne sítú voda + SL AkunUlatveč o skarne sítú voda + SL AkunUlatveč o skarne sítú voda + SL AkunUlatveč o skarne sítú voda + ELA Ulatveč o skarne sítúa uvačenovučenovučenovučenovučenovučenovučenovučenovučenovučenovučenovučenovučenovučenovučenovučenovučenovučenovučenovučenovučenovučenovučenovučenovučenovučenovn uvačenovučenovučenovučenovučenovučenovučenovučenovučenovučenovučenovučenovučenovučenovučenovučenovučenovučenovučenovučenovučenovučenovučenovučenovučeni uvačenovučenovučenovučenovučenovučenovučenovučenovučenovučenovučenovučenovučenovučenovučenovučenovučeni uvačenovučenovučenovučenovučenovučenovučenovučenov uvačenovučenovučenovučenovučenovučenovučeni uvačenovučenovučenovučenovučenovučeni uvačenovučenovučeni uvačenov uvačeni uvačeni uvačeni uvačeni uvačeni uvačeni uvačeni uvačeni uvačeni uvačeni uvačeni uvačeni uvačeni uvačeni uvačeni uvačeni uvačeni uvačeni uvačeni uvačeni uvačeni uvačeni uvačeni uvačeni uvačeni uvačesi uvaćeni uvaćeni uvaćeni uvaćeni uvaćeni uvaćeni uvaćeni uvaćeni uvaćeni uvaćeni uvaćeni uvaćeni uvaćeni uvaćeni uvaćeni uvaćeni uvaćeni uvaćeni uvaćeni uvaćeni uvaćeni uvaćeni uvaćeni uvaćeni uvaćeni uvaćesi uvaćesi uvaćesi uvaćesi uvaćesi uvaćesi uvaćesi uvaćesi uvaćesi uvaćesi uvaćesi uvaćesi uvaćesi uvaćesi uvaćesi uvaćesi uvaćesi uvaćesi uvaćesi uvaćesi uvaćesi uvaćesi uvaćesi uvaćesi uvaćesi uvaćesii uvaćesi uvaćesi uvaćesi uvaćesi uvaćesi uvaćesi uvaćesi uvaćesi uvaćesi uvaćesi uvaćesi uvaćesi uvaćesi uvaćesi uvaćesi uvaćesi uvaćesi uvaćesi uvaćesi uvaćesi uvaćesi uvaćesi uvaćesi uvaćesi uvaćesti iya csa csa csa csa csa csa csa csa csa csa csa csa csa csa csa csa csa csa csa csa csa csa csa csa csa csa csa csa csa csa csa csa csa csa csa csa csa csa csa csa csa csa csa csa csa csa csa csa csa csa cso

Declaration of conformity
We, Einhell UK Ltd
Champions Business Park, First Floor Unit 10, Arrowe Brook Rd, Upton, Wirral CH49 0AB, United Kingdom
declare the conformity to UK standards and legislation was assessed for:
Cordless clean water pump GE-SP 18 LL Li (Einhell)
UK legislation
□ Simple Pressure Vessels (Safety) Regulation
□ Electrical Equipment (Safety) Regulation
□ Radio Equipment Regulation
□ Personal Protective Equipment Regulation
☐ The Ecodesign for Energy-Related Products and Energy Information Regulation
X The Restriction of the Use of Certain Hazardous Substances in Electrical and Electronic Equipment Regulation
□ Noise Emission in the Environment by Equipment for use Outdoors Regulation
Noise:measuredL mn = dB (A); guaranteed L mn = dB (A)
X Supply of Machinery (Safety) Regulation
X Electromagnetic Compatibility Regulation
□ Measuring Instruments Regulation
□ Pressure Equipment (Safety) Regulation
Annex IV
Notified Body:
Reg. No.:
Standards: BS 60335-1; BS 60335-2-41; BS 62233; BS 55014-1; BS 55014-2
Wirral, 2021.06.16

Tom Chambers, Managing Director Einhell UK Ltd.
Archive-File/Record: NAPR024538
Art.-No.: 41.815.60 / 41.815.61 I.-No.: 21011
Subject to change without notice Wiesenweg 22, D-94405 Landau/Isar
Documents registrar: Thomas Fischer
EH 07/2021 (01)