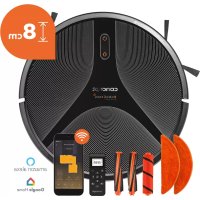
RoboCross VR2110 - Vacuum Cleaner Concept - Free user manual and instructions
Find the device manual for free RoboCross VR2110 Concept in PDF.


| Product Type | Robot Vacuum Cleaner |
| Brand | Concept |
| Model | RoboCross VR2110 |
| Power | 25 W |
| Battery Voltage | 14.8 V |
| Battery Type | Lithium-ion (Li-Ion) |
| Battery Capacity | 3200 mAh |
| Continuous Working Time | 180 minutes |
| Full Charging Time | 5 hours |
| Charging Adapter Voltage | AC 220-240 V - 50/60 Hz |
| Adapter Output | DC 24 V |
| Noise Level | 55-65 dB |
| WiFi Frequency Range | 2.4-2.4835 GHz |
| Max Transmission Power | 18 dBm |
| Cleaning Modes | Automatic, Spot, Perimeter, Scheduled |
| Mopping Function | Yes, with electric water tank (cloth included) |
| Connectivity | WiFi 2.4 GHz, Concept Home mobile app |
| Remote Control | Yes, included |
| Virtual Wall Magnetic Strip | Yes, included |
| Safety Sensors | Anti-drop (3), infrared anti-collision, wall, TOF |
| Included Brushes | Main brush, 2 side brushes (L/R), HARDFLOOR brush, CARPET brush, PET brush |
| Filters | HEPA filter, foam filter, filter grid (3 sets) |
| Product Warranty | 24 months |
| Battery Warranty | 6 months |
Frequently Asked Questions - RoboCross VR2110 Concept
User questions about RoboCross VR2110 Concept
0 question about this device. Answer the ones you know or ask your own.
Ask a new question about this device
Download the instructions for your Vacuum Cleaner in PDF format for free! Find your manual RoboCross VR2110 - Concept and take your electronic device back in hand. On this page are published all the documents necessary for the use of your device. RoboCross VR2110 by Concept.
USER MANUAL RoboCross VR2110 Concept
Robotic Vacuum Cleaner
Staubsauger-Roboter
Aspirateur robot
Robot aspirapolvere
Aspiradora robótica
Aspirator robot
natural_image
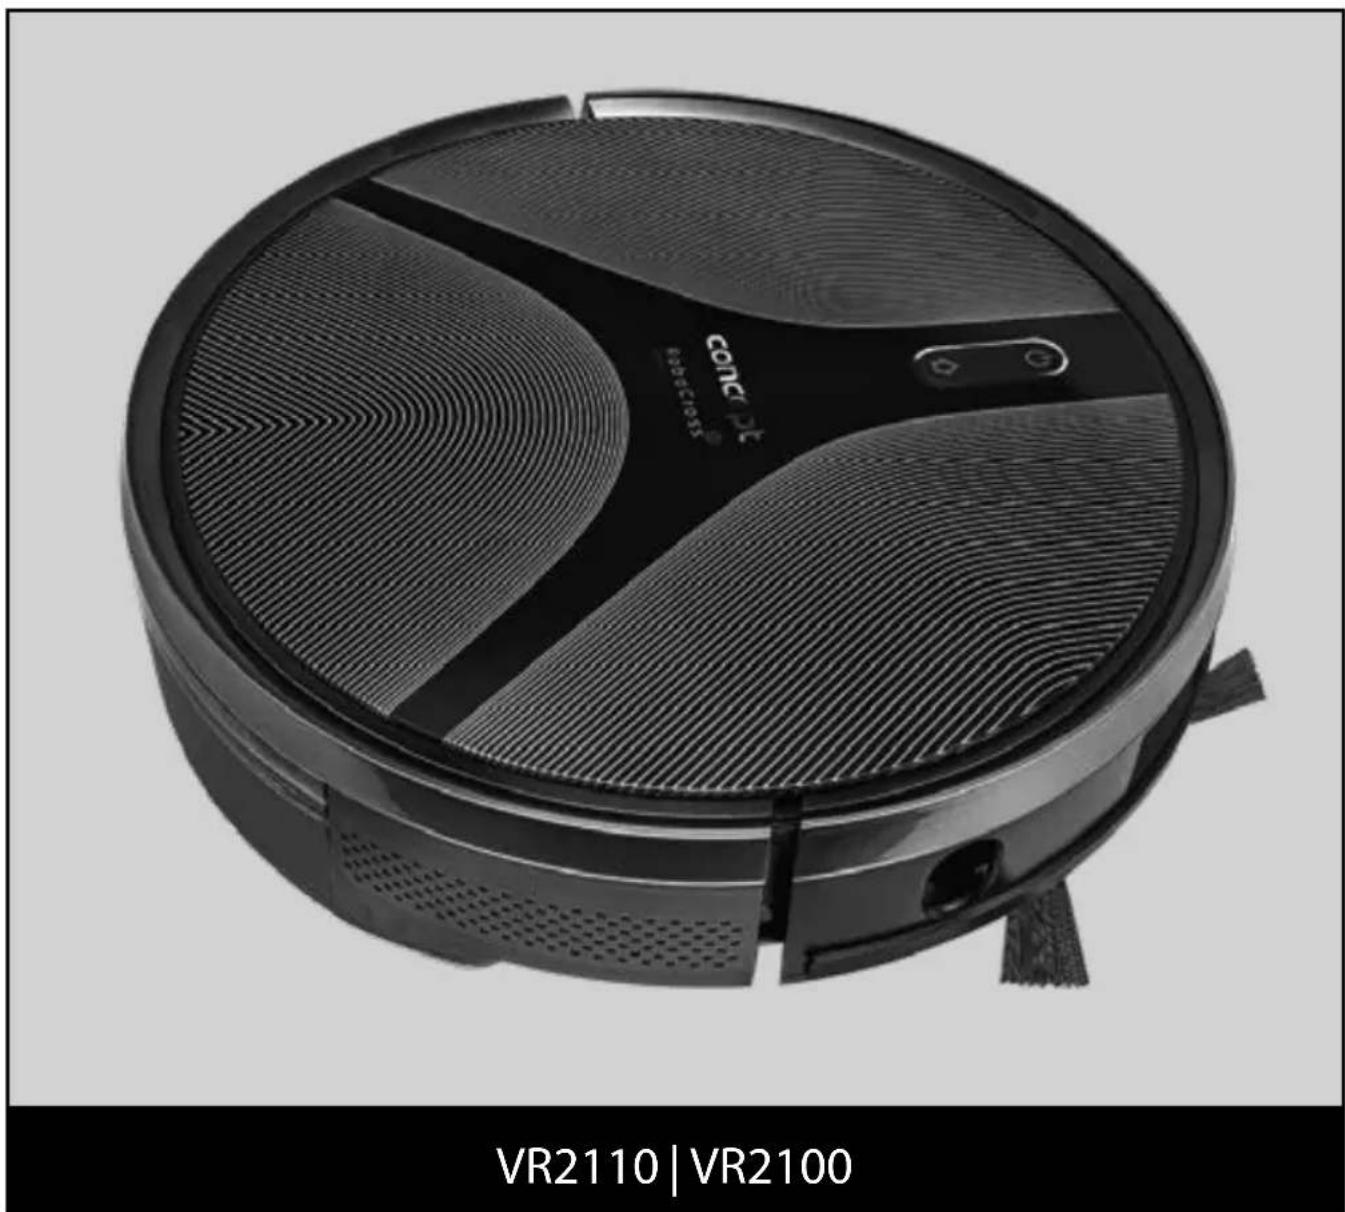
Black circular vacuum cleaner with textured surface and control buttons, labeled VR2110 | VR2100 at bottom (no other text or symbols)CZ
HU LV DE FRNSK PL
IT ES
RO
PODĚKOVÁNÍ
CZ
concept
concept
CZ
Dokovací stanice
Seznam součásti
natural_image
Five labeled diagrams of mechanical parts: a handle, a component with circular features, a striped pattern, a textured surface, and a spiral (no text or symbols)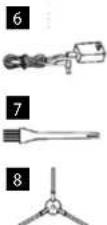

KLÍČOVÉ FUNKCE
SK
concept
concept
SK
Dokovacia stanica
1 Kontrolka napájania
2 Oblast'vysielania signálu
3 Nabíjacie kontakty základne
4 Záchytná drázka
5 Krycia doska
6 Priechod pre käbel
7 Zásuvka napájacleho adaptéra
8 Navigaci kolik
Zoznam súčasti
1 Dokovacia stanica 1x
2 Dialkové ovládanie 1x
3 Textília na vytieranie 2x
4 HEPA filter + penový filter 3x (pri VR2100 2x)
5 Magneticky pásik 1x
6 Adapter 1x
7 Čistiaca kefka 1x
8 L'avá a pravá kefka 2x
natural_image
Five labeled diagrams of mechanical parts: a flat tool, a component with a knob, a textured surface, a patterned blade, and a circular button (no text or symbols)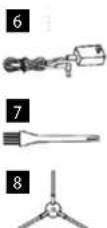

natural_image
Illustration of four different types of electronic components or devices, including a cylindrical capacitor, striped cable, plastic wrap, and a mechanical housing (no text or symbols present)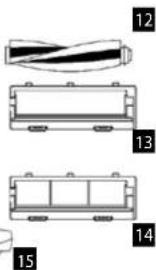
KLÚČOVÉ FUNKCIE
OCHRANA ŽIVOTNĚHO PROSTREDIA
Stacja dokująca
HU
concept
concept
HU
Dokkoló állomás
natural_image
Illustration of five different household appliances or tools, including a flat tool, a device, a patterned garment, and a spiral-patterned item (no text or symbols present)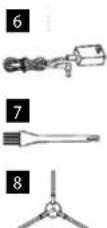

natural_image
Illustration of various types of electronic components or devices, including a resistor, capacitor, and switch (no text or symbols present)
ALAPFUNKCIÓK
LV
concept
concept
LV
- Filtra sleta väks
2 Puteklu tvertnes poga
3 Slenas sensors
Bāzes stacija
natural_image
Five labeled diagrams of mechanical parts: a clamp, a component with a gear, a textured surface, and a patterned blade (no text or symbols)

GALVENAS IEZIMES
Thank you for purchasing a Concept product. We wish you much joy with your new appliance every day you use it. Please read the instruction manual carefully before initial use. To refer to this manual any time you need to, we recommend you to keep it in a safe place. And please pass it to any future owner of the appliance.
| Technical specifications | ||
| VR2110 VR2100 | ||
| Input 25 W 25 W | ||
| Battery voltage 14.8 V 14.4 V | ||
| Charger voltage | AC 220-240 V - 50/60 Hz | |
| DC 24 V DC 24 V | ||
| Sound level 55-65 dB 55-65 dB | ||
| Battery 3200 mAh, Li-Ion 2600 mAh, Li-Ion | ||
| Operation time 180 minutes | 150 minutes | |
| Full charge time | 5 hours | 4-5 hours |
| Frequency range | 2.4-2.4835 GHz | 2.4-2.4835 GHz |
| Transmitter power (max.) 18 dBm 18 dBm | ||
IMPORTANT
Before connecting to the mains, make a visual check to ensure that the unit is intact and that no damage occurred during transport.
IMPORTANT SAFETY PRECAUTIONS
- Do not use the appliance in any other way than as described in this manual.
- Remove all the covering and marketing materials from the appliance before the first use.
- Remove all items from the floor from the floor that could disrupt the effective a trouble-free cleaning (cables, papers, clothes, table cloths and curtains touching the ground).
- If there are stairs in the cleaning area, place a magnetic strip (virtual wall) at a minimum distance of 15 cm from the top edge. This distance should ensure the highest protection against falling from the stairs.
- Use only original accessories and spare parts for this model.
- Do not sit on the vacuum robot or place other objects on it.
- The appliance should only be used in households at temperatures between 0 °C and 40 °C.
- Make sure that the dust container and mopping cloth are properly attached before use.
- Do not put your hair, clothes, fingers or other body parts near the main brush. Keep the main brush and the suction part of the vacuum robot clean, remove all hair and dust that can lower the suction properties of the vacuum robot and the cleaning quality.
EN
concept
concept
EN
- Do not use the appliance on wet or damp floors.
- Do not vacuum liquids, burning cigarettes, splinters and sharp objects, matches and other flammable substances, larger pieces of paper, plastic bags or other items that can damage the vacuum robot.
- Do not allow the vacuum robot to pass over loose cables when vacuuming.
- When servicing and cleaning the appliance, turn the power switch to the OFF position.
- Direct sunlight may cause a reduced sensitivity of the infra-red sensors of the vacuum robot, please avoid direct sunlight.
- A carpet must be secured so that the robot does not enter on it during cleaning. If a mopping cloth with a water tank is installed on the vacuum robot, cleaning can be interrupted or unwanted soaking of the carpet can occur.
- Do not place the appliance in a place where it could easily fall on the floor (table, chairs).
- Before charging the appliance, make sure the charging station is properly connected.
- Extreme thermal conditions or inappropriate use may result in leakage of the battery. If the fluid gets on your skin, wash immediately under running water. In case of contact with eyes, rinse immediately under running water for at least 10 minutes. Get medical help.
• In case you want to dispose of the product, first disconnect the battery from the appliance. - If the appliance is being transported or it is not used for a long time, switch it to the OFF position. This extends the battery life.
- Make sure the mains voltage corresponds to the values on the rating plate of the product. Do not connect the appliance to the distribution sockets and extension leads.
- When disconnecting the unit from the wall outlet, never pull the power cord, grasp the plug end and disconnect it by removing it from the receptacle.
- Do not use the appliance as a toy.
- Do not use coarse and chemically aggressive substances to clean the appliance.
- The appliance is only suitable for home use and is not intended for commercial use.
- Do not immerse the power cord, plug or appliance in water or any other liquid.
- Do not repair the appliance yourself. Please contact an authorized service centre to prevent injury from improper handling.
- This appliance can be used by children aged from 8 years and above and persons with reduced physical, sensory or mental capabilities or lack of experience and knowledge if they have been given supervision or instruction concerning the use of the appliance in a safe way and understand the hazards involved. Cleaning and maintenance performed by the user must not be carried out by children unless they are 8 years old and under
supervision. Children aged under 8 years of age must be kept away from the appliance and its power cord. Do not let children play with the appliance.
- Children aged under 3 years of age must be prevented from accessing the appliance unless they are permanently supervised.
- The manufacturer and importer to the European Union has no liability for damage caused by the operation of the appliance, i.e. wounds, scalding, fire, injuries, damage to other things, etc.
- If the power cord is damaged, have it replaced by a qualified service centre to avoid a dangerous situation. It is forbidden to use the appliance with a damaged power cord.
- The robotic vacuum cleaner must only be used with the original AC adapter supplied with it. To avoid a dangerous situation, never use any other type of adapter.
Damages from failure to follow the manufacturer's instructions are not covered by the warranty.
Carefully check that you have unpacked all the accessories that are supplied. During the warranty period, we recommend to keep the original paper box, user manual and the packaging material
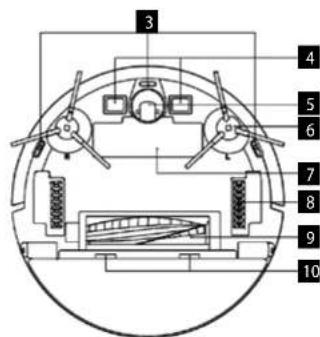
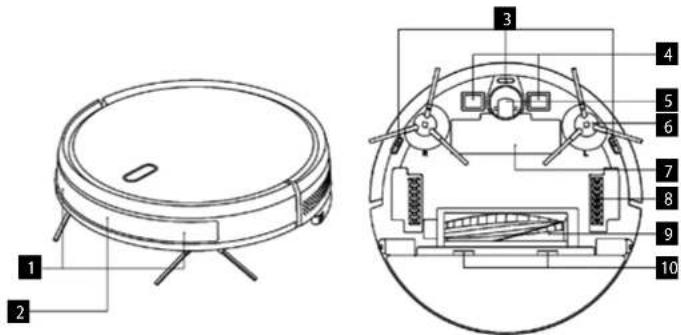
PRODUCT DESCRIPTION
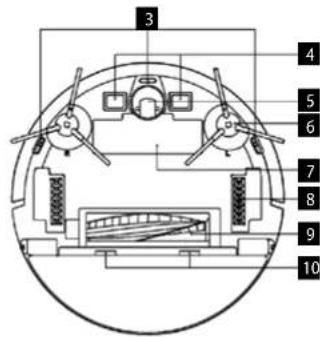
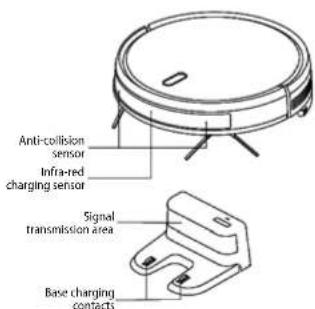
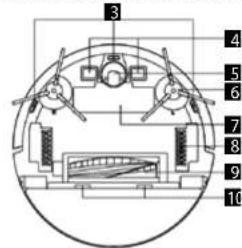
1 Anti-collision sensor
2 Infra-red charging sensor
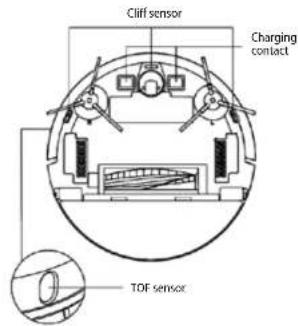
3 Cliff sensor
4 Charging contact
5 Universal wheel
6 Side brush
7 Battery cover
8 Drive wheel
9 The main brush
10 Main brush cover latch
EN
concept
concept
EN
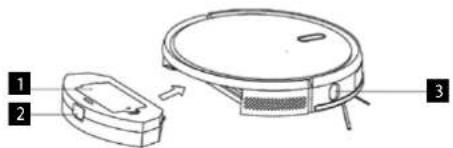
1 Filter strainer cover
2 Dust container button
3 Wall sensor

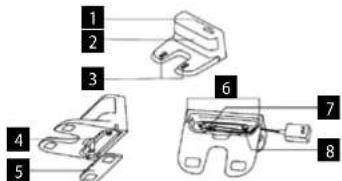
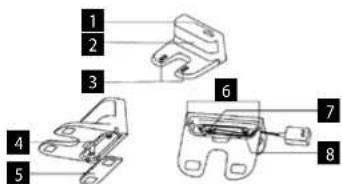
Docking station
1 Power indicator light
2 Signal transmission area
3. Base charging contacts
4 Catch groove
5. Cover plate
6. Cable passage
6 cable passage
7 AC adapter socket
8. Winding pin
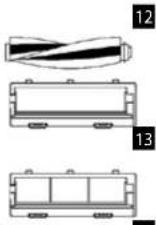
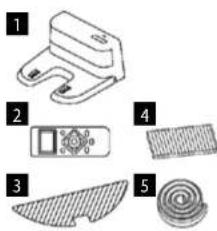
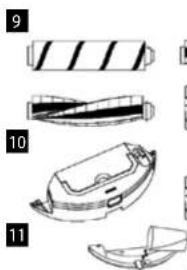
List of parts
1 Docking station 1x
2 Remote control 1x
3. Wiping cloth 2x
4. HEPA filter + foam filter 3x (for VR2100 2x)
5. Magnetic strip 1x
6 Adapter 1x
7. Cleaning brush 1x
8 Left and right brush 2x
9 HARDFLOOR brush 1x (VR2110 only) CAUTION! Cannot be used on carpets, cleaning may be interrupted.
10 CARPET brush 1x
11 Electrically operated water tank 1x (VR2110 only)
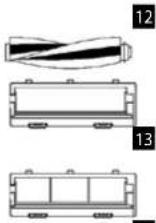
12 PET brush 1x (VR2110 only)
13 Main brush cover 1x (VR2110 only)
suitable for HARDELOOR and PET brushes
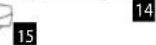
14 Main brush cover with steel wire 1x (suitable for
CARPET brush)
15 Hanging water tank 1x (VR2100 only)
natural_image
Five labeled diagrams of household appliances or tools, including a flat tool, a device, a patterned garment, and a circular button (no text or symbols present)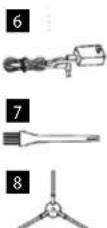
natural_image
Illustration of various types of household appliances or accessories, including a striped rectangular object and a segmented device (no text or symbols present)
KEY FEATURES
Cleaning / ON/OFF
- Press briefly to start or pause cleaning.
- Press and hold for 3 seconds to switch the appliance on or off.
- Long press for 15 seconds to force the appliance to shut down under unusual circumstances.
Charging / Local cleaning
- Press briefly to start or pause charging.
- Long press to start local cleaning.
Indicator light
- Orange: Normal operation or charging.
• Red: Abnormal condition or low battery. - Red-orange: The appliance is not connected to the network.
Wi-Fi reset
- Press both buttons simultaneously for 3 seconds.
INSTALLATION
- Connect the power cord and store the excess cable length in the cable compartment.
- Place the docking station against the wall and connect the power.
Note:
- Provide a space of min. 0.5 m on both sides of the docking station and min. 1.5 m in front of the station.
- If the power cord is stretched vertically to the ground, the appliance may pull it out and the docking station may be switched off.
-
In normal condition, the charging indicator light is on when switched on, and off when charged.
-
Do not move the docking station or expose it to direct sunlight.
Note: Direct sunlight will interfere with the docking station signal and the appliance may not return to the docking station properly.
4. Installing the side brush
Make sure the left side brush (L) and right side brush (R) markings correspond to the L and R markings on the bottom cover. Push the side brushes L and R until you hear a "click" sound.
5. Putting the appliance into operation and charging
To switch the robot on, press and hold the button ⏻.
If the power indicator light is normally on, charge the robot in the docking station.
Note: If the appliance does not start due to a low battery, charge it in the docking station and it will start automatically. Normally, the appliance can only operate
when the battery level is ≥20%.
- Connecting a mobile app (you can skip this step) Read the instructions for connecting Wi-Fi and connect the mobile app.
7. Start of cleaning
After switching on the robot, briefly press the button on the robot or start cleaning using the mobile app (you can pause the appliance by pressing any button during use).
Note:
• The sweeping robot cannot be used to remove fluids.
- If the battery charge level is less than 20 %, the
appliance cannot operate. In this case, recharge it.
• If the battery charge level is less than 20 %, the
appliance automatically returns to the docking station.
- Before use, remove various wires (including the docking station power cord) from the floor to prevent outages and damage to objects or wires when the appliance catches these wires.
8. Installing the wiping module
a) Installing the wiping cloth: glue the wiping cloth straight to the bottom of the water tank.
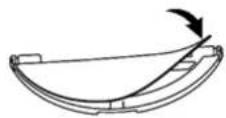
Model VR2100 - Hanging water tank
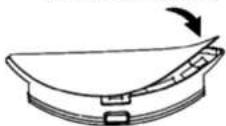
Model VI2110 - Electrically operated water tank
Note: Clean the wiping cloth after use to keep it in good condition.
b) Fill the water tank: open the cover and fill the tank with water.
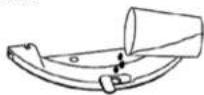
Model VR2100 - Hanging water tank

EN
concept
concept
EN
Before filling with water, remove the dust container using the handle (VR2110).
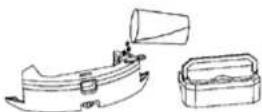
Model VR2110 - Electrically operated water tank
c) Install the module:
Model VR2100: push the module horizontally along the back of the robot. The module is installed in place when you hear a "click" sound.
Model VR2110: insert the dust container into the water tank and insert the handle into the slot. Then press and hold the button in the centre of the tank and push it horizontally along the back of the robot. The module is installed in place when you hear a "click" sound.
- Removing the wiping module
Model VR2100: Once the robot has completed its work, press the latches on both sides, remove the wiping module backwards, empty the water from the water tank and clean the cloth (do not move or flip the robot during cleaning).
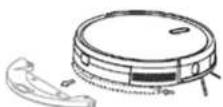
Model VR2100 - Hanging water tank
Model VR2110: Once the robot has completed its work, press the button in the middle of the water tank, remove the wiping module backwards, empty the water from the water tank and clean the cloth (do not move or flip the robot during cleaning).
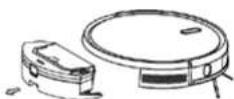
Model VR2110 - Electrically operated water tank
-
Instructions for using the wiping module
-
Do not use the wiping module unless supervised.
- For safety, make sure the wiping module is removed when charging or when not in use.
- Do not attempt to wipe the carpet.
- For a better wiping effect, the wiping module should be used after sweeping or vacuuming the floor three times.
- To refill water or clean the cloth while the appliance is operating, pause it, remove and reinsert the wiping module as described in steps 8 and 9. Do not move or flip the appliance to avoid positioning errors and map loss.
- The wiping function of the appliance is designed for wiping and aids deep cleaning. However, it cannot effectively remove stubborn dirt and thus replace human power.
USE
ON/OFF
Press and hold the button 📊 for 3 seconds, the indicator light comes on and the appliance starts.
Press and hold the button ☐ for 3 seconds while the appliance is in standby mode, the indicator light goes out and the appliance switches off.
NOTE: The appliance cannot be switched off while it is being charged.
CLEANING/PAUSE
After starting the appliance, briefly press the button ⏻ on the appliance or start the appliance using the mobile app (press any button to pause the appliance).
Note:
• The robotic vacuum cleaner cannot be used to remove fluids.
- If the battery charge level is less than 20 %, the appliance cannot operate. In this case, recharge it.
- If the battery charge level is less than 20 %, the appliance automatically returns to the docking station.
- Before use, remove various wires (Including the docking station power cord) from the floor to prevent outages and damage to objects or wires when the robot catches these wires.
CHARGING
Automatic mode: The appliance automatically returns to the docking station after work.
Manual mode: When paused, press the button ◇ briefly to start charging or you can use your mobile app to charge the appliance. The indicator light flashes when the appliance is fully charged.
Note: If the appliance does not find the docking station,
It will automatically return to its original position. In this case, place the device manually into the docking station.
MAGNETIC STRIP
Magnetic strips can be set to separate areas that should not be cleaned (for example, bathrooms, kitchens, etc.). Note: attach the magnetic strip to the floor so that it cannot move. Otherwise, it will affect its effectiveness.
CLEANING MODE
Upon start-up, the appliance will move according to the cleaning program in curves to clean up the entire floor area and complete the cleaning of all rooms one by one in a regular, efficient manner with full coverage. When cleaning is complete, the appliance returns to the docking station and recharges automatically.
LOCAL CLEANING
By pressing and holding the button ☐ for 3 seconds, the robot is localized, cleans a circular area of 1.5 m diameter, and automatically returns to its default location and stops when cleaning is complete.
CLEANING PLANNING
You can set a fixed cleaning time using the mobile app. The appliance will automatically start cleaning at the specified time and will return to the docking station when completed.
WI-FI RESET
If the mobile phone cannot connect to the appliance due to a change in router and password configuration or other reasons, press the button ⏻ and the button ⏻ for 3 seconds at the same time until you hear the "Wi-Fi has been reset" voice prompt and until the indicator light turns on blue-violet and flashes slowly.
SILENT MODE
You can turn robot voice messages on or off using the mobile app.
SETTING THE SUCTION POWER
You can set the suction power to a quiet, standard or high level using the mobile app.
When the carpet is detected, the suction force automatically increases to the highest level. WARNING - the carpet is correctly detected only with the Carpet brush.
SETTING THE WATER FLOW (only for electrically operated water tank of model VR2110)
You can set the water flow to a low, standard or high level using the mobile app.
USING THE REMOTE CONTROL
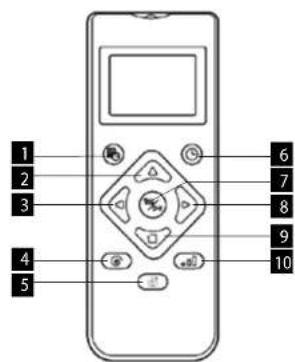
- Cleaning planning
- Moving forward
- Turning left
- Local TURBO cleaning
- Start/pause charging
- Automatic cleaning / pause
- Cleaning/pause
- Turning right
- Peripheral cleaning
- Setting suction power / water flow
Note: To ensure that all the correct settings are effective, you must point the remote control at the front of the robotic vacuum cleaner from close proximity.
TIME SETTING
- Press the button to the remote control to enter the
time setting, the Sunday symbol flashes on the LCD - Press the left and right buttons to select the day of the
- Press the left and right buttons to enter the day of the week and press the button confirm it, then the LCD will automatically switch to the clock setting.
- Press the up and down buttons to set the hour and press the left and right buttons to move to the minute setting.
- After setting the current time, point the remote control at the front of the robotic vacuum cleaner and press the button confirm all time settings. Failure to do so will invalidate your settings.
- This completes the time setting for both the remote control and the robotic vacuum cleaner.
Cleaning plan
EN
concept
concept
EN
- Press the button 📂 the remote control to enter the plan setting function, the Sunday symbol flashes on the LCD.
- Press the left and right buttons to select the day of the week and press the button confirm it, then the LCD will automatically switch to the clock setting.
- Press the up and down buttons to set the hour and press the left and right buttons to move to the minute setting. Then point the remote control at the front of the robot vacuum cleaner and press the button confirm this plan setting for the robotic vacuum cleaner.
- When one plan setting is completed, the remote control automatically moves to the next plan setting. If you do not want to continue with the setting, press the exit button 📄 wait 10 seconds for the setting to finish automatically.
- This completes the time setting for both the remote control and the robotic vacuum cleaner.
Cancelling the cleaning plan
- Press the button 📋 on the remote control, the Sunday symbol flashes on the LCD and the symbols for the days of the week you have planned appear.
- Press the left and right buttons to select the day of the week you have planned, and press and hold the button for 3 seconds to cancel the plan. You can also select the next planned day you want to cancel, or press the exit button wait 10 seconds for the setting to finish automatically.
DAILY MAINTENANCE
Main brush (clean regularly)
- Turn the appliance over and press the latch on the main brush cover to pull it out.
- Remove dust from inside and from inside the main brush with a small brush and clean the main brush.
- Reassemble the main brush and press firmly on the cover until the latch clicks into place.
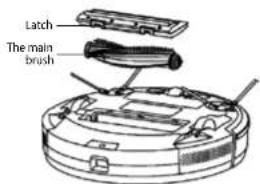
- Turn the appliance over and pull the side brush up.
- Remove hair and dirt and refit the side brush.
- Make sure the left side brush (L) and right side brush (R) correspond to the L and R symbols on the bottom cover. Push the L and R side brushes to reinstall them. Note: Replace the side brushes every 3 to 6 months to ensure their cleaning effect.

Dust container and filter grid (clean regularly) 1. Press the button and pull the dust container backwards.
- Open and clean the dust container.
Cleaning the filter grid (clean regularly)
- After prolonged use, remove the filter grid, foam filter and HEPA filter.
- Clean the removed filter grid. Rinse the foam filter and HEPA filter under water.
- Wipe the individual parts and let them dry freely.
- After drying, gradually install them in the correct order: grid - foam filter - HEPA filter.

Side brush (clean regularly)
Note:
- Rinse the filter grid with clean water and do not add any detergent.
- Do not clean the filter grid with a brush or fingers.
- Allow the filter grid to air dry for at least 24 hours.
- Replace the filter grid every 3 to 6 months.
Cleaning the filter (clean regularly)
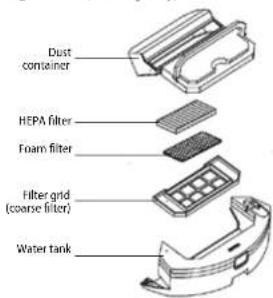
Electrically operated water tank
Wiping module (clean after each use)
- Remove the cloth, empty the water tank.
- Clean the cloth, dry both the water tank and the cloth. For model VR2110, first pull out the dust container and then empty the water tank.
Sensors (clean regularly)
Clean the sensors with a soft cloth as follows:
- Clean the sensors along the wall to the right.
- Three cliff sensors at the bottom of the appliance.
- Infra-red anti-collision sensor in front of the appliance.
- Protection against electric shock and docking station contacts at the bottom of the appliances (turn off the appliance during cleaning).
- Docking station signal transmission area.
Sensors (clean every month)
EN
concept
concept
EN
Battery
- The appliance is equipped with high-performance lithium-ion batteries. To maintain battery performance, keep the appliance charged every day.
- If the appliance is not used for a long time, turn it off and store it properly. Charge it at least every 3 months to prevent damage to the batteries due to excessive discharge.
COMMON PROBLEMS
| Problem Remedy | |
| The robot cannot be started | If the battery is low, place the robot in the docking station and align it with the board contacts, the appliance will start automatically (if the robot is completely off, it can start automatically after a while).Do not use the appliance if the ambient temperature is below 0 °C or above 50 °C. Use at 0-40 °C. |
| The robot cannot be charged | Move the robot off the station, make sure the docking station indicator light turns on, and make sure both ends of the docking station power adapter are properly connected.In case of poor contact, clean the docking station contact points and charging contacts on the robot or turn the side brush to the side. |
| The robot cannot be recharged | The robot is too far from the docking station, place it near the docking station and try again. |
| Abnormal behaviour Turn off the robot and restart it. | |
| Unusual noise is heard during use | The main brush, side brush or wheel may be wrapped with foreign objects, turn off the robot and remove foreign objects. |
| Cleaning ability is reduced or dust is dropping from the appliance | The dust container is full. Clean it.The filter grid is clogged. Clean or replace.The main brush is wrapped with foreign objects, clean it. |
| Wi-Fi cannot be connected | The Wi-Fi signal is bad. Check that the correct Wi-Fi coverage is available.Wi-Fi is connected in an unusual way. Reset Wi-Fi, download the latest app, and try connecting again.The password is entered incorrectly.There is a router for the 5G frequency band, the robotic vacuum cleaner is equipped only for the 2.4G frequency band. |
| The planned cleaning did not take place | If the battery level is low, planned cleaning can only be started if the battery level is at least 30 %. |
| Does the robot consume power when it is always placed in the docking station? | The robot consumes a small amount of power when it is permanently placed in the docking station, allowing the best battery performance. |
| Do I need to charge the robot three times for 16 hours the first time? | The lithium battery can be used immediately after charging and has no memory effect. |
Firmware update
Use the mobile app to update the firmware. If new firmware is detected, update as prompted. When updating the firmware, the battery level should be ≥50% , so the appliance should be placed in the docking station.
TROUBLE SHOOTING
| Voice message Remedy | |
| Error 1: Oh dear! I cannot find the dust container Cleaning | was started after removing the dust container. |
| Error 2: Please check if the radar on top has been covered or blocked | The top sensor is covered or placed in an open area (there is no obstruction in the 6 × 6 m ^2 area). |
| Error 3: Please place me in a new location and try again Pick up the robot or lift it into the air. | |
| Error 4: Please scrub the cliff sensor, and restart me from a new location | The cliff sensor is covered or placed at a height. |
| Error 5: Please scrub the front sensor, and restart me from a new location | The infra-red anti-collision sensor is dirty or covered. |
| Error 6: Please scrub the right-hand sensor, and restart me from a new location | The wall sensor is dirty or covered. |
| Error 7: Please scrub the radar housing on top, and restart me from a new location | The anti-collision radar sensor is dirty or covered. |
| Error 8: Please check if the bumper has been blocked in some way | The edge sensor or anti-collision sensor is stuck. |
| Error 9: Master, please clean the dust container and filter | The dust container is full or the filter grid needs to be replaced. |
| Error 10: Dust container has been removed, please clean the container and filter | After error 9 has been signalled, the user has removed the dust container and this triggers error 10. |
| Error 11: I'm stuck, please help me! The robot is stuck somewhere. | |
| Error 12: Please place me correctly! The robot is tilted. | |
| Error 13: Please check if my wheels have become blocked somewhere | The drive wheel is stuck or tangled. |
| Error 14: Please check if the main brush has become stuck | The main brush is tangled or stuck. |
| Error 15: Please check if the side brushes have become stuck | The side brush is tangled or stuck. |
| Error 16: What's going on? Where is the docking station? | Docking station not found or not connected. |
| Error 17: Oh dear! Program error, please restart me | Abnormal condition due to unknown failure, restart the robot. |
| Error 18: Error encountered initiating shut-down | The robot alerts the user and automatically shuts down or recharges. |
| Error 19: Low battery, please recharge | When the battery charge level is too low, the robot is not in the docking station and cleaning starts (the battery charge level is less than 10 %). |
| Error 20: To shut me down, please place me away from the docking station | The robot was turned off while charging at the docking station. |
EN
concept
concept
EN
WIRELESS CONNECTION AND COMPATIBILITY
- Jindrich Valenta - CONCEPT shall in no way be liable for any incidental, indirect or consequential damages, or for any loss of data or loss due to information leakage during communication via wireless technology.
- Successful wireless communication cannot be 100% guaranteed on all Smart devices and Wi-Fi networks (routers). Due to the variety of devices on the market, there may be cases where the character or specification of a given Smart device or Wi-Fi network (router) makes connection impossible or is somehow disturbed. In addition, a number of factors, including hardware and software configuration, also affect the success of wireless communication via Wi-Fi network. The connection between the robot and your Wi-Fi network can also be adversely affected by the surrounding Wi-Fi networks, which can be tuned to the same channel and thus interfere with the connection (e.g. in housing estates, apartment buildings, etc.). These facts are not a reason to claim the appliance.
- The application is owned and operated by a third party (the "Entity") different from Jindrich Valenta - CONCEPT (the "Seller"). No personal data is transferred to the Entity by the Seller. When registering for the application, the customer submits personal data directly to the Entity, who becomes the administrator of personal data. The application and the associated protection of personal data are governed by the Entity's rules.
Compatibility:
Smart device operating system - Android 5.0 and higher
- IOS 9.0 and higher
Wi-Fi network - 2.4 GHz
- WPA1 and WPA2 security (WPA2 recommended)
NOTICE: The appliance cannot be operated on IEEE 802.1X-protected Wi-Fi networks (usually corporate Wi-Fi networks).
Before you can control the device through the application, it is necessary to connect it to your phone and give it access to your Wi-Fi network.
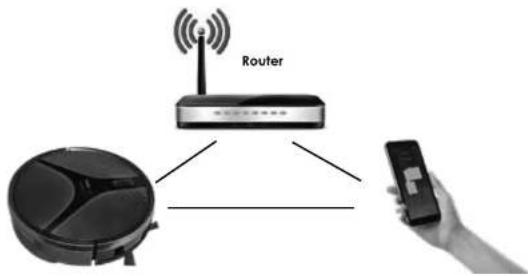
Recommended distance during set-up: less than 4 meters
Make sure your robotic vacuum cleaner, router, and your mobile phone are close together so that you can pair your phone with the device with no problems.
Download and installation of the app
- Scan the QR code below (Fig. 1) or find and download the "Concept Home" application on Google Play or App Store (Fig. 2).
- If you already have Concept Home, open the app, sign in, and continue with the pairing instructions.
- If you are a new user, start by registering (Fig. 3). Follow the instructions to enter the verification code and complete the registration (Fig. 4).
- Follow the instructions to create a family (Fig. 5).
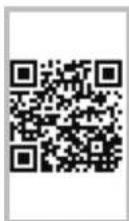
Fig. 1
Instructions for pairing the device
- At the beginning of pairing, you need to be connected to your Wi-Fi network.
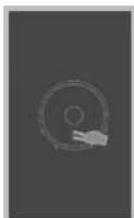
- Make sure that the appliance is in standby mode before starting the connection. Press both buttons (Fig. 6) at the same time for at least 3 seconds until the robot starts flashing and you hear the "Wi-Fi lost, please follow the App instruction for reconnection" voice message. Make sure your phone is connected to the same Wi-Fi network you want to connect the robot to.
- Then press + or "Add device" (Fig. 7) in the application to add a new device.
- Confirm "Confirm indicator rapidly blink" (Fig. 8).
- Select your Wi-Fi network to which the device needs to connect to and enter your password (Fig. 9).
- This will start the set-up process, which may take some time (Fig. 10).
- Your phone will try to connect to the device and it will connect it to your Wi-Fi network.
- After successful set-up (Fig. 11), press "Completed" to enter the device control interface (Fig. 12).
Pairing troubleshooting
- Verify that your Wi-Fi network password is correct.
• The device only supports 2.4 GHz Wi-Fi networks. - The router is overloaded as many other devices are connected.
- When attempting to connect to the device (Fig. 10), try to manually connect to its Wi-Fi network.
App modes
You can choose between the AUTO (Automatic/ZIGZAG), Local (Circular), Peripheral (EDGE) and DOCK (search for the docking station).
SERVICE CENTRE
Extensive maintenance or repair, which requires access to internal parts of the product, has to be performed by a qualified specialist or the service centre.
ENVIRONMENTAL CONCERNS
- Packaging materials and old appliances should be recycled.
- Packaging materials may be disposed of as sorted waste.
- Dispose the plastic bags made of polyethylene (PE) of as sorted waste.
Recycling of the appliance at the end of its lifespan:

This appliance is labelled in accordance with European Directive 2012/19/EU concerning used electrical and electronic appliances (waste electrical and electronic equipment - WEEE). The symbol on the product or on its packaging indicates that this product may not be treated as household waste. Instead it should be taken to the appropriate collection point for the recycling of electrical and electronic equipment. By ensuring this product is disposed of correctly, you will help prevent potential negative consequences for the environment and human health, which could otherwise be caused by inappropriate waste handling of this product. The disposal of such material has to be done according to the recycling regulations. For more detailed information about recycling of this appliance see the authorized local office or service for household waste disposal or the shop, where you purchased the appliance.

The product meets all the necessary requirements of the EU directives applicable to the specific product.
Changes in text, design, and technical specifications are subject to change without prior notice and we reserve the right to change them.

VR2110, VR2100
DANKSAGUNG
Dockingstation
Komponentenliste
FR
concept
concept
FR
Bloc d'alimentation
natural_image
Five labeled diagrams of electronic components or devices, including a fan, display, and screen (no text or symbols present)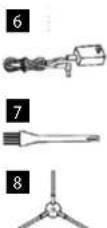

natural_image
Illustration of various electronic components and parts, including a resistor, capacitor, and switch (no text or symbols present)
FONCTIONS CLÉES
FUNZIONI CHIAVE
PULIZIA/SOSPENSIONE TEMPORANEA
m = 311
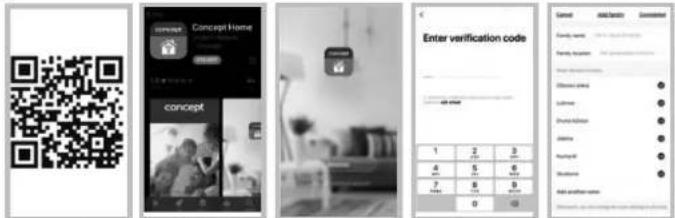
fig. 1 fig. 2 fig. 3 fig. 5 fig. 4
fig. 6 fig. 7 fig. 8 fig. 9 fig. 10

ES
concept
concept
ES
Estación base
Lista de componentes
natural_image
Illustration of five different electronic components or devices, including a flat switch, a control panel, a textured surface, a patterned blade, and a coiled cable (no text or symbols present)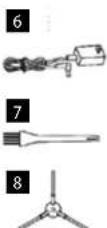

natural_image
Three technical line drawings of battery components (no text or symbols)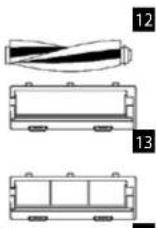
Cepillo lateral (llmpleza regular)
natural_image
Line drawing of a circular vacuum cleaner with labeled parts (1 and 2), no text or symbols present.
RO
concept
concept
RO
Stația de andocare
Lista de componente
natural_image
Five labeled diagrams of electronic components or parts, including a fan, connector, and striped pattern (no text or symbols)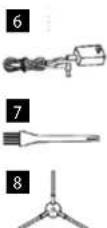

natural_image
Illustration of four different types of electronic components or devices, including a cylindrical capacitor, striped cable, plastic wrap, and a mechanical housing (no text or symbols present)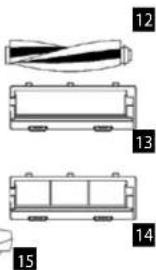
FUNCTII CHEIE
www. www.my-concept.com
Distribútor:
ELKO Valenta - Slovakia, s. r. o.
Hurbanova 1563/23, 911 01 Trenčin
Slovenská republika
tel.: +421 326 583 465, fax: +421 326 583 466
email: info@my-concept.sk
www. www.my-concept.sk
Podrobnosti o produktu
CONCEPT POLSKA sp. z o.o.
The manufacturer (or importer) is responsible for ensuring the product complies with the requirements of applicable legal regulations as well as those of the relevant technical standards. Moreover, they are responsible for ensuring the product has the properties the manufacturer described in documents related to the goods or those reasonably expected by the customer with regard to the nature of the goods or based on advertising produced by the manufacturer, and further they are responsible for ensuring the product is fit for the purpose proposed by the manufacturer or that a product of the same type is normally used for.
The quality warranty term is 24 months from product takeover by the customer.
The warranty does not apply to wear and tear caused by regular use. The customer shall not be entitled to any warranty claims if, prior to taking the product over, they knew the product contained a defect or if the defect is attributable to the customer.
In terms of these warranty conditions, a defective battery is considered a battery that is electronically inoperative (i.e., does not communicate with the base unit, the charging or discharging circuits are defective, etc.) or has an internal short circuit.
Defects or changes in parameters caused by normal use and wear (e.g. natural capacity decrease) are in no way considered a defect in terms of warranty.
The battery is provided warranty service for a period of 6 months. In terms of these warranty conditions, the battery has the nature of a consumable, for more details see „Consumables”.
Consumables
For consumables (batteries, etc.) we guarantee the preservation of technical parameters for 6 months, in case it was not damaged by improper use and its lifetime has not expired.
The warranty specifically does not apply:
- If the product installation, operation and service conditions stipulated in the product operating manual have not been adhered to,
- to malfunctions caused due to mechanical, heat or chemical damage, short circuit, over voltage or incorrect installation,
• to malfunctions caused by an inexpert third-party intervention,
• to malfunctions caused by natural disaster, - to malfunctions caused by insufficient or inappropriate maintenance in violation of the operating manual, including malfunctions caused by water and other sediments.
• to changes in colour of the heating surface or to scratching of the surface caused as a result of using the products in an unusual manner,
• to appearance and functional changes caused by exposure to sunlight, thermal radiation of water and other sediments. - If the service life of certain product parts expires, e.g. for accumulators, bulbs, etc.
The warranty does not apply to any products and services provided along with the product (gifts, promotional articles, etc.).
Filing a complaint
A complaint against a product defect must be filed as soon as identified, yet no later than before the end of the warranty term.
The customer must file a product complaint with the dealer from which they have purchased the product, or with any authorised service centre, a list of which is included in the product package, or available at www.my-concept.com.
While filing a product complaint, the product must be duly cleaned and securely packed so as to prevent any damage during its transport to an authorised service centre, where relevant, unless the product is delivered in person.
The customer must submit proof of having concluded a purchase contract for the product by producing the receipt.
While filing their complaint, the customer must indicate the noted defect and identify the preferred complaint application method.
Complaints processing
As long as the noted defect may be removed, the user has the right to have the defect duly removed free of charge on a timely basis.
If the noted defect is not removable, or if the customer becomes entitled to replacement of the product or a part thereof, yet the replacement is not possible, for example due to the product having been sold out, the customer has the right to return the product (withdrawal from the contract).
The customer shall have the right to a new product (replacement) or to replacement of a part of the product even if the defect can be removed, provided they cannot properly use the product due to repeated occurrence of the defect or due to a high number of such defects. In such a case, the customer also has the right to return the product (by withdrawing from the contract).
If the product is not returned (the customer does not withdraw from the contract), or if the customer does not apply the right to a new defect-free product (replacement), to replacement of a part thereof or to repair of the product, they may request a reasonable discount. The customer also has a right to a reasonable discount if a new defect-free product cannot be supplied to them, or if a product part cannot be replaced or the product repaired unless the situation is remedied within a reasonable time limit, or if remedying the situation would create major discomfort on the part of the customer.
The seller, authorised service centre or a staff member authorised by them must decide about each complaint immediately or within three business days in complicated cases. This term does not include a reasonable period of time, depending on the type of product concerned, required for the defect to be assessed by an expert. A complaint, including defect removal, must be dealt with without any undue delay, yet no later than within 30 calendar days of the complaint filing date, unless the seller and the customer agree on a later deadline.
On returning the product (withdrawing from the contract) the customer must return any accessories and documents supplied along with the product.
The customer does not have the right to keep the defective parts and components of the product replaced as part of a repair of the product.
This shall be without prejudice to any other rights the customer may have in relation to the purchase of the product.
Remark: Complaints against products damaged in transport are governed by the carrier's complaints procedure.
Manufacturer
Jindřich Valenta - Concept
Vysokomytská 1800, 565 01 Chocen
Czech Republic
tel.: +420 465 471 400
tax +420 465 473 304
Company ID No. 13216660
email: servis@my-concept.cz
www. www.my-concept.com
Product data
| Model: | |
| Production number: | |
| Date of purchase: Seal and signature of vendor: | |

concept concept
DE
GARANTIEBEDINGUNGEN
Garantie
CONDITIONS DE GARANTIE
Garantie
www. www.my-concept.co
Détails du produit
www. www.my-concept.com
www. www.my-concept.com
Date despre produs
CONCEPT POLSKA sp. z o.o.
Ostrowskiego 30, 53-238 Wroclaw Tel.: +48 713 390 444, Fax: 713 390 414 www.my-concept.pl

ASPICO KFT

- PODĚKOVÁNÍ
- concept
- Dokovací stanice
- Seznam součásti
- KLÍČOVÉ FUNKCE
- Dokovacia stanica
- Zoznam súčasti
- KLÚČOVÉ FUNKCIE
- OCHRANA ŽIVOTNĚHO PROSTREDIA
- Dokkoló állomás
- ALAPFUNKCIÓK
- Bāzes stacija
- GALVENAS IEZIMES
- IMPORTANT
- IMPORTANT SAFETY PRECAUTIONS
- EN
- PRODUCT DESCRIPTION
- Docking station
- List of parts
- KEY FEATURES
- Cleaning / ON/OFF
- Charging / Local cleaning
- Indicator light
- Wi-Fi reset
- INSTALLATION
- Note:
- Installing the side brush
- Start of cleaning
- Installing the wiping module
- USE
- ON/OFF
- CLEANING/PAUSE
- CHARGING
- MAGNETIC STRIP
- CLEANING MODE
- LOCAL CLEANING
- CLEANING PLANNING
- SILENT MODE
- SETTING THE SUCTION POWER
- TIME SETTING
- Cancelling the cleaning plan
- DAILY MAINTENANCE
- Main brush (clean regularly)
- Cleaning the filter grid (clean regularly)
- Wiping module (clean after each use)
- Sensors (clean regularly)
- Battery
- Firmware update
- WIRELESS CONNECTION AND COMPATIBILITY
- Compatibility:
- Download and installation of the app
- Instructions for pairing the device
- Pairing troubleshooting
- App modes
- SERVICE CENTRE
- ENVIRONMENTAL CONCERNS
- Recycling of the appliance at the end of its lifespan:
- DANKSAGUNG
- Dockingstation
- Komponentenliste
- Bloc d'alimentation
- FONCTIONS CLÉES
- FUNZIONI CHIAVE
- PULIZIA/SOSPENSIONE TEMPORANEA
- Estación base
- Lista de componentes
- Stația de andocare
- Lista de componente
- FUNCTII CHEIE
- Distribútor:
- Consumables
- Filing a complaint
- Complaints processing
- Manufacturer
- concept concept
- GARANTIEBEDINGUNGEN
- Garantie
- CONDITIONS DE GARANTIE
- CONCEPT POLSKA sp. z o.o.
- ASPICO KFT
Brand : Concept
Model : RoboCross VR2110
Category : Vacuum Cleaner