
IAN 345363 - Tools CRIVIT - Free user manual and instructions
Find the device manual for free IAN 345363 CRIVIT in PDF.

User questions about IAN 345363 CRIVIT
0 question about this device. Answer the ones you know or ask your own.
Ask a new question about this device
Download the instructions for your Tools in PDF format for free! Find your manual IAN 345363 - CRIVIT and take your electronic device back in hand. On this page are published all the documents necessary for the use of your device. IAN 345363 by CRIVIT.
USER MANUAL IAN 345363 CRIVIT
FAHRRADWERKZEUG-SET BIKE TOOL KIT SET D'OUTILS POUR VÉLO
DE AT CH
FAHRRADWERKZEUG-SET
Gebrauchsanweisung
FR BE
SET D'OUTILS POUR VÉLO
Instructions for use
NL BE
FIETS GEREEDSCHAPSET
Gebruiksaanwijzing
CZ
SOUPRAVA NÁRADI PRO JÍZDNÍ KOLO
Návod k použití
IAN 345363_2004


You have chosen to purchase a high-quality product. Familiarise yourself with the product before using it for the first time.

Read the following instructions for use carefully.
Use the product only as described and only for the given areas of application. Store these instructions for use carefully. When passing the product on to third parties, please also hand over all accompanying documents.
Package contents (Fig. A)
1 x chain whip (1)
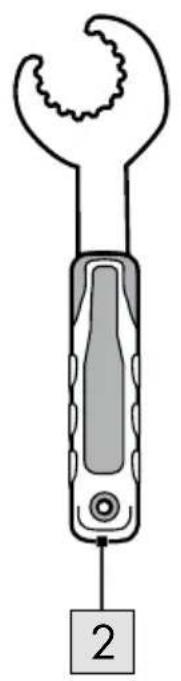
1 x bearing spanner, e.g. for Hollowtech II, compatible bearing shells (2)
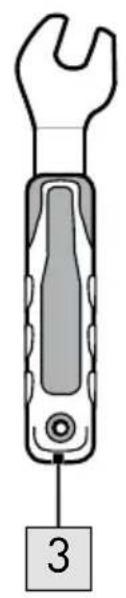
1 x pedal wrench (15mm) (3)
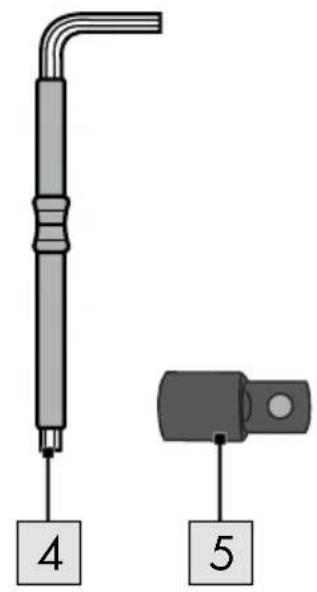
1 x Allen key, 8mm (4)
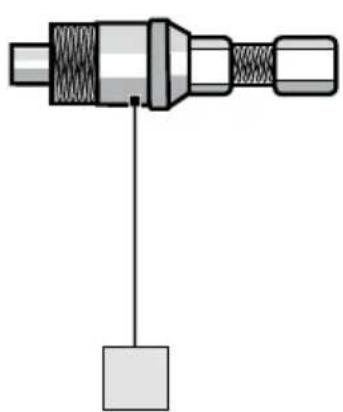
1 x attachment holder/puller (5)
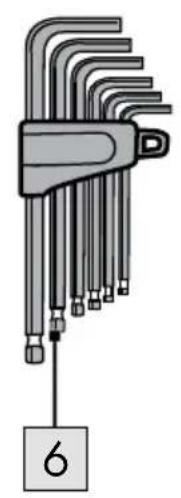
6 x Allen key 2/2.5/3/4/5/6mm (4/5/6mm with spherical head) (6)
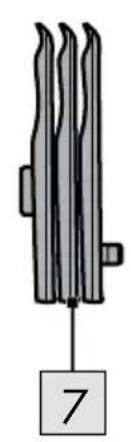
3 x tyre lever (7)
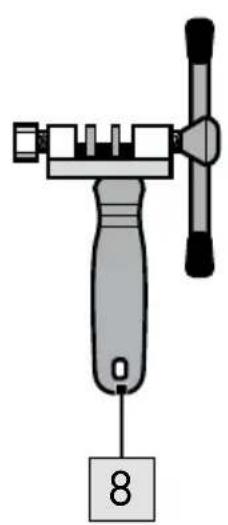
1 x chain rivet tool for 6 - 10 gears (8)
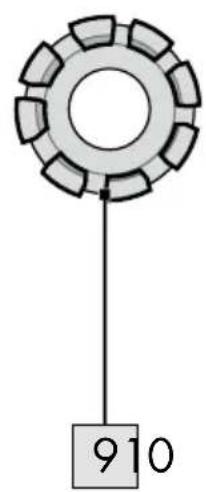
1 x spoke spanner (9/10/11/12/13/14/ 2x15) (9)
1 × square crank puller (10)
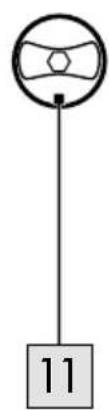
1 x star cap tool for Hollowtech II chainsets (11)
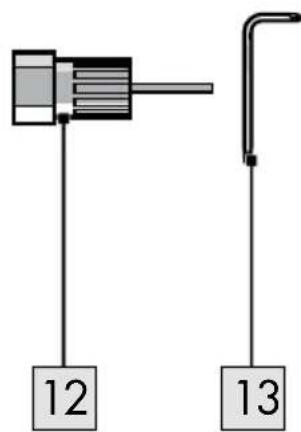
1 x Cassette puller with guide pin for Shimano HG (12)
1 x T25 Torx spanner (13)
1 x tool case
1 x instructions for use
Technical Data
Dimensions: approx. 28.5 × 21.3 × 6cm
(W×H×D)
Weight: approx. 1850g

Date of manufacture (month/year):
11/2020
Intended use
This product is a bicycle tool case for private use. The product is intended for simple repairs and does not replace specialist tools.

Safety Instructions
Life-threatening hazard!
- Never leave children unattended with the packing materials. There is a risk of suffocation!

Risk of injury!
- The product contains sharp components. Be careful not to injure yourself!
- Pay special attention to your fingers when flipping the case open and shut. There is a risk of injury from crushing.
- Check the product for damage or wear before each use.
- Caution! Not suitable for children under 36 months. Risk of suffocation and choking due to small parts that can be swallowed or inhaled!
Use
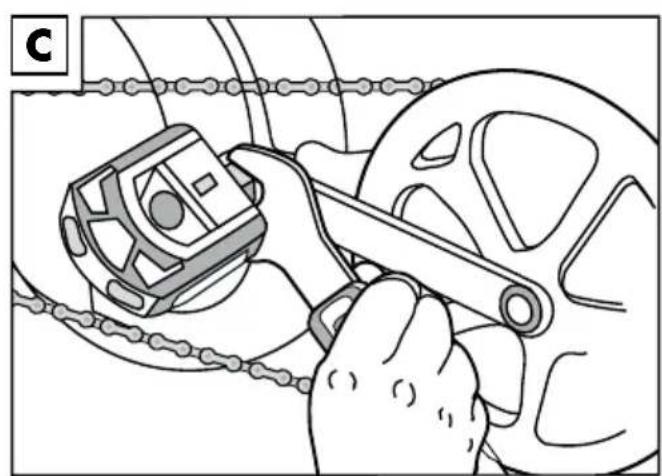
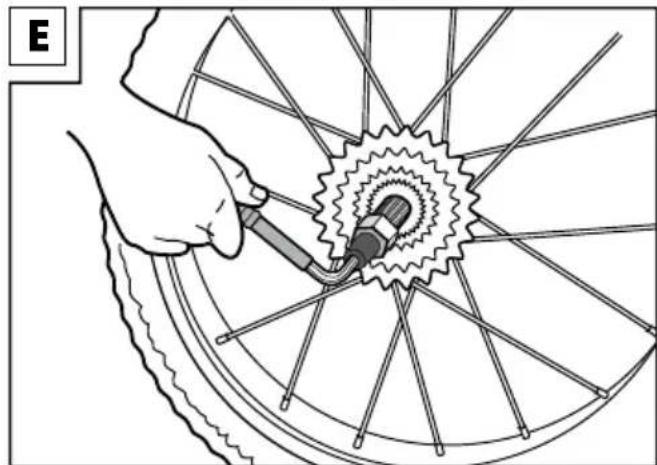
Removing the cassette (Fig. E)
- Remove the back wheel of your bicycle. To do this, undo the quick release or alternatively, undo the nuts.
- Put the cassette removal tool (12) into the closure ring of the cassette (Fig. E).
Note: Take note that the removal tool must fit your cassette. Depending on the manufacturer, you may possibly require a different removal tool each time.
- Put the chain whip in parallel around the sprockets of the cassette.
- Insert the Allen key (4) with the attachment (5) into the cassette removal tool (12) and loosen the closure ring.
- First unscrew the closure ring. Then remove the cassette.
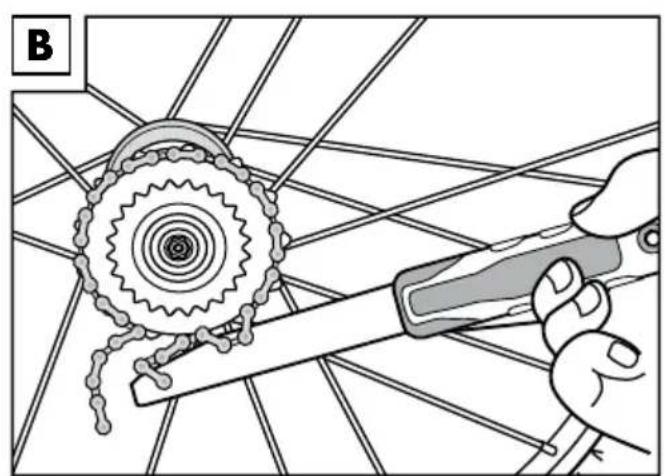
Removing the pedals (Fig. C)
- Unscrew the left pedal in a clockwise direction using the pedal spanner (3).
- Unscrew the right pedal in an anti-clockwise direction using the pedal spanner (3).
Note: Grease the pedal thread before reinstating the pedals.
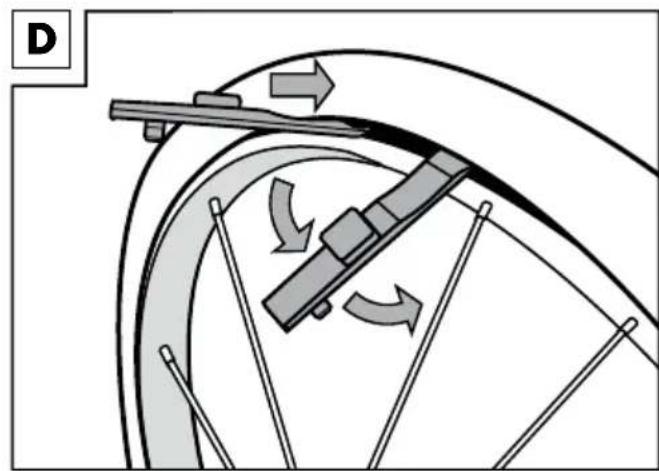
Changing the tube (Fig. D)
- Let the air out of the tube.
- Using the flat end of the tyre lever (7), carefully push it between the rim and the tyre. Start near the valve.
Note: To prevent the tyre lever falling out again, you can attach it to a spoke using the hook.
- Insert the second tyre lever (7) in a little further and pull the tyre over the rim until the tube can be removed all the way around.
Note: Handle the tyre lever carefully. The tube must not be damaged.
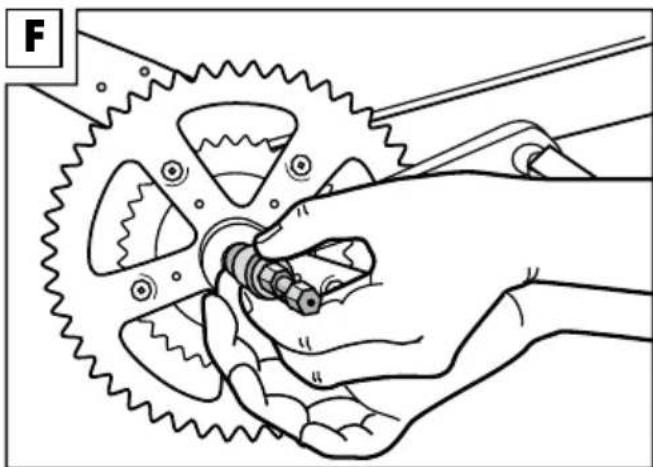
Removing (square) crank (Fig. F)
- Loosen the crank bolt with a suitable key and remove it.
Note: Some cranks have bolt covers. These must be removed before the crank is disassembled. - Turn the bolt of the crank puller (10) back completely and turn the crank puller (10) by hand into the crank.
Note: To make sure that the crank puller is firmly seated in the crank, tighten it with a spanner (SW 22mm).
3. Screw in the bolt of the crank puller (10) with a spanner (SW 14) until the crank has come loose.
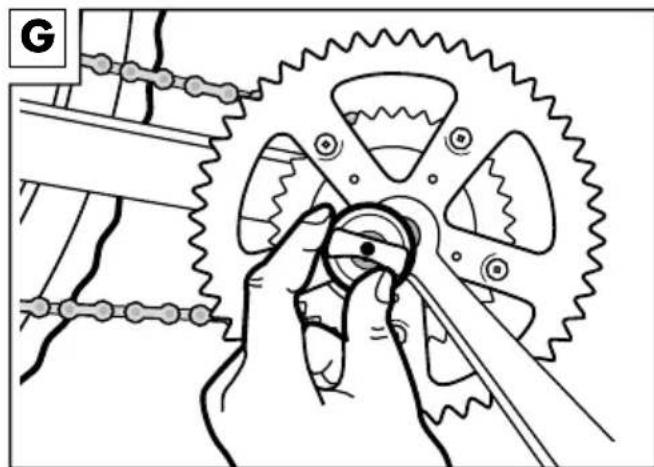
Removing (Hollowtech II) crank (Fig. G)
- Unscrew the crank cap with the star cap tool (11).
- Loosen the crank bolts with the appropriate Allen key (6).
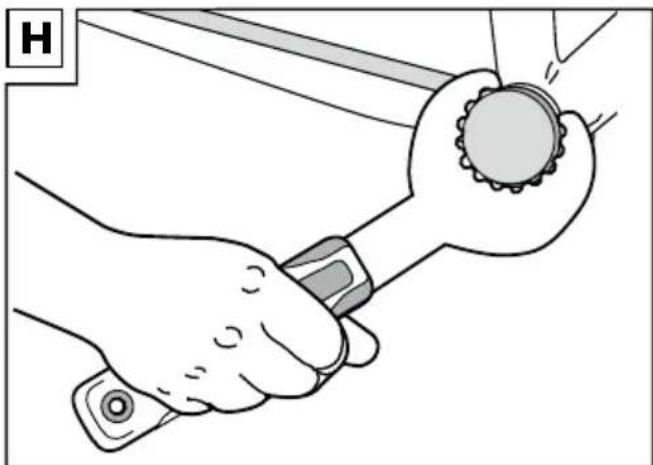
Removing the inside bearing (Hollowtech II chainset) (Fig. H)
- First remove the crank.
- Loosen the left bearing shell with the bearing spanner (2), turning anti-clockwise.
- Loosen the right bearing shell with the bearing spanner (2), turning clockwise.
- Remove the inside bearing.
Note: Grease the inside bearing before reinstating.
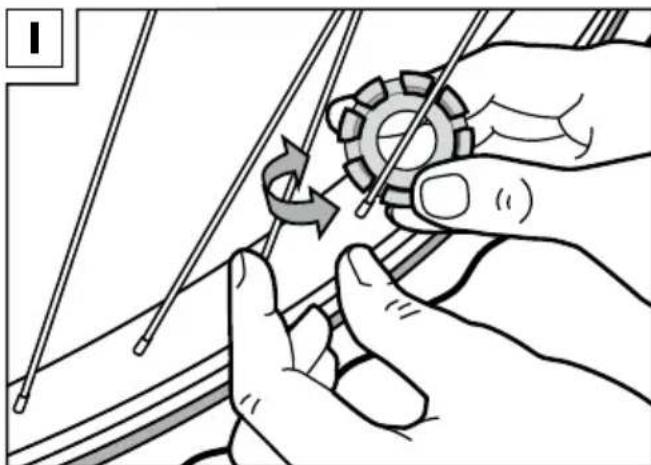
Tensioning the spokes (Fig. I)
- Attach the spoke spanner (9) to a nipple.
- Turn the spoke spanner clockwise to tighten the spoke or anti-clockwise to loosen it.
- Check the tension of the spokes and repeat steps 1 and 2 if necessary.
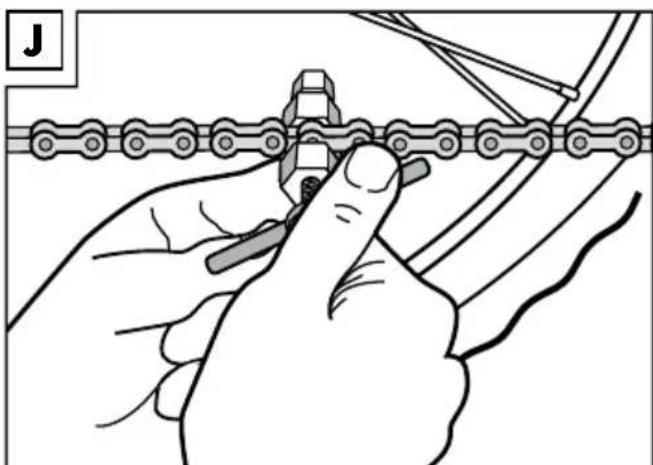
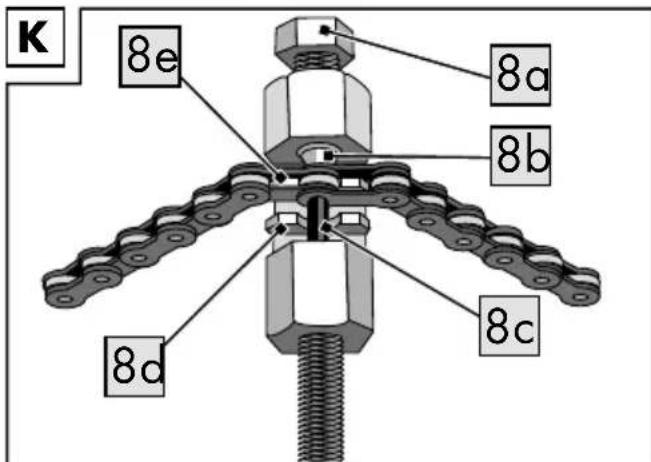
Opening the chain (Fig. J) (Fig. K)
- Put the chain rivet tool (8) onto the lower chain strand.
- Place the chain exactly onto the guide rail (8e).
- Turn the adjusting screw (8a) to secure the chain. The chain guard (8b) must be correctly aligned with the chain and be firmly attached to the chain.
Note: The chain guard holds the chain tight during removal / insertion of the chain rivet and prevents the chain from tilting. The hollow space serves to receive the chain rivet when it's being pressed out.
- Turn the lever clockwise to remove the respective chain rivet using the chain tool (8c).
- Pull the rivet-free end of the chain out through the rear derailleur.
Note: Note that the guide rail (8d) is not suitable for holding the chain. Always put the chain onto the guide rail (8e) when pressing the chain rivet in or out.
Closing the chain (Fig. K)
- Insert the two ends of the chain into each other and fit the chain into the chain rivet tool (8).
- Secure the chain with the chain guard (8b).
- Position the new chain rivet on the guide rail (8d) and press it in.
Storage, cleaning
When not in use, always store the product clean and dry at room temperature.
Wipe clean with a dry cloth only.
IMPORTANT! Never clean the product with harsh cleaning agents.
Disposal
Dispose of the article and the packaging materials in accordance with current local regulations. Packaging materials such as foil bags are not suitable to be given to children. Keep the packaging materials out of the reach of children.

Dispose of the products and the packaging in an environmentally friendly manner.

The recycling code is used to identify various materials for recycling. The code consists of the recycling symbol - which
is meant to reflect the recycling cycle - and a number which identifies the material.
Notes on the guarantee and service handling
The product was produced with great care and under constant supervision. You receive a three-year warranty for this product from the date of purchase. Please retain your receipt.
The warranty applies only to material and workmanship and does not apply to misuse or improper handling. Your statutory rights, especially the warranty rights, are not affected by this warranty.
With regard to complaints, please contact the following service hotline or contact us by e-mail.
Our service employees will advise as to the subsequent procedure as quickly as possible.
We will be personally available to discuss the situation with you.
Any repairs under the warranty, statutory guarantees or through goodwill do not extend the warranty period. This also applies to replaced and repaired parts. Repairs after the warranty are subject to a charge.
IAN:345363_2004
GB Service Great Britain Tel.: 0800 404 7657 E-Mail: deltasport@lidl.cc
IE Service Ireland Tel.: 1890 930 034 (0,08 EUR/Min., (peak)) (0,06 EUR/Min., (off peak)) E-Mail: deltasport@lidl.ie
Felicitations!
Pedalen demonteren (afb. C)
Vymena hadice (obr. D)
Napnutie spic (obr. I)
- Umiestnite centrovaci kl'uc (9) na nipel.
- Otácajte centrovacim kl'ucom v smere hodinovych ruciciek, aby sa spica pevnejsie utiahla alebo proti smeru hodinovych ruciciek, aby sa uvolnila.
- Skontrolujte napnutie spic a opakujte priadne kroky 1 a 2.
Otvorenie ref'aze (obr. J) (obr. K)
- Nasad'te nitovac ref'aze (8) na spodn vetvu ref'aze.
- Položte refaz s presným licovanim na vodiaculištu (8e).
- Otacajte nastavovacou skrutkou (8a) pre zaistenie refaze. Poistka refaze (8b) musi byt spravne vyrovnana na refazi a pevne priliehat k refazi.
Upozornenie: Poistka refaze pavne drzi refaz poças odstrańovania/vkladania nitu refaze a zabrańije spriećeniu refaze. Dutý priestor slúžina upnutie nitu refaze pri vytláčani.
- Otácajte páku v smere hodinovych ruciciek, aby ste pomocou vytlacca nitu refaze (8c) odstranili prisluśný nit refaze.
- Vytiahnite koniec ref'aze bez nitu von cez radiaci mechanizmus.
Upozornenie: Majte na pamati, ze vodiaca lista (8d) nie je vhodnna drzanie refaze. Refaz polozte na vodiacu listu (8e) vzdy pri vyfahovani alebo zatlacani nitu refaze.
Zatvorenie ref'aze (obr. K)
- Zasunte do seba obidva konce refaze a vsad'te refaz do nitovaca refaze (8).
- Zaistite ref'az pomocou poistky ref'aze (8b).
- Umiestnite novy nit refaze na vodiacu listu (8d) a zatlache ho dovnutra.