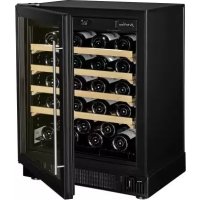
COSYP1T - Wine cellar ARTEVINO - Free user manual and instructions
Find the device manual for free COSYP1T ARTEVINO in PDF.


| Product Type | Aging and serving wine cellar |
| Brand | ArteVino |
| Model | COSYP1T |
| Dimensions (H x W x D) | 816-832 x 594 x 549 mm |
| Net weight | 45 kg |
| Capacity | 116 bottles (Bordeaux format) |
| Door type | Glass door, reversible |
| Temperature range | 9 °C to 15 °C (adjustable setpoint) |
| Volume | Approximately 116 L |
| Energy class | A |
| Annual energy consumption | 132 kWh |
| Refrigerant | R600a (isobutane) |
| Power supply | 230 V / 50 Hz, grounded plug |
| Adjustable feet | 4 height-adjustable feet |
| Interior lighting | 2 white LEDs |
| Humidity control | Removable humidity cassette, hygrometry display |
| Door reversibility | Yes, right to left |
| Maintenance | Clean air filter every 3 months, clean interior once a year |
| Safety | Temperature alarm, humidity alarm, child lock not specified |
| Warranty | Check with retailer |
Frequently Asked Questions - COSYP1T ARTEVINO
User questions about COSYP1T ARTEVINO
0 question about this device. Answer the ones you know or ask your own.
Ask a new question about this device
Download the instructions for your Wine cellar in PDF format for free! Find your manual COSYP1T - ARTEVINO and take your electronic device back in hand. On this page are published all the documents necessary for the use of your device. COSYP1T by ARTEVINO.
USER MANUAL COSYP1T ARTEVINO
1 Comply with DEPARTMENT OF ENERGY - 10 CFR Part 430 - Energy Conservation Program Energy Conservation Standards for Miscellaneous Renovation Products.
NORMES
1 Securite directive 2006/95/CE
Normes EN6035.1-2012A11:2014 EN6035.3-2.24:2010
2 CEM 2004/108/CE
Normc EN55014-1/2
Norme 62233:2008
3 ENVIRONNEMENT
Directive 2010/30/LIE
Reglement 1060/2010

R600a
You have just purchased a product from the ARTEVINO brand. Thank you for your custom. We take a lot of care in terms of the design, appearance and ease of use of your products.
We hope that you will be completely satisfied with this product.
Important information
Information in this document may change without notice.
ARTEVINO provides no guarantee for this appliance when it is used for a purpose other than that which it was designed for.
ARTEVINO shall not be held responsible for any errors in this manual or any damage linked to or resulting from the supply, performance or use of this appliance.
This document contains original information, protected by copyright. All rights are reserved. Partially or fully translating, reproducing or photocopying this document is strictly forbidden without ARTEVINO's prior, written agreement.
This appliance is only intended for storing wine bottles.
This appliance is not designed to be used by people (including children) with reduced mental, sensory or physical abilities or people lacking experience or knowledge, unless they are supervised or given instructions on how to use the machine by somebody responsible for their safety.
Children should be supervised to ensure that they do not play with the appliance.
If the power lead is damaged, it must be replaced by a specific unit or lead available from the manufacturer or its after-sales department.
WARNING:
Ensure that the vents in the appliance's cavity or flush-fitting structure are unobstructed at all times.
- Do not use mechanical devices or any other means to speed up the defrosting process other than those recommended by the manufacturer.
- Do not damage the cooling circuit.
Do not use electrical appliances inside the wine storage compartment, unless they have been recommended by the manufacturer.
Do not store explosive substances inside this appliance, for example aerosols containing flammable propellant gas.
This appliance is intended for domestic and similar applications such as:
- kitchenstoes for staff of shops, offices and other work environments.
- gtes and for use by guests of hotels, models and other residential environments.
environments such as hotel rooms.
the food service industry and other similar applications except for retail sale.
You will find a product Identification label inside the wine cabinet. This label provides several pieces of technical information as well as safety instructions notably the name and chemical symbol of the refrigerant.
The internal and external cold circuit of the cabinet contains refrigerant gas.
- No sharp objects must come into contact with the cold circuit.
If the cold circuit is damaged, keep electrical appliances and flames away from the wine cabinet. Open all the windows to thoroughly ventilate your room. Contact an approved repair service.
- Do not remove the rack at the base of the cabinet. Do not directly install wine bottles without the rack.
Use of extension leads is not recommended.
Danger: risk of children climbing inside faulty cabinets. Before disposing of your wine cabinet:
- Remove the door
Leve the shelves inside the wine cabinet. This will make it harder for children to climb inside.
The important information mentioned above must be retained for the lifetime of the wine cabinet. The user manual must be given to anybody likely to use or handle the cabinet and when it is transported to another place or taken to a recycling plant.
Table of contents
I- Protecting the environment. P3
2- Description of your wine cabinet.. P.4
3- Important facts about wine. P5
4 Power supply P5
5- Installing your wine cabinet P.5
I.Unpacking P.S
II. Installation P.6
III. Precautions P.6
IV. Flush-fitting P.7-8
V. Door reversibility P.9
6- Loading and layout advice. P.10-11
7- Commissioning and temperature setting. P 12
I. Plugging in and commissioning P.12
II-a.Description (single-temperature model) P.12
III-a.Temperature setting P.12
II-b.Description (multi-temperature model) P.13
III-b. Temperature setting.. P 13
IV. Humidity display (single-temperature model) 14
V. Lighting mode 14
- Everyday maintenance of your wine cabinet. P 14
- Operating faults. P 15
10-Technical features and energy data.. P. 16
I- Protecting the environment
Disposing of packaging:
The packaging used by ARTEVINO is made from recyclable material (except for the high density expanded polysystrene base and the hinge chock).
After unpacking your cabinet, take the packaging to a refuse collection point. For the most part, it will be recycled.
In accordance with legislation on protecting the environment, your wine cabinet does not contain C.F.C.s or H.C.F.C.s

To save energy:
Install your wine cabinet in a suitable place (see page 7) and observe the temperature ranges provided.
- Keep the door open for as short a time as possible.
- Ersure that the door seal is airtight and that it is not damaged. If it is, contact your ARTEVINO stockist.
N.B.: Respecting the environment:
When replacing your wine cabinet, contact your local municipal refuse department to ensure that you are following the correct recycling procedure.
For refrigerant gases, substances and some parts contained in the wine cabinets, ARTEVINO uses recyclable materials which require a special disposal procedure.
Disable unused appliances by unplugging them and cutting the power load.
2- Description of your wine cabinet

A Control panel
B Lighting (2 white LEDs)
C Plug (do not remove)
D Sliding shelf
E Base of cabinet rack
F Power lead
G Humidity carridge ( single-temperature models)
H Front-vented baso
Grill providing access to the ventilation filter
4 feet, adjustable in height
K Lower hinge (x2)
L Fresh air vent
M Door fitted with handle
N Upper hinge
3- Important facts about wine
Your ARTEVINO cabinet is designed to guarantee optimal storing and/or serving conditions for your wine.
Wine is a complex product which develops very slowly. It therefore requires specific conditions in order to reach its potential.
All wines are stored at the same temperature, only the serving temperatures differ, depending on the wine.
That being said, as in natural cellars belonging to wine producers, it is not so much the absolute value of the storage temperature that is important but its constancy. In other words, regardless of the temperature inside your wine cabinet from 10 to 14°C (for a maturing cabinet), your wine will be stored in ideal conditions, provided that this temperature is not subject to extreme variations.
IF YOU NOTICE A TEMPERATURE OR HUMIDITY FAULT INSIDE YOUR CABINET FOR ANY REASON, REST ASSURED THAT ONLY LONG EXPOSURE TO THESE ABNORMAL CONDITIONS IS HARMFUL TO YOUR WINE.
4- Power supply
The wine cabinet's power lead has a plug to be connected to a standard earthed socket to prevent any risk of electric shock.
For your own safety, the wine cabinet must be correctly earthed. Ensure that the socket is correctly earthed and that your installation is protected by a circuit breaker (30mA)
Any work must be carried out by a qualified electrician.
Not valid for some countries.
Have the power supply socket checked by a qualified electrician who will tell you whether or not it is correctly earthed and will carry out, if necessary, work to make it compliant.
If moving to a foreign country, check that the characteristics of the cabinet correspond to the country (voltage, frequency).
5- Installing your wine cabinet
1. Unpacking
- When unpacking your cabinet, ensure that it does not have any signs of impact or warping or any apparent defects.
- Open the door and check that the inside of your appliance is intact (walls, shelves, hinges...).
- Arrange the power lead so that it does not come into contact with any of the cabinet's components.
Shelf protectors for transporting the cabinet have been attached to each shelf. 2 protectors per shelf (Picture 1). Remove them both using a rotary motion (Picture 2). You can retain these protectors and re-use them if you are going to transport your wine cabinet over a long distance.

II. Installation
Transport your cabinet to its intended location. The place you choose to install your wine cabinet must
- be open and well ventilated (not enclosed in a cupboard, for example),
- be away from any source of heat or direct sunlight,
not be too damp (linen cupboard, laundry room, bathroom...). Ensure that no water splashes onto the entire back section of the appliance.
have a flat, stable floor.
have an accessible standard power supply which does not come into contact with any of the appliance's components (standard outlet that complies with standards in the country, carried with circuit breaker). The use of extension cords or adaptors is forbidden.
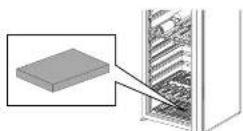
Adjust the cabinet's 4 feet (by screwing or unscrewing) in order to level your cabinet (use of a spirit level recommended). For single-temperature models only, place the humidity cartridge (located in your cabinet's "accessories" bag) at the base of the cabinet under the rack. In the tray provided (see diagram below), When using for the 1st time, fully immerse the cartridge in the water for a few minutes to saturate it then drain thoroughly.
III. Precautions
Do not place your cabinet in an area liable to flooding.
- Never obstruct the front air vent.
To facilitate levelling, your wine cabinet is fitted with 4 adjustable feet.
- Carry out the final levelling of your wine cabinet (use of a spirit level recommended).
N.B.: the LEDs on the control panel must only be replaced by a qualified electrician.
- When moving your cabinet, never tilt it more than 45° , and always on its side (on the opposite side of the flexible lead).

Wait 48 hours before plugging in your appliance.
EN
6
IV. Flush-fitting


Changing the hinges to flush-fit the cabinet
Unswr the thre sows using a T25 Torx wrench.
2 Remove the upper hinge.
3 Carefully remove the caps using a thin blade.
4/5 Assume the rings with a pin using screws so that the door is completely parallel to the cabinet.
617 Assemblie the hige without a pr using the srow.

Precautions: if you remove the cabinet's glass door, never stand it on its edges or it could break.

Precautions: When closing the door, check that the seal adheres firmly to the cabinet to ensure that it is completely tight.
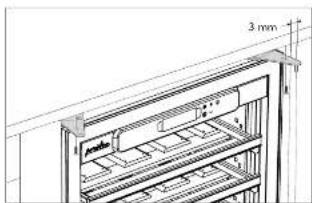
The wine cabinet's 4 feet are adjustable in height so that you can adjust its height henceforth the work top or inside the unit and sign the door with adjacent units.
- Never obstruct the front air vents as this could cause the wine cabinet to operate incorrectly.

If necessary, use the hexagonal raising pieces, which you will find in the "accessorize" tag.
- Tilt the appliance forwards, ensuring that the coor remains closed.
- Unswee the back feet and install the raising pieces using a 17 mm open-and-reach.
- Screw the 2 rear foot back onto the raising pieces.
Repeat this procedure for the 2 front feet, ensuring that you sit the appliance backwards.
The plug must be accessible after your appliance has been installed.

Installing a cabinet at a height inside a unit
For safety reasons, we do not recommend installing the wine cabinets inside a unit.
If you decide to do so, have a unit specially designed or checked by a furniture specialist to ensure that the unit supporting the appliance, as well as the adjacent units, can support the weight of the cabinet filled with full bottles, i.e. 200 kg. Have this specialist guarantee the stability of the cabinet when opening the door and pulling out shelves filled with full bottles.

V. Door reversibility

This allows you to change its direction of opening. Proceed as follows (example for charging a right-hand door to a left-hand door):
Unew the three strws using aT25 Torx wrench.
2 Remove the upper hinge.
3 Carefully remove the caps using a thin blade.
4 Remove the cabinet door by opening it slightly, then lifting it upwards.

5 Unscry the door pin.
6 Carefully remove the cap using a thin blade and replace with the pin. Reposition the cap on the opposite side.

N.B.: the glass door is very heavy. Take all necessary precautions to ensure this you do not injure yourself or drop it.

9 Put in place the upper hinges.
10 Scrow the hinge so that the door is completely parallel to the cabinet. Check that the seal adheres firmly to the cabinet (by closing the door), so ensure it is completely air tight.
Put in place the caps.

6- Loading and layout advice
Each shelf can be used as a storage, sliding or display shelf. The shelves of your cabinet have 8 recesses allowing you to store your bottles in complete safety.

Layout of a shelf in storage version:
To install bottles on a storage shelf, proceed as follows:

Insert 2 guides in the shelf support strips provided. For each shelf position a guide on the right and a guide on the left (see diagram 1). Ensure that you securely clip the guides into their slot (see diagram 2).
2 Place the shelf in the 2 guides (see diagram 3).

Diagram 3
3 Place a locking dowel in each of the 2 holes located as the front of the shelf, on the upper section. These dowels then fix the shelf with respect to the guide and prevent any unwanted movement of the shelf.
4 Start by placing the bottles in each recess of the back row, with the base of the bottle towards the back.
5 Continue with the front row, putting the battles in the opposite direction.
6 Continue stacking the bords, taking care to ensure that none of the healers matches the back wall.
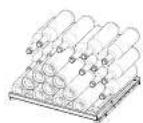
Bottle capacity in this storage layout
30 traditional Bordeaux bottles (HOT)
EN
10
Layout of a shelf in display version
To install bottles on a display shelf, proceed as follows:
Insert the 2 guides in the shelf support strips provided. For each shelf, position a guide on the right and a guide on the left (see diagrams 1 and 2).
2 Place the shelf in the 2 guides (see diagram 3).
Place a locking dowel in each of the 2 holes located at the front of the shell, on the upper section. These dowels then fit the shell with respect to the guide and prevent any unwanted movement of the shell.
4 Start by placing the bottles in each recess of the back row, with the base of the bottle towards the back.
5 Continue stacking the buttons on the back row, taking care to ensure that none of the botties touches the back wall.
To display your bodies, stand them upright at the front of the shelf.
Layout of a shelf in sliding version
To install bottles on a sliding shelf, proceed as follows:
Insert 2 guides in the shelf support strips provided. For each shelf, position a guide on the right and a guide on the left (see diagrams 1 and 2).
2 Place the shelf in the 2 guides (see diagram 3).
3 Place a locking dowel in each of the 2 holes located at the back of the shelf, on the upper section.
These dowels prevent the shelf from being completely pulled out of the cabinet.
4 Start by placing the bottles in each recess of the back row, with the base of the bottle towards the back.
5 Continue with the front row, placing the bottles in the opposite direction.

N.B.: -NEVER PULL OUT MORE THAN ONE SLIDING SHelf AT A TIME. -DO NOT STACK BOTTLES ON SEVERAL LEVELS IN THE SLIDING LAYOUT.
Layout advice for your wine cabinet
Your wine cabinet is designed to safely store a maximum number of bottles. Please heed the following advice in order to optimise loading
Ensure that you distribute your bottles as evenly as possible over the different shelves in your cabinet, in order to distribute the weight in several pieces. Ensure that your bottles do not touch the lock wall of the cabinet.
- Also, ensure that you distribute your bottles evenly over the entire height of the wine cabinet (avoid loading all the bottles at the top or all the bottles at the bottom).

For operational performance, we recommend that you fill your raetion to as less 75% of its capacity.
Bottle capacityin this display layout

25 traditional Bordeaux bottles maximum
Bottle capacity in this sliding layout

8 traditional Bonnetoux bottles maximum
7- Commissioning and temperature setting
- Plugging in and commissioning
After waiting 48 hours, plug in your wine cabinet.
To switch it on, press and hold down the 1 button for 5 seconds.
Have your socket checked (presence of correct-sized fuses and 30mA circuit breaker). Do not plug several cubite into an adaptor.
Check your type of wire cabinet.
eand keys


means single-temperature
means multi-temperature

II-a. Description (single-temperature model)

The tactile keys are very sensitive. There is no need to apply force, a light touch is sufficient to register the command. Remember to remove your finger from the panel between each press.
A Lighting mode
B. Temperature, time
Sensr fault alarm
D. Temperature alarm
E Access to settings and confirmation key
F Selection and setting keys
G Lighting mode access and confirmation key
H Standby key
Humidity level alarm
Hot circuit operating indicator
K Coldcircuit operating indicator
Temperature display
III-a. Temperature setting
Press and


1 Press and hold down the key for approximately 5 seconds. The display will start to freeze.

2.


keys to set the desired temperature.
- pros


The value shown on the display is the actual temperature inside the cabinet. It is therefore necessary to wait for the temperature to reach the maximum value.
- The default setting is 12°C / 54°F (ideal maturing temperature). However, the temperature can be set from -95°C / 148°F - 59°F .

N.B.: to operate correctly, your cabinet must be placed in a room with a temperature of 0 - 30°C / 35 - 86°F
II-b. Description (multi-temperature model)


The tactile keys are very sensitive. There is no need to apply force, a light touch is sufficient to register the command. The touch is also sensitive to the finger from the pencil between each press.
A Lighting mode
B Temperature zone concerned
Sensor fault alarm
D Temperature alarm
E Access to settings and confirmation key
F Selection and setting keys
G Lighting mode access and confirmation key
H Standby key
Highest temperature in the cabinet display
Hot circuit operating indicator
K Cold circuit operating indicator
Lowest temperature in the cabinet display
III-b. Temperature setting
Recommended setting range for the lowest temperature: 7 - 9°C / 45 - 48°F Recommended setting range for the highest temperature: 17 - 20°C / 63 - 61°F

4 Prox the or keys to set the temperature of the upper part of the cables.


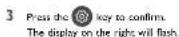
5 Press the key to confirm.
For the lowest temperature, the default setting is 0°C / 46°E
However, the temperature can be set from 6 - 10°C/7.43°F
For the highest temperature, the default setting is 18°C / 64°F

However, the temperature can be set from 15 - 20°C / 59 - 60°E . N.B.:
To operate correctly, your cabinet must be placed in a room with a temperature of 12 - 30°C / 54 - 86°E
- A difference of at least 10°C 50°F is recommended between the setting values of the low and high temperatures.

This temperature shown on the display is the actual temperature inside the cabinet. It is therefore necessary to wait for your new setting to take effect.
IV. Humidity display (single-temperature model)
Your wine cabinet has a function to measure humidity, allowing you to see the relative humidity level inside the appliance. The ideal humidity level is above 50% , ideally 60 - 75% .
If you want to increase the relative humidity level in your cabinet, pour the equivalent of one glass of water onto the humidity cartridge positioned on the rack at the base of the cabinet, having first removed the bottles.
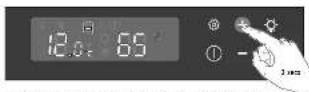
To display the humidity level inside your cabinet, press and hold down the button for 2 seconds

V. Lighting mode

Press the key
The indicator light of the active mode will flash.
You have 2 setting options for lighting:
1
Lighting disabled

2 Press the or keys to select the desired mode.
3 Press the key to confirm.
Precautions to observe bright light, never look directly into the lens.
8-Everyday maintenance of your wine cabinet

Your ArteVino wine cabinet is a tried and tested appliance
Maintenance procedures to carry out every 3 months
Clean the ventilation filter.
Remove the 2 screws from the gill using a n² Allen wrench
- Allow it to do other unnecessary work.
Maintenance procedures to carry out once a year
- Unplug and unlock the appliance.
- Remove any partitions that could block the drainage pipe located inside the cabinet, so the harrow.
Clean inside the compartments with water and a gentle cleaning product. - Runethoroughly Dry with a soft cloth.
- Check the condition of the door seal. Cleaning the seal often proves necessary. Cleaning with unsoluble products will cause premature ageing of the seals. You should therefore follow these rules: Whenever cleaning the seal, finish by rinsing the seal with clean water; There must be no cleaning product remaining on the seal. Arrevino recommends that you use only a mild soapys solution. If cleaning with this type of solution produces a less compact seal, use it in one bath, so Eruvano based solution, but with a concentration of less than 10% , and ensure that you rinse the seal with clean water.


Regular monitoring your menu cabinet and reporting any finds to your retailer will assure that your appliance provides you with the best available service.
EN
14
9-Operating faults
| Possible incidents Causes Corrective action | |
| The pictogram is displayed The temperature has not returned to the permitted ±4 °C in relation to the temperature setting | Check that the door is closed. Check the condition of the door seal. If you loaded your cabinet with a large number of bottles in the last few hours, wait a while then check again. If the alarm continues, contact your ArteVino stockist. |
| The pictogram is still displayed despite having taken the above corrective action | Operating fault Unplug the cabinet and contact your ArteVino retailer. |
| The pictogram is flashing The relative humidity level has been < 50% for over 72 hrs | Add a glass of water to the humidity cartridge (see chapter 6, § 19). In order to know how often to add water, count the number of days separating the 1st day you added water and the day the pictogram was displayed. After a few hours the pictogram will disappear. |
| The appliance cannot lower the humidity level to the desired value | Empty the cabinet, remove the humidity cartridge and clean the tray. Remove the pipe placed at the back of the tray. The humidity will be directly discharged out of the appliance. If the problem persists despite having carried out these different procedures, call your ArteVino stockist. |
| The pictogram is displayed Temperature sensor fault alarm | Unplug the cabinet and contact your ArteVino retailer. |
| I cannot switch on the cabinet | Check that the wall socket is supplied with power by plugging in another electrical appliance. Check that the power lead is correctly connected on the cabinet side. |
| The compressor is not working! Unplug the cabinet and contact your ArteVino retailer. | |

If your appliace does not soon to be operating correctly, contact your Arteine stockl.
When starting up
ANY WORK CARRIED OUT BY TECHNICAL SERVICES NOT APPROVED BY ARTEVINO SHALL BE INAPPROVED THE WARRANTY.
USING A GLASS DOOR CAN AFFECT THE PERFORMANCE OF YOUR WINE CABINET IS CERTAINLY EXTREME TEMPERATURE CONDITIONS (>30°C)
10-Technical features and energy data
| Cory | |||||||
| Height mm | Width mm | Depth mm | light in kg | Recommended temperature range | Min T° C /°F Max T° C /°F | ||
| empty cabinet | full cabinet | ||||||
| Single-temperature | |||||||
| COSYPT | 816-832 | 594 | 549 | 45 | 52 | 0/32 | 30/86 |
| Multi-temperature | |||||||
| COSYMT | 816-832 | 594 | 549 | 45 | 52 | 12/54 | 30/86 |
Sorting precision: +1°C, Display precision: +1°C.
Data relating to European and American regulations on energy consumption
| Reference | Model | Type of door | Useful volume in lines | European Union1330V 30 Hz - R600a gas | United States115V 60 Hz - R600a gas | Sound emission dB(A) | |
| Annual energy consumption kWh/year | Energy efficiency class | Annual energy consumption kWh/year | |||||
| COSYPT | single-temperature | Glass door | 116 | 132 | A | 172 | 41 |
| COSYPTM | Multi-temperature | Glass door | 116 | 132 | A | 172 | 41 |
In compliance with Deregatian Regulation EU) n 1060/2010 of the Commission daut 28 September 2010 completing dirissio 201030/ EU of the European Parliament and the Council.
Energy consumption calculations based on results obtained over 24 hrs in standard test conditions (25°C / 77°F) -
Actual energy consumption depends on the operating conditions and incurs of the appliance.
Comply with DEPARTMENT OF ENERGY 10 CFR Part 430 Energy Conservation Program: Energy Conservation Standards for Miscellaneous Refrigeration Products.
STANDARDS
Your product complies with the following standards:
Safety directive 2006/95EC
Standards EN60335.1:2012 A11:1410 EN60335.2-24:2010
2 EMC 2004/108/EC
Standard BN5014-1/4-2 Standard 62233.0002
3 ENVIRONMENT
Directive: 2010/038/EU Regulation 1067/2010

R600a
In some countries, ArteVino wine cibines contain a flammable refrigerant gas (R600: ISO BUTANE)
Willkommen!
The Anteige heating 2019

- Driven Sin and the Tota
1
Net gekig in bepaide laiden
maximal 2.5 traditional Bordeaux/lessens
Capacitive Filter in skin: schulconfixture

maximal Brodinger-bondeauissens
A. last year, however
stroctotetraite en aargleckelchelar m30M .Sueit meer dan quin wipkup en qurelthetproctant com.
1Voldoet an DEPARTMENT OF ENERGY - 10 CFR Part 430-Energy Conservation Program: Energy Conservation Standards for Miscellaneous Refrigeration Products.
NORMEN
- NORMES
- R600A
- IMPORTANT INFORMATION
- WARNING
- TABLE OF CONTENTS
- I- PROTECTING THE ENVIRONMENT
- DESCRIPTION OF YOUR WINE CABINET
- IMPORTANT FACTS ABOUT WINE
- POWER SUPPLY
- INSTALLING YOUR WINE CABINET
- UNPACKING
- INSTALLATION
- PRECAUTIONS
- FLUSH-FITTING
- CHANGING THE HINGES TO FLUSH-FIT THE CABINET
- INSTALLING A CABINET AT A HEIGHT INSIDE A UNIT
- DOOR REVERSIBILITY
- LOADING AND LAYOUT ADVICE
- COMMISSIONING AND TEMPERATURE SETTING
- II-B. DESCRIPTION (MULTI-TEMPERATURE MODEL)
- III-B. TEMPERATURE SETTING
- HUMIDITY DISPLAY (SINGLE-TEMPERATURE MODEL)
- LIGHTING MODE
- 8-EVERYDAY MAINTENANCE OF YOUR WINE CABINET
- WHEN STARTING UP
- STANDARDS
- WILLKOMMEN
- NORMEN
Brand : ARTEVINO
Model : COSYP1T
Category : Wine cellar