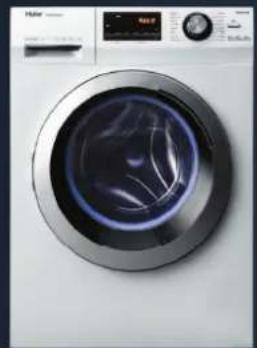
IPro Series 5 HWD80B14959U1 - Washing machine HAIER - Free user manual and instructions
Find the device manual for free IPro Series 5 HWD80B14959U1 HAIER in PDF.
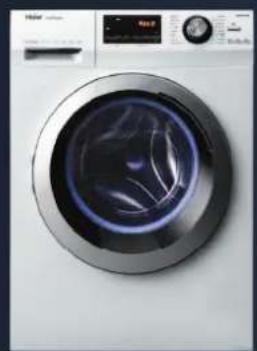
| Product Type | Front-loading washing machine |
| Brand | Haier |
| Model | IPro Series 5 HWD80B14959U1 |
| Washing capacity | 8 kg |
| Maximum spin speed | 1400 rpm |
| Dimensions (H × W × D) | 85 × 60 × 60 cm |
| Net weight | 70 kg |
| Power supply | 220-240 V ~ 50 Hz |
| Power consumption | 2000 W |
| Energy class | A+++ |
| Main functions | Wash, rinse, spin; programs: cotton, synthetics, delicates, wool, quick 15 min; options: prewash, extra rinse, delayed start, rinse hold |
| Care and cleaning | Regular cleaning of the drain filter, pump, detergent drawer and door seal |
| Safety | Child lock, door locked during cycle, anti-overflow system |
| Spare parts and repairability | Available parts: door seal, door lock, hinge, detergent drawer. Repairability facilitated by replacement guides. |
| Color | White |
Frequently Asked Questions - IPro Series 5 HWD80B14959U1 HAIER
User questions about IPro Series 5 HWD80B14959U1 HAIER
0 question about this device. Answer the ones you know or ask your own.
Ask a new question about this device
Download the instructions for your Washing machine in PDF format for free! Find your manual IPro Series 5 HWD80B14959U1 - HAIER and take your electronic device back in hand. On this page are published all the documents necessary for the use of your device. IPro Series 5 HWD80B14959U1 by HAIER.
USER MANUAL IPro Series 5 HWD80B14959U1 HAIER
ENGLISHEN | REPAIR INSTRUCTIONS
SERBIAN SR | UPUTSTVO ZA POPRAVAK
TURKISH TR | ONARIM TALIMATLARI
Haier

Люк-Враза
HCTPYKUN
JIIOK-BPATA|TIN1 HNCTPYMEHTN-RAEYENKJIIOU C BbPTAUMOMEHT25
1 OTBopete IIOK-BpataTa

KIOH C BPTU MOMENT 25, cBane To HTOBete, KOITO KpEIT NaHTa T KaM KOPNYCA
3 InterneIIOka-BpataOT rohpata ctpaHa nrocbate
JIOK-BPATA|TIN2 INHCTPYMEHTI-RAEUYKIOUcCBBPTAUMOMEHT25,FBKBABTPBBEHKIOUcCBBPTAUMOMEHT7
1 OTBopete IIOK-Bpata

2 CbaIeTe KanaKa, cIeI, KaTo CBAInTe BHTa My
3 CbaIe BnHTOBeOT nactmacobata naHTA
4 N3terlneIIOKA-BpataOT rohpata cTpaHa nro CbaTe

NAHTA|TIN1 INHCTPymEHTN-RAEUYKIOUcBbPTaM MOMEHT25
1
OTBopeteIIOK-BpataTa
4
CbaIeBCMHKNBHTOBEOTIOK-BpTaTAt
2
C NOMOHTA H Tp6eH KIOH C BbptTMMoHr25CBaTe BnHTOBete, KOITKpeRr NaHTATA KbM KopIyCa
5
OTdenepe pamkata OTHOceuata pamka
3
NTERNEIHOKA-BpATAOTROPHATACTPAA HIOCBANTE
6
CmeheTe naHTata, KATO BHUMABATE da He 3aYbITE BTyJNITE
NAHTA|TIN2 INCHTPMENTN-TAEUEH KJIIOU C BbPTRAI MOMEHT 25,FBBKAB TpBbEH KJIIOU C BbPTRAI MOMEHT7
1
OTBopeTe IIOK-BpTaTa

4
I3TcnerTe Ioka-Bpata OT rohpata CtpaHa nro CbaIeTe
7
KORAto pemkBt c BaneH,OTdeneMaHweta OT yNbTHHeHMeTO,3a DaDOCTnHete DO bTpeHoHCTTA Hypeda
2
CbaIe KaIaKa, cIeI KaTO CbJIte BnHTa My
5
CbaIe uΦTa
8
CbaIeTe BbHWHTE BnHTOBe OT NaHTata
3
CbaIe BnHTOBTe OT nlaCTMaCoBaTa naHTA
6
CbaIe Cko6aHa BpaTata
9
Cbaletene BHTOBETe BBB BBTpeUHOCTTa Ha KOpNyCa C TpBBeH KIOH C BbPTAA MmOENT 7. Cbaletene NaHrata

3AKIIOUaJIKA HABPATATA|TIN1 INHCTPymeHTN-OTBEPTKACKPBCTATAJIABA,KIEUIN,OTBEPTKACIIIOCKAJIABA
1
OTBOPETIIOK-BpataTAt
4
KATO 3N0N3BATE RAeHEN KIOH, CBAJTe SAKPENBaUHTE BNTHOTE OIIOHa KaTaHa BPATAH NATCHETe KNEMA.
2
HnnoI3aTe nOCKATAOTBepTKa 3a NOBUNrAHe HCBAAHHe HA BbHNAHTa CkO6a
5
CbaIeTe KIOUaIKaTa Ha BpaTaTa
3
KORAtoCKoBataeCAaIeHa,OTdIeNETe MAHwetaOYnIbTHHeHcTeO,3aDCTHHeTe OdoBtpeWHOCTHa YpcaDe
6
OTDeIe C6bata, B cyuH a HoKHeKTOPT TIN "faston", BHIMaBaiTe Ha pa3MeHHTe npabnHATA cTpaHa HcKobata
3AKIIOyAJIKA HABPATA|TIN2 INHCTPYMEHTN-OTBEPTKACKKpbCTATAJIABA,KJIELUN,OTBEPTKACTIJOCKAJIABA
1
OTBopete IIOK-BpataTAt
4
Kato 3n0n3BATE raeueH KIOH, CBAETe 3aKpTaBaUHTBE BHTOBE O T KOHAnKaTHa BApTaTAt
7
CbaIeKIOHcKATAHaBpTaT
2
H3no13BaIte IIOCKaT OTBepTKa 3a IOBIMrHaHe N CBAIAHRe HA BbHnHaTa CKo6a
5
Pa3rno6epepa0THaTnIOCKOCTn 06IINIOBNTE
8
CbaIe BoDnna3nte
3
KORA TO CKOBATA C BAEHHe,OTDEJETe MAHWEOTA YNBJTHEHMETO,3A DA CTNHETEO BoBTPHEWCHCTTA Hyape
6
Pa3rno6eTe Do3aTopa n rHe3doto
9
CmeHeTe KIOUaIkaT aHa BpaTaT a, KATO BHIMABATE 3a MEXAHHCHO T CbPbBAHC Ha ABAPINHO TO TOpBpAHC n EeKToPcNECKNTe B0B3Kn

YINbTHNTEN HA BPATATA
HCTPYMEHTN - TAEYEN KIIOU, KJIeUN, OTBEPTKA C NIOCKA IJLABA, DBA TPbBHN KIIIOUCA BbPTT MOMEHT 7
1
OTBopeTe IIOK-BpTaTAtA
2
ИЗнлбайтп lockаТОВЕРТКА NOВДИНАн И CBАЛЯНЕ на ВьншОНТСКБА

3
Korato ckoBata e cbaNeHa, OTDeHeTe MaHueta OT yIbTHHeHTo, 3a Da CTnHrte Do BbTpewHOCTTa Ha ypeDa
4
Kato H3noBate NIOCKA OTBePTKa, CBaIe TcKObTa BbOxy MAHUeta
CbaIe yIyIbTHHeHMeTe
6
IOCTABETHOBOTO
yINTBHeHNE,KATO
BHIMABAte3aPabINHOTO
IIOJIOJEHNeHA
BdIb6HaHTNHTE

7

HanbxaTe cko6aTa Bbpx MaHweta
8
CteHTe yIbTHHeHaTa CkoBa Bbpy MaHHeTa C nOMoTa Ha HcHTpyMeHTnte

Hamectete ynlbtheHHeTo bpxy Kopnyca. Nocbatete BbHnHata ckOa n 3aterHete (ako e HeooXoDIMO, C NOMOuTa H Na KIeun)
9
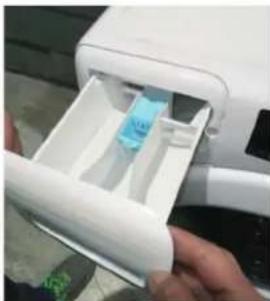
YEKMEDJE 3A IEPNIJEH IPNAPAT

1
OTBopete YekMeJKeTo 3a nepnien npenapat
2
C nomoueta HaDbete pue IHO3dbpnaTe CnHIO
3
OTKaYeTe MaKkTa OT YekMeJKeTc 3a nepnIeH npenapat, KaTO BHMaBaTe Da He CuyNITe KYKITE

DVERE | TYP 1 NASTROJE -KLIC TORX 25

1 Otevierte dvefe
Apaepote to kaumu afo npot a apapeet n biia tou
5 Apaepoe tov neipo
8 Apaipae Tc, eWepukec, Bdec ano tv meVTEe
3 Apaepote tic biEcg tou naootko uevteoe
Anouuapmoayote tov slavouea kai to
9
Avikataaotne thv aodaleia noptac,
pooedoyoctn t npoxovkn ouvean tou
avoiuyoactekaktnc ovaykn kau wu
naekptkwnuvoeuw

NAPEMBYMA NOPTA EPTAAEIA-MHXANIKOKAEIITORX,AAIBA,ENINEKO KATABI,AYOMHXANIAKAEIA ΣΩAHNONAPI.7


ΣYPTAPI ANOPPYIANTIKOY
1
Avoite to ouptapitou anoppunavko

2
Xpnoiouwvtac duo Xepia,tpaBnTe to uE duvam

3
Anaykiotpwote tn
maoka ano to auptapu
anoppunavtku
npoeoxvtac va un
onatae ta aykotpa
Haier
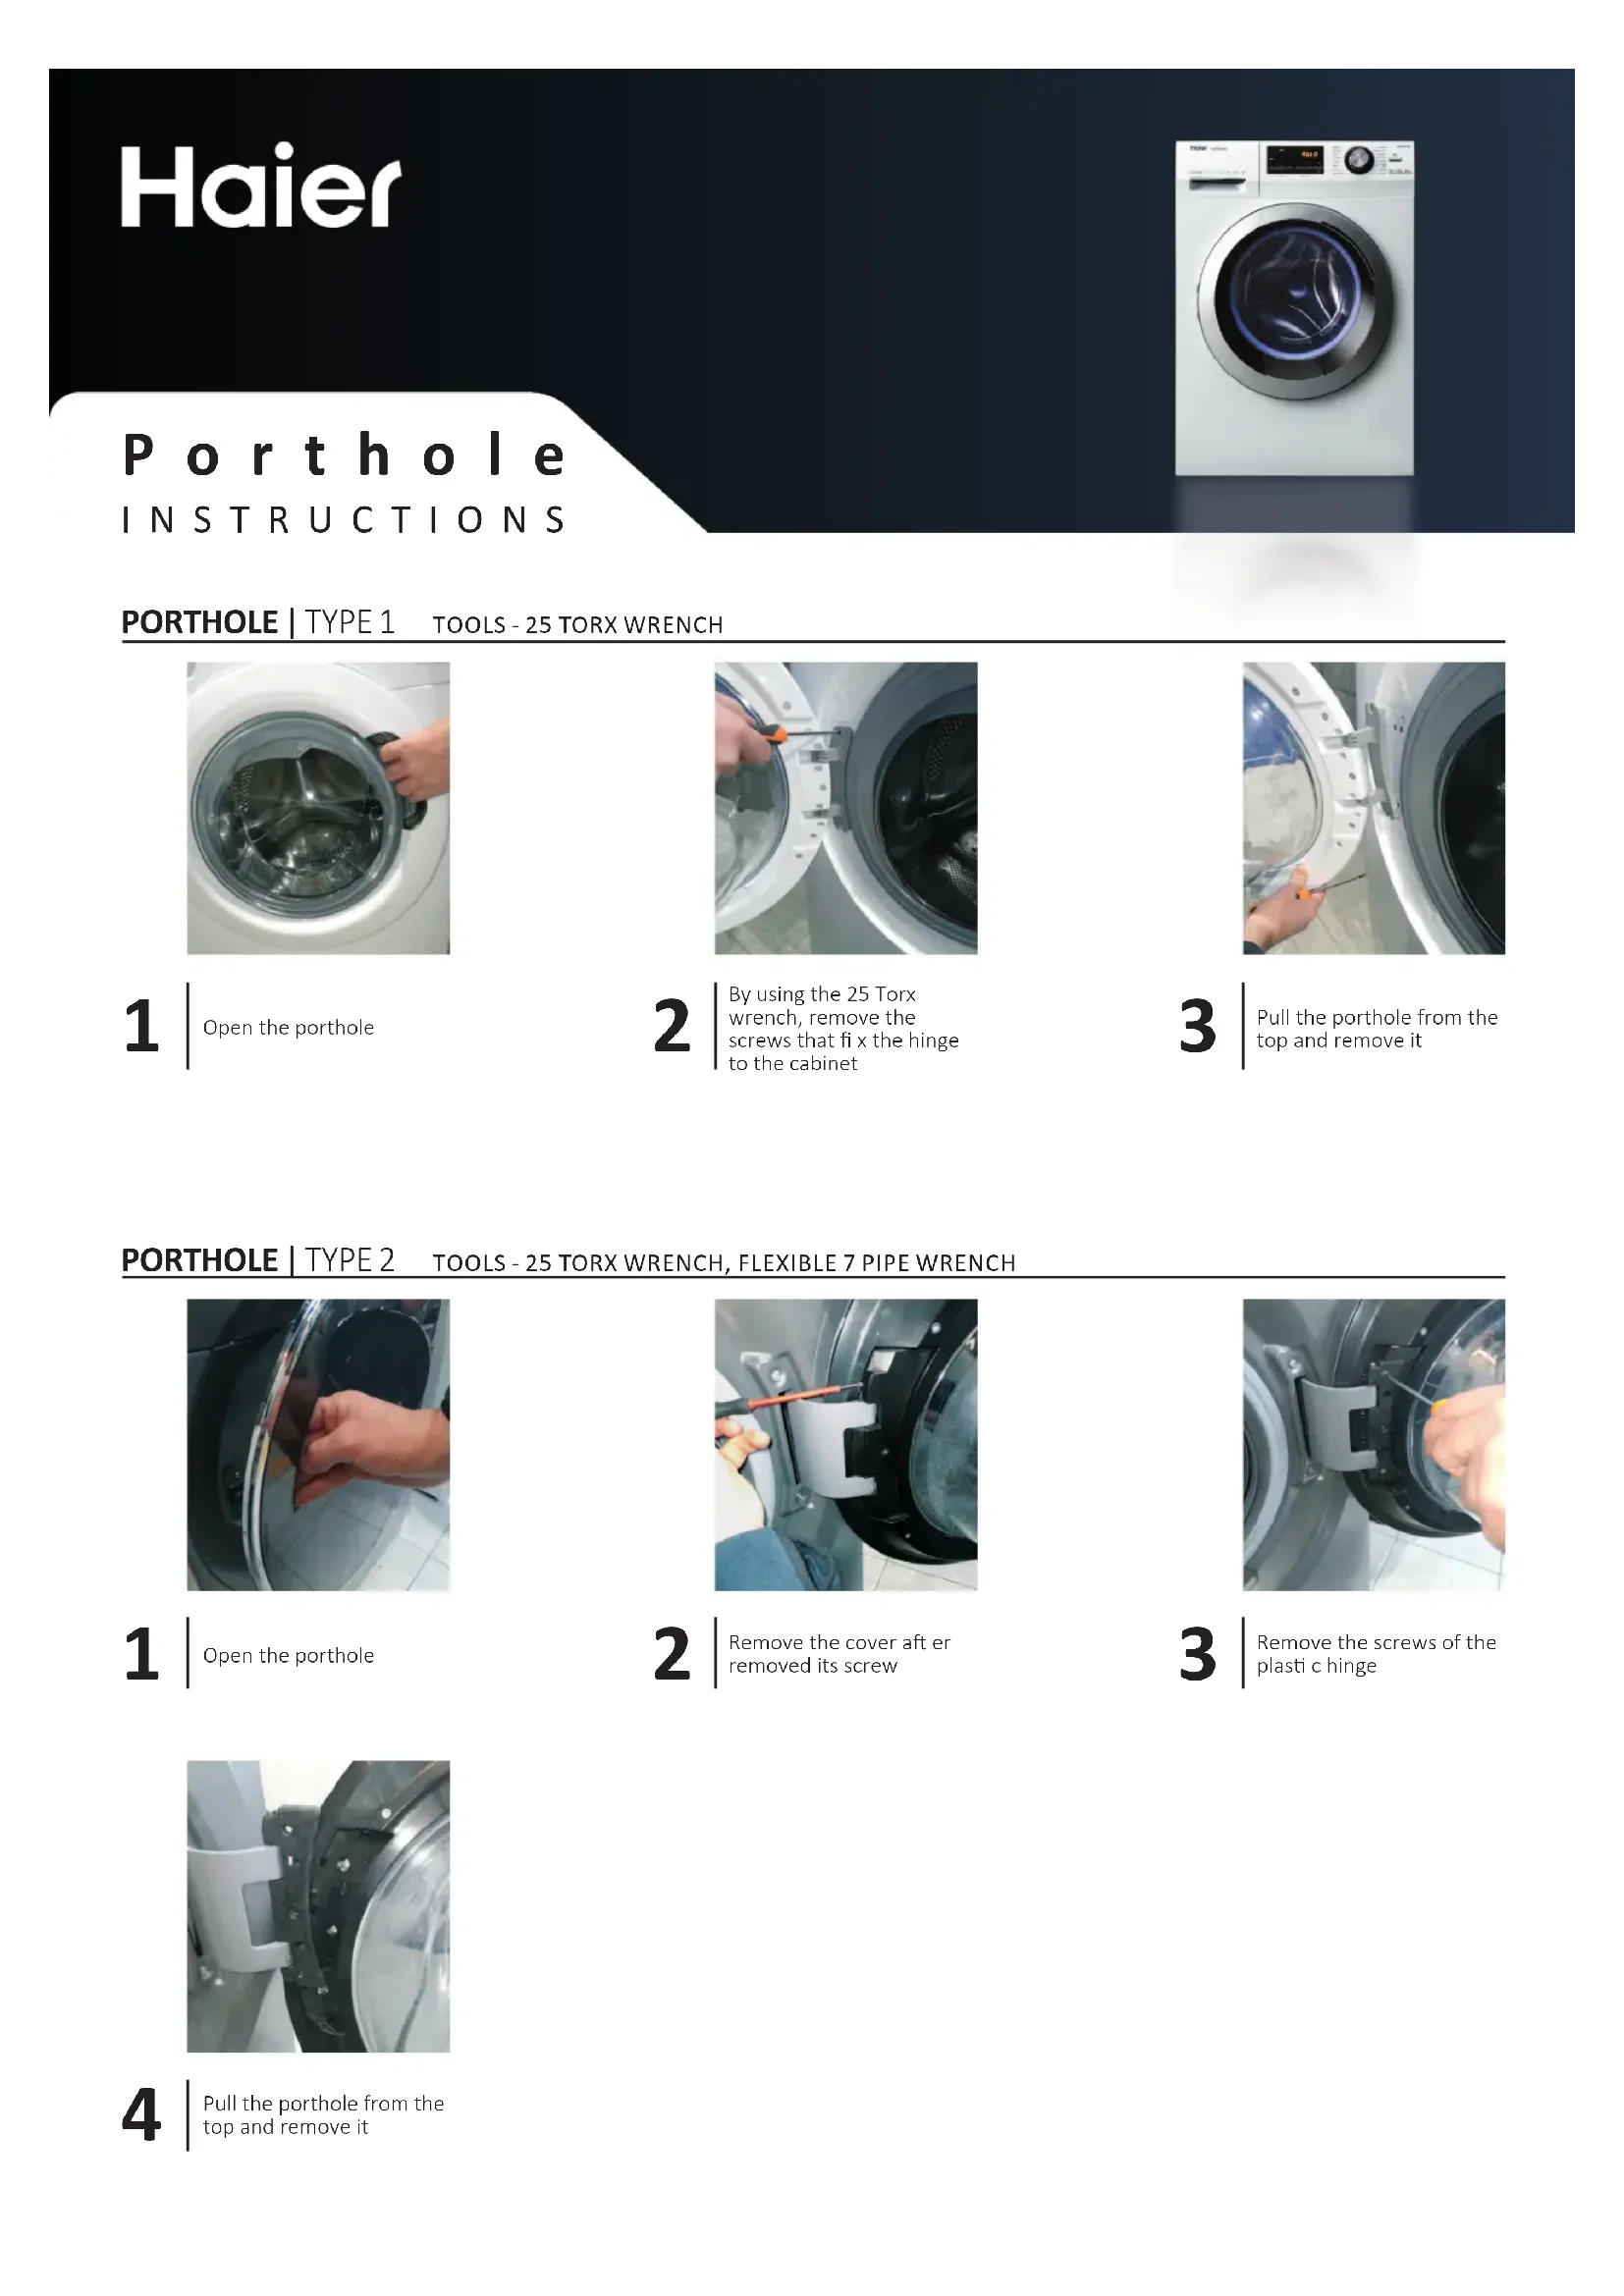
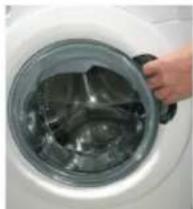
Porthole
INSTRUCTIONS
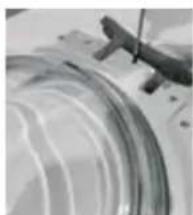
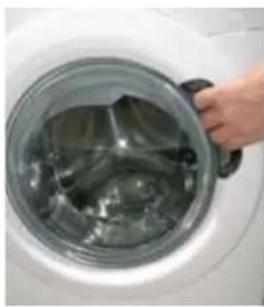
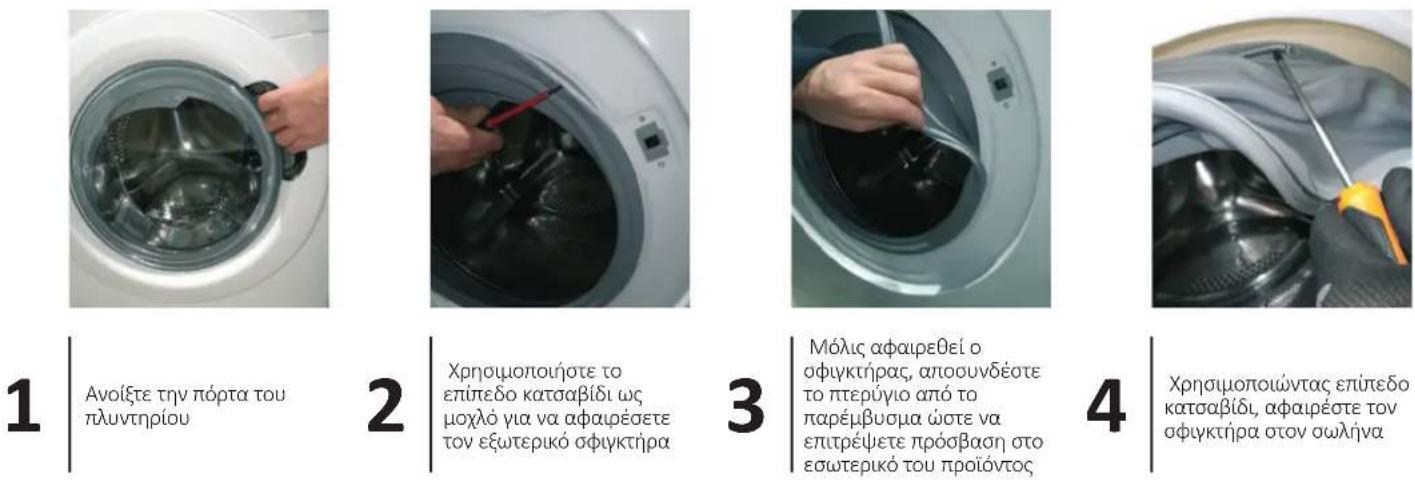
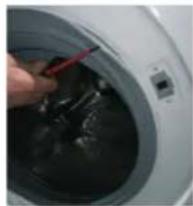
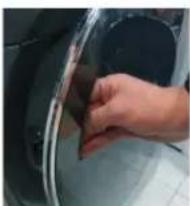
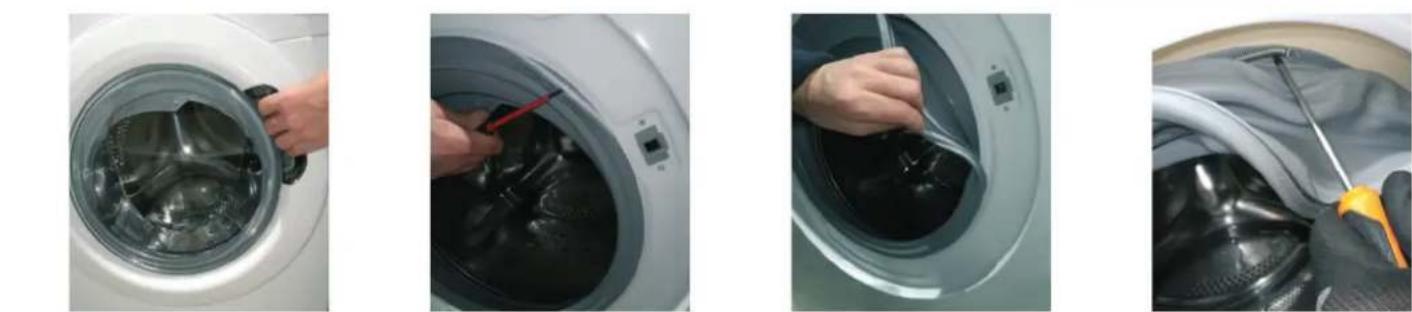
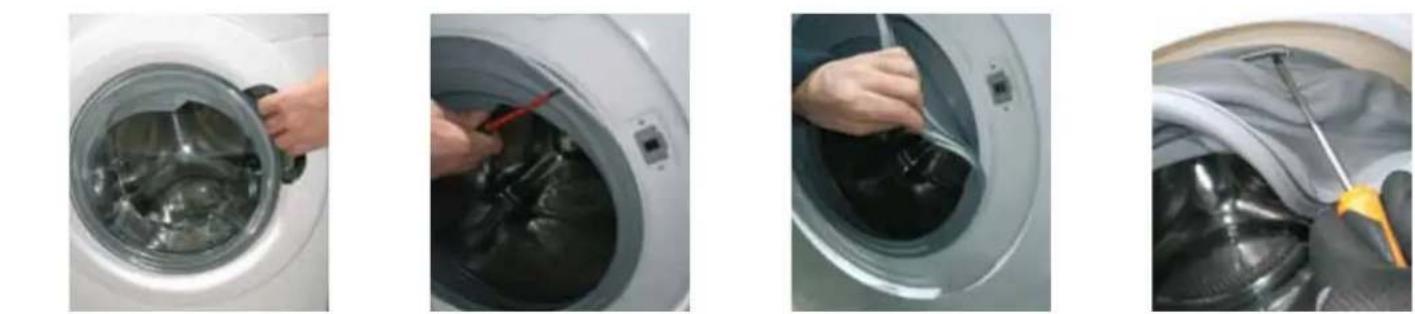
PORTHOLE | TYPE 1 TOOLS-25 TORX WRENCH
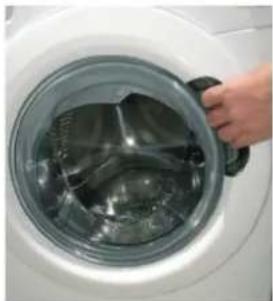
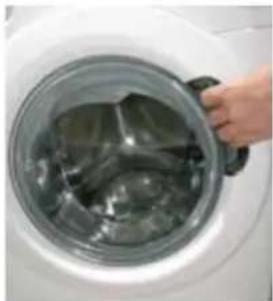
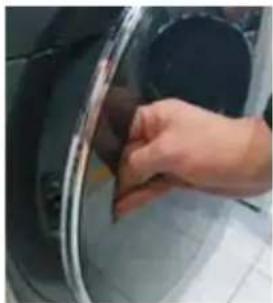
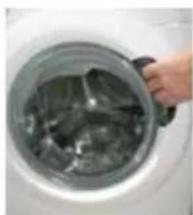
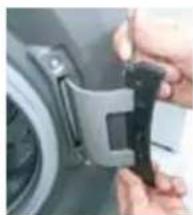
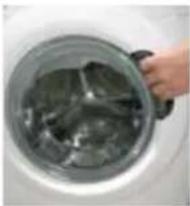
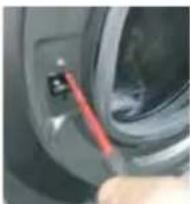
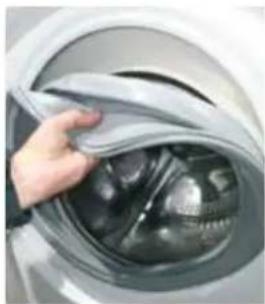
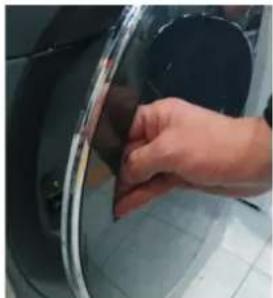
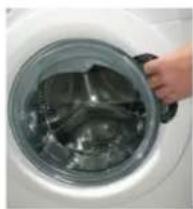
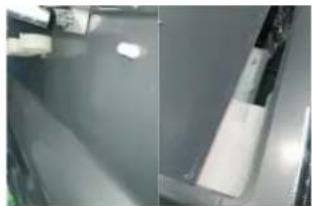
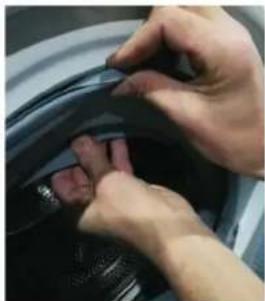
1 Open the porthole
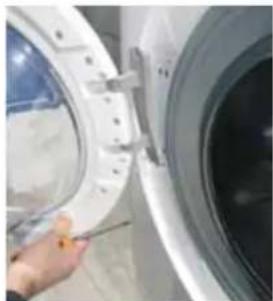
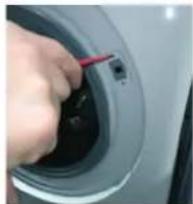
2 By using the 25 Torx wrench, remove the screws that fix the hinge to the cabinet
3 Pull the porthole from the top and remove it
PORTHOLE | TYPE 2 TOOLS - 25 TORX WRENCH, FLEXIBLE 7 PIPE WRENCH
1 Open the porthole
2 Remove the cover aft er removed its screw
3 Remove the screws of the plastic hinge
4 Pull the porthole from the top and remove it

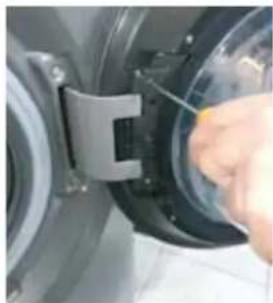
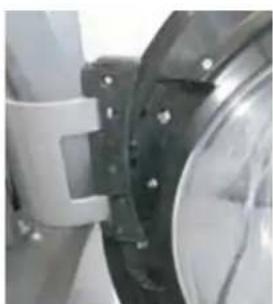
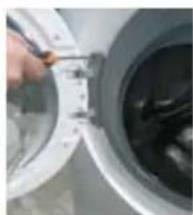
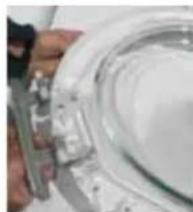
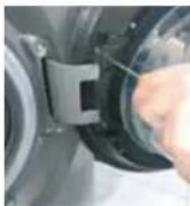
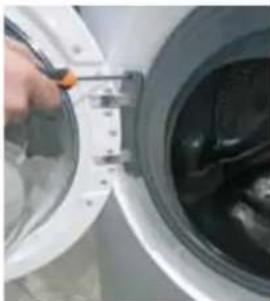
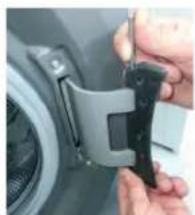
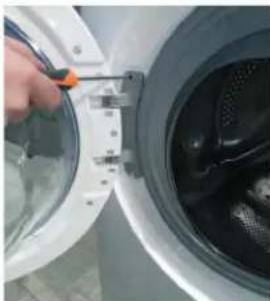
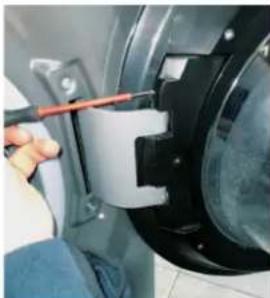
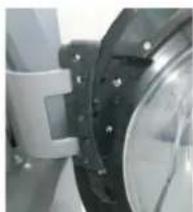
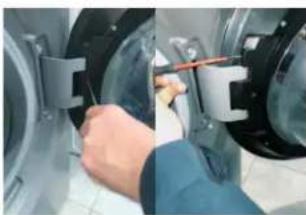
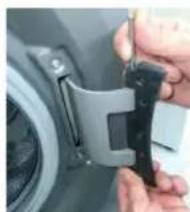
HINGE TYPE 1 TOOLS-25 TORX WRENCH
1 Open the porthole
4 Remove all the screws of the porthole
2 By using the 25 pipe wrench, remove the screws that fix the hinge to the cabinet
5 Separate the frame from the counter frame
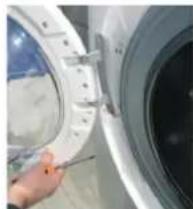
3 Pull the porthole from the top and remove it
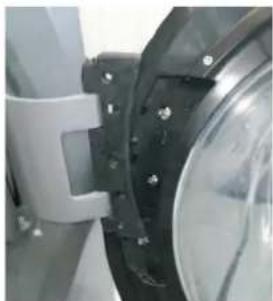
6 Replace the hinge, taking care not to lose the bushes
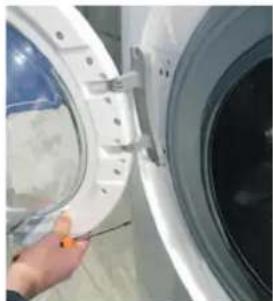
HINGE | TYPE 2 TOOLS - 25 TORX WRENCH, FLEXIBLE 7 PIPE WRENCH
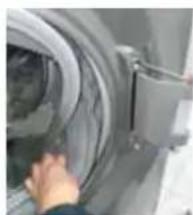
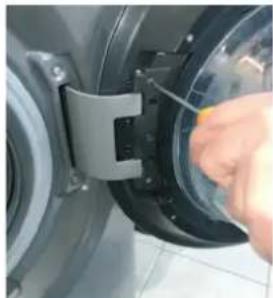
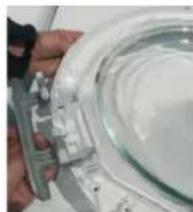
1 Open the porthole
4 Pull the porthole from the top and remove it
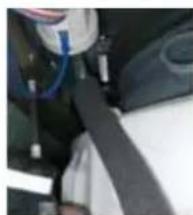
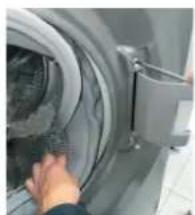
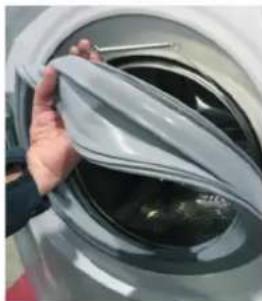
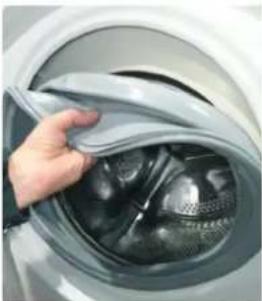
Once the strap is removed, detach the flap from the gasket, to allow access to the inside of the product
2 Remove the cover aft er removed its screw
5 Remove the pin
8 Remove the external screws from the hinge

3 Remove the screws of the plastic hinge
6 Remove the door clip
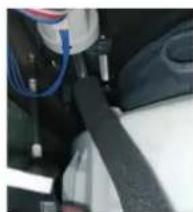
9 Remove the screws inside the cabinet with the 7 pipe wrench. Remove the hinge

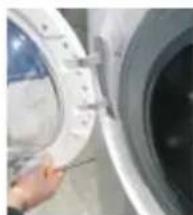
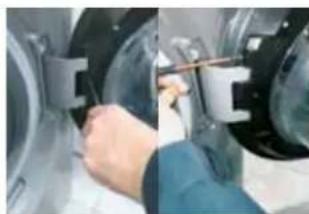
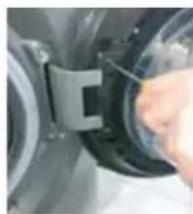
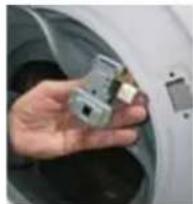
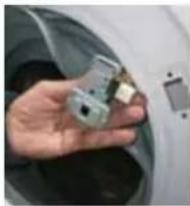
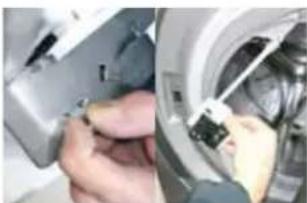
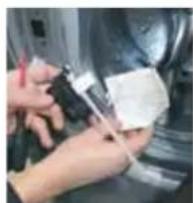
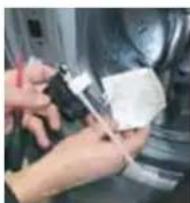
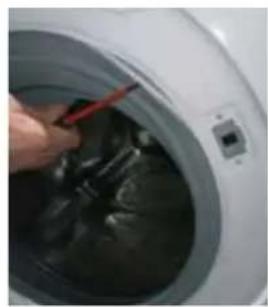
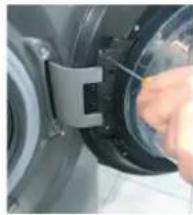
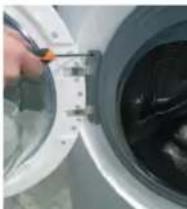
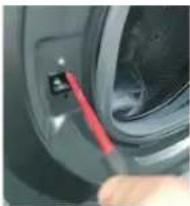
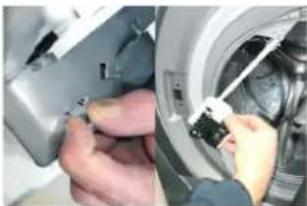
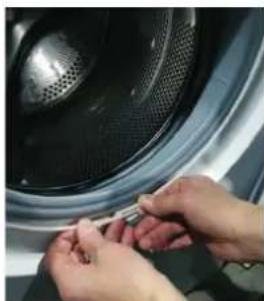
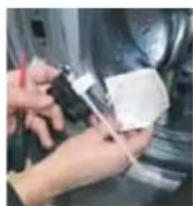
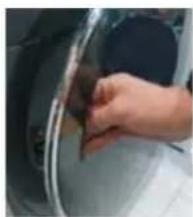
DOOR LOCK | TYPE 1 TOOLS-CROSS-HEADED SCREWDRIVER, TONG, FLAT SCREWDRIVER
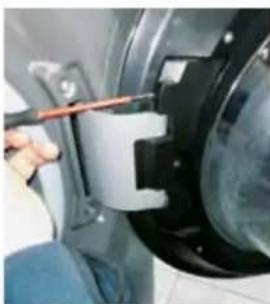
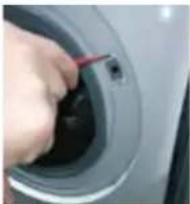
1 Open the porthole
4 By using Torx wrench, remove the fixing screws of the door lock, and press its buckle.
Use the fl at screwdriver for leverage, and remove the external clamp
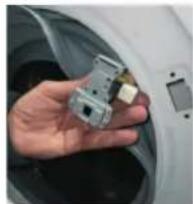
5 Remove the door lock
Once the clamp is removed, detach the flap from the gasket, to allow access to the inside of the product
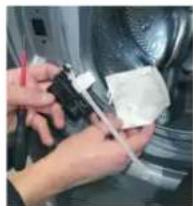
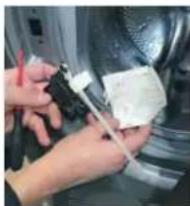
6 Disconnect the wiring, in case of "faston", pay att enti on to do not invert the wiring
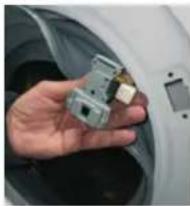
DOOR LOCK | TYPE 2 TOOLS-CROSS-HEADED SCREWDRIVER, TONG, FLAT SCREWDRIVER
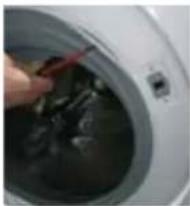
1 Open the porthole
4 By using Torx wrench, remove the fixing screws of the door lock
7 Remove the door lock.
Use the flat screwdriver for leverage, and remove the external clamp
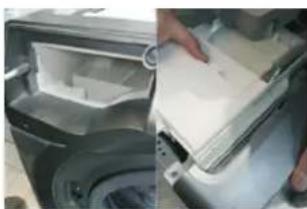
5 Disassemble the work top and trims
8 Remove the water protection

Once the clamp is removed, detach the flap from the gasket, to allow access to the inside of the product
Disassemble the dispenser and bezel
9 Replace the door lock by paying att enti on to mechanical linkage of emergency opening and electrical connecti ons

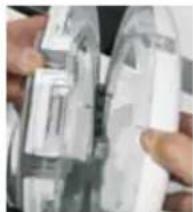
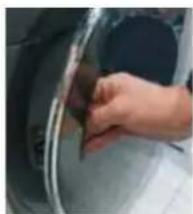
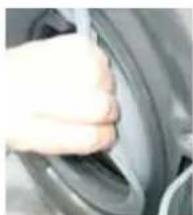
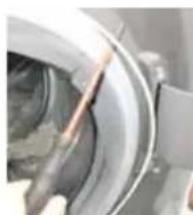
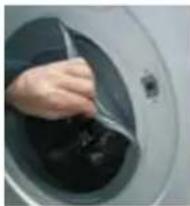
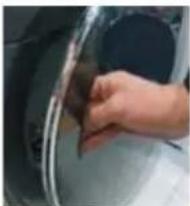
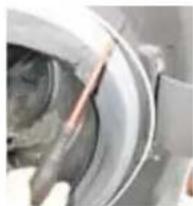
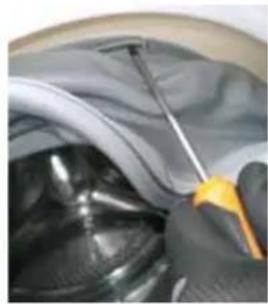
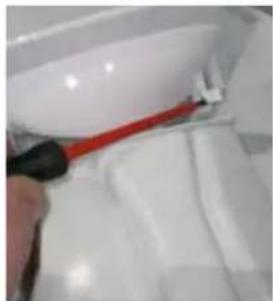
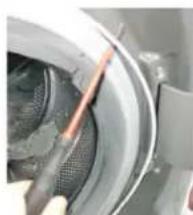
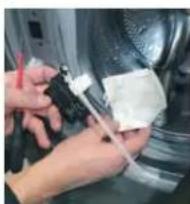
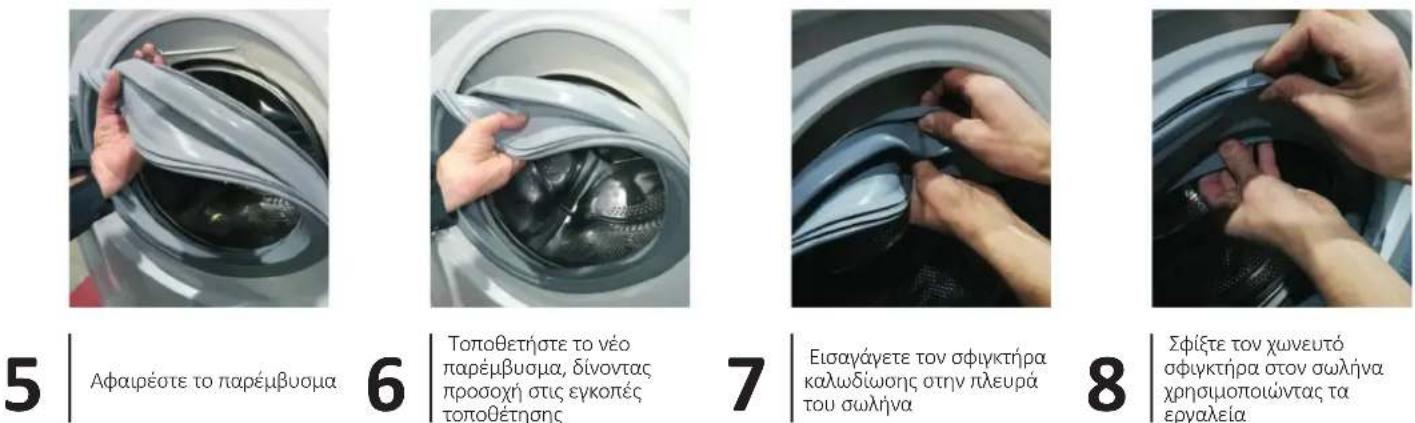
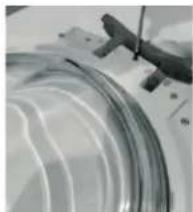
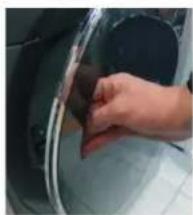
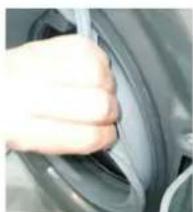
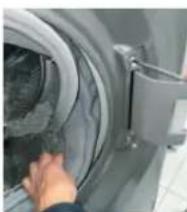
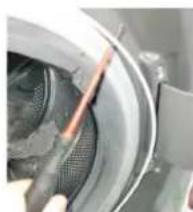
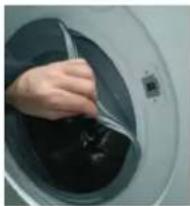
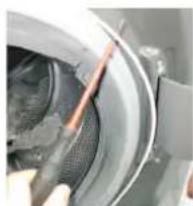
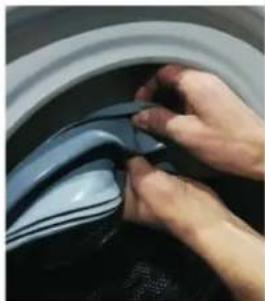
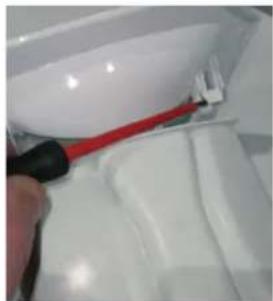
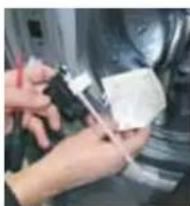
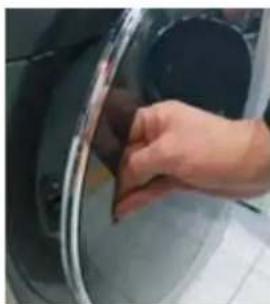
DOOR'S GASKET TOOLS - TORX WRENCH, TONG, FLAT SCREWDRIVER, TWO 7 PIPE WRENCHES
1
Open the porthole
2
Use the fl at screwdriver for leverage, and remove the external clamp
3
Once the clamp is removed, detach the flap from the gasket, to allow access to the inside of the product
4
By using fl at screwdriver, remove the clamp on the tube
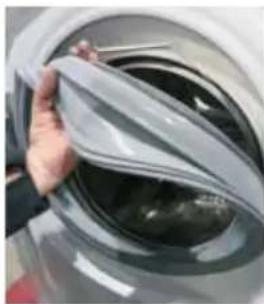
5
Remove the gasket
6
Place the new gasket, paying att enti on to the positi oning notches
7
Insert wiring clamp on the tube side
- Tighten the clamp fl ush on the tube by using the tooling
9
Fit the gasket on the cabinet. Fix the external clamp and ti ghten it (if needed with tong)
Haier
Detergent drawer
INSTRUCTIONS
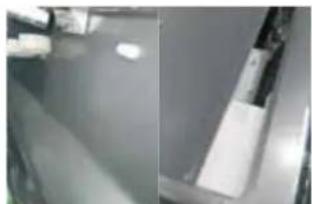
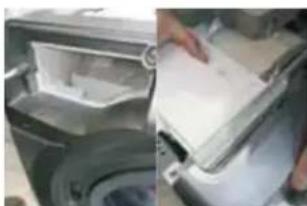
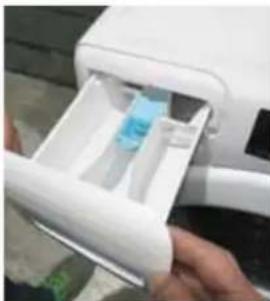
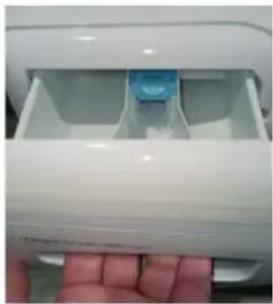
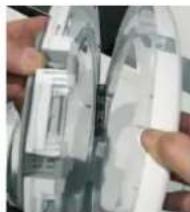
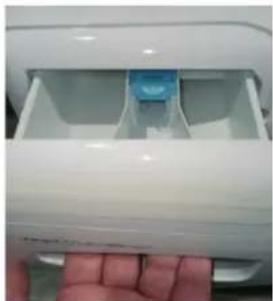
DETERGENT DRAWER
1
Open the detergent drawer
2
By using two hands, pull it out firmly
3
Unhook the mask from the detergent drawer, being careful not to break the hooks
Haier
Puertafrontal
INSTRUCCIONES

7 Uklonite bravu vrata
8 Uklonite zašitu od vode
9 Zamijenite bravu vrata i obratite pozornost na mehanicki spo otvora za slujac nuze di elektriche prikljuce

BRTVA VRATA ALATI-TORX KLJUC, HVATALJKA, ODVIJAc, DVA CIJEVNA KLJUcA 7
1
Otvorite prozor
2
S pomocu ravnog odvija cnapravite polugu iuklonite vanjsku kopcu
3
Nakon sto se kopca ukloni, odvojite oblogu od brte kako biste omogucili pristup unutrasnjosti proizvoda
4
TECAJ | TIP 2 ORODJA - TORX KLIUc 25, UPOGIBNICEVNI KLIUc 7
1 Odpritervatca
DVERE | TYP 2 NASTROJE - KLUCTORX 25, FLEXIBILNE, 7 RUKOVY KLUCT
1 Otvorte dvere