HW80-BP14357TU1 - Washing machine HAIER - Free user manual and instructions
Find the device manual for free HW80-BP14357TU1 HAIER in PDF.

User questions about HW80-BP14357TU1 HAIER
0 question about this device. Answer the ones you know or ask your own.
Ask a new question about this device
Download the instructions for your Washing machine in PDF format for free! Find your manual HW80-BP14357TU1 - HAIER and take your electronic device back in hand. On this page are published all the documents necessary for the use of your device. HW80-BP14357TU1 by HAIER.
USER MANUAL HW80-BP14357TU1 HAIER
1 UIT 3 Display 5
▶ in geval van storingen
natural_image
Front view of a white washing machine with black interior and circular vent, labeled '9-2' in top right corner (no other text or symbols visible)natural_image
Illustration of a hand cleaning a washing machine with a cloth (no text or symbols)
Opmerking: Hygiène
natural_image
Technical line drawing of a mechanical component with no visible text or symbols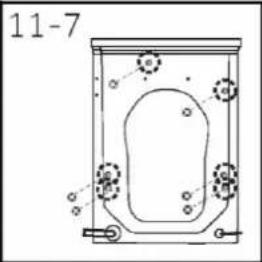
natural_image
Diagram of a container with internal components and circular elements, labeled '11-7' (no readable text or symbols)

VOORZICHTIG!
HW80-BP14357TU1HW80-BP14357TU1

HW90-BP14357TU1

natural_image
Abstract geometric composition with four gray shapes arranged in a cross pattern (no text or symbols)Haier
natural_image
Close-up of a washing machine interior showing mesh and perforated surfaces (no text or symbols visible)HW80-BP14357TU1 HW90-BP14357TU1

natural_image
Front view of a white washing machine with black interior and circular frame (no visible text or symbols)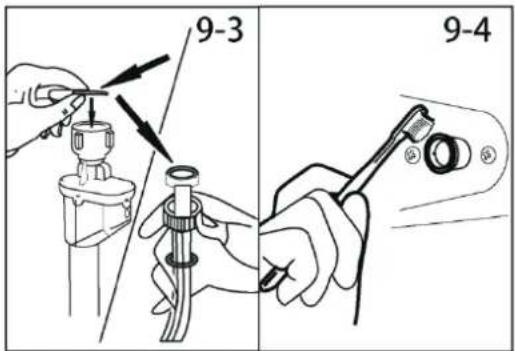
natural_image
Line drawing of a hand cleaning a washing machine with a cloth (no text or symbols)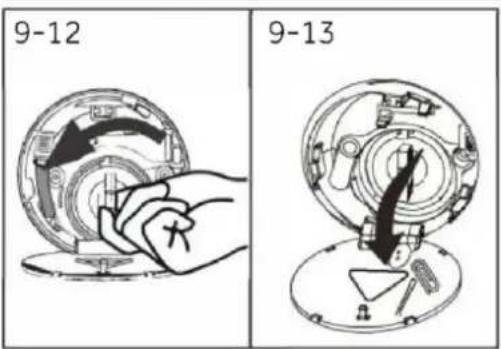
natural_image
Technical line drawing of a mechanical component with no visible text or symbols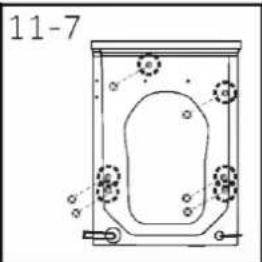
natural_image
Diagram of a container with internal structures and particles, labeled '11-7' (no text or symbols within the diagram itself)

ATTENTION!
HW80-BP14357TU1HW80-BP14357TU1

HW90-BP14357TU1

natural_image
Abstract geometric composition of four gray shapes arranged in a cross pattern (no text or symbols)Haier
User manual Washing machine
HW80-BP14357TU1 HW90-BP14357TU1
Thank you for purchasing a Haier Product.
Please read these instructions carefully before using this appliance. The instructions contain important information which will help you get the best out of the appliance and ensure safe and proper installation, use and maintenance.
Keep this manual in a convenient place so you can always refer to it for the safe and proper use of the appliance.
If you sell the appliance, give it away, or leave it behind when you move house, make sure you also pass this manual so that the new owner can become familiar with the appliance and safety warnings.
Legend

Warning – Important Safety information

General information and tips

Environmental information
Disposal

Help protect the environment and human health. Put the packaging in applicable containers to recycle it. Help to recycle waste of electrical and electronic appliances. Do not dispose appliances marked with this symbol with the household waste. Return the product to your local recycling facility or contact your municipal office.

WARNING!
Risk of injury or suffocation!
Disconnect the appliance from the mains supply. Cut off the mains cable and dispose of it. Remove the door catch to prevent children and pets to get closed in the appliance.
1-Safety information....4
2-Product description....7
3-Control panel 8
4-Programmes....12
5-Consumption....13
6-Daily use 14
7-hOn App....19
8-Eco-friendly washing 22
9-Care and cleaning 23
10-Troubleshooting 26
11-Installation....29
12-Technical data....33
13-Customer service....34
Before switching on the appliance for the first time read the following safety hints!

WARNING!
Before first use
▶ Make sure there is no transport damage.
▶ Make sure all transport bolts are removed.
Remove all packaging and keep out of children's reach.
▶ Handle the appliance always with at least two persons because it is heavy.
Daily use
This appliance can be used by children aged from 8 years and above and persons with reduced physical, sensory or mental capabilities or lack of experience and knowledge if they have been given supervision or instruction concerning use of the appliance in a safe way and understand the hazards involved.
- Keep away children under 3 years of age from the appliance unless they are constantly supervised.
▶ Children shall not play with the appliance.
▶ Do not let children or pets come close to the appliance when the door is open.
▶ Store washing agents out of reach of children.
▶ Pull up zips, fix loose threads and take care for small items to prevent laundry from being entangled. If necessary, use an appropriate bag or net.
Do not touch or use the appliance when barefoot or with wet o damp hands or feet.
Do not cover or encase the appliance during operation or afterwards to allow any moisture or dampness to evaporate.
Do not place heavy objects or sources of heat or damp on top of the appliance.
Do not use or store flammable detergent or dry cleaning agent in close vicinity to the appliance.
▶ Do not use any flammable sprays in close vicinity to the appliance
Do not wash any garments treated with solvents in the appliance without having dried them previously in the air.

WARNING!
Daily use
▶ Do not remove or insert the plug in the presence of flammable gas.
▶ Do not hot wash foam rubber or sponge-like materials.
▶ Do not wash any laundry which is polluted with flour.
▶ Do not open detergent drawer during any wash cycle.
▶ Do not touch the door during the washing process, it gets hot.
▶ Do not open the door if the water level is visibly over the porthole.
▶ Do not force the door to open. The door is fitted with a self-lock device and will open shortly after the washing procedure is ended.
▶ Switch off the appliance after each wash programme and before undertaking any routine maintenance and disconnect the appliance from the electrical supply to save electricity and for safety.
▶ Hold the plug, not the cable, when unplugging the appliance.
Maintenance / cleaning
▶ Make sure children are supervised if they carry out cleaning and maintenance.
▶ Disconnect the appliance from the electrical supply before undertaking any routine maintenance.
- Keep the lower part of the porthole clean and open door and detergent drawer if appliance is not in use to prevent odours.
▶ Do not use water spray or steam to clean the appliance.
▶ Replace a damaged supply cord only by the manufacturer, its service agent or similarly qualified persons in order to avoid a hazard.
▶ Do not try to repair the appliance by yourself. In case of repair please contact our customer service.
\~ Remove all foreign objects such as metal objects, chemicals, fragile goods, lighted candles, lighted cigarettes, etc. from the appliance.
Installation
The appliance should be placed in a well-ventilated place. Ensure a location which allows opening the door fully.
▶ Never install the appliance outdoors in a damp place, or in an area which may be prone to water leaks such as under or near a sink unit. In the event of a water leak cut power supply and allow the machine to dry naturally.

WARNING!
Installation
▶ Install or use the appliance only where the temperature is above 5^ C.
▶ Do not place the appliance directly on a carpet, or close to a wall or furniture.
Do not install the appliance in direct sunlight or in the near of heat sources(e.g. stoves, heaters).
▶ Make sure that the electrical information on the rating plate agrees with the power supply. If it does not, contact an electrician.
▶ Do not use multi-plug adapters and extension cables.
▶ Make sure only the delivered electric cable and hose set are used.
▶ Make sure not to damage the electric cable and the plug. If damaged have it replaced by an electrician.
▶ Use a separate earthed socket for the power supply which is easy accessible after installation. The appliance must be earthed.
Only for UK: The appliance's power cable is fitted with 3-coard (grounding) plug that fits a standard 3 cord (grounded) socket. Never cut off or dismount the third pin (grounding). After the aappliance is installed, the plug should be accessible.
▶ Make sure the hose joints and connections are firm and there is no leakage.
Intended use
This appliance is intended for washing machine-washable laundry only. Anytime follow the instructions given on the label of each garment label. It is designed exclusively for domestic use inside the house. It is not intended for commercial or industrial use.
Changes or modifications to the device are not allowed. Unintended use may cause hazards and loss of all warranty and liabilityclaims.

Note:
Due to technical changes and different models, the illustrations in the following chapters may differ from your model.
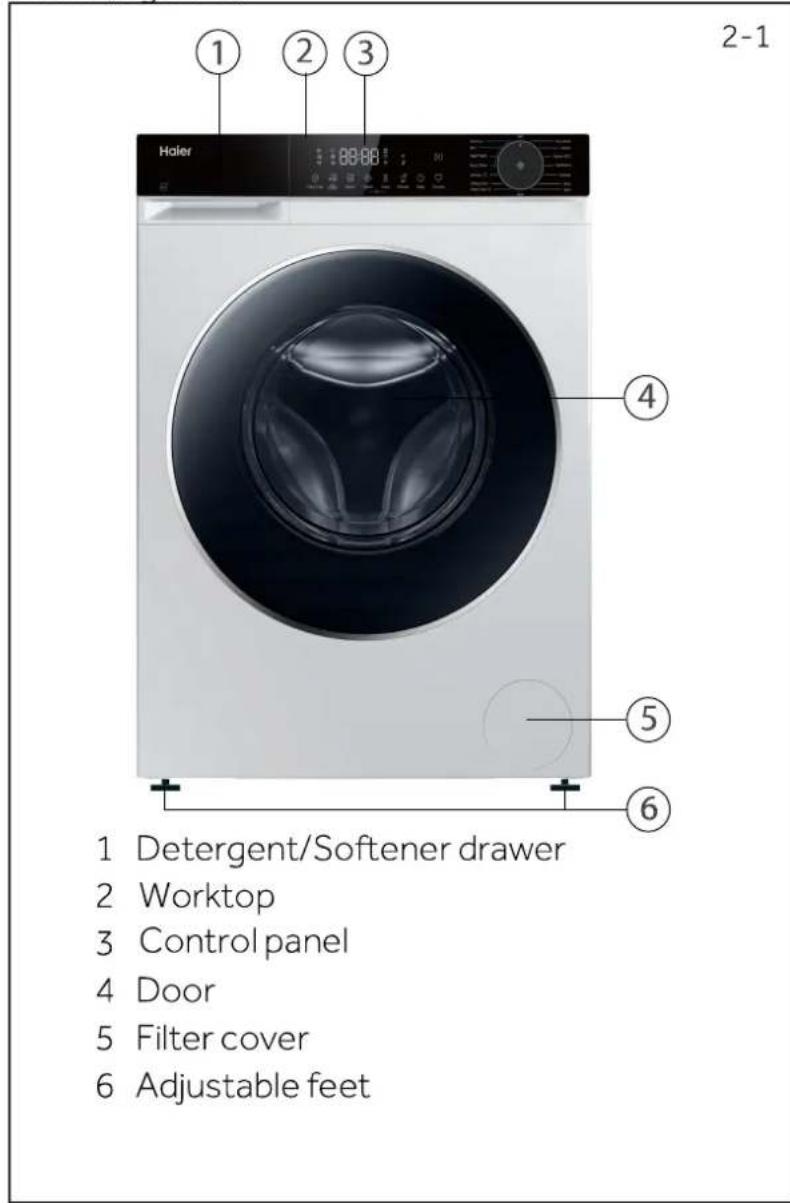
2.1 Picture of appliance.
Front (Fig. 2-1):
Rear side (Fig. 2-2):
2-1

1 Transportation bolts (T1-T4)
2 Backcover
3 Back cover screws(6EA)
4 Power cord
5 Drain hose
6 Water inlet valve
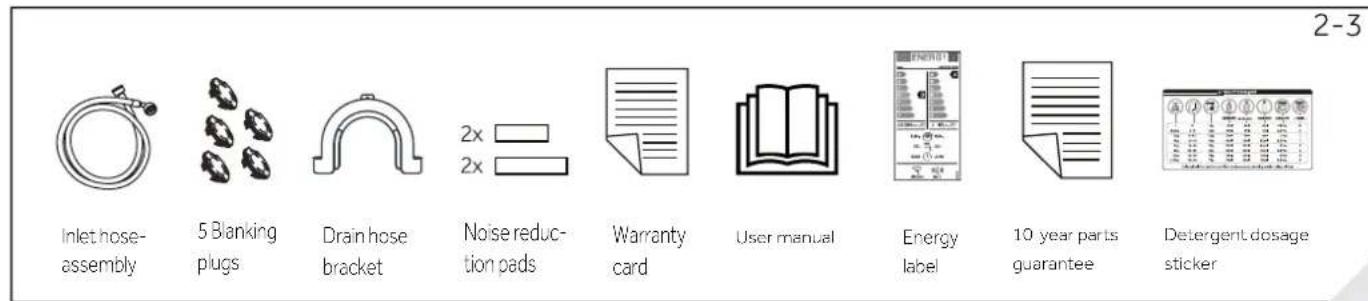
2.2 Accessories
Check the accessories and literature in accordance with this list (Fig. 2-3):
3-Control panel
3-1
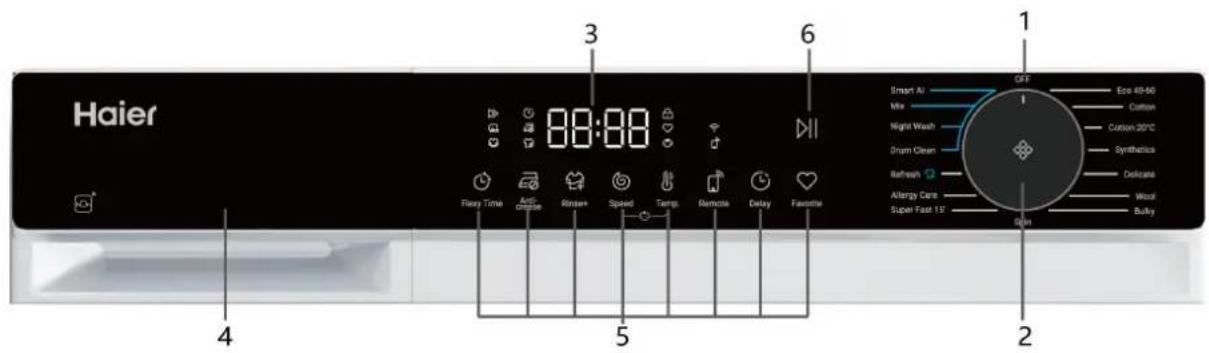
1 OFF
3 Display
5^1) Function buttons
2 Programme selector
4 Detergent/Softener drawer
6 "Start/Pause" button
1) The display icon is the touch area. The text area is a description of the icon and cannot be used for touch.

Note : Acoustic signal
In following cases an acoustic signal sounds:
when pressing a button
▶at the end of programme
▶in case of failures
▶ when select a programme
The acoustic signal can be deselected if necessary; see DAILY USE.
3-2

3.1 OFF
Turn the knob to any position (except OFF) to start the machine. Turn the knob to the OFF position to shut down the machine (Fig.3-2).

Note: Power off
Without WIFI connection, the switched-on appliance automatically powers off if it is not activated within 2 minutes before starting the programme or at the end of the programme. With WIFI connection, the waiting time duration is 24h.
3-3
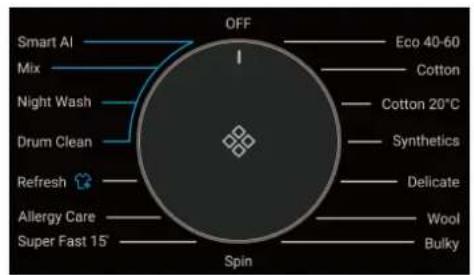
3.2 Programme selector
By turning the knob (Fig. 3-3), one of 1 programmes (the Aus knob is not included) can be selected.
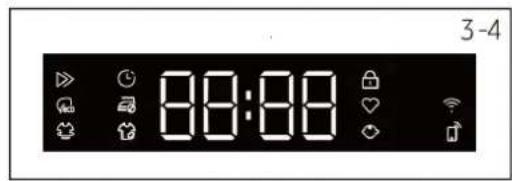
3.3 Display
The display (Fig. 3-4) shows following information:
▶ Washing time
▶ End time delay
▶ Error codes and service information
▶ Display symbols
▶ Speed, Temperature, etc
| Symbol | Meaning |
| Delay. | |
| Favorite | |
| Drum door is locked. | |
| Control panel is locked. | |
| Appliance is connected to Wi-Fi. | |
| Anti-crease. | |
| Remote. | |
| Steam:Smart,Allergy care have steam washing function bydefault | |
| Quick. | |
| Eco. | |
| Intensive. |
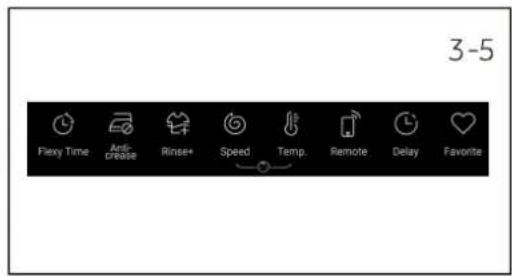
3.4 Function buttons
The function buttons (Fig. 3-5) enable additional options in the selected programme before programme starts. The related indicators are displayed.
By switching off the appliance or setting a new programme, all options are disabled.
If a button has multiple options, the desired option can be selected by touching the button sequentially.

Note: Factory settings
To get best results in each programme Haier has well defined specific default settings. If there is no special requirement default settings are recommended.
3.4.1-Function button "Delay"
Touch this button (Fig . 3-6) to start the programme with a delay. End time delay could be increased in steps of 30 minutes from 0,5 -24h (End time will longer than original programme time). For example display off 6:30 means end of programme cycle will be in 6 hours and 30 minutes. Touch "Start/Pause" button to activate the time delay.


Note: Liquid detergent
If using liquid detergent, it is not recommended to activate the end time delay.
3-Control panel
3-7

3-8

3-9

3-10

3-11

3-12

3-13

3-14

3.4.2 Function button "Anti-crease"
For those programmes that can select "Anti-crease" function (Fig. 3-7), touch "Anti-crease" button to select this function and the corresponding icon will light up. Touch again or select another programme, this feature will be cancelled.
Under "Anti-crease" function, the max spin speed will decrease After spin, the washing machine keeps intermittent operation to shake off the clothes to prevent mildew and odor, reduce wrinkles and make them smoother after hanging up. During operation, the LED display will show " - " " -- " " --- " " ---- ", and this phase lasts for 12 hours at most, users can touch "Start/ Pause" to terminate the programme at any time.
3.4.3 Function button "Temp."
Touch this button (Fig. 3-8) to change the washing temperature of the programme. If no value is illuminated(the display" -- ") the water will not heated.
3.4.4 Function button "Speed"
Touch this button (Fig. 3-9) to change or deselect the spin of the programme. If no value is illuminated the display "☐" the laundry will not spin.
3.4.5 Function button " Rinse+ "
Touch this button (Fig. 3-10) to rinse the laundry more intense with fresh water. This is recommended for people with sensitive skin.
By touching the button several times zero to three additional cycles can be selected. They appear in the display with P--0/P--1/P--2/P--3. Different programme options are different.
3.4.6 Function button "Favorite"
Touch this button (Fig.3-11), the favorites icon is lit, go to the program that opens the favorites function, and display the functions that have been collected. Click the Favorites button again, and the favorites icon will be extinguished to cancel the favorites function.
3.4.7 Function button "Start/Pause"
Touch this button (Fig. 3-12) gently to start or interrupt the currently displayed programme.
3.4.8" Flexy Time" button
Touch this button (Fig.3-13) to select Quick(Reduce main wash time and speed up washing), Eco (Reduce washing water temperature to reduce power consumption) or Intensive (Increase the main washing time and strengthen the washing).
3.4.9 "Remote" button
Shortly press this button to activate/deactivate the Remote Control of the appliance via the hOn app (Fig.3-14)

Note:
To start the pairing procedure, please follow the app instructions. More information, please see the dedicated "hOn App" chapter 7.
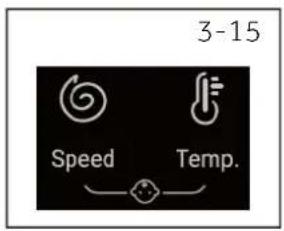
3.5 Child lock
Choosing a programme and then start, touch button "Speed" and "Temp." (Fig. 3-15) for 3 seconds simultaneously to block all panel elements against activation, panel display 🔊. For unlocking please touch again the two buttons. The child lock indicator lights up when the child lock works. Feature is optional when the machine is running.
The display shows cLot (Fig. 3-16) if a button will be touched when the child lock is activated. The change is not running.

The child lock which is set up manually must be cancelled manually or will be canceled automatically at the end of the programme. Power off and error information won't cancel child lock. It still works when the appliance is powered on next time.
▶ If you use the child lock, first press the program key, then the child lock will be on.
▶ Hold it for 3 seconds, the child lock will turn to full light and the child lock will be activated.
▶ Child lock can't be set up or cancelled through hOn App.
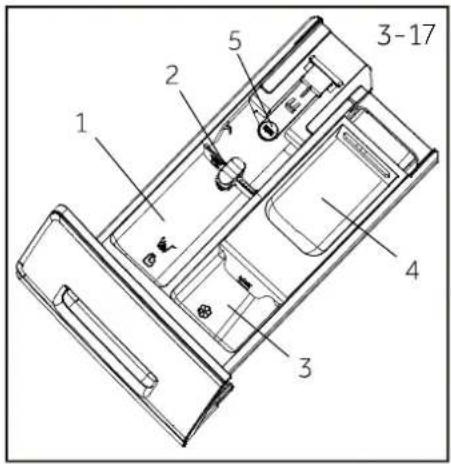
3.6 Detergent drawer
Open dispenser drawer, the following components can be seen (Fig. 3-17):
1: The main washing compartment, for powder or liquid detergent.
2: Detergent flap selector: lift it up for powder detergent, keep it down for liquid detergent.
3: Compartment for softner.
4: Pre-wash compartment, for a small amount of powder detergent.
5: Lock tab, press it down to pull out dispenser drawer.
The recommendation on the type of detergents is suitable for the various washing temperatures, please refer to the manual of detergent.

Note: The procedure to check the number of cycles that the machine has run.
Procedure: under standby mode, select "cotton" programme first, then press "Anti-crease" and "speed" at the same time, it will display the number of running cycles for 2 seconds, and then back to standby interface. The cumulative running cycles will add 1 after the programme ends. The running cycles will be displayed in hexadecimal if it is over 9999.
- Yes, o Optional, / No
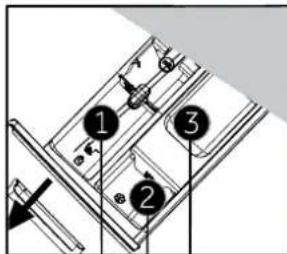
Detergent compartment for:
1 Detergent
2 Softener or care product
③ Detergent ^3)
| Programme | Max. load in kgHW 0/ HW90 | Temperature in °C ^1) | Fabrics type | Preset spin speed in rpm | Function | |||||||||
| selectable range | Preset | 1 | 2 | 3 | Flexy time | Anti-crease | Rinse+ | Delay | Remote | Favorite | ||||
| Smart AI | 8/9 | -- to 60 | 40 | ● | ○ | / | Lightly soiled mixed- laundry of cotton and synthetic | 1000 | ^4) | ○ | ○ | ○ | ○ | ○ |
| Mix | 8/9 | -- to 60 | 30 | ● | ○ | ○ | Lightly soiled mixed- laundry of cotton and synthetic | 1000 | ○ | ○ | ○ | ○ | ○ | ○ |
| Night Wash | 8/9 | -- to 60 | 30 | ● | ○ | ○ | Cotton / Synthetic | 800 | ○ | / | ○ | / | ○ | ○ |
| Drum Clean | / | -- to 90 90 | / | / | / | / | / | / | / | / | / | ○ | ○ | |
| Refresh | 1/1 | / | / | / | / | / | Cotton / Synthetic | / | / | / | / | / | ○ | ○ |
| Allergy Care | 8/9 | -- to 90 | 60 | ● | ○ | ○ | Cotton / Synthetic | 1000 | ^4) | ○ | ○ | ○ | ○ | ○ |
| Super Fast 15^2) | 1/1 | -- to 40 | -- | ● | ○ | / | Cotton / Synthetic | 1000 | / | ○ | ○ | ○ | ○ | ○ |
| Spin | 8/9 | / | / | / | / | / | Not-fragile fabric | 1000 | / | / | / | / | ○ | ○ |
| Eco 40-60 | 8/9 | -- to 60 | 40 | ● | ○ | ○ | Cotton | 1400 | ○ | ○ | ○ | ○ | ○ | ○ |
| Cotton | 8/9 | -- to 90 | 40 | ● | ○ | ○ | Cotton | 1400 | ○ | ○ | ○ | ○ | ○ | ○ |
| Cotton 20 C | 8/9 | / | / | ● | ○ | ○ | Cotton | 1000 | ○ | ○ | ○ | ○ | ○ | ○ |
| Synthetics | 4/4.5 | -- to 60 | 40 | ● | ○ | ○ | Synthetic or mixed fabric | 1200 | ○ | ○ | ○ | ○ | ○ | ○ |
| Delicate | 2/2.5 | -- to 30 | 30 | ● | ○ | / | Delicate laundry and silk | 600 | / | / | ○ | ○ | ○ | ○ |
| Wool | 1/1 | -- to 40 | -- | ● | ○ | / | Machine-washable fabric made of wool or with wool content | 800 | / | / | ○ | ○ | ○ | ○ |
| Bulky | 5/6 | -- to 60 | 30 | ● | ○ | ○ | Cotton / Synthetic | 1000 | ○ | ○ | ○ | ○ | ○ | ○ |
-- Water is not heated up.
1) Choose 90°C wash temperature only for special hygienic requirements.
2) Reduce detergent amount because programme duration is short.
3) No or a small amount of powder detergent. A little detergent can be added only with the pre-wash function on the App.
When washing heavy loads, the washing machine may vibrate greatly or move if clothes are wrapped.
The design and specifications are subject to change without notice for quality improvement purposes.
4) All the Flexy time function can only be selected after adjusting the temperature to cancel the icon.
Scan QR code on energy label for energy consumption information.
The actual energy consumption may differ from the declared one according to local conditions.

Note: Auto Weight
The appliance is equipped with a loading recognition. At low loading, energy, water and washing time will be reduced automatically in some programmes. The display default time may vary depending on the load weight, involving the "Smart AI, Synthetic, Cotton, Cotton 20 °C, ECO 40-60, Mix, Night Wash" programme.
Indicative information(as per Commission Regulation (EU) 2019/2023):
| Rated Capacity | Programme | (HH:MM) | ENERG ^1 (kg/h /cycle) | L/cycle) | Max Temperature (°C) | Effective Speed (RPM) | Residual Moisture (%) | |
| 8 kg(1400r) | Eco 40-60 | 8 | 3:38 | 0.520 | 54.0 | 28 | 1330 | 53.0 |
| Eco 40-60 | 4 | 2:48 | 0.330 | 35.0 | 26 | 1330 | 53.0 | |
| Eco 40-60 | 2 | 2:38 | 0.190 | 30.0 | 25 | 1330 | 55.0 | |
| COTTON 20°C | 8 | 0:53 | 0.220 | 75.0 | 20 | 1000 | 65.0 | |
| COTTON 60°C | 8 | 3:28 | 2.100 | 75.0 | 57 | 1400 | 53.0 | |
| Synthetics 40°C | 3.5 | 2:07 | 0.850 | 65.0 | 40 | 1200 | 40.0 | |
| Super Fast 15' | 1 | 0:15 | 0.250 | 38.0 | -- | 1000 | 65.0 | |
| 9 kg(1400r) | Eco 40-60 | 9 | 3:48 | 0.625 | 62.0 | 28 | 1330 | 53.0 |
| Eco 40-60 | 4.5 | 2:58 | 0.400 | 36.0 | 28 | 1330 | 53.0 | |
| Eco 40-60 | 2.3 | 2:48 | 0.200 | 30.0 | 25 | 1330 | 55.0 | |
| COTTON 20°C | 9 | 0:53 | 0.220 | 75.0 | 20 | 1000 | 65.0 | |
| COTTON 60°C | 9 | 3:28 | 2.100 | 75.0 | 57 | 1400 | 53.0 | |
| Synthetics 40°C | 4.5 | 2:07 | 0.250 | 38.0 | 30 | 1200 | 37.0 | |
| Super Fast 15' | 1 | 0:15 | 0.250 | 38.0 | -- | 1000 | 65.0 |
The values given for programmes other than the Eco 40-60 programme are indicative only.
6-Daily use
6.1 Power supply
Connect the washing machine to a power supply (220V to 240V\~/50Hz; Fig. 6-1). Please refer also to section INSTALLTION (see P29).
6.2 Water connection
▶ Before connecting check the cleanliness and clarity of the water inlet.
▶ Turn on the tap (Fig.6-2).
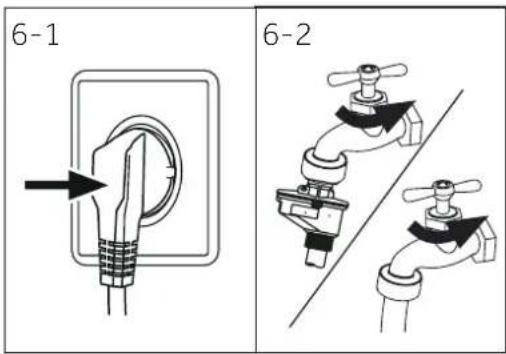

Note: Tightness
Before use check for leakage in the joints between the tap and the inlet hose by turning on the tap.
6.3 Preparing laundry
▶ Sort out clothes according to fabric (cotton, synthetics, wool or silk etc.) and how dirty they are (Fig. 6-3). Pay attention to the care labelling of washing labels.
Separate white clothes from coloured ones. Wash coloured textiles first by hand to check if they fade or run.
▶ Empty pockets (keys, coins, etc.) and remove harder decorative objects (e.g. brooches).
▶ Garments without hems, delicates and finely woven textile such as fine curtains are to be put into a wash bag to care for this delicate laundry (hand or dry cleaning would be better).
▶ Close zippers, velco fastener and hooks, make sure the buttons are sewn on tightly.
▶ Place sensitive items like laundry without firm hem, delicate underwear and small items such as socks, belts, bras, etc. in a wash bag.
▶ Unfold large pieces of fabric such as bed sheets, bedspreads etc.
▶ Turn jeans and printed, decorated or color-intensive textiles inside out; possibly wash separately.


CAUTION!
Non-textile, as well as small, loose or sharp-edged items may cause malfunctions and damage of clothes and appliance.
Care chart
Washing
 | Washable up to 95°Cnormal process norm |  | Washable up to 60°Cprocess |  | Washable up to 60°Cmild process |
 | Washable up to 40°Cnormal process |  | Washable up to 40°Cmild process |  | Washableup to 40°Cvery mild process |
 | Washable up to 30°Cnormal process |  | Washable up to 30°Cmild process |  | Washableup to 30°Cvery mild process |
 | Wash by handmax. 40°C |  | Donotwash | ||
| Bleaching | |||||
| Any bleaching allowed | Only oxygen/non-chlorine | Do not bleach | |||
| Drying | |||||
 | Tumble drying possiblenormal temperature |  | Tumble drying possiblelower temperature | Do not tumble dry | |
 | Line drying |  | Flat drying | ||
| Ironing | |||||
| Iron at a maximumtemperatureupto 200 °C | Iron at a medial tem-peratureupto 150°C without steam (steam ironing may cause irreversible damage) | Iron at a low temper-ature up to 110 °C; ironing may cause irreversible damage) | |||
| Do not iron | |||||
| Professional Textile Care | |||||
| Dry cleaning in tetra-chloroethene drocarbons | Dry cleaning in hy- | Do not dry clean | |||
| Professional wet clean | Do not professionalwet clean | ||||
Bleaching
| Any bleaching allowed | Only oxygen/non-chlorine | Do not bleach |
Ironing
 | Iron at a maximum temperature upto 200 °C |  | Iron at a medial temperature upto 150°C without steam (steam ironing may cause irreversible damage) |  | Iron at a low temperature up to 110 °C; |
 | Do not iron |
Professional Textile Care
 | Dry cleaning in tetra-chloroethene drocarb |  | Dry cleaning in hy- |  | Do not dry clean |
 | Professional wet clean | Do not professional wet clean |
6.4 Loading the appliance
▶ Put in the laundry piece by piece.
▶ Don't overload. Note the different maximum load according to programmes! Rule of thumb for maximum load: Keep six inches between load and drum top.
▶ Close the door carefully. Make sure that no pieces of laundry are pinched.
6.5 Selecting detergent
▶ Washing efficiency and performance is determined by used detergent quality.
▶ Use only machine wash approved detergent.
▶ If needed use specific detergents, e.g synthetic and woolen fabric.
▶ Do not use dry cleaning agents such as trichloroethylene and similar products.
Choose the best detergent
| Kind of detergent | |||||
| Programme | Universal | Colour | Delicate | Special | Softener |
| Smart AI | L/P | L/P | - | - | o |
| Mix | L | L/P | - | - | o |
| Night Wash | L/P | L/P | - | - | o |
| Drum Clean | - | - | - | L/P | - |
| Refresh | - | - | - | - | - |
| Allergy Care | P | L/P | - | - | o |
| Super Fast 15' | L | L | - | - | o |
| Spin | - | - | - | - | - |
| Eco 40-60 | L/P | L/P | - | - | o |
| Cotton | L/P | L/P | - | - | o |
| Cotton 20°C | L/P | L/P | - | - | o |
| Synthetics | - | L/P | - | - | o |
| Delicate | - | - | L/P | L/P | o |
| Wool | - | - | L/P | L/P | o |
| Bulky | P | L/P | - | - | o |
L = gel-/liquid detergent P = powder detergent O = optional - = no
If using liquid detergent, it is not recommended to activate the time delay.
We recommend by using:
▶ Laundry powder: 20°C to 90°C* (best use: 40-60°C)
▶ Color detergent: 20°C to 60°C (best use: 30-60°C)
▶ Wool/delicate detergent: 20°C to 30°C (best use: 20-30°C)
* Choose 90 °C wash temperature only for special hygienic requirements.
* If you choose the water temperature 60°C or above, we would like to advise you to use less detergent. Please kindly use the special disinfectant, which is suitable for cotton or synthetic cloth.
* It is better to use less or free suds detergent powder.
natural_image
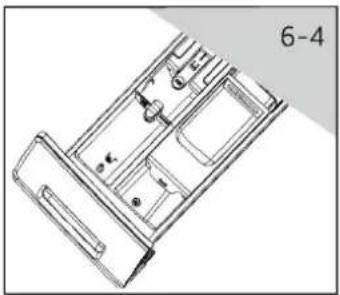
Technical line drawing of a mechanical component with no visible text or symbols6.6 Adding detergent
- Slide out the detergent drawer.
- Put the required chemicals into corresponding compartments (Fig. 6-4).
- Push back the drawer gently.

Note:
Remove detergent residues before next wash cycle from the detergent drawer.
▶ Do not overuse detergent or softener.
▶ Please follow the instruction on the detergent package.
▶ Always fill the detergent just before the beginning of the wash cycle.
▶ Concentrated liquid detergent should be diluted before adding.
▶ Do not use liquid detergent if function "Delay" is selected.
▶ Carefully choose the programme settings according to the care symbols on all laundry labels and according to the programme table.
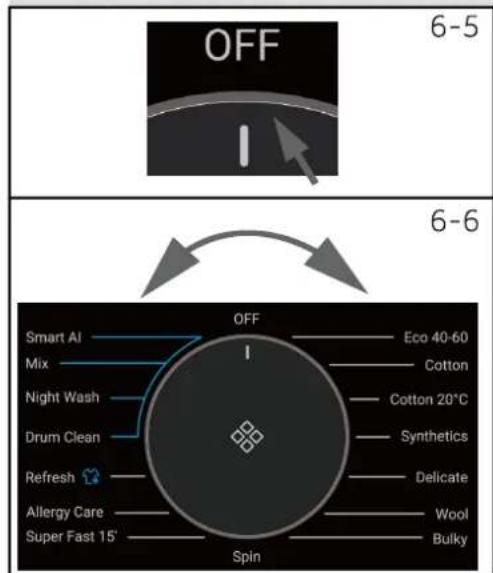
6.7 Switch on the appliance
Turn the knob to any position (except Aus) to start the machine. Turn the knob to the OFF position to shut down the machine (Fig. 6-5).
6.8 Select a programme
To get the best washing results, select a programme which fits the degree of soiling and sort of laundry type. Turn the programme knob (Fig. 6-6) to select the right programme.

Note: Odour removal
Before first use we recommended to run programme "Dru Clean ith no load and small amount of detergent in washing agent compartment or special machine cleaner to remove possibly corruptive residues.

6.9 Add individual selections
Select required options and settings (Fig. 6-7); refer to Control Panel.
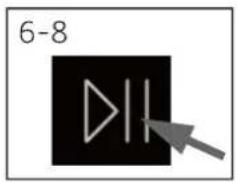
6.10 Start wash programme
Touch "Start/Pause" button (Fig. 6-8) to start.
Appliance operates according to present settings.
Changes are only possible by cancelling the programme.
6.11 Interrupt / cancel wash programme
To interrupt a running programme touch gently "Start/Pause"
Touch it again to resume operation.
To cancel a running programme and all its individual settings:
- Touch "Start/Pause" button to interrupt the running programme.
- Turn the knob to select a new programme and start it.
6.12 After washing

Note: Door lock
For safety reasons the door is locked partially during the washing cycle. It is only possible to open the door at the end of the programme or after the programme was cancelled correctly (see description above).
In case of high water level, high water temperature and during spinning it is not possible to open the door; Loci- is displayed.
- At programme cycle end End is displayed.
- The appliance switches off automatically.
- Remove laundry as soon as possible to go easy on it and to prevent more wrinkling.
- Turn off the water supply.
- Unplug the power cord.
- Open the door to prevent formation of moisture and odours. Let it open while not used.
- Small clothes are easy to stick to the wall after high-speed swing drying, please do not omit when opening the door to pick up clothes.

Note: Standby-mode / energy-saving mode
The switched on appliance will go into standby-mode if it will not be activated within 2 minutes before starting the programme or at the end of programme. The display switsches off. This saves energy. To interrupt the standby-mode touch "Power" button.
6.13 Activate or deactivate the buzzer
The acoustic signal can be turned off if necessary
- Switch on the appliance.
- Select the spin programme.
- Touch the "inse" button and "Speed" button at the same time for about 3 seconds. "OFF" will be displayed and the buzzer will be deactivated.
or activating the buzzer touch these two buttons at the same time again.
"ON" will be displayed.
7.1 General
This appliance is equipped with Wi-Fi technology for remote control via the hOn app.

WARNING!
Follow the safety precautions indicated in this manual even when using the appliance through the app. Adhering to these instructions is essential for safe use.
7.2 Requirements
- Wi-Fi Network: A router compatible with 802.11b/g/n and 2.4 GHz band is required. Networks operating at 5 GHz and public networks are not supported. The network name (SSID) must be between 1 and 31 characters, and the password between 8 and 64 characters. Encryption options include open, WPA-PSK, and WPA2-PSK.
- Compatible Devices: The app is available for Android, iOS, and Huawei devices, on both tablets and smartphones.
- Positioning: Install the appliance in an area with a strong Wi-Fi signal.
Wi-Fi Technical Specifications:
• Frequency: 2400 MHz - 2483.5 MHz
• Max Power: 20 dBM
• Standard: IEEE802.11b/g/n & BLE V4.2
7.3 Download and Installation of the hOn App
- Download the app by scanning the QR code below or visiting go.haier-europe.com/download-app.


Note: Registration
Creating a profile (sign up) is only required on first use or if the account has been deleted/disabled. For future uses, simply log in with your mail and password.
Check the DEMO mode in the app to explore the Wi-Fi features.
7.4 Appliance Pairing

Note:
The home network must be set to 2.4 GHz; networks operating at 5 GHz are not supported. Ensure your smartphone is connected to the same 2.4 GHz Wi-Fi network you want to use to configure the appliance.
-
Open the hOn app, create a new profile (or log in if you already have one).
-
The washing machine is in standby mode, while short pressing the

button until "PA Ir" appears on the display screen;
-
Tap "Add Appliance" and follow the on-screen instructions on your smartphone to complete the setup.
-
Until "donE" displayed on for 3 sec then display "hOn" and start slow blinking, the connection is successful.
If the binding fails and "rE" and "trY" displayed, you can repeatedly operate to rebind.
7.5 Remote Control activation
-
Ensure the router is powered on and connected to the Internet.
-
Load the laundry and close the door.
-
Turn on the appliance.
-
Short press the 📞 button. The door will lock (for models with door lock).
-
Start the cycle through the app. The control panel will be disabled, except for the "START/PAUSE" buttons. Only the child lock will be available during the program.
-
Remote control can also be activated during the cycle by short pressing the button.


Note: Remote Control Expiration
You can send a command from the app up to 24 hours after Remote Control is enabled.
7.6 Remote Control deactivation
- During a cycle, you can deactivate Remote Control by short pressing the

button; the cycle will continue. You can view the cycle status in the app but won't be able to send commands (e.g., stop/pause).
-
If safety conditions permit, the door can be opened (for models with door lock).
-
To resume remote control through the app, make sure the door is closed, then
short press the

button again.
7.7 End of Cycle with Remote Control
-
At the end of the cycle, the door unlocks, and (for models with door lock) Remote Control is deactivated.
-
After 2 minutes, the appliance will automatically power off.
7.8 Turning Off Wi-Fi Module and Clearing Network Credentials
To delete the saved Wi-Fi network information and turn off the Wi-Fi module:
-
Power on the appliance.
-
Without starting any cycle, press and hold the until "rESt" appears.

button for 5 seconds
-
Within seconds, press and hold the "Delay" button for another 5 seconds until "donE" appears.
-
The configuration information will be deleted. Select a program or turn off the appliance to exit.
-
To reconfigure, remove the appliance from the hOn app and start a new pairing procedure.

Note:
Use this procedure only if you intend to sell the appliance.

Environmentally responsible use
▶ To achieve best use of energy, water, detergent and time you should use the recommended maximum load size.
▶ Do not overload (hand width clearance above laundry).
For slightly soiled laundry select the Super Fast 15' programme.
▶ Apply exact dosages of each washing agent.
▶ Choose the lowest adequate washing temperature-modern detergents are efficiently cleaning below 60°C.
▶ Raise default settings only due to heavy staining.

General information:
The eco 40-60 programme is able to clean normally soiled cotton laundry declared to be washable at 40^ or 60^ , together in the same cycle, and that this programme is used to assess the compliance with the EU ecodesign legislation;
The most efficient programmes in terms of energy consumption are generally those that perform at lower temperatures and longer duration;
▶ Noise and remaining moisture content are influenced by the spinning speed: the higher the spinning speed in the spinning phase, the higher the noise and the lower the remaining moisture content.
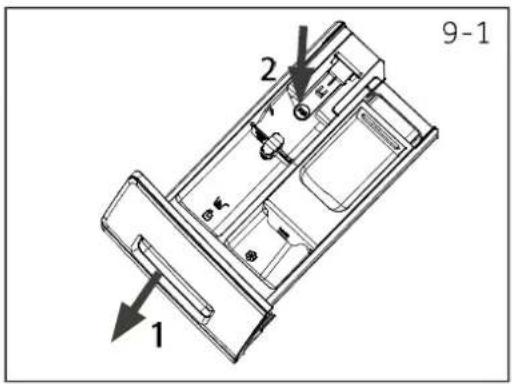
9.1 Cleaning the detergent drawer
Take always care there are no detergent residues. Clean the drawer regularly (Fig. 9-1):
- Pull out the drawer until it stops.
- Press the release button and remove the drawer.
- Wipe the inside of the sink clean with a towel.
- Flush the drawer with water until it is clean and insert the drawer back in the appliance.
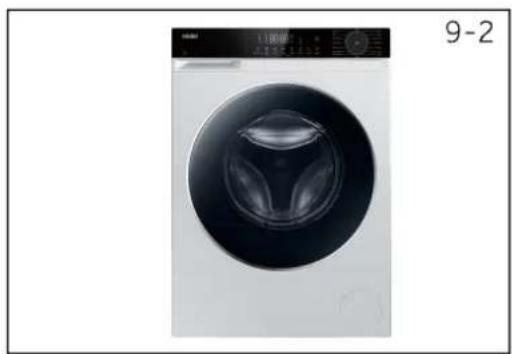
9.2 Cleaning the machine
▶ Unplug the machine during cleaning and maintenance.
▶ Use a soft cloth with soap liquid to clean the machine case (Fig. 9-2) and rubber components.
▶ Do not use organic chemicals or corrosive solvents.
9.3 Water inlet valve and inlet valve filter
To prevent blockage of water supply by solid substances like lime clean regularly the inlet valve filter.
▶ Unplug the power cord and turn off the water supply.
▶ Unscrew the water inlet hose at the back (Fig. 9-3) of the appliance as well as on the tap.
▶ Flush the filters with water and a brush (Fig. 9-4).
▶ Insert the filter and install the inlet hose.
▶Turn on the tap to see if it leaks.
9.4 Cleaning the drum
Remove accidentally washed items, especially metal parts such as pins, coins, etc. from the drum and the groove of the door gasket (rubber ring) because they cause rust stains and damage.
▶ Use a non-chloride cleaner for removing rust stains. Observe the warning hints of the cleaning agent manufacturer.
▶ Do not use any hard objects or steel wool for cleaning.
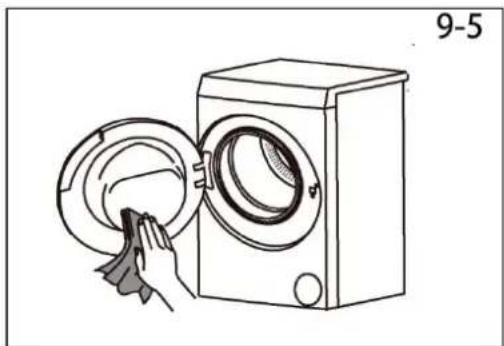
▶ After the procedure, open the door, use a towel to clean the stains and foam around the gasket, and keep the inside and outside of the gasket clean (Fig. 9-5).
natural_image
Front view of a white washing machine with black circular design and three leaf-like cutouts (no visible text or symbols)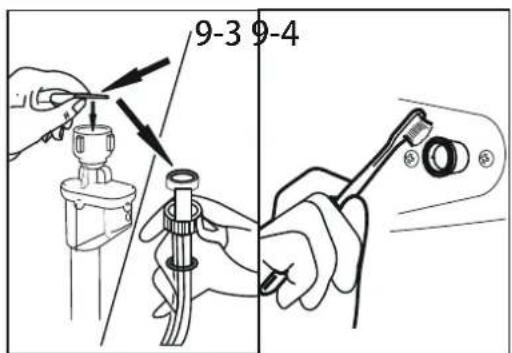

natural_image
Line drawing of a hand cleaning a washing machine with a cloth (no text or symbols)
Note: Hygiene
For regular maintenance, we recommend running the programme "Dru Clean within 100 cycles to avoid possible corrosive residues. Add a small amount of detergent to the detergent compartment or use a special machine cleaner.
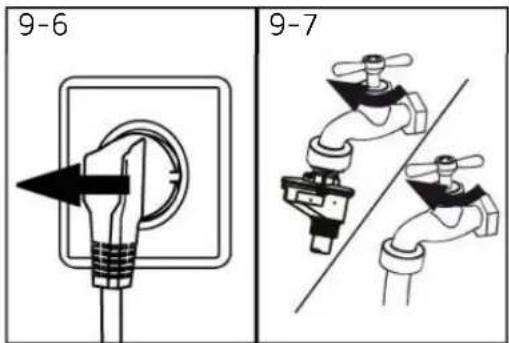
9.5 Long periods of disuse
If the appliance is left idle for a longer period:
- Pull out the electrical plug (Fig. 9-6).
- Turn off water supply (Fig. 9-7).
- Open the door to prevent formation of moisture and odours. Let door open while not used.
Before next usage check carefully power cord, water inlet and drain hose. Make sure everything is properly installed and without leakage.
9.6 Pump filter
Clean the filter once a month and check the pump filter for instance if the appliance:
▶ Doesn't drain the water.
Doesn't spin.
▶ Cause unusual noise while running.

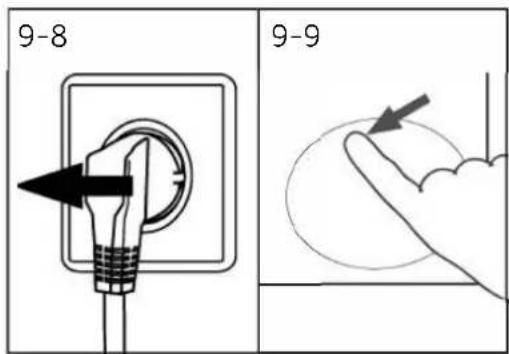
WARNING!
Scalding Risk! Water in the pump filter can be very hot! Before any action please ensure water has cooled down.
- Turn off and unplug the machine (Fig. 9-8).
- Push and open service flap (Fig. 9-9).
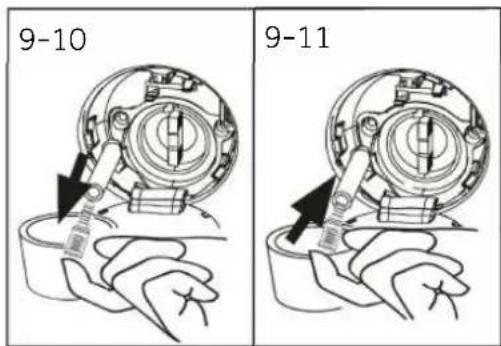
- Provide a flat container to catch leach water (Fig. 9-10). There could be bigger amounts!
- Pull the drainhose out and hold its end above the container (Fig. 9-10).
- Take the sealing plug out of the drainhose (Fig. 9-10).
- After complete drainage close drainhose (Fig. 9-11). and push it back into the machine.
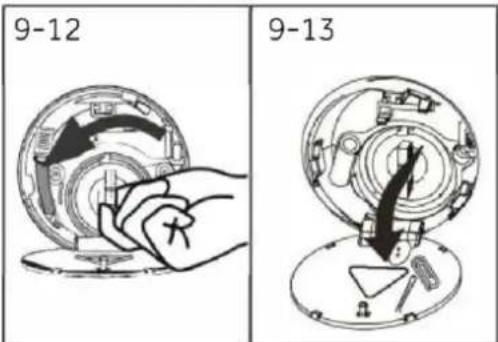
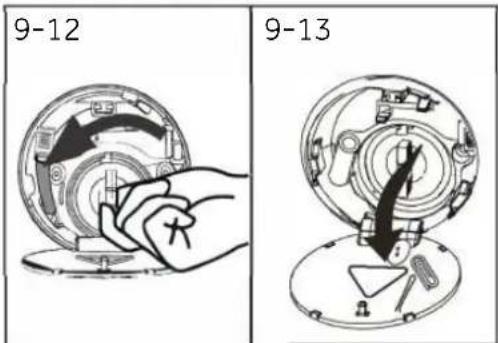
- Unscrew and remove counter clockwise the pump filter (Fig. 9-12).
- Remove contaminants and dirt (Fig. 9-13).
EN
9-Care and cleaning
- Clean carefully pump filter, e.g. using running water (Fig. 9-14).
- After cleaning, reinstall the handle and tighten it until it does not move. At this time, the handle is in vertical state (Fig. 9-15).
- Close service flap.

CAUTION!
▶ Pump filter sealing has to be clean and unhurt. If the lid is not full tightened, water can escape.
The filter must be in place, or it may lead to leakage.
10-Troubleshooting
Many occurring problems could be solved by yourself without specific expertise. In case of a problem please check all shown possibilities and follow below instructions before you contact an after sales service. See CUSTOMER SERVICE.

WARNING!
Before maintenance, deactivate the appliance and disconnect the mains plug from the mains socket.
Electrical equipment should be serviced only by qualified electrical experts, because improper repairs can cause considerable consequential damages.
▶ A damaged power cable should only be replaced by the manufacturer, its service agent or similarly qualified persons in order to avoid a hazard.
10.1 Information codes
Following codes are displayed only for information referring to the washing cycle. No measures must be performed.
| Code | Message |
| 1:25 | The remaining wash cycle time will be 1 hour and 25 minutes. |
| 6:30 | The remaining wash cycle time including chosen end-time delay will be 6 hours and 30 minutes. |
| End | The washing cycle is finished. The appliance shuts off automatically. |
| Lock | Door is closed because of high water level, high water temperature or spinning cycle. |
| OFF | The buzzer is deactivated. |
| ON | The buzzer is activated. |
| CLot | The function keys is closed. The programme changing is invalid. |
10.2 Troubleshooting with display code
| Problem | Cause | Solution |
| CLR FLBr | Drainage error, water is not fully drained within 6 minutes. | Clean pump filter.Check drain hose installation. |
| E2 | Lock error. | Shut the door properly. |
| E4 | Water level not reached after 12 minutes.Drain hose is self-syphoning. | Make sure that tap is fully opened and water pressure is normal.Check drain hose installation. |
| EB | Water protective level error. | Contact the After sales service. |
| ES | Drainage error. Water is not fully drained in set time.(Refresh programme) | Clean pump filterCheck drain hose installation |
| F3 | Temperature sensor error | Contact the After sales service. |
| F4 | • Heating error. | • Contact the After sales service. |
| F7 | • Motor error. | • Contact the After sales service. |
| FA | • Water level sensor error. | • Contact the After sales service. |
| FH | • The iot module fails to be configured | • Contact the After sales service. |
| FCO,FC for FC2 | • Abnormal communication error. | • Contact the After sales service. |
| Fb | • Machine leakage | • Open drain pump to drain.Shut down the machine.Contact the after sales service |
10.3 Troubleshooting without display code
| Problem | Cause | Solution |
| Washing machine fails to operate. | Programme is not yet started.Door is not properly closed.Machine has not been switched on.Power failure.Child lock is activated. | Check programme and start it.Close the door properly.Switch the machine on.Check power supply.Deactivate child lock. |
| Washing machine will not be filled with water. | No water.Inlet hose is kinked.Inlet hose filter is blocked.Water pressure is less than 0.03 MPa.Door is not properly closed.Water supply failure. | Check water tap.Check inlet hose.Unblock inlet hose filter.Check water pressure.Close the door properly.Ensure the water supply. |
| Machine is draining while being filled. | Height of drain hose is below 80 cm.Drain hose end could reach into water. | Make sure that drain hose is properly installed.Make sure the drain hose is not in water. |
| Drainage failure. | Drain hose is blocked.Pump filter is blocked.Drain hose end is higher than 100 cm above floor level. | Unblock drain hose.Clean pump filter.Make sure that drain hose is properly installed. |
| Strong vibration while spinning. | Not all transportation bolts have been removed.Appliance has no solid position.Machine load is not correct. | Remove all transportation bolts.Ensure solid ground and a ev-elled position.Check load weight and balance. |
| Operation stops before completing wash cycle. | Water or electric failure. | Check power and water supply. |
| Operation stops for a period of time. | Appliance displays error code.Problem due to load pattern.Programme performs soaking cycle. | Consider display codes.Reduce or adjust load.Cancel programme and restart. |
10-Troubleshooting
EN
| Problem | Cause | Solution |
| Excessive foam floats drum and/or detergent drawer. | Detergent is not a appropriate.Excessive use of detergent. | Check detergent recommendations.Reduce amount of detergent. |
| Automatic adjustment of washing time. | Washing programme duration will be adjusted. | This is normal and doesn't affect functionality. |
| Spinning fails. | Unbalance of laundry. | Check machine load and laundry and run a spinning programme again. |
| Unsatisfactory washing result. | Degree of pollution does not agree with selected programmeDetergent quantity was not sufficient.Maximum load has been exceeded.Laundry was unevenly distributed in the drum. | Select an other programme.Choose the detergent acc. to the degree of pollution and according to manufacture specifications.Reduce loading.Loose the laundry. |
| Washing powder residues are on the laundry. | Insoluble particles of detergent can remain as white spots on the laundry. | Perform extra rinse.Try to brush the points from the dry laundry.Choose an other detergent. |
| Laundry has grey patches. | Caused by fats such as oils, creams or ointments. | Pretreat the laundry with a special cleaner. |

Note: Foam formation
If too much foam is inspected during spin cycle, motor stops and drain pump will be activated for 90 seconds. If that elimination of foam fails up to 3 times, programme ends without spinning.
Should the error messages reappear even after the taken measures, switch off the appliance, disconnect the power supply and contact the customer service.
10.4 In case of power failure
The current programme and its setting will be saved. When power supply is restored operation will be resumed.
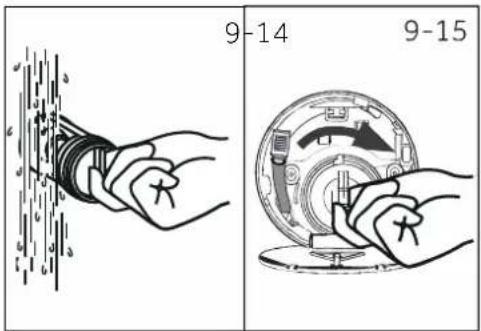
If a power failure cuts an operating wash programme door opening is mechanically blocked. To get out any laundry water level should not be seen in the glassy porthole of the door. - Danger of burns! Water level has to be lowered as described in "Pump filter". Not till then pull lever (A) beneath service flap (Fig.10-1) until door is unlocked by a gentle click. Afterwards refix all parts.

When the washing machine in a safe state (under the water level below the window along a certain distance, barrel temperature below 55^ C, the inner barrel did not turn), may unlock the doors of the machine operation.
11.1 Preparation
▶ Take the appliance out of the packaging.
Remove all packaging material including protecting film on cabinet, polystyrene base, keep them out of childrens reach. While opening the package, water drops may be seen on plastic bag and porthole. This normal phenomenon results from water tests in the factory.

Note: Packaging disposal
Keep all packaging materials out of children's reach and dispose them in an environmentally friendly manner.
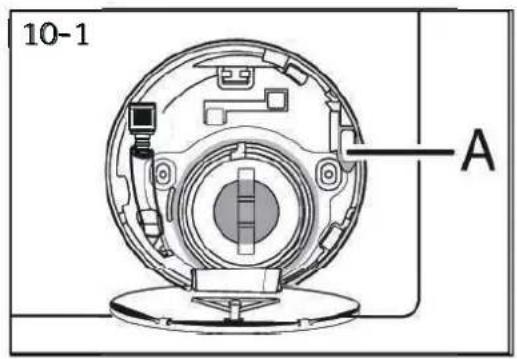
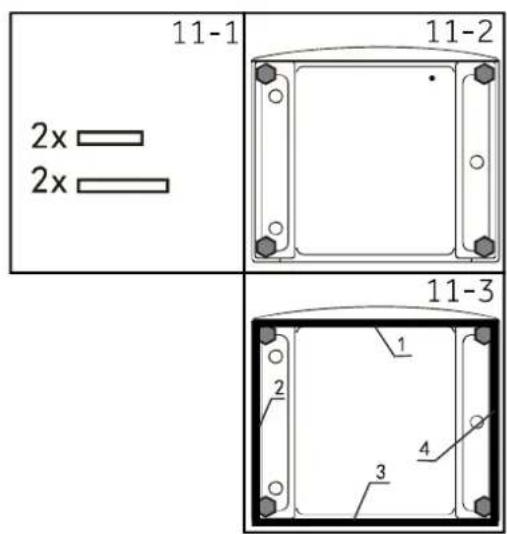
11.2 OPTIONAL: Install noise reduction pads
- When opening the shrink package, you will find four noise reduction pads. These are used for reducing noise (Fig. 11-1).
- Lay the washing machine down to its side, port-hole pointing upwards, bottom side towards operator (Fig. 11-2).
- Take out the noise reduction pads and remove the double-sided adhesive protective film; paste around the bottom; the noise reduction pads under the washing machine cabinet as shown in Figure 3(two longer pads in position 1 and 3, two shorter pads in position 2 and 4). Finally set the machine upright again (Fig. 11-3).
Warm tip:
Noise reduction pad is optional, could help to reduce noise, please assemble it or not according to your own demand.
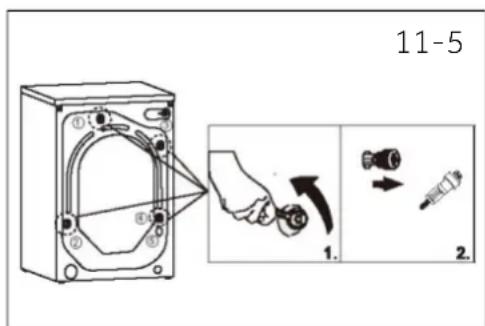
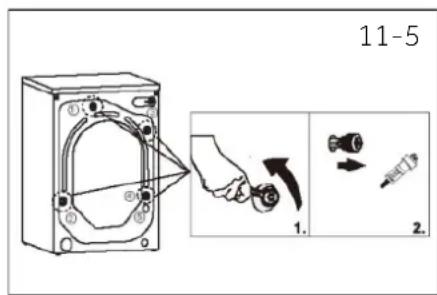
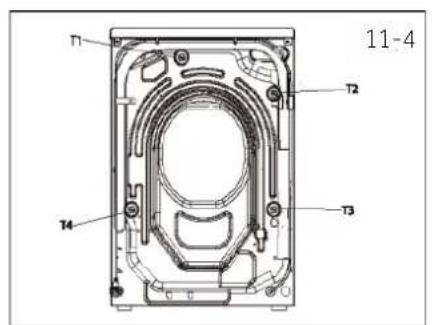
11.3 Dismantle the transportation bolts
The transport protection on the rear side is designed for clamping anti-vibration components inside the appliance during transportation to prevent inner damage. All elements (T1,T2,T3 and T4, Fig .11-4 . must be removed before use.
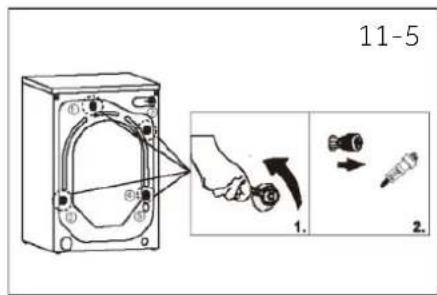
- Remove all 4 bolts (T1 - T4) (Fig. 11-5).
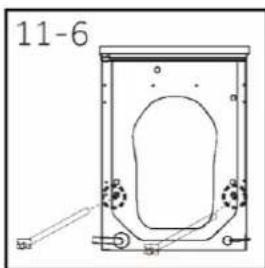
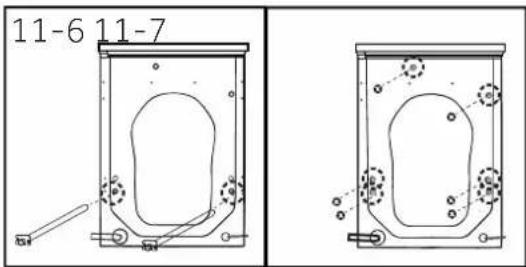
11-Installation
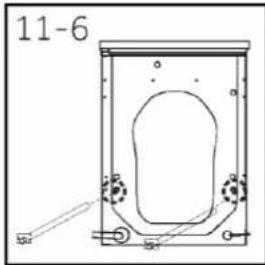
- Remove transportation rods (0 to 2) depends on the model. (Fig.11-6)
- Install hole plugs (5 to 6) depends on the model. (Fig.11-7)

Note: Keep in safe place
Keep all parts of the transport protection in a safe place for later use. Whenever the appliance is to be moved at first reinstall the protection parts.
11.4 Moving the appliance
If the machine is to be moved to a distant location, replace the transportation bolts removed before installation to prevent damage: The assembly takes place in reverse order.
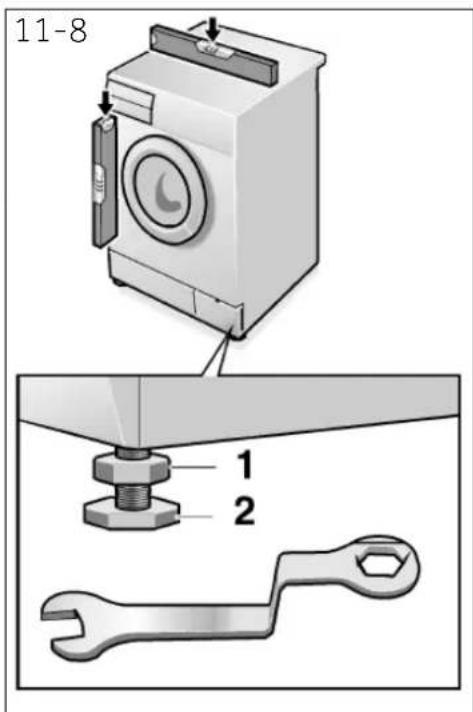
11.5 Aligning the appliance
Adjust all feet (Fig. 11-8) to achieve a complete level position. This will minimize vibrations and thus noise during use. It will also reduce wear and tear. We recommend to use a spirit level for adjustment. Floor should be as stable and flat as possible.
- Loose the locknut (1) by using a wrench.
- Adjust the height by turning the foot (2).
- Tighten lock ut (1) against the housing.
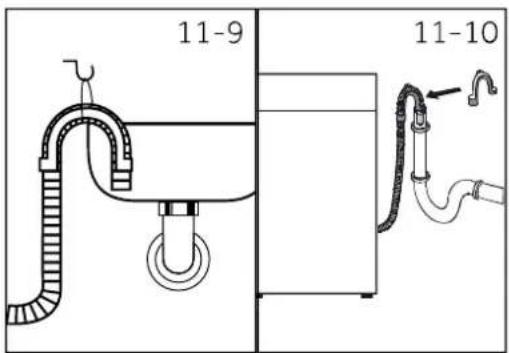
11.6 Drain Water Connection
Fix the water drain hose properly to the piping. The hose has to reach at one point a height between 80 and 100 cm above the appliance bottom line! If possible keep always drain hose fixed to the clip at the appliance back.

WARNING!
▶ Use only the supplied hose set for the connection.
▶ Never reuse old hose sets!
▶ Only connect to cold water supply.
Before connection, check whether the water is clean and clear.
Following connections are possible:
11.6.1 Drain hose to sink
▶ Hang the drain hose with the U-support over the edge of a sink with adequate size (Fig. 11-9).
▶ Protect the U-support sufficiently against slipping.
11.6.2 Drain hose to waste water connection
The internal diameter of the stand pipe with vent-hole must be minimum 40 mm.
▶ Put the drain hose for 80-100 mm in the wastewater pipe.
▶ Attach the U-support and secure it sufficiently (Fig. 11-10).
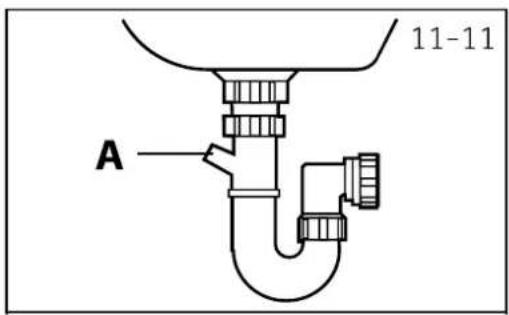
11.6.3 Drain hose to sink connection
The junction must lie above the siphon.
▶ A spigot connection is usually closed by a pad (A). That must be removed to prevent any disfunction (Fig. 11-11).
▶ Secure the drain hose with a clamp.

CAUTION!
The drain hose should not be submerged in water and should be securely fixed and leak-free. If the drain hose is placed on the ground or if the pipe is at a height of less than 80 cm, the washing machine will continuously drain while being filled (self-siphoning).
▶ Drain hose is not to be extended. If necessary contact after sales service.
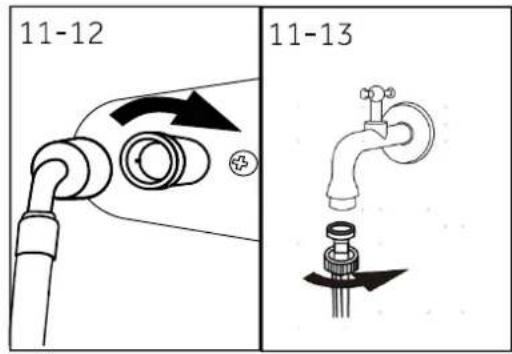
11.7 Fresh Water Connection
Make sure that the gaskets are inserted.
- Connect the water inlet hose with the angled end to the appliance (Fig. 11-12). Tighten the screw joint by hand.
- The other end connect to a water tap with a 3/4" thread (Fig. 11-13).
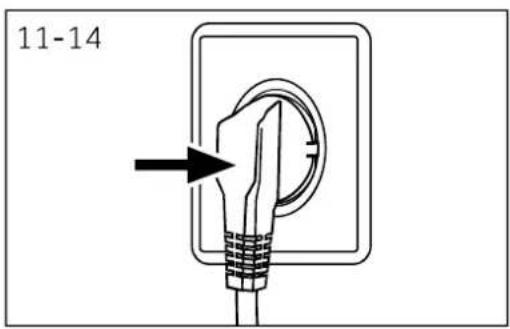
11.8 Electrical Connection
Before each connection check if:
▶ power supply, socket and fusing are appropriate to the rating plate.
▶ the power socket is earthed and no multi-plug or extension are used.
▶ the power plug and socket are strictly according.
▶ Only UK: The UK plug meets BS1363A standard.
Put the plug into the socket (Fig. 11-14).

WARNING!
▶ Ensure always that all connections (power supply, drain and fresh water hose) are firm, dry and leack free!
▶ Take care these parts are never to be crushed, kinked, or twisted.
If the supply cord is damaged, it must be replaced by the service agent (see warranty card) in order to avoid a hazard.
12.1 Additional technical data
| HW80 | HW90 | |
| Voltage in V | 220-240V~/50Hz | |
| Current in A | 10 | |
| Max. power in W | 1950 | |
| Water pressure in MPa | 0.03≤P≤1 | |
| Net weight in kg | 57 | 58 |
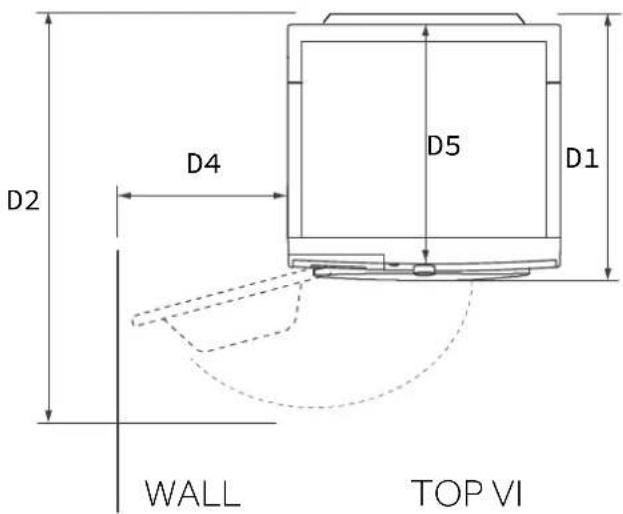
12.2 Product dimensions
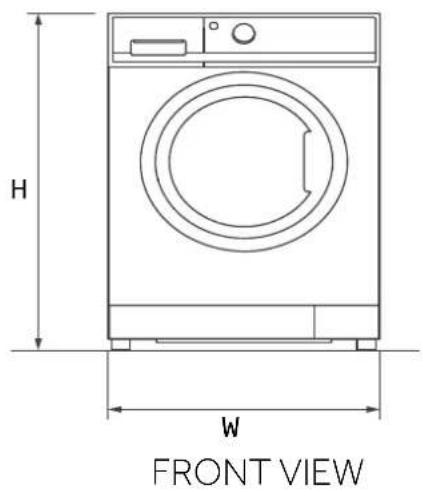
| PRODUCT DIMENSIONS | HW80 | HW90 |
| H Overall height of product mm | 850 | 850 |
| W Overall width of product mm | 595 | 595 |
| D5 overall depth of product (From top panel to main control board size)mm | 429 | 462 |
| D1 Overall depth of product mm | 468 | 501 |
| D2Depth of door open mm | 960 | 993 |
| D4Minimum door clearance to adjacent wall mm | 187 | 187 |
Note: The exact height of your washer is dependent on how far the feet are extended from the base of the machine. The space where you install your washer needs to be at least 40mm wider and 20mm deeper than its dimensions.
12.3 Standards and Directives C€
This product meets the requirements of all applicable EC directives with the corresponding harmonised standards, which provide for CE marking.
13-Customer service
We recommend our Haier Customer Service and the use of original spare parts, and the minimum period during which the spare parts for the household washing machine is 10 years.
If you have a problem with your appliance, please first check section TROUBLESHOOTING. If you cannot find a solution there, please contact:
▶your local dealer.
the Service & Support area at www.haier-europe . com where you can find telephone numbers and FAQs and where you can activate the service claim.
For specific product information, please login to the Haier official website https://www.haier-europe.com/en_GB/technical-assistance/
and search the model you use, click the product to go to the detail page then click "documents" to find the user manual to download it. You can also find the product information in this page.
To contact our Service, ensure that you have the following data available.
The information can be found on the rating plate.
Model ____ Serial No. ____
Also check the Warranty Card supplied with the product in case of warranty.
For general business enquiries please find below our addresses in Europe:
| European Haier addresses | |||
| Country* Postal address Country* Postal address | |||
| Italy | Haier Europe Trading SRLVia De Cristoforis, 1221100 VareseITALY | France | Haier France SAS3-5 rue des Graviers92200 Neuilly sur SeineFRANCE |
| Spain Portugal | Haier Iberia SLPg. Garcia Faria, 49-5108019 BarcelonaSPAIN | Belgium-FRBelgium-NLNetherlandsLuxembourg | Haier Benelux SAAnderlechtRoute de Lennik 451BELGIUM |
| Germany Austria | Haier Deutschland GmbHHewlett-Packard-Str. 4D-61352 Bad HomburgGERMANY | PolandCzechiaHungaryGreeceRomaniaRussia | Haier Poland Sp. zo.o.Al. Jerozolimskie 181B02-222 WarszawaPOLAND |
| United Kingdom | Haier Appliances UK Co.Ltd.One Crown SquareChurch Street EastWoking, Surrey, GU21 6HRUK | ||
*For more information please refer to www.haier-europe.com.
Model information is available in the product database at https://eprel.ec.europa.eu/ by searching for the model identifier reported in the field Model of the product label affixed on the product; the link to the model in the product database can be found here below for each model identifier:

HW80-BP14357TU1HW80-BP14357TU1

HW90-BP14357TU1