MMS 730 - Music receiver MAGNAT - Free user manual and instructions
Find the device manual for free MMS 730 MAGNAT in PDF.
| Product type | Music receiver |
| Brand | Magnat |
| Model | MMS 730 |
| Dimensions (main unit) | 434 x 76 x 332 mm |
| Dimensions (remote control) | 48 x 148 x 17 mm |
| Weight | 3.3 kg |
| Power supply | Mains 230 V, max. power consumption 20 W, standby < 0.5 W |
| FM tuner | 87.5 – 108 MHz, sensitivity -108 dBm |
| DAB/DAB+ tuner | Sensitivity -100 dBm |
| Supported audio formats (USB) | MP3, WMA |
| Supported audio formats (network) | MP3, WMA, AAC, FLAC, APE, WAV |
| Bluetooth connectivity | Bluetooth 5.0 with Qualcomm® aptX™ HD |
| Network connectivity | WiFi 2.4 GHz (802.11 b/g/n) and LAN RJ45 |
| USB port | USB-A 1.1, 5 V/DC, 1000 mA, up to 8 GB (FAT 16/32) |
| Audio outputs | 2x analog RCA (fixed), 1x optical Toslink™, 1x coaxial RCA (fixed) |
| Frequency response | 20 Hz – 20 kHz |
| Care and cleaning | Dry, soft cloth, avoid any chemical products |
| Safety | Operating temperature 10-40°C, do not expose to water or flames, sufficient ventilation |
| Spare parts and repairability | Repairs by qualified personnel only, original spare parts |
| Supplied accessories | Instruction manual, remote control (AAA batteries included), mains cable, DAB/FM antenna |
Frequently Asked Questions - MMS 730 MAGNAT
User questions about MMS 730 MAGNAT
0 question about this device. Answer the ones you know or ask your own.
Ask a new question about this device
Download the instructions for your Music receiver in PDF format for free! Find your manual MMS 730 - MAGNAT and take your electronic device back in hand. On this page are published all the documents necessary for the use of your device. MMS 730 by MAGNAT.
USER MANUAL MMS 730 MAGNAT
Important notes for installation / warranty card
Use your phone, tablet or computer as a remote control for Spotify. Go to Spotify.com/connect to learn how.
he Spotify Software is subject to third party licenses found here: https://www-spotfly.com/connect/third-party-licenses.
The Bluetooth® word mark and logos are registered trademarks owned by Bluetooth Sigt, Inc. and any use of such marks by Magnat Audio-Produkte GmbH is under license. Other trademarks and trade names are those of their respective owners.
Qualcomm aptX is a product of Qualcomm Technologies, Inc. and/or its subsidiaries.
Qualcomm is a trademark of Qualcomm Incorporated, registered in the United States and other countries, aptx is a trademark of Qualcomm Technologies International, Ltd., registered in the United States and other countries.
At the end of the product's useful life, please dispose of it at appropriate collection points provided in your country.
The equipments are checked and tested continuously during the entire production process. In case you have problems with
y
- During the warranty period we will notify any defects due to faulty material or relationship by replacing or repairing the defective part at our discretion. Further claims, and in particular those for price reduction, cancellation or sale, compensation for damages or subsequent damages, are excluded.
3.Unauthorized tampering with the equipment will invalidate this warranty.
-
Consult your authorized dealer first, it warranty says needle is needed. Should it prove necessary to return the component to the factory, please ensure that the component is packed in original factory packing in good condition . Your excuse our reject as proof of your partfication
-
Excluded from the warranty are: - Illumines - Velass - Batteries - Wear parts - Salping damages, either readily apparent or consolidated (causes for such damages must be indeed immediately with forwarding agent), the railway express office or past office, - Scratch in cases, metal components, front panels, etc. (You must notify your dealer directly of such defects within three days of purchase). - Defects caused by incorrect installation or connection, by operation errors (see配套 instructions), by overloading or misuse of equipment which never have been repaired incorrectly or modification where the case has been opened by passengers other than us. - Consequential damages to other equipments. - Reimbursement of costs, without our prior consent, when repairing damages by third parties.
Toules rois felicissions!
Name and address of the dealer/stamp
Käufer/Customer
Name/Name
StraBe/Street
PLZ,Orl/City
Land/Country
Kaufdatum/ buying date
No warranty without receipt!
INHALT
3 ANALOGECINCH-AUSGANGE
5 DIGITAL OUT OPT, COAX
Pfell/Sklp (ruckwart)
The Spotify Software is subject to third party licenses found here: https://developer.spotify.com/edsk-third-party-licenses/
UPGRADE
2.4GHz,802.11 b/g/n,WPA2,300MBps
RJ45
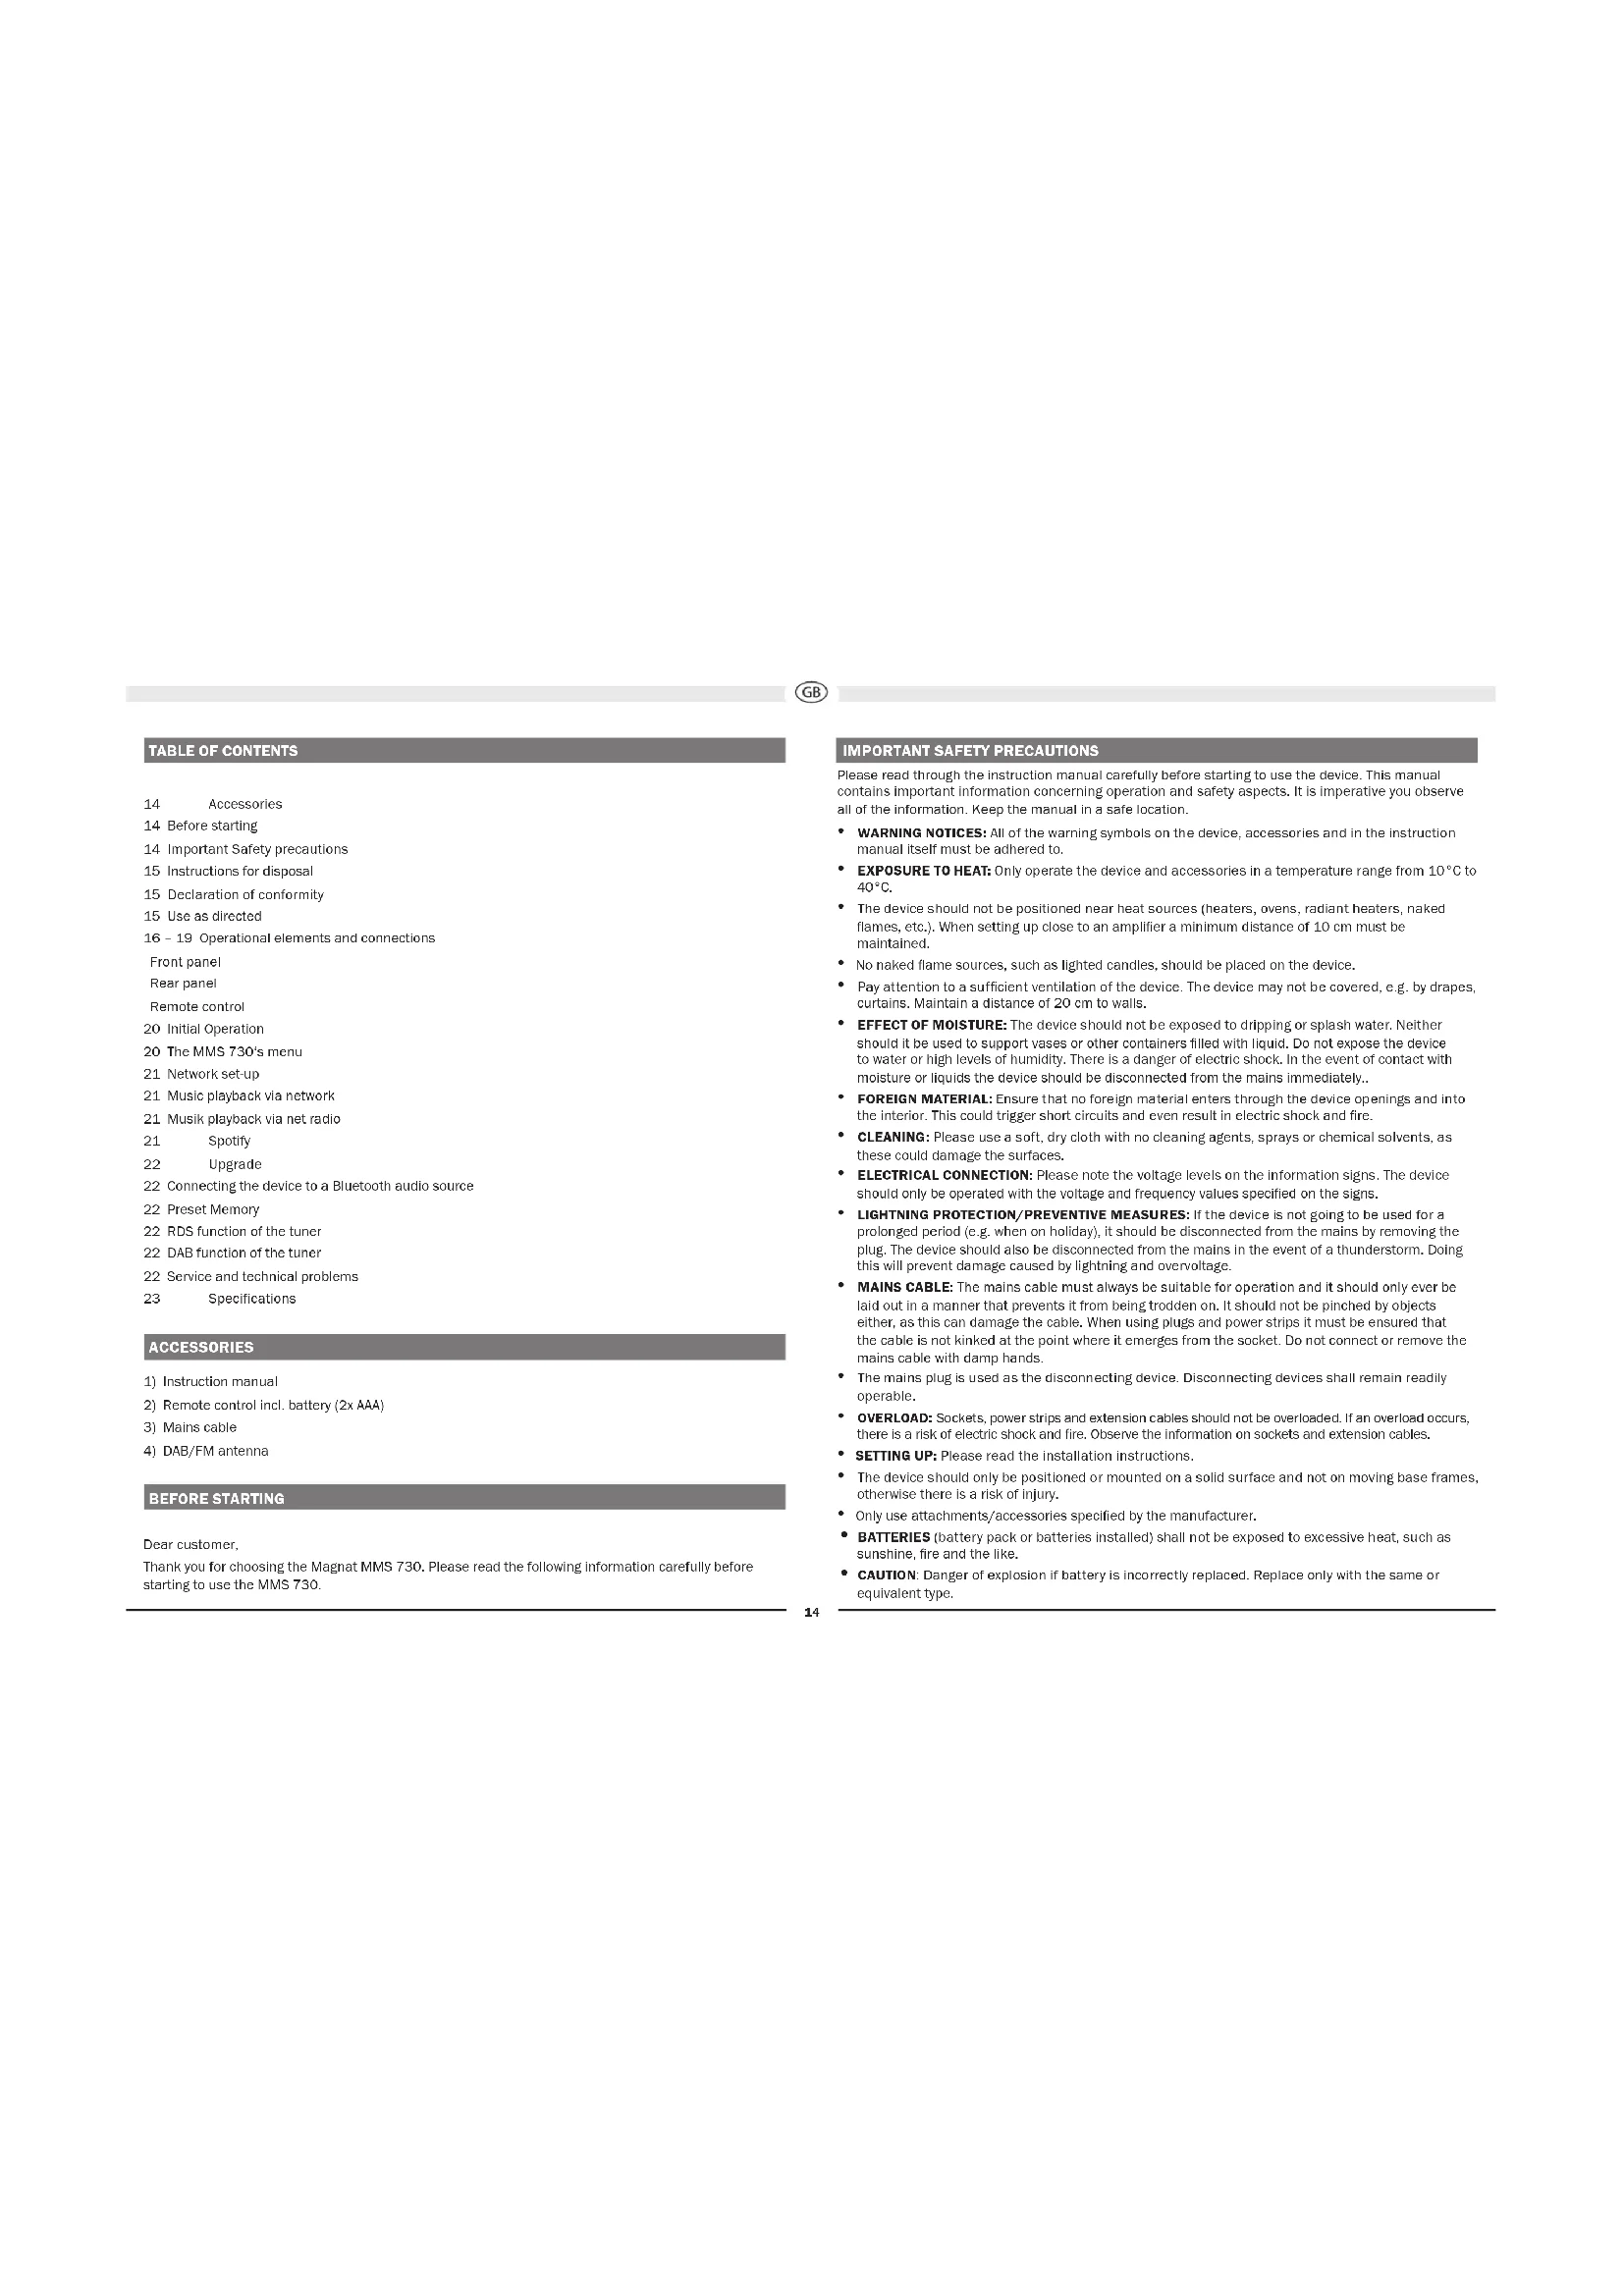
14 Accessories
14 Before starting
14 Important Safety precautions
15 Instructions for disposal
15 Declaration of conformity
15 Use as directed
16-19 Operational elements and connections
Front panel
Rear panel
Remote control
20 Initial Operation
20 The MMS 730's menu
21 Network set up
21 Music playback via network
21 Musik playback via net radio
21 Spotty
22 Upgrade
22 Connecting the device to a Bluetooth audio source
22 Presel Memory
22 RDS function of the tune
22 DAB function of the tuner
22 Service and technical problems
23 Specifications
ACCESSIONS
1) Instruction manual
2) Remote control incl. battery (2x AAA)
3) Mains cable
4) DAB/FM antenna
BEFORE STARTING
Dear customer,
Thank you for choosing the Magnet MMS 730. Please read the following information carefully before starting to use the MMS 730.
IMPORTANT SAFETY PRECAUTIONS
Please read through the instruction manual carefully before starting to use the device. This manual contains important information concerning operation and safety aspects. It is imperative you observe all of the information. Keep the manual in a safe location.
WARNING NOTICES: All of the warning symbols on the device, accessories and in the instruction manual itself must be adhered to.
- EXPOSURE TO HEAT: Only operate the device and accessories in a temperature range from 10^ to 40^ .
- The device should not be positioned near heat sources (heaters, ovens, radiant heaters, naked flames, etc.). When setting up close to an amplifier a minimum distance of 10cm must be maintained.
No naked flame sources, such as lighted candles, should be placed on the device.
Pay attention to a sufficient ventilation of the device. The device may not be covered, e.g. by drapes, curtains, Maintain a distance of 20~cm to walls.
- EFFECT OF MOISTURE: The device should not be exposed to dripping or splash water. Neither should it be used to support vases or other containers filled with liquid. Do not expose the device to water or high levels of humidity. There is a danger of electric shock. In the event of contact with moisture or liquids the device should be disconnected from the mains immediately.
- FOREIGN MATERIAL: Ensure that no foreign material enters through the device openings and into the interior. This could trigger short circuits and even result in electric shock and fire.
- CLEANING: Please use a soft, dry cloth with no cleaning agents, sprays or chemical solvents, as these could damage the surfaces.
- ELECTRICAL CONNECTION: Please note the voltage levels on the information signs. The device should only be operated with the voltage and frequency values specified on the signs.
LIGHTNING PROTECTION/PREVENTIVE MEASURES: If the device is not going to be used for a prolonged period (e.g. when on holiday), it should be disconnected from the mains by removing the plug. The device should also be disconnected from the mains in the event of a thunderstorm. Doing this will prevent damage caused by lightning and overvoltage.
- MAINS CABLE: The mains cable must always be suitable for operation and it should only ever be laid out in a manner that prevents it from being trodden on. It should not be pinched by objects either, as this can damage the cable. When using plugs and power strips it must be ensured that the cable is not kinked at the point where it emerges from the socket. Do not connect or remove the mains cable with damp hands.
The mains plug is used as the disconnecting device. Disconnecting devices shall remain readily
- OVERLOAD: Sockets, power strips and extension cables should not be overloaded. If an overload occurs, there is a risk of electric shock and fire. Observe the information on sockets and extension cables.
- SETTING UP: Please read the installation instructions.
- The device should only be positioned or mounted on a solid surface and not on moving base frames, otherwise there is a risk of injury.
- Only use attachments/accessories specified by the manufacturer.
- BATTERIES (battery pack or batteries installed) shall not be exposed to excessive heat, such as sunshine, fire and the like.
- CAUTION: Danger of explosion if battery is incorrectly replaced. Replace only with the same or equivalent type.

RISK OF SWALLOWING BATTERIES!
- The product/remote control may contain a coin/button type battery, which can be swallowed. Keep the battery out of reach of children at all times! If swallowed, the battery can cause serious injury or death. Severe internal burns can occur within two hours of ingestion.
- If you suspect that a battery has been swallowed or placed inside any part of the body, seek Immediate medical attention.
- When you change the batteries, always keep all new and used batteries out of reach of children. Ensure that the battery compartment is completely secure after you replace the battery.
- If the battery compartment cannot be completely secured, discontinue use of the product. Keep out of reach of children and contact the manufacturer.
DAMAGE THAT MUST BE RECTIFIED BY A SPECIALIST:
If any of the following damage occurs, disconnect the device from the mains immediately and contact a specialist to conduct the repair work:
- The device should not continue to be operated if there is visible damage to the mains cable. A damaged cable should not be repaired, but must be replaced.
- Damage to the mains socket at the device.
If moisture or water has entered the device or foreign objects have fallen into the device.
If the device has fallen and the housing is damaged. - If the device does not work properly, even though all of the information in the instruction manual has been observed.
Only those subsequent alterations approved by the manufacturer may be conducted. Only original spare parts should be used for repair.
After conducting any repairs the safety of device should be checked to ensure it is functioning correctly and safely.
Repairs must always be conducted by qualified specialists, as you might otherwise be exposed to dangerous high voltage levels or other hazards.

This symbol warns the user that high voltage is used within the device which can result in electric shock.

This symbol makes the user aware that there are important notes in the enclosed instruction manual which must be observed.

WARNING:DO NOT OPENRISK OF ELECTRIC SHOCK
To reduce the risk of fire or electric shock, do not expose this unit to rain or moisture.

This is Class II apparatus with double Insulation, and no protective earth provided.
INSTRUCTIONS FOR DISPOSAL
In accordance with European Directive 2012/19/EU all electrical and electronic appliances must be disposed of separately via local collection points. Please observe the local regulations and do not dispose of your old appliances with normal household waste.
Battery disposal
Old batteries are hazardous waste and must be disposed of in accordance with current regulations.
DECLARATION OF CONFORMITY

Hereby, Magnat Audio-Produkte GmbH declares that the device Magnat MMS 730 is in compliance with the essential requirements and other relevant provisions of directive 2014/53/EU. The Declaration of Conformity can be found at www.mac-audio.de in the download area of the device.
USE AS DIRECTED

This device is designed for indoor use only.

OPERATIONAL ELEMENTS AND CONNECTIONS - FRONT PANEL
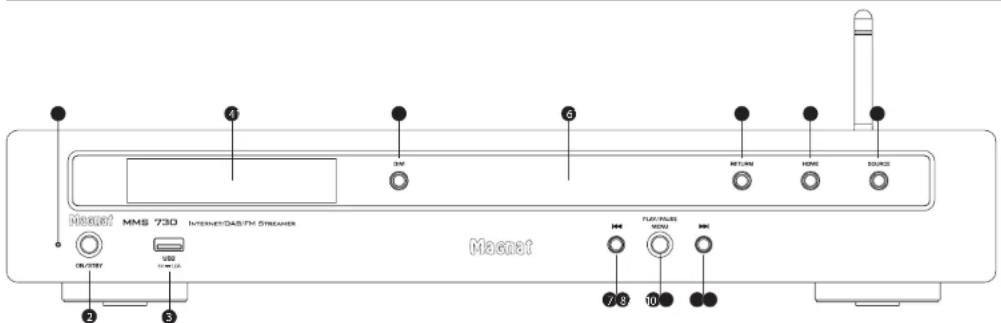
2 LED STATUS INDICATION
This illuminated display indicates the MMS 730's 2 possible states:
LED is illuminated green: The MMS 730 is switched on. The device is ready for use.
LED is illuminated red: The MMS 730 is in the standby mode.
1 ON/STBY
Switches the device on when it is in the standby mode. If the LED does not illuminate, actuate the power switch located on the rear of the device. Conversely the device can be switched from power operation to the standby mode.
3. USB INPUT
For connecting USB storage media up to 8 GB (FAT 16/32)
4 DISPLAY
The display shows the following information:
- Selected source
-
Station and reception information in FM and DAB mode
-
If the USB storage medium contains MP3 or WMA files, the file type and number of files are displayed:
HP3 15 FILER - When playing from USB:
Track currently playing, elapsed time of current track, e.g.: 10-45 - If the MP3 or WMA files contain ID3 tag information, this is displayed in the 2nd line of the display.
5 DIM
This button can be used to set the display brightness at three levels.
6 SENSOR FOR THE REMOTE CONTROL
Please aim at this sensor when using the remote control.
7 TUNING/
FM mode:
- Short press: Changes the reception frequency in 50 kHz increments (FM)(manual station setting).
- Press and holds: Searches for the next station (automatic station setting).
DAB mode:
Selects the next or previous station in the DAB band.
8SKIP/MENU
USB mode:
Skip (backwards)
- Playback starts at the beginning of the current track
- Two short presses to the left;
Playback starts at the beginning of the previous track
Skip (forwards)
- Playback starts at the beginning of the next track
9 PLAY/PAUSE/MENU
Starts or interrupts the USB playback. Restarts the audio stream. Press and hold to open the settings menu.
10 MENU settings
Press and hold the button to access the menu for setting additional parameters. Navigate through the menu using the Skip keys. Press the button again to confirm the set parameters.
Further information can be found in the following sections:
- MMS 730 MENU
- NETWORK SETUP
11 RETURN
Use the Return key to jump back to the previous menu in the settings.
12 HOME
Use the HOME button to jump straight back to the main menu in NETRADI mode.
13 SOURCE (INPUT SELECTOR SWITCH)
Switches between the different audio sources:
- USB: USB playback.
- BT: Connection to a Bluetooth device
DAB INPUT: Selecting the DAB/DAB+tuner
FM INPUT: Selecting the FM tuner - NETWORK: Network/streaming input, control via the app
- NET RADIO: Internet radio input, control via the remote control, directly on the MMS 730 or via the app

OPERATIONAL ELEMENTS AND CONNECTIONS - REAR PANEL
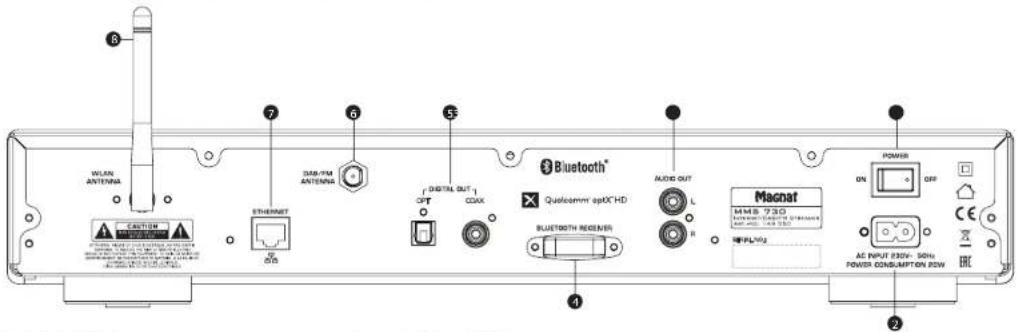
1 POWER SWITCH
Switches the device on and sets it in the standby mode. If the switch is set to the "OFF" position, the device is disconnected from the mains supply.
2 MAINS CONNECTION
For connecting the supplied mains cable. The safety fuse should only be changed by qualified service personnel.
3 ANALOGUE RCA OUTPUTS
For connecting to analogue audio inputs Please observe the coloured marking of the sockets and connectors. Red is always the right hand channel.
Fixed output level
4 BLUETOOTH ANTENNA
5 DIGITAL OUT OPT, COAX
Connect the MMS 730 to the digital Input on your amplifier/receiver using an optical or coaxial digital audio cable.
Fixed output level
6 DAB/FM ANTENNA CONNECTION
For connecting the supplied DAB/FM antenna or a house antenna.
7 LAN SOCKET
For connection to the router or the network,
8. WLAN ANTENNA
180° rotable WLAN antenna.
OPERATIONAL ELEMENTS AND CONNECTIONS - REMOTE CONTROL
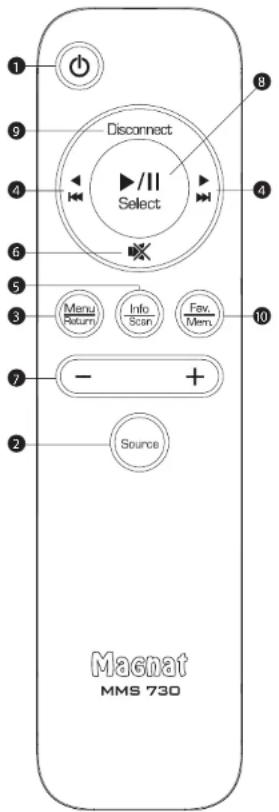
- Before using the remote control the supplied batteries must be inserted into the battery compartment located at the rear of the remote control.
- If the batteries have run out after prolonged use, please replace them (Type 2 x AAA).
- To prevent causing damage to the remote control please remove the batteries if the device is not going to be used for a prolonged period.
1 POWER
Switches the device on when it is in the standby mode. If the LED does not illuminate, actuate the power switch located on the rear of the device. Conversely the device can be switched from power operation to the standby mode.
2 INPUT SELECTION
Press several times to scroll through the sources in the following order: USB-BT-DAB-FM-NETWORK-NETRADIO-USB
3 MENU/RETURN
NET RADIO mode;
Press and hold to go one step back in the selection menu.
Calls up the system menu. Use the following arrow buttons to navigate through the menu
▲and▼,Press the SELECT button (8) to confirm the set parameters.
Also see the MMS 730 MENU chapter.
Press and hold to go to the previous setting menu.
4SKIP/ARROW/NAVIGATIONBUTTONS
USB mode:
Arrow/Skip (backwards)
- Short press: Playback starts at the beginning of the current track
- 2 short presses: Playback starts at the beginning of the previous track
- Menu: Navigation / adjustment of parameters.
Arrow/Skip (forwards)
- Short press: Playback starts at the beginning of the next track
- Menu: Navigation and setting parameters.
FM mode:
- Short press: Changes the reception frequency in 50 kHz increments (FM)(manual station setting).
- Press and hold: Searches for the next station on the selected band (automatic station setting).
DAB_mode:
Selects the next or previous station in the DAB band.
and
Menu: Setting parameters.
5 INFO/SCAN
USB mode: Display of the ID3 tag (if supported by the music file):
The 2nd line of the display shows the ID3 tag Information. Press the INFO button to display further information.
For MP3 and WMA files, the file name of the current track is also displayed.
FMmode(jNFO)
One short press enables the retrieval of RDS information (where supported by the station).
Further details about the RDS station information can be found in the "RDS functions of the tune" section.
DAB mode (SCAN):
Retrieving DAB station information (where supported by the station).
Further details about the DAB station information can be found in the "DAB functions of the tuner" section.
Press and hold to start the automatic station search for DAB.
Bluetooth operation:
The display shows the device ID of the paired device, the data rate and the ID3 tag Information of the current track.
Press the INFO button to display further ID3 tag information:
6 MUTE
Switches the sound on and off.
7+/-BUTFONS
The +/- buttons can be used to scroll through preset stations (DAB+, FM and NETRADIO). See also 10 FAV.

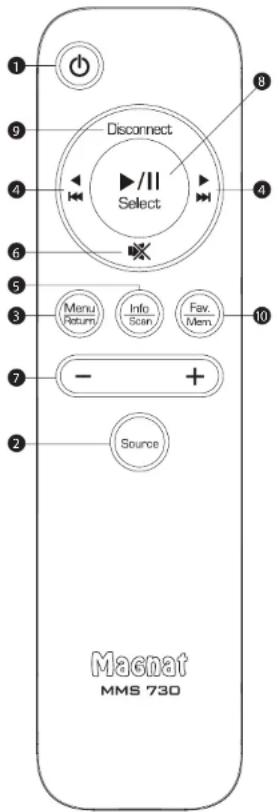
OPERATIONAL ELEMENTS AND CONNECTIONS - REMOTE CONTROL
8 PLAY/PAUSE/SELECT
USB mode:
Starts or pauses the audio stream playback.
NETRADI operation;
Restarts audio stream playback. Menu: Open the window
Confirm the entry.
Closes an existing Bluetooth connection and starts the pairing mode.
10_FAV/MEM
SAVING AS FAVOURITES DAB/FM/NETRADIO DAB mode:
One short press saves the current DAB station. The + / - button can be used to select the desired memory location (M1-M40).
- Press and hold once to delete a memory location. Then use the +/- buttons to select the memory location to be deleted and confirm the deletion via the PLAY button.
FM mode:
One short press saves the current FM station. The + / - button can be used to select the desired memory location (M1-M40).
- Press and hold to delete a memory location. Then use the +/- buttons to select the memory location to be deleted and confirm the deletion via the PLAY button.
Pressing briefly saves the Internet radio station currently displayed in the favorites list.
The favorites list cannot be edited for NETRADIO!
- Favorites can be deleted in the MENU under Favoritest
USB mode:
In USB mode, the last track played is saved and, if the USB memory has not been removed, it will continue at the beginning of this track the next time the source is changed. Fast forward/rewind within the track is not possible. Music tracks from the ROOT folder are only considered for playbackl
NETRADIO operation:
INITIAL OPERATION
- Place the MMS 730 on a flat surface. Observe the relevant clearance gaps specified under 'Important safety instructions'.
Important: Do not place any objects (magazines, CD/record sleeves, etc.) on the device. The ventilation openings on the top of the device must remain unobstructed at all times!
- Connect the MMS 730 to your receiver via a coaxial/optical or analogue output.
- Connect the DAB/FM antenna to the antenna connection point at the rear of the device. For later operation, the position of the antenna should then be determined according to where the best reception is. The end of the antenna should then be secured in the appropriate position, e.g., using a drawing pin.
Reception can be improved by a suitable indoor or outdoor household antenna if the reception is not so good.
- Connect the mains cable supplied to the rear of the unit and then Insert the other end into a 230 V socket.
- First activate the power switch at the back; the device is now in standby mode.
- Then switch on the device using the remote control or via the ON/STBY key at the front.
- Select your desired audio source using the Input selector button (A-4).
THE MMS 730'S MENU
Other parameters can easily be set via the menu.
- The menu is accessed via the MENU key on the remote control or by pressing the volume MENU on the front of the unit.
- Navigation within the menu and changing the settings is done by using the arrow keys
on the remote control or activating the SKIP buttons on the device.
Confirmation of the individual menu items using the PLAY button on the remote control or by pressing the PLAY/PAUSE/MENU button on the device.
The following settings are possible:
- System information:
- Select SYSTEM INFO in the menu. The and keys can be used to display the Individual firmware versions of the device for service purposes.
Network Wizard - Upgrade
Available device updates including descriptions are offered on our homepage. -
FACTORY reset: The basic settings are restored via the FACTORY RESET menu item (delete all station memories, auto standby on, network settings deleted, saved NETRADIO favourites lists are not deleted).
-
Auto standby function:
The unit has an auto standby function that automatically switches the device to standby mode around 3 1/2 hours after the last time it was operated (via the controls on the unit or via the remote control). This function implements an EU energy saving regulation (1275/2008 EC), reducing power consumption if the device is accidentally left turned on after use.
Select APO SETTING in the menu. The function can now be activated or deactivated. When leaving the factory, the function is activated.
- Exit:
You can leave the menu via EXIT.
NETWORK SET-UP
CONNECTION TO THE NETWORK VIA LAN (CABLE):
Connect the MMS 730 to your LAN network. Use a LAN cable (not included) for this. The MMS 730 automatically obtains a network address from your router within approx. 5 minutes and can then be used.
CONNECTION TO THE NETWORK VIA W LAN WIRELESS)
You have two options for connecting the MMS 730 to your WiFi network:
1. Network setup with the NETWORK WIZARD:
- Select NETWORK WIZARD in the MMS 730 menu.
The W-LAN search starts automatically, with SCANNING shown in the display. - When the search is finished, use the SKIP buttons (remote control {4}) or the SKIP button (device (8)) to show the existing networks in the display one after the other.
-
Press the PLAY button (remote control (8)) or the MENU button (device (10)) to select the desired network
-
Then enter the WiFi password: Navigate through the alphabet and numbers using the SKIP buttons or the PLAY button. Confirm the individual password digits with the SELECT button (remote control (8)) or the MENU button (device (10)). The last digit entered can be deleted using the selection box.
-
When you have finished entering the complete password, confirm it with the selection field.
The MMS 730 will now connect to your WiFi network. After successful connection, CONNECTED is shown in the display.
If the connection fails, CONNECT FAIL is displayed. In that case, please check the password and enter again.
2. Network setup with the MAGNAT AUDIO STREAM app:
- Download the MAGNAT AUDIO STREAM app from the Apple Store or Google Play Store and install it on your tablet/mobile phone
- When started, the app searches for available devices.
- When installing for the first time, select "Add device", Then select MAGNAT.
- Follow the instructions on the next page of the app and switch to the WiLAN settings of your mobile device. Select the MMS730 XXX network.
After successful connection, switch back to the MAGNAT AUDIO STREAM app. This then connects to the MMS 730 and guides you through the further installation process. - Alternatively, other "MUZO" based apps can also be used.
MUSIC PLAYBACK VIA NETWORK
The audio streaming function of the MMS 730 allows you to play music via Internet services. You can also access audio files stored on your local network. The functions can be controlled via the MAGNAT AUDIO STREAM App.
Select the NETWORK Input.
MAGNAT AUDIO STREAMAoo
The following functionalities are available:
- My Music: For playing local music from your tablet or mobile phone as well as from network hard disks or USB storage media connected to the router.
Tuneln; Internet radio
Note: The network functions can be controlled via the app only. In group mode via app only the „Master+unit display correctly current playback, source and further information! By using the app for volumen adjustment MMS 730 and mobile phone are synchronized between each other after first volumen click. This can result in a volumen jump!
MUSIC PLAYBACK VIA NET-RADIO (INTERNET RADIO)
The MMS 730 has a built-in internet radio turner that can be controlled directly on the device or via the remote control - independent of the MAGNAT AUDIO STREAM App.
- Select the NET RADIO input.
- Use the ARROW/SKIP buttons (remote control 4) or the SKIP button (unit 8) to navigate through the internet radio menus.
- Use the PLAY button (remote control 8) or the MENU button (unit 10) to confirm your selection.
- Press the RETURN button (remote control 3) to go back one step in the menu.
- Press and hold the MENU button (remote control 8) to return to the main menu.
The following options are available in the main menu:
- Location: Sort radio stations by continent/country/city, ...
Genre: Sort radio stations by genre. - Podcasts: Displays podcast content. Sorting e.g. Country, Genre, Show All, ...
Favorltes:
You can store your favourite radio stations in a list:
- Save favorites: Briefly press the FAV/MEM button (remote control 10)
- Delete favorites: Press and hold the FAV/MEM button.
Confirm that delete with the PLAY/PAUSE button.
Note: A total of 40 stations can be stored in the memory. Deleting of favorites is only possible at
favorile menu. The sequence of the stored radio stations cannot be edited.
Note: The stored stations cannot be accessed via the Internet radio function (Tunel) of the MAGNAT AUDIO STREAM App.
Note: The available radio stations are provided by Tuneln.
Spotify:
Use your phone, tablet or computer as a remote control for Spotify. Go to Spotify.com/connect to learn how.
Licenses:
The Spotify Software is subject to third party licenses found here:
https://developer.spotify.com/esdk-third-party-licenses/
UPGRADE
The MMS 730 Include a OTA (Over The Air) upgrade opportunity. The App show if a update is available and let you choose to Install. Please follow the App Instructions for Installation.
Note: The OTA upgrade is only for WLan and LAN functionalities.
CONNECTING THE DEVICE TO A BLUETOOTH AUDIO SOURCE
Select Bluetooth input. If you have previously connected a Bluetooth device, the MMS 730 will automatically attempt to re-establish a connection with this device. If this is the case, you may be required to manually confirm the connection on the source device.
If a connection has not already been made or the connection cannot be re-established, the MMS 730 will automatically activate the ,pairing mode', ^u will flash on the display.
Now activate the Bluetooth mode on your source device. The MMS 730 will appear in the list of Bluetooth devices as „MMS 730". If it is not displayed in the list, set your source device to search for Bluetooth devices manually and make sure that the MMS 730 has been switched to the pairing mode.
Depending on the source device, you may be asked whether the password is to be accepted during the pairing procedure. You can confirm this by simply pressing Accept. If you are still asked for a password, use the default passwords .0000 or .1234. If you are asked if you want to establish a connection after pairing, please select .Yes. When the device has been paired and connected successfully the .BT indicator will illuminate continuously.
The MMS 730 supports the .Qualcomm ^® aptXTM high quality audio transmission standard. If your source device also supports this standard, .Qualcomm ^® aptX will be selected automatically as the transfer mode when establishing a Bluetooth connection.
PRESET MEMORY
The device is equipped with two independent PRESET memories for FM and DAB stations. Each memory can store up to 40 stations.
Staring stations:
Set the desired DAB or FM stations using the TUNING buttons on the unit or via the remote control.
- Activating the FAV button on the remote control opens the memory and the desired memory location can be selected via the +/- button. Saving occurs automatically after 5 seconds in the storage location.
- Successful storage is confirmed on the display with the appearance of STORED PRESET. In the first line, the storage location number is played permanently before the station frequency.
Select a station from the list of stations:
Select the desired storage location via the +/- keys (by pressing briefly).

RDS (RADIO DATA SYSTEM)-FUNCTION OF THE TUNER (FM ONLY)
RDS is a system which provides information about FM stations that is broadcast together with the station's signal. The MMS 730 can present this information (about the station, broadcast, etc.) in the display.
The RDS information can be retrieved by repeatedly pressing the DISPLAY button (remote control) in the following order:
- PS (Program Service Name): Displays the name of the programme.
RT (Radio Text): Shows station information and messages.
PTY (Program Type): Displays the type of programme.
Time / Date
If one of these functions is not supported despite reception of an RDS signal, N / A^* will appear in the display.
DAB FUNCTIONS OF THE TUNERS (DAB ONLY)
The DAB transmission system provides further data and information that can be accessed via the DISPLAY button (remote control) in the following order:
Station name
- DLS (Dynamic Label Segment): Shows station information and messages (e.g., title and artist of the current song, news messages, other information about the current programme or station)
Programme type (e.g. pop, news, classical)
DAB multiplex number and frequency of the current station
Time/Date
- Bit rate of the current audio signal
DAB multiplex name
SERVICE AND TECHNICAL PROBLEMS
If you should encounter any technical problems, please contact your specialist dealer or Magnet Audio-Produkte GmbH, www.magnet.de.
SPECIFICATIONS
Tuner
FM frequency range: UKW:87.5-108 MHz
DAB/DAB+:174.928-239.200MHz(Band III)
FM sensitivity:UKW:-108 dBm
DAB/DAB:+:100 dBm
USB
Payable formats: MP3, WMA
USB A Ver.: 1.1 5V/DC 1000 mA; up to 8GB FAT 16/32
Analogue outputs: 2x RCA 2V/RMS with fixed level
Frequency response: 20 Hz-20 kHz
Digital outputs:
1x optical (ToslinkTM)
1x coaxial (RCA) with fixed level 2V/RMS
48/44.1/48/88.2/192kHz
Supported bit depths:
bit
Network input:
WLAN:
Operating Frequency:
2402-2480MHz
Maximum emitted power
in accordance with EN 62479
5,49 dBm (Bluetooth®)
In accordance with EN 62311:
16.80 dBm (Bluetooth®)
Power input:
Maximum 20 W
Standby < 0.5 W
Dimensions (w x h x d):
Main device: 434 x 45 x 318 mm
Main device incl. operational elements and connecting terminals: 434 x 76 x 332 mm
Remote control: 48 × 148 × 17 ~mm
Weight: 3.3kg
Subject to technical change.
For further information please visit our website: http://www.magnat.de.
SOMMAIRE
RISQUE D'INGESTION DES PILES!
INSTRUCTIONS POUR LA MISE AU REBUT
5 DIGITAL OUT OPT, COAX
CONNEXION AU RESEAU VIA LAN (CABLE):
APPLICATION MAGNAT AUDIO STREAM:
The Spotify Software is subject to third party licenses found here: https://developer.spotify.com/esdk·third·party·licenses/
UPGRADE
DAB/DAB+174,928-239,200MHz(bande III)
44.1/48/88.2/96/176.4/192 kHz
16/24 Bit
Entrecerecau:
Dimensions (L x H x P)
Appareil principal: 434 x 45 x 318 mm
Modalitya DAB (SCAN):
Modalitya Bluetooth:
COLLEGAMENTO ALLA RETE TRAMITE WI-FL (WIRELESS):
ADD MAGNAT AUDIO STREAM:
The Spotify Software is subject to third party licenses found here: https://developer.spotify.com/edsk-third-party-licenses/
UPGRADE
supportate: 44.1/48/88.2/96/176.4/192kHz
WI-Fl: 2.4GHz, 802.11 b/g/n, WPA2, 300MBps
LAN: RJ45
Formati supportati: MP3, WMA, AAC, FLAC, APE, WAV
Ingresso Bluetooth®: Bluetooth® 5.0 / Qualcomm® aptX™ HD
Antena WiFi girable 180°
Licenses: The Spotify Software is subject to third party licenses found here: https://developer.spotify.com/esdk-third-party-licenses/
UPGRADE
2.4GHz,802.11 b/g/n,WPA2,300MBps
(hasta 192kHz/24Bit)
RJ45
Formatos compatibles:
VMA, AAC, FLAC, APE, WAV
Entrada Bluetooth®:
Bluetooth® 5.0 / Qualcomm® aptX™ HD
5.49 dBm (Bluetooth®)
YBaKaCMbI NOKyNaTeB!
BaIaOaHIM Boc 3eueHHe PccBep Magnat MMS 730. NkAaycta, BHHMaTe DAnKoUyIO HNOOPMNIPEPJI KIOAOENHE MMS 730.
BAXHbIe YKA3AHINI NO B30NACHOCTH
PykoBOCTBO NO 3KcNAYATAUH COdEPKHT BAXHBIE YKACAANH NO pEXHNMY PABOTb H 6eOAnCHCTN. O63aTeABoHO C6aOaTb BCE Yka3AHN. XpaHtB PykoBOCTBO NO 3KcNAYATAUH B HAeXHOM Mecte.
PNDYPNDETAEHbIe YKA3AHn: CaEDyt pNHNMaBt BOHMAHNE GcPNDyPTeTAEbIe 0603aHbIe NgCPTORCTB, pNPHDAHIOCTR H y PKOBOACTREo NOKHTWATAHNI.
BAHINHE TEMNEPATYPb:3KcNMyBpyyte yctpOBO C npHHAeXHOCTMn B HANAOHE TEmpeyot 10 ^ C do 40^ . YTOPOCTBO HC DAXHOYcTBAHBAHbucBbMMHcHOTNNHKOBTEAA (HARPEBATEN,NCH, MOKPKoBMHN, OTKBIOE PAAM).TPOMOHTBCeBOMNHcYCMHtAEHcABrYMCHeBAtB MMHNAHoe paccTOnBB10 cm
He pnyckaite KOHTAKTA ycrpoCTBa COTKpbTbIM NAMeHem, HAnpHMeP, CO CBeayAM.
O6pHHTE BHMHHe HAOCTAOHYB EHTNAAHIO YCPTPOHTBa. HeAHn HAPPAHbYcPTPOHTBO, HANPMep, 10pAMn, RAPMnMMyctAHmMBaTb HA OCTAOHOM paccTOMn (npMn. 20 cm) or cten.
BAMHHE BAAKHOCTHOCTPOBCTBO HE OAOHO NOEBAPETBCA BO5DAEHTBBO BDOAHBX KNEAB HAN 6b03T. TAKGE HO EHAEBN CNOAEBOTB B KNACTBE NOCTABKN DAI BAH MM ADPYX 3AIOAHHBEX XIAOKCTBO COCYO8. He NOePAETRE YcPOTCTBO BO5DAEHTBBO HMO BAOYX C BIAKOHN BAAKHOCTBO CYCZEETB ONACHCTBO NAOENHIX TOKBM. B CAYAE KOHTAKTA C BAOTOH HAN XIAOKCTBO HEMEDAHEHIO OTOOEOAHYBT YcPOTCTBO OT CETHIANTAH.
NOCTOPOHNHE PNEAMEBTs: CnayetobpaatbBHMMHHe ha To, 0to6b Hepe3 OTBepcTBA ypoTCTBa HneonanBnBHTpb NOCTOPHNHE PNEAMEBTs. OH MyrT cTb pnnHHoB B03NNHOHOOKOTPKNX 3aMukAHIN, NopAKENH TOKOM HAIOXAPA.
VHCTCA:CAeEeyPnMHeHcyXyHMRKyoTKaHbHcHOeOaBbaBbHuCHTAEUPOCPDA, CPHCHN HXMHNHEHKePACTOBAPHTA, HNHIOEBOeHxHbTOMOKTOYHbTOBpOeDEHHI.
NOACOEOAHHEHNEIHTAHN:CAeYETcoBIAOyIbnapaMeTpblnAHPXKHeH,yykAaHHHe H 380dCkHX TabuHxk.5oK NITAHH YcPOCTs MOHO KcNMyATPOBaTbTOBko CyaAaHHBM HA 380dCkHX TabuHxk.5oK NITAMH NAPMADH NAPHKeHN.HACOTb.
3AUNHTOAOTMOAHN/MEPBI PIEDOCIOPTOKHOCTIN:EcHnIbOABDAMTBAOBBPEM (HANB, B OITCYKBE) HNCNOBETCAE,CABYETOEoOOBCHNTCBETOIEWKEOPETCetOHNTAHNN. PHINBOOCEYET TAKKEOoEOOHNHTBcOTEHNTAOB BO pR07a.Tem CbIM bpeoTbaeTaONpBeKpEnHe 0YADAA MOANHEH NPOBEEHHORHO HBNPAKHNJ.
CETEBOKBASEB: CEBEBOBAIbAOJEXH6bIb cserdaTROgKcKMYATAUHNYKMAIbIbTaBC TIObKO TAKMn 6bpam, YTObHI KHO To Hr HO HAcHTyHb. TaKxie HeBa3 TaKIMATe KABe6bPdEMaTm, KOPTOB MeOTN PNOEPDHTo. IPII pINMIENHEITLNTcNEbHX BHOK YADHHITAEbHbX UTENTCEbHbX POETOK CMeYET OcbpaATb HBMAMHe Ha To. TObSI KABe6BHe6B HADOMAH B MCTe BbOxAIS UTENTCEbHO PoETKN. He DpTAPHBATcDO CetEBOTO KABe6Hn H NoDKNKONtE bFO BAaBHMyPKaYB.
CETBOWIITINCEAEHNOBAYTEKAROKTOKAOOJIOOEYCTPOCTBO,IKHEMYDOKEHOBIEBEOCEENEOEHOBOAHOIDTOYBIAOOE BPEM
- NEPERPY3KA: WtcreceAbbe pote3KTH, ydaHHTBeAbBe tIeNcEAbBe pote3KH ydaHHTBHeAe 0dXHHbPabotAtc npeBteBHeHM HApryHK. Pnppeperpy3ke cyueCctByet onaCHoctb nopaEXHnR TOKOM N nooka. OspatKeBHMMHe HOMMHABHe 3HaHE He pOte3KTH ydaHHTBeABHeBx K6kHexe.
YCTAHOBKA:Ogbntte BHMHHe Ha Hcptpykuio no MOHTaxy.
YCTOHOOTDOXKHOYTOCTAHABANBBSAICNMOHHTOBBBTcAOTBKOYCTOHHNBOCHNOHENEOHNOHNIXIOEIKBKK,18K KAK PHINHE CYCIEHETRIOECHOCTBHTRPHMTH

ONACHOCTb IPOIATbIBAHN BATAPEI
HIOA3yBtMO TANKBO XAOBIIUE B KOMNABT NOCTABKHN YKAZ3AHHB PNOH3BO4HEAMOPHTHAAHBPII HEMEEXHOCH
BatapeHn AkyMAYATOpby H DoAaHbNo Daepatpc BoaOeCTNO BbcOcHX TmepTApTy, HApNHMeP, CoaHeHOrO CTeS, OTHa H.Tn.
CyuTcEByeTOnACOCTBbPSB,ECN6BtApER 3AMEnHES HENP8BAHbHO.3AMEnHtE 6aBpEO TObKO HABTKIOKII HBAHOHrYIO.
YOTPOBTO/BOYAHTDACNTHNOHOI HORYPBAE MORY COePAERTHyTPOBHHBe/HECKOBIE BATSEKHN, KOTOPIE MOXK PPOAOITOHN. XPAHITE BATSEPH ENEOCTHOM DARE TCE MECTE. IPOPATAHBHAN BATSEP MOKET NAPGCTH KTRAKEBM TPAAMAM NCMEPHT. Cpea3 aNaC NOCA EPPADABAHB BATSEM OYB3HNNHTRKNEHBYBDEHPENHOKOIN
PnHIOADZENH HnIPOAHTBANHEH NIAIHOBAHAA B6TepRnBnPAHMMHEMDAHNO 00007ATCTCB 32 MEAHHHKONNOMCNUO.
-ПиЗЗмeheБатархХангпЕНOBИЕИСИОв308AHHьББATAPENBHEHOCTYTHOMДANDETEME.
Pocne 3aemeHb6atapen y6eHTecB TOM,TOOTCEK AANHOCTBO 3AKpBT.
EcMOTCENDABAPETHEHEDMOXHOONHOCTBO3AKpbIb,HEHCNOABsyIIEH3dAeHNE.
PMAEHTHEHDAEHNBEHDOCYTHOE
DARETERTMEOHNOBPATHTECKIPPOH3ODUAEAO.
NOBPEXDAEHNA, KOTOPBIE DOAXKHBYCTPAHRTbCR CNEUAAHCTOM:
PnepaCaeHNOxNpOePExHHx,piOoHpoEooHMO HeMeDeHHO OTOeHHOTb OTcEHNTBHA HnppeDyTcHmAHyA HpaIOeOHBeHHeMHo
EAAH Cn coteBOM Ka6e 6dy6t6hAp9KCHNbIePaeKdAHH,3KcXyTAHbPOBaYbCTpOCTOB06aBcUe HbAa. POpBeAeHNbIKaBbAepeMHTOHpBuHbAa, ETOHYKIO3MHmY
PnepexdHHpaBemaHHTAHHa yCtpoiCTBe.
EGAN BYTPb yCPOHCTBa nona Ka BAAra NnnoctopOHnnc npedMeTb.
EaynyctpoHCTBOonpOKHHyOcBnPmAToMnoBpcdNcKopnyC.
ECAI yCPOBCTBO HENPAHBAHBO FyHKUHOHHPYB, XOTBI CO6AIODEHN BCE YKASAHN PyKOBOCTBA NO 3KcNAATAYaTHIN.
AIOIYTHMO IINPADIHHMMATbTOAKoTgAOIHHEHbHHeNIMOOHH, KOTOpBte paoeeHHe HNTOTOBHTAEEM.
Aa peMOHa HeoOxAHMo HcnoAaSObaB ToAaKo OpunHbAaHbIe 3anaChBe dTaA.
Pcpeo MoHHTO 06bAIO MIO POBEPHTyIcPOCTHb H 6e3HOACHOt, IO6bH OB6CENHb HADAEJAaee H AADKHOE 4yHKUHOHPOBAHIE.
PeMOHThbpeB06TbOaTOxHBICBcEeBAIbHOANBcBBAKmMHIPOOBHHBMnCnHLBnAChTAM, TAK KAK HAEHMeKOToB3OHHHbYbONAOHE BbKOeHnHAPNKeHHeNAKpyDhBnBnAOCHOTc.

3OT CHMBO PNDPNDPEBET NO50BATEA O 7OM,TOE BYHTN YCPTOBCT8SA HCNOSAETOR BSCOKOBHNPHKNEO, KOTOPOE MREPIHSEKT KNBSCHM YDABPM TOKK.

TOT CINBAO YKBAIIBESBT NAOB3BOATEAO YCPOTRCTBA H TO, NO B PIPRAHMAOMY POKBOBDCTBE NO KAKAYATBIHMMIEOTBCIKN BHKNGKUZGK3AAGHH, KOTOPUB ABQABMOHUYKHO DAPADABH.

He oKpbibatOnachoctb 3eKtpnueckoro yapa!
YQHbmyHMHHBTHIOCHCHOTOPOMAHNAM3MKPTHECKDQYBAHP, HHO6XHOHMO 3AaHJUATyCYPTOBCTO TOXADH NAM BAAIT

YIpyORIOH KABCCA 8BHTHII C C ABOHOH HOAOIAHEO. KOHTAK 3AALLHTHOO 3AEMEAHNO ORCYTCBEY.
YKA3AHNIO YTNAN3AUH
CormaHc EpoBneckO AnepKHe 2012/19/EU BCE AekPrnckHe H AekPtckHbpe np6bpfa aYMaHsAnDLoHbCaBaCBcOTAebHo B MeCht-Be COpBHe pNtBuKoT, POKKaYCTa, BOnHOHrTe MeChtBie PnpDAHmH He BuPacBcBte CTapBe YpOCTaBmeCte CObbHM DonOMBHIM MyCOPOM.
YTHH3aun6aTaapeek
Cstpe 6atepekn OHocrT K OOCbIM OTXoAaM NPOAeKAT yTHAN3aun CorgAChO DeHCTbyouaHm PnpndnAnHM
AekAPAUH COOTBETCTB

AaHbM KomnHaM Magnat Audio Produkte GmbH yocctoepeR. 40 ycptoe MMS 730 oBeaert OCHOBHM Tpe6oAHN H ApyTN PmEBAHM HOpAM DnEeHTb2 2014/53/EU. DEkApauH COOTBETBHA HxOHTCR HA caTRE W.magnat.de a paeDe Downloads (MATEPHAN DA KAnHbH) KXKOQY OCTOKTBa...
1 CHN HNHANKAUNH COCTOHHN
3OTH HANKATOP NOKA BIAEET 2 COCTOHHN,9 KOTOpbIX MOKET HAXOHTBCK AKNHOENHH MM5 730:
CIAI.ROMPT EAMEMHUM IEMOMMS M30 1BAOABHEU. YCTOPCHDTO ROTOBK KOKIYABUYAIIM
CHADOPHTKAPCHMUBEOTOMMS730 HAXAHOCTBREKKHMOXAHJNHO
2 ON/STBY
BKAOKHUYCTOPDTHBO,EDAHOOHXADHTOB 8 peKHMIE OKHDAHAA. ECHCBETAOHD HeRTOPT, HXYKO BKAOKHTC CTeBEOB BbOaAeTBA H 38HNHE CTOPHOY YcPOoTBA.HAOBOpOT, yCPOICTAO MOKHO nepeKMOHTb Hs peKIMAPower B pKMMOKOHAA
3 USB-BX0A
AANI PAOKMOCHENI USB-HAKOHNITCAR
AO B IET (FAT 16/32)
4 ANCIAE
Hb nCnAe Ioka3BaEaTe CaiyOuBnBnN KInPnFmApDn
BbIpaHHHbHCTOHHHK
CBAECHNIOEPDNCHNPMAECBPOKHMFCNDAB.
ECAN faMBy MP3 HMQ WMA HAXOaTcH BAUSB-HHKONTME,OTOPBAKETCTHTNAMGHO KMOHCTEOB FAOMH HHKONTME:
HP 15 FILES
- PnBBOOPaHbDcHHN C USB:
HabHHHe BocPNOBHOAMOBMOKIO3HOES APbE ABOPOINHOADHOEN, HAPNHEp 12 05-15
EaHΦMIP3 HWMWcAepKAT CBEENH 0ID3-19AX,HN0t6paXAKOTB BTOPO CPTOKE DAAJTHAE.
5 DMMMEP
C NOMOIOI 3TOI HONKIN MOXIO pERYHOPOBATb TPNI CTHENIE RIKPOCTH DHCIMET.
6. DATYHK DAA DNTAHUHNOHHO
TTOB6bHNO8a308a7b PyAB TACTB1UHHO HTOYPAB8E,LEAETECbMM B 3TY TOKy.
7 HACTPOKKA-/+
PexmmFm
Kpoktoke HAKAHINE: HmMeHReH NaCTOy npHMAE 50 KU [FM] (pyHae HAcPOHa Ka CTAHUN)
- PpOoKHTENbHOH HAKATHE; HUET CAtyDpyOyO CTaHbU (ABtOMaTHeCKa HAcTPOKa CTaHm) Pekim DAB:
BbHpaertcLdAkyoynm npdeAlyo 3aTHnO
B Dnnaasohe DAB.
8 SKIP (NPONYCTNTb)/MEHIO
Pponyctntb (ha3aA)
Bocinpo33BdEHEHANHBAETCHC HANBAI TeksUJI KOMNOSHIK
AbnoHoe KOpOIOKe HAKATNE HANEOB: BocpoHaeDHeHcHnHAcTc HcHnAne pdoaayeKOMPOSHNI
Pponycntnb (onepeA)
Bocnp03BdeHHe HnHaAeTc HnBaAa Caeayoum KcmOoNtni
9 PLAY/PAUSE/MENU
3aaykaeH Hn Ppebpaat BocnpnBcDcHIO
uepe3 USB. Npe3anykaet aymonotok.
Ppo4oKHTaeHoe Haxtane KHOHN kTOpmbae
MeHIO HCTPOE.
10 MEHIO-Hactpoukn
HAKMHTNE HYEKKBIAE KHOKNY DARETO,TOB6
Bb3BaTb MCHIO AAR HACTPOIKI DOANOHINBcHex
napamEToB. HABATRUA B MEHOO OUCSECTAeRETO
KHOKNAM Skip (npnpyiH), HAKMHTAE KHOKNY
eue p3a, Tb6no nAOBEPnB yCTAHGAEHNHIE
napamToB.
AnHOHHTHEHYHIOHPDMAHIOBNMOKETEHINB CAEADYOHXN LABX2
MEHIO MMS 730
HACTPOIKA CETN
11 RETURN (B03BPAT)
Hcnaa3yIte Kaahnu Return, tOboi bepehybc K npduaycu meHIO HacrothKia
12 IANABHAR CTPAHNUA
DAH NOAIOUOENKPOYETPYMMGcTH.
8 WLAN-AHTEHHA
NoBopothaHa 180° WLAN-aHTeHHa.
3AEMEHTbI YNPABAAEHIN PA3bEMbl -NTyABT
PepeKHCPOB8BNMybTA
MCTAHUHOHORYPABAHNRMOUHOcER
B KOMTAKE3AEMENTBIHTAHHHCAeYET
BCTABMbT0dEMEHNEARDAIbaTeepk,
PACNOAOEHHOHE TaHbSMOTOPOHy
ECAH BATEPAKIN NOAEC PNODAOKHTAEIHO HCTOAB3OBAHIN CAYT,HXHYHO BYET 2AMOHHTO (TIN AAA).
B LIXKI PINGDPTAOIDHINHIOHNPOYIITBAI DACTAHMOHORO YPBNBAEHNBBHIMMEI AEMENTbTI HANTAHN H3 YCTPOCTBA,ECM HE PAHNPYCTE HCNOABOTb CFO DAHTBACOB BPEMN.
1 POWER
BIXHOAHTYEPOBO,ECM OHO HAXAOHCTB EPEKIMME OKDAHIN. ECM CBTADHOH HE TOPRT, HXHYKO BIXHOHTBCETBOB BIXMOHOTBA HA 3aHJHN OTOPOHYE YTOPOCTBA.HNABOOPT, YCTOPOCTBO MOKHO NEPEKUOKHTB H3 PEKHM A POWER B P KEMH OKDAHIN
2 BbI6OPA BXODA
HnabKNeckoKaP3a,BlIpeNKoAbeTeC5 MEKxHCTOyHNKBM BCAeHOUWMNPO4K6 USB-BT-DAB-FM-CETb-CETEBOPAADNO-USB
3 MEHIO/RETURN (B03BPAT)
PEXMM CETEBOE PAAMO
PINOAOXITAEHOBHEKATNEOBOAERD EPOHYBCEH34DA MEOH DIOBOPA.
OTKPOITE CHCTHEMO MEHO.HABATBILNA B MEOH OUCIOCTAETCRO KHONKMI HAKHMTE KHNKY SELECT (BblBPATb) (8), 106bIbIaTBDHPvCTyHOBANOHMNEPAMAPRTb.
OTKMOUHTE CYIeCTByKooee CoeHHeHH
Bluetooth 3anyotne pekm Pairing
Cnncoc H36paHoro HeAbaPepaKtnpoBaTaC
noomoucBETEBOTPOADNO
HsbaHHoe MoKHO ydaMb MEHIO
pa3eae "Hs6paHHoe!"
PcXnM USE:
BpeKMe USBCOxPAHHeTcNIOAeAH
BOCIPB30BGIMARKOMIOAOWECMOSB
RANOMTAE He CINYUAN,101PCEHE
C HAYAAN 3TOK KOMNCHUNBbCTPA
nepemotka KOMNOSHUN BnepeHa HeBO3MOxHa.
MysBkAxBHbIe TpeKn HnKIN ROKT 0ctyHb
TOXK0BOP3BeEeH1
10 FAV/MEM
COXPAHEHHOE H36PAHHOE DAB/FM/
CETEBOE PAAIO
PekmDAB:
Kopokoe Haxatne coxpaHre Tekyu
CTAHIO DAB.KeMaemyo RyeKy nAMrN (M1
-M40}MOXHO BbBpaHc NMOOIO KABNN
m = 311
AANTEnbHoe HaxaThe No3B0rE ydaNTb
Heynny narnr. 3aem c nmoosbIO KHONK
+/-BbIeepnE RcNkY nAMRn dAaCHHn
noTBCpAHTc ydaAChHc KhoNkoI PLAY.
Pexum EM:
Kopotkoe Haxatne coxpaHret Tekyu
CTAHIO FM. XeAemyio yueky naaTn (M1
-M40)MOXHO BbIbpaTc nmoaBIO KAAHIN
AANTeBHOE HAXATHE NOSBOARET YAAHNTb
RyehKy nAMTH.3aTeM C NOMOUsbIO KHONK
+/-BbIbePHTe RyeHcy nAMnDydaeneHHN
noTBepeHte ydaHne KhoNkoI PLAY.
PcKUM CETEBOE PAHO:
Kopotkoe Haxatne coxpaHReTekyuyio
OTo6paKaemyIO HHTepHcT-paHOCTAHUIO B
CINCKe H36paHHbIX.
BKAIOUOYEHNE
- YCTAHOTME MMS 730 HA POHOM MCE. Co6AIOAIE PACCOTIRHA, KOPTBpe yK3AHHIy D-YK3AHHX NO 6eONACOHTN.
BAKHO: He paaaie KAIe Hn-60 PneMeTb (XyPhaA, CD-Hk/NaAeTHKnH N T.1) aY cytePCTBc BENTHAAHBE NTDPCEbI 2 bEXPHN NACT yCTPOPTCBDAOxhJI BCERd AOTOBATcB CaoobDHHM
IIOKMOHHTMMS730KCAOcMyPCHBcpy,HCNOAByKOBCKAHbH/ONTHHCCKHHAHAHOARBOB BIXKO.
IaKIOHIOHTA HTHNY DAB/FM KHTAHOMY BXOy MAOBHOTI CTOPAOYE YCTPOACBIA.PIN NOCMAEOHNJU PAPOTO OAOJA XBIOTPNEAHOAONJI AHTCHNPU. NPI KOTPOO BYGCT HAUYUNIPNPM.3ATMe KOHIEU HTHNY DOAKH EOKPNAE B COOTBTCTBOUJOE NOHUNJH, HANHPME, CPOMOIOKIKHADPKO KHITIK.
COCTACTCYBOWAOMOUIHBRHTCHNHAHSHCUHRAHTCHHMAOTYPNHEGAFAONPHARTHXCAOABHXXYYWHTHPHEA.
Ia 230 B.
3A 100
BKAHOHTEYCPTPOIcBO CnMOOIOK HON/STBY HA NEpeDHeN PAeHN Hm NpTa DnCTAHNOHOHOR ynpaAeHH
BbIbepeHre HxKbBam aydoHcTOnHKn c noMoouh KhoHnKs SOURCE.

MEHIO MMS 730
HactpoKn npaMeTPOB MoKHO AERKO OcyueCTBHT HepeMHeIO.
MeHIO bIbIeBaTeCArepe3 KHONKY MENU HA pMbte DnCTBcHNOHOrO ynpaMaEHN HAAHXATHEH HKHONK YMNE HA nepeAbeNBHeH.
HaHnraaNo MeHO H3MeCHHe HAcTpoe BbIOAHHOTc G NOMOio KHOKo CO CTpeKaAM
HnnyabeDnCTAHUNHOYnpaBaeHNAHcnoMoBuKHOHOKSIPHaycptpoctBe.
PdTeepxDnEeHrOEtBtBnXyTnKTHoMBe CIOMOUHO KHOHTKN PLAY HAYIIMTE AIEHHTAHOHOTOr ytpaBnAHHN HAIHKATHEM KOHTKN PLAY/PAUSE/MENU HAYCPOPTIRE.
BoaMOXHbI CmCyAIOuNc yCTaHOBKn:
HnfoopmaunO cHCTeMe:
Bb6eBte Hme NSOYI EMOHOPALIOO CCHTEM.CnmoaHOHNOKA H AAB
MacTepeTu
OCTyTHHe 06HOBcHHeY cTPOrCTb, BkIOoAor IINCAHHe, PpeCTBaIeHbHa HbIeHdOMaHHe CTpAHHe.
BoaBpK 3A0BDACMKHACTPOKAM: OCHOBHe HAcTPOKHOCBOCTAHABAHAOCTC NOMOIO BOYNHYBA MEHO FACTORY RESET (ydaAROTc Bce COXAPCHNOH CTHBIAI, BIOHOCETCR POHMANTMHCCKOKO OKADHNA, ydaAROTc CETSEBC HAcTPOKH, N6PbOHQE CTeBEOE PAIDHO YdMeATRC).
-ФункшаВТOMaTHuecKOrO OxHdAHHa:
YCTPOCTBO CHA KEXHO YHUNCHAOBAMATTHCCKTOO XOHDAHINKOTOPARABOMTATHCKHEPEKNEKAHOET YCTPOCTBO PNPMEHPQEH3 5.3 UCA HAYE OTCYTBDAKOMHA(CNOMOUZAEEMHTOBYPANMENH HA CTPOCTBO HMM C NOMOUBIO DACTAHUMHOHO YPNAIBHIN B DEXHM OXHDAHIN.3TA FHYKHUN COOTBCTETR PNDNHNHO EC 6D AHPCDPCEKEXHHN 1275/2008 EG N HMYHNEET NOPTOPACHE NAKTPOACHPRIN, C BYAUE COMY TPOCTBO HE OKAIHOHO NO HEOACMTPOI NOACIEOASBOHIN. BBAEBPHTBE M HBN APOT SETTING.FHYKHUN MOXET BKKOWATBBN HNN BKKOWATBBN.YCTPOCTBO NOKNTABHNN C KKNONKHOH FHYKHUN
BbIXOa
Hepes nyHK MT MEHO EXIT BbnoAeRcBbXoA H3 MEHO.
HACTPOINKCAETN
IIOKAIIOYEHNE K CETN YEPE3 LAN (KAGEA):
IIOKHOHHTME MMS 730 K Bauei AOKAHOH CETn LAN, DAR aToro HCNaBYrE LAN · Kae6bAe (He BDOHTB KOMNKeT), IINPMeR b TcHHe 5 MHyr MS 730 ABtmatnckn noyHt cTeBoa aPec ot BAbero MMpUpyTAHOTOPa NMOKET BuHcNtOBAoAH.
IIOKAIIOHEHNE K CETN HEPE3 W·LAN (PAADHO):
CyueBeyer dBA cnoobba noKmueHH MMS 730 K Bauee becappoAoHcet:
1. HacpoKa cetn c nomoubMoMACTEPA CETH:
B MeHKo MMS 730 b6epeute MACTEP CETN.
- Nocck W·LAN HauHnAeTcR ABaMThUeCckn,Ha dmcIe eOTo6paXaetcR c0o6ueHHe CKAHINPOBAHNE.
Noc3a aeeepnne nnohckn hnoaahyte kaaan Hksp (nyt) dhtdntnHHO rynpAANHH4 (I)nn KHNky SKP (ycptc0180 (8), uto6o oto6pa9bn cyueeoybpoene cehn ha dnnae oohy 3a pyro.
HAKHMKHONKHYI PLAY (NYM) ACHINHOHNHOHNOHN (8)) HAI KHANKY MENU (YCTPOPTTHG (10)) AMTO, TOTO. 6065 BubpabTbAeMAyMO CEBT
BBeHnTe npoW·LAN:
PEXOHTNEAAMBHTN HINPAAMC NMOOUBK KABMW SKIP MM KHONKH PLAY. OTeAHHIE CCHMBIAPAOANDEEPKDAOTCR KHNKOJSELECT(MyBtAChTAAHHOHORYPTABEHA(8))HM KHONKEMENY (10),C NOMOIO NOA Bb6oepoNOCAEDHH BBeEHHBCHMBOMOKET 6bbydAeH
Korda Bbl BBcH NAPONb NOHOCTbIO, NOATBcDANTe ETO C NOMOUsIO NOMA Bbopa
Tenep MMS 730 NOAHOHCTC K aBaei cetn W*LAN. Iocae ycneHoro NOAHOHHTNOARHTC Oooohoe CONNECTED (COEAHOHETYCAHBOEAHO).
ECAM COEAHHEHc Yc8bHOAeBO,OTOB6AEHTOBcOoIEHc HONCT FAL (COEHNHEHc HE YCTAOHAEOH).B ATOM CAYIAC, NOXAMYCTa, NPOeABeTpeNAbN BNOPTOPTEc ERO BDO.
2. Hactpoika cetnc nmooubIO npmoxoeHHa MAGNAT AUDIO STREAM:
34ypr3ne npmoxhene MAGNAT AUDIO STREAM nAppie NnGoogle Play uctanohote erno HcB0nPAHueT/Mo6hAhhBtepeoo
- 10n3aynckpe nnnoxehn BnnoaehieCn DNOCK AOCTYNDX XETPDNCTB
- AmaepBOHaayhoYcTaHOBKn Bb6epTeAoBBtbyyctPOHCTBO.3aTEM b6epHTe MAGNAT.
CyeHnRE TYPKTHNHAeHcOyIe HcPbIe NpHKeHHn HpeKoHHTBaue MoHmHOe yTOOHBO HA HACTOOKW · LAN. BuaTeBceBMS730 XXX
IIOe cyueHOrO NOAOKHOENB DPOHNEcB aNOXKHOENH MAGNAT AUDIO STREAM. ONo KOHOAETC K MMS 730 N PNOOBAP BEEPEA AABHEIN NPOOEC VCTAHOPK
B KaeCTBe AMTEpHbB MoXHO HcNOb3OBaB bN APyTHe PnHOxEH Ha OCHObe MUZO
BOCINPOX3BEAHEHME MY3bIKI YEPE3 CETb (CETb)
MM73 0000000000000000000000000000000000000000000000000000000000000000000000000000000000000000
Bb6epe CETEBOBxOa
PnOKeHHe MAGNAT AUDIO STREAM:
AOCTYTHBCAEADYOLUNEHYHKUNH
Moi Mybka: DAB OCNPOB3E8EHNKOKAHOHMBMYC H2HBAHETU/MoHbHOBO TEEAOEOA, A TAKOCE C cTeBBXc EeJIHXK HIOKOB WU USB+KHOHNTAE, PNOKAOEHHEKX K MAPRTVHTATSO.
Tuneln:HTePHeT·pao
PpHmueaHHe: FyHKHOHaBbOcTb cTeH MOKET KOHTPOAHPoBaBtCB TToBko Ypees npMOXeHHe.
PnIpyrnoBOMBoOPBOBABeHcpezPnOKeKHeTOKyHHNtOCHNtIKBOpBOBAbEeHN 10pOHOHbAHyIOHPoDmhoNIOKOBa3BaTOKTOHcMcyTOCTPOCTBa-MAeTpE-HPnIHOANsBOBBHn PnOKeHBeIPOKOCbCINHOPOBAPyEROTCAPOAEHepBOO-KKKNA MEXdyMMS730nTeAEOHOM. 3IO MoeR pIPIRESEK C KKBVHJFpOPMoCKS
BOCINPOH3BEDEHNE MY3bIKI YEPE3 HHTEPHET-PAHO (BEG-PADHO)
MMS 730 MHTBIEHOTNEAANIETHEPDAHO, KOTOPAI YTHRAEBAHOTINHEPOCAPECTIBHNO C yICPOPTABN HAM C PONIOHIO (YMAJ IAHCINHIOHOHOR YTHRAEBAHOT-HEBAHBOHOO ON I PRAPMOXEHONG MAGNAT AUDIO STREAM.
BbIepHe BxOa HHTEPHEP-PAHO
- PEPEXOHTe NO MEHIO HHTepHET pAHO C NMOUBO CTpeAHK /KAABHUN IPOPTYCTNTb
(NYABHCTAHUHOHHOROynpaaEHH4)HHKHOHNIPOTYCTHTb(ycTPOBCTB
PnDBepeHte BbOp KIOKoI PLAY (yABT DcTAHIOHOrO ynpAeHHB) Hm KIOKo MEHO (yCPOAcBO 10).
MOnonbMyIe KHOHkYBCBpat (nystnctAHKHOHcOy npAeHH3)Tb6bepHybcer H OaH HaaHba MeHIO.
Haekmte HcyepxHBAe KhoHny MEHO (yntAHTnCTaHNOHORO ynpBaCHN8), 106blBepHybcr B
B TANBHOM MCHIO AOCTYNHBI CMOYIOUHNC NAPAMETbI:
PacnookHe: Copipobka paociaHuy no KOHTHeHAM / cpaHAM/TopaAM,
XaHDbCocIHPOBkaAMDCCTAHUMXHaHPM
- NoKaactb: OTo6paXHe cOeOpXaHn IoKacta. CoptHpOaKa, HApHMeP, cTpaHa, XaHp, noka3aTb Boc
- N36paHHoe:
BbIMoKeTe COXpAHnB BAAH NIOHMbIe PdHOCTAHmB CnICKe:
CoxpaHHTB Bu36paHHOM: KopoTKo HaxMHTe KHOKy FAV/MEIM (IyvblnctAHIOHHO ynpabMaHn10)
- Yādīnbi H3 ɪsðpərɪðrɔ; Yāyēpkhɪaɪbɪ Ḥákətə KɔHbɪy FAV / M E N i Nədʒepərɪy yādəmɪhɪ KHOHkən
Play / Paʊe.
PIMNEMAHIE:HOCTNY4O COTOBAMTHY,UAYEAMBE BO3MOKHO TOBko B MEHOH-HE60PAHNHO. PTOADKO COXPAHbIX CTBnI H He MOKET BoTPOA
BHIMHAK: K COXPHANBHM CTAHJIABRM HCSA8 NOYAMBH JOCTYN HOPC3 FHKHBOH INHETPHT*pAO (Tuneln) pNHOK688 MAGNAT AUDIO STREAM.
PIMMEYAHHE: Pepaembe Hn Bbnpaembe cncn paHOCTAHn npaoctamrTunein.
Spolity: INOMATMAYBE CBOB CMAPTFOH, NAMBIET HIXI KOMITIOCT B KIRKCTBIE BYATA DIACTAHUHOHOTO YINPHIMHHAN DA Spolity.
Y3HaHre 60bHe Ha spotfity.com/connect.
Licenses: The Spotify Software is subject to third party licenses found here: https://developer.spotify.com/esdk*third*party*licenses/
OBHOBAEHN
MMS 730 HMMET FyHKUHO O6OBAHHNI OTA (Over The Air). ECN DcCTYHO O6OBAHHNE, OH 6BET OTOBPaKaTcB R PIMOKCHHH H MOXET BbIb YcTAHO BACHO HePC3 HEO. CAcDyTe HnCTpyKLIHM RPMIOKCHHH.
PnmeHHe:O6HOBACHE OTA OTHOCHTC TOMK K fhyHKHOHAHOCTN WLAN H LAN.
COEAMHEHNE YCTPONCBA CAYMOHOCHTOHKOM BLUETOOTH
BBeBpeNIOAOKUHNEI NO BIuHToL, FcAe PAHINH CINB3C aTmYyCTPOBTOB MBIuOHT yK EytABHBAHBAe, IpEaIPINHMAETB ARIOMATAWCKAONBOHJI KOCBCTHOENHEH COOEHNHEH. PII 3OTM MOXET NOTP605BaCB BpyHYKOI POATBEPDIL BOCCTBOHAEH COOEHNHEH HA YCPTOPCTBE HOTNHOHIE.
ECAH BAHHE COEHNHHNE HE YCTAHBBAAACBC HAI OHO HE MOXET bBbOCBCTAHBOEHO.MMS 730
AOTOMATHNEMK HNAKBAET PEKM CNOEHHH, KOTOPH TAKOE HA3BBAETCPEKMOM CNAPBAHH.HA
AMNHAE BYETM MHTATI HANKATOP · 巴
Teneb Bkoumte pKHM Bluetooth yctOoCTBA-HCTOHNHMA. MMS 730 BbUoMTB C bCnKcE YTOpOCTB Bleuoth KIK, MMS 730'. EAN OH N H BbUoMTB C BcNKOETY BcNIOCTB AKTHBNPBe TBPNYHO PHCNCKyTOpOCTB Bleuoth HA cyTOPOCTBE-HCTOHNHKe N npOBpeB, EKnOueH N HA MMS 730 pKEM
B3B1NCHOTCTPOYDHTBCHTONHIIBO BPEMNRPOECECAYTHOAHBEHMOEOEHNHEHMOKETbIb
3aADAHBOPOC, CNDyETANPNIHTBNPoB.OTOBNTBHNAOPOCMOKHOIPOCHOHXAATHEMHKNH
TPINHPoB.CEAHBOPOCNOAPAOEBNTOPIR,NCNOSAYTECBTAHDPHIEHAPNOI,O000-11234
ECAHCOEMHHNEYcTBHAHMDAOCpAHee,MOKET3aBADABCBPOPC,ONITMEHbLYCTAHOBHTB
COeHNHEHAE.HaHETO HAKOTBeAONDB,"PnOcYoCNFOHORQyCTAHOBHMAEOCDHCHHARZAAOPCTA
HNHKATQP,BT HAIOANCACnPGPT,HCMMRA.
MMS 730 NOIeepKHeAeTcOa6o KueeHtHHeHbRcAaHnAprrpeepKaayuQuaQoComm @apIXTM, Ecm yctpoCTHO-IOCHNtHK TAKCe NOIeepKHeAeTcY TeXhoHOrTHo, pnp YcTaHbOBeAHn CoeHHeHHB HBeetoo B KcAeHTBE PekHMpeepAAu AutomotHEeckN BbUkPaTeCrt, QuaComm @apIXTM.
3ANOMHAKOUEEYCTPOICTBOAIACTAHUIN
YCTOPCBO 060D580BA DMYM H3A3BCHMNIM DYAP OT BYPA 3AOKMHHAOLIMN YCPTOPCTBAWM AAR CTAHLM FM DAB. KUKOAE 3AMNHMOHUEY CYPOTIOXIE MOBMMUDE 4O CTAHLM
CoxpaHCHHe cTaHHn:
YCTAHOBITEHNOHYO CTAHUIO DAB HN FM C nOMOSSK HONOK TUNING HA yCTPOIAE H N C nOMOSSK HAMTHAUHOHNOHT YTPDABACHN.
3aONHauOeuycPOTbOToKxPbAecnHaANTHENKHOHNFAVbHpyBeHXCTAHUNHOHOYpBaHIN HcMOBIOHOKNHOH+/-MoBbBbOpbHyXHNOReHkyNaMRTCoxpaHHeN BReHkyNaMRTnpHOxOHTAOMTHeckn6y
YcHueHOO CoPbHCHNO HOBpCBACToH BAHCmEOI NORAMCHMO HADNHCSTORED PRET. B nepBOB CTOpe PNEB HAOToTbe CTnHIO NOTOHRHO OTOAeTaHOTe HOMER RHOHN.
Bb60 cTahmUu3cnHcKa cTahM
Bbepnre HyxHoe Meo xpaen Hc nomuaa Kaaan +/-(Kopo1koe haxane).

ФУHKUH RDS (RADIO DATA SERVICE) TIOHEPA (TOAБKO FM)
RDS-30STCHTEMCA NOMOIO BO KOTOPO SO BPEMNEPEDAB HAMANSOHE YKB BMECTC CHHAMOM CTAHINN PEPDAETC DOHNTOHNTBMAH HHPOPMAHA. HA MMS 730 ATA HHPOPMAHA (O CTAHIM, PEPDAEHTN.) MOKET BbBOADTcRA Ha DnAeAA.
RDS INDOPAMMA MOKET 6b8t B3BBAH NOPTOBHM HAXATHEM KHONKI DISPLAY (JCTBHIOHOHHOE ynpamaneke): a cadyoum oem POKAP:
- PS (Program Service Name): POKAZIBAer HABBAHNE CTAHUN
- RT (Radio Text): NpokasBaer HhOpmaaHn coo6eHHn CTAHnn.
- PTY (Program Type): Nokaabaet TnnpcepaH.
BpemrAa
DAB FHKUNI TIOHEPA (TOAboKO DAB)
CINETEMApeyDABCOepKHTIOTOBDAHNNHIOHNOPMAMHNOKONHOI DISPLAY(DACTHANHOHOEypnAEMBDO)aCaeUOWOENOPRAE
-HasBaHHe cTahu
DLS(DNHMMNNECNK CENMETMKN):POKASBAET HNFOOPMEUH COOUEHNH HENHPHEM,HAZAHHE NHCNOAHTHE TEKUYTO MYSKBAHBOHO PPOH3EeHNH HOBCTHE COOEEHNH,NDPO6HIAH HINFOPMAAH NOHOCTX DHR HCM TAHMN
TN nporpaMM {HanpMep, non, HOBOCTN, KAAccnKa}
MybnaekchbHoomopDABnacrtaKyuuecHua
Bpem/4nata
- Ckopoocb nepeaun B 6ntax Tekyuero ayduocnHama
MybTHACKCHOC HMR DAB
CEPBNC INTEXHNUECKNE IPO6AEMBI
EEN BOHNIHYT TECHNHHEKNE IPOBAEMI,OBAPATHEB C HEBRIAHARBOPAHOHNA MAB3HN HA APHPMy Magnat Audio-Produkte GmbH, tea: www.magnet.de
TEXMHUECKHEXAPAKTEPHCTUKH
Tiohep
Hana3oh Yactor UKW:87,5-108 Mf
YyBCTBHTeMbHOCTb YKB:-108 ABM
DAB/DAB+:-100△6M
USB
Bocnpoh380dmMbte fopMa: MP3, WMA
USB A Bep.: 1.1 5B/DC 1000 mA; 40 8F5 FAT 16/32
AHAOROBBb BixOdb: 2x RCA 2B/RMS cKcpoBaHHbIM ypOBHem
HactoThe bXapakTepeNk: 20T-20K
AHHKpeTH3aH: 44.1/48/88.2/96/176.4/192K
PnDaepeKbAeMbte6HToBbIy6hHbI:16/245HT
CetB0B BxOa;
WLAN: 2.4Ttu,802.11 b/g/n, WPA2,300M6m/c
LAN: RJ45
NoepKbAebbe pOpMaTbI MP3.WMA,AAC,FLAC,APE,WAV
Bxog Bluetooth®: Bluetooth® 5.0 / Qualcomm® aptX™ HD
Pabouy qacto; 2402-2480 Mtu
MaKcHmAbHaH 3MyyaeMaR MoHooCTb
cornacho EN 62479: 5,49 ABM (Bluetooth®)
coracho EN 62311: 16,80 ABM (WLAN)
Notpe6aHHe MoHocTH: MaKCHMyM 20 Bt.
B pexmme oxnndnaHg <0,5 Bt.
Pampe (LxBxF)
Bcduue yctpoCTBO: 434x 45x 318 MM
Beyuee ypcnoTBO, BKAIOUa 3AEMeNTbI yipbaENH
H COCAHNHTAe HbIe KACMMbl 434X76X332 MM
NpAHTANCTAHNOHHOYnpaBaeHH:48x148x17MM
Bec:3.3K
BO3MOXHbI TEXHHYECKNE H3MEHEHN.
CdoonHHTeBHOHHOpMaHmOxHOo3HAKOMITbCaHaHaMe caHe:http://www.magnat.de.