OR2000EB - Heating GORENJE - Free user manual and instructions
Find the device manual for free OR2000EB GORENJE in PDF.
| Product type | Oil-filled radiator |
| Brand | Gorenje |
| Model | OR2000EB |
| Power supply | 220-240 V / 50-60 Hz |
| Maximum power | 2000 W (3 levels: fast, medium, slow) |
| Dimensions (approx.) | Height 65 cm, Width 40 cm, Depth 30 cm |
| Weight (approx.) | 10 kg |
| Number of heating elements | 7 fins |
| Temperature adjustment | Adjustable thermostat with button or +/- keys, from 5°C to 35°C |
| Timer | Programmable on/standby from 0 to 24 hours |
| Remote control | Yes, on/off, mode, temperature, timer functions |
| Digital display | LCD with temperature and remaining time |
| Memory function | Restores last setting after restart |
| Safety protection | Automatic shut-off at 50°C, overheat protection |
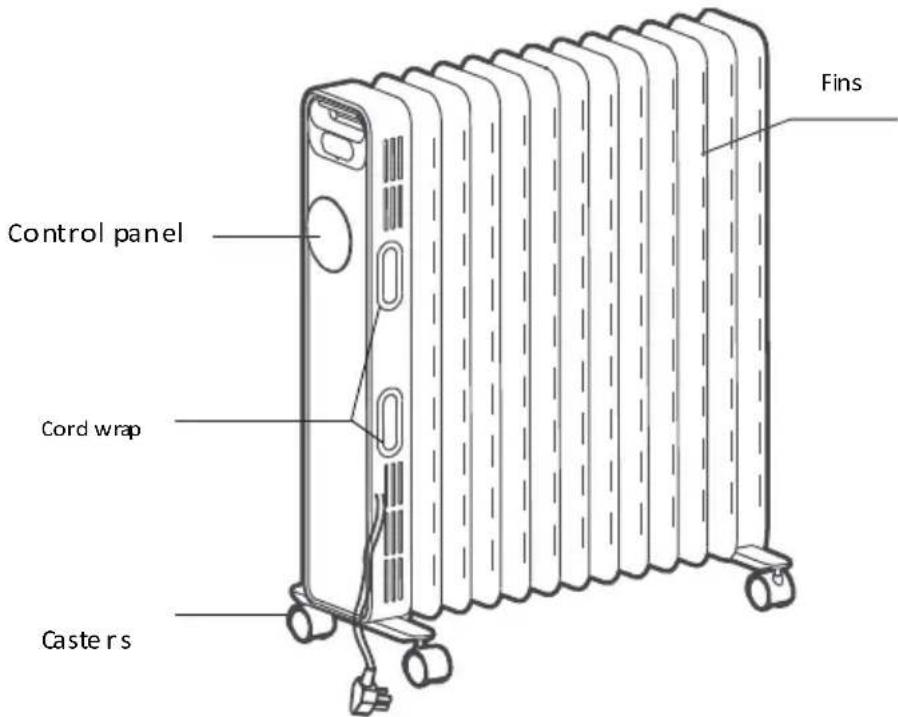
| Casters | 4 swivel casters for easy movement |
| Cable winder | Yes, to store the power cord |
| Maintenance and cleaning | Wipe with a soft, damp cloth, without abrasive detergent |
| Spare parts available | Casters, power cord, remote control |
| Repairability | Sealed oil tank, repairs by manufacturer or authorized service |
| Usage | Household use only |
| Warranty | See international Gorenje warranty card |
Frequently Asked Questions - OR2000EB GORENJE
User questions about OR2000EB GORENJE
0 question about this device. Answer the ones you know or ask your own.
Ask a new question about this device
Download the instructions for your Heating in PDF format for free! Find your manual OR2000EB - GORENJE and take your electronic device back in hand. On this page are published all the documents necessary for the use of your device. OR2000EB by GORENJE.
USER MANUAL OR2000EB GORENJE
RADIATOR (I MBUSHUR) ME VAJ
RADIATOR UMPLUT CU'ULEI
RADIATOR PLNENY OLEJEM
OLEJOVY RADIATOR
МАСЛЯНИИ РАДІАТОР
OLAJRADIATOR
МАСЛЕН РАДИАТОР
МАСЛЯНЫЙ РАДИАТОР
QILEFYLDT RADIATOR
OLGEFULLTER HEIZKORPER
OLJYTAYTTEINEN SAHKOPATTERI
OLJEFYLT RADIATOR
OLJEFYLLT ELEMENT
ΚΑΛΟΡΙΦΕΡ ΛΑΔΙΟΥ
RADIATEUR À — BAIN D'HUILE
RADIATORE AD OLIO
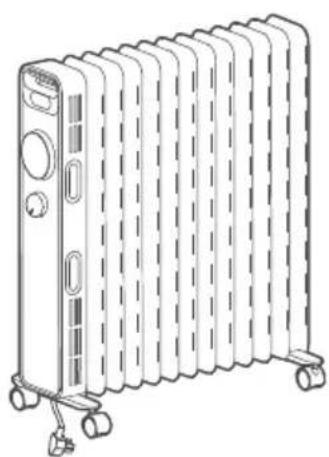
natural_image
Line drawing of a multi-tiered air conditioner unit with cooling legs and wheels (no text or symbols)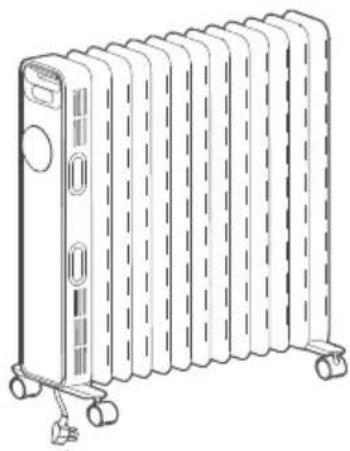
natural_image
Line drawing of a multi-tiered solar power heater with cooling fans and wheels (no text or symbols)This product is only suitable for well insulated spaces or occasional use.
NAVODILA ZA UPORABO SI
UPUTE ZA UPORABU BIH HR
UPUTSTVA ZA UPOTREBU SRB MNE
MANUEL D'INSTRUCTIONS FR
natural_image
Diagram of a mechanical assembly with two clamps and a spring-like base, showing downward force arrows (no text or symbols)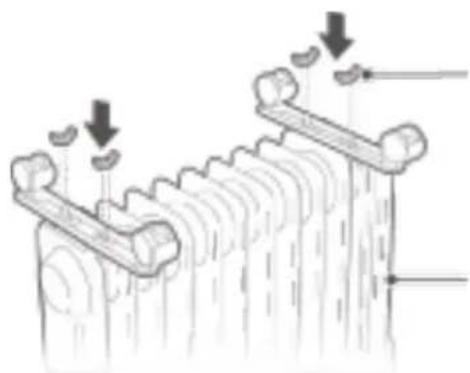
natural_image
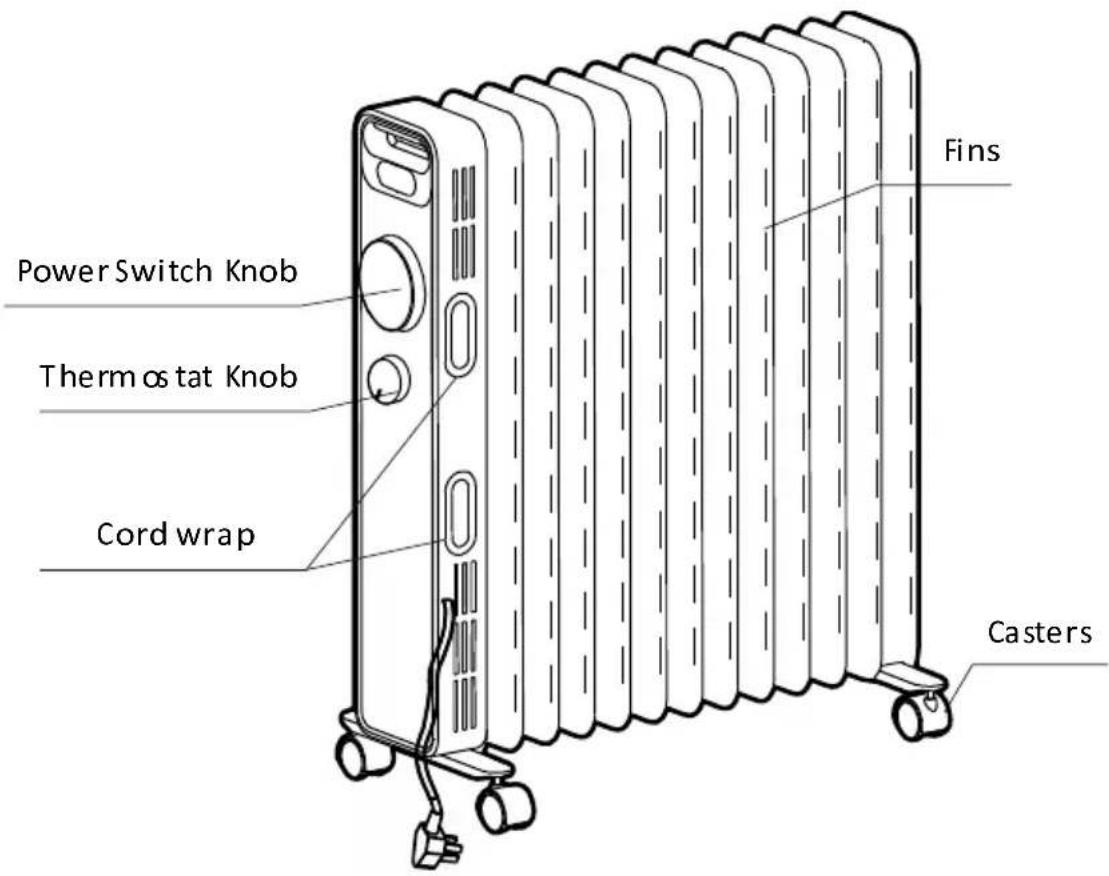
Diagram of a mechanical or electrical component with two vertical supports and downward arrows indicating force or movement (no text or symbols present)Krilne matice
Upravljalna plošča
Slika 1 Slika 2
NAVODILA ZA UPORABO (OR2000M)
natural_image
Line drawing of a remote control with three buttons and a central plus button (no text or symbols)| PARAMETER TABLE | ||
| Model: | OR2000M | |
| Type: | NY2009 20M | |
| ITEM VALUE UNIT | ||
| Rated Power 2000 W | ||
| Voltage Type 220-240 V | ||
| Nom. heat output 800 W | ||
| PARAMETER TABLE | ||
| Model: | OR2000E | |
| Type: | NY2009 20MR | |
| ITEM VALUE UNIT | ||
| Rated Power 2000 W | ||
| Voltage Type 220-240 V | ||
| Nom. heat output 800 W | ||
ČIŠČENJE IN VZDRŽEVANJE
natural_image
Diagram of a mechanical assembly with two downward arrows indicating force or direction (no text or symbols present)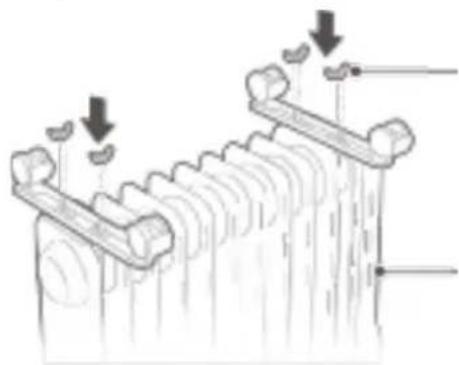
natural_image
Diagram of a mechanical or electrical component with directional arrows indicating movement or force (no text or symbols present)natural_image
Front view of a remote control with three buttons and a central plus button (no text or symbols)| PARAMETER TABLE | ||
| Model: | OR2000M | |
| Type: | NY2009 20M | |
| ITEM VALUE UNIT | ||
| Rated Power 2000 W | ||
| Voltage Type 220-240 V | ||
| Nom. heat output 800 W | ||
| PARAMETER TABLE | ||
| Model: | OR2000E | |
| Type: | NY2009 20MR | |
| ITEM VALUE UNIT | ||
| Rated Power 2000 W | ||
| Voltage Type 220-240 V | ||
| Nom. heat output 800 W | ||
ČIŠĆENJE I ODRŽAVANJE
- Električnu grijalicu redovito čistite. Naročito pazite da brišete prašinu sa površine rebara, budući da naslage prašine mogu utjecati na učinkovitost isijavanja toplote.
- Uređaj isključite iz električne mreže i pričekajte da se ohladi. Zatim obrišite prašinu koristeći meku vlažnu krpu. Nemojte koristiti deterdžente niti gruba sredstva za čišćenje.
- Pazite da ne izgrebete površinu rebara oštrim tvrdim predmetima, jer ćete time oštetiti i boju, a posljedično površina uređaja može početi hrđati.
Zaštita okoline
Nakon isteka njegova radnog vijeka, uređaj nemojte baciti zajedno s ostalim miješanim komunalnim otpadom. Umjesto toga, uređaj je potrebno dostaviti na zbirna mjesta za recikliranje takve opreme. Takvim zbrinjavanjem dotrajalog uređaja pomažete u očuvanju okoline.
GARANCIJA I SERVIS
Za bilo kakve informacije ili u slučaju problema obratite se Centru Gorenja za pomoć korisnicima u vašoj državi (telefonski broj naći ćete u međunarodnom garancijskom listu). Ukoliko u vašoj državi nema takvog Centra za korisnike, obratite se vašem lokalnom trgovcu Gorenje, ili pozovite odjel Gorenja za male kućanske uređaje.
natural_image
Diagram of a mechanical assembly with two hanging rods and a base, showing downward force arrows (no text or symbols)Slika 1
Slika 2
Uputstva za rukovanje aparatom (OR2000M)
Pre početka upotrebe
- Priključni kabl ne sme da bude oštećen ili prignječen.
- Pre početka upotrebe molimo vas da proverite da li nominalna struja vaše utičnice odgovara podacima navedenim u gornjoj tabeli, odnosno da li je utičnica ispravno uzemljena. Ako struja ne odgovara, ili ako utičnica nije uzemljena, treba da se zameni.
natural_image
Diagram of a mechanical assembly with two downward arrows indicating force or direction (no text or symbols present)Slika 1

natural_image
Diagram of a mechanical or electrical component with directional arrows indicating movement or force (no text or symbols present)Slika 2
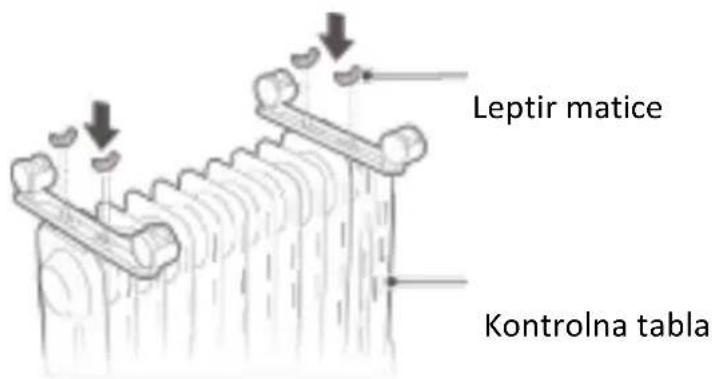
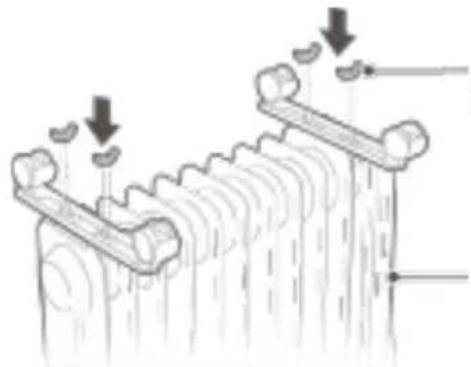
Leptir matice
Kontrolna tabla
Uputstva za rukovanje aparatom (OR2000E / OR2000EB)
Pre početka upotrebe
- Priključni kabl ne sme da bude oštećen ili prignječen.
- Pre početka upotrebe molimo vas da proverite da li nazivna struja vaše utičnice odgovara podacima navedenim u gornjoj tabeli, odnosno da li je utičnica ispravno uzemljena. Ako struja ne odgovara, ili ako utičnica nije uzemljena, treba da se zameni.
Uputstva za upotrebu
Rad i stanje pripremljenosti: Spojite aparat na električnu mrežu. Začuje se dugi pisak.
natural_image
Front view of a remote control with three buttons and a central plus button (no text or symbols)| PARAMETER TABLE | ||
| Model: | OR2000M | |
| Type: | NY2009 20M | |
| ITEM VALUE UNIT | ||
| Rated Power 2000 W | ||
| Voltage Type 220-240 V | ||
| Nom. heat output 800 W | ||
| PARAMETER TABLE | ||
| Model: | OR2000E | |
| Type: | NY2009 20MR | |
| ITEM VALUE UNIT | ||
| Rated Power 2000 W | ||
| Voltage Type 220-240 V | ||
| Nom. heat output 800 W | ||
ČIŠĆENJE I ODRŽAVANJE
-
Električnu grejalicu treba redovito čistiti. Naročitu pažnju treba posvetiti brisanju prašine sa površine rebara, budući da naslage prašine mogu da utiču na efikasnost sevanja toplote.
-
Pre čišćenja aparat isključite iz električne mreže i pričekajte da se ohladi. Zatim obrišite aparat koristeći meku vlažnu krpu. Nemojte koristiti deterdžente niti gruba sredstva za čišćenje.
-
Pazite da ne izgrebete površinu rebara oštrim tvrdim predmetima, jer ćete time oštetiti i boju, a posledično površina uređaja može početi da rđavi.
natural_image
Diagram of a mechanical assembly with two clamps and a spring-like component, showing downward force arrows (no text or symbols)слика 1
natural_image
Diagram of mechanical components with arrows indicating force or movement (no text or symbols)natural_image
Diagram of a mechanical assembly with two hanging rods and a base, showing downward force arrows (no text or symbols)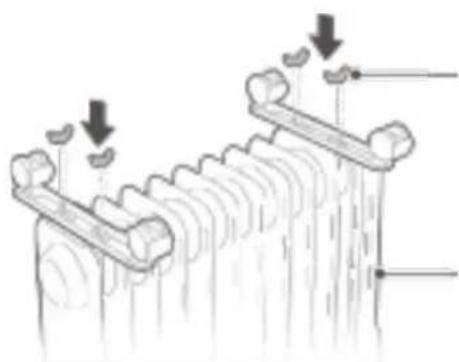
natural_image
Diagram of a mechanical or electrical component with two shafts and directional arrows indicating force or movement (no text or symbols present)Пеперутка-за вртки
Контролна кутија
natural_image
Simple line drawing of a remote control with three buttons and a plus/minus function (no text or symbols)| PARAMETER TABLE | ||
| Model: | OR2000M | |
| Type: | NY2009 20M | |
| ITEM VALUE UNIT | ||
| Rated Power 2000 W | ||
| Voltage Type 220-240 V | ||
| Nom. heat output 800 W | ||
| PARAMETER TABLE | ||
| Model: | OR2000E | |
| Type: | NY2009 20MR | |
| ITEM VALUE UNIT | ||
| Rated Power 2000 W | ||
| Voltage Type 220-240 V | ||
| Nom. heat output 800 W | ||
ЧИСТЕЊЕ И ОДРЖУВАЊЕ
Important safety precautions
When using the appliance, always follow the basic safety precautions listed below. Read these instructions carefully and use the appliance only in accordance with the instructions. // After removing the packaging, make sure that the appliance is in good condition. // In order to avoid overheating, do not cover the heater. // If the supply cord is damaged, it must be replaced by the manufacturer or its service agent or a similarly qualified person in order to avoid a hazard. // This appliance can be used by children aged from 8 years and above and persons with reduced physical, sensory or mental capabilities or lack of experience and knowledge if they are under supervision or taught about safe use of the appliance and if they are aware of potential dangers related to the use of appliance. When children are using the appliance please supervise them and make sure they do not play with the appliance. // Children should not clean the appliance or perform maintenance tasks unless they are 8 years old or older and with proper supervision. // The appliance must not be located immediately below a socket-outlet. // Do not use this appliance in the immediate surroundings of a bath, a shower or a swimming pool. // This marking indicates that this product should not be disposed with other household wastes throughout the EU. To prevent possible harm to the environment or human health from uncontrolled waste disposal, recycle it responsibly to promote the sustainable reuse of material resources. To return your used device, please use the return and collection systems or contact the retailer where the product was purchased. They can take this product for environmentally safe recycling. // This heater cannot achieve accurate temperature control of the environment, and thus cannot be used as insulation device for storage environment, items, animals and plants. // This radiator is filled with a precise quantity of special oil. Repairs requiring opening of oil-container are only to be made by the manufacturer or his service agent who
should be contacted if there is an oil leak. When scrapping the appliance, follow the regulations concerning the disposal of oil. // 10. This heater cannot achieve accurate temperature control of the environment, and thus cannot be used as insulation device for storage environment, items, animals and plants. // The appliance is intended for domestic use only.
Caution
Fire risk exists if the heater is covered by or positioned close to curtains or other combustible materials. // Some parts of this product can become very hot and cause burns. Particular attention must be given where children and vulnerable people are present.
PART FIGURE (OR2000M)
USE OF OIL-FILLED RADIATOR (OR2000M)
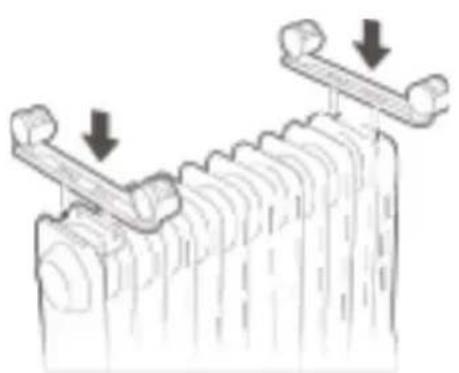
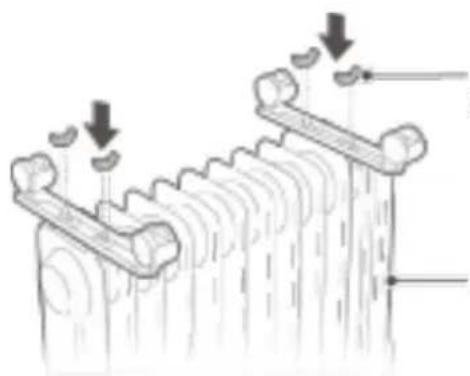
- Turn the heater upside down.
- As shown in figure 1, align the mounting hole of a set of caster assembly and install it on the screw of the caster pad plate at the end of the radiator fin, and The other caster assembly is aligned to the screws mounted at the bottom of the control box.
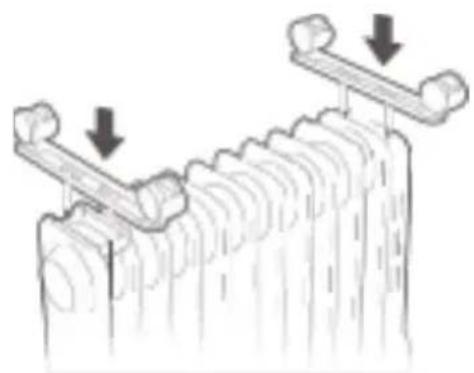
- As shown in figure 2, two sets of caster components are tightened with four butterfly nuts. Install solid and then put the heater in place-just put the wheels on the ground.
natural_image
Diagram of a mechanical component with two downward arrows indicating force or movement (no text or symbols present)figure 1
natural_image
Diagram of mechanical components with downward arrows indicating motion or force, no text or symbols presentbutterfly nuts
control box
figure 2
OPERATING INSTRUCTIONS (OR2000M)
Before the start
- The power cord shall not be damaged or fractured.
- Please verify the rated current of the power socket is in line with the requirements in the table above and is equipped with a safety grounding device before use; otherwise, replace the socket.
Start and power selections
1.Start
Plug in the power, clockwise turn the thermostat knob to the "+" mark position, then turn on the power switch, the heater starts to work.
2. Power selection
Under normal circumstances, please use the maximum power "III" gear for rapid heating. If the room temperature reaches a suitable temperature, please choose a lower power "II" or "I" gear to reduce energy consumption to prevent the room becoming overheated.
To use the machine for the first time or to re-insert the socket, please pay attention to check whether the plug and the socket are fitted well.
Insert the power plug into the socket and start for use; after about half an hour, turn off and pull out the plug. Check whether the plug pins are hot; replace the socket if so (more than about 50 °C) to avoid burning the plug or even causing a fire caused by overheating of the socket due to poor contact.
Temperature adjustment
During use, if you feel it is necessary to lower the room temperature since it is too high, you can use the following adjustment modes:
-
Turn the power switch to gear "II" or "I".
-
Counterclockwise turn the thermostat knob back by a certain angle, for which it indicates that the set temperature is lower when the temperature indication is closer to the " - " position.
Stop
Turn the power switch to indication point "0", and then pull out the power plug.
Movement of the heater
To move the heater, turn it off first, and pull out the power plug; then push the body to make the four casters below the body to roll.
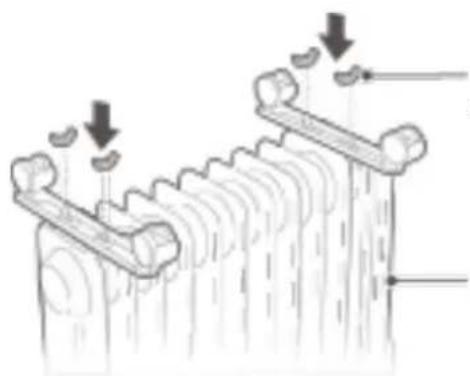
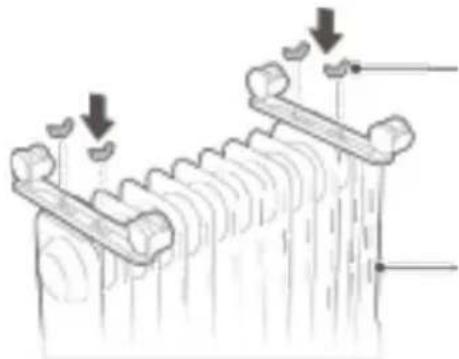
PART FIGURE (OR2000E / OR2000EB
USE OF OIL FILLED RADIATOR OR2000E / OR2000EB)
- Turn the heater upside down.
- As shown in figure 1, align the mounting hole of a set of caster assembly and install it on the screw of the caster pad plate at the end of the radiator fin, and The other caster assembly is aligned to the screws mounted at the bottom of the control box.
- As shown in figure 2, two sets of caster components are tightened with four butterfly nuts. Install solid and then put the heater in place-just put the wheels on the ground.
natural_image
Diagram of a mechanical assembly with two downward arrows indicating force or direction (no text or symbols present)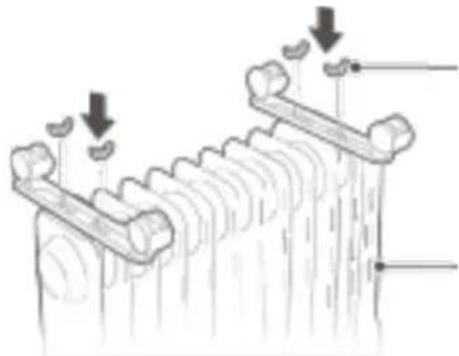
natural_image
Diagram of a mechanical or electrical component with downward arrows indicating force or movement (no text or symbols present)butterfly nuts
control box
figure 1 figure 2
OPERATING INSTRUCTIONS (OR2000E / OR2000EB)
Before the start
- The power cord shall not be damaged or fractured.
- Please verify the rated current of the power socket is in line with the requirements in the table above and is equipped with a safety grounding device before use; otherwise, replace the socket.
Operating Instructions
Work/Standby: Plug in the power, the buzzer will "beep" for a long time, press the power key "☐" to enter the heating working state, and then press the power key "☐" to enter the standby state.
Gear selection: For work status, press “≈” key to select one of work modes such as high gear, medium gear and low gear.
Temperature Setting: Under the working status, press and hold the "+"key or "-" key to set the temperature, press and hold the "+"key or the "-"key to quickly set the temperature; after setting the temperature, have non-operation for 5 seconds, exit the temperature setting screen.
Scheduled operation: Tap the timer key "⏻" in standby mode to enter the scheduled work setting screen. Press "+" key or "-" key to set the scheduled time, press "+" key Or "-" key for a long time to quickly set the scheduled time and the scheduled time will reach the working status of the machine.
Scheduling standby: Under the working status, press the timer key "to enter the scheduling standby setting screen. Press "+" key or "-" key to set the scheduling time, - press "+" key or "-" key for a long time to quickly set the scheduling time, and the scheduling time is in the standby state to the machine.
A: the scope of scheduling is for 0\~24hours, and press "+" key or "-" key each time to increase or decrease 1 hour. When the set value is OH, press the " "key to set the time for 24H. When the set value is 24H, press the "+" key, and the setting time is OH. When the set value is OH, the scheduling is canceled. When the set value is not OH, the scheduling is started. Set the appointment time, press the timing key " "key or " ≈" key, or without operation for 5 seconds, exit scheduling mode.
B: If the scheduling time is set, press the power button "⏻" to enter the standby state and cancel the scheduling.
C: After the scheduling is started, press the scheduling key" "to check the remaining time of the appointment and reset the scheduling time. During the scheduled time, the machine is shut down or started up under temperature control, and the scheduled time is always normal and free from down time. During the scheduled time, it is cleared in case of power failure
Memory function: When started up the machine again and it will operate according to the status before the last standby.
Safety protection function: When the indoor ambient temperature Th exceeds 50^ C under the standby or working state, all out puts are turned off, the buzzer prompts 10 long beeps, the digital screen displays "FF" and flash es at 1 Hz for 75 seconds. As long as there is protection, even if the ambient temperature is less than 50^ C, the running or operation cannot be resumed, and the operation can only be performed after the power is turned off and on again.
Shut down: Under the working state, press the power key "💡" on the control panel to enter the standby state, unplug the power cord, wait for the whole machine to cool, and place the heater stably.
To use the machine for the first time or to re-insert the socket, please pay attention to check whether the plug and the socket are fitted well.
Insert the power plug into the socket and start for use; after about half an hour, turn off and pull out the plug. Check whether the plug pins are hot; replace the socket if so (more than about 50 °C) to avoid burning the plug or even causing a fire caused by overheating of the socket due to poor contact.
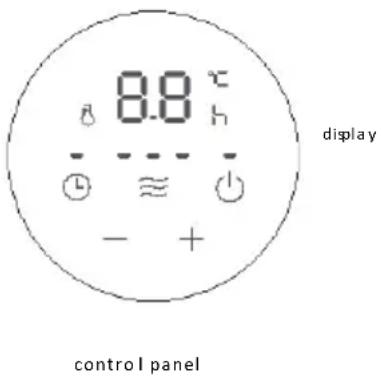
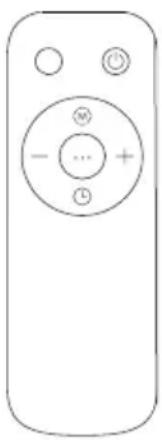
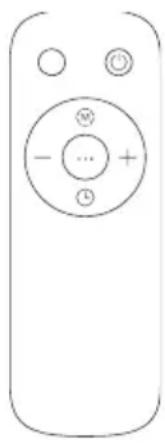
USING THE REMOTE CONTROL (OR2000E / OR2000EB)
Instructions for remote control unit functions are basically consistent with the operation panel of the body, and the remote control unit cannot control the combination key.
| ∪ | ON/OFF |
| (M) | Mode |
| + “ + ” | |
| - “ - ” | |
| (L) | Timer |
natural_image
Simple line drawing of a remote control with no text or symbols| PARAMETER TABLE | ||
| Model: | OR2000M | |
| Type: | NY2009 20M | |
| ITEM VALUE UNIT | ||
| Rated Power 2000 W | ||
| Voltage Type 220-240 V | ||
| Nom. heat output 800 W | ||
| PARAMETER TABLE | ||
| Model: | OR2000E | |
| Type: | NY2009 20MR | |
| ITEM VALUE UNIT | ||
| Rated Power 2000 W | ||
| Voltage Type 220-240 V | ||
| Nom. heat output 800 W | ||
CLEANING AND MAINTENANCE
- The electric heater should be cleaned regularly to wipe out the dust on the surface of flanges. As this may influence the radiating efficiency.
- Disconnect electricity supply and allow radiator to cool, wipe out dust with a soft damp cloth. Do not use detergent or abrasives.
- Do not scrap the surfaces of flanges with sharp hard tools, to avoid surfaces getting rusty, because of damage of the paint coat.
Environment
After the useful life of the appliance, do not discard it with municipal waste – take it to the official recycling point. This is how you can contribute towards conservation of the environment.
Warranty and service
For information or in case of problem please turn to Gorenje's consumer help centre in your country (you can find the telephone number in the international warranty sheet). If there is no such centre in your country, please turn to your local Gorenje dealer or Gorenje's department for small domestic appliances.
For personal use only!
GORENJE WISHES YOU A LOT OF PLEASURE IN USING YOUR RADIATOR!
MANUAL UDHËZIMI
RADIATOR (I MBUSHUR) ME VAJ
natural_image
Diagram of a mechanical component with two downward arrows indicating force or movement (no text or symbols present)figura 1

natural_image
Diagram of mechanical components with downward arrows indicating motion or force, no text or symbols presentDadot flutur
Kutia e kontrollit
figura 2
UDHËZIME PËR OPERIMIN (OR2000M)
Përpara ndezjes
natural_image
Simple line drawing of a remote control with buttons and a plus/minus icon (no text or symbols)| PARAMETER TABLE | ||
| Model: | OR2000M | |
| Type: | NY2009 20M | |
| ITEM VALUE UNIT | ||
| Rated Power 2000 W | ||
| Voltage Type 220-240 V | ||
| Nom. heat output 800 W | ||
| PARAMETER TABLE | ||
| Model: | OR2000E | |
| Type: | NY2009 20MR | |
| ITEM VALUE UNIT | ||
| Rated Power 2000 W | ||
| Voltage Type 220-240 V | ||
| Nom. heat output 800 W | ||
PASTRIMI DHE MIRËMBAJTJA
MANUAL DE INSTRUCTIUNI
RADIATOR UMPLUT CU ULEI
natural_image
Diagram of a mechanical assembly with two clamps and downward arrows indicating force or movement (no text or symbols)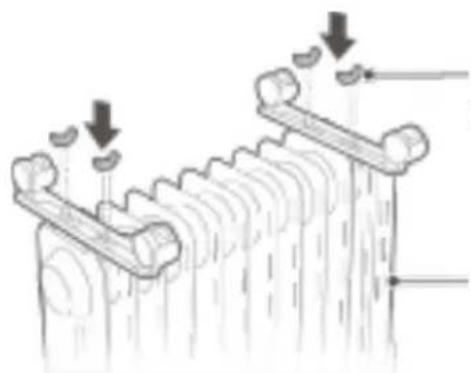
natural_image
Diagram of mechanical components with arrows indicating force or movement (no text or symbols)natural_image
Simple line drawing of a remote control with buttons and a plus/minus icon (no text or symbols)| PARAMETER TABLE | ||
| Model: | OR2000M | |
| Type: | NY2009 20M | |
| ITEM VALUE UNIT | ||
| Rated Power 2000 W | ||
| Voltage Type 220-240 V | ||
| Nom. heat output 800 W | ||
| PARAMETER TABLE | ||
| Model: | OR2000E | |
| Type: | NY2009 20MR | |
| ITEM VALUE UNIT | ||
| Rated Power 2000 W | ||
| Voltage Type 220-240 V | ||
| Nom. heat output 800 W | ||
natural_image
Diagram of a mechanical assembly with two clamps and a base, showing downward force arrows (no text or symbols)
natural_image
Diagram of a mechanical or electrical component with two curved arms and downward arrows indicating force or movement (no text or symbols present)natural_image
Line drawing of a remote control with three buttons and a central plus button (no text or symbols)| PARAMETER TABLE | ||
| Model: | OR2000M | |
| Type: | NY2009 20M | |
| ITEM VALUE UNIT | ||
| Rated Power 2000 W | ||
| Voltage Type 220-240 V | ||
| Nom. heat output 800 W | ||
| PARAMETER TABLE | ||
| Model: | OR2000E | |
| Type: | NY2009 20MR | |
| ITEM VALUE UNIT | ||
| Rated Power 2000 W | ||
| Voltage Type 220-240 V | ||
| Nom. heat output 800 W | ||
ÚDRŽBA A ČIŠTĚNÍ
natural_image
Diagram of a mechanical assembly with two downward arrows indicating force or direction (no text or symbols present)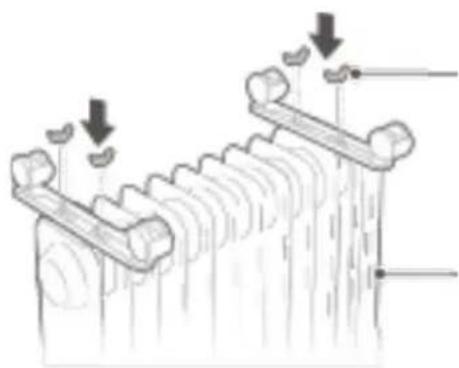
natural_image
Diagram of a mechanical or electrical component with two vertical supports and downward arrows indicating force or movement (no text or symbols present)krídlové matice
riadiaca skrinka
Obrázok 1 obrázok 2
NÁVOD NA OBSLUHU (OR2000E / OR2000EB)
Pred prvým použitím
natural_image
Simple line drawing of a remote control with buttons and a plus/minus icon (no text or symbols)| PARAMETER TABLE | ||
| Model: | OR2000M | |
| Type: | NY2009 20M | |
| ITEM VALUE UNIT | ||
| Rated Power 2000 W | ||
| Voltage Type 220-240 V | ||
| Nom. heat output 800 W | ||
| PARAMETER TABLE | ||
| Model: | OR2000E | |
| Type: | NY2009 20MR | |
| ITEM VALUE UNIT | ||
| Rated Power 2000 W | ||
| Voltage Type 220-240 V | ||
| Nom. heat output 800 W | ||
ÚDRŽBA A ČISTENIE
natural_image
Diagram of a mechanical assembly with two lever arms and a spring-like base, showing downward force arrows (no text or symbols)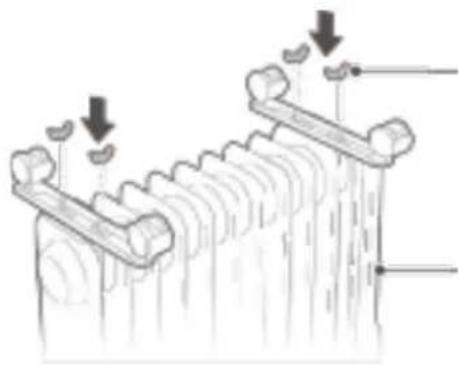
natural_image
Diagram of a mechanical or electrical component with two vertical rods and downward arrows indicating force or movement (no text or symbols present)natural_image
Simple line drawing of a remote control with buttons and a plus/minus function (no text or symbols)| PARAMETER TABLE | ||
| Model: | OR2000M | |
| Type: | NY2009 20M | |
| ITEM VALUE UNIT | ||
| Rated Power 2000 W | ||
| Voltage Type 220-240 V | ||
| Nom. heat output 800 W | ||
| PARAMETER TABLE | ||
| Model: | OR2000E | |
| Type: | NY2009 20MR | |
| ITEM VALUE UNIT | ||
| Rated Power 2000 W | ||
| Voltage Type 220-240 V | ||
| Nom. heat output 800 W | ||
natural_image
Diagram of a mechanical assembly with two clamps and a spring-like base, showing downward force arrows (no text or symbols)- ábra
natural_image
Diagram of mechanical components with downward arrows indicating motion or force, no text or symbols presentnatural_image
Diagram of a mechanical assembly with two downward arrows indicating force or direction (no text or symbols present)- ábra
natural_image
Diagram of a mechanical or electrical component with downward arrows indicating force or movement (no text or symbols present)- ábra
szárnyas csavarok
vezérlő doboz
MÚKÖDÉSI ÚTMUTATÓ (OR2000E / OR2000EB)
natural_image
Simple line drawing of a remote control with buttons and a plus/minus icon (no text or symbols)| PARAMETER TABLE | ||
| Model: | OR2000M | |
| Type: | NY2009 20M | |
| ITEM VALUE UNIT | ||
| Rated Power 2000 W | ||
| Voltage Type 220-240 V | ||
| Nom. heat output 800 W | ||
| PARAMETER TABLE | ||
| Model: | OR2000E | |
| Type: | NY2009 20MR | |
| ITEM VALUE UNIT | ||
| Rated Power 2000 W | ||
| Voltage Type 220-240 V | ||
| Nom. heat output 800 W | ||
natural_image
Diagram of a mechanical assembly with two hanging rods and a spring-like base, showing downward force arrows (no text or symbols)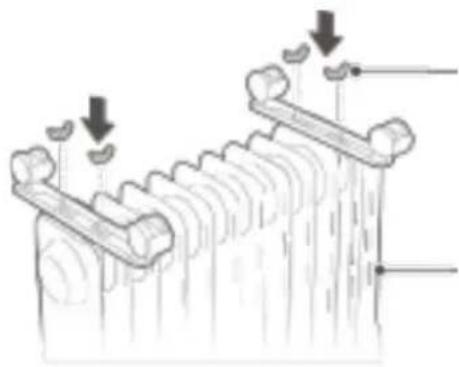
natural_image
Diagram of a mechanical or electrical component with downward arrows indicating force or movement (no text or symbols present)крилчати гайки
контролна кутия
Фигура 1 Фигура 2
ИНСТРУКЦИИ ЗА РАБОТА (OR2000E / OR2000EB)
Преди да започнете
natural_image
Simple line drawing of a remote control with no text or symbols| PARAMETER TABLE | ||
| Model: | OR2000M | |
| Type: | NY2009 20M | |
| ITEM VALUE UNIT | ||
| Rated Power 2000 W | ||
| Voltage Type 220-240 V | ||
| Nom. heat output 800 W | ||
| PARAMETER TABLE | ||
| Model: | OR2000E | |
| Type: | NY2009 20MR | |
| ITEM VALUE UNIT | ||
| Rated Power 2000 W | ||
| Voltage Type 220-240 V | ||
| Nom. heat output 800 W | ||
natural_image
Simple line drawing of a remote control with buttons and a plus/minus function (no text or symbols)| PARAMETER TABLE | ||
| Model: | OR2000M | |
| Type: | NY2009 20M | |
| ITEM VALUE UNIT | ||
| Rated Power 2000 W | ||
| Voltage Type 220-240 V | ||
| Nom. heat output 800 W | ||
| PARAMETER TABLE | ||
| Model: | OR2000E | |
| Type: | NY2009 20MR | |
| ITEM VALUE UNIT | ||
| Rated Power 2000 W | ||
| Voltage Type 220-240 V | ||
| Nom. heat output 800 W | ||
ОЧИСТКА И УХОД
natural_image
Diagram of mechanical components with downward arrows indicating assembly or force direction (no text or symbols)Figur 1

natural_image
Diagram of mechanical components with downward arrows indicating motion or force, no text or symbols presentFigur 2
vingemøtrikker
betjeningspanel
BRUG (OR2000M)
Før ibrugtagning
natural_image
Simple line drawing of a remote control with three buttons and a central plus button (no text or symbols)| PARAMETER TABLE | ||
| Model: | OR2000M | |
| Type: | NY2009 20M | |
| ITEM VALUE UNIT | ||
| Rated Power 2000 W | ||
| Voltage Type 220-240 V | ||
| Nom. heat output 800 W | ||
| PARAMETER TABLE | ||
| Model: | OR2000E | |
| Type: | NY2009 20MR | |
| ITEM VALUE UNIT | ||
| Rated Power 2000 W | ||
| Voltage Type 220-240 V | ||
| Nom. heat output 800 W | ||
RENG∅RING OG VEDLIGEHOLD
natural_image
Simple line drawing of a remote control with buttons and a plus/minus icon (no text or symbols)| PARAMETER TABLE | ||
| Model: | OR2000M | |
| Type: | NY2009 20M | |
| ITEM VALUE UNIT | ||
| Rated Power 2000 W | ||
| Voltage Type 220-240 V | ||
| Nom. heat output 800 W | ||
| PARAMETER TABLE | ||
| Model: | OR2000E | |
| Type: | NY2009 20MR | |
| ITEM VALUE UNIT | ||
| Rated Power 2000 W | ||
| Voltage Type 220-240 V | ||
| Nom. heat output 800 W | ||
natural_image
Line drawing of a remote control with three buttons and a central plus button (no text or symbols)| PARAMETER TABLE | ||
| Model: | OR2000M | |
| Type: | NY2009 20M | |
| ITEM VALUE UNIT | ||
| Rated Power 2000 W | ||
| Voltage Type 220-240 V | ||
| Nom. heat output 800 W | ||
| PARAMETER TABLE | ||
| Model: | OR2000E | |
| Type: | NY2009 20MR | |
| ITEM VALUE UNIT | ||
| Rated Power 2000 W | ||
| Voltage Type 220-240 V | ||
| Nom. heat output 800 W | ||
PUHDISTUS JA HOITO
| ∪ | AV/PÅ |
| (M) | Modus |
| + “+” | |
| - “-” | |
| (L) | Timer |
natural_image
Simple line drawing of a remote control with buttons and a plus/minus icon (no text or symbols)| PARAMETER TABLE | ||
| Model: | OR2000M | |
| Type: | NY2009 20M | |
| ITEM VALUE UNIT | ||
| Rated Power 2000 W | ||
| Voltage Type 220-240 V | ||
| Nom. heat output 800 W | ||
| PARAMETER TABLE | ||
| Model: | OR2000E | |
| Type: | NY2009 20MR | |
| ITEM VALUE UNIT | ||
| Rated Power 2000 W | ||
| Voltage Type 220-240 V | ||
| Nom. heat output 800 W | ||
RENGJ∅RING OG VEDLIKEHOLD
natural_image
Simple line drawing of a remote control with three buttons and a plus/minus button (no text or symbols)| PARAMETER TABLE | ||
| Model: | OR2000M | |
| Type: | NY2009 20M | |
| ITEM VALUE UNIT | ||
| Rated Power 2000 W | ||
| Voltage Type 220-240 V | ||
| Nom. heat output 800 W | ||
| PARAMETER TABLE | ||
| Model: | OR2000E | |
| Type: | NY2009 20MR | |
| ITEM VALUE UNIT | ||
| Rated Power 2000 W | ||
| Voltage Type 220-240 V | ||
| Nom. heat output 800 W | ||
RENGÖRING OCH SKÖTSEL
natural_image
Diagram of two mechanical components with downward arrows indicating motion or force, no text or symbols present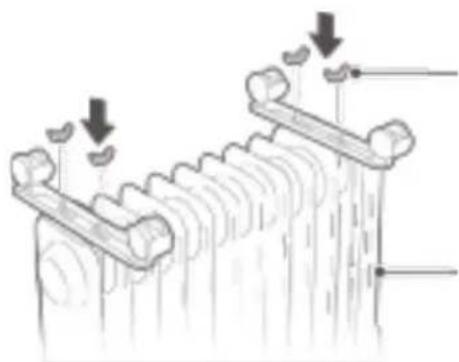
natural_image
Diagram of a mechanical or electrical component with two vertical rods and downward arrows indicating force or movement (no text or symbols present)natural_image
Simple line drawing of a remote control with buttons and a plus/minus icon (no text or symbols)| PARAMETER TABLE | ||
| Model: | OR2000M | |
| Type: | NY2009 20M | |
| ITEM VALUE UNIT | ||
| Rated Power 2000 W | ||
| Voltage Type 220-240 V | ||
| Nom. heat output 800 W | ||
| PARAMETER TABLE | ||
| Model: | OR2000E | |
| Type: | NY2009 20MR | |
| ITEM VALUE UNIT | ||
| Rated Power 2000 W | ||
| Voltage Type 220-240 V | ||
| Nom. heat output 800 W | ||
MANUEL D'INSTRUCTIONS
RADIATEUR À — BAIN D'HUILE
natural_image
Diagram of a mechanical assembly with two hanging rods and a base, showing downward force indicators (no text or symbols present)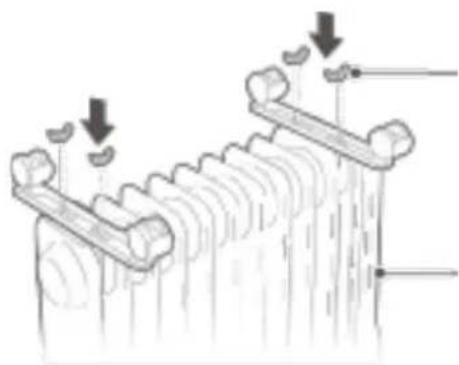
natural_image
Diagram of a mechanical or electrical component with two curved arms and downward arrows indicating force or movement (no text or symbols present)natural_image
Simple line drawing of a remote control with buttons and a plus/minus icon (no text or symbols)| PARAMETER TABLE | ||
| Model: | OR2000M | |
| Type: | NY2009 20M | |
| ITEM VALUE UNIT | ||
| Rated Power 2000 W | ||
| Voltage Type 220-240 V | ||
| Nom. heat output 800 W | ||
| PARAMETER TABLE | ||
| Model: | OR2000E | |
| Type: | NY2009 20MR | |
| ITEM VALUE UNIT | ||
| Rated Power 2000 W | ||
| Voltage Type 220-240 V | ||
| Nom. heat output 800 W | ||
NETTOYAGE ET ENTRETIEN
natural_image
Line drawing of a remote control with three buttons and a central plus button (no text or symbols)| PARAMETER TABLE | ||
| Model: | OR2000M | |
| Type: | NY2009 20M | |
| ITEM VALUE UNIT | ||
| Rated Power 2000 W | ||
| Voltage Type 220-240 V | ||
| Nom. heat output 800 W | ||
| PARAMETER TABLE | ||
| Model: | OR2000E | |
| Type: | NY2009 20MR | |
| ITEM VALUE UNIT | ||
| Rated Power 2000 W | ||
| Voltage Type 220-240 V | ||
| Nom. heat output 800 W | ||