UAVS 300 A1 - Shredder UNITED OFFICE - Free user manual and instructions
Find the device manual for free UAVS 300 A1 UNITED OFFICE in PDF.

User questions about UAVS 300 A1 UNITED OFFICE
0 question about this device. Answer the ones you know or ask your own.
Ask a new question about this device
Download the instructions for your Shredder in PDF format for free! Find your manual UAVS 300 A1 - UNITED OFFICE and take your electronic device back in hand. On this page are published all the documents necessary for the use of your device. UAVS 300 A1 by UNITED OFFICE.
USER MANUAL UAVS 300 A1 UNITED OFFICE
Operating instructions and safety instructions
NL BE
PAPIERVERNIETIGER
Before reading, unfold the page containing the illustrations and familiarise yourself with all functions of the device.
FR BE
GB/IE Operating instructions and safety instructions Page 17
KOMPERNASS HANDELS GMBH
BURGSTRASSE 21
44867 BOCHUM
DEUTSCHLAND
www.kompernass.com
Contents
Introduction 18
Proper use 18
Package contents and transport inspection 18
Appliance description 19
Technical data 19
Safety information 20
Assembly 22
Transport 23
First use 23
Operation 23
Switching the appliance on 23
Inserting paper 24
Inserting credit cards 25
Inserting a CD 25
Clearing a material blockage 26
Turning the appliance off 26
Overheating protection 26
Emptying the waste collectors 27
Cleaning 27
Storage when not in use 28
Troubleshooting 28
If there is a jam in the appliance 28
If the appliance suddenly stops working 28
If the appliance cannot be switched on 29
Disposal 29
Disposal of the appliance 29
Disposal of the packaging 29
Appendix 30
Kompernass Handels GmbH warranty 30
Service 31
Imporer 31
Introduction

Congratulations on the purchase of your new appliance.
You have chosen a high-quality product.
The operating instructions are part of this product. They contain
important information on safety, usage and disposal. Before using the product, please familiarise yourself with all operating and safety instructions. Use the product only as described and for the range of applications specified. Keep these operating instructions as a reference and store them near the product.
Please also pass these operating instructions on to any future owner.
Proper use
This appliance is intended for shredding paper, credit cards, CDs/DVDs as well as small staples (sizes: 24/6 and 23/6 (11.5 x 6 mm), B-8 (11.5 x 7 mm), No10 (8.4 x 5 mm) and paper clips (up to 25 mm) in private households. The appliance is not intended for any other purpose, nor for use beyond the scope described. The appliance is not intended for use in commercial or industrial environments.
The manufacturer accepts no responsibility for damage caused by failure to observe these instructions, improper use or repairs, unauthorised modifications or the use of unapproved replacement parts. The risk is borne solely by the user.
Package contents and transport inspection

DANGER
- Do not allow children to play with packaging materials. There is a risk of suffocation.
Remove all parts of the appliance and the operating instructions from the carton.
Remove all packaging materials from the appliance.
Check the contents of the package. The following components are included in delivery:
- Appliance base
- Cutter attachment
Large waste collector - Small waste collector
4xcastors - Operating instructions
NOTE
Check the package for completeness and signs of visible damage.
If the delivery is incomplete or damage has occurred as a result of defective packaging or during transport, contact the Service hotline (see section Service).
Appliance description
(See fold-out page for illustrations)
Power cable
Cutter opening for CDs/credit cards
3 Cutter attachment
Safety switch (built-in)
Integrated carrying recesses (left and right)
Power lamp
Overheat lamp
REV/OFF/AUTO/FWD switch
Cutter opening for paper
10 Rollers (2x)
1 Castors with locking lever (2x)
12 Small waste collector (for CDs/credit cards)
18 Large waste collector (for paper)
Viewing window
15 Appliance base
Technical data
| Power supply 220-240 V | ~ (AC), 50 Hz |
| Nominal current 1.5 A | |
| Rated power 300 W | |
| Protection class | II/☐ (double insulation) |
| Collector capacity Paper | 15 litres |
| Cutting process for paper | Cross-cut, 5 x 18 mm particles Safety level P-4 |
| Working width of cutter opening for paper/CD | 220 mm/124 mm |
| Paper cutting capacity 10 sheets | (80 g/m 2) |
Safety information
The following safety instructions must always be followed when using electrical appliances:
DANGER! RISK OF ELECTRIC SHOCK!
- Do not use the appliance if the power plug or the power cable is damaged. To prevent accidents, have defective plugs and/or power cables replaced immediately by an authorised specialist technician or our Customer Service department.
- Appliances which do not work properly or have been damaged must be checked immediately and repaired by Customer Service.
- Do not expose the appliance to rain, and never use it in a humid or wet environment.
Take steps to ensure the power cable never becomes wet or moist during use. Never touch the plug or the appliance with wet hands. - Do not kink or crush the power cable or place heavy objects on it. Route the power cable so that it does not come into contact with hot surfaces.
- Do not place the appliance in the direct vicinity of any sources of heat or water. There is a risk of fire or of receiving an electrical shock!
WARNING! - RISK OF INJURY!
Only one person should operate the shredder at a time.
- Never leave the appliance unattended during operation.
Kee loose clothing, long hair, jewellery, etc. at a safe distance from the cutter opening.
Never insert your fingers into the cutter opening.
Keep children away from the appliance. They could hurt themselves.
Do not use the appliance in dusty or explosive environments (ignitable gases, vapours or vapours from organic solvents). Risk of explosion!
- Never insert your finger into the central hole of a CD when you are feeding it into the appliance.
- Keep pets away from the appliance. They could hurt themselves.

WARNING! - RISK OF INJURY!
This tool is not intended for use by persons (including children) with limited physical, physiological or intellectual abilities or lack of experience and/or knowledge, unless they are supervised by a person who is responsible for their safety, or receive instructions from this person on how to use the appliance.
- The packaging material can be a source of danger for children. Dispos of the material immediately after unpacking or keep it in a safe place not accessible to children.
- Route the power cable in such a way that no one can tread on it or trip over it.
CAUTION! PROPERTY DAMAGE!
- Do not use the appliance outdoors. The appliance could be irreparably damaged!
- Do not overload the appliance. The paper shredder is designed for brief operating periods.
- Never use the paper shredder for purposes for which it is not designed or intended.
NOTES ON SAFE USE
Always position the appliance close to a power socket. Do not use an extension cable. Ensure that the appliance and the power socket are easily and quickly accessible in the event of an emergency.
In case of danger, pull the plug out of the power socket immediately.
- Remain alert at all times! Always pay attention to what you are doing and always use common sense. Do not use the appliance if you are distracted or feeling unwell.
Assembly

WARNING! - RISK OF INJURY!
Do not connect the appliance to a power socket during assembly.
The cutting blades in the cutter attachment 3 of the appliance are very sharp. Take extreme care when assembling the appliance.
Place the appliance base flat on the floor with the rear side downwards.
Fit the plain castors on the front and the castors with locking levers 11 on the rear of the base 15. Press the castors into the holes on the appliance base 15 until you hear them click into place (see fig. 1).
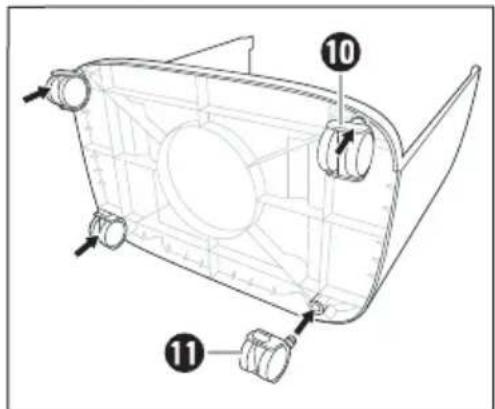
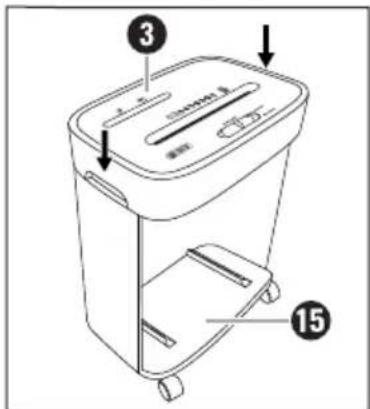
Fig. 1
Fig. 2
Place the appliance base 15 on the castors after fitting them.
Hold the cutter attachment ③ by the two integrated carrying recesses ⑤ and position it over the appliance base ⑤ so that the power cable ① points backwards and the opening in the appliance base ⑤ points forwards.
Press the cutter attachment firmly downwards until you hear it lock into place on the appliance base (see fig. 2).
Place the small waste collector in the large waste collector (see fig. 3).
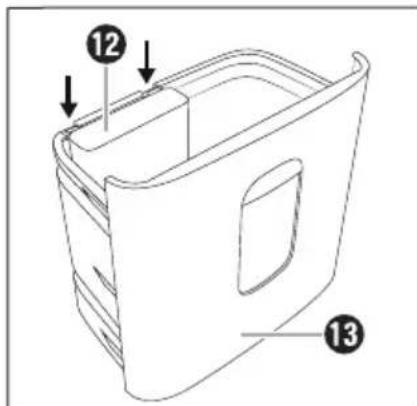
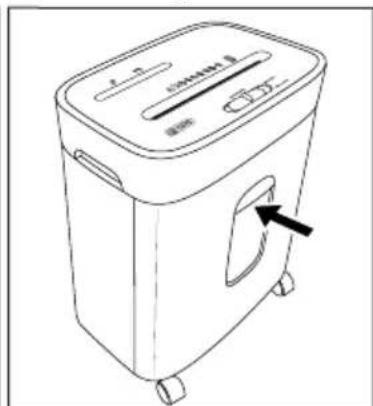
Fig. 3
Fig. 4
Slide the large waste collector13 fully into the appliance base 15 (see fig. 4).
NOTE
The large waste collector must be pushed fully into the appliance base until you hear it click into place. Otherwise, the appliance will not start!
The safety switch will not be deactivated until the large waste collector has been pushed in correctly, allowing the appliance to be used.
Transport
The appliance comes with four castors 10 / 1 for easy transport. Release the levers on the two castors with locking levers by pushing the levers upwards (see fig 5). The appliance can now be rolled conveniently.
Press the levers on the two castors with locking levers downwards once you have parked the appliance in order to prevent the appliance from rolling away (see fig. 6).
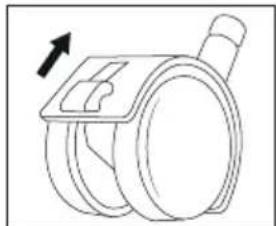
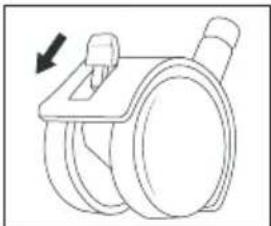
Fig.5 Fig.6
NOTE
- Use the castors only on even surfaces. Do not roll the appliance over shag-pile carpets (e.g. flokati, tufted). These could block the castors.
Always hold the appliance by the two integrated carrying recesses to lift it up.
First use
NOTE
Make sure the REV/OFF/AUTO/FWD switch 8 is in the OFF position before plugging the appliance into the power socket.
Every shredder is tested for functionality after manufacture. It is possible that you may find paper residue in the cutting blades.
Insert the plug into a mains power socket.
Operation
Switching the appliance on
Move the REV/OFF/AUTO/FWD switch 3 to the AUTO position for shredding. The power lamp 6 lights up permanently blue and the appliance is now ready for use.
NOTE
Make sure the large waste collector is inserted correctly into the appliance base 15 and has clicked into place! Otherwise the appliance will not start! The power lamp 6 only lights up once the large waste collector 13 is pushed all the way into the appliance base 15.
Inserting paper
CAUTION! PROPERTY DAMAGE!

Never feed paper into the cutter opening if it still has paper clips or staples larger than 25mm attached! These could damage the cutting blades.
NOTE
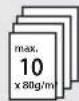
You can shred up to 10 sheets (80 g/m² paper) at the same time.
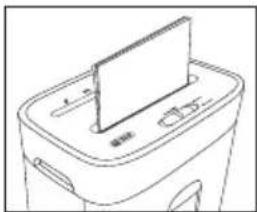
Fig. 7
Insert paper into the middle of the cutter opening for paper 9 from above and in portrait format (see fig. 7). The appliance starts automatically and switches itself off automatically if no further paper is inserted.
NOTE
Regularly remove any residue left in the cutting blades with a suitable object (e.g. brush or tweezers). Ensure that the appliance is unplugged before doing this.
Inserting credit cards

Fig. 8
Insert the credit card from above into the middle of the CD/credit card cutter opening 2 (see fig.8) and move the REV/OFF/AUTO/FWD switch 8 to the FWD ("forward") position.
You can only shred one credit card at a time. Always insert the card into the CD/credit card cutter opening 2 with the wide side first. Otherwise, the magnetic strip will not be destroyed.
NOTE
Always insert the credit card into the middle of the CD/credit card cutter opening 2. Otherwise, the shredding process will not start.
If you want to ensure that the information on the magnetic strip is irrevocably destroyed, insert the credit card into the middle of the cutter opening for paper 9 and move the REV/OFF/AUTO/FWD switch 8 to the FWD position.
Note that the residue will then fall into the large waste collector 13. If necessary, empty this beforehand in order to keep paper and plastic waste separate.
Inserting a CD
WARNING! RISK OF INJURY!
- Never insert your finger into the central hole of a CD when you are feeding it into the appliance.

Fig. 9
Insert the CD from above into the middle of the CD/credit card cutter opening 2 (see fig. 9). You can only shred one CD at a time.
Clearing a material blockage
Move the REV/OFF/AUTO/FWD switch 8 to the REV ("reverse") position if the material being shredded causes a jam. The appliance now goes into reverse and the material is ejected.
Alternatively, move the REV/OFF/AUTO/FWD switch 8 to the FWD ("forward") position if the material causes a blockage. The appliance is now in forwards operation and the material that is being shredded is pulled in again.
Move the REV/OFF/AUTO/FWD switch 8 to the OFF position as soon as the jammed material has been ejected.
Turning the appliance off
NOTE
We recommend that you switch off the appliance and let it cool down for about 30 minutes after 3 minutes of operation to prevent overheating.
Switch the appliance off by moving the REV/OFF/AUTO/FWD switch 8 to the OFF position. The power lamp 6 goes out.
Overheating protection
This appliance is fitted with overheating protection. If the motor overheats due to overloading, the appliance switches itself off automatically. The overheat lamp ⑦ lights up permanently red until the motor has cooled down sufficiently.
If this occurs, do the following:

WARNING! - RISK OF INJURY!
- Pull the power plug out of the power socket to prevent unintended starting of the appliance.
Switch the appliance off by moving the REV/OFF/AUTO/FWD switch 8 to the middle OFF position.
Empty the waste collectors12/13.
Allow the appliance to cool down for about 30 minutes.
Replace the plug in the mains power socket.
Switch the appliance on by moving the REV/OFF/AUTO/FWD switch 8 to the AUTO position. The overheat lamp 7 no longer lights up once the appliance has cooled down sufficiently.
Emptying the waste collectors

WARNING! RISK OF INJURY!
- Remove the power plug from the power socket to prevent the appliance from accidentally switching on.
NOTE
- Empty the waste collector12/13 regularly to prevent the shredded material from being drawn into the cutting blades from below.
- Dispose of the waste material in an environmentally-responsible manner.
Pull the large waste collector 13 out of the appliance base 15.
Take the small waste collector 12 out of the large waste collector 13.
Empty the large waste collector13 and small waste collector 12 separately.
Place the small waste collector 2 back in the large waste collector 3 (see fig. 3).
Slide the large waste collector fully into the appliance base again until you hear it click into place (see fig. 4).
Cleaning

DANGER! RISK OF ELECTRIC SHOCK!
Always pull out the plug before cleaning the appliance. There is a risk of electric shock!

WARNING! RISK OF INJURY!
The appliance becomes hot during use. Allow the appliance to cool down completely before cleaning it.
Do not touch the cutting blades of the appliance with your fingers. The cutting blades are very sharp!
CAUTION! PROPERTY DAMAGE!

Do not spray any oil or other lubricants into the cutter openings 2/9. These can irreparably damage the appliance.
To avoid irreparable damage to the appliance, ensure that no moisture gets into it during cleaning.
- Do not use caustic, abrasive or solvent-based cleaning materials. These can damage the surfaces of the appliance.
Remove any residue left in the cutting openings 2 / 9 or cutting blades with a suitable object (e.g. brush or tweezers). Ensure that the appliance is unplugged before doing this.
Clean the surfaces of the appliance with a soft, dry cloth.
Use a lightly moistened cloth and a mild detergent to remove stubborn dirt residues from the appliance surface.
Storage when not in use
If you decide not to use the appliance for a long period, disconnect it from the mains power supply and store it in a clean, dry place away from direct sunlight.
Troubleshooting
If there is a jam in the appliance
This means that you may have attempted to feed too much paper into the appliance (max. 10 sheets 80g / m^2 paper).
Move the REV/OFF/AUTO/FWD switch 3 to the REV position if the paper causes a blockage. The appliance now goes into reverse and the material is ejected.
Alternatively, move the REV/OFF/AUTO/FWD switch 8 to the FWD position if the paper causes a blockage. The appliance is now in forwards operation and the material that is being shredded is pulled in again.
Pull the paper out of the appliance and then move the REV/OFF/AUTO/FWD switch 8 to AUTO.
The appliance is now ready for use again.
If the appliance suddenly stops working
This means that the appliance has overheated and the automatic safety cut-out has activated itself. The overheat lamp ⑦ lights up permanently red.
Move the REV/OFF/AUTO/FWD switch 8 to the OFF position.
Remove the plug from the mains power socket.
Allow the appliance to cool down for about 30 minutes.
Replace the plug in the mains power socket.
Switch the appliance on by moving the REV/OFF/AUTO/FWD switch 8 to the AUTO position. The power lamp 6 lights up permanently blue. The overheat lamp 7 remains off when the appliance has cooled down sufficiently.
If the appliance cannot be switched on
Make sure the cutter attachment 3 is fitted correctly on the appliance base 15.
Make sure the waste collector is pushed all the way into the appliance base 15.
Try a different socket.
The appliance is possibly defective. Have the appliance checked by a qualified technician.
The appliance has overheated and triggered the automatic safety cut-out. Proceed as described in the section above If the appliance suddenly stops working.
Disposal
Disposal of the appliance

The adjacent symbol of a crossed-out wheelie bin means that this appliance is subject to Directive 2012/19/EU. This directive states that this appliance may not be disposed of in normal household waste at the end of its useful life, but must be brought to a specially set-up collection point, recycling depot or disposal company.
This disposal is free of charge for the user. Protect the environment by disposing of this appliance properly.

Your local community or municipal authorities can provide information on how to dispose of the product.

The product is recyclable, subject to extended producer responsibility and is collected separately.
Disposal of the packaging

The packaging materials have been selected for their environmental friendliness and ease of disposal and are therefore recyclable.
Dispose of packaging materials that are no longer needed in accordance with applicable local regulations.
Dispose of the packaging in an environmentally friendly manner.
Note the labelling on the packaging and separate the packaging material components for disposal if necessary. The packaging material is labelled with abbreviations (a) and numbers (b) with the following meanings:
1-7:plastics,
20-22: paper and cardboard,
80-98: composites
Appendix
This appliance has a 3-year warranty valid from the date of purchase. If this product has any faults, you, the buyer, have certain statutory rights. Your statutory rights are not restricted in any way by the warranty described below.
Warranty conditions
The warranty period starts on the date of purchase. Please keep your receipt in a safe place. This will be required as proof of purchase.
If any material or manufacturing fault occurs within three years of the date of purchase of the product, we will either repair or replace the product for you or refund the purchase price (at our discretion). This warranty service requires that you present the defective appliance and the proof of purchase (receipt) within the three-year warranty period, along with a brief written description of the fault and of when it occurred.
If the defect is covered by the warranty, your product will either be repaired or replaced by us. The repair or replacement of a product does not signify the beginning of a new warranty period.
Warranty period and statutory claims for defects
The warranty period is not prolonged by repairs effected under the warranty. This also applies to replaced and repaired components. Any damage and defects present at the time of purchase must be reported immediately after unpacking. Repairs carried out after expiry of the warranty period shall be subject to a fee.
Scope of the warranty
This appliance has been manufactured in accordance with strict quality guidelines and inspected meticulously prior to delivery.
The warranty covers material faults or production faults. The warranty does not extend to product parts subject to normal wear and tear or to fragile parts which could be considered as consumable parts such as switches, batteries or parts made of glass.
The warranty does not apply if the product has been damaged, improperly used or improperly maintained. The directions in the operating instructions for the product regarding proper use of the product are to be strictly followed. Uses and actions that are discouraged in the operating instructions or which are warned against must be avoided.
This product is intended solely for private use and not for commercial purposes. The warranty shall be deemed void in cases of misuse or improper handling, use of force and modifications / repairs which have not been carried out by one of our authorised Service centres.
Warranty claim procedure
To ensure quick processing of your case, please observe the following instructions:
Please have the till receipt and the item number (e.g. IAN 12345) available as proof of purchase.
■ You will find the item number on the type plate on the product, an engraving on the product, on the front page of the operating instructions (below left) or on the sticker on the rear or bottom of the product.
If functional or other defects occur, please contact the service department listed either by telephone or by e-mail.
You can return a defective product to us free of charge to the service address that will be provided to you. Ensure that you enclose the proof of purchase (till receipt) and information about what the defect is and when it occurred.
You can download these instructions along with many other manuals, product videos and installation software at www.lidl-service.com.
This QR code will take you directly to the Lidl service page (www.lidl-service.com) where you can open your operating instructions by entering the item number (IAN) 123456.
Service
GB Service Great Britain
Tel.: 0800 404 7657
E-Mail: kompernass@lidl.co.uk
IE Service Ireland
Tel.: 1890 930 034
(0,08 EUR/Min., (peak))
(0,06 EUR/Min., (off peak))
E-Mail: kompernass@lidl.ie
IAN331849_1910
Importer
Please note that the following address is not the service address. Please use the service address provided in the operating instructions.
KOMPERNASS HANDELS GMBH
BURGSTRASSE 21
44867 BOCHUM
GERMANY
www.kompernass.com
Table des matieres
Introduction 34
Protection anti-surchauffe 42
Protection anti-surchauffe
Chere cliente, cher client,
Chere cliente, cher client,
KOMPERNASS HANDELS GMBH
BURGSTRASSE 21
44867 BOCHUM
ALLEMAGNE
www.kompernass.com
Inhoud
Inleiding 52
WAARSCHUWING! LETSELGEVAAR!
WAARSCHUWING! LETSELGEVAAR!
WAARSCHUWING! LETSELGEVAAR!
WAARSCHUWING! LETSELGEVAAR!
WAARSCHUWING! LETSELGEVAAR!
WAARSCHUWING! LETSELGEVAAR!
WAARSCHUWING! LETSELGEVAAR!
KOMPERNASS HANDELS GMBH
BURGSTRASSE 21
44867 BOCHUM
DUITSLAND
www.kompernass.com
Spistresci
Wstep 68
KOMPERNASS HANDELS GMBH
BURGSTRASSE 21
44867 BOCHUM
NIEMCY
www.kompernass.com
Obsah
Uvod 84
KOMPERNASS HANDELS GMBH
BURGSTRASSE 21
44867 BOCHUM
NÉMECKO
www.kompernass.com
Obsah
Uvod 100
Použivanie podl'α určenia 100
Rozsah dodávky a kontrola po preprave 100
Opis pristroja 101
Technické udaje 101
KOMPERNASS HANDELS GMBH
BURGSTRASSE 21
44867 BOCHUM
NEMECKO
www.kompernass.com

KOMPERNASS HANDELS GMBH
BURGSTRASSE 21
44867 BOCHUM
GERMANY
www.kompernass.com