
PLS 10 A3 - Rechargeable spotlight POWERFIX - Free user manual and instructions
Find the device manual for free PLS 10 A3 POWERFIX in PDF.

| Product type | Rechargeable LED light projector |
| Brand | Powerfix Profi |
| Model | PLS 10 A3 |
| Dimensions (L x H x D) | Approx. 11.4 x 8.6 x 10.5 cm |
| Weight | Approx. 1,040 g |
| Battery type | Integrated rechargeable Li-Ion, 7.4 V / 5,200 mAh |
| Operating voltage | 12 - 24 V (DC) |
| Total power consumption | Approx. 10 W |
| LED power consumption | Approx. 8.5 W |
| Total luminous flux | 900 lm +/-5% (with cover) |
| Color temperature | Approx. 5,000 K (neutral white) |
| Beam angle | Approx. 100° |
| LED lifespan | Approx. 30,000 hours |
| Battery charging time | Approx. 6 hours |
| Operating time (full charge) | Approx. 4 hours (at 85% luminous flux) |
| Protection class | IP65 (dust and water spray protection) |
| Safety class | III (Very Low Voltage) |
| Operating temperature (charging) | 0 °C to +45 °C |
| Operating temperature (discharging) | -20 °C to +45 °C |
| Max. projected area | Approx. 10 m² (at 3 m distance) |
| Included mains charger | Model HV-T16VB-12100A, input 100-240 V~, output 12 V / 1 A |
| Included car charger | 12/24 V cable with fuse T 3.15 A H 250 V |
| Maintenance | LED not replaceable, integrated battery not user-replaceable |
| Cleaning | Soft, dry cloth, no solvents |
| Warranty | 3 years, spare parts available during warranty period |
Frequently Asked Questions - PLS 10 A3 POWERFIX
User questions about PLS 10 A3 POWERFIX
0 question about this device. Answer the ones you know or ask your own.
Ask a new question about this device
Download the instructions for your Rechargeable spotlight in PDF format for free! Find your manual PLS 10 A3 - POWERFIX and take your electronic device back in hand. On this page are published all the documents necessary for the use of your device. PLS 10 A3 by POWERFIX.
USER MANUAL PLS 10 A3 POWERFIX

AKKU LED-STRAHLER 10 WATT RECHARGEABLE 10W LED WORK LIGHT PROJECTEUR À LED SANS FIL 10 WATTS
TARGA GMBH
Coesterweg 45
DE-59494 CERMANIV
GEMANT
Stand der Informationen - Last Information Update
Version des informations - Datum nieuwe versie
Ostatnia aktualizacja - Aktualizace na základě nejnovějších informaci
Aktualizácia na základe nojnovtich informáci:
11 / 2018 - Ident-No.: PLS 10 A3 11/2018-1
OE AT
Bedienungsanleitung und Sicherheitsinweise
FR BE
Mode d'emploi et consignes de sécurité
PL
Instruksja montażu i wskoźówki bezpieczeństwa
SK
Návod na použivanie a bezpečnostné pokyny
GB IE
Operating instructions and safety instructions
NL BE
Handleiding en veiligheidsoorwizingen
CZ
Návod k obsluze a bezpečnostní pokyny
IAN 310908
IAN 310908
DE BE
PLCJ


Deutsch....2
English....19
Français....35
Nederlands 56
Polski 72
Čeština 89
Slovensky....105
Inhalt
natural_image
Exterior view of a black-and-white photoelectric lamp with labeled components (A, B, C, D) and no visible text or symbols on the main objects.natural_image
Symbol of a trash bin crossed with a diagonal line and a horizontal bar below (no text or numbers present)natural_image
Two symbolic icons: a person sorting a trash bin and a recycling symbol (no text or labels)natural_image
Two views of a device showing internal components with arrows indicating directional movement (no text or symbols visible)- Intended use....20
- Package contents ...... 21
- Technical specifications ....22
- Safety instructions ....23
- Copyright ......27
- Before you start....27
6.1 Mounting....27
6.2 Charging the battery 28
- Getting started 28
-
12/24 V car charger cable ....28
8.1 Replacing the fuse....29 -
Maintenance / cleaning 30
9.1 Servicing....30
9.2 Cleaning....30
9.3 Storage when not in use....30
-
Troubleshooting ....30
-
Environmental regulations and disposal information....31
11.1 Removing the battery ....31 - Conformity notes ....32
- Warranty and Service Information....33
Congratulations!
By purchasing the Powerfix Profi PLS 10 A3 battery LED emitter, hereinafter referred to as the battery LED emitter, you have opted for a quality product.
The User's Manual forms part of this product. It contains important information on safety, usage and disposal. Before using the product, please familiarise yourself with all operating and safety instructions. Only use the product as described and for the applications given. If you pass the product on to someone else, make sure to give them all the relevant documents with it.
1. Intended use
This battery LED emitter is only suitable for private use in dry, indoor areas, e.g. workshops or garages. The battery LED emitter is a specialist product which, by the nature of its construction, withstands extreme physical strain (1.0m ^2 / s ^3 200-2000 Hz) in the form of vibrations, as does the built-in battery.
The battery LED emitter is not designed to provide room lighting within the home. It must always be used with the stand; wall-mounting is not permitted. The product fulfils all relevant norms and standards relating to CE conformity. Any modifications to the battery LED emitter other than recommended changes by the manufacturer may result in these standards no longer being met.
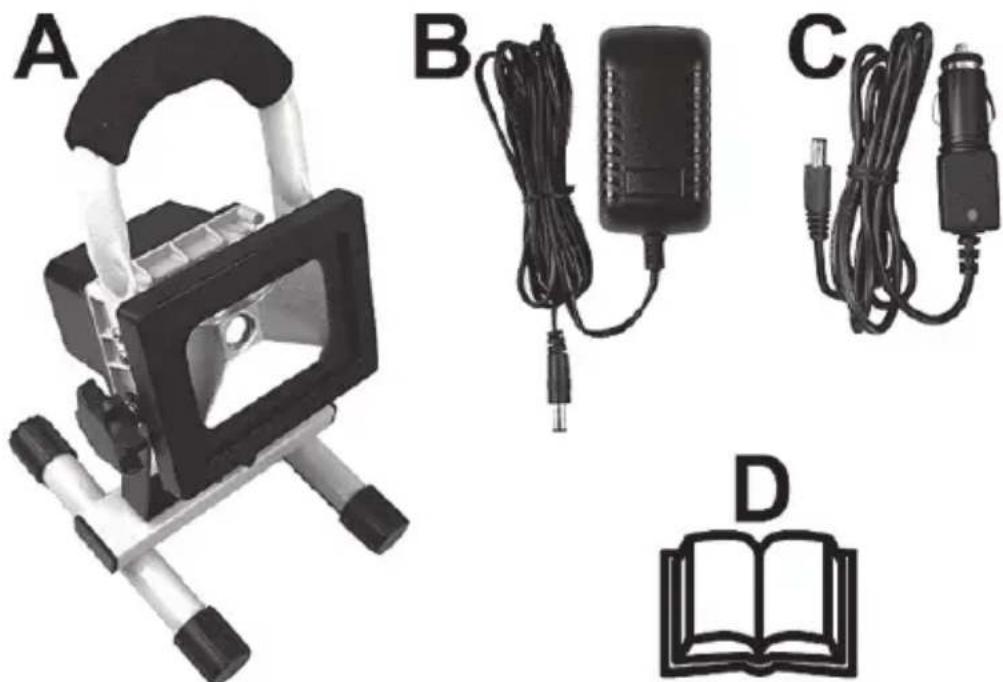
2. Package contents
natural_image
Product display image showing a lamp, charging cable, and open book (no text or symbols visible)A Rechargeable Battery LED Working Light Powerfix Profi PLS 10 A3
B Wall plug battery charger
C 12/24 V car charger cable
D These operating instructions (line-art illustration)
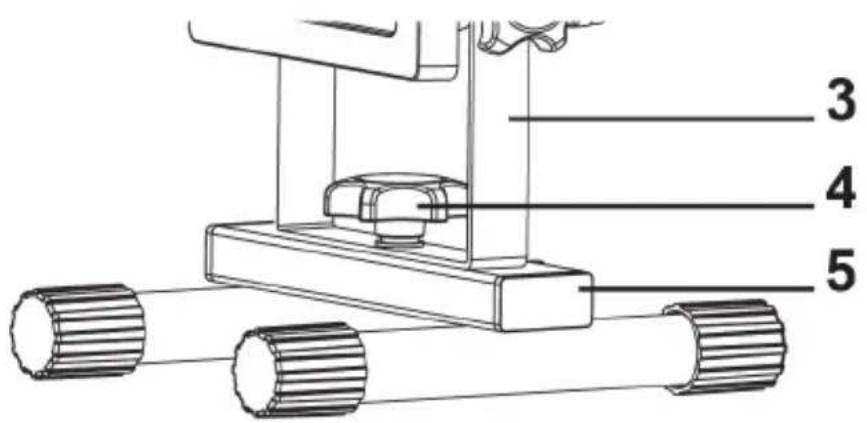
These operating instructions have a fold-out cover. On the inside of the cover is a diagram of the battery LED emitter with the components numbered. The meanings of the numbers are as follows:
1 Handle
2 Rechargeable Battery LED Working Light
3 Mounting bracket
4 Knurled screw
5 Stand
6 LED charging indicator
7 Rubber cover (for DC-IN receptacle)
8 DC-IN receptacle
9 On/Off switch
10 Knurled screws
3. Technical specifications
Battery LED emitter
| Brand | Powerfix | Profi | |
| Model name PLS 10 A3 | |||
| Operating voltage 12 - 24 V (Direct current) | current) = | ||
| Rechargeable battery Rechargeable Li-on battery 7.4 V / 5200 mAh | |||
| Battery charging time approx. 6 hours | |||
| Runtime with fully charged battery |  | approx. 4 hours at around 85% of luminous flux | |
| Power consumption complete battery LED emitter | approx. 10 W | ||
| Safety class | III, [10sec] xtra Low Voltage, ELV) | ||
| Degree of protection IP65 (protection against dust and jets of water) | |||
| Operating position vertical - emitter | at the top, stand (5) at the bottom | ||
| Max. area projected approx. 10m2 if set up at 3 metre distance | |||
| Luminaire | Citizen | LED | |
| LED power consumption approx. 8,5 W | |||
| Total luminous flux 900 lm +/-5% (with cover / glass window) | |||
| Colour temperature approx. 5000 K (neutral white) | |||
| Light beam aperture | approx. 100° | ||
| LED service life | 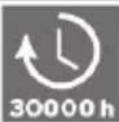 | approx. 30,000 hours | |
| Operating temperature | Charging: 0°C to +45°CDischarging: -20°C to +45°C | ||
| Dimensions (W x H x D) | approx. 11.4 x 8.6 x 10.5 cm | ||
| Weight | approx. 1040 g | ||
Wall plug battery charger
| Manufacturer GuangZhou HongGuang Electronics Co., Ltd | |
| Model | HV-T16VB-12100A |
| Input voltage 100 - 240 VAC, 50/60 Hz | |
| Output voltage | 12 V-(Direct current), 1 A, Polarity ⊖⊕⊕ |
| Safety class | II, □ |
Car charger cable
| Brand Powerfix Profi | |
| Model PLS 10 A3 | |
| Input voltage 12 V/24 V (Direct current) | |
| Output voltage | 12 V/24 V = (Direct current), 1 A,Polarity ⊖ ⊕ ⊕ |
| Fuse T 3.15 A H 250 V |
The technical specifications and design can be changed without prior notice.
4. Safety instructions
Before you use this battery LED emitter (A) for the first time, please read and comply with these instructions and warnings, even if you are familiar with handling electronic devices! Keep these operating instructions in a safe place for future reference. If you sell the device or give it away, pass on the operating instructions at the same time. The User Manual is part of the device.

DANGER! This symbol and the word "Danger" alert you to a potentially dangerous situation. Ignoring it can lead to severe injury or even death.

WARNING! This symbol and the word "Warning" denote important information required for the safe operation of the battery LED emitter (A) and for the safety of its users.

The power adapter is only suitable for use in dry inside spaces.

Short-circuit protected, sealed safety transformer
SELV
Safety extra-low voltage with special protection against electric shock

Independent operating device for use outside lights without additional cover

Switchable power supply
- - - 0.5m
Fire hazard: Make sure the battery LED emitter is at least 0.5 m away from any materials it is shining onto. Excessive heat can cause fire.

Specialist product: Not suitable for interior lighting in the home.

CAUTION! Electrical devices are not suitable for children. Do not allow children to play with electrical devices when not under supervision. Children may not understand that they can be dangerous. Keep the packaging materials out of the reach of children. There is a risk of suffocation.

CAUTION! LED Radiation! Avoid damage to your eyes! Never look into the LED beam. If you suspect you have damaged your eyes, seek medical attention.

CAUTION! If you notice any smoke, unusual noises or strange smells, switch the battery LED emitter off immediately. If this occurs, do not continue to use it and have it checked out by an expert. Never inhale smoke from a possible device fire. If you do inadvertently inhale smoke, seek medical attention. Smoke inhalation can be damaging to your health.
CAUTION! Never use optical instruments such as a magnifying glass to look directly into the beam. This could damage your eyes. If you suspect you have damaged your eyes, seek medical attention.
WARNING! Do not hang anything off the LED emitter and do not place any objects on it. The casing is not designed to support weights. This could damage the battery LED emitter (A).
WARNING! Use the supplied wall plug battery charger (B) and the supplied 12/24 V car charger cable (C) to charge the build-in battery of the battery LED emitter (A) and never use it for continuous operation like a power adapter. Never connect the wall plug battery charger (B) or the 12/24 V car charger cable (C) to other devices. Charge the built-in battery of the battery LED emitter (A) with the supplied wall plug battery charger (B) and the supplied 12/24 V car charger cable (C).
5. Copyright
All the contents of this user manual are protected by copyright and provided to the reader for information only. Copying data and information without the prior explicit written consent of the author is strictly forbidden. This also applies to any commercial use of the contents and information. All texts and diagrams are up-to-date as of the date of printing. Subject to change without notice.
6. Before you start
Remove the battery LED emitter (A) and the accessories from the packaging.
Inspect the battery LED emitter (A) and the accessories for damage. If the battery LED emitter (A) is damaged, do not use it.
6.1 Mounting
No tools are needed to mount the battery LED emitter (A). The battery LED emitter (A) is delivered in two pieces (emitter with handle and stand). To start, you have to assemble them. To do so, rotate the knurled screw (4) that secures the device for transport and is inserted on the stand (5) counter-clockwise and remove it. Make sure not to lose the washer and the retainer ring placed of the knurled screw (4) threaded pin. Next fold the mounting bracket (3) downwards. Then insert the knurled screw (4) through the central bore hole of the mounting bracket (3) from the top into the thread of the stand (5) and rotate it clockwise (see the figure). Tighten the knurled screw (4) so the mounting bracket (3) firmly fixes to the stand (5).
6.2 Charging the battery
The DC-IN socket (8) is protected against humidity with a rubber cover (7). To release this rubber cover (7), pull the red latch. Then connect the wall plug battery charger (B) charging plug to the battery LED emitter (A) DC-IN socket (8), and connect the wall plug battery charger (B) to an easy-accessible mains outlet. Before using the device for the first time, fully charge the built-in Li-lon battery. During charging, the charge indicator (6) lights red. When the built-in Li-lon battery is fully charged, the charge indicator (6) changes to green. Unplug the wall plug battery charger (B) from the mains outlet and then disconnect the wall plug battery charger (B) plug from the DC-IN socket (8). Close the DC-IN socket (8) with the rubber cover (7). Now the battery LED emitter (A) is ready for use.
Note: If the charge indicator (6) flashes in red while using the battery LED emitter (A), the built-in Li-Ion battery is almost empty. In this case, recharge the battery.
7. Getting started
You can use the two knurled screws (10) to adjust the vertical angle and therefore the beam of the battery LED emitter (A). Release the knurled screws (10) by rotating them 360 degrees counter-clockwise. Next adjust the vertical angle of the battery LED emitter (A) according to your needs. Then tighten the two knurled screws (10).
Use the On/Off switch (9) to switch the battery LED emitter (A) on and off. The On/Off switch (9) is protected against humidity with a rubber cover. You can recognize the position of the On/Off switch (9) by looking at this rubber cover. In addition, the switch positions (ON/OFF) are labelled.
8. 12/24 V car charger cable
In addition to the wall plug battery charger (B) you can also charge the built-in Li-Ion battery of your battery LED emitter (A) using the 12/24 V car charger cable (C) supplied. To release this rubber cover (7), pull the red latch. Then connect the wall 12/24 V car charger cable (C) charging plug to the battery LED emitter (A) DC-IN socket (8) and connect the 12/24 V car charger cable (C) to a suitable 12/24 V vehicle cigarette lighter. The green LED indicator on the 12/24 V car charger cable (C) plug indicates that it is ready for operation. During charging the charge indicator (6) of the battery LED emitter (A) lights red. When the
built-in Li-Ion battery is fully charged, the charge indicator (6) changes to green. Unplug the 12/24 V car charger cable (C) from the vehicle cigarette lighter and then disconnect the plug from the 12/24 V car charger cable (C) from the DC-IN socket (8). Close the DC-IN socket (8) with the rubber cover (7). Now the battery LED emitter (A) is ready for use.
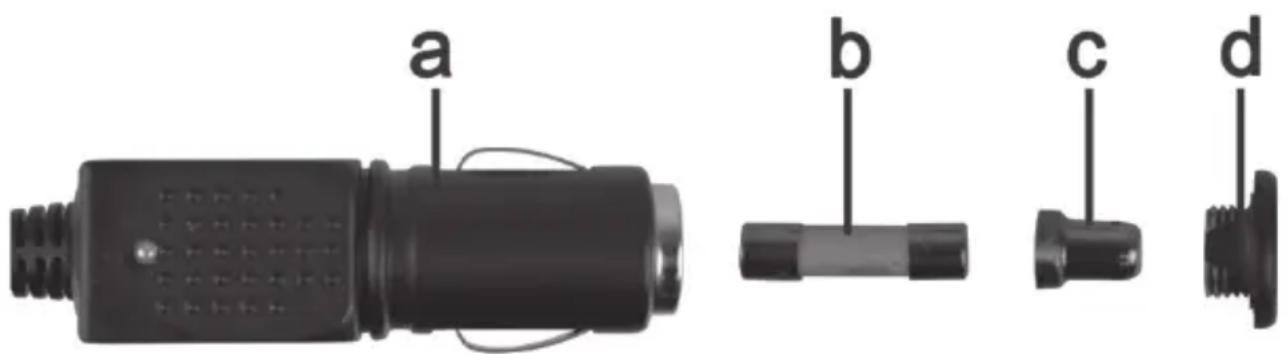
8.1 Replacing the fuse
If the 12/24 V car charger cable (C) is connected but the LED indicator of the 12/24 V car charger cable (C) does not light, the fuse might be defective.

WARNING! If you need to replace the fuse, make sure to use a fuse of the same type (see the Technical Specifications).
To replace the fuse, proceed as follows:
- Rotate the screw cap (d) counter-clockwise and remove it from the cigarette lighter plug housing (a). If necessary, use a pliers.
- Replace the fuse (b) with a new fuse of the same type. You can purchase a suitable fuse from any electronics retail outlet.
- First insert the fuse (b) into the cigarette lighter plug housing (a).
- Insert the metal contact (c) into the screw cap (d).
- Next insert the screw cap (d) with the inserted metal contact (c) over the fuse (b) and then screw the cap (d) clockwise onto the cigarette lighter plug housing (a).
9. Maintenance / cleaning
9.1 Servicing
The battery LED emitter (A) uses a long-life LED. This is not replaceable and requires no maintenance.
The built-in battery pack is a non-standard battery and not available in retail stores. Therefore it is not intended for the customer to replace the battery.
9.2 Cleaning

Make sure that no liquid gets into the housing could damage the battery LED emitter (A).
To clean the battery LED emitter (A), use a soft, dry cloth. Never use any solvents or cleaners that may damage the plastic housing. For more stubborn dirt, use a slightly damp cloth.
9.3 Storage when not in use
If the battery LED emitter (A) is not to be used for an extended period, store it in a clean and dry place. To retain battery performance, recharge regularly if stored for extended periods.
10. Troubleshooting
Battery LED emitter does not illuminate
- Check the position of the On/Off switch (9).
- The built-in battery may be discharged. Recharge it.
Battery does not charge
- The wall plug battery charger (B) is defective. Check if you can charge it with the 12/24 V car charger cable (C).
- 12/24 V car charger cable (C) defective. Verify if the green LED indicator on the 12/24 V car charger cable (C) plug is on after inserting it into a powered cigarette lighter. If not, replace the fuse of the 12/24 V car charger cable (C) as described in "Replacing the fuse"
11. Environmental regulations and disposal information
natural_image
Symbol of a trash bin with crossed lines indicating no waste or restriction, and a solid black rectangle below (no text or symbols)Devices marked with this symbol are subject to the European Directive 2012/19/EU. All electrical and electronic devices must be disposed of separately from household waste at official disposal centres.
Avoid damage to the environment and risks to your personal health by disposing of the device properly. For further information about proper disposal, contact your local government, disposal bodies or the shop where you bought the device.

natural_image
Two symbolic icons: a person sorting a trash bin and a recycling symbol (no text or labels)Dispose of all packaging in an environmentally-friendly manner. Cardboard packaging can be taken to paper recycling centres or public collection points for recycling. Any film or plastic contained in the packaging should be taken to your public collection points for disposal.

Please note the markings on the packaging material when disposing of it, it is labelled with abbreviations (a) and numbers (b), the meanings of which are as follows:
1-7: plastic / 20-22: paper and cardboard / 80-98: composite materials
11.1 Removing the battery
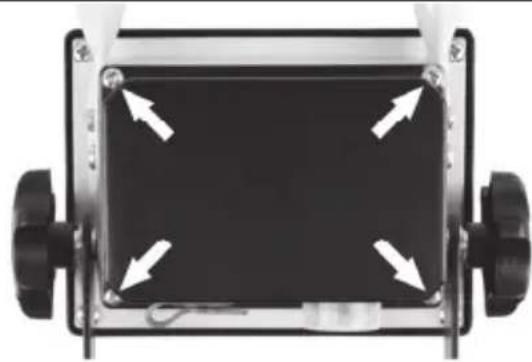
This battery LED emitter (A) contains a built-in battery pack. It must be removed before disposing of the battery LED emitter (A).
To remove it, proceed as follows:
- Loosen the 4 Philips screws (arrows) on the black cover on the battery LED emitter (A) back panel.
- Tilt the black cover over.
- Disconnect the plug of the battery cable (arrow) and remove the battery.
natural_image
Front view of a black rectangular device with four white arrows pointing inward, mounted on a silver frame (no text or symbols visible)
natural_image
Close-up of hands installing or adjusting an electronic circuit board with visible wiring and components (no text or symbols)Dispose of the battery and the LED emitter separately.
Respect the environment. Old batteries must not be disposed of with domestic waste. They must be handed in at a collection point for waste batteries. Please note that batteries must be disposed of fully discharged at appropriate collection points for old batteries. If disposing of batteries that are not fully discharged, take precautions to prevent short circuits. To prevent any short circuits, cover the battery cable plug with insulating tape.
12. Conformity notes

The product complies with the requirements of the applicable European and national directives. Evidence of conformity has been provided. The manufacturer has the relevant declarations and documentation. The complete EU Declaration of Conformity is available for download from this link: www.targa.de/downloads/conformity/310908.pdf
13. Warranty and Service Information
Warranty of TARGA GmbH
Dear Customer,
This device is sold with three years warranty from the date of purchase. In the event of product defects, you have legal rights towards the seller. These statutory rights are not restricted by our warranty as described below.
Warranty conditions
The warranty period commences upon the date of purchase. Please keep the original receipt in a safe place as it is required as proof of purchase. If any material or manufacturing faults occur within three years of purchase of this product, we will repair or replace the product free of charge as we deem appropriate.
Warranty period and legal warranty rights
The warranty period is not extended in the event of a warranty claim. This also applies to replaced and repaired parts. Any damage or defects discovered upon purchase must be reported immediately when the product has been unpacked. Any repairs required after the warranty period will be subject to charge.
Scope of warranty
The device was carefully manufactured in compliance with stringent quality guidelines and subjected to thorough testing before it left the works. The warranty applies to material and manufacturing faults. This warranty does not cover product components which are subject to normal wear and which can therefore be regarded as wearing parts, or damage to fragile components such as switches, rechargeable batteries or components made of glass. This warranty is void if the product is damaged, incorrectly used or serviced. To ensure correct use of the product, always comply fully with all instructions contained in the user manual. The warnings and recommendations in the user manual regarding correct and incorrect use and handling of the product must always be observed and complied with. The product is solely designed for private use and is not suitable for commercial applications. The warranty is rendered void in the event of incorrect handling and misuse, if it is subjected to force, and also if any person other than our authorised service technicians interfere with the device. No new warranty period commences if the product is repaired or replaced.
Submitting warranty claims
To ensure speedy handling of your complaint, please note the following:
- Before using your product for the first time, please read the enclosed documentation carefully. Should any problems arise which cannot be solved in this way, please call our hotline.
- Always have your receipt, the product article number as well as the serial number (if available) to hand as proof of purchase.
- If it is not possible to solve the problem on the phone, our hotline support staff will initiate further servicing procedures depending on the fault.

Service

Phone: 0800 404 7657
E-Mail: targa@lidl.co.uk

Phone: 1890 930 034
E-Mail: targa@lidl.ie

Phone: 800 62230
E-Mail: targa@lidl.com.mt

Phone: 8009 4409
E-Mail: targa@lidl.com.cy
IAN: 310908

Manufacturer
Please note that the following address is not a service address. First contact the service point stated above.
TARGA GmbH
Coesterweg 45
DE-59494 Soest
GERMANY
Table des matières
natural_image
Product display image showing a lamp, charging cable, and open book (no text or symbols visible)natural_image
Simple line drawing of a trash bin with two crossed lines indicating no waste or prohibition (no text or symbols)


natural_image
Two views of a small electronic device showing internal components and wiring, with arrows indicating direction of movement (no text or symbols present)Cher client, chère cliente,
Cher client, chère cliente,
natural_image
Product display image showing a lamp, charging cable, and open book (no text or symbols visible)natural_image
Symbol of a trash bin with crossed lines indicating no waste or restriction, and a solid black rectangle below (no text or labels)natural_image
Top-down view of a mechanical device with four white arrows pointing to a black rectangular component (no text or symbols visible)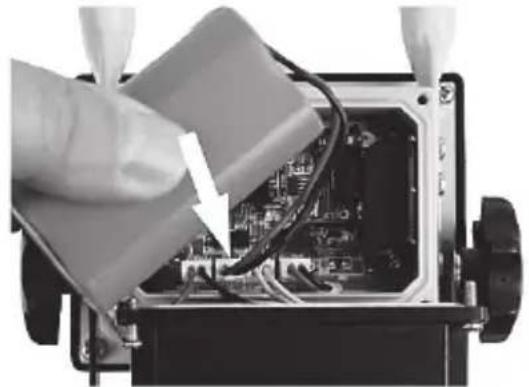
natural_image
Close-up of a hand inserting wires into an electronic device casing (no visible text or symbols)natural_image
Symbol of a trash bin crossed out by two diagonal lines (no text or labels)Li-Ion
natural_image
Product display image showing a lamp, charging cable, and open book (no text or symbols visible)natural_image
Symbol of a trash bin crossed with two crossed lines, no text or numbers presentnatural_image
Two symbolic icons: a person sorting a trash bin and a recycling symbol (no text or labels)natural_image
Top-down view of a mechanical device with four white arrows pointing to a black rectangular component (no text or symbols visible)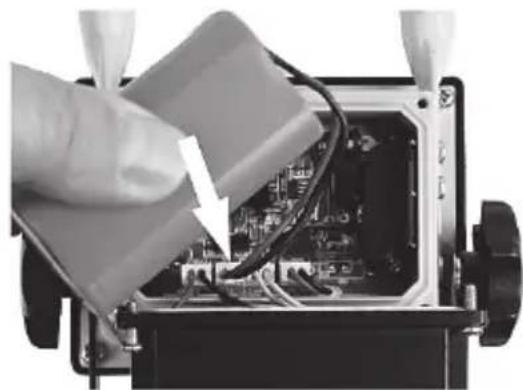
natural_image
Close-up of a hand inserting wires into an electronic device (no visible text or symbols)natural_image
Symbol of a trash bin crossed with diagonal lines, representing waste sorting or disposal (no text or labels)Li-Ion
natural_image
Product display image showing a lamp, charging cable, and open book (no text or symbols visible)A LED svítidlo Powerfix Profi PLS 10 A3 napájené z akumulátoru
B Zásuvkový nabíječ
natural_image
Symbol of a trash bin crossed with two crossed lines and a solid rectangle below (no text or labels)natural_image
Two symbolic icons: a person sorting a trash bin and a recycling symbol (no text or labels)natural_image
Two views of a small electronic device showing internal components and wiring, with arrows indicating directional movement (no text or symbols visible)natural_image
Symbol of a trash bin crossed with a diagonal line, representing waste sorting or restriction (no text present)Li-Ion
natural_image
Four-panel image showing a device labeled A, B, C, and D: a lamp switch, a charging plug, and an open book (no text or symbols on main objects)natural_image
Symbol of a trash bin crossed with no visible text or labelsnatural_image
Two views of a small electronic device showing internal components and wiring, with arrows indicating directional movement (no text or symbols visible)natural_image
Symbol of a trash bin with crossed lines indicating no waste or discharge (no text or labels)Li-Ion
- AKKU LED-STRAHLER 10 WATT RECHARGEABLE 10W LED WORK LIGHT PROJECTEUR À LED SANS FIL 10 WATTS
- Inhalt
- Congratulations!
- Intended use
- Package contents
- Technical specifications
- Safety instructions
- SELV
- - - - 0.5m
- Copyright
- Before you start
- Mounting
- Charging the battery
- Getting started
- 12/24 V car charger cable
- Replacing the fuse
- WARNING! If you need to replace the fuse, make sure to use a fuse of the same type (see the Technical Specifications).
- Maintenance / cleaning
- Servicing
- Cleaning
- Storage when not in use
- Troubleshooting
- Battery LED emitter does not illuminate
- Battery does not charge
- Environmental regulations and disposal information
- Removing the battery
- Conformity notes
- Warranty and Service Information
- Warranty of TARGA GmbH
- Warranty conditions
- Warranty period and legal warranty rights
- Scope of warranty
- Submitting warranty claims
- Service
- Manufacturer
- Table des matières
Brand : POWERFIX
Model : PLS 10 A3
Category : Rechargeable spotlight