New Holland T8 - Toys PEG PEREGO - Free user manual and instructions
Find the device manual for free New Holland T8 PEG PEREGO in PDF.
| Product Type | Electric vehicle for children (tractor with trailer) |
| Brand | Peg Perego |
| Model | New Holland T8 |
| Recommended Age | 3 years and up |
| Maximum User Weight | 38.6 kg (85 lbs) |
| Power Supply | Rechargeable lead-acid battery 12V 8Ah (included) |
| Charger | 12Vdc 12W, input 120Vac 60Hz 16W (included) |
| Initial Charging Time | 18 hours |
| Motors | 2 motors of 165 W (pre-installed) |
| Speeds | 1st: 3.6 km/h, 2nd: 7.3 km/h, Reverse: 3.6 km/h |
| Brake | Automatic electric brake (release accelerator pedal) |
| Radio | Built-in FM radio (2 AA 1.5V batteries not included) |
| Trailer | Included, max load capacity 10 kg |
| Assembly Required | Yes, by an adult (estimated time: 45 minutes) |
| Tools Needed | Medium Phillips screwdriver, pliers, hammer (not included) |
| Warranty | 2 years (subject to online registration) |
| Maintenance and Cleaning | Clean with a damp cloth; do not use abrasive products; grease moving parts with light oil |
| Safety | Overload protection (automatic switch); sealed maintenance-free battery; do not use on public roads |
| Spare Parts and Repairability | Contact Peg Perego customer service (1-800-661-5050) for parts and repairs |
Frequently Asked Questions - New Holland T8 PEG PEREGO
User questions about New Holland T8 PEG PEREGO
0 question about this device. Answer the ones you know or ask your own.
Ask a new question about this device
Download the instructions for your Toys in PDF format for free! Find your manual New Holland T8 - PEG PEREGO and take your electronic device back in hand. On this page are published all the documents necessary for the use of your device. New Holland T8 by PEG PEREGO.
USER MANUAL New Holland T8 PEG PEREGO
Requires 2 AA batteries (not included)
Exige 2 batteries AA (non incluses)
- Year 3 +
• Weight Capacity 85 lbs - Année 3+
• Capacité de poids 85 lbs
• Año 3+ - Capacidad de peso 85 lbs
STOP! VERY IMPORTANT
Do NOT ride vehicle before charging battery for 18 hours. Failure to do this will permanently damage the battery and void your warranty.
ALSO;
Charge the battery immediately after each use, regardless of how long the vehicle was used.
Storing the battery in a discharged state will permanently damage the battery.
When storing, the battery must be recharged every 30 days.
NEED HELP: Call 1-800-728-2108
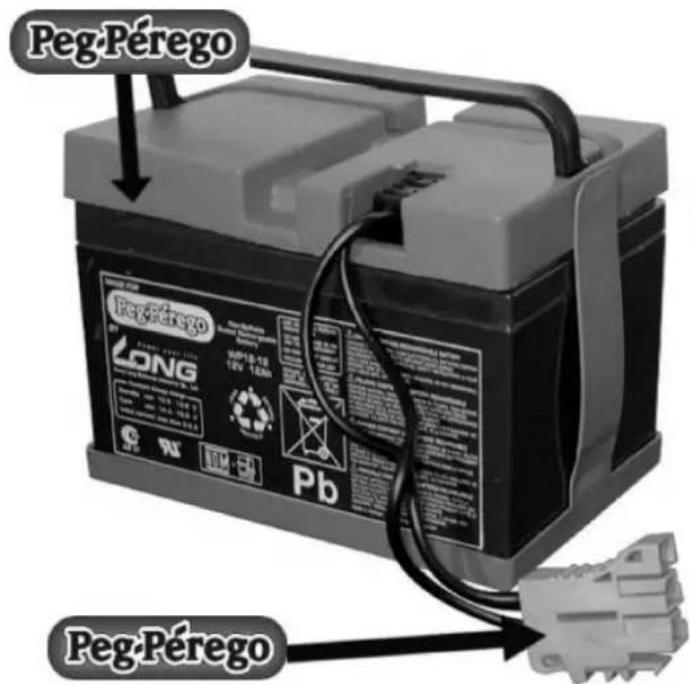
ONLY USE THE PEG PEREGO BATTERY & CHARGER WITH THIS TOY.
As Peg Perego USA, INC. grows, counterfeits and unauthorized distributors and retailers are making non-Peg Perego products and low quality knockoffs that are mistaken for an authentic one. Please avoid use of outside brand - third party accessories and/or products with the Peg Perego brand, which have resulted in damage to the product.
Ways to determine a true Peg Perego battery and/or charger:
I) The Peg Perego logo along the front of the battery itself.
2) The Peg Perego logo along the front of the charger.
3) The Peg Perego logo along the battery and charger connectors.

A) Plug the battery charger into a power outlet in compliance with the specifications on the label. This power unit is intended to be correctly oriented in a vertical or floor mount position.
B) Connect the charger the battery for 18 hours.
C) If your battery charger is provided with a LED indicator, it means one of the following:
I) When plugging in the charger, as described in A, and no battery is connected, the green LED light will appear, indicating that the device is working correctly.
2) Connect the battery as described in B. If all connections have been made properly and the battery is sufficiently discharged, the start of charging will be confirmed by the orange LED lighting up or by the flashing green LED light.
3) When the battery is almost fully charged, the LED will return to a solid green light.
D) The green LED does not necessarily mean that the battery is charged.
E) If the battery is already charged, the green LED is already on or turns green soon after B is carried out. If the battery life is reduced the next time you use the battery, please contact Customer Service for assistance in checking the battery and battery charger operation.
F) Once the charge is completed and the LED is on, unplug the battery charger from the main outlet first, then the battery terminal. Connect the battery to the electrical system of your toy, which is now ready to use.
The battery charger is fitted with a safety device. In the event of short circuit or overheating, a protection system prevents current peaks, which could damage your battery charger.
In this case, unplug the battery charger from the power outlet, find and remove the cause of short circuit, and re-connect everything to the power outlet.
IS ESPAÑOL
I • Insert only lead batteries.
2 • Do not use with non-rechargeable batteries. Risk of explosion.
3 • For adult use only. It is not a toy.
4 • Do not use with damaged sheathing, cable or connector.
5 • During recharging operations, make sure the battery charger is in a well-ventilated area.
6 • Should the battery charger be damaged in any way, do not use it until it is fully repaired.
ATTENTION:
natural_image
Illustration of hands connecting a plug into a battery pack (no text or symbols)
natural_image
Illustration of a hand holding a car seatbelt next to a device, with a right-hand arrow indicating rotation (no text or symbols)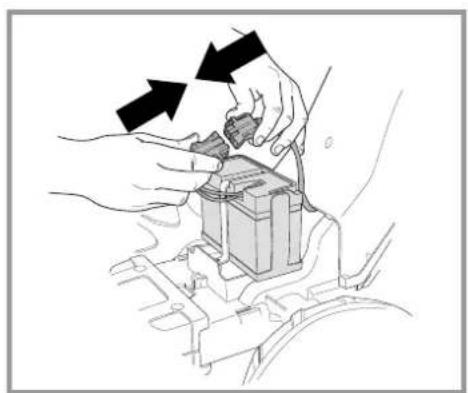
natural_image
Illustration of hands assembling or adjusting a mechanical component with arrows indicating assembly direction (no text or symbols present)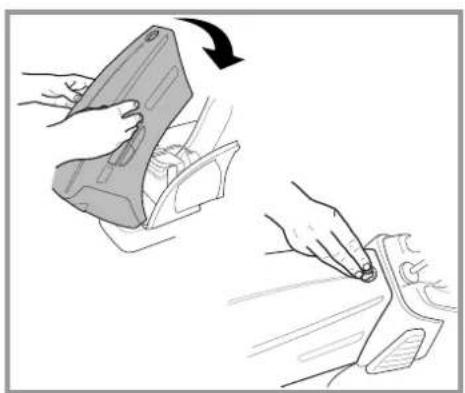
natural_image
Illustration showing a hand using a device to press down a car's seatbelt (no text or symbols present)
natural_image
Line drawing of hands adjusting a mechanical component with bidirectional arrows indicating movement (no text or symbols)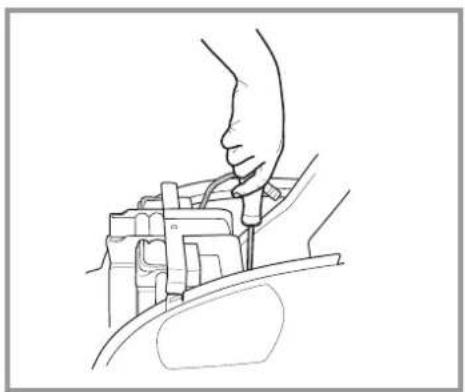
natural_image
Line drawing of a hand using a tool to adjust or install a mechanical component (no text or symbols present)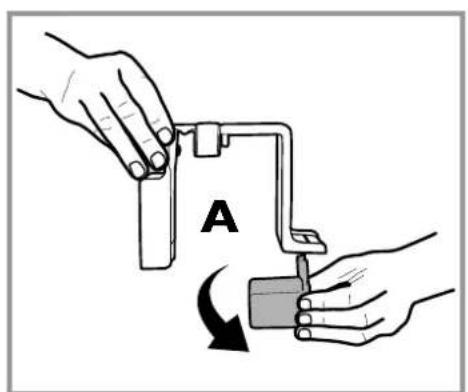
natural_image
Illustration of hands performing a mechanical task with a labeled component (A), showing a curved arrow indicating rotation or motion (no text or symbols beyond label)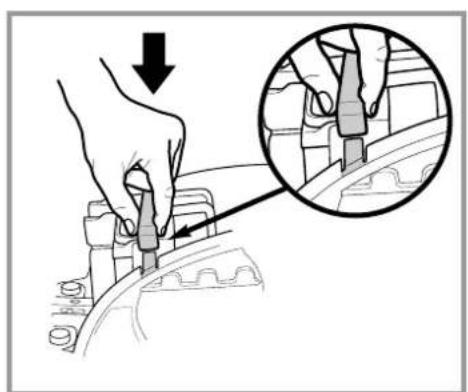
natural_image
Illustration of a hand using a tool to adjust or install a mechanical component, with an inset showing the close-up of the component (no text or symbols present)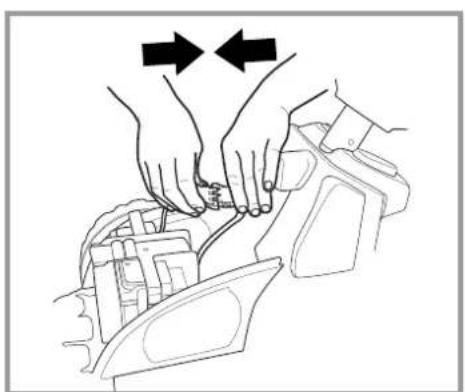
natural_image
Line drawing of hands adjusting a mechanical component with two arrows indicating direction (no text or symbols)ENGLISH FRANC
INITIAL BATTERY CHARGE
Connect battery charger to a 120vac wall recepticle. Connect battery charger to battery.
INSTALLING BATTERY
- Release the hood using a coin to rotate the safety catch byy 180^ and lift up th hood.
- Connect the battery connector to the electrical system connector.
- Close the hood and lock it by rotating the
safety catch by 180° with a coin. The vehicle is ready for use.
BATTERY RECHARGE
WARNING:
WARNING: BATTERY CHARGING AND ANY OTHER OPERATION ON THE ELECTRICAL SYSTEM MUST BE CARRIED OUT BY ADULTS ONLY THE BATTERY CAN ALSO BE CHARGED WITHOUT REMOVING IT FROM THE VEHICLE.
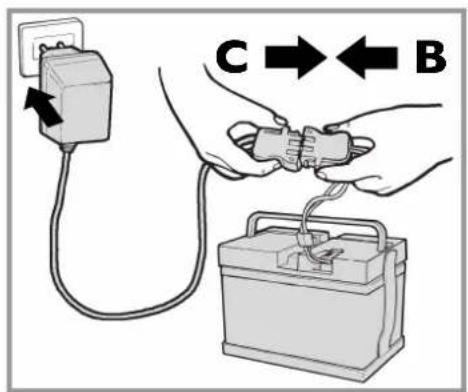
- Insert the battery charger plug into a domestic electrical power outlet according to its attached instructions. Connect plug B with plug C of the battery charger. When charging is complete disconnect the battery charger from the domestic outlet and then disconnect plug C from plug B.
- Insert plug B fully, until it snaps into position in plug A. Insert the battery holder. Finally, always remember to close and fix the battery compartment cover.
IS ESPAÑOL
PREMIERE CHARGE DE BATTERIE
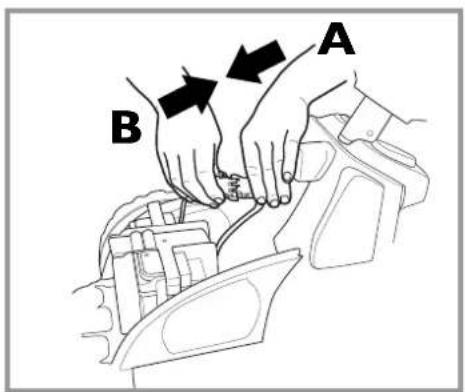
- Open the battery compartment as shown previously. Disconnect the battery connection plugs.
- Unscrew the 2 battery holder screws and remove the holder as shown in the figure. Remove the battery.
- If you have purchased or already own a Peg Perego 12V/12Ah battery, it is necessary to eliminate the plastic spacer (A) extracting it from the battery holder.
- Position the new battery with the battery holder taking care to insert the sides into the fake motor seatings. Fix the battery holder with the two screws.
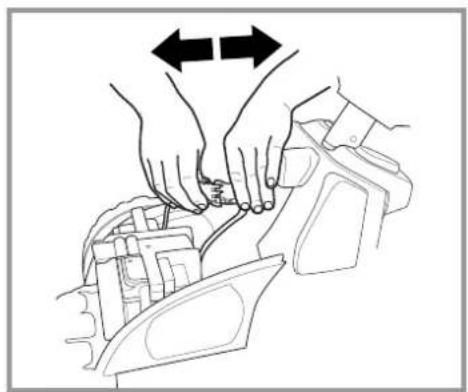
- Connect the battery and electrical system plugs. Close the hood and engage the safety catch as shown above.
REPLACEMENT DE LA BATTERIE
ATTENTION : LES DESSINS DES BATTERIES SONT DONNÉS PUREMENT À TITRE INDICATIF. LA BATTERIE EN VOTRE POSSESSION POURRAIT ÊTRE DIFFÉRENTE DU MODÈLE REPRÉSENTÉ. LES SÉQUENCES DE REMPLACEMENT ET DE CHARGE REPRÉSENTÉES N'EN RESTENT PAS MOINS VALABLES.
natural_image
Line drawing of a car interior showing hand holding a tool, with no visible text or symbols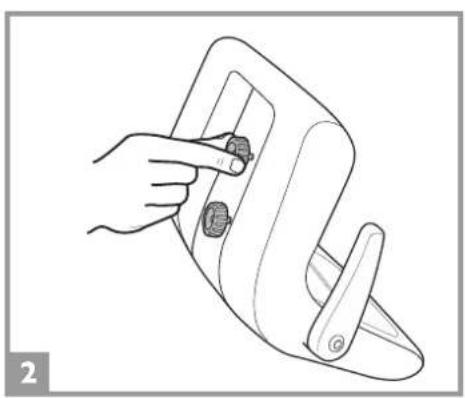
natural_image
Line drawing of a hand holding a small object, possibly a device or tool, with no visible text or symbols.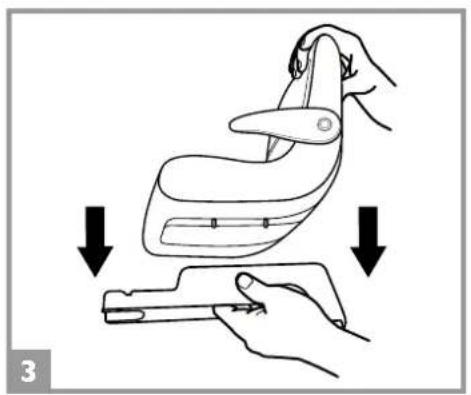
natural_image
Illustration of a hand holding a small object with arrows indicating movement or force (no text or symbols)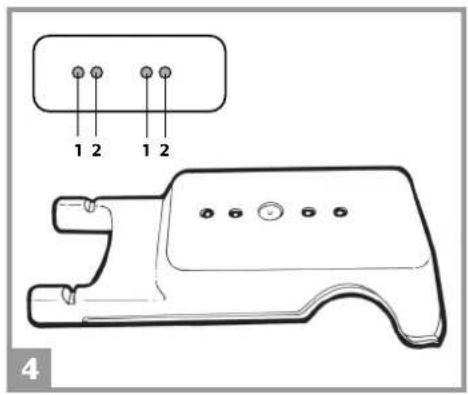
natural_image
Line drawing of hands holding a small object, possibly a tool or device, with no visible text or symbols.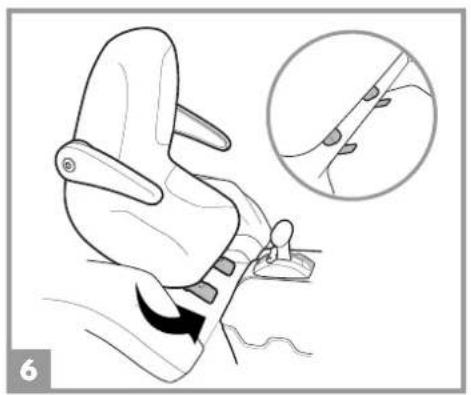
natural_image
Illustration of a car seatbelt with a magnified inset showing the side view of the seat (no text or symbols present)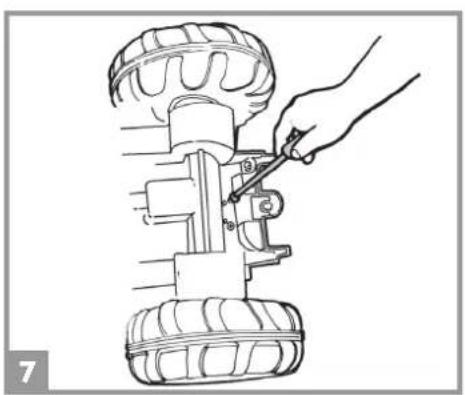
natural_image
Line drawing of a hand using a tool to adjust or install a vehicle tire component (no text or symbols present)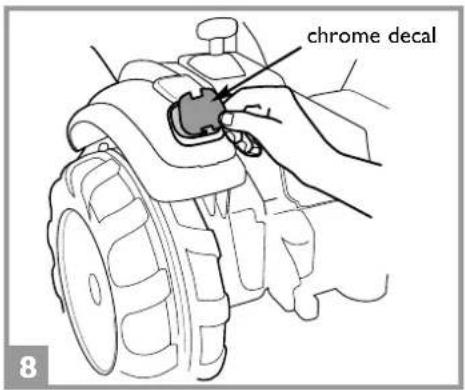
natural_image
Line drawing of hands holding a tool or device with a pen, no text or symbols present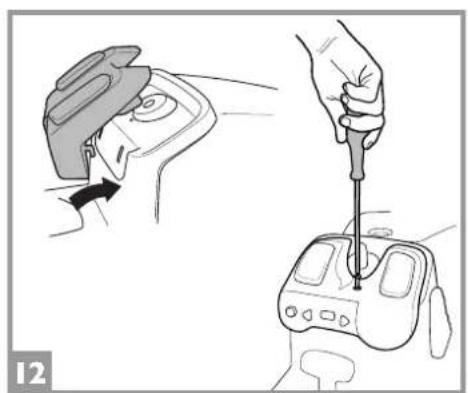
natural_image
Illustration showing a hand using a screwdriver to adjust a car head panel (no text or symbols present)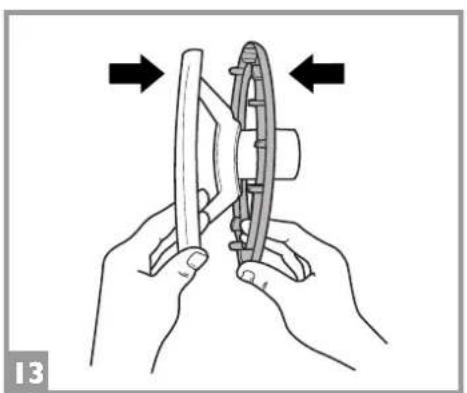
natural_image
Illustration of hands assembling a mechanical component with arrows indicating motion (no text or symbols)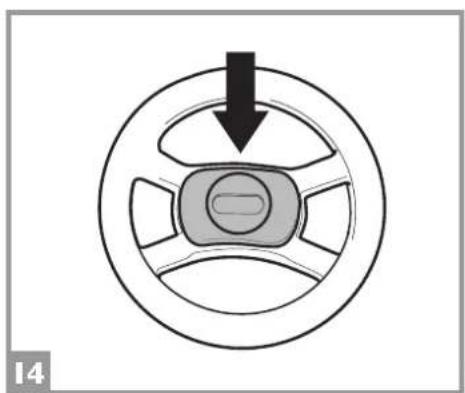
natural_image
Diagram of a steering wheel with a downward arrow indicating clockwise motion (no text or symbols)CAUTION:
ADULT ASSEMBLY REQUIRED. USE CARE WHEN UNPACKING AS COMPONENTS TO BE ASSEMBLED MAY POSE A SMALL PARTS/SHARP EDGE HAZARD.
IF THE PRODUCT IS DAMAGED WHEN YOU OPEN THE PACKAGING, CONTACT THE SERVICE CENTER AND DO NOT USE THE PRODUCT.
BATTERY IS INCLUDED AND MUST BE INSTALLED.
I •Snap fit the side inserts to the frame.
2 • Unscrew the knobs on the bottom of the seat.
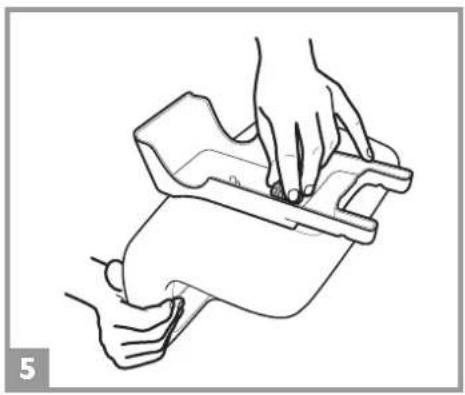
3 • Position the seat by matching the holes in the seat support.
4 • The seat is adjustable in 2 positions according to the height of the child (see figure).
5 • After positioning the seat, refit the 2 fixing knobs.
6 • Insert the front tabs of the seat support into the slots in the frame.
7 • Position the seat support on the tractor frame and screw up the 2 screws.
8 • Apply the stickers in the rear light seatings as shown in the figure.
9 • Engage the lights from the bottom towards the top.
10 • Fit the two caps in the "C" shaped seatings of the left and right rear wheel arches.
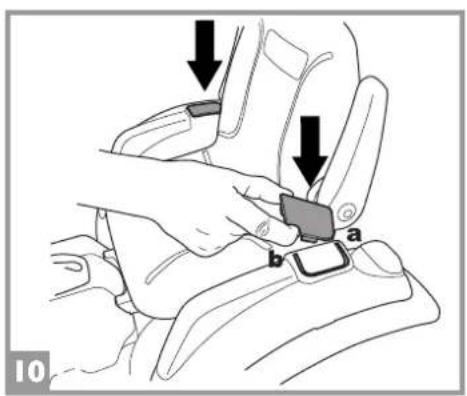
II • Insert two AA 1.5 V batteries into the radio by opening the rear cover on the dashboard (see figure).
12 • Position the radio, inserting the two hooks into the frame below the steering shaft, and fixing it with a screw as shown in the figure.
13 • Snap fit the ring under the steering wheel.
14 • Insert the cap into the central hole of the steering wheel.
ATTENTION:
ASSEMBLAGE PAR UN ADULTE REQUIS.
OUVRIR LES EMBALLAGES AVEC PRÉCAUTION CAR LES PIÈCES À ASSEMBLER PEUVENT COMPORTER DES RISQUES DE COUPURES OU DE BLESSURES.
SI LE PRODUIT EST ENDOMMAGÉ LORSQUE VOUS OUVREZ L'EMBALLAGE, CONTACTEZ LE SERVICE APRÈS-VENTE ET N'UTILISEZ PAS LE PRODUIT.
LA BATTERIE EST INCLUSE ET DOIT ETRE CONNECTÉE.
natural_image
Line drawing of hands performing a mechanical or electrical operation, possibly cutting or inspecting a component (no text or symbols present)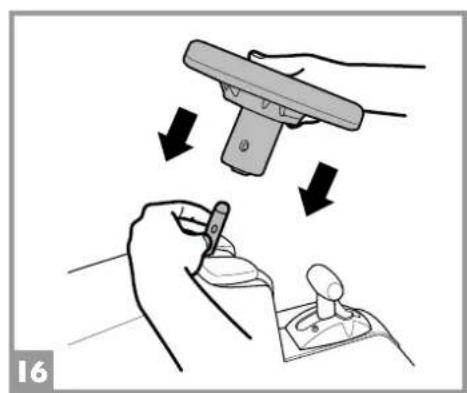
natural_image
Illustration showing two hand positions: one holding a mechanical component, the other holding a tool (no text or symbols present)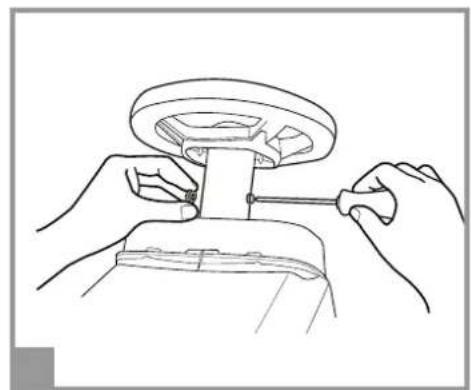
natural_image
Line drawing of hands operating a mechanical device with a circular component and handle (no text or symbols)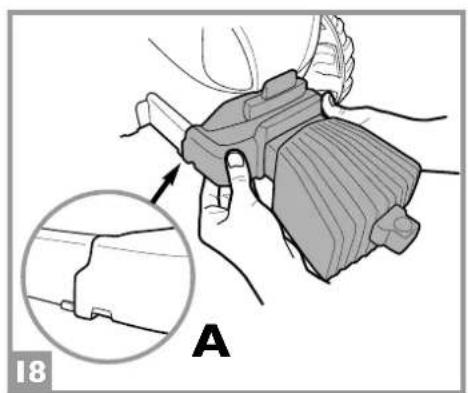
natural_image
Illustration of a hand using a mechanical device to adjust a component, with an inset showing a close-up of the part (no text or symbols present)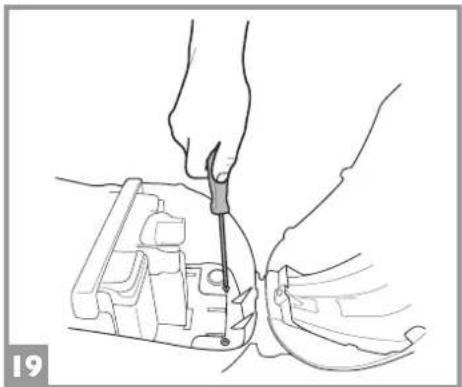
natural_image
Line drawing of hands using a tool to adjust or install a mechanical component (no text or symbols visible)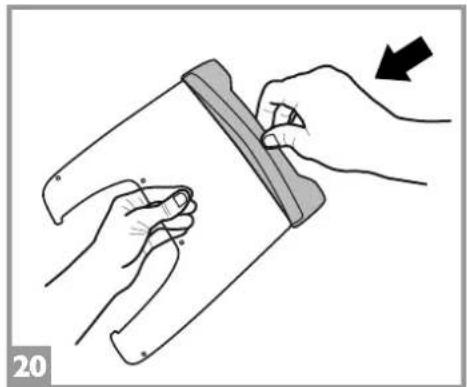
natural_image
Illustration of hands holding a tool or device with an arrow indicating direction (no text or symbols present)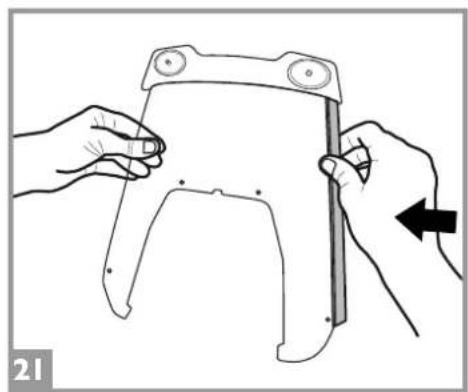
natural_image
Illustration of two hands holding a plastic component with a ruler, showing alignment (no text or symbols)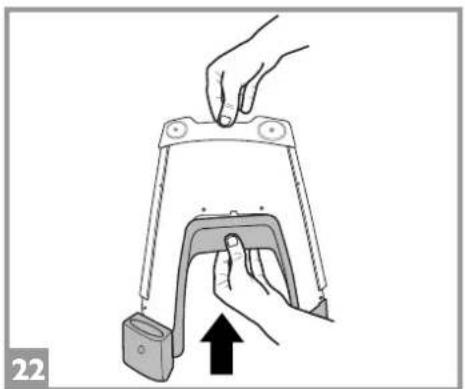
natural_image
Illustration of a hand using a tool to lift a mechanical component, with an arrow indicating upward motion (no text or symbols)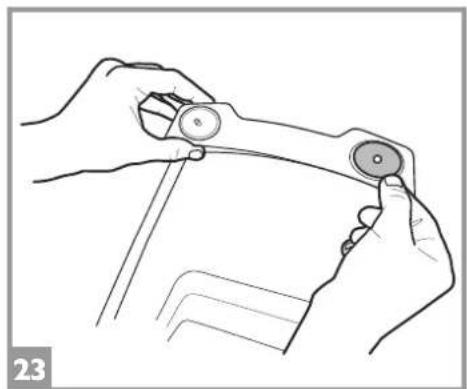
natural_image
Line drawing of hands holding a tool or device with a circular component, no text or symbols present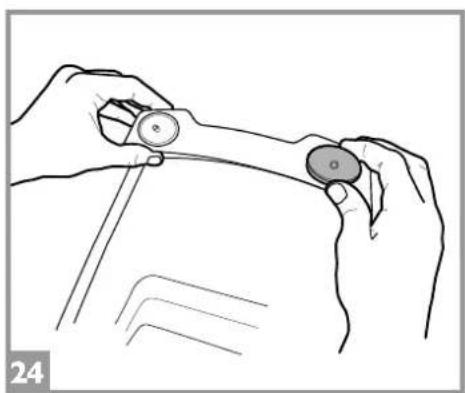
natural_image
Line drawing of hands holding a tool with circular components, no text or symbols present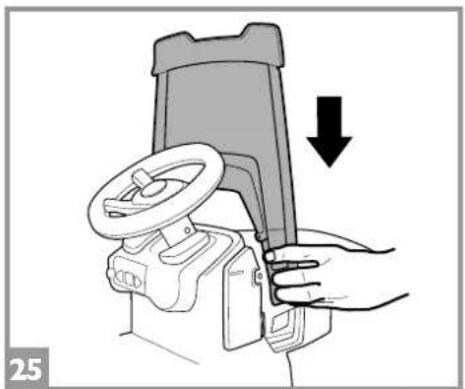
natural_image
Illustration of a hand using a steering wheel to adjust the steering wheel (no text or symbols present)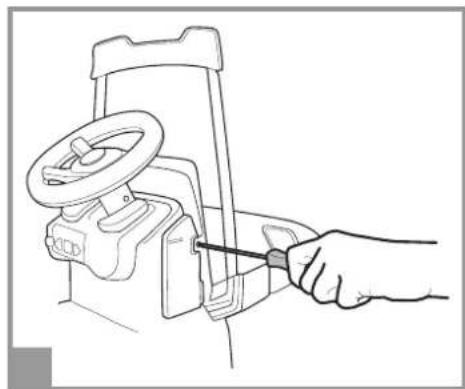
natural_image
Line drawing of a hand using a screwdriver to adjust or install a mechanical component (no text or symbols)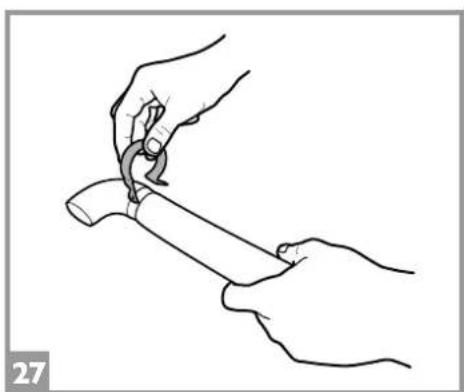
natural_image
Line drawing of two hands using a tool to cut a cylindrical object (no text or symbols)
natural_image
Line drawing of a hand holding a firearm inside a vehicle's steering wheel (no text or symbols)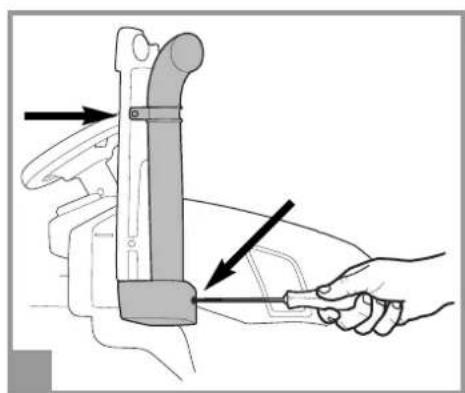
natural_image
Illustration of a hand using a tool to adjust or install a mechanical component, with arrows indicating direction (no text or symbols present)ENGLISH
15 • Remove the rubber stop from the steering
shaft. Push the steering shaft from the bottom of the tractor until it comes out the top of the frame.
16 • Hold the shaft in this position and fit the steering wheel.
17 • Fix the steering wheel with the screw and the nut provided, taking care to insert the screw into the round cavity and the nut into the hexagonal cavity.
18 • Insert the counterweight into the front of the vehicle, pushing and engaging the side tabs (PART. A).
19 • Open the cab by rotating the red hook by 180^ . Screw fit the counterweight from inside the cab with the 2 screws provided. Close the cab and lock it by rotating the hook back.
20 • Install the upper part of the windscreen, turning it upside-down and making sure that the 2 pins fit together.
21 • Install the 2 side parts of the frame.
22 • Complete the installation of the lower part of the windscreen by fitting the pins together.
23 • Apply the silver sticker to the lights on the windscreen.
24 •Snap fit the 2 front light covers.
25 • Extend the windscreen and slide it into the side guides from above, as shown in the figure. Push it into its seating until the holes line up.
26 • Fix the windscreen at the sides with I washer and I screw each side.
27 • Snap fit the band onto the funnel, taking care to position it correctly.
28 • Insert the funnel into the windscreen seating.
29 • Fix it with the 2 screws provided.
FRANÇAIS ESPAÏ
ENGLISH
30 • Apply the silver sticker to the front lights and then the respective covers.
31 • Snap fit the 2 front and 2 back hub caps on the wheels.
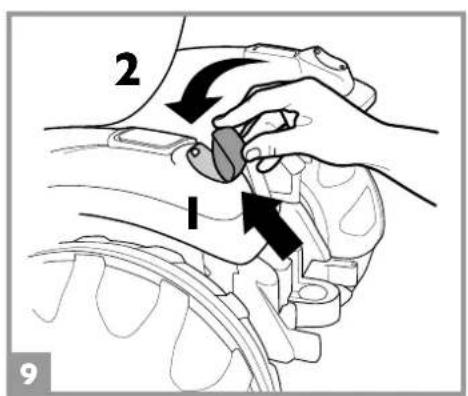
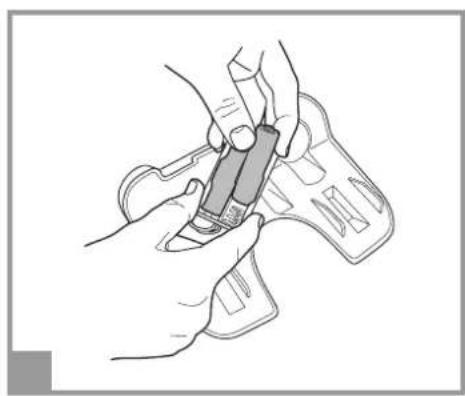
32 • Insert one of the 4 self-locking washers (2 spares) into the special tool provided. IMPORTANT: the tongues on the self-locking washer must be facing the inside of the tool (see detail A).

natural_image
Diagram of a car tire being struck with a hand, showing the wheel and tire (no text or symbols)FRANÇAIS ESPAÏN
natural_image
Illustration showing a hand using a hammer to tighten a tool with a base, accompanied by a magnified view of the tool (no text or symbols present)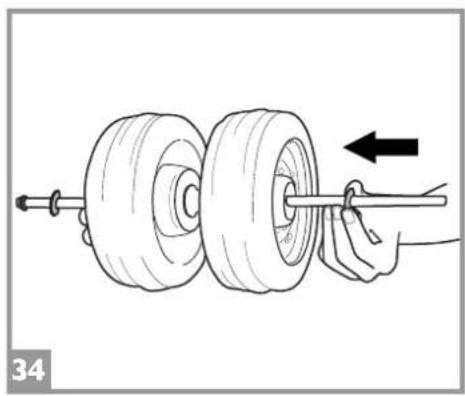
natural_image
Diagram of a hand using a tool to adjust a two-cylinder wheel assembly (no text or symbols present)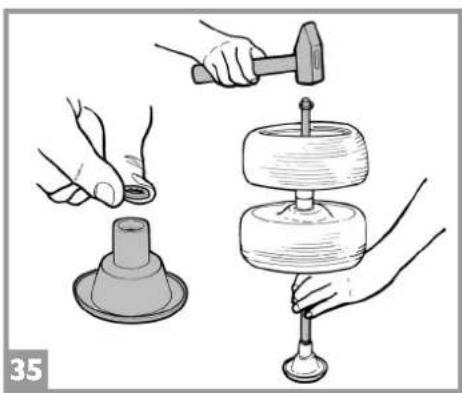
natural_image
Illustration of hands using different tools to handle a mechanical component (no text or symbols present)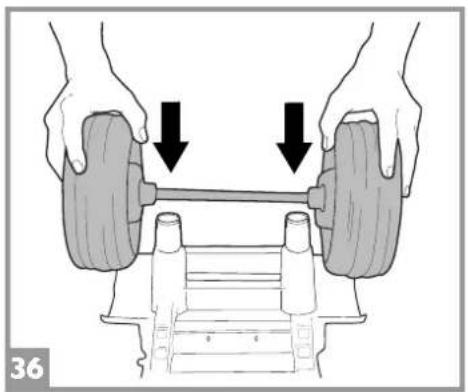
natural_image
Illustration of hands performing a dumbbell lift exercise on a vehicle chassis (no text or symbols)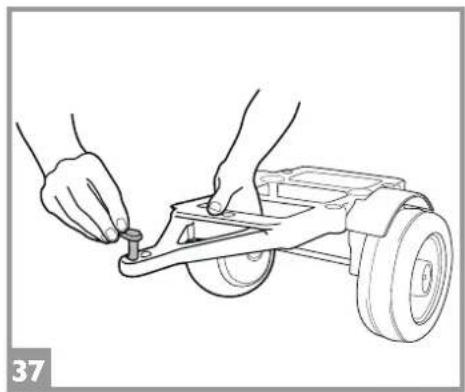
natural_image
Line drawing of hands assembling a wheeled cart (no text or symbols)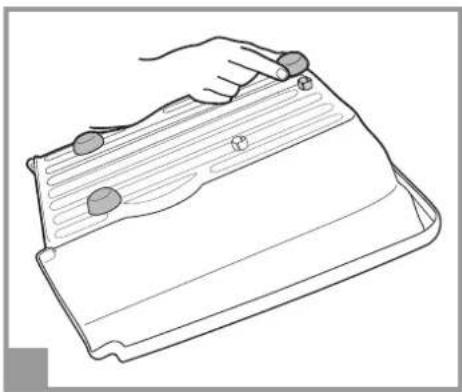
natural_image
Line drawing of a hand holding a flat, rectangular object with circular indentations (no text or symbols)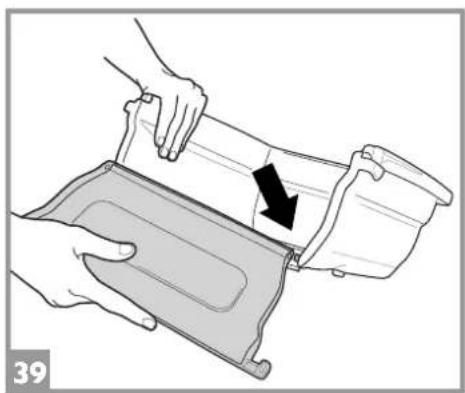
natural_image
Illustration of hands using a tool to adjust or install a mechanical component, with no visible text or symbols.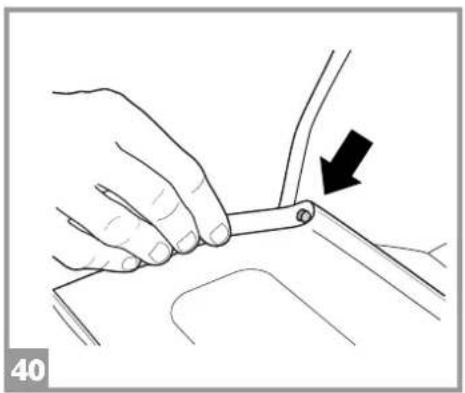
natural_image
Illustration of a hand holding a tool with an arrow indicating direction (no text or symbols)
natural_image
Illustration of hands pressing down a rectangular box with an arrow indicating rotation (no text or symbols)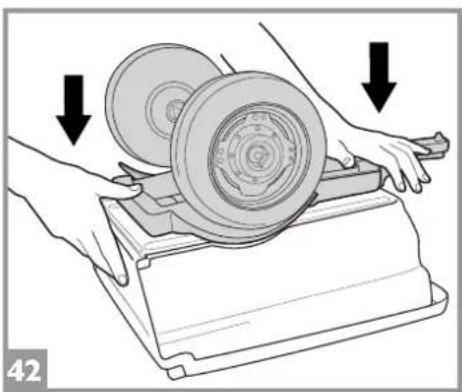
natural_image
Illustration of hands operating a mechanical device with a disc and base, showing two downward arrows indicating motion (no text or symbols present)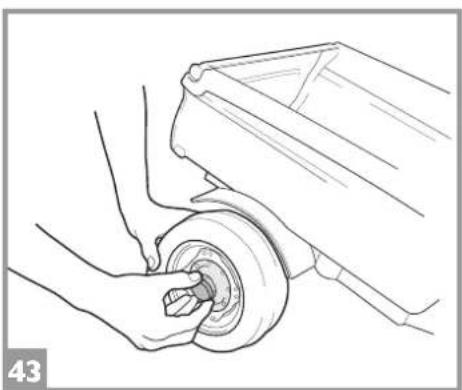
natural_image
Line drawing of a hand using a mechanical component to adjust a wheel (no text or symbols)
natural_image
Mechanical assembly diagram showing a valve mechanism with a black arrow indicating direction (no text or symbols present)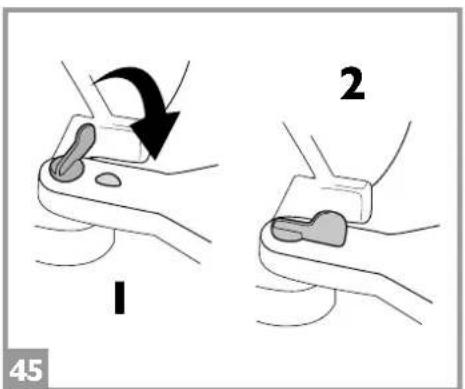

ENGLISH FRANC
33 • Remove the axle from its packaging and remove the protective caps. Insert the axle into the special tool and use a hammer to drive it in completely. Then remove the special tool.
34 •Slide the components onto the axle in the following order: spacer washer, rim, wheel, other wheel, rim, spacer washer.
IMPORTANT: check that the wheels are inserted correctly with the hub caps facing outwards.
35 • Position a self-locking washer in the special tool, then insert the assembled axle and hammer it in completely.
36 • Use pressure to fit the wheel group onto the base of the trailer.
37 • Insert the red pin in the end of the trailer.
38 • Remove the 3 protection caps from the bottom of the trailer box.
39 • Position the gate of the trailer box by inserting the longest peg first.
40 • Complete insertion of the gate by pressing on the short peg.
41 • Flip the gate up to close the trailer box.
42 • Engage the trailer base (prepared earlier) with the trailer box, pressing as shown in the figure.
43 •Fit the 2 hub covers on the trailer wheels.
44 • The trailer is hitched to the tractor as follows: insert the trailer hook into the hole on the back of the tractor and rotate it (see fig. 45).
45 • Position 1: the trailer can be released.
Position 2: the trailer is locked on.
IMPORTANT: the trailer may only carry items up to a maximum weight of 22 lbs (10 kg)
VEHICLE FEATURES AND INSTRUCTIONS FOR USE
46 •GEAR LEVER. The vehicle has 3 gears. IMPORTANT: when removed from the packaging, the vehicle only drives in 1st gear and reverse. In order to enable the 2nd gear, proceed as shown in figure 52.
IS ESPAÑOL
natural_image
Diagram of a mechanical component with an arrow indicating a specific part, no text or symbols present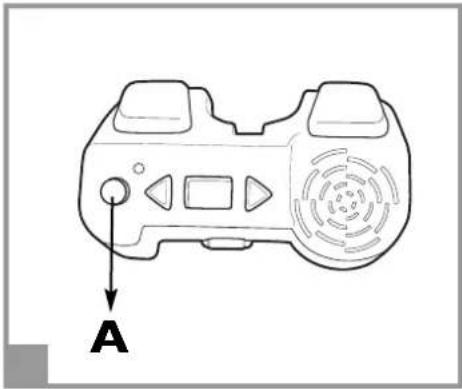
natural_image
Line drawing of a game controller with labeled component 'A' (no text or symbols on the device itself)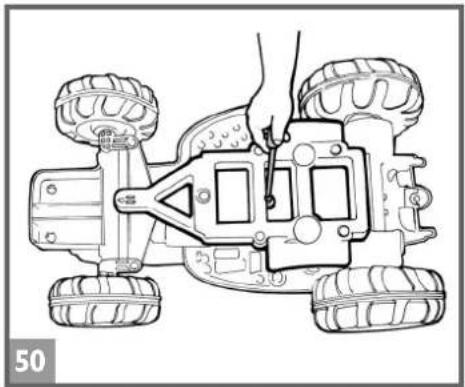
natural_image
Line drawing of a toy car with visible wheels and a hand adjusting the side (no text or symbols)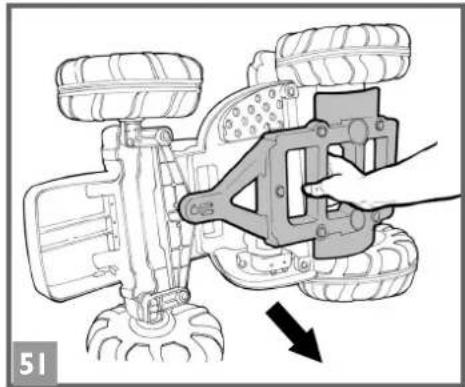
natural_image
Illustration of a hand using a tool to adjust or install a toy vehicle (no text or symbols visible)ENGLISH FRANC
47 •Unscrew the 2nd gear stop (fig. A). Rotate the stop to the next position (fig. B). Screw the stop back on. Now all the drive gears are available.
48 • ELECTRICAL ACCELERATOR/BRAKE PEDAL. When the foot is lifted from the pedal the brake engages automatically.
49 • FM RADIO: To switch the radio on and off or adjust the volume turn knob A. To change radio stations press the 2 triangular buttons (see figure).
50/51 • Unscrew and remove the bottom of the trailer from the bottom of the tractor.
IS ESPAÑOL
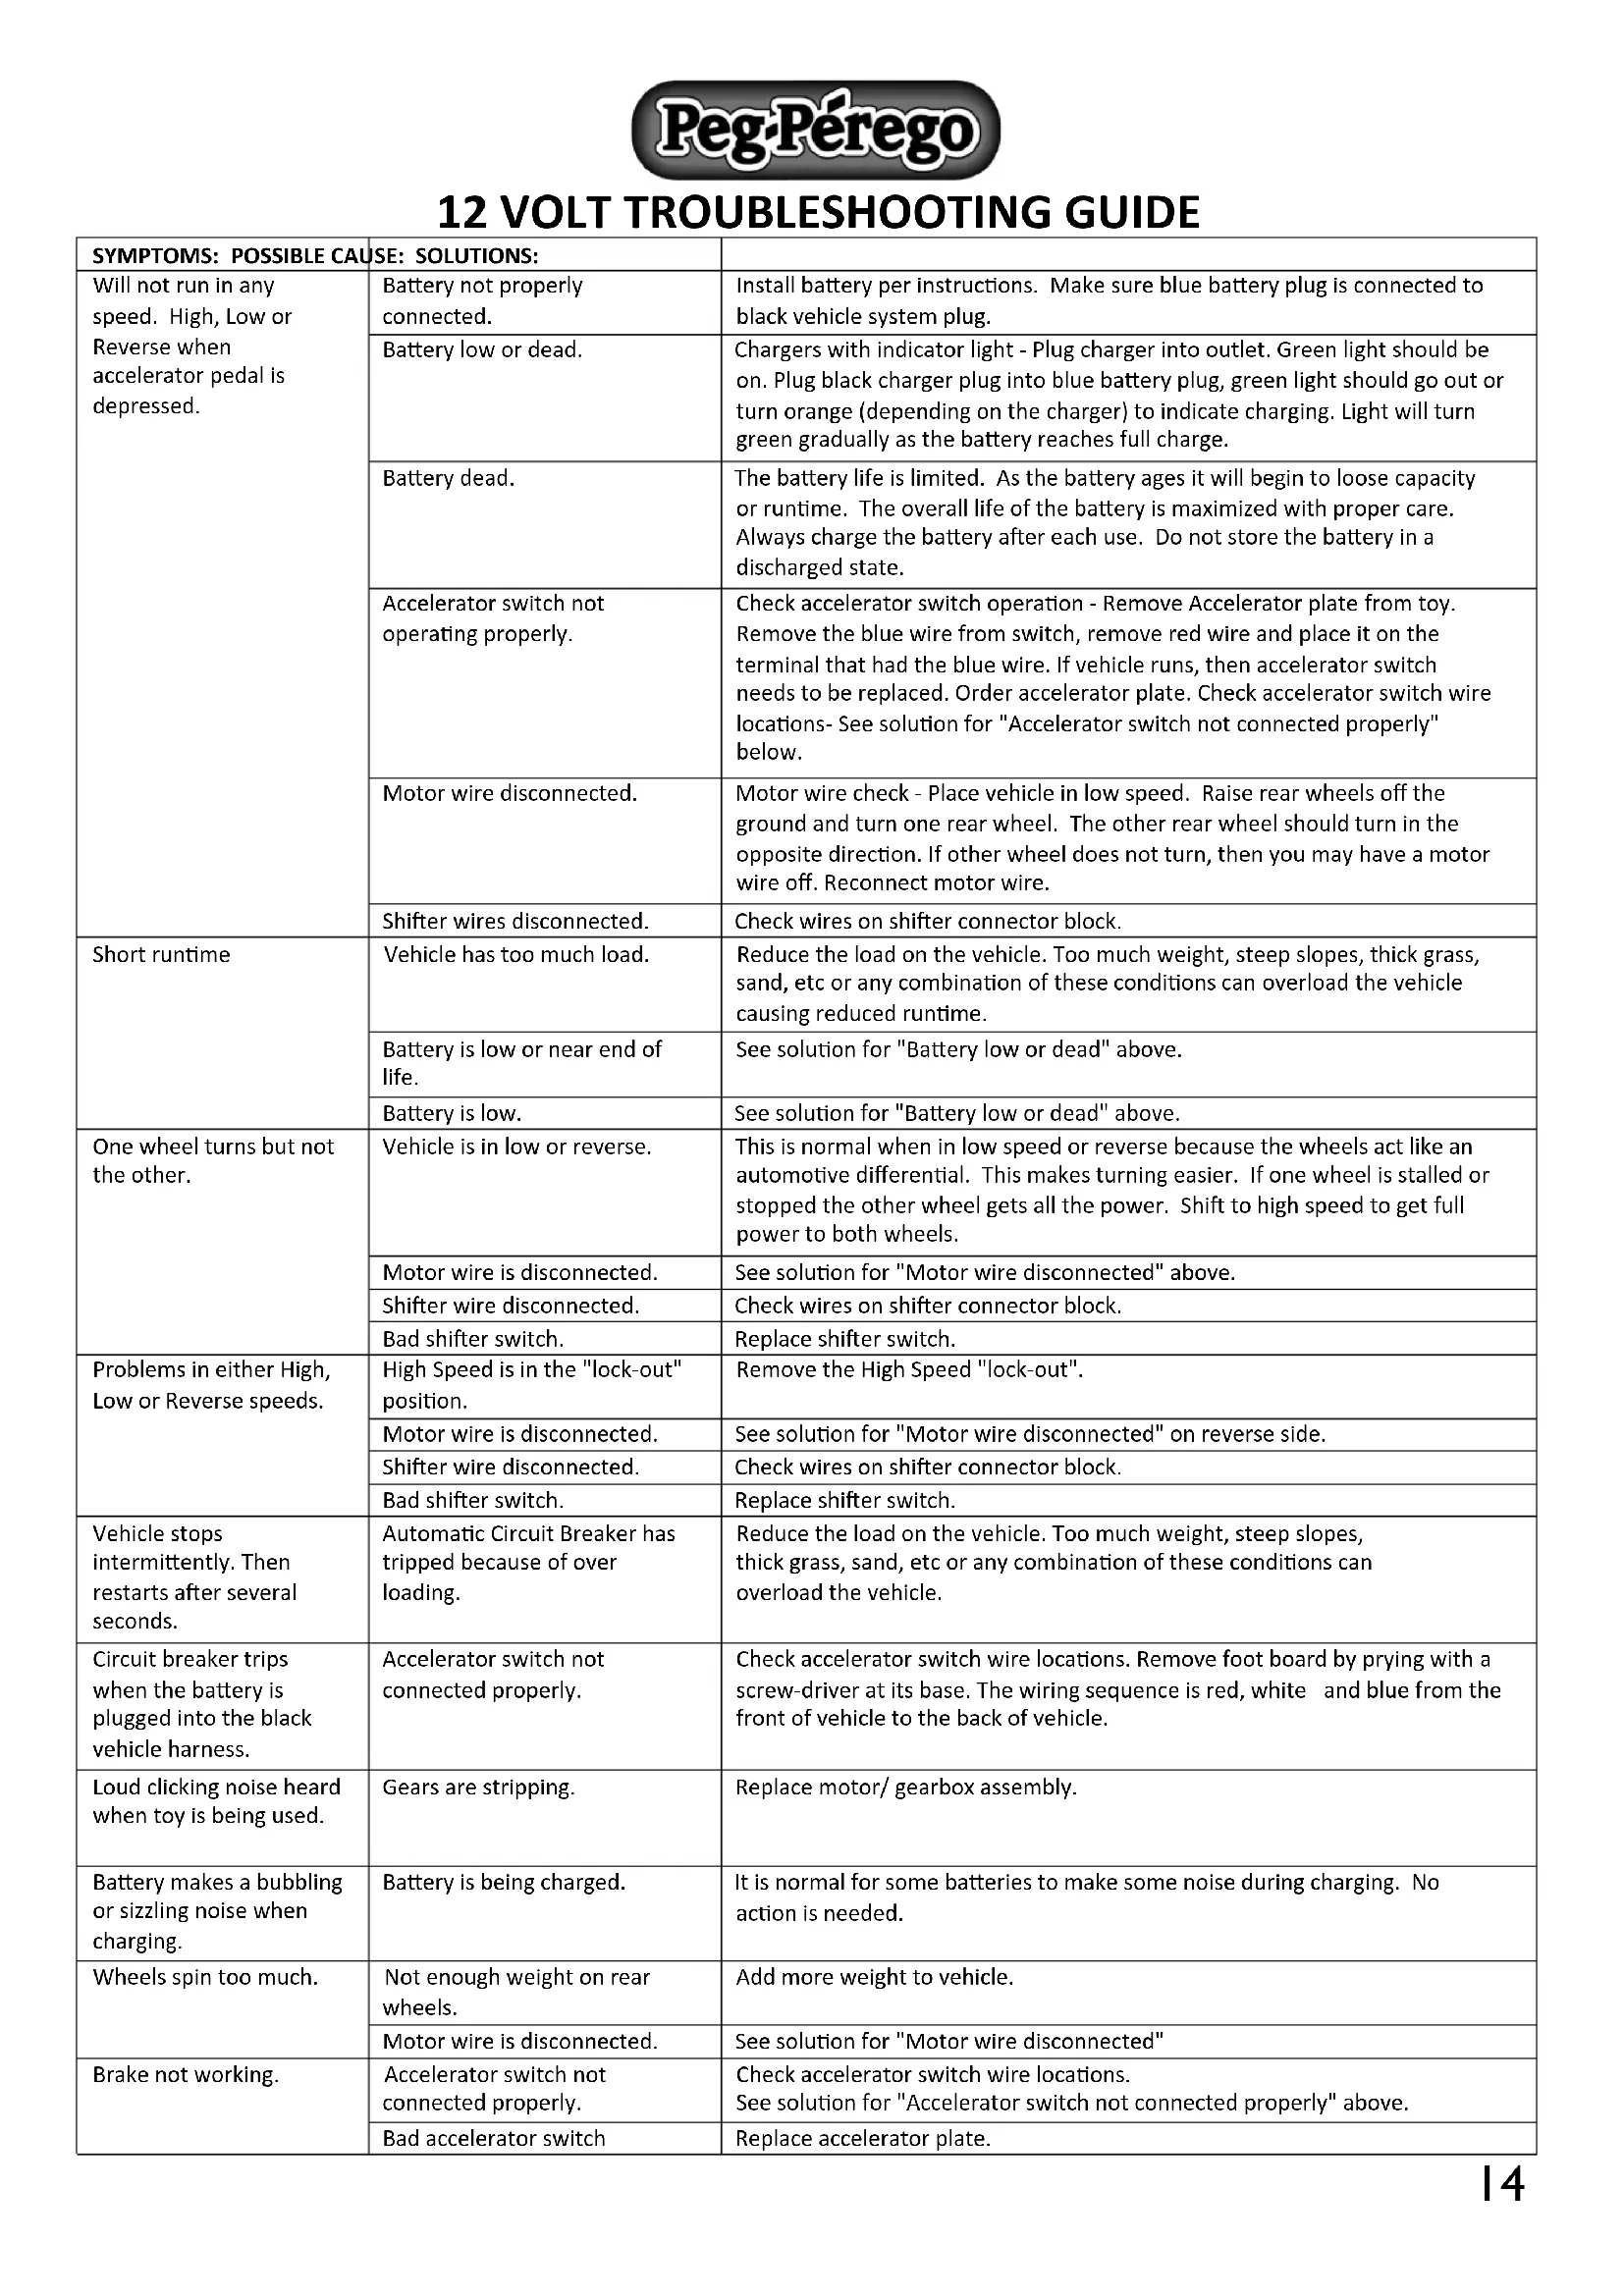
12 VOLT TROUBLESHOOTING GUIDE
| SYMPTOMS: POSSIBLE CAUSE: SOLUTIONS: | ||
| Will not run in any speed. High, Low or Reverse when accelerator pedal is depressed. | Battery not properly connected. | Install battery per instructions. Make sure blue battery plug is connected to black vehicle system plug. |
| Battery low or dead. | Chargers with indicator light - Plug charger into outlet. Green light should be on. Plug black charger plug into blue battery plug, green light should go out or turn orange (depending on the charger) to indicate charging. Light will turn green gradually as the battery reaches full charge. | |
| Battery dead. | The battery life is limited. As the battery ages it will begin to loose capacity or runtime. The overall life of the battery is maximized with proper care. Always charge the battery after each use. Do not store the battery in a discharged state. | |
| Accelerator switch not operating properly. | Check accelerator switch operation - Remove Accelerator plate from toy. Remove the blue wire from switch, remove red wire and place it on the terminal that had the blue wire. If vehicle runs, then accelerator switch needs to be replaced. Order accelerator plate. Check accelerator switch wire locations- See solution for "Accelerator switch not connected properly" below. | |
| Motor wire disconnected. | Motor wire check - Place vehicle in low speed. Raise rear wheels off the ground and turn one rear wheel. The other rear wheel should turn in the opposite direction. If other wheel does not turn, then you may have a motor wire off. Reconnect motor wire. | |
| Shifter wires disconnected. | Check wires on shifter connector block. | |
| Short runtime | Vehicle has too much load. | Reduce the load on the vehicle. Too much weight, steep slopes, thick grass, sand, etc or any combination of these conditions can overload the vehicle causing reduced runtime. |
| Battery is low or near end of life. | See solution for "Battery low or dead" above. | |
| Battery is low. | See solution for "Battery low or dead" above. | |
| One wheel turns but not the other. | Vehicle is in low or reverse. | This is normal when in low speed or reverse because the wheels act like an automotive differential. This makes turning easier. If one wheel is stalled or stopped the other wheel gets all the power. Shift to high speed to get full power to both wheels. |
| Motor wire is disconnected. | See solution for "Motor wire disconnected" above. | |
| Shifter wire disconnected. | Check wires on shifter connector block. | |
| Bad shifter switch. | Replace shifter switch. | |
| Problems in either High, Low or Reverse speeds. | High Speed is in the "lock-out" position. | Remove the High Speed "lock-out". |
| Motor wire is disconnected. | See solution for "Motor wire disconnected" on reverse side. | |
| Shifter wire disconnected. | Check wires on shifter connector block. | |
| Bad shifter switch. | Replace shifter switch. | |
| Vehicle stops intermittently. Then restarts after several seconds. | Automatic Circuit Breaker has tripped because of over loading. | Reduce the load on the vehicle. Too much weight, steep slopes, thick grass, sand, etc or any combination of these conditions can overload the vehicle. |
| Circuit breaker trips when the battery is plugged into the black vehicle harness. | Accelerator switch not connected properly. | Check accelerator switch wire locations. Remove foot board by prying with a screw-driver at its base. The wiring sequence is red, white and blue from the front of vehicle to the back of vehicle. |
| Loud clicking noise heard when toy is being used. | Gears are stripping. | Replace motor/ gearbox assembly. |
| Battery makes a bubbling or sizzling noise when charging. | Battery is being charged. | It is normal for some batteries to make some noise during charging. No action is needed. |
| Wheels spin too much. | Not enough weight on rear wheels. | Add more weight to vehicle. |
| Motor wire is disconnected. | See solution for "Motor wire disconnected" | |
| Brake not working. | Accelerator switch not connected properly. | Check accelerator switch wire locations. See solution for "Accelerator switch not connected properly" above. |
| Bad accelerator switch | Replace accelerator plate. | |
ENGLISH
PEG PEREGO® thanks you for choosing this product. For more than 60 years, PEG PEREGO have been taking children for an outing: first with its famous baby carriages and strollers, later with its pedal and battery operated toy vehicles.
Discover our complete range of products, news and other information about the Peg Perego world on our web site www.pegperego.com
IMPORTANT INFORMATION
- Read this instruction manual carefully to learn the use of the vehicle and to teach your child safe and enjoyable driving. Please keep this manual (with your original sales receipt) for use as a reference in the future.
•DO NOT RETURN YOUR VEHICLE TO THE STORE. This product cannot be returned for a refund after it has been used. If you have ANY questions, need replacement parts or need assistance, call us toll-free; U.S.A., call 1-800-728-2108 / CANADA, call 1-800-661-5050 - This product meets and/or exceeds all ASTM (American Society for Testing and Materials) TOY SAFETY STANDARDS, including F 963, Consumer Toy Safety Specifications as well as C.R.C, c.931, the Canadian Hazardous Products (Toys) Regulations.
- If you give away the product to third parties, make sure that it is accompanied by the instruction manual.
- Tools needed for assembly: Phillips screwdriver medium, pliers and a hammer (not included)
- Your new vehicle is partially pre-assembled. It will require adult assembly. Please set aside at 45 minutes for assembly.
- Before the vehicle is used for the first time, charge the battery for 18 hours to initiate it. Failure to do this can result in permanent battery damage.
- Use only with the included Peg Perego 12 Volt lead-acid, rechargeable battery and a Peg Perego 12 Volt Charger (both included).
.Year 3+
•Weight capacity 85 lbs
- Do not exceed the maximum total weight capacity of 85 lbs (38,6 kg).
Contents:
• I NEW HOLLAND T8 -- partially assembled
• I Rechargeable 12V 8Ah sealed lead-acid battery
- I Charger 12V
•two 165 W motors -- pre installed
- assembly hardware
•parts to be assembled
• decals
•Speed in 1st gear 2 ^1/4 MPH
•Speed in 2nd gear 4 ^1/2 MPH
•Speed in reverse gear 2 ^1/4 MPH
•To prevent damaging the motor and gears, teach your child to stop the vehicle before switching directions.
- Use this vehicle ONLY outdoors. Most interior flooring can be damaged by riding this vehicle indoors. Peg Perego will not be responsible for damage to the floor if the vehicle is used indoors.
- Peg Perego reserves the right to modify or change its products. Price, literature, manufacturing processes or locations or any combination of the above mentioned entities may change at any time for any reason without notice with impunity.
CAUTION:
ELECTRIC VEHICLE NOT RECOMMENDED FOR CHILDREN UNDER 3 YEARS OF AGE. AS WITH ALL ELECTRIC PRODUCTS, PRECAUTIONS SHOULD BE OBSERVED DURING HANDLING AND USE TO PREVENT ELECTRIC SHOCK. RECHARGER INCLUDED. 120Vac 60Hz 16W INPUT - 12Vdc 12W OUTPUT
CAUTION:
Only adults should recharge batteries never children.
Never allow children to handle batteries.
Only use the batteries specified by the manufacturer. Only use the charger specified by the manufacturer.
Do not mix old and new batteries.
Do not mix alkaline, standard (carbon-zinc), or rechargeable (nickel-cadmium) batteries.
CHARGING THE BATTERY
- Charge the batteries no longer than 24 hours, following the instructions enclosed with the battery charger.
- Charge the battery, as the vehicle shows low power, in this way you will avoid damage to the battery.
- If you don't use your vehicle for a long period of time unplug the battery from the main wire harness of the vehicle. Remember to charge the battery at least every three months.
- Never charge the battery upside down.
- Do not forget batteries during charging! Check them periodically.
- Never use a replacement recharger or batteries unless they are approved by PEG PEREGO.
- Batteries are sealed and maintenance free.
- Battery polarity must be observed when connecting battery to wiring.
WARNING:
• BATTERIES CONTAIN TOXIC AND CORROSIVE SUBSTANCES. DO NOT TAMPER WITH THEM.
•Batteries contain an acid-based electrolyte.
- Do not make direct contact between battery terminals, as this can cause an explosion or fire.
- Charging produces explosive gases. Charge batteries in a well ventilated area away from sources of heat and flammable materials.
- Exhausted batteries are to be removed from the vehicle.
- Do not place the batteries near clothing to avoid damage.
IF A LEAK DEVELOPS
Shield your eyes. Avoid direct contact with the electrolyte, protect your hands.
Place battery in a plastic bag and follow directions listed below.
IF ELECTROLYTE COMES IN CONTACT WITH SKIN OR CLOTHING
Flush with cool water for at least 15 minutes.
See a physician at once.
IF ELECTROLYTE IS INJECTED
Give tap water, milk of magnesia or egg whites at once.
Do not induce vomiting.
See a physician at once.
DISPOSAL OF BATTERIES; CONTAINS SEALED LEAD ACID BATTERY. BATTERY MUST BE RECYCLED.
Help protect the environment!
Do not throw used batteries in your regular, household trash.
Dispose old batteries at an approved battery dumping station; contact your local Environmental Protection Agency office or call Peg Perego Customer Service for additional information.

⚠️ CAUTION AA BATTERIES
The insertion of batteries must only be carried out or supervised by adults. Do not let children play with the batteries.
•The batteries should be replaced by an adult.
- Use only the type of battery specified by the manufacturer.
•Respect the polarity +/-
- Do not allow the batteries to be in contact with metal parts (risk of fire or explosion).
•Always remove the batteries if the toy is not in use for a long period.
- Never attempt to charge batteries that are not rechargeable.
- Remove dead batteries from the toy.
- Dispose of dead batteries into appropriate containers provided for their recycling.

DON'T STOP THE FUN: purchase a spare battery to have a freshly charged back-up available.
For your child's safety: please read and follow all instructions below before operating.
•ATTENTION:
Check the fastening retainers to be sure they are tight.
- 1st SPEED slow speed (beginner drivers):
With both hands on the steering wheel press down on the accelerator pedal; the vehicle goes forward at 2 ^1/4 mph.
- 2nd SPEED: fast speed (experienced drivers):
With both hands on steering wheel press down on the accelerator pedal; the vehicle goes forward at 4/2 mph.
•REVERSE:
Place the left hand on steering wheel. With the right hand holding the gearshift in reverse, press your foot down on the accelerator; the vehicle reverses at 2/4 mph. (Reverse is spring-loaded for safety).
•BRAKE:
The electric braking system stops the vehicle automatically when your child lifts his foot off the pedal.
Teach your child the proper use of this vehicle for a safe and fun play time.
- Before starting be sure that the way is free from people and objects.
- Drive with both hands on the steering wheel and keep your eyes on the road at all times.
- Stop in time to avoid accidents and immediately release pedal when stuck.
- Use the 2nd speed only after your child has the maturity and the reflexes to operate the vehicle safely.
CAUTION:
- If the vehicle is overloaded, as can happen on soft sand, mud, or very uneven ground, the overload switch will immediately disconnect the power. The power supply will be restored after a few seconds.
VEHICLE MAINTENANCE AND SAFETY
This product meets and/or exceeds all ASTM (American Society for Testing and Materials) TOY SAFETY STANDARDS, including F 963, Consumer Toy Safety Specification.
This vehicle is not intended for use on streets, around traffic or parked cars.
MAINTENANCE AND CARE
- Do not try to repair the vehicle by yourself.
- Regularly check the conditions of the vehicle, particularly the electrical system, the plug connections, the covering caps and the charger. In case of fault, do not try to use the vehicle and the charger. For repair use only original PEG PEREGO's spare parts.
- PEG PEREGO assumes no liability if the electrical system is tampered with.
•Take care with the battery charger cable. For example, do not pull it to remove the plug, do not pull the vehicle along on its wheels using the cable, do not cover the cable because it may overheat, do not leave it on hot surfaces and be careful about where and how you roll it up.
- Do not leave vehicle or batteries near sources of heat such as radiators, stoves, fireplaces, etc.
- Protect vehicle from water, rain, snow, etc.
- When operating in overload conditions, such as soft deep sand, mud or rough uneven terrain, the overload circuit breaker will automatically disconnect the power. After 30 or more seconds, the circuit breaker will automatically reset, however you must eliminate overload conditions to resume normal driving.
- Periodically lubricate (with a light weight oil) moving parts, such as wheel bearings, steering linkages, where they rotate or touch one another.
- The vehicle's surfaces can be cleaned with a damp cloth. Do not use abrasive cleaners. The cleaning must be carried out by adults only.
- Never disassemble the vehicle mechanisms or motor unless authorized by PEG PEREGO.
SAFETY
WARNING:
• To reduce the risk of injury, adult supervision is required. Never use in roadways, near motor vehicles, on or near steep inclines or steps, swimming pools or other bodies of water; always wear shoes, and never allow more than one rider.
- Surfaces that are appropriate for use: grass, dirt or hard surfaces with slopes not to exceed 10%.
•A child must be 3 years of age or older for the necessary coordination and maturation to operate this motorized vehicle safely.
- Never use the vehicle on steep slopes or near steps or stairs. This vehicle is not suitable for use on public highways.
- Children should always wear shoes when riding in or driving a riding vehicle.
- Do not allow children to place their hands, feet or any part of their body, clothing or other articles near the moving parts while vehicle is in operation.
- Do not allow the electrical components, motors, wiring, switches of your motorized vehicle to become wet and never wash it with a hose.
•The vehicle is designed just for one child: never allow more than one rider. - NEVER STORE GÄSOLINE OR ANY FLAMMABLE SUBSTANCE WHERE A CHILD CAN ACCESS IT. AND NEVER ALLOW GASOLINE OR ANY FLAMMABLE SUBSTANCE TO BE NEAR A BATTERY POWERED CHILDREN'S VEHICLE WHEN IT IS BEING RIDDEN.
PROBLEMS?
IF THE VEHICLE DOES NOT OPERATE?
- When operating in overload conditions, such as running the vehicle against a fixed object, through soft deep sand or mud, or over rough or uneven terrain, the overload circuit breaker will automatically disconnect the power. After 10 or more seconds, the circuit breaker will automatically reset, however-you must eliminate overload conditions to resume normal driving.
- Check that all plugs are properly connected.
- Check electrical switches. Replace if necessary.
- Check that the battery is connected to the electrical system.
IF THERE IS NO POWER?
- Fully recharge the battery. If the problem persist, check with an Authorised PEG PEREGO Service Center.
CUSTOMER SERVICE
For your convience, PEG PEREGO offers after-sales service, directly or through a network of authorized service centers for repairs or replacement parts.
If you have any questions about your Peg Perego vehicle, please call our toll-free service lines at;
U.S.A, call I-800-728-2108
CANADA, call 1-800-661-5050
Trained customer service representatives are available to take your call in English or Spanish.
FRANÇAIS
Extended Warranty (for a 2nd Year) with Online Product Registration at www.pegperegousa.com/product-registration
*We respect your privacy. The personal information collected here is used only by Peg Perego and will not be sold to or used by any other company or organization.
Statement of Limited Warranty
One-year limited warranty for Peg Perego vehicles from date of purchase, and/or six-month limited warranty for battery, charger and wheels from date of purchase.
This limited warranty covers your Peg Perego ride-on vehicle and/or the rechargeable battery (if applicable) to the original, noncommercial purchaser who purchased it from Peg Perego or an authorized Peg Perego dealer, against defects in materials and/or workmanship, however it does not cover the cost of shipping or handling. If the problem is not covered by this warranty, the consumer must pay for all related expenses associated with parts and services rendered.
This warranty covers normal use and does not cover the vehicle or the battery if it has been damaged by unreasonable use, neglect, accident, abuse, misuse, improper service, modification and/or other causes not arising from defects in materials or workmanship. In no event shall Peg Perego be liable for any other incidental or consequential damages. Except for this limited warranty, Peg Perego makes no other representation or warranty, express or implied, with respect to the products. Peg Perego specifically disclaims all other express and implied warranties, including any implied warranties of merchantability and fitness for a particular purpose.
For Fast & Friendly Service, call 1-800-728-2108, or visit www.pegperego.com.

Peg-Pérego
Do not return your vehicle to the store!
We're a toll-free phone call away and we can help.
If you are missing parts or need assistance, please see the contact information below.
ARRÊTEZ!
Model Number IGOR0074
PEG PEREGO U.S.A Inc.
3625 INDEPENDENCE Dr. FORT WAYNE IN 46808
fax 260 484 2940
call us toll free 1·800·728·2108
Ilame USA gratis 1·800·225·1558
PEG PEREGO CANADA Inc.
585 GRANITE COURT PICKERING ONT. CANADA LIW3KI
fax 905 839 9542
call us toll free 1·800·661·5050
PEG PEREGO S.p.A.
via A. De Gasperi, 50 20862 ARCORE (MB) ITALIA

www.pegperego.com