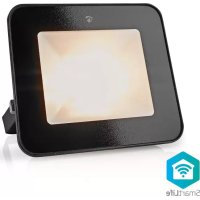
WIFILOFC20FBK - Lighting NEDIS - Free user manual and instructions
Find the device manual for free WIFILOFC20FBK NEDIS in PDF.



| Product type | Smart WiFi projector |
| Brand | Nedis |
| Model | WIFILOFC20FBK |
| Dimensions (L x W x H) | 126 x 142 x 43 mm |
| Power supply | 220 - 240 VAC ; 150 mA |
| Light color | RGB + 3000 - 6500 K |
| Transmission protocol | Wi-Fi 802.11bgn |
| Wi-Fi frequency range | 2412 - 2484 MHz |
| Max transmission power | 16 dB |
| Antenna gain | 1.5 dB |
| Operating temperature | -20 °C to +40 °C |
| Protection class | IP65 |
| Intended use | Indoor and outdoor |
| Main functions | Control via Nedis SmartLife app, scheduling, timer, dimming, color change |
| Control | Nedis SmartLife app (iOS/Android) |
| Installation | Wall mount included, wired connection |
| Maintenance and cleaning | Unplug before cleaning; use a dry, soft cloth |
| Safety | Do not look directly at the light; disconnect before maintenance; use only the supplied cable |
| Spare parts and repairability | Replaceable power cable; repair by qualified technician |
| Warranty | Standard Nedis, see terms |
| General information | RGB LED Wi-Fi projector, compatible with Alexa and Google Home via SmartLife |
Frequently Asked Questions - WIFILOFC20FBK NEDIS
User questions about WIFILOFC20FBK NEDIS
0 question about this device. Answer the ones you know or ask your own.
Ask a new question about this device
Download the instructions for your Lighting in PDF format for free! Find your manual WIFILOFC20FBK - NEDIS and take your electronic device back in hand. On this page are published all the documents necessary for the use of your device. WIFILOFC20FBK by NEDIS.
USER MANUAL WIFILOFC20FBK NEDIS
Smart WiFi Floodlight (with Sensor)
For outdoor use (IP65 / IP44)
WIFILOFC20FBK
WIFILOFS20FBK
EN Quick start guide 4
DE Kurzanleitung 7
FR Guide de démarrage rapide 12
(NL) Snelstartgids 16
IT Guida rapida all'avvio 20
(ES) Guía de inicio=rápido 24
(PT)Guia de iniciação rápida 28
(SV) Snabbstartsguide 32
(FI) Pika-aloitusopas 36
(NO) Hurtiguide 40
DA Vejledning til hurtig start 43
HU Gyors beüzemelési utmutató 47
(PL)Przewodnik Szybki start 51
(EL) O\$nyoc yprnyopnc EKKivnnonc 55
(SK) Rychly námod 59
(CS) Rychly námov 63
(RO) Ghid rapid de initiere
A
Smart WiFi Floodlight
WIFILOFC20FBK
WIFILOFS20FBK
For more information see the extended manual online:ned.is/wifilofc20fbkned.is/wifilofs20fbk
Intended use
The Nedis Wi-Fi based Floodlight is used to illuminate indoor and outdoor areas.
This product is intended for indoor and outdoor use.
The product is not intended for professional use.
The product can be controlled with the Nedis SmartLife app. Any modification of the product may have consequences for safety, warranty and proper functioning.
Specifications
| Product Smart WiFi | Floodlight | Smart WiFi Floodlight with sensor |
| Article number WIFILOFC20FBK WIFILOFS20FBK | ||
| Dimensions (l x w x h) 126 x 142 x 43 mm | 176 x 128 x 59 mm | |
| Power input 220 - 240 VDC; 150 mA | ||
| Light colour RGB + 3000 - 6500 K | 3000 - 6500 K | |
| Wi-Fi transmission protocol | 802.11bgn | |
| Wi-Fi frequency range 2412 - 2484 GHz | ||
| Maximum transmit power | 16 dB | |
| Antenna gain 1.5 dB | ||
| Operating temperature -20 °C --40 °C | ||
| IP rating IP65 IP44 | ||
| Detection angle - 120 degrees | ||
| Detection range - Up to 8 meters | ||
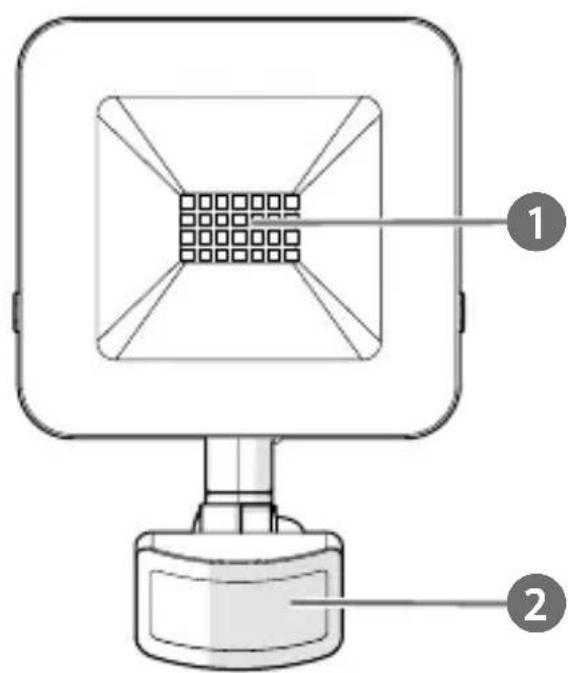
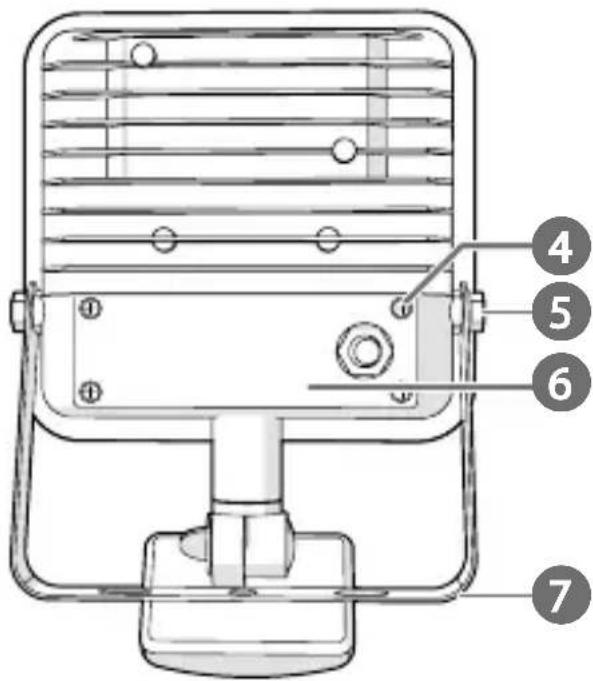
Main parts (image A)
1 LEDs
PIR sensor*
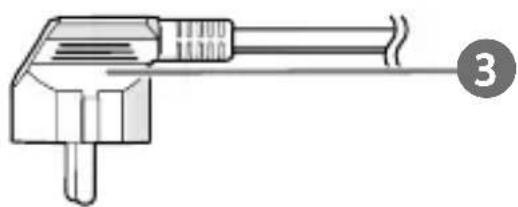
3 Power cable
4 Junction box screws
5 Mounting bracket bolts
6 Junction box cover
7 Mounting bracket
- WIFILOFS20FBK only.
Safety instructions
WARNING
- Ensure you have fully read and understood the instructions in this document before you install or use the product. Keep the packaging and this document for future reference.
- Only use the product as described in this document.
- Do not use the product if a part is damaged or defective. Replace a damaged or defective product immediately.
- Do not drop the product and avoid bumping.
- This product may only be serviced by a qualified technician for maintenance to reduce the risk of electric shock.
- Disconnect the product from the power source and other equipment if problems occur.
- Disconnect the product from the power source before service and when replacing parts.
- Only use the provided power cable.
- Do not unplug the product by pulling on the cable. Always grasp the plug and pull.
- Children should be supervised to ensure that they do not play with the product.
- Only power the product with the voltage corresponding to the markings on the product.
- Do not look directly into the light, this may cause eye damage.
- Some wireless products may interfere with implantable medical devices and other medical equipment, such as pacemakers, cochlear implants and hearing aids. Consult the manufacturer of your medical equipment for more information.
- Do not use the product at locations where the use of wireless devices is prohibited due to potential interference with other electronic devices, which may cause safety hazards.
Install the mounting bracket
Make sure the power cable is disconnected from the power outlet.
- Check what plugs and screws are best suited for the intended surface.
The maximum diameter of A 7 is 4.5mm
- Remove the mounting bracket bolts A5 from the product.
- Remove the mounting bracket A7 from the product.
-
Use A7 to mark the drill locations with a pencil.
-
Drill the holes.
- Insert wall plugs.
- Fasten A7 to the wall with screws.
- Attach the product to A7 by fastening A5.
Replacing the power cable
You can replace the power cable with a longer or existing power cable.
Make sure the power cable is disconnected from the power outlet.
- Open the junction box cover A6.
- Disconnect the live, neutral and earth wires.
- Connect the new live, neutral and earth wires.
4.Close A6. - Tighten A4
Installing the Nedis SmartLife app
- Download the Nedis Smartlife app for Android or iOS on your phone via Google Play or the Apple App Store.
- Open the Nedis Smartlife app on your phone.
- Create an account with your e-mail address and tap Continue.
You will receive a verification code on your e-mail address.
- Enter the received verification code.
- Create a password and tap Done.
- Tap Add Home to create a SmartLife Home.
- Set your location, choose the rooms you want to connect with and tap Done.
Connecting the app
- Make sure Bluetooth is enabled on your smartphone.
- Open the Nedis Smartlife app on your smartphone.
- Register or login to your account.
- Tap + in the top right corner.
- Insert the power plug into a power outlet.
- Select the product type you want to add from the list.
The LEDs A 1 blink to indicate pairing mode is active.
If the LEDs are not blinking, switch on the product, and after 10 seconds, switch the product off and on 3 times to manually enter the pairing mode.
- Follow the instructions in the app.
PIR sensor control (WIFILOS20FBK only)
After connecting the device with the app, the control page opens automatically.
-
Tap on Sensor to enter the sensor control menu.
-
Switch the sensor on or off.
- Set the detection distance.
- Set the detection sensitivity.
- Set the light duration after detection.
PIR sensor stand-by light (WIFILOS20FBK only)
- Activate the Slight bright option in the sensor control menu
- Set the stand-by light brightness.
- Set the stand-by light duration.
The product enters stand-by mode after the full light duration.
Declaration of Conformity
We, Nedis B.V. declare as manufacturer that the product WIFILOFC20FBK / WIFILOFS20FBK from our brand Nedis, produced in China, has been tested according to all relevant CE standards and regulations and that all tests have been passed successfully. This includes, but is not limited to the RED 2014/53/EU regulation.
The complete Declaration of Conformity (and the safety datasheet if applicable) can be found and downloaded via: nedis.com/wifi致富20fbk#support. nedis.com/wifi致富20fbk#support
For additional information regarding the compliance, contact the customer service:
Web: www.nedis.com
E-mail: service@nedis.com
Nedis B.V., de Tweeling 28
5215 MC 's-Hertogenbosch, the Netherlands
DE Kurzanleitung


- Smart WiFi Floodlight (with Sensor)
- Smart WiFi Floodlight
- Intended use
- Specifications
- Main parts (image A)
- Safety instructions
- WARNING
- Install the mounting bracket
- Replacing the power cable
- Installing the Nedis SmartLife app
- Connecting the app
- PIR sensor control (WIFILOS20FBK only)
- PIR sensor stand-by light (WIFILOS20FBK only)
- Declaration of Conformity
- DE Kurzanleitung
Brand : NEDIS
Model : WIFILOFC20FBK
Category : Lighting