IAN 340132 - Stroller accessory Lupilu - Free user manual and instructions
Find the device manual for free IAN 340132 Lupilu in PDF.
User questions about IAN 340132 Lupilu
0 question about this device. Answer the ones you know or ask your own.
Ask a new question about this device
Download the instructions for your Stroller accessory in PDF format for free! Find your manual IAN 340132 - Lupilu and take your electronic device back in hand. On this page are published all the documents necessary for the use of your device. IAN 340132 by Lupilu.
USER MANUAL IAN 340132 Lupilu
Before reading, fold out the iluustrine page and get to know all of the functions of your cril.
()
Klap skän mad fluktuationen og indan de lausem oog dat alfofalgandre farrig mad afle.
eperseutifkundien.
图
Pepeep
G/IE/N Usage and safety information Page 9
DK Bungc ng skkerhchurvivincpe Side 11
You have chosen to purchase a high-quality product. Familiarise yourself with the product before using it for the first time.

Read the following instructions for use carefully.
Use the product only as described and only for the given areas of application. Store these instructions for use carefully. When passing the product on to third parties, please also hand over all accompanying documents.
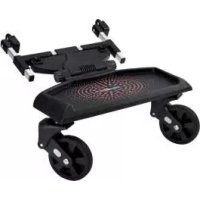
Package contents (Fig. A)
1 x buggy board (1)
2× castor (2)
2× coupling (3)
1 x extension (4)
1 x extension (5)
1 x string with hook (6)
1 x instructions for use
Technical data

Max. user weight: 20kg

Date of manufacture (month/year): 05/2020
Intended use
This product is solely intended as a buggy board for a child 2 years of age or older with a max. weight of 20kg
The product is suitable for attaching to a commercially available pram and buggy model.
The product is intended for private use only.
Safety information

Life-threatening hazard!
- Never leave children unattended with the packaging materials. There is a suffocation hazard.

Risk of injury!
- Note the changed characteristics such as centre of mass, stability and driving behaviour of the pram/buggy when the product is mounted on the pram/buggy.
Usage of the product is only permissible if an adult is holding onto the push handle.
Usage of the product is only permissible if a child is in the transport buggy.
- Any brake on the pram/buggy may never be impaired by the product. The brake must be freely accessible.
Children may only stand on the product when in use.
Children who use the product must hold tightly onto the push handle of the pram/buggy.
- Do not make any changes to the product that compromise safety.
- Make sure that all parts are undamaged and properly fitted. Incorrect assembly may result in injury. Damaged parts can affect safety and function of the product.
- Check the product for damage or wear before each use. Check that all screws are tight before each use!
Only use the product if it is in perfect condition! Do not use the product if it is visibly damaged or if you suspect it is damaged!
- Use the product for its intended purpose only.
The product may only be used under adult supervision and should not be used as a toy. - Never leave children unattended.
- The product is not suitable for transporting other items.
Assembly
1. Folding out the product (Fig. B)
The product is delivered folded up. Proceed as follows to fold it out:
- Unscrew the holders (1a).
- Fold the front part of the product forward.
- Refasten the holders.
Note: first align the buggy board horizontally. Set the correct angle for connecting with the pram/buggy.
2. Wheel assembly (Fig. C)
- Turn the product (1) around so that the underside is facing upward.
-
Insert the wheels (2) into the openings until they lock tightly.
Note: the wheels must audibly lock. -
Coupling assembly (Fig. D)
WARNING! If you fasten the couplings onto a vertical brace, make sure that other cross-braces or fasteners are above it in order to prevent the product from sliding upward. Horizontal braces are suitable for optimal placement of the product. -
Set the plastic strap (3a) around the frame of the pram/buggy.
- Insert the end of the plastic strap through the opening of the clasp (3b).
- Tighten the coupling by turning the coupling screw (3c).
Note: make sure that the pram/buggy can be folded together without difficulty. Otherwise mount the couplings at another spot.
4. Fasten the other coupling in the same way.
Important! The couplings must be firmly attached to the frame so that there is no room for movement and they do not move.
-
Connecting the coupling (Fig. E)
-
Press the flip switch (4a) / (5a) of the extension (4) / (5) to open the clasp.
- Connect the hook (4b)/(5b) with the coupling screw (3c).
- Press the hook back into the clasp.
Note: when connecting the hook make sure that the blocking pin (4c)/(5c) of the extension is pointing downward.
-
Setting the width (Fig. F)
-
Loosen by pulling the latch (1b) on the front part of the product.
- Pull the sides of the product to the desired width.
-
Let the latch lock tightly and audibly.
-
Setting the length/connecting the product (Fig. G)
-
Push the extensions (4)/(5) into the sides of the buggy board.
- Audibly lock the blocking pins (4c)/(5c) into one of the holes.
Note: the product has four holes on the underside for setting the length.
Set the product as close to the pram/buggy as possible so that the child can stand comfortably and hold onto the push handle.
- Tilting up during non-use and for better accessibility of the locking brake (Fig. H)
If the product is not in use and for easier access to the locking brake, you are able to tilt it up:
- Loosen the coupling screw (3c) if necessary.
- Fold the standing surface of the product upward.
- Connect the hook (6) to the edge of the standing surface and fasten the string on the push handle of the pram/buggy.
Important! Always remove the string with the hook (6) when the pram/buggy is not in use.
Disassembly
Important! Do not fold up the pram/buggy with the product attached.
Proceed as follows to remove the product from the pram/buggy:
-
Push the flip switch (4a)/(5a) of the extensions (4)/(5).
-
Pull the hooks (4b)/(5b) from the coupling screws (3c) and remove the buggy board (1).
-
Leave the couplings on the frame.
Storage, cleaning
When not in use, always store the product clean and dry at room temperature.
Clean only with water and wipe dry afterwards with a cloth.
IMPORTANT! Never clean the product with harsh cleaning agents.
Disposal
Dispose of the article and the packaging materials in accordance with current local regulations.
Packaging materials such as foil bags are not suitable to be given to children. Keep the packaging materials out of the reach of children.

Dispose of the products and the packaging in an environmentally friendly manner.

The recycling code is used to identify various materials for recycling. The code
consists of the recycling symbol - which is meant to reflect the recycling cycle - and a number which identifies the material.
Notes on the guarantee and service handling
The product was produced with great care and under constant supervision. You receive a three-year warranty for this product from the date of purchase. Please retain your receipt.
The warranty applies only to material and workmanship and does not apply to misuse or improper handling. Your statutory rights, especially the warranty rights, are not affected by this warranty. With regard to complaints, please contact the following service hotline or contact us by e-mail.
Our service employees will advise as to the subsequent procedure as quickly as possible. We will be personally available to discuss the situation with you.
Any repairs under the warranty, statutory guarantees or through goodwill do not extend the warranty period. This also applies to replaced and repaired parts. Repairs after the warranty are subject to a charge.
IAN:340132_1910
GB Service Great Britain
Tel.: 0800 404 7657
E-Mail: deltasport@lidl.co.uk
IE Service Ireland
NI Tel.: 1890930034
(0,08 EUR/Min., {peak})
(0,06 EUR/Min., (off peak))
E-Mail: deltasport@lidl.ie
Hjertelig tillykke!