eufyCam Solar Panel - Camera batteries eufy - Free user manual and instructions
Find the device manual for free eufyCam Solar Panel eufy in PDF.

| Product Type | Solar panel for security camera |
| Brand | eufy |
| Model | T8700 |
| Compatibility | eufyCam 1, 2, 2 Pro, 2C, 2C Pro, E, Solo |
| Power | Solar energy |
| Connectivity | USB (with waterproof gasket) |
| Maximum cable length | 4 m between panel and camera |
| Recommended tilt angle | 30° |
| Recommended orientation | South (Northern hemisphere) / North (Southern hemisphere) |
| Installation | Wall or roof mount (screws and anchors included) |
| Moisture protection | Waterproof gasket included for USB connector |
| Package contents | 1× solar panel, 4× camera adapters, 1× quick start guide |
| Maintenance and cleaning | Clean regularly with a soft cloth to remove dust and debris |
| Safety | Compliant with Industry Canada CNR; maintain a distance of 20 cm from body |
| Repairability | No specified spare parts; contact eufy support if issues |
Frequently Asked Questions - eufyCam Solar Panel eufy
User questions about eufyCam Solar Panel eufy
0 question about this device. Answer the ones you know or ask your own.
Ask a new question about this device
Download the instructions for your Camera batteries in PDF format for free! Find your manual eufyCam Solar Panel - eufy and take your electronic device back in hand. On this page are published all the documents necessary for the use of your device. eufyCam Solar Panel by eufy.
USER MANUAL eufyCam Solar Panel eufy
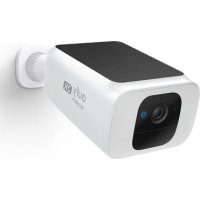
Solar Panel Charger for eufyCams

Anker Innovations Limited. All rights reserved. eufy Security and eufy Security Logo are trademarks of Anker Innovations Limited, registered in the United States and other countries. All other trademarks are the property of their respective owners.
51005002461V01
English 01
Deutsch 12
Espanol 20
Français 28
Italiano 36
Nederlands 44
Portugués 52
60
TABLE OF CONTENTS
01 What's in the Box
01 How the Solar Panel Works
02 Positioning the Solar Panel
03 Installing the Solar Panel
04 Connecting the Solar Panel to eufyCam
07 Setting Up the System
08 Notice
1/ What's in the Box

1 x Solar Panel
Charger for
eufyCams
Model: T8700

1x 360-degree
mounting
bracket

1x Screw
Pack

4x Camera
adapters

1xQuick
Start Guide
2/ How the Solar Panel Works
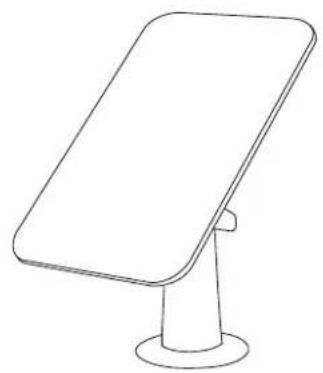
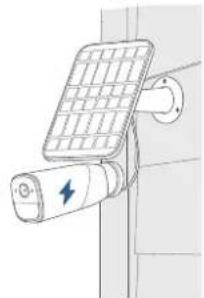
The Solar Panel works with our eufyCam series security cameras. When placed in direct sunlight, the Solar Panel provides energy to your connected eufyCams. To get the maximum amount of sunlight exposure, install the Solar Panel on the roof or wall outside of your house.

01 EN EN 02
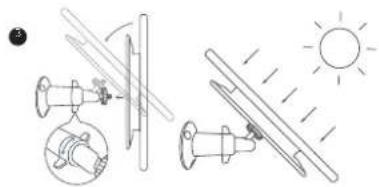
3 / Positioning the Solar Panel
While positioning the Solar Panel, keep the following factors in mind. These factors may affect the solar panel efficiency:
- Weather conditions will impact the levels of energy produced
- Dirt or debris on the panels can negatively impact the intake of sunlight
- The amount of sunlight that the solar panel receives
To optimize your solar panel efficiency, identify an optimal position on your roof or wall for installation.
- Select a location where the solar panel can get the most sunlight throughout the year
- Position your solar panel south-facing (in the Northern Hemisphere) or north-facing (in the Southern Hemisphere), and tilt the panel at a 30^ angel.
- Regularly wipe/clean your solar panel to keep it free of debris and dirt.
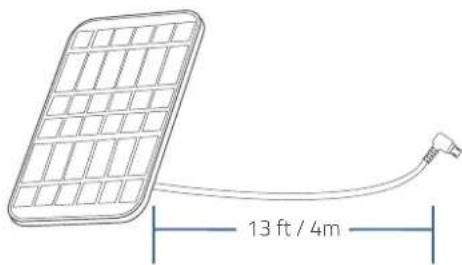
- Keep your solar panel and eufyCam within 13 ft / 4m of each other.
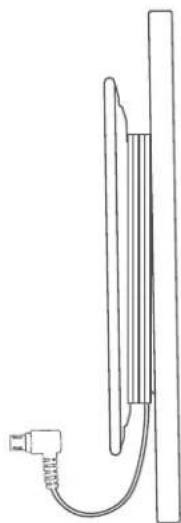
4/ Installing the Solar Panel
Before installing the Solar Panel, take down your eufyCam from the wall.
- Place the mounting bracket against a wall or roof and secure it with the included screws.
- For walls or roofs that are made out of hard materials such as concrete, brick, or stucco, insert anchors first.
- Anchors are not needed for wooden walls or roofs.
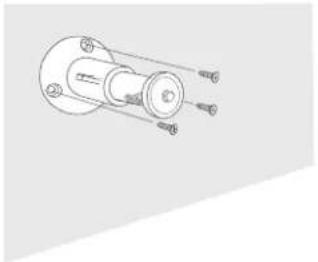
- Screw the Solar Panel to the mounting bracket and make sure it is well secured.
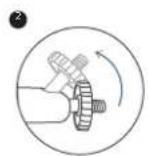
- Angle the Solar Panel on the mounting bracket to receive the largest amount of sunlight. A 30^ tilt is recommended.
03 EN EN 04
5 / Connecting the Solar Panel to eufyCam
Select the appropriate installation package for your eufyCam.
- If you own a eufyCam 1/2/2 Pro, ensure it is using the screw mounting bracket rather than a magnetic one.
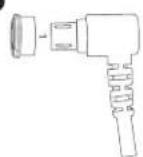
- Use the waterproof gasket as support when connecting the solar panel to your camera. The gasket protects your camera from exposed moisture and other elements that may damage the camera.
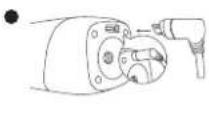
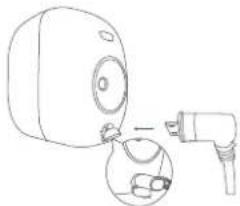
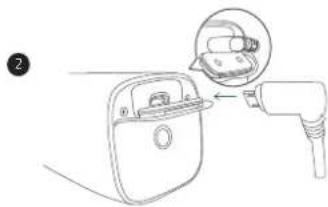
- For eufyCam 1/2/2 Pro:
① Slide the waterproof gasket onto the USB connector of the Solar Panel cable.
(2) Plug the USB connector into the USB port of eufyCam 1/2/2 Pro.
③ Cover the waterproof bracket and then screw the thread bolt into the mounting screw slot.

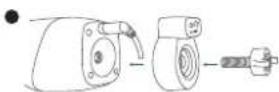
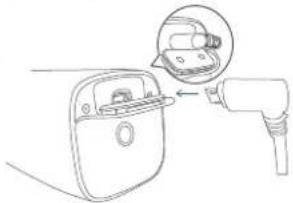
- For eufyCam 2C / 2C Pro / eufyCam E:
① Slide the respective waterproof gasket onto the USB connector of the Solar Panel cable.
② Plug the USB connector into the USB port of eufyCam 2C / 2C Pro / eufyCam E.
1
2
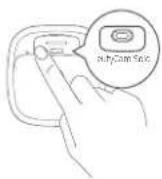
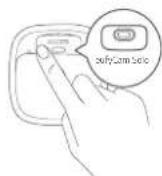
- For eufyCam Solo:
① Open eufyCam Solo's back panel and follow the direction the arrow key indicates. Align the waterproof gasket for eufyCam Solo with the USB port and press it in to attach.
② Plug the USB connector into the USB port of eufyCam Solo.
1
2
- Screw the mounting bracket for eufyCam into the mounting slot of your camera, and angle the mount to get the desired field of view.
- Route the extension cable along the solar panel hub to avoid tangling cables.
Note:
- Make sure the USB connector is fully plugged into the camera.
- Make sure you follow the user manual to install the Solar Panel correctly.
- Make sure the waterproof gasket and other accessories can protect the connectors on your camera.
6/ Setting Up the System
- Update your eufy Security app from the App Store (iOS devices running version 10.2 and later versions) or Google Play (Android devices running version 5.0 and later versions). Make sure it has been updated to the latest version.


- Open the eufy Security app, go to Camera Settings > Device Info > Check for camera firmware to update your eufyCam firmware.
- Go to Camera Settings > Power Manager > Power Source, Tap Power Source and select Solar Panel.
You're done! Your Solar Panel is set up.
7/Notice
FCC Statement
This device complies with Part 15 of the FCC Rules. Operation is subject to the following two conditions: (1) this device may not cause harmful interference, and (2) this device must accept any interference received, including interference that may cause undesired operation.
Warning: Changes or modifications not expressly approved by the party responsible for compliance could void the user's authority to operate the equipment.
Note: This equipment has been tested and found to comply with the limits for a Class B digital device, pursuant to Part 15 of the FCC Rules. These limits are designed to provide reasonable protection against harmful interference in a residential installation.
This equipment generates uses and can radiate radio frequency energy and, if not installed and used in accordance with the instructions, may cause harmful interference to radio communications. However, there is no guarantee that interference will not occur in a particular installation. If this equipment does cause harmful interference to radio or television reception, which can be determined by turning the equipment off and on, the user is encouraged to try to correct the interference by one or more of the following measures: (1) Reorient or relocate the receiving antenna. (2) Increase the separation between the equipment and receiver. (3) Connect the equipment into an outlet on a circuit different from that to which the receiver is connected. (4) Consult the dealer or an experienced radio/ TV technician for help.
FCC Radio Frequency Exposure Statement
The device has been evaluated to meet general RF exposure requirements. The device can be used in fixed/mobile exposure condition. The min separation distance is 20cm
Notice: Shielded cables
All connections to other computing devices must be made using shielded cables to maintain compliance with FCC regulations.
The following importer is the responsible party
Company Name: POWER MOBILE LIFE, LLC
Address: 400 108th Ave NE Ste 400, Bellevue, WA 98004-5541
Telephone:1-800-988-7973
This product complies with the radio interference requirements of the European Community.
Declaration of Conformity
Hereby, Anker Innovations Limited declares that this device is in compliance with the essential requirements and other relevant provisions of Directive 2014/53/EU. For the declaration of conformity, visit the Web site:https://www.eufylife.com/.
This product can be used across EU member states.
Do not use the Device in the environment at too high or too low temperature, never expose the Device under strong sunshine or too wet environment.
The suitable temperature for T8700 and accessories is -20^ - 45^
When charging, please place the device in an environment that has a normal room temperature and good ventilation.
It is recommended to charge the device in an environment with a temperature that ranges from 5^ 25^ .
Please ensure to use only the charger offered by the manufacturer. Using unauthorized charger may cause danger and violate the authorization of the device and the guarantee article.
This charger is for indoor use only.
RF exposure information: The Maximum Permissible Exposure (MPE) level has been calculated based on a distance of d = 20cm between the device and the human body. To maintain compliance with RF exposure requirement, use product that maintain a 20cm distance between the device and human body.
Anker Technology UK) Ltd, Suite B, Fairgate House, 205 Kings Road, Tyseley, Birmingham, B11 2AA, United Kingdom

This product is designed and manufactured with high quality materials and components, which can be recycled and reused.

This symbol means the product must not be discarded as household waste, and should be delivered to an appropriate collection facility for recycling. Proper disposal and recycling helps protect natural resources, human health and the environment. For more information on disposal and recycling of this product, contact your local municipality, disposal service, or the shop where you bought this product.
IC Statement
This device complies with Industry Canada licence-exempt RSS standard(s). Operation is subject to the following two conditions:
(1) this device may not cause interference, and
(2) this device must accept any interference, including interference that may cause undesired operation of the device."
This Class B digital apparatus complies with Canadian ICES-003.
When using the product, maintain a distance of 20cm from the body to ensure compliance with RF exposure requirements.
1× support defixation a 360^

1×sachet de vis

a a a a a a a a a a a a a a a a a a a a a a a a a a a a a a a a a a a a a a a a a a a a a a a a a a a a a a a a a
3
a a a a a a a a a a a a a a a a a a a a a a a a a a a a a a a a a a a a a
Lgis Jgic Ia, USB eufyCam Solo J clal a j
.eufyCam Solo+USB USB

12-month limited warranty
+1 (800) 988 7973(United States) Mon-Fri 9AM-5PM (PT)
+44 (0) 1604 936 200(United Kingdom) Mon-Fri 6AM-11AM (GMT)
+49 (0) 69 9579 7960(Germany) Mon-Fri 6:00-11:00
+971 42463266 (Middle East & Africa) Sun-Thu 9:00 - 17:30 (GMT+4)
+971 8000320817 (UAE) Sun-Thu 9:00 - 17:30 (GMT+4)
+966 8008500030 (KSA) Sun-Thu 8:00 - 16:30 (GMT +3)
+965 22069086 (Kuwait) Sun-Thu 8:00 - 16:30 (GMT+3)
+20 8000000826 (Egypt) Sun-Thu 7:00 - 15:30 (GMT+2)

Customer Support: support@eufylife.com
Anker Innovations Limited
Room 1318-19, Hollywood Plaza, 610 Nathan Road, Mongkok, Kowloon, Hong
Kong

@EufyOfficial @EufyC. al @EufyOfficial