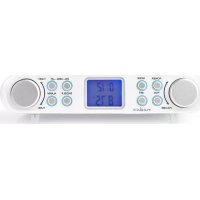
RDFM4000WT - Radio NEDIS - Free user manual and instructions
Find the device manual for free RDFM4000WT NEDIS in PDF.


| Product type | FM Radio |
| Brand | Nedis |
| Model | RDFM4000WT |
| Dimensions (W x H x D) | 245 x 48 x 120 mm |
| Weight | 544 g |
| Power supply | 220-240 VAC, 50 Hz |
| Backup power | 2 AA batteries (3 VDC, not included) |
| Rated power | 5 W |
| Radio band | FM |
| FM frequency range | 87.5 - 108 MHz |
| Preset stations | 30 |
| Audio connections | 3.5 mm input, 3.5 mm output |
| Main functions | FM radio, clock, alarm, stopwatch, timer, sleep, alarm repeat |
| Display | LCD with auto dimming (11:00 PM - 5:00 AM) |
| Mounting | On flat surface (foldable feet) or under cabinet (bracket included) |
| Included accessories | Mounting bracket, screws, power cable, FM antenna |
| Backup battery type | 2 x AA (LR6, 1.5V, not included) |
| Intended use | Indoor only, non-professional household use |
| Care and cleaning | Disconnect before cleaning; use a dry cloth; do not use abrasive products |
| Safety | Do not expose to water, heat, or direct sunlight; do not use near water; keep away from children; do not open (no user-serviceable parts) |
| Spare parts and repairability | No user-serviceable parts; refer all repairs to a qualified technician; power cable not replaceable; discard product if damaged |
| General information | Compliant with RED Directive 2014/53/EU; declaration of conformity available at webshop.nedis.fr |
Frequently Asked Questions - RDFM4000WT NEDIS
User questions about RDFM4000WT NEDIS
0 question about this device. Answer the ones you know or ask your own.
Ask a new question about this device
Download the instructions for your Radio in PDF format for free! Find your manual RDFM4000WT - NEDIS and take your electronic device back in hand. On this page are published all the documents necessary for the use of your device. RDFM4000WT by NEDIS.
USER MANUAL RDFM4000WT NEDIS
suitable for under the cabinet mounting
RDFM4000WT

Quick start guide 5

Kurzanleitung 7

For more information see the extended manual online:ned.is/rdfm4000wt
Intended use
The RDFM4000WT is an FM radio with 30 preset radio stations that can be mounted under a cabinet to save valuable workspace.
The product is equipped with clock, alarm, stopwatch and countdown functions.
This product is not intended for use by persons (including children) with a reduced physical, sensory or mental capabilities or lack of experience and knowledge, unless they have been given supervision or instruction concerning the use of the product by a person responsible for their safety.
The product is intended for indoor use only. The product is not intended for professional
Any modification of the product may have consequences for safety, warranty and proper functioning.
Specifications
| Product FM Radio | |
| Article number RDFM4000WT | |
| Dimensions (w x h x d) | 245 x 48 x 120 mm |
| Weight 544 g | |
| Power input 220 - 240 VAC; 50 Hz | |
| Rated power 5 W | |
| Battery type 3 VDC (2 x AA) (not included) | |
| Radio bands FM | |
| FM frequency range 87.5 - 108 MHz | |
| Preset stations 30 | |
| Connections 3.5 mm audio input and output | |
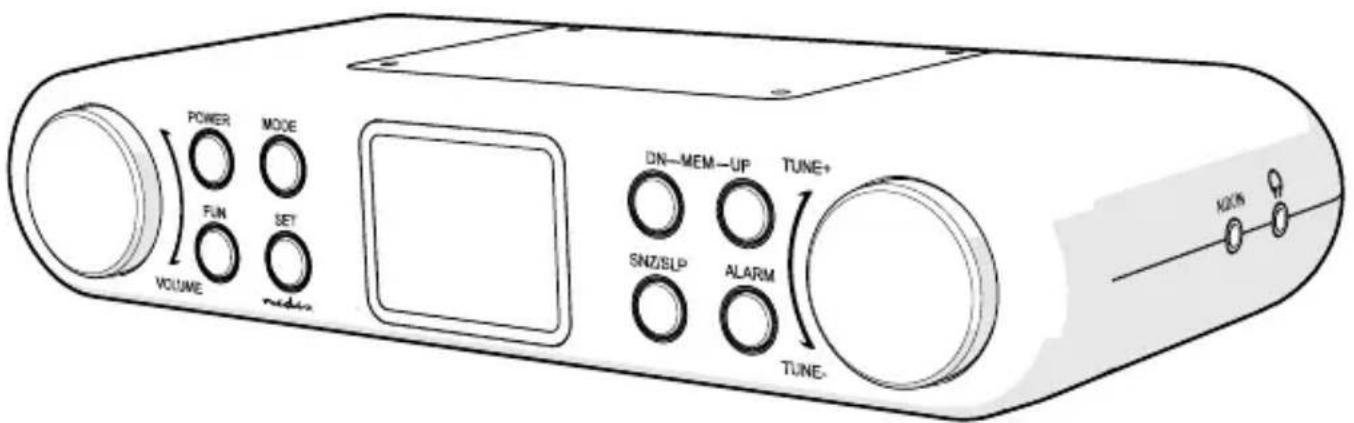
Main parts (image A)
1 Mounting bracket
FM antenna
3 Battery compartment
4 Stands
Mode button
6 Power button
Volume wheel
8 Function button
9 Set button
10 LCD display
11 Buzzer mode indicator
12 Radio mode indicator
13 Power cable
14 3.5 mm audio output
15 3.5 mm audio input
16 Memory down button
17 Memory up button
18 Tune wheel
19 Alarm button
20 Snooze / sleep button
21 Assembly template
22 Screws
Safety instructions
WARNING
- Only use the product as described in this manual.
- Read the manual carefully before use. Keep the manual for future reference.
- Do not use the product if a part is damaged or defective. Replace a damaged or defective product immediately.
- Do not drop the product and avoid bumping.
- This product may only be serviced by a qualified technician for maintenance to reduce the risk of electric shock.
- Disconnect the product from the electrical outlet and other equipment if problems occur.
- Do not expose the product to water or moisture.
- Disconnect the product from the power source before service and when replacing parts.
- Children should be supervised to ensure that they do not play with the product.
- The power cable cannot be replaced. If the cable is damaged the product should be scrapped.
-
Secondary cells and batteries need to be charged before use. Always use the correct charger and refer to the manufacturer's instructions or equipment manual for proper charging instructions.
-
After extended periods of storage, it may be necessary to charge and discharge the cells or batteries several times to obtain maximum performance.
- Battery usage by children should be supervised.
- Remove the batteries if you do not use the product for an extended period of time.
- Unplug the product if you do not plan on using the product for an extended period of time.
- Do not use the product near water.
- Do not expose the product to direct sunlight, naked flames or heat.
- When the product is not used for an extended period, store the product in a dry place away from sunlight and protect it against excessive dust and dirt.
- Do not open the product. There are no user serviceable parts inside.
- Do not put hands and foreign objects inside the product.
- Keep the product away from magnetic or magnetized objects.
- Extended exposure to high volumes can cause hearing loss.
Installing the product on a flat surface
- Unfold the stands A 4
- Place the product on a flat surface close to a power outlet.
Installing the product under cupboard (image B, C, D)
The cupboard floor thickness should be at least 16mm
Install the product close to a power outlet.
Use a screwdriver to fix the screws.
not plug the power cable A13 into the power outlet during the installation.
not use any accessories that are not included.
not install the product under a cupboard with a lighting strip installed underneath.
not install the product above places were steam and water can get in contact with the product.
Inserting the batteries (image E)
- Open the battery compartment A 3
- Insert 2 AA batteries.
Ake sure to match the (+) and (-) polarity markings.
3.CloseA 3
Connecting the product to a power source
- Plug the power cable A 13 into the power outlet.
Switching on the product
- Press the power button A to switch on the product.
- Press A 6 while the product is switched on to switch to standby mode.
In standby mode the time and date are shown on the LCD display A10.
The display is automatically dimmed between 23:00 - 05:00 h
Controlling the product
Rotate the volume wheel A to adjust the volume to the desired sound level.
Rotate the tune wheel A 18 to adjust values and press the set button A 9 to confirm a setting.
Rotate and hold A 18 to rapidly advance or reverse values.
Setting the clock
- Switch the product to standby mode.
- Press A 9.
- Set the current minutes and confirm.
- Set the current hours and confirm.
- Set the clock to 24 hour or 12 hour setting and confirm.
Setting the calendar
- Switch the product to standby mode.
- Press the mode button A 5.
The month, day and year appear on A 10
- Press A 9.
- Set the current day and confirm.
- Set the current month and confirm.
- Set the current year and confirm.
Setting the alarm
- Switch the product to standby mode.
- Press the alarm button A 19 once. ALM 1 appears on A 10.
- Press A 19 again. ALM 2 appears on A 10
- Select the buzzer mode indicator A 12 or the radio mode indicator A 11 and confirm.
- Set the minutes and confirm.
- Set the hours and confirm.
- In radio mode, press A again to continue and select a radio station. When the alarm goes off, press any button to switch off the alarm.
- Press the snooze / sleep button A 20 to delay the alarm sound, the alarm sound resumes after 5 minutes.
Controlling the music
- Switch on the product.
- Press the function button A 8 to select radio or AUX function.
In radio mode the current radio frequency appears on A10.
- Tune to a desired FM station or rotate and hold A18 to start the automatic scanning for the next available radio station.
- In AUX mode, connect an external audio source to the 3.5mm audio input A15 to play external audio.
The product automatically switches to standby after 10 minutes without a signal.
Saving radio presets
- In radio mode, press A 9.
- Select a preset number with the memory up button A17 or the memory down button A16 and confirm to save the current radio station.
Setting the timer
- Press A 8 1 time. TMR appears on A10
- Press A 9.
- Set the seconds and confirm.
- Set the minutes and confirm.
- Rotate A 18 clockwise to start the timer. When the timer runs out, a signal tone sounds for about 1 minute. When the timer goes off, press any button to switch off the sound.
Setting the stopwatch
- Press A 8 2 times. STW appears on A 10
- Rotate A 18 clockwise to start the stopwatch.
- Rotate A 18 clockwise again to stop the stopwatch.
- Rotate A 18 counterclockwise to reset the stopwatch.
Using sleep function
In sleep mode, the radio plays until the timer runs out.
The remaining time appears on A10.
- Press A 20 to change the remaining time in steps of 10 minutes.
Declaration of Conformity
We, Nedis B.V. declare as manufacturer that the product RDFM4000WT from our brand Nedis, produced in China, has been tested according to all relevant CE standards and regulations and that all tests have been passed successfully. This includes, but is not limited to the RED 2014/53/EU regulation.
The complete Declaration of Conformity (and the safety datasheet if applicable) can be found and downloaded via webshop.nedis.com/rdfm4000wt#support
For additional information regarding the compliance, contact the customer service: Web: www.nedis.com
E-mail: service@nedis.com
Phone: +31 (0)73-5991055 (during office hours)
Nedis B.V., de Tweeling 28
5215 MC's-Hertogenbosch, the Netherlands

Kurzanleitung
UKW-RadioRDFM4000WT

- Intended use
- Specifications
- Main parts (image A)
- Safety instructions
- WARNING
- Installing the product on a flat surface
- Installing the product under cupboard (image B, C, D)
- Inserting the batteries (image E)
- Connecting the product to a power source
- Switching on the product
- Controlling the product
- Setting the clock
- Setting the calendar
- Setting the alarm
- Controlling the music
- Saving radio presets
- Setting the timer
- Setting the stopwatch
- Using sleep function
- Declaration of Conformity
- Kurzanleitung
- UKW-RadioRDFM4000WT
Brand : NEDIS
Model : RDFM4000WT
Category : Radio