
HG06145 - Hand tool PARKSIDE - Free user manual and instructions
Find the device manual for free HG06145 PARKSIDE in PDF.

| Product Type | Rivet nut pliers |
| Brand | Parkside |
| Model | HG06145 |
| Weight | 900 g |
| Length | 340 mm |
| Max. working stroke | 9 mm |
| Max. effective working stroke | 7 mm |
| Supported material thicknesses | M5: 0.5-2.5 mm; M6: 0.5-3.0 mm; M8/M10/M12: 0.5-3.5 mm |
| Rivet hole diameters | M5: 7-7.5 mm (sheet) / 8 mm (tubes); M6: 9-9.5 / 10; M8: 11-11.5 / 12; M10: 13-13.5 / 14; M12: 15-15.5 / 16 |
| Package contents | 1 rivet nut pliers, 1 clamping key, 150 nuts (M5-M12) |
| Intended use | Insertion of rivet nuts into sheets and tubes |
| Cleaning | Dry cleaning with a brush |
| Maintenance | Oil moving parts with sewing machine oil |
| Storage | In a clean, dry place |
| Disposal | Packaging recyclable, product recyclable (separate collection) |
| After-sales service France | 0800 919270, owim@lidl.fr |
| After-sales service Belgium | 070 270 171 (0.15 EUR/min), owim@lidl.be |
| Available languages | FR, CS, DE, EN, NL, PL, SK |
| Included accessories | Clamping key, nuts (30 of each size M5-M12) |
| Number of included nuts | 150 (30 per size from M5 to M12) |
Frequently Asked Questions - HG06145 PARKSIDE
User questions about HG06145 PARKSIDE
0 question about this device. Answer the ones you know or ask your own.
Ask a new question about this device
Download the instructions for your Hand tool in PDF format for free! Find your manual HG06145 - PARKSIDE and take your electronic device back in hand. On this page are published all the documents necessary for the use of your device. HG06145 by PARKSIDE.
USER MANUAL HG06145 PARKSIDE
natural_image
Close-up of a hand connecting a black cable to a white metal frame, no visible text or symbols
natural_image
Open black tool kit with various mechanical components and a plastic case (no visible text or labels)NIETMUTTERNZANGE MIT ZUBEHÖR / RIVET NUT TOOL WITH ACCESSORIES / PINCE À ÉCROUS
DE AT CH
NIETMUTTERNZANGE MITZUBEHÖR
RIVET NUT TOOL WITH ACCESSORIES
Operation and safety notes
NL BE
BLINDNIETTANGMET TOEBEHOREN
GB / IE Operation and safety notes Page 12
text_image
Technical diagram of a pliers assembly with labeled parts and part numbers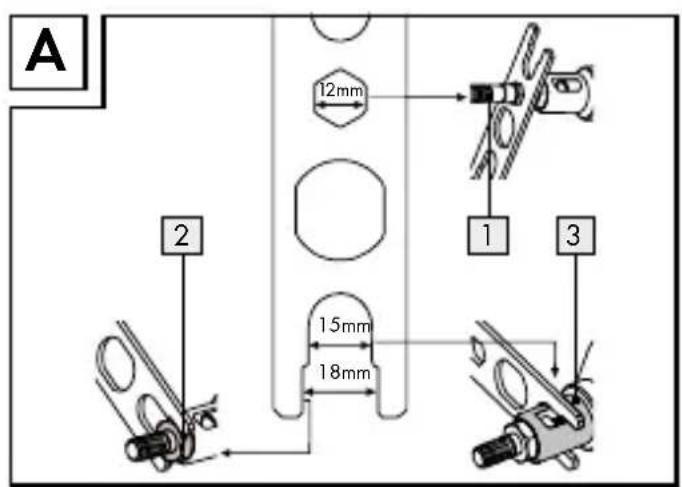
text_image
A 12mm 1 2 1.5mm 18mm 1 3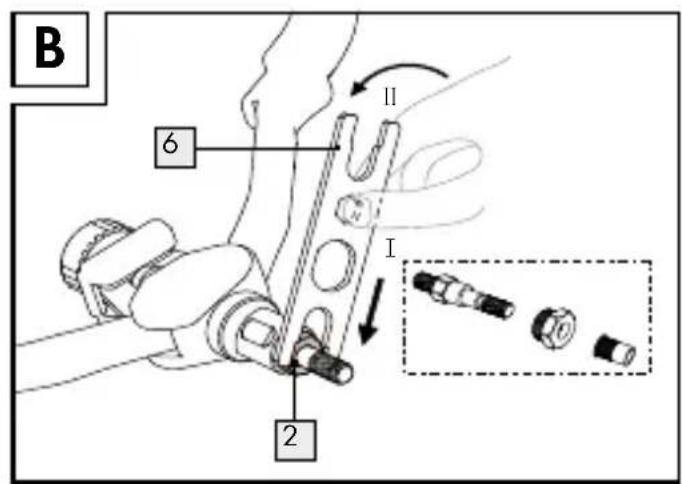
text_image
B 6 II I 2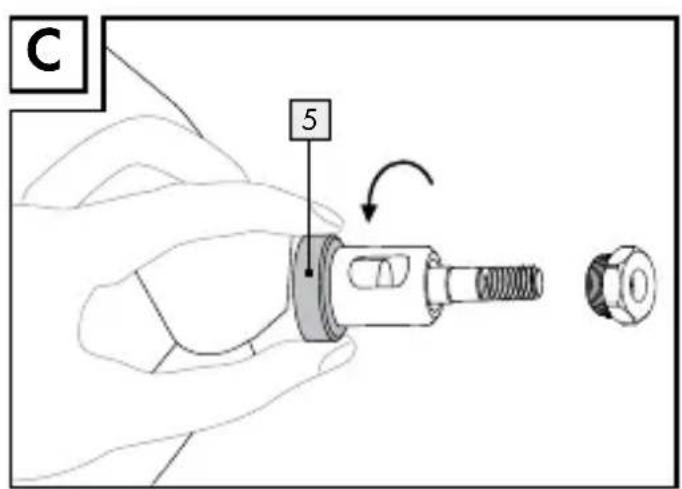
text_image
C 5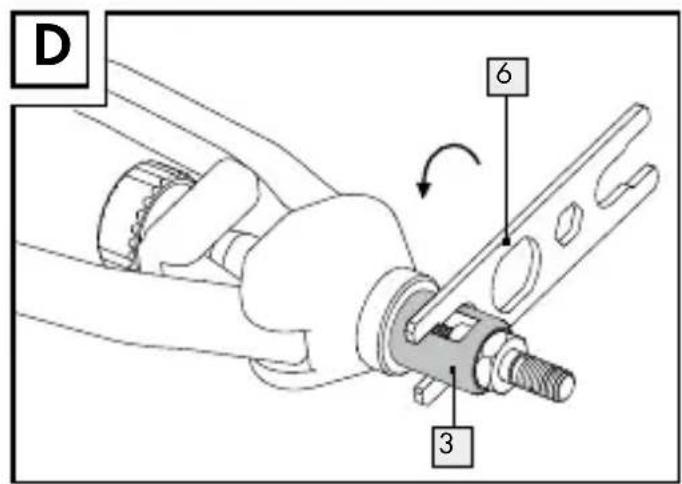
text_image
D 6 3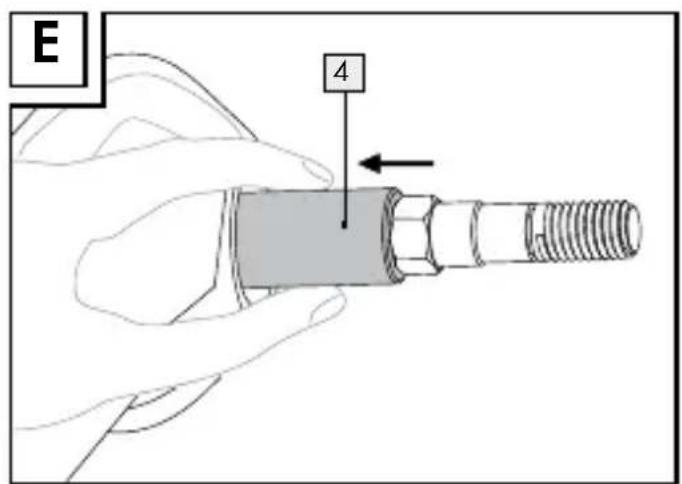
text_image
E 4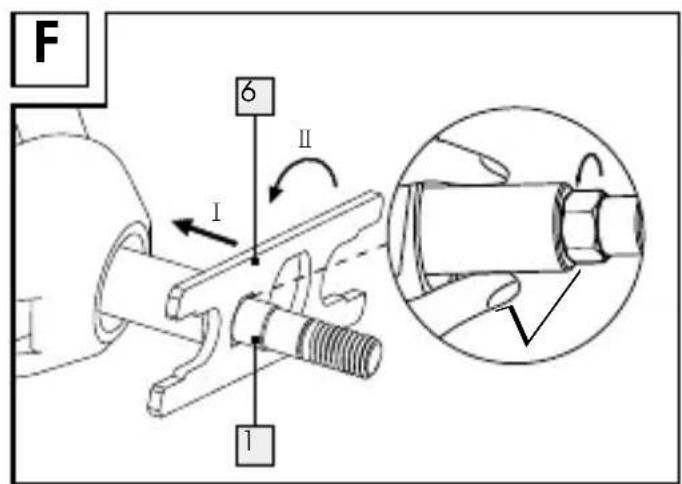
text_image
F 6 II I I
text_image
G I II 1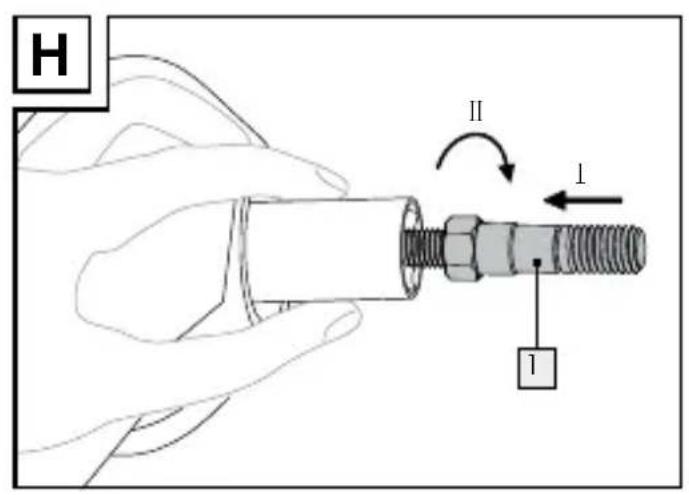
text_image
H II I I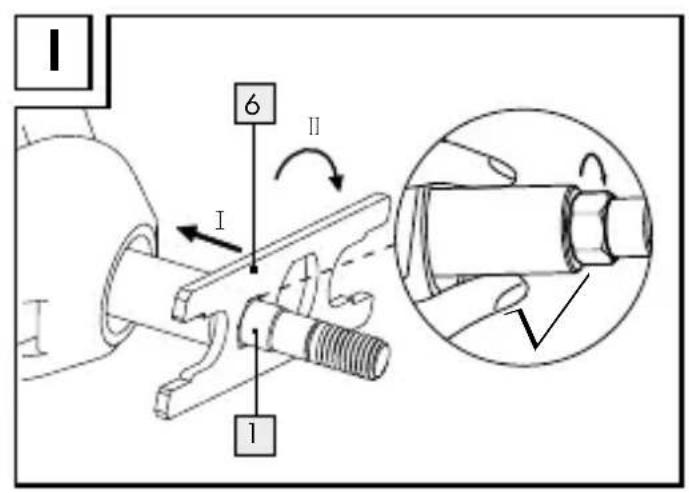
text_image
I 6 II I I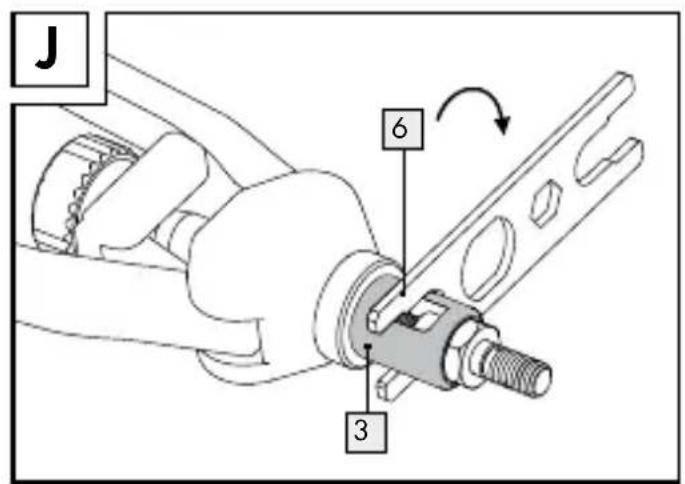
text_image
J 6 3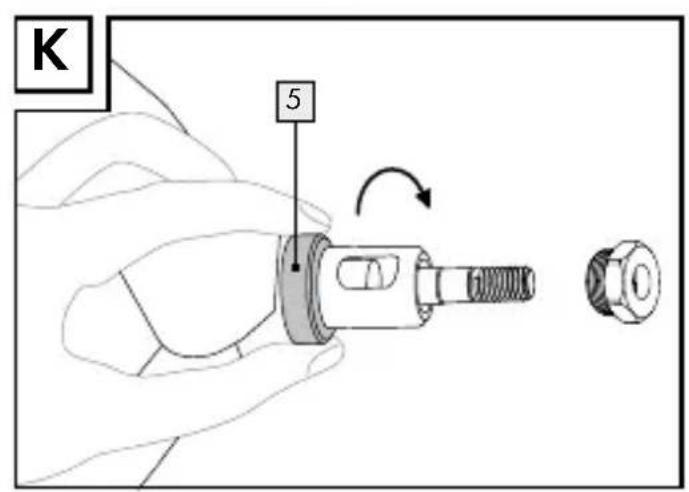
text_image
K 5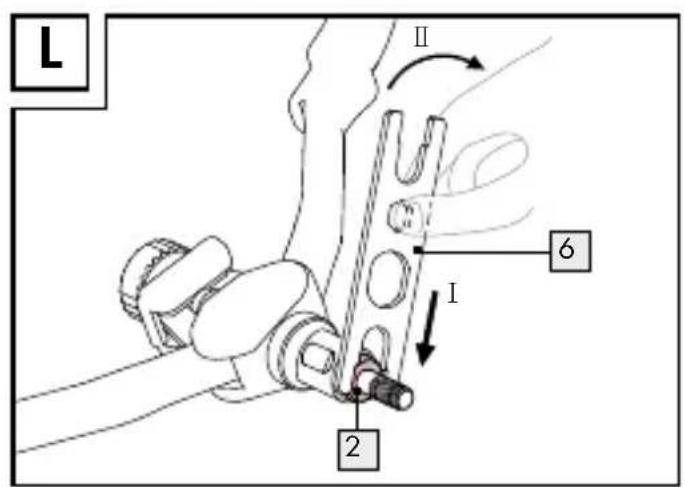
text_image
L II 6 I 2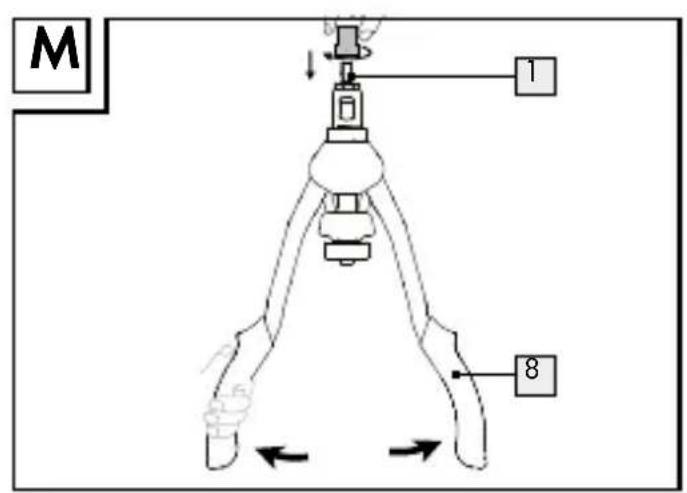
text_image
M 1 8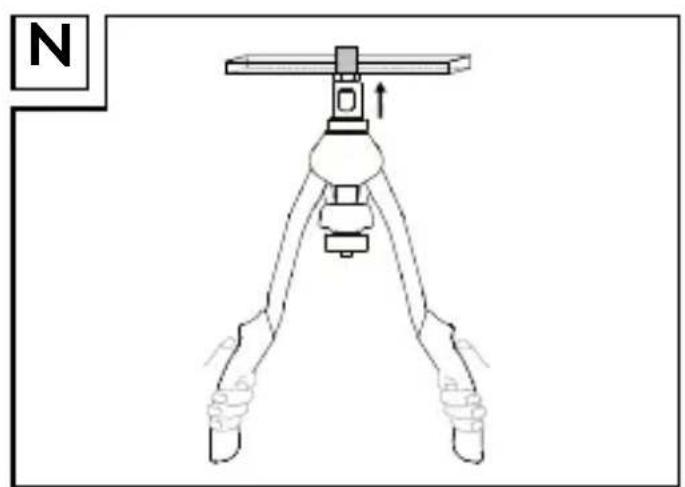
natural_image
Line drawing of a tripod-mounted device with a central rotating knob and two arms, no text or symbols present.Intended use......Page 13
Parts description......Page 14
Technical data......Page 14
Scope of delivery....Page 14
Safety notes......Page 14
Preparation......Page 15
Changing the mandrel....Page 16
Operation ...... Page 17
Troubleshooting Page 17
Cleaning, maintenance and storage......Page 18
Disposal Page 18
Service Page 18
| List of pictograms used | |||
 | Please read the operating instructions |  | Wear safety gloves |
 | Observe the warnings and safety notes! |  | Wear protective glasses |
 | Danger to life and risk of accidents for infants and children! |  | Dispose of the packaging and device in an environmentally friendly manner! |
Rivet Nut Tool with Accessories
- Introduction

We congratulate you on the purchase of your new product. You have chosen a high quality product. Familiarise yourself with the product before using it for the first time. In addition,
please carefully refer to the operating instructions and the safety advice below. Only use the product as instructed and only for the indicated field of application. Keep these instructions in a safe place. If you pass the product on to anyone else, please ensure that you also pass on all the documentation with it.
- Intended use
This product is suitable for inserting rivet nuts into a depression e.g. for metal pipes or metal sheets. The product is for private use only, not for commercial use, and is only intended for the uses specified in these instructions.
Parts description
1 Mandrel (12 mm)
2 Nose piece (18 mm)
3 Socket (15 mm)
4 Slide sleeve
5 Adjusting nut
6 Wrench
7 Knob
8 Handle
- Technical data
Weight: 900 g
Length: 340 mm
max. working stroke: 9 mm
max. effective working stroke: 7 mm
Riveting plate thickness (usage requirements):
M5 suitable for 0.5 to 2.5 mm thickness
M6 suitable for 0.5 to 3.0 mm thickness
M8 / M10 / M12 suitable for 0.5 to 3.5 mm thickness
- Scope of delivery
1 Hand riveter
1 Wrench
30 M5 nuts
30 M6 nuts
30 M8 nuts
30 M10 nuts
30 M12 nuts
1 Set of instructions for use

Safety notes


WARNING! DANGER TO LIFE AND RISK OF ACCIDENTS
FOR INFANTS AND CHILDREN! Never leave children unsupervised with the packaging material. The packaging material poses a
suffocation hazard. Children frequently underestimate the dangers. Always keep children away from the packaging material. This product is not a toy.
- Remain alert at all times, pay attention to what you are doing and use common sense in your work. Do not use the product when tired or under the influence of drugs, alcohol or medications. One moment of carelessness when using the product can result in injuries.
- Only use the product when it is in perfect condition and is undamaged. A damaged product can break during use and cause injuries.
■ Always hold the product with only one hand, and only by the handles when installing and changing the inserts (see Fig. B). Keep the other hand away from the product. Crushing injuries may occur around the pliers mechanism.
- Preparation
Explain how to use the wrench 6 (see Fig. A).
- Changing the mandrel
☐ Choose the correct size of mandrel 1.
☐ Loosen the nose piece 2 using the wrench 6. To do this, turn the wrench 6 anticlockwise (see Fig. B).
☐ Loosen the adjusting nut 5 by turning it anticlockwise (see Fig. C).
☐ Loosen the socket 3 using the wrench 6. To do this, turn the wrench 6 anticlockwise (see Fig. D).
☐ Pull the slide sleeve 4 back and hold it in place (see Fig. E).
☐ Loosen the original mandrel 1 using the wrench 6 To do this, turn the wrench 6 anticlockwise (see Fig. F).
☐ Loosen the mandrel by turning it anticlockwise (see Fig. G).
☐ Choose the correct size of mandrel 1.
☐ Screw in a different mandrel 1 in a size of your choice by turning it clockwise (see Fig. H).
☐ Pull the slide sleeve 4 back and hold it in place. Secure the mandrel 1 using the wrench 6. To do this, turn the wrench 6 clockwise (see Fig. I).
Turn the socket 3 clockwise using the wrench 6 (see Fig. J).
Tighten the adjusting nut by turning it clockwise (see Fig. K).
☐ Lock the nose piece 2 using the wrench 6. To do this, turn the wrench 6 clockwise (see Fig. L).
Operation
| Nut size | Applicable material thickness (mm) | Diameter of the hole to be riveted (mm) |
| M5 | 0.5–2.5 7–7.5 (sheet steel) / 8.0 (tubes) | |
| M6 | 0.5–3.0 9–9.5 (sheet steel) / 10.0 (tubes) | |
| M8 | 0.5–3.5 11–11.5 (sheet steel) / 12.0 (tubes) | |
| M10 | 0.5–3.5 13–13.5 (sheet steel) / 14.0 (tubes) | |
| M12 | 0.5–3.5 15–15.5 (sheet steel) / 16.0 (tubes) |
Open the handle and install the rivet nut onto the mandrel 1 (see Fig. M).
After installing, insert the rivet nut into the hole to be riveted (see Fig. N).
☐ Close the handle 8 to drive the nut into place (see Fig. O).
Turn the knob 7 anticlockwise to remove the hand riveter (see Fig. P).
- Troubleshooting
Open the handle 8 (see Fig. Q).
☐ Loosen the nose piece 2 using the wrench 6. To do this, turn the wrench 6 anticlockwise (see Fig. R).
□ Push the slide sleeve 4 back and hold it in place (see Fig. S).
Turn the hand riveter anticlockwise and remove this (see Fig. T).
Place the wrench 6 on the mandrel 1 and turn it anticlockwise to remove the mandrel 1 (see Fig. U).
● Cleaning, maintenance and storage
Store the product in a clean and dry condition.
□ Clean the product dry using a brush.
☐ Use sewing machine oil to keep the moving parts smooth-running.
●Disposal
The packaging is made entirely of recyclable materials, which you may dispose of at local recycling facilities.
Contact your local refuse disposal authority for more details of how to dispose of your worn-out product.
Service
GB Service Great Britain
Tel.: 0800 404 7657
E-Mail: owim@lidl.co.uk
IE Service Ireland
Tel.: 1890 930 034
(0,08 EUR / Min., (peak))
(0,06 EUR / Min., (off peak))
E-Mail: owim@lidl.ie
text_image
Diagram of a robotic device with labeled parts and directional arrows indicating movement or force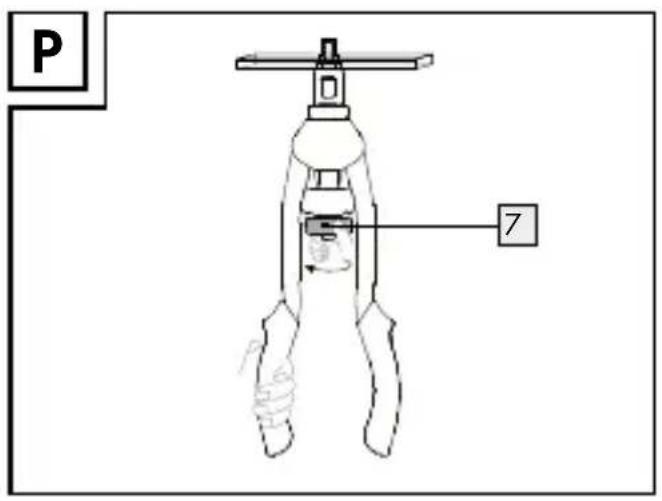
text_image
P 7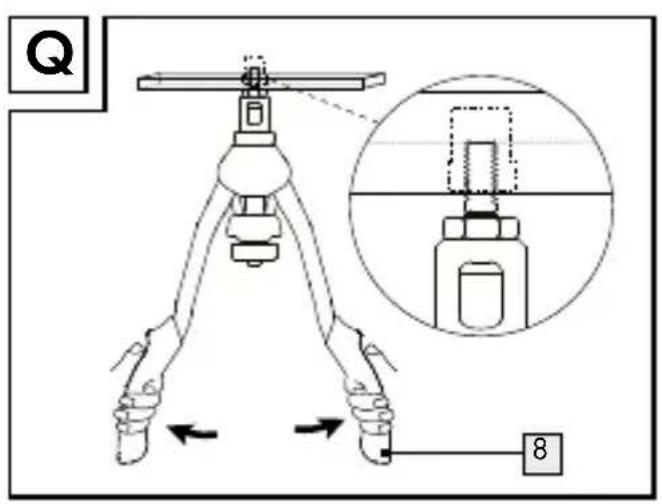
text_image
Q 8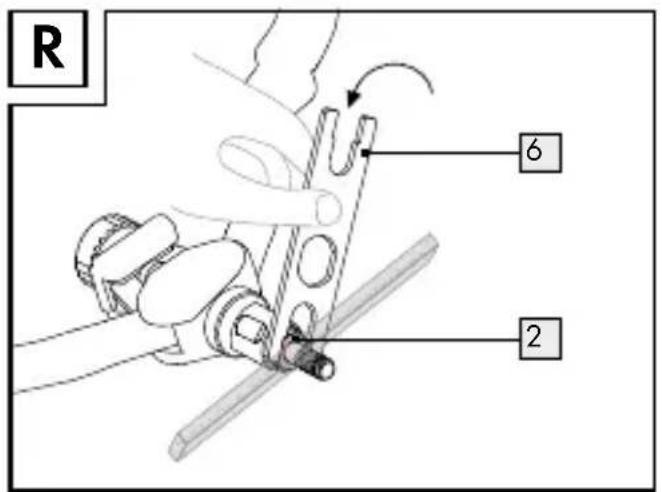
text_image
R 6 2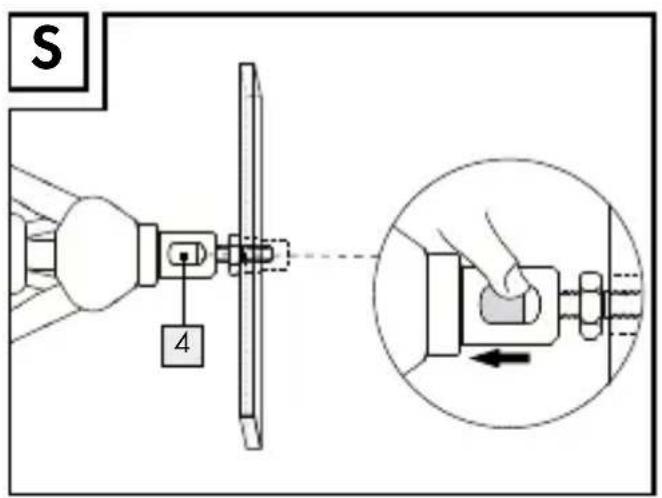
text_image
S 4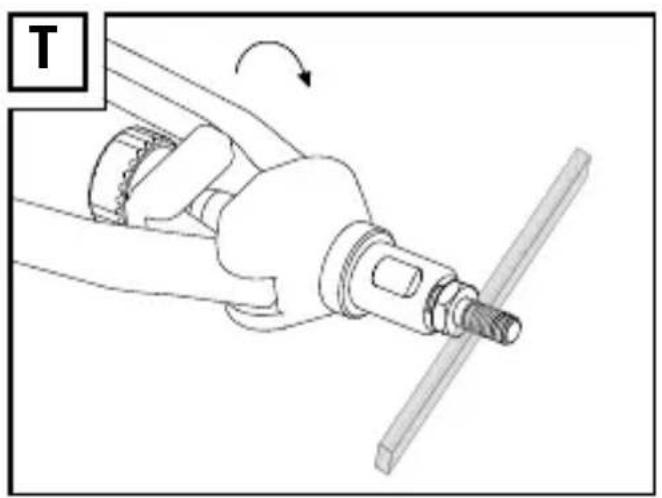
natural_image
Mechanical assembly diagram showing a tool interacting with a shaft, no text or symbols present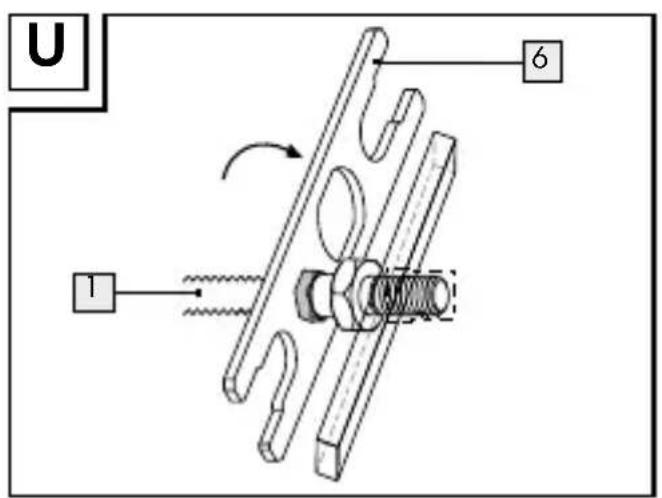
text_image
U 6 1OWIM GmbH & Co. KG
Stiftsbergstraße 1
74167 Neckarsulm
GERMANY
Model no.: HG06145
Version: 05/2020
