
Floodlight Camera - Lamp eufy - Free user manual and instructions
Find the device manual for free Floodlight Camera eufy in PDF.

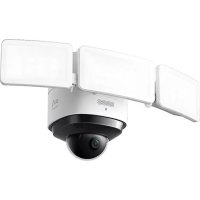
| Product Type | Floodlight Camera |
| Brand | Eufy |
| Model | T8420 |
| Power Supply | AC Mains (100-240 V, 50/60 Hz) |
| Operating Temperature | -20 °C to 50 °C |
| Connectivity | Wi-Fi 2.4 GHz |
| Motion Detection | Yes |
| Night Vision | Yes |
| LED Lighting | Yes, built-in |
| Installation | Wall mount with junction box |
| Package Contents | Floodlight Camera, junction box, installation hook, screws |
| Certifications | FCC (2AOKB-T8420X), IC (23451-T8420X) |
| RF Safety Distance | Keep a distance of 20 cm from the body |
| Maintenance and Cleaning | Clean with a dry, non-abrasive cloth |
| Spare Parts and Repairability | No detachable parts, repair by a certified electrician |
Frequently Asked Questions - Floodlight Camera eufy
User questions about Floodlight Camera eufy
0 question about this device. Answer the ones you know or ask your own.
Ask a new question about this device
Download the instructions for your Lamp in PDF format for free! Find your manual Floodlight Camera - eufy and take your electronic device back in hand. On this page are published all the documents necessary for the use of your device. Floodlight Camera by eufy.
USER MANUAL Floodlight Camera eufy
Anker Innovations Limited. All rights reserved. Eufy Security and Eufy Security Logo are trademarks of Anker Innovations Limited, registered in the United States and other countries. All other trademarks are the property of their respective owners.
51005002595 V01

Quick Start Guide
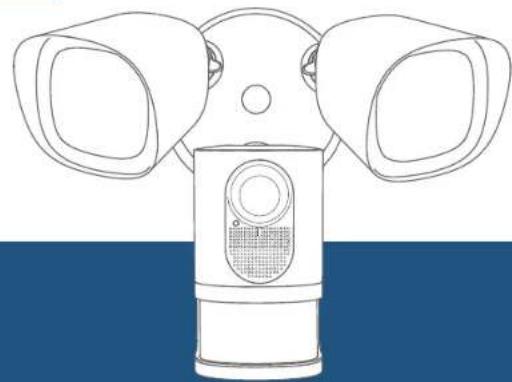
Floodlight Camera
Table of Contents
Safety Instructions 01
What's in the Box 01
Getting Started 02
Installing the Junction Box 04
Mounting Floodlight Camera 07
Adjusting Floodlight Camera 09
Restoring Power 10
Using the Floodlight Camera on the Eufy Security App 10
NOTICE 12
Safety Instructions
- Shut off power at the fuse or circuit breaker before installing.
2 Do not install the device near flammable surfaces. - Must have a licensed electrician install the Floodlight Camera.
- Do not use the device in environments where the temperature is too high or too low, avoid exposing the device to direct sunshine or very wet environments.
- The suitable temperature for the product and accessories is -20^ to 50^ .
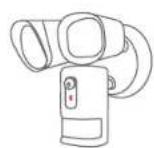
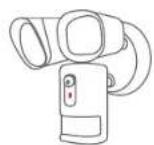
What's in the Box
Floodlight Camera (T8420X)
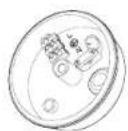
Junction Box

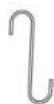
Installation Hook

Central Screw

Central Screw Cap Plate Screws

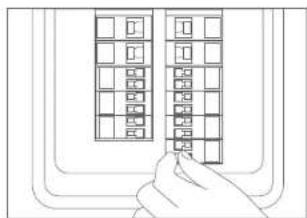
Getting Started
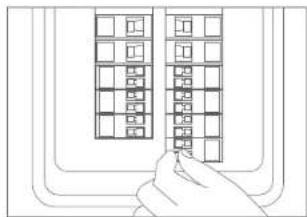
I. Shut the power off at the breaker in your house. Switch on/off the lights to make sure the electricity in your house is properly shut off.
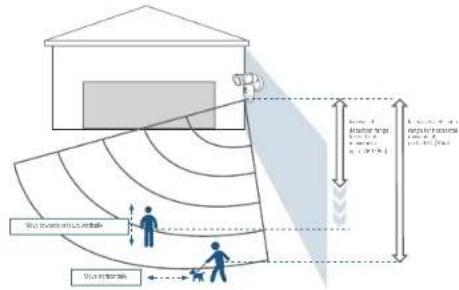
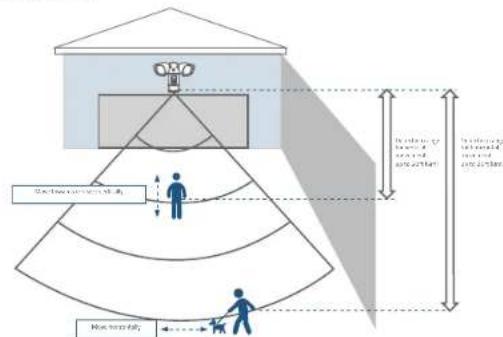
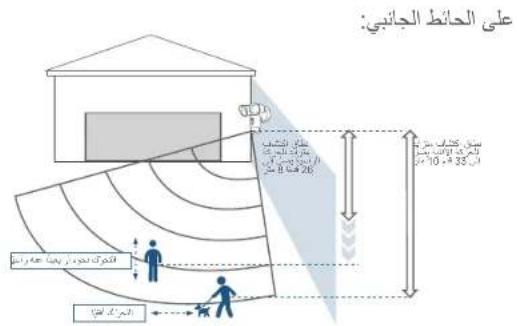
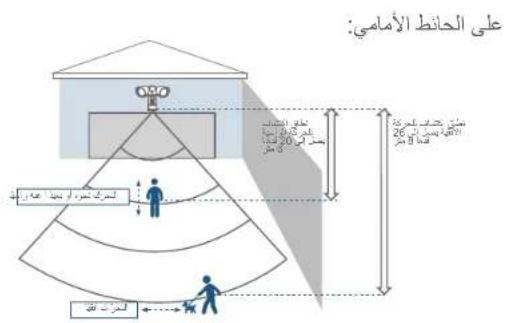
- Determine the area you want to be lit and camera coverage is required. Install your Floodlight Camera on the front wall or on a side wall of your house. To get optimal detection and light coverage for the floodlight and camera, install it on a side wall if possible.
The motion sensor is more sensitive to movements across the camera field of view than movements towards or away from the sensor. We highly recommend you install the floodlight camera on the side wall.
01 ENEN
02
On the side wall:
On the front wall:
03 ENEN
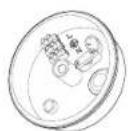
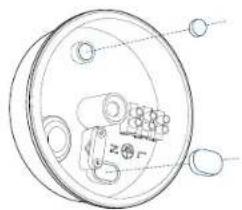
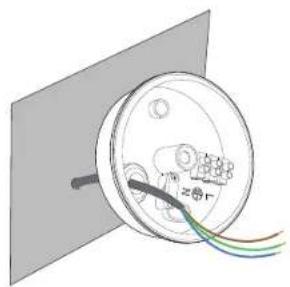
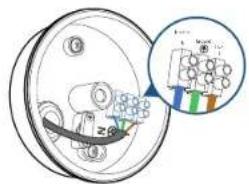
Installing the Junction Box
- Remove the rubber plugs indicated in the illustration below.
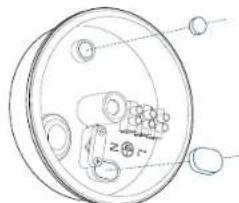
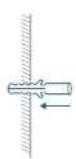
2 Run the existing wire through the hole.

If you don't have existing wires outdoors, contact a licensed electrician to run the wires.
-
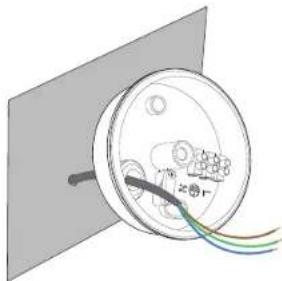
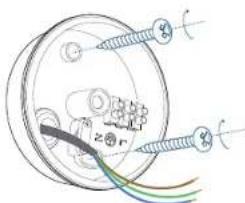
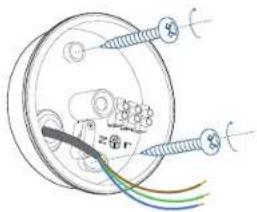
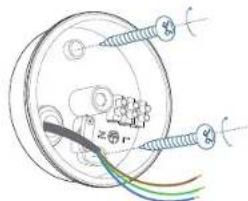
Install the junction box:
-
Orientate the two mounting holes vertically to ensure stable mounting.
- On wooden walls, DO NOT pre-drill holes. Use the screws provided to fix the junction box onto the wall.
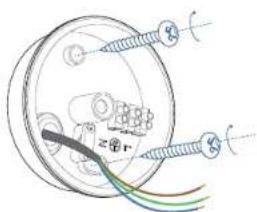
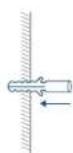
- On walls that are made out of hard materials, such as stucco, brick, or concrete, drill holes with a 15/64 inch (6 mm) drill bit, and then insert the anchors provided into the holes. Use the screws provided to fix the junction box on the wall.
0
2
05 ENEN
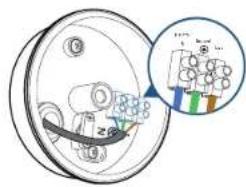
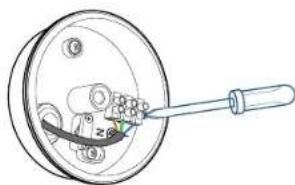
- Unscrew the bolt with a flat-head screwdriver. Connect the Neutral (blue) / Ground (green / green and yellow) / Live (brown) wire to the Neutral / Ground / Live wire connector in the junction box respectively. Secure the wires tightly to prevent wires from falling.
0
2
06
Mounting Floodlight Camera
Hang Floodlight Camera
Hang Floodlight Camera on the junction box with the hook provided.
07 ENEN
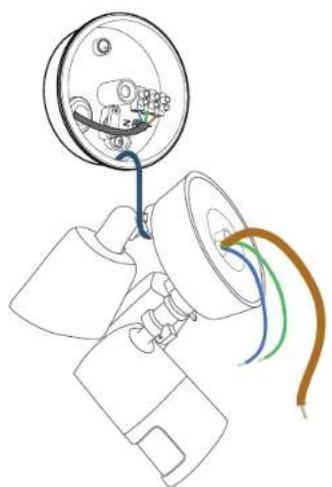
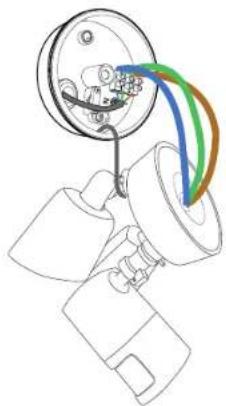
Connect Wires
I. Connect Ground wire from the Floodlight Camera to the Ground wire from the wire connector in the junction box.
2. Connect the Live / Neutral wire from the Floodlight Camera to the Live / Neutral wire from the wire connector in the junction box respectively.

- Secure the wires with a flat-head screwdriver.

Green / green and yellow, brown and blue wires must connect to the matching colors. Never cross connect.
08
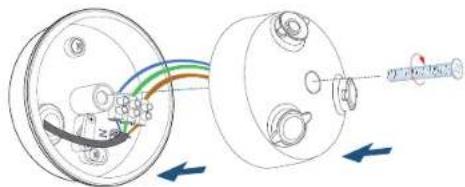
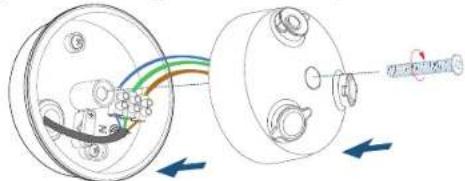
Mount Floodlight Camera On the Junction Box
- Align the hole on the junction box with the opening in the Floodlight Camera.
- Screw the central screw through the center of Floodlight Camera to mount it in position.
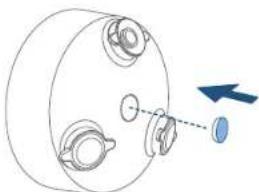
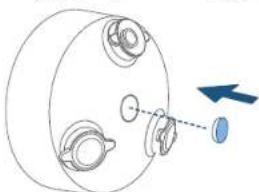
- Cover the central screw with the central screw cap to prevent it from rusting.
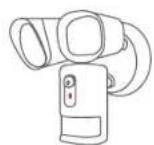
Adjusting Floodlight Camera
- After installation is complete, loosen the adjustment screws on the camera and floodlight to adjust the camera and light position to the desired angles.
2 Tighten the screws firmly to complete the installation.
09 ENEN
Restoring Power
Switch on the main circuit breaker in the house. To confirm whether the Floodlight Camera is operating, check the LED indicator. If it is flashing red, it is ready for Eufy Security App setup.

If Floodlight Camera is not powered on, switch off the circuit breaker before checking the wiring of Floodlight Camera.
Using the Floodlight Camera on the Eufy Security App
I. Download the Eufy Security app from the App Store (iOS devices) or Google Play (Android devices).


- Sign up for a Eufy Security account. Follow the onscreen instructions to connect Floodlight Camera to your Wi-Fi network. Now you can check live stream in the Eufy Security App.

The Floodlight Camera can be used only after your phone and the Floodlight Camera are connected to the same wireless network.
For troubleshooting, check the Help section in the Eufy Security app.
Refer to the app for information on the various LED status indications.
NOTICE
FCC Statement
This device complies with Part 15 of the FCC Rules. Operation is subject to the following two conditions: (1) this device may not cause harmful interference, and (2) this device must accept any interference received, including interference that may cause undesired operation.
Warning: Changes or modifications not expressly approved by the party responsible for compliance could void the user's authority to operate the equipment.
Note: This equipment has been tested and found to comply with the limits for a Class B digital device, pursuant to Part 15 of the FCC Rules. These limits are designed to provide reasonable protection against harmful interference in a residential installation.
This equipment generates uses and can radiate radio frequency energy and, if not installed and used in accordance with the instructions, may cause harmful interference to radio communications. However, there is no guarantee that interference will not occur in a particular installation. If this equipment does cause harmful interference to radio or television reception, which can be determined by turning the equipment off and on, the user is encouraged to try to correct the interference by one or more of the following measures: (1) Reorient or relocate the receiving antenna. (2) Increase the separation between the equipment and receiver. (3) Connect the equipment into an outlet on a circuit different from that to which the receiver is connected. (4) Consult the dealer or an experienced radio/ TV technician for help.
FCC Radio Frequency Exposure Statement
The device has been evaluated to meet general RF exposure requirements. The device can be used in fixed/mobile exposure condition. The min separation distance is 20cm
Notice: Shielded cables
All connections to other computing devices must be made using shielded cables to maintain compliance with FCC regulations.
The following importer is the responsible party:
Company Name: POWER MOBILE LIFE, LLC
Address: 400 108th Ave NE Ste 400, Bellevue, WA 98004-5541
Telephone:1-800-988-7973
This product complies with the radio interference requirements of the European Community.
Declaration of Conformity
Hereby, Anker Innovations Limited declares that this device is in compliance with the essential requirements and other relevant provisions of Directive 2014/53/EU. For the declaration of conformity, visit www.eufylife.com
Do not use the Device in the environment at too high or too low temperature, never expose the Device under strong sunshine or too wet environment.
The suitable temperature for the product and accessories is -20^ - 50^
RF exposure information: The Maximum Permissible Exposure (MPE) level has been calculated based on a distance of d = 20cm between the device and the human body. To maintain compliance with RF exposure requirement, use product that maintain a 20cm distance between the device and the human body.
Wi-Fi Operating Frequency Range:2412~2472MHz for EU;
Wif Max Output Power:18.98dBm(ERIP)
Bluetooth Operating Frequency Range:2402~2480 MHz; Bluetooth Max Output Power:8 dBm(EIRP)
Anker Technology (UK) Ltd | Suite B, Fairgate House, 205 Kings Road, Tyseley, Birmingham, B1 2AA, United Kingdom
This product is designed and manufactured with high quality materials and components, which can be recycled and reused.
This symbol means the product must not be discarded as household waste, and should be delivered to an appropriate collection facility for
recycling. Proper disposal and recycling helps protect natural resources, human health and the environment. For more information on disposal and recycling of this product, contact your local municipality, disposal service, or
13 ENEN
the shop where you bought this product.
IC Statement
This device complies with Industry Canada licence-exempt RSS standard(s).
Operation is subject to the following two conditions:
(1) this device may not cause interference, and
(2) this device must accept any interference, including interference that may cause undesired
operation of the device."
This Class B digital apparatus complies with Canadian ICES-003.
When using the product, maintain a distance of 20cm from the body to ensure compliance with RF exposure requirements.
Anker Innovations Limited
Room 1318-19, Hollywood Plaza, 610 Nathan Road, Mongkok, Kowloon, Hong Kong
Inhaltsverzeichnis
Download on the App Store

GET ON Google Play
Download on the App Store

GETON Google Play
49 FR FR
Telecamera a faro (T8420X)
Download on the App Store

GET ON Google Play
Download on the App Store

GETITON Google Play
73 NLNL
Download on the App Store

GET ON Google Play
85 PTPT
Jaiyai jaiyai jaiyai jaiyai
Floodlight 1
y12 12345678901234567890123456789012345678901234567890
aaiia aaii gaiyaiyaiyaiyaiyaiyaiyaiyaiyaiyaiyaiyaiyaiyaiyaiyaiyaiyaiyaiyaiyaiyaiyaiyaiyaiyaiyaiyaiyaiyaiyaiyaiyaiyaiyaiyaiyaiyaiyaiyaiyai
20 20 20
50
S木弟形 COBD = S COD + S_ BDO
Floodlight (T8420X)
Jusshj
i#

jiesjies

jss janns lddh jll y

1
Jaiy Jaiy jaiy aall jia o y sll abla ic aoalb alc
j 1
aaii aiee iiaai 1 1 1 1 1 1 1 1 1 1 1 1 1 1 1 1 1 1 1 1 1 1 1 1 1 1
- | g + u| = 1,g + u| g + u| = 1
a 1
89 AR
Jusgill gaiu Cuiy
Juslll 1
AR 90
:
Jauu cuii jiaial i jao juaai lii jiu yj
aai jai yalwai piil wai jiaai lge la u wai jayai y
baillly Jua gill jyua
y 15/64 y 15/64
0
2
aanaa aai jia 1
1(3j)all
()
gill gill 1
1
0

2
Floodlight 1.2015
Floodlight 1
Floodlight 1

Floodlight 1
Jssss
Floodlight /
aannn nnnn nn nnnn nnnn nnnn nnnn nnnn nnnn

i 1
93 AR
AR 94
Floodlight 1. Floodlight
aall jaoai jssyjall jauail oaiy jssyjall jauail ayiay
Floodlight 电
olg 1 yolSll gie o gai Iyolal yolua sia a cuiill Jaoi
Aeg yall yglle e gial yolsl iogai bai
95 AR
S OBC = S COD + S_ BOC
J 15111111111111111111111111111111111111111

Floodlight 155
Eufy Security Floodlight
J (Android) Google Play (iOS)


eefy Security Jusu Wi-Fi Floodlight Jusu Fosit eufy Security

Floodlight 155 Floodlight 155
AR 96
Eufy Security
LED jJzj 11111111111111111111
Customer Service
Kundenservice | Servicio de atencion al cliente Service client
12-month limited warranty
United States +1 (800) 988 7973 Mon-Fri 9AM-5PM (PT)
United Kingdom +44 (0) 1604 936 200 Mon-Fri 6AM-11AM (GMT)
Germany +49 (0) 69 9579 7960 Mo-Fr 6:00-11:00
- Email Us
Customer Support: support@eufylife.com
Anker Innovations Limited
Room 1318-19, Hollywood Plaza, 610 Nathan Road, Mongkok,
Kowloon, Hong Kong

@LufyOfficial @LufyOfficial @LufyOfficial

99 AR
- Quick Start Guide
- Table of Contents
- Safety Instructions
- What's in the Box
- Getting Started
- Installing the Junction Box
- Mounting Floodlight Camera
- Hang Floodlight Camera
- Connect Wires
- Mount Floodlight Camera On the Junction Box
- Adjusting Floodlight Camera
- Restoring Power
- Using the Floodlight Camera on the Eufy Security App
- NOTICE
- FCC Statement
- FCC Radio Frequency Exposure Statement
- Declaration of Conformity
- IC Statement
- Inhaltsverzeichnis
- 1
- Customer Service
- - Email Us
Brand : eufy
Model : Floodlight Camera
Category : Lamp