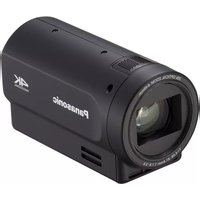
VDRD310EP - Camcorder PANASONIC - Free user manual and instructions
Find the device manual for free VDRD310EP PANASONIC in PDF.

User questions about VDRD310EP PANASONIC
0 question about this device. Answer the ones you know or ask your own.
Ask a new question about this device
Download the instructions for your Camcorder in PDF format for free! Find your manual VDRD310EP - PANASONIC and take your electronic device back in hand. On this page are published all the documents necessary for the use of your device. VDRD310EP by PANASONIC.
USER MANUAL VDRD310EP PANASONIC
Operating Instructions
Instrukcja obslugi
Návod k použití
Kezelésiutasítás
For PC Connection
Before use, please read these instructions completely.
End User License Agreement
Before opening the CD-ROM package, please read the following.
You ("Licensee") are granted a license for the Software defined in this End User Software Agreement ("Agreement") on condition that you agree to the terms and conditions of this Agreement. If Licensee does not agree to the terms and conditions of this Agreement, promptly return the Software to Matsushita Electric Industrial Co., Ltd. ("Matsushita"), its distributors or dealers from which you made the purchase.
Article 1 License
Licensee is granted the right to use the software, including the information recorded or described on the CD-ROM, instruction manuals, and any other media provided to Licensee (collectively "Software"), but all applicable rights to patents, copyrights, trademarks and trade secrets in the Software are not transferred to Licensee.
Article 2 Use by a Third Party
Licensee may not use, copy, modify, transfer or allow any third party, whether free of charge or not, to use, copy or modify the Software, except as expressly provided for in this Agreement.
Article 3 Restrictions on Copying the Software Licensee may make a single copy of the Software in whole or in part solely for back-up purposes.
Article 4 Computer
Licensee may only use the Software on a single computer at a single location.
Article 5 Reverse Engineering, Decomposing or Disassembly
Licensee may not reverse engineer, decompile, or disassemble the Software, except to the extent either of them is permitted under law or regulation of the country where Licensee resides. Matsushita, or its distributors or dealers will not be responsible for any defects in the Software or damage to Licensee caused by Licensee's
reverse engineering, decompiling, or disassembly of the Software.
Article 6 Limitation of Liability
The Software is provided "AS-IS" without warranty of any kind, either expressed or implied, including, but not limited to, warranties of non-infringement, merchantability and/or fitness for a particular purpose. Further, Matsushita does not warrant that the operation of the Software will be uninterrupted or error free. Matsushita or any of its distributors or dealers will not be liable for any damage suffered by Licensee arising from or in connection with Licensee's use of the Software.
Article 7 Export Control
Licensee agrees not to export or re-export to any country the Software in any form without the appropriate export licenses under regulations of the country where Licensee resides, if necessary.
Article 8 Termination of License
The right granted to Licensee hereunder will be automatically terminated if Licensee violates any of the terms and conditions of this Agreement. Upon such automatic termination, Licensee must destroy the Software and related documentation together with all the copies thereof at Licensee's own expense.
Contents
End User License Agreement 2
Before using
Before using with a computer. 4
What you can do with a computer 4
Contents on provided CD-ROM 5
Operating environment. 7
Installation/Connection
Installation 10
Installing DVD-RAM Driver 10
Installing DVD-MovieAlbumSE 11
Installing DVDfunSTUDIO 12
Starting the applications 13
Reading the operating instructions of the software applications 13
Software application uninstallation 14
Connection and recognition 14
Connection and recognition procedures...14
About the computer display. 15
To disconnect USB cable safely 16
Verifying the unit is correctly recognized by the computer. 16
Creating a DVD-Video
Creating a DVD-Video disc on a
computer 18
Creating a DVD-Video
on a computer from a DVD-RAM
or DVD-RW (VR format) 18
Others
Frequently asked questions. 21
Troubleshooting 22
Before using
Before using with a computer
You can export motion pictures recorded on this unit to a computer with the software on the supplied CD-ROM and create original DVD-Video discs.
What you can do with a computer
When using a DVD-RAM or DVD-RW (VR format) recorded on this unit
- Before using DVD-RW (VR format) on a computer, be sure to finalize it on this unit.
| Can do | Software used |
| Playing back on a computer | DVD-MovieAlbumSE (supplied) |
| Copying a disc | VR disc copy tool (supplied) |
| Creating a DVD-Video disc | DVD-MovieAlbumSE (supplied) and DVDfunSTUDIO (supplied) |
When using a DVD-RW (Video format) or DVD-R recorded on this unit
- Before using the disc on a computer, be sure to finalize it on this unit.
| Can do | Software used |
| Playing back on a computer | Commercially available DVD-Video playback software |
| Copying a disc | DVDfunSTUDIO (supplied) |
When using an SD card recorded on this unit
| Can do | Software used |
| Playing back on a computer | Standard Windows picture viewer or a commercially available picture viewer |
| Copying files to a computer | Windows Explorer |
- Always use the AC adaptor when connecting the unit to the computer. You cannot connect to the computer when using a battery.
- We cannot guarantee proper operation of this unit if you use software other than that supplied.
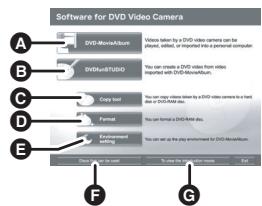
Contents on provided CD-ROM
The following software applications are contained on the provided CD-ROM.
DVD-RAM Driver
This is necessary to configure the unit as a drive on a computer.
DVD-MovieAlbum
DVD-MovieAlbumSE:
This software is for playing back VR format motion pictures.
By using DVD-MovieAlbumSE with this unit, it is possible to perform playback of the DVD-RAM or DVD-RW (VR format). It is also possible to transfer exported data to DVDfunSTUDIO.
It is possible to edit the motion pictures on a DVD-RAM if you have a separate DVD-RAM drive.
Playing back DVD-RAM and DVD-RW (VR format).
A Playback area
Thumbsails
Disc contents are shown.
VR disc copy tool:
This is used when creating a copy of a VR format disc.
Copy the data to the hard disk of the computer and then write it to another DVD-RAM.
- A separate DVD-RAM drive is required to create another DVD-RAM disc.
Before using
DVDfunSTUDIO
This software is for creating a DVD-Video disc.
Use this software when burning a DVD-Video disc from motion pictures exported using
DVD-MovieAlbumSE. For details, refer to page 18.
- To create a DVD-Video disc, a separate DVD-RW/DVD-R/ +RW / +R drive is required.
1 Export the images from a DVD-RAM or DVD-RW (VR format) with DVD-MovieAlbumSE.
A File Export
2 Create a DVD menu with DVDfunSTUDIO, then write the data to a new disc.
B DVD menus created
Arrange the motion pictures exported from DVD-MovieAlbumSE in the DVD menu and edit the menu design.
Burning button
The contents start being written to disc.
3 A DVD-Video disc is created.
Playback is possible on a DVD player.
Creating a copy of a DVD-RW (Video format) or a DVD-R:
If you use the [Burn from an image] function in DVDfunSTUDIO, you can create a new disc from the data copied to the computer with Windows Explorer.
Refer to the operating instructions of DVDfunSTUDIO for details.
- If your DVD player does not support DVD-R DL, playback is possible on it by copying the DVD-R DL contents recorded on this unit to a DVD-RW or a DVD-R.
- To create a copied disc, a separate DVD-RW/DVD-R+/RW/+R drive is required.
Acrobat Reader
To view the installed operating instructions, Adobe Acrobat Reader 5.0 or later is required.
If the Adobe Acrobat Reader is not already installed on your computer, you can install it from the CD-
ROM. Click the desired language in [Setup Menu], and follow the on-screen messages to install.
Operating environment
- A CD-ROM drive is necessary to install the supplied software applications.
- When 2 or more USB devices are connected to a computer, or when devices are connected through USB hubs or by using extension cables, proper operation is not guaranteed.
- Use the supplied USB cable when connecting to the computer. (Operation is not guaranteed with any other USB cables.)
DVD-RAM Driver
| Personal computer | IBM PC/AT compatible personal computer |
| OS | Microsoft Windows 2000 Professional Microsoft Windows XP Home Edition Microsoft Windows XP Professional |
| CPU | Intel Pentium III 450 MHz or higher |
- The driver operates as Read Only.
DVD-MovieAlbumSE 4.3
| Personal computer | IBM PC/AT compatible personal computer |
| OS | Microsoft Windows 2000 Professional Microsoft Windows XP Home Edition Microsoft Windows XP Professional |
| CPU | Intel Pentium III 800 MHz or higher (Intel Pentium 4 1.3 GHz or higher recommended) |
| RAM | 256 MB or more (512 MB or more recommended) |
| Display | Medium (16 bit)/High Colour (16 bit) or more Desktop resolution of 800×600 pixels or more (Graphics card complying with DirectX 9.0c, and DirectX over lay) 32 MB video memory or more |
| Free hard disk space | 200 MB or more |
| Sound | Windows compatible sound device (DirectSound Support) |
| Interface | Hi-Speed USB (USB 2.0) — A type |
| Necessary software | DirectX 9.0c Acrobat Reader 5.0 or later |
- Even if the system requirements mentioned in these operating instructions are fulfilled, some computers cannot be used.
- This software cannot be used on a Macintosh OS.
- DirectX 9.0c will be installed automatically during installation of the supplied software.
Operation on an OS other than the one pre-installed is not guaranteed. - Operation on Microsoft Windows XP Media Center Edition, Tablet PC Edition and 64-bit operating system is not guaranteed.
- Depending upon the environment of your computer, if it does not support Hi-Speed USB (USB 2.0), for example, frame dropout may occur, the audio may be intermittent, or the software may run slowly when you play back recorded images. DVD-RAM and DVD-RW (VR format) can be used if you insert them in the computer's internal DVD-RAM/DVD-RW (VR format) compatible drive.
Before using
DVDfunSTUDIO 2.5
| Personal computer | IBM PC/AT compatible personal computer |
| OS | Microsoft Windows 2000 Professional Service Pack 4 Microsoft Windows XP Home Edition Service Pack 2 Microsoft Windows XP Professional Service Pack 2 |
| CPU | Intel Pentium III 800 MHz or higher (Intel Pentium 4 1.3 GHz or higher recommended) |
| RAM | 256 MB or more (512 MB or more recommended) |
| Display | Medium (16 bit)/High Colour (16 bit) or more Desktop resolution of 1024×768 pixels or more (Graphics card complying with DirectX 9.0c, and DirectX over lay) 32 MB video memory or more |
| Free hard disk space | 200 MB or more • When writing to a disc, the same amount of free space as the disc is necessary. |
| Sound | Windows compatible sound device (DirectSound Support) |
| Interface | Hi-Speed USB (USB 2.0) — A type |
| Necessary software | DirectX 9.0c Acrobat Reader 5.0 or later |
- To create a DVD-Video disc, a separate DVD-RW/DVD-R/ + RW/ + R drive is required.
- Even if the system requirements mentioned in these operating instructions are fulfilled, some computers cannot be used.
- This software cannot be used on a Macintosh OS.
- DirectX 9.0c will be installed automatically during installation of the supplied software.
Operation on an OS other than the one pre-installed is not guaranteed. - Input is not supported in languages other than English, German, French, Italian, Spanish and Simplified Chinese.
Operation cannot be guaranteed on all DVD drives.
DVD discs authored with this software are not guaranteed to play in all DVD players.
Operation on Microsoft Windows XP Media Center Edition and Tablet PC Edition is not guaranteed. - This software is not compatible with Microsoft Windows 3.1, Windows 95, Windows 98/98SE, Windows Me, Windows NT and 64-bit operating system.
- If your computer does not satisfy the above system requirements, an error may occur when writing data to disc.
- Set the display resolution to 1024 × 768 (16 bits colour) or higher. Select [start] ([Settings] ) [Control Panel] ([Appearance and Themes] ) [Display] and select [Settings] tab, and then adjust [Screen resolution] and [Color quality].
Before using
Using Built-in SD Drive
| Personal computer | IBM PC/AT compatible personal computer |
| OS | Microsoft Windows 2000 Professional Microsoft Windows XP Home Edition Microsoft Windows XP Professional |
| CPU | Intel Pentium II 300 MHz or higher |
| RAM | 32 MB or more (64 MB or more recommended) |
| Interface | USB 1.1 or later — A type |
-
The USB equipment operates with the driver installed as standard in the OS.
-
Microsoft®Windows®and DirectX®are either registered trademarks or trademarks of the Microsoft Corporation in the United States and/or other countries.
- IBM and PC/AT are registered trademarks of International Business Machines Corporation of the U.S.
- Intel® and Pentium® are the registered trademarks or trademarks of the Intel Corporation in the United States and other countries
- Microsoft product screen shot(s) reprinted with permission from Microsoft Corporation.
- Other names of systems and products mentioned in these instructions are usually the registered trademarks or trademarks of the manufacturers who developed the system or product concerned.
Installation/Connection
Installation
When installing the software, log on to your computer as the Administrator or with a user name with equivalent authorization. (If you do not have authorization to do this, consult your manager.)
Do not connect the USB cable before installing the DVD-RAM Driver. If the DVD-RAM Driver is installed after connecting this unit and the computer with the USB cable, this unit may not be correctly recognized by the computer. (The DVD-RAM Driver has a driver for USB connection.)
- Before starting the installation, close any other software applications which are running.
- Do not perform any other operations on your computer while the software is being installed.
- If another DVD-RAM Driver is already installed in your computer, check this DVD-RAM Driver. If packet writing software which supports DVD-RAM discs is installed, it is necessary to uninstall it and then install the provided DVD-RAM Driver.
- Install DVD-RAM Driver and then install DVD-MovieAlbumSE or DVDfunSTUDIO.
Installing DVD-RAM Driver
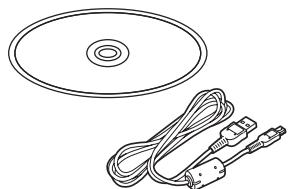
1 Insert the CD-ROM into the computer.
The introduction movie starts. Click [To continue the installation] at the end of the introduction movie and then the [Setup Menu] screen will appear.
- If the introduction movie screen does not appear, double-click the CD-ROM drive icon in [My Computer].
2 Click [DVD-RAM Driver].
![PANASONIC VDRD310EP - Click [DVD-RAM Driver]. - 1](/content/2019/09/53942/images/9030b2bc83884063c4910e1278ef01b4b67cf6b191270a041dc04bb993ccd8b4.jpg)
- The software application may not run properly if you cancel the installation at any point e.g. by pressing [Cancel].
3 Click [Driver and Formatter Setup].
![PANASONIC VDRD310EP - Click [Driver and Formatter Setup]. - 1](/content/2019/09/53942/images/0b47b2d8d91e68025fdc98e0aebf7c4312efadec54b4f1259d08ca4afc31d531.jpg)
- If an [Information] or [Question] message appears, continue following the on-screen messages for installation.
4 Click [Next].
![PANASONIC VDRD310EP - Click [Next]. - 1](/content/2019/09/53942/images/43ef2b317db718b8edee46c6d4fb2ea188304b795e4acb560af1820e12c91222.jpg)
5 Read carefully through the End User License Agreement ( 2) , then click [Yes].
![PANASONIC VDRD310EP - Read carefully through the End User License Agreement ( 2) , then click [Yes]. - 1](/content/2019/09/53942/images/893ca33ba3cce5963cf37cb0f3cafa918c2645a9debebca9d7c5c21fb4843fb7.jpg)
- You cannot install the application if you click [No].
Installation/Connection
6 Click [Next].
![PANASONIC VDRD310EP - Click [Next]. - 1](/content/2019/09/53942/images/e16ecce45574f67da0f24d29410aae31cadd826f470f4c86811b43981acdabea.jpg)
Continue to follow the on-screen messages to install it.
7 When installation is complete, some notes will appear: Check the contents, then click [× ] at the top right of window.
![PANASONIC VDRD310EP - Click [Next]. - 2](/content/2019/09/53942/images/84d1ff5651c7802f9982fab9c13023e4b400fbbf517fe7f82e4e5bb60498b2fb.jpg)
8 Click [Finish].
![PANASONIC VDRD310EP - Click [Finish]. - 1](/content/2019/09/53942/images/be655c507d15e9ed99d47517fc0c6b49964ab06fe56be7fcdfc53af5c985bbe8.jpg)
Windows 2000 only:
The detection of device will start, after which it will take several minutes for the computer to detect the device. When detecting the device is complete, a message that prompts you to reboot will appear: Click [Yes].
The computer must be rebooted for the driver to work.
If any trouble has occurred while installing DVD-RAM Driver:
When [Block] is selected in the [Driver Signing Options] in the [System Properties], the installation procedure will not complete. Select [Warn] and try again.
To check and change the setting, select [start] ([Settings] ) [Control Panel] (Performance and Maintenance] ) [System] and select [Driver Signing] of the [Hardware] tab.
About the [RAMASST] support tool:
[RAMASST] is a support tool for Windows XP that disables the drive's CD writing function so that data can be written from a computer to a DVD-RAM.
When you install the DVD-RAM Driver, [RAMASST] is automatically installed and displayed in [Startup].
Installing DVD-MovieAlbumSE
1 Insert the CD-ROM into the computer.
The introduction movie starts. Click [To continue the installation] at the end of the introduction movie and then the [Setup Menu] screen will appear.
- If the introduction movie screen does not appear, double-click the CD-ROM drive icon in [My Computer].
2 Click [DVD-MovieAlbumSE 4.3].
![PANASONIC VDRD310EP - Click [DVD-MovieAlbumSE 4.3]. - 1](/content/2019/09/53942/images/05fa956b1f5dda5daba8d087aa753b0db397452c450190b1fff303f861944eda.jpg)
- The software application may not run properly if you cancel the installation at any point e.g. by pressing [Cancel].
- Depending on the operating environment, you may be required to install DirectX 9.0c. If so, click [Yes], and install it. If you install the software in a computer that is not compatible with DirectX 9.0c, the computer may not work properly. If you are unsure whether or not your computer is compatible, contact the maker of your computer.
Installation/Connection
3 Click [Next].
![PANASONIC VDRD310EP - Click [Next]. - 1](/content/2019/09/53942/images/259c33d65f2d586779a2fb9007ea124bcc2b8611f4d0bd693053a39fd9076789.jpg)
4 Select [PAL (Europe)] for the TV system, click [Next].
![PANASONIC VDRD310EP - Select [PAL (Europe)] for the TV system, click [Next]. - 1](/content/2019/09/53942/images/53865082e756bb01b28a7eccc80b8758a2dfd9e1b7d84781dd1f1c0f4e1299e7.jpg)
Continue to follow the on-screen messages to install it.
5 Click [Finish].
![PANASONIC VDRD310EP - Click [Finish]. - 1](/content/2019/09/53942/images/77ce01c73b63b3b276bdb8ee1e8f4e0b59dd66b98afeb77b8db1be138bcae4cd.jpg)
The computer must be rebooted for the application to work.
Installing DVDfunSTUDIO
1 Insert the CD-ROM into the computer.
The introduction movie starts. Click [To continue the installation] at the end of the introduction movie and then the [Setup Menu] screen will appear.
- If the introduction movie screen does not appear, double-click the CD-ROM drive icon in [My Computer].
2 Click [DVDfunSTUDIO 2.5].
![PANASONIC VDRD310EP - Click [DVDfunSTUDIO 2.5]. - 1](/content/2019/09/53942/images/60f9438c2513deaa28dc2faf06d59d7c87613cafe9c30d333e615437ea2f1b12.jpg)
- The software application may not run properly if you cancel the installation at any point e.g. by pressing [Cancel].
Depending on the operating environment, you may be required to install DirectX 9.0c. If so, click [Yes], and install it. If you install the software in a computer that is not compatible with DirectX 9.0c, the computer may not work properly. If you are unsure whether or not your computer is compatible, contact the maker of your computer.
3 Click [Next].
![PANASONIC VDRD310EP - Click [Next]. - 1](/content/2019/09/53942/images/f8729a7c39e985256cb619132a835ff7d7d7b7c10ed4a8193be9c0bad802eaec.jpg)
4 Select [PAL (Europe)] for the TV system, click [Next].
![PANASONIC VDRD310EP - Select [PAL (Europe)] for the TV system, click [Next]. - 1](/content/2019/09/53942/images/fef82e4be3708a3fdd78487c8c301f0655e31e9b74256e74820182af63625b7d.jpg)
Continue to follow the on-screen messages to install it.
5 Click [Finish].
![PANASONIC VDRD310EP - Click [Finish]. - 1](/content/2019/09/53942/images/2c5bf07477fe93048efd82e4e10d2b805b14492b1e7b6d50d688a7c7b40c9b38.jpg)
The computer must be rebooted for the application to work.
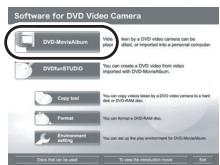
Starting the applications
1 Select [start] [All Programs (Programs)] [Panasonic] [DVD camcorders] [DVD camcorders].
A screen showing a brief explanation of the application is displayed.
2 Click [Close].
![PANASONIC VDRD310EP - Click [Close]. - 1](/content/2019/09/53942/images/b3a4166bc39401e49c47d55314c5c7f4b2a89eaae4bbcc90b60b86086694b9d2.jpg)
3 Click the desired item to start it.
DVD-MovieAlbum starts
3 DVDfunSTUDIO starts
Images recorded on this unit are copied to the hard disk on the computer or another DVD-RAM
DVD-RAM can be initialized
The DVD-MovieAlbum playback environment can be set
F Displays a list of discs that can be used
6 Plays the application introduction movie
Reading the operating instructions of the software applications
For details on how to use the software applications, read the PDF instructions.
- You will need Adobe Acrobat Reader 5.0 or later to read the PDF operating instructions. ( 6)
DVD-RAM Driver
Select [start] [All Programs (Programs)] [DVD-RAM] [DVD-RAM Driver] [Using DVD-RAM disc].

DVD-MovieAlbumSE
Select [start] [All Programs (Programs)] [Panasonic] [DVD-MovieAlbumSE] [Operation Manual].
Installation/Connection
DVDfunSTUDIO
Select [start] [All Programs (Programs)] [Panasonic] [DVDfunSTUDIO] [Operating instructions].
Software application uninstallation
Follow the steps below to uninstall any software applications that you no longer require.
1 Select [start] ([Settings] [Control Panel] [Add or Remove Programs (Applications)].
2 Select the software application to be deleted, then click [Change/ Remove] ([Change or Remove] or [Add/Remove]).

- Proceed with the uninstallation by following the on-screen instructions.
- After uninstalling the software, be sure to reboot the computer.
Connection and recognition
Connection and recognition procedures
After the driver and software applications are installed, the unit must be connected to the computer and be correctly recognized by the computer.
- Connect after installing the driver and software applications.
- If the supplied CD-ROM is inserted in the computer, remove it. (If the [Setup Menu] is running, wait until it finishes, then remove the CD-ROM.)
- If the recognition procedure is not accomplished properly, operation will not be possible after connecting the unit to the computer.
- If the unit fails to operate normally, it may mean that you have not conducted the installation or recognition procedure properly.
- Be sure to finalize DVD-RW (VR format), DVD-RW (Video format) and DVD-R on this unit, before using them on the computer. Un-finalized discs will not be recognized by the computer.
Connect this unit to the AC adaptor.
1 Insert a disc or card with recorded images in the unit, then turn on the unit.
2 Connect this unit and a computer.

USB cable (supplied)
- Insert the plugs as far as they will go. The unit and computer will not operate properly if the plugs are not inserted fully.
- Do not use any other USB cables except the supplied one. (Operation is not guaranteed with any other USB cables.)
The USB function selection screen will appear.
3 Select [PC CONNECT(DISC)] or [PC CONNECT(CARD)] and press the joystick.
This unit is automatically recognized by the computer.
- When the unit is connected to a computer, its power cannot be turned off. In this case, disconnect the USB cable ( 16)
- If the unit is connected to a computer when the USB function is set to [PC CONNECT(DISC)], no image will appear on the LCD monitor or the viewfinder.
- When this unit is connected to a computer, you cannot use this unit's DISC EJECT lever to remove a disc. Use Windows Explorer to right-click the drive icon for this unit and select [Eject].
-
When a computer is accessing a disc or card in this unit, the ACCESS/PC lamp or card access lamp lights. (When a card is being accessed, appears on the LCD monitor.) Do not disconnect the USB cable or AC adaptor while the disc or card is being accessed as it may damage the data.
-
The disc and card cannot be accessed simultaneously.
- It may be necessary to reboot the computer after connecting this unit to it for the first time.
About the computer display
When the unit is connected to a computer, it is recognized as an external drive.
- Depending on the operating environment of the computer, the shape of the drive icon and the drive name (Example: E:) will differ.
When accessing the disc
Windows XP:
Optical disc drive is displayed in [My Computer].

DVD-CAMERA(G)
DVR_CAMERA (G)
Windows 2000:
[Removable Disk] and optical disc drive are displayed in [My Computer].
- When a DVD-RAM or DVD-RW (VR format) is inserted in this unit, it can be accessed from the removable disk drive.

Removable Disk (F:
- When a DVD-RW (Video format) or DVD-R is inserted in this unit, it can be accessed from the optical disc drive.

Example folder structure of a DVD-RAM or DVD-RW (VR format):

DVD CAMERA*

DVD RTAV
- DVD video recording format motion pictures are stored in the [DVD_RTAV] folder.
Installation/Connection
Example folder structure of a DVD-RW (Video format) or DVD-R:

DVD CAMERA*

DVD-Video format motion pictures are stored in the [VIDEO_TS] folder.
* Depending on the maker of the disc and the device used to format it, the name displayed will differ.
Do not move or change the name of the folders and files recorded on this unit by Windows Explorer etc.
When accessing the card
[Removable Disk] is displayed in [My Computer].

Removable Disk (G:)
Example folder structure of an SD card:

Removable Disk

DCIM

100CDPFP

- JPEG format still pictures (IMGA0001.JPG etc.) are stored in the [100CDPFP] folder. These can be opened with picture software that supports JPEG pictures.
- Up to 999 files can be recorded in the [100CDPFP] or other such folder.
- The DPOF setting files are recorded in the [MISC] folder.
- Do not use the computer to delete the SD card's folders. Otherwise, it may no longer be possible for this unit to read the SD card.
- Always use this unit to format SD cards.
- When data not supported by this unit has been recorded on a computer, it will not be recognized by this unit.
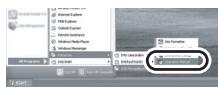
To disconnect USB cable safely
1 Double click the tray.

icon in task
Hardware disconnect dialogue appears.
Depending on your computer's settings, this icon may not be displayed.
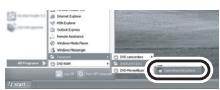
2 Select [USB Mass Storage Device] and click [Stop].
3 Verify [MATSHITA DVD-RAM LMXK1987 USB Device] or [MATSHITA DVD Cam USB Device] is selected and click [OK].
Click [Close], and you can safely disconnect the cable.
- If you disconnect the USB cable while the access lamp is on or while l appears on the LCD monitor, it may freeze the software or damage the data. (Refer to the operating instructions for DVD Video Camera.)
Verifying the unit is correctly recognized by the computer
To verify the unit is correctly recognized by the computer, select the unit's mode, connect the unit to the computer via the USB cable and then follow the steps below.
- With some computers including those made by NEC, the Device Manager may not be displayed if a mode that places restrictions on the functions has been established. Consult the manufacturer or follow the steps in your computer's operating instructions to establish a mode in which all the functions can be used, then proceed with operation.
Installation/Connection
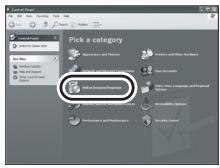
1 Select [start] ([Settings] ) [Control Panel] ([Performance and Maintenance] ) [System].

2 Click the [Hardware] tab, then click [Device Manager].
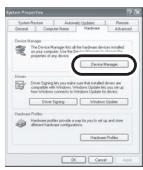
3 Verify the following items are displayed.
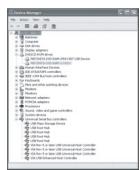
If the driver has been recognized properly
When using a disc:
Windows XP:
- [MATSHITA DVD-RAM LMXK1987 USB Device] is displayed at [DVD/CD-ROM drives].
- [USB Mass Storage Device] is displayed at [Universal Serial Bus controllers].
Windows 2000 Professional:
-
[MATSHITA DVD-RAM LMXK1987 USB Device] is displayed at [DVD/CD-ROM drives].
-
[MATSHITA DVD-RAM LMXK1987 USB Device] is displayed at [Disc drives].
- [USB Mass Storage Device] is displayed at [Universal Serial Bus controllers].
When using a card:
[USB Mass Storage Device] is displayed at
[Universal Serial Bus controllers].
If the driver has not been recognized properly
[!] or [Unknown device] appears at [Universal Serial Bus controllers] or [Other devices], etc.
(Where the display will appear depends on the type of computer you are using.)
You can use the following method to enable it to be recognized.
Method 1: Turn off the unit and your computer once and try again.
Method 2: Eject the disc or SD card from the unit and try again.
Method 3: Try connecting the unit to another USB port on your computer.
Creating a DVD-Video
Creating a DVD-Video disc on a computer
Creating a DVD-Video on a computer from a DVD-RAM or DVD-RW (VR format)
Using DVD-MovieAlbumSE and DVDfunSTUDIO, you can create a DVD-Video disc (DVD-RW/DVD-R disc) from the images recorded on this unit.
- Before using DVD-RW (VR format) on a computer, be sure to finalize it on this unit.
- When using DVD-MovieAlbumSE or DVDfunSTUDIO, log on to your computer as Administrator with a login name equally authorized. If you log on with a login name other than Administrator, you cannot use the applications.
- When using DVD-MovieAlbumSE or DVDfunSTUDIO, close any other software applications.
- The End User License Agreement is displayed when the software is first started so read carefully through its terms and conditions, then click [I agree].
Connect this unit to the AC adaptor.
1 Insert a DVD-RAM or DVD-RW (VR format) with recorded images in the unit, then turn on the unit.
2 Connect this unit and a computer.

A USB cable (supplied)
- Insert the plugs as far as they will go. The unit and computer will not operate properly if the plugs are not inserted fully.
- Do not use any other USB cables except the supplied one. (Operation is not guaranteed with any other USB cables.)
The USB function selection screen will appear.
3 Select [PC CONNECT(DISC)] and press the joystick.
4 Prepare a DVD-RW/DVD-R/+RW/+R drive that can be written to.
5 (On the computer) Select [start] [All Programs (Programs)] [Panasonic] [DVD camcorders] [DVD camcorders], then click [DVD-MovieAlbum].
- If the screen showing a brief explanation of the application is displayed, close it.
DVD-MovieAlbumSE starts and the images recorded on the disc are displayed.
When starting DVD-MovieAlbumSE, the [Mount Information] dialogue box may appear or the recorded images may not be shown. If this occurs, try the following procedure. If there are multiple drives, a drive other than this unit may be selected.
1) Click [Preference] on the dialogue box or [Preference]) button at top right of DVD-MovieAlbumSE screen, and then click the [Device setting] tab.
2) Choose the drive where the disc is loaded in the [Drive Select] column, and then click [OK].
6 Click [Export].
![PANASONIC VDRD310EP - Click [Export]. - 1](/content/2019/09/53942/images/d10053b218dcd1aa230200b04ca8a63e0c4f3b97d7fef72fbe5eb14f127dd1dc.jpg)
7 Set the export settings in the [Export all titles] screen and click [Start].
![PANASONIC VDRD310EP - Click [Export]. - 2](/content/2019/09/53942/images/fe9499fe988a2ac8e3a870f6d98b77501a572fedc8fc75ec99d5b4d8863e0cf4.jpg)
- It is recommended that you do not change the settings displayed on the screen.
8 When export is complete, a message will appear. Check the small box for [Eject the disc
being used.], and then click [Yes].
![PANASONIC VDRD310EP - Click [Export]. - 3](/content/2019/09/53942/images/571af73be86ce3f4fc00f57465135c24ec3e452ca20f50a32b8041b3001b971d.jpg)
DVD-MovieAlbumSE automatically closes and DVDfunSTUDIO automatically starts.
9 Insert a brand-new DVD-RW or DVD-R disc into the disc drive.
![PANASONIC VDRD310EP - Click [Export]. - 4](/content/2019/09/53942/images/77600677902dc795a4e5f74aee8180890d083371b7a1f8e9205e50b062ff77f3.jpg)
+RW and + discs can also be used if the disc drive supports them.
10 When the [CollectTool] screen appears, click [OK].
![PANASONIC VDRD310EP - Click [Export]. - 5](/content/2019/09/53942/images/500c881d8f3368cdc5f6423bf476424c1cb86ac2a9a414e2fb974cfbdebcc09f.jpg)
The exported scene will be automatically registered on the DVDfunSTUDIO editing screen.
11 Edit the DVD menu as required.
- Select the desired destination drive to write to if necessary.
12 Click [Burning].
![PANASONIC VDRD310EP - Click [Export]. - 6](/content/2019/09/53942/images/e96a7448610db86383c07e4e83f4f8340a693903a9d5874d0c0c4c345bc76c30.jpg)
LSQT1140
![PANASONIC VDRD310EP - Click [Export]. - 7](/content/2019/09/53942/images/e3503b617d38a9f6ff347b1fc4c8944d5a5b0bf44d6127b9bee7a33b853abd9c.jpg)
Creating a DVD-Video
Writing to the disc starts.
When writing is complete, the disc is ejected automatically.
- The DISC EJECT lever on this unit does not work when the unit is connected to a computer. Use the software's eject button to eject the disc. (When not using the software, use Windows Explorer to right-click the drive icon for this unit and select [Eject].)
- The names of playlists created on this unit cannot be displayed on DVD-MovieAlbumSE.
- If you export an image recorded in 16:9 aspect ratio with DVD-MovieAlbumSE, it is saved as a 4:3 aspect image that has been squeezed horizontally.
If you then use the exported image with DVDfunSTUDIO, it is displayed as a 16:9 aspect image.
- The DVD menu created with DVDfunSTUDIO does not appear on this unit. Play back the disc on a DVD player.
- You cannot add data to a disc written to with DVDfunSTUDIO as the disc is finalized after writing.
Take care that the temperature of the unit, when connected to a computer, does not rise excessively (reference for usage: approx. 30 minutes at about 30^ ).
Frequently asked questions

Can software other than that supplied be used?

For information about software from other companies, contact the makers of the software.

Is playback possible on a computer?

DVD-RAM, DVD-RW (VR format): Use the supplied software DVD-MovieAlbumSE.
- Before using DVD-RW (VR format) on a computer, be sure to finalize it on this unit.
DVD-RW (Video format), DVD-R:
Finalize the disc on this unit and then play it back with commercially available DVD-Video playback software.
SD card:
Use picture viewer software.

Is editing possible on a computer?

DVD-RAM:
It is possible to edit the motion pictures with the supplied software DVD-MovieAlbumSE if you have a separate DVD-RAM drive.
DVD-RW (VR format), DVD-RW (Video format), DVD-R:
Editing is not possible on a computer.

Is it possible to copy data to a computer?

DVD-RAM, DVD-RW (VR format):
Use VR disc copy tool or the File Export function in DVD-MovieAlbumSE.
- Before using DVD-RW (VR format) on a computer, be sure to finalize it on this unit.
DVD-RW (Video format), DVD-R:
Copy with Windows Explorer. Data that has been copied to a computer can be written to a new disc with DVDfunSTUDIO.
- Before using DVD-RW (Video format) or DVD-R on a computer, finalize them on this unit.
SD card:
Copy with Windows Explorer.

What should I do when the disc contents cannot be displayed with DVD-MovieAlbumSE?

If there are multiple drives, a drive other than this unit may be selected. Click the [Preference] button at top right of DVD-MovieAlbumSE screen, click the [Device setting] tab to choose the drive where the disc is loaded in the [Drive Select] column, and then click [OK].
Others
Troubleshooting
| Problem | Check points |
| Even if connected by the USB cable, this unit is not recognized by the computer. | ·The USB function selection screen does not appear if the USB cable is connected while the menu screen is displayed. →Close the menu screen before connecting the USB cable. ·Is the AC adaptor connected? →Use the AC adaptor when connecting the unit and a computer. ·Select another USB terminal on the computer. ·Check the operating environment. (Refer to the operating instructions for DVD Video Camera.) ·Turn the unit off then on and disconnect then reconnect the USB cable. |
| WhenDVD-MovieAlbumSE is started, the [Mount Information] dialogue box appears. | ·You inserted an incompatible disc. →A disc other than a DVD-RAM or a DVD-RW (VR format) is loaded in the drive: DVD-MovieAlbumSE cannot be used for media other than DVD-RAM or DVD-RW (VR format). ·If there are multiple drives, a drive other than this unit may be selected. →Click the [Preference] button in the dialogue box, click the [Device setting] tab to choose the drive where the disc is loaded in the [Drive Select] column, and then click [OK]. ·If an error message appears even after a compatible disc is inserted, packet writing software may be installed in your computer. Uninstall the packet writing software. |
| An image that should have been recorded does not appear whenDVD-MovieAlbumSE is started. | ·If there are multiple drives, a drive other than this unit may be selected. →Click the [Preference] button at top right of DVD-MovieAlbumSE screen, click the [Device setting] tab to choose the drive where the disc is loaded in the [Drive Select] column, and then click [OK]. |
| DVD-RW (Video format) or DVD-R cannot be played back onDVD-MovieAlbumSE. | ·DVD-MovieAlbumSE does not support playback or data read of DVD-RW (Video format) or DVD-R. →Use optional-user provided DVD-Video playback software to play back DVD-RW (Video format) or DVD-R on the computer. |
| The DISC EJECT lever does not work when the unit is connected to the computer. | ·The DISC EJECT lever does not work after the unit is connected to the computer. →Use Windows Explorer to right-click the drive icon and execute [Eject]. Or use the software's eject button to eject the disc. ·After files are exported from DVD-MovieAlbumSE, a confirmation message is displayed about ejecting the disc. Select [Eject the disc being used]. |
Others
| Problem | Check points |
| Cannot select this unit as the write destination drive with DVDfunSTUDIO. | Cannot write to this unit with DVDfunSTUDIO. →To create a DVD-Video disc, a separate DVD-RW/DVD-R/+RW/+R drive is required. |
| When the USB cable is disconnected, an error message will appear on the computer. | To disconnect the USB cable safely, double-click the icon in the task tray and follow the instructions on the screen. |
Matsushita Electric Industrial Co., Ltd.
Web site: http://panasonic.net