Vaporetto MV 60.20 - Steam cleaner POLTI - Free user manual and instructions
Find the device manual for free Vaporetto MV 60.20 POLTI in PDF.
User questions about Vaporetto MV 60.20 POLTI
0 question about this device. Answer the ones you know or ask your own.
Ask a new question about this device
Download the instructions for your Steam cleaner in PDF format for free! Find your manual Vaporetto MV 60.20 - POLTI and take your electronic device back in hand. On this page are published all the documents necessary for the use of your device. Vaporetto MV 60.20 by POLTI.
USER MANUAL Vaporetto MV 60.20 POLTI
MANUEL D'INSTRUCTIONS
KIT ACCESSORI ALTA PRESSIONE
Composto da:
Polti's experience in steam technology is at the service of professional cleaning with a range of appliances suitable for every need and for all environments.

REGISTER YOUR PRODUCT
Visit our website www.politcom or call our Customer Services department to register your product.
You can benefit from a special welcome offer, in participating countries, and keep up to date on all the latest Polti news, as well as buy accessories and consumables.
To register your product, in addition to your personal information, you must enter the serial number (SN) which you will find on the silver label, located on the box and on the appliance.
To save time and have your serial number to hand, write it in the space provided on the back cover of this manual.
KEY
A) Boiler switch
B) Pressure gauge
C) Steam control knob
D) Main switch
(E) Detergent switch
F) Detergent function indicator light
G) Steam ready indicator light
H) Out of water light
I) Accessory rack
J) Rack lock knob
K) Power cable winder pins
L) Tank drain tap
M) Dirt container lock levers
N) Hose clip
O) Unit socket door
P) Water tank
Q) Water tank cap
R) Hooks for flexible hose
S) Detergent tank cap
T) Detergent tank
U) Dirt collection tank handle
V) Dirt container lid
W) Air outlet filter
X) Safety float
2. OPTIONAL ACCESSORIES
PAEU0374
STEAM & VACUUMING KIT
Made up of:
1 - Flexible hose
2 - Extension hoses
3 - Universal brush
4 - Hard floor frame
5 - Rug frame
6 - Bristle frame
7 - Five cloths for brush
8 - O-ring replacement part
PAEU0376
VAPORFLEXI BRUSH STEAM KIT
Made up of:
9 - Flexible hose
10 - Extension hoses
11 - Vaporflexi brush
12 - Five microfibre cloths
13 - Rug frame
14 - O-ring replacement part
PAEU0378
EXTRACTION / INJECTION KIT
Made up of:
15 - Large brush with vaporiser
16 - Small brush with vaporiser
17 - Floor frame for large brush with vaporiser.
18 - Bristle frame for large brush with vaporiser.
19 - Floor frame for small brush with vaporiser.
20 - Bristle frame for small brush with vaporiser.
PAEU0379
WINDOW CLEANING + UPHOLSTERY KIT
STEAM / VACUUMING
Made up of:
21 - Vacuuming + Steam Nozzle
22 - 130 mm window cleaning frame
23 - 200 mm window cleaning frame
24 - Five microfibre pads
PAEU0380
STEAM WINDOW CLEANING +
UPHOLSTERY KIT
Made up of:
25 - Squeegee
26 - Blade 250 mm
27 - Blade 350 mm
28 - Small brush
29 - Five microfibre pads
PAEU0381
HIGH PRESSURE ACCESSORIES KIT Made up of:
30 - Small brush with PPS bristles
31 - Small brush with brass bristles.
32 - Medium-sized brush with PPS bristles.
33 - Medium-sized brush with brass bristles.
34 - Large brush with PPS bristles.
35 - Large brush with brass bristles.
36 - Triangular brush with PPS bristles
37 - Small nozzle with rubber inserts
38 - Short small lance
39 - High-pressure lance
40 - WC lance
41 - Steam concentrator accessory
PAEU0382
STEAM HIGH PRESSURE ACCESSORIES KIT Made up of:
42 - Concentrator accessory
43 - Small brush with PPS bristles
44 - Small brush with brass bristles
45 - Medium-sized brush with PPS bristles
46 - Medium-sized brush with brass bristles
47 - Large brush with PPS bristles
48 - Large brush with brass bristles
49 - Triangular brush with PPS bristles
50 - Short small lance
51 - High-pressure lance
PAEU0383
VACUUMING ACCESSORIES KIT
Made up of:
52-Lance
53 - Small nozzle
54 - Oval brush with horsehair bristles for delicate surfaces
55 - Round brush with nylon bristles
PAEU0386
STEAM & VACUUMING 10 CLOTHS KIT
Made up of:
58 - Ten microfibre Cloths
PAEU0387
VAPORFLEXI BRUSH 10 CLOTHS KIT
Made up of:
59 - Ten microfibre cloths
PAEU0388
TEN PADS KIT
Made up of:
60 - Ten microfibre pads
PAEU0389
10 TRIANGULAR PADS KIT
Made up of:
61 - Ten triangular microfibre pads
PAEU0390
TRIANGULAR BRUSH + PADS KIT Made up of:
62 - Triangular brush
63 - Five triangular microfibre pads
PAEU0391
SMALL BRUSH + PADS KIT
Made up of:
64 - Small brush
65 - Five microfibre pads
PAEU0228
WALLPAPER STRIPPER KIT
Made up of:
66 - Wallpaper stripper
PAEU0246
STEAM MOP ACCESSORY
Made up of:
67 - Flexible brush
68 - Five microfibre cloths
69 - Five micro-burring cloths
PAEU0370
POLTI SANI SYSTEM KIT
Made up of:
70 - Polti Sani System Pistol
71 - Twenty-four HP-Med bottles
72 - Thirty stoppers.
73 - Two flow concentrators
74 - Accessory holder bag
75 - Brass cleaning brush.
IMPORTANT PRECAUTIONS FOR USE

WARNING! BEFORE USING THE APPLIANCE, CAREFULLY READ ALL THE INSTRUCTIONS AND WARNINGS IN THIS MANUAL, AND ON THE APPLIANCE ITSELF.
Polti S.p.A. declines all liability for any accident deriving from any improper use of this appliance.
Only usage as detailed in this instruction manual constitutes correct usage.
Any use which does not comply with these instructions will invalidate the warranty.
SAFETY SYMBOLS:
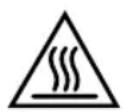
ATTENTION: High temperature. Risk of scalding! If shown on the product, do not touch as parts may be very hot.

ATTENTION: Steam. Risk of scalding!
This appliance reaches very high temperatures. Incorrect use of the appliance can cause scalding.
- Never disassemble or carry out maintenance on the appliance apart from that indicated in this manual. In the event of a fault or malfunction, do not try and repair the appliance yourself. In the event of a heavy knock, fall, damage or fall into water, the appliance may not longer be safe to use. Incorrect use or non-observation of the instructions herein may lead to serious accidents. Always contact Authorised Service Centres.
-
This appliance must not be used if it has been dropped, if there are visible signs of damage or if it leaks.
-
The plug must be removed from the socket before the tank/boiler is filled with water.
- During use the product is under pressure. Do not remove the cap from the boiler if it is on.
- To carry out any maintenance or cleaning requiring access to the boiler, ensure that the appliance is switched off using the power switches and has been disconnected from the mains for at least two hours.
- The appliance may be used by people with diminished physical, sensory or mental abilities, or by people with no experience or without the necessary knowledge, provided that they are supervised or after they have received instructions on the safe use of the appliance and on understanding the inherent dangers. Children should be supervised to ensure that they do not play with the appliance.
- Keep the appliance out of reach of children when it is on and until it has completely cooled down.
- Keep all the parts of the packaging out of the reach of children; they are not toys. Keep the plastic bag out of the reach of children: danger of suffocation.
- The appliance must not be left unattended if plugged in to the mains.
- The steam must not be directed towards appliances that contain electrical components, such as inside ovens.
- This appliance is exclusively meant for indoor domestic or similar use.
- Keep the product upright and on a stable surface while in use.
- Use the product on flat surfaces. In the case of transport on uneven surfaces, lift the appliance using the carrying handle or use an additional cart.
In order to reduce the risk of accidents, including: fires, electrocution, personal injury and scalding, both during use and during preparation, maintenance and storage, always take the fundamental precautions listed in this manual.
RISKS CONNECTED TO THE POWER SUPPLY ELECTRIC-ELECTROCUTION
- The earthing system and highly sensitive residual-current circuit breaker, complete with magnetothermic cut-out for your system, guarantee safe use of electrical appliances. Therefore, for your own safety, check that the electrical system to which the appliance is connected complies with current laws.
- Do not connect the appliance to the mains if the voltage does not correspond with that of the domestic electrical circuit in use.
- Do not overload the sockets with adaptors and/or transformers. Only connect the product to a single socket with current that is compatible with the supplied plug.
- Electrical extension leads that are unsuitable for the power rating or which are not compliant with law may overheat and possibly lead to short-circuiting, fire, power outage or damage to the equipment. Only use extension leads which are certified, suitable for the power rating, supporting 16A and earthed.
- Always turn off the appliance at the on/off switch before unplugging it.
- To remove the plug from the socket, do not pull the power cable, but hold the plug itself to avoid damage to the plug and the cable.
- Always unplug the appliance if it is not in use and before any preparation, maintenance or cleaning operation.
- Fully unwind the cable from the cable winder before connecting the appliance to the mains and before use. Always use the product with the cord completely unwound
-
Do not pull or jerk the cable or expose it to tensions (twisting, crushing or stretching). Keep the cord away from hot and/or sharp surfaces and elements. Avoid crushing the cables in doors and windows. Do not pull the cable tight around corners. Avoid treading on the cable. Do not wind the power cord around the appliance, especially if the appliance is hot. Do not place the appliance on top of the power cable, this can be dangerous.
-
Do not change the plug on the power cable.
- If the supply cord is damaged, it must be replaced by the manufacturer, its service agent or similarly qualified persons in order to avoid a hazard. Do not use the product if the power cable is damaged.
- Do not touch or use the appliance barefoot and/or with wet body or feet.
- Do not use the appliance near containers full of water, e.g. sinks, baths and swimming pools.
- Do not immerse the appliance, including the power cable and plug, in water or other liquids.
RISKS DURING USE OF THE PRODUCT - INJURIES/SCALDING
- The product should not be used in areas where there is a danger of explosions or in the presence of toxic substances.
- Do not pour toxic substances, acids, solvents, detergents, corrosive substances and/or explosives or perfumes into the water tank.
- Only pour water, or the water mix indicated in the "Which water to use" chapter, into the water tank.
- Pay attention to the intended use of the two tanks. It is important that the tank (P) is filled always with water and not with detergent. The use of detergent in the water tank could cause serious damage to the product. Once the funnel has been used to fill the detergent tank, rinse it under running water before using it to fill the water tank.
- Do not vacuum or direct the steam jet onto toxic substances, acids, solvents, detergents or corrosive substances. Handle and remove dangerous substances according to the indications provided by their manufacturers.
- Do not vacuum or direct the steam jet onto explosive powders or liquids, hydrocarbons, open flames and or extremely hot objects.
- Keep all body parts away from the vacuum intake and from any moving parts.
- Do not use the vacuum function on people and/or animals.
- Use the special carry handle for transport. Do not pull the power cable. Do not use the power cable as a handle. Do not
lift the appliance using the power cable or the steam hoses/vacuum tubes. Do not lift the product using the dirt collector grip.
- Do not position the product near sources of heat such as fireplaces, stoves and ovens.
- Do not position the product near electromagnetic fields such as the induction plate.
- Re-wind the cable when the appliance is not in use.
- Do not obstruct the openings and grills on the product.
- Do not attempt to use the steam jet on any part of a human or animal's body.
- Do not direct the steam jet on clothes while they are being worn.
- Cloths and rags and fabrics which have been subjected to a deep steam reach very high temperatures, above 100^ . Wait a few minutes and check that they have cooled before handling them. Therefore, avoid contact with the skin if they have just been steamed.
- The steam lock on the handle guarantees greater safety, as it prevents the accidental activation of steam delivery by children or people who are unaware of the function of the appliance. When steam is not being used, engage the steam lock.
- To continue steam delivery, return the switch to its original position.
- Use the accessory for cleaning the WC (40) only for the application for which it is intended, because owing to its particular shape, if steam or detergent are dispensed, they might be directed towards the user, with the risk of scalding. Pay the utmost attention and in the case of momentary non-use insert the steam lock on the hose using the safety key.
CORRECT USE OF THE PRODUCT
This appliance is intended for domestic and similar professional use, in accordance with the descriptions and instructions contained in this manual. Please read these instructions carefully and keep them. If this manual is lost, it can be consulted and/or downloaded from the website www.polti.com.
Only vacuum domestic or similar dirt and/or water.
Do not use on debris or chalk, cement or residues from building sites or brick laying.
Do not use on earth and sand/soil, etc.
Do not use on ash, soot and combustion residues (fireplaces, barbecues, etc.).
Do not use on printer, photocopier or fax toner and ink powder.
Do not vacuum pointed, sharp or stiff objects. The appliance only functions correctly if the water filter collector is inserted and complete with all its parts.
Never leave the appliance exposed to weathering.
Do not vacuum with the dirt collection bucket empty, but fill it always as indicated in chapter 1.5.
POLTI S.p.A. reserves the right to make the aesthetic, technical and construction changes it deems necessary, without prior notice.
Before leaving our factory all our products are rigorously tested.
Therefore your Polti Vaporetto MV may already contain some residual water in the boiler and the tank.
Only usage as detailed in this instruction manual constitutes correct usage. Any other use may damage the appliance and invalidate the warranty.
INFORMATION FOR USERS
Pursuant to European Directive 2012/19/EU, regarding electric and electronic appliances, this appliance must not be disposed of with domestic waste, but sent to an official collection facility. This appliance complies with EU Directive 2011/65/EU.
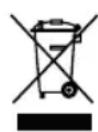
The crossed-out bin symbol on the appliance indicates that, at the end of its useful lifespan, the product must be disposed of separately from
other waste. Therefore, at the end of its life, the user must deliver the appliance to an appropriate collection centre for electric and electronic waste.
Proper separate waste collection to facilitate the subsequent recycling, treatment and environmentally compatible disposal of the
appliance helps to prevent negative effects on the environment and human health, and promotes recycling of the materials the product is made of. Unlawful disposal by the owner involves the application of the administrative sanctions envisaged by current legislation.
WHICH WATER TO USE IN THE BOILER
This appliance has been designed to function with normal medium-hardness tap water between 8^ and 20^ . If the tap water contains a lot of calcium carbonate, use a mix composed of 50% tap water and 50% widely available demineralised water. Do not use pure demineralised water.
Warning: check the hardness of the water at the technical office of your local council or the local water supplier.
If you only use tap water, you can reduce the formation of limescale by using the special Polti Kalstop (PAEU0094) decalcifying agent, distributed by Polti, and available for sale at all major domestic-appliance stores or online at www.polti.com.
Never use distilled water, rain water or water containing additives (e.g. starch, perfumes), or water produced by other domestic appliances, water softeners and filter jugs. Do not put in chemical, natural, detergent, or limescale removing substances, etc.
Use tap water in the water filter collector.
1. PREPARING FOR USE
1.1 ASSEMBLING THE ACCESSORY RACK (I)
- Put the accessory rack (I) in position on the appliance, aligning the four holes on it with the screws on the top of the appliance.
- Screw in the four knobs for locking the rack in place (J) to anchor the rack in position.
1.2 FILLING THE WATER (P) AND DETERGENT (T) TANK
- Unscrew the cap (Q) and fill the water tank (P) using the funnel and the container with normal tap water (Pic. 1).
- Screw the cap (Q) back on.
- Unscrew the cap (S) and Use the funnel to fill the tank (T) with opportunistically diluted detergent.
- Screw the cap back on (S).
WARNING: Pay attention to the intended use of the two tanks. It is important that the tank (P) is filled always with water and not with detergent. The use of detergent in the water tank could cause serious damage to the product. Once the funnel has been used to the detergent tank, rinse it under running water before using it to fill the water tank.
1.3 DETERGENT (not supplied):
Consult the label, the data sheets and the safety sheets of the substances or detergents paying attention to the hazard pictograms, the warnings, the indications and the prudence advice. Do not use foaming substances or detergents.
Do not use substances or detergents containing substances bearing hazard pictograms: explosive, combustible, flammable, toxic, harmful, corrosive, irritant, sensitising, carcinogenic, mutagenic, toxic for reproduction, hazardous for the environment.
Never mix together substances and/or detergents.
WARNING: Any failure caused by the use of detergents that do not comply with the above will be excluded from warranty.
1.4 PREPARED THE DIRT COLLECTION BUCKET
- Release the locking lever (M) (Pic. 2) of the dirt collection bucket and slide the bucket unit out of the appliance
- Lift the lid (V) of the dirt collection bucket (U).
- Fill the bucket (U) with 1 litre of tap water. You can also add into the bucket 1 phial of Polti Bioecologico, the natural, perfumed anti-foam deodorant which, in addition to filling the room with a pleasant perfume, prevents the formation of foam in the water filter, guaranteeing the correct operation of the appliance. (For more details, please refer to the Polti Bioecologico chapter).
- Reposition the bucket unit inside.
2. USE FUNCTIONS
The functions of the appliance (steam cleaning, vacuuming, detergent and the combined functions) must be set according to the type of optional accessories that you decide to use.
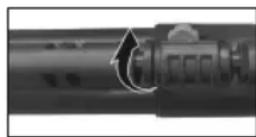
For the optional accessories containing a flexible hose (1; 9) open the door of the built-in socket; insert the built-in plug pushing it (Pic. 3), without pressing the button, until the
hooking mechanism clicks, then check that it is tight. To disconnect the built-in plug from the appliance, press the button and pull the plug to remove it from the appliance.
Completely unwind the power cable and connect it to an appropriate mains socket (Pic. 4). Always use the product with the cord completely unwound.
2.1 STEAM FUNCTION
It is possible to use this function with: the Steam & Vacuuming Kit PAEU0374 (chap. 7.1), the Vaporflexi Brush Steam Kit PAEU0376 (chap. 7.2), the Polti Sani System Kit PAEU0370 (chap. 7.15), the Steam Mop accessory PAEU0246 (chap. 7.16).
- Turn the main switch (D) to "I"
- Press the boiler switch (A). The steam ready light (G) will begin to flash until it becomes fixed (around 5-10 minutes), at this point the appliance is ready to generate steam.
WARNING: Do not release steam if the light (G) is flashing, wait for it to remain fixed, so that the system is stabilised and enables the maximum possible yield.
- Ensure that the steam lock on the handle is deactivated (chap. 7.1, chap. 7.2).
- Press the steam request button on the handle to release steam (chap. 7.1, chap. 7.2).
WARNING: The first time it is used, drops of water may leak out. This is due to an imperfect thermal stabilisation within the sheath We therefore recommend directing the first jet of steam onto a cloth, until a uniform jet is obtained.
2.2 VACUUM FUNCTION
It is possible to use this function with: the Steam & Vacuuming Kit PAEU0374 (chap. 7.1).
- Turn the main switch (D) to "l".
- Hold button on the handle down for a few seconds, and the appliance will begin vacuuming.
WARNING: Vacuum cleaning should be used to pick up liquids/wet substances only, NOT for collecting dry dirt.
- To stop vacuuming, hold the button (5) on the handle (2) down for a few seconds.
2.3 DETERGENT FUNCTION
It is possible to use this function with: the Steam & Vacuuming Kit PAEU0374 (chap. 7.1), the Vaporflexi Brush Steam Kit
PAEU0376 (chap. 7.2), the Steam Mop accessory PAEU0246 (chap. 7.16).
WARNING: The detergent function can only be activated when the Steam Kit is connected to the machine.
- Turn the main switch (D) to "I".
- Press the detergent switch (E). The detergent indicator light (F) will come on.
- Press the steam/detergent button on the handle to dispense detergent. (1;9) .
- Ensure that the steam lock on the handle is deactivated (1; 9).
- To disable the detergent function, press the switch (E). The light (F) will go out.
2.4 COMBINED FUNCTIONS
It is possible to combine the following functions:
STEAM - VACUUMING
STEAM - DETERGENT
DETERGENT - VACUUMING
STEAM - DETERGENT - VACUUMING
These functions are possible with: the Steam & Vacuuming Kit PAEU0374 (chap. 7.1), the Vaporflexi Brush Steam Kit PAEU0376 (chap. 7.2), the Polti Sani System Kit PAEU0370 (chap. 7.15), the Steam Mop accessory PAEU0246 (chap. 7.16).
WARNING: On the first release of steam, there may be some drops of water mixed with the steam due to temperature imbalances.
Direct the first jet of steam onto a rag.
To avoid any dirt in the dirt collector causing bad smells, we recommend emptying and cleaning after every use according to the methods described in Chapter 5.
3. CONNECTION KIT AND OPTIONAL ACCESSORIES
All the accessories can be connected directly to the flexible steam/vacuum hose (1; 9) or to the extension hoses (2; 10).
3.1 Hook the two extension tubes onto the handle :
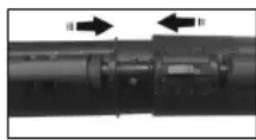
Move the locknut of the accessory, if present, to the OPEN position and connect the accessories.
Move the accessory locknut to the CLOSED position. Check the strength of the
connection.
There is another lock button on the extension tubes: proceed as above for the
accessories, releasing the tubes by sliding the button as far as the lock position.
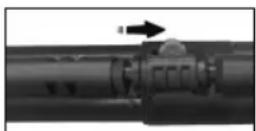
3.2 To use the other accessories proceed as follows:
- Move the locknut to the OPEN position and pair the accessories.
- Move the accessory locknut to the CLOSED position.
Check the strength of the connection.
3.3 To connect the special accessories only for vacuuming it is only necessary to pair them.
3.4 To connect the steam lance to the steam concentrator, screw it on. The same operation can be carried out for the coloured brushes, which can be screwed both onto the steam concentrator and onto the steam lance. The different colours enable a diversified use of the brushes according to the surface to be treated.
4. STEAM ADJUSTMENT
You can optimise the steam flow by means of the steam adjustment knob (C).
Turning the knob clockwise increases the steam jet. To reduce it, turn the knob anticlockwise. Here are some tips for regulating it.
Maximum level: to remove encrustations, stains, grease and for more stubborn dirt;
- Medium level: for carpets, rugs, glass and floors;
- Minimum level: to steam plants, clean delicate fabrics, wall coverings, upholstery, etc.
5. EMPTYING AND CLEANING THE DIRT COLLECTION BUCKET
When the dirt sucked into the bucket reaches the maximum permitted level, vacuuming will be automatically blocked by the special float (X) (you will hear the motor running faster).
WARNING: Turn the appliance off and only restart it when the level of the water in the bucket has been reinstated as described in the chapter "PREPARING THE DIRT COLLECTION BUCKET". Turning it back on immediately may damage the Hepa filter (W). To resume the cleaning operations, proceed as illustrated below, reinstating then the water level in the container.
If the water in the dirt collection bucket is very dirty, replace it in any case.
To empty the bucket, proceed as follows:
- Turn the appliance off by pressing the main switch (D) and disconnect the power supply cable from the mains.
- Release the two levers locking the dirt container (M) in place and slide the container out of the appliance (Pic. 2).
- Open the lid on the dirt container (V) using the handle (U).
- Clean the dirt collection bucket.
- If you want to continue to work top up the water level as indicated in the chapter "PREPARING THE DIRT COLLECTION BUCKET".
- Put the container back inside the appliance, performing the procedure described above in reverse order.
Empty the dirt collection bucket before putting the appliance away.
6. PRESSURE INDICATOR
The product has an indicator (B) for displaying the operating pressure.
7. OPTIONAL KITS
USE
Before steam treating leather, special fabrics and wood surfaces, consult the manufacturer's instructions and always carry out a test on a hidden part or on a sample of the material. Allow the steamed part to dry to make sure that no changes in colour or deformations have occurred.
Please pay careful attention when cleaning wooden surfaces (furniture, doors, etc.). and treated terracotta flooring as prolonged use of steam may damage the wax, polish or co
lour of the surfaces to be cleaned.
We therefore recommend only steaming these surfaces for short periods of time, or cleaning using a previously steamed cloth. On particularly delicate surfaces (i.e. synthetic materials, lacquered surfaces, etc.) we recommend using minimum steam. To clean glass surfaces in particularly cold seasons, preheat the windows starting from a distance of about 50~cm from the surface. To take care of your plants, we recommend spraying them from a minimum distance of 50~cm .
7.1 STEAM & VACUUMING KIT PAEU0374
This kit makes it possible to use the appliance as a steam cleaner with integrated vacuum cleaner to vacuum, clean and sanitise all surfaces. The compact size of the universal brush (3) - which is connected to the flexible hose (1) by means of extension hoses (2) - enables it to be used also in small spaces. The cloth (7) makes it possible to collect the dirt dissolved by the steam and is suitable for all floor types.
The interchangeable frames of the brush enable it to be used on all surfaces for several functions: the bristle frame (6) is recommended only for the vacuuming function; the hard floor frame (4) for recovering damp on smooth surfaces and the carpet frame (5) for cleaning carpets and rugs.
To apply the different frames on the universal brush, move the two slides located on the back of the brush outward and apply the frame indicated for the type of surface to be cleaned. To lock the frame move the two slides inwards. Do not steam directly on wooden surfaces.
7.2 STEAM KIT WITH VAPORFLEXI BRUSH PAEU0376
The innovative Vaporflexi brush (11) used with the special microfibre cloth (12) guarantees optimal steam delivery and its distribution over the whole surface of the cloth, for even more effective and quick cleaning on all surfaces, even the most delicate ones.
Extremely easy to handle, it guarantees more freedom of movement and the chance to reach and clean even the smallest of spaces.
The kit also includes the flexible hose (9) and the extension hoses (10).
Before removing the cloth from the brush wait a few minutes to allow the cloth to cool.
7.3 EXTRACTION/INJECTION KIT PAEU0378 The brushes for injection/extraction washing spray and vacuum at the same time making it possible to deep clean carpets, rugs, sofas, armchairs and upholstery penetrating deeply into the fibres.
It is also possible to join and separate the frames of the brushes by hooking them up or making them slide according to the surfaces to be treated.
7.4 STEAM & VACUUMING WINDOW CLEANING + UPHOLSTERY KIT PAEU0379
With the vacuum+steam nozzle (21) you can perform several functions: vacuuming of various surfaces, even small ones, steam cleaning with the pad applied (24), cleaning of windows or mirrors in combination with the 200 (23) or 130~mm (22) window cleaning frames.
Finally the bristle insert can be applied to the nozzle and, thanks to the abrasive action of the bristles, you can remove fur and hair from upholstery.
7.5 STEAM WINDOW CLEANING + UPHOLSTERY KIT PAEU0380
The squeezegee (25) combined with the interchangeable 250~mm (26) or 350~mm (27) rubber blades makes it possible to clean and sanitise any window, mirror and glass surface. The brush (28) is instead designed for cleaning small surfaces, such as upholstery fabrics, car interiors, small glass surfaces, tiles, cabinet doors and other doors. It can be used with the pad (29) provided.
7.6 HIGH PRESSURE STEAM & VACUUMING ACCESSORIES KIT PAEU0381
The use of this kit makes it possible to concentrate the steam pressure so as to have a powerful and effective jet. The steam concentrator accessory (41) can be used both with only the steam function activated or with the vacuuming function: in this way the dirt dissolved by the steam is vacuumed by the appliance. Moreover, with the addition of the brushes (30/31/32/33/34/35/36), greater abrasive action is obtained; the brushes are available in various shapes and materials so that they can be used on the different surfaces. They can be screwed either onto the concentrator accessory (41) or to the lances (38/39/40).
The different lances (38/39/40) make it possible instead - according to the type - to reach also the most hidden corners and to clean in small spaces. To use the small lance
(38) screw it onto the steam concentrator (41).
The small nozzle (37) is recommended for vacuuming the dirt removed from tight surfaces such as between tiles, door jambs, slits of shutters, etc.
WARNING: Use the lance for cleaning the Wc (40) only for the application for which it is intended, because owing to its particular shape if steam or detergent are dispensed, they might be directed towards the user, with the risk of scalding. Pay the utmost attention and in the case of momentary non-use insert the steam lock on the hose using the safety key.
7.7 HIGH PRESSURE STEAM ACCESSORIES KIT PAEU0382
The use of this kit makes it possible to concentrate the steam pressure so as to have a powerful and effective jet. Ideal for removing the most stubborn dirt and for cleaning the most hidden and hard-to-reach points. The kit is made up of several accessories, each with a specific function.
The concentrator accessory (42) can be connected directly to the handle or to the extension hoses (10). It is also possible to connect to the same (42) both the lance and the brushes present in the kit. The two lances (50/51) make it possible - according to the type - to reach the most hidden corners and to clean in small spaces. Moreover, with the addition of the brushes (43/44/45/46/47/48/49), greater abrasive action is obtained; the brushes are available in various shapes and materials so that they can be used on different surfaces.
7.8 VACUUMING ACCESSORIES KIT PAEU0383
The different accessories of this kit make it possible to vacuum dust and dirt from all surfaces, including fabrics. With the lance (52) you will be able to reach also the most difficult points; the small nozzle (53) is indicated for cleaning upholstery, sofas, wallpaper and car interiors, while the two nylon (55) and horsehair (44) brushes make it possible to clean all surfaces, even the most delicate ones.
7.9 TRIANGULAR BRUSH + 5 PADS KIT PAEU0390
Small and flexible brush (62) with convenient swivel joint to allow cleaning of difficult corners and nylon bristles to dissolve and remove even the most stubborn dirt. The kit also contains 5 microfibre pads (63) which avoid direct contact with the steam jet, ideal
for treating delicate surfaces, fabrics and upholstery.
7.10 10 TRIANGULAR PADS KIT PAEU0389
Kit made up of 10 microfibre pads (61) compatible with the triangular brush (62) ideal for cleaning sofas, mattresses and upholstery in general. Their softness makes them ideal also for cleaning delicate surfaces.
7.11 SMALL BRUSH + 5 PADS KIT PAEU0391
This brush (64) is indicated for cleaning all surfaces, even the most delicate ones, and thanks to its small size it is particularly suitable where the spaces are small and narrow. It can be used with the microfibre pads (65) provided to avoid direct contact with the steam jet.
7.12 10 PADS KIT PAEU0388
Kit made up of 10 microfibre pads (60) compatible with the brush (28) ideal for cleaning sofas, mattresses and upholstery in general. Their softness also makes them ideal for cleaning delicate surfaces.
7.13 STEAM & VACUUMING 10 CLOTHS KIT PAEU0386
Kit made up of 10 universal microfibre cloths (58) with polyester inserts that make them glide better. Ideal for collecting dirt and indicated for all types of steam-washable, smooth and rough floors and also for the most delicate ones because they avoid direct contact with the steam jet. Machine-washable.
7.14 VAPORFLEXI BRUSH 10 CLOTHS KIT PAEU0387
Kit made up of 10 microfibre cloths (59) for Vaporflexi brush (11) ideal for cleaning all types of floors, even the most delicate, whether rough or smooth thanks to the polyester inserts which make them glide better. Machine-washable.
7.15 POLTI SANI SYSTEM KIT PAEU0370
The Polti Sani System pistol (70) - thanks to the patented Superheated Chamber technology - dispenses dry saturated steam at high temperatures up to 180^ and in combination with the Polti HPMED detergent. Developed in 2006 in collaboration with the Faculty of Medicine and Surgery of the University of Pavia, it makes it possible to sanitise frequently and rapidly any type of space, surface and fabric, also in the presence of people and animals.
7.16 STEAM MOP ACCESSORY PAEU0246
Brush for floors, walls, windows and ceilings. Connected to the appliance the swivelling steam broom is ideal for also cleaning- besides all types of floors- walls, windows and ceilings. The special tank inside of the brush allows it to uniformly distribute steam along the provided microfibre cloth. The rod is adjustable allowing it adapt to any height.
7.17 WALLPAPER STRIPPER PAEU0228
The wallpaper stripper accessory is designed to remove wallpaper from walls without difficulty: with the help of the steam the wallpaper glue melts in seconds.
8. LACK OF DETERGENT
A lack of detergent is indicated by a specific light (F), which from fixed starts to flash, and by an acoustic signal.
To reinstate the level of the detergent it will be sufficient to proceed as described in the chapter "FILLING THE WATER (P) AND DETERGENT (T) TANK".
9. LACK OF WATER IN TANK
The lack of water in the water tank (P), is indicated by the light (H), which comes on and remains on, and by an acoustic signal. To resume work proceed to fill again as described in the chapter "FILLING THE WATER (P) AND DETERGENT (T) TANK".
10. LACK OF WATER IN THE BOILER
There may be a lack of water in the boiler if the refilling system is not working properly. This type of malfunctioning is signalled by the light (H) starting to flash and by an acoustic signal.
Turn off the appliance, wait for 15 minutes and turn it on again. If the problem persists contact the service centre.
11. POLTI BIOECOLOGICO
Polti Bioecologico is an anti-foaming and deodorising product containing natural substances. It prevents foaming inside the water filter thus ensuring correct functioning of the appliance. When diluted inside the dirt collection tank, Polti Bioecologico also acts as an effective deodoriser and thanks to the natural substances which it is composed of, it prevents unpleasant smells inside the collection tank and releases a fresh clean fragrance into the environment.

Capacity of 1 phial: 5ml e
HOW TO USE POLTI BIOECOLOGICO
11.1 Add water to the dirt collection bucket according to the instructions in this manual.
11.2 Shake the phial before use.
11.3 Bend and break the phial cap.
11.4 Pour the contents of the phial into the bucket of the appliance.
Introduce 1 phial before each use A possible change in the colour of the liquid does not alter the functioning or the efficacy of the product
WARNING: Never pour Polti Bioecologico into the boiler.
Polti Bioecologico is sold at all major domestic-appliance shops or online at www.polti.com.
12. GENERAL MAINTENANCE
To clean the outside of the appliance, use a damp cloth and tap water only.
All accessories can be cleaned using running water, ensuring they are completely dry before the next use.
Do not use detergents of any kind.
12.1 PULIZIA DEL FILTRO (W)
- Turn off the appliance with the main switch (D) and unplug it.
- Release the two levers locking the dirt container (M) in place and slide the container out of the appliance (Pic. 2).
- Remove the filter on the air outlet (W) from its housing and clean it with a brush with stiff bristles; if the filter is not clean enough, rinse it with water and let it dry. Replace the filter if it appears to be damaged, to prevent it from compromising the appliance's performance.
- If you wish to continue working, reassemble the filter by performing the procedure described above in reverse. The filter will last about 100 hours of operation.
12.2 EMPTYING TANK (P) AND (T)
It is easy to empty the water tank (P) and the detergent tank (T).
To empty the tanks, simply open the tank drain tap (L) (Pic. 7). Close again when empty.
Be sure to position a recipient large enough under the tank you wish to empty.
13. STORAGE
When you have finished using the device, put it away in a clean and dry place after disconnecting it from the power mains. Keep it away from sources of heat and protect from the weather. Do not expose the appliance to extreme temperatures.
The accessories can be stored in the practical accessory rack (I). The extension hoses (2 10) can be hooked to the clips (N) (Pic. 5).
Before putting away your Polti Vaporetto MV appliance wind up the power cable on the cable winding hooks (K)(Pic. 6).
- TROUBLESHOOTING - TIPS
| PROBLEM CAUSE SOLUTION | ||
| The appliance does not start. The appli-ance does not start. No power. Main switch (D) off | Check that the appliance has been disconnected from the mains, as indicated in Section 1. Turn on the main switch (D). | |
| Suction power is decreased. Nozzle | flexible vacuum hose or extension hoses are blocked. | Turn the appliance off and unplug it. Clean the filter and remove any blockages of tubes and accessories. |
| Water leaks out when vacuuming liquids. | Float blocked. Clean the water | filter assembly. |
| Loss of steam or drops of water between the connection of the accessories. | The seals are damaged. Replace the seals. | |
| The appliance is on but does not supply steam. | The appliance is not pressurised yet. | Wait for the light (G) to go off. |
| No steam comes out, light (H) re-mains on with buzzer sounding. | No more water in the tank (P). | Turn off the appliance and fill it up again, as described in the chapter "FILLING THE WATER (P) AND DETERGENT (T) TANK". |
| The appliance does not vacuum. Dir collection bucket is full. Turn off the appliance, remove the container and empty it. Top up the water level as described in the chapter "PREPARATION OF DIRT CONTAINER". | ||
| Light (H) flashing and acoustic si-gnal. | Shortage of water in the boiler. | Turn off the appliance and then turn it on again. If the defect continues, please contact an authorised service centre, see the chapter "NO WATER IN BOILER". |
| No detergent comes out, light (F) flashing and acoustic signal. | No more detergent in the tank (T). | Turn off the appliance and top up the level of detergent as described in the chapter "FILLING THE WATER (P) AND DETERGENT (T) TANK". |
| The detergent function does not come on. | The flexible hose has not been inserted (1;9), see optional Kit. | Insert the flexible hose |
| Should the problems persist, contact an Authorised Polti Service Centre (see www.polti.com for the up-to-date list) or Customer Services. | ||
WARRANTY
This appliance is guaranteed for one year from the date of purchase if purchased by a professional/commercial business with an invoice (VAT number). If the purchase is made by a consumer with a tax receipt, the warranty period is two years, as required by the Consumer Code. The date of purchase and the duration of the guarantee must be proven by the tax document issued by the seller:
- Invoice: one year warranty
Tax receipt: two-year warranty
For repairs, the appliance must be accompanied by proof of purchase.
This warranty does not affect the consumer rights deriving from European Directive 99/44/EC as regards some aspects of sale and warranty of consumer goods, rights which the consumer should uphold with respect to the seller.
This warranty is valid in the countries which adhere to European Directive 99/44/EC. For other countries, local regulations on warranties apply.
WHAT THE WARRANTY COVERS
During the warranty, Polti guarantees free repair of a product with a manufacturing or factory defect and, therefore, the client is not liable to pay for any work or materials.
In case of irreparable defects, Polti may replace the product free of charge.
To avail of the warranty, the customer should visit one of the Polti Authorised Service Centres with proof of purchase from the seller valid for tax purposes and bearing the date of purchase of the product. Without proof of purchase and the relative date of purchase, the work will be charged for. Store the proof of purchase document safely for the whole duration of the warranty.
WHAT THE WARRANTY DOES NOT COVER
- Any fault or damage not deriving from a manufacturing defect.
- Any fault due to improper use or use other than that indicated in the instruction booklet, an integral part of the product sales contract.
- Any defect resulting from force majeure (fires, short circuits) or caused by third parties (tampering).
- Damage caused by the use of non-original Polti parts, and repairs or modifications performed by staff or service centres not authorised by Polti.
- Damage caused by the customer.
- Parts (filter, brush, hose, battery, etc.) damaged by use (consumable goods) or normal wear and tear.
- Any damage caused by limescale.
- Defects resulting from lack of maintenance/cleaning according to the manufacturer's instructions.
Assembly of non-original Polti accessories or those that have been modified or which are not suitable for the appliance.
Inappropriate use and/or use not compliant with the instructions for use and any other warnings or indications contained in this manual invalidates the warranty.
Polti takes no responsibility for any direct or indirect damage to people, objects or animals caused by non-compliance with the instructions indicated in this instruction booklet, regarding warnings for use and product maintenance.
To see the up-to-date list of the Polti Authorised Service Centres, visit the website www.polti.com.
BIENVENUE DANS LE MONDE DE POLTI VAPORETTO
KIT 10 CHIFFONS BROSSE VAPORFLEXI
Composé de :
59 - Dix chiffons en microfibre
PAEU0388
KIT DIX BONNETTES
Composé de :
ACCESSIONE STEAM MOP
Composé de :
UTILISATION CORRECTE DU PRODUIT
2.3 FONCTION DETERGENT
USO CORRECTO DEL PRODUCTO
SET 10 DAMPF- & SAUGTÜCHER
Bestehend aus:
SET POLTI SANI SYSTEM
Bestehend aus:
70 - Polti Sani System Pistole