G9OCABSSPSS - Oven GE - Free user manual and instructions
Find the device manual for free G9OCABSSPSS GE in PDF.
Download the instructions for your Oven in PDF format for free! Find your manual G9OCABSSPSS - GE and take your electronic device back in hand. On this page are published all the documents necessary for the use of your device. G9OCABSSPSS by GE.
USER MANUAL G9OCABSSPSS GE
Write the model and serial numbers here: Model # _________________ Serial # _________________ Find these numbers on a label on the back of the unit. GE is a trademark of the General Electric Company. Manufactured under trademark license.
TROUBLESHOOTING ............10 LIMITED WARRANTY ........... 11 CONSUMER SUPPORT ..........122 49-9000003 Rev. 0 THANK YOU FOR MAKING GE APPLIANCES A PART OF YOUR HOME. Whether you grew up with GE Appliances, or this is your first, we’re happy to have you in the family. We take pride in the craftsmanship, innovation and design that goes into every GE Appliances product, and we think you will too. Among other things, registration of your appliance ensures that we can deliver important product information and warranty details when you need them.49-9000003 Rev. 0 3 CAUTION To ensure continued protection against risk of electric shock, connect to properly grounded outlets only This appliance has a polarized plug (one blade is wider than the other). To reduce the risk of electric shock, this plug is intended to fit into a polarized outlet only one way. If the plug does not fit fully into the outlet, reverse the plug. If it still does not fit, contact a qualified electrician. Do not attempt to modify the plug in any way. SAFETY INFORMATION
READ AND SAVE THESE INSTRUCTIONS
CAUTION IMPORTANT SAFEGUARDS Always follow these safety precautions when using this appliance. • Carefully read all instructions before operating the toaster oven.• Remove and discard all packaging materials prior to operating the oven.• UPLUG APPLIANCE FROM OUTLET WHEN NOT IN USE AND BEFORE CLEANING. Allow oven to cool before cleaning or handling.• To protect against electrical shock do not immerse cords, plugs, or appliance in water or other liquid.• Always place oven on a level, stable, and heat-resistant surface whenever oven is in operation• Keep at least 4” (10 cm) clearance on all sides of the appliance whenever oven is in operation. Do not operate appliance underneath wall cabinets.• Ignition may occur if the appliance is covered or touching flammable materials during operation. Do not place flammable materials on, near, or inside oven.• The exterior surfaces of the appliance can be hot during and after oven operation. Allow appliance to cool completely before handling appliance.• Do not store items on top of the appliance, as this surface can be very hot during and after oven operation.• To prevent burns or injury, always use proper protection, such as hot pads or oven mitts, when removing or handling items from oven.• Do not let power cord hang over edge of table or counter. Do not let power cord contact hot surfaces.• Always clean the oven according to cleaning and care instructions, as provided on page 10. Do not use metal utensils or scouring pads to clean oven cavity or heating elements. This can create risk of electrical shock and may also damage parts of the oven.• Do not operate oven without crumb tray properly installed.• Do not clean with metal scouring pads. Pieces can break off the pad and touch electrical parts involving a risk of electric shock.• Do not operate any appliance with a damaged cord or plug or after the appliance malfunctions or has been damaged in any manner.• It is recommended to use only the accessories originally provided with this appliance.• Except for the provided accessories, do not store any items inside of the oven cavity.• This appliance is intended for indoor household use only. Do not store or operate outdoors.• Do not leave the appliance unattended whenever in operation. Keep close supervision whenever appliance is used by or near children.• Always stop oven operation before unplugging the appliance.• Before handling, moving, or cleaning the appliance, always unplug the power cord from the wall outlet and ensure the appliance has properly cooled• Do not use this appliance with an extension cord• Do not place on or near a hot gas or electric burner, or in a heated oven.• Extreme caution should be exercised when using containers constructed of other than metal or glass.• Use extreme caution when removing tray or disposing of hot grease.• Do not cover crumb tray or any part of the oven with metal foil. This will cause overheating of the oven.
IMPORTANT SAFETY INFORMATION
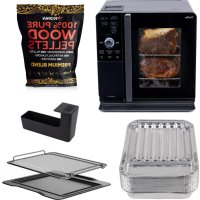
READ ALL INSTRUCTIONS BEFORE USING THE APPLIANCE WARNING RISK OF FIRE OR ELECTRIC SHOCKŶTO REDUCE THE RISK OF FIRE OR ELECTRIC SHOCK, DO NOT REMOVE COVER (OR BACK).ŶDo not attempt to repair or replace any part of your toaster oven unless it is specifically recommended in this manual. All other servicing should be performed by authorized service personnel.4 49-9000003 Rev. 0 PARTS INCLUDED Parts Included
Shade/Slices and Time/Temp Knob
Crumb Tray (Located inside oven door)
Shade/Slices and Time/Temp Knob
J49-9000003 Rev. 0 5 CONTROLS Controls Shade Setting Displays the selected shade for TOAST and BAGEL cooking modes Convection Fan Icon Displays when convection fan is activated Time Display Displays the cook time remaining. Also displays number of slices when adjusting settings for TOAST and BAGEL cooking modes Temperature Display Displays selected oven temperature Convection Button 7RJJOHVFRQYHFWLRQIDQRQRႇ Convection fan icon will display when convection fan is activated Cooking Mode Knob Knob rotates to select the desired cooking mode Cooking Settings Knob Knob rotates to adjust the desired cooking settings for each cooking mode. Knob also functions as a button. Pressing knob button toggles between adjustment of slices/shade or time/temperature, depending on the cooking mode selected.
Indicates that the oven is currently preheating to the selected tempera- ture Cooking Mode Only the selected cooking mode will be displayed Progress Bar Shows progress of the current cook cycle Start Button Begins the cooking cycle with selected settings Cancel Button Ends the current cooking cycle and WXUQVRႇRYHQ6 49-9000003 Rev. 0 Getting Started
USING THE TOASTER OVEN
Unpacking and Cleaning
- Remove and safely discard all packing materials before operating the oven.
- It is recommended to wipe the interior of the oven
FDYLW\ZLWKDGDPSVSRQJHEHIRUH¿UVWXVH
- It is recommended to thoroughly clean all accessories
EHIRUH¿UVWXVH$FFHVVRULHVPD\EHFOHDQHGZLWK
warm, soapy water. Rinse and dry thoroughly.
- Place the oven on a level and stable surface where oven has at least 4" (10cm) of clearance on all sides of the unit, and at least 4" (20cm) of clear space above.
- Do not place or store any items on top of the oven, with the exception of the provided accessories. Powering the Oven
- Unravel power cord and plug into a grounded 120V power outlet.
- It is recommended to operate the oven empty in
- Rotate the "Mode" knob until the ROAST cooking mode is illuminated. By default, the cook time will be set to 20 minutes.
- Press the "Start" button to begin oven operation. The oven will begin preheating. Press "Start" button again to skip preheat mode and begin ROAST cooking cycle immediately. The 20-minute timer will begin to count down.
- During this initial cooking cycle, the oven may emit visible vapors. These vapors are normal, safe, and not detrimental to the oven. Ensure that the room is well ventilated.
- At the end of the cooking cycle, the oven alarm will
- The oven is now ready for cooking.49-9000003 Rev. 0 7 Functions
USING THE TOASTER OVEN
Automatic Cooking Modes The following cooking modes automatically adjust cooking time based on the selected food type, food quantity, and the desired shade/doneness. Preheating is not needed for these cook modes. TOAST
7KLVPRGHLVLGHDOIRUEURZQLQJVOLFHVRIEUHDG(QJOLVKPXႈQVDQGIUR]HQZDႉHV(DFKVOLFHZLOOEHEURZQHGHYHQO\
RQERWKVLGHVZLWKRXWWKHQHHGIRUÀLSSLQJWKHIRRG BAGEL This mode is ideal for browning the cut side of bagels or thickly sliced specialty breads. Food should be placed in oven with the cut side facing upward. PIZZA This mode is ideal for cooking frozen pizzas to melt cheese, brown toppings, and crisp the crust To adjust the cooking settings for these modes, please refer to page 8. Mode Rack Position Quantity Default Settings Preheat Temperature Range Time Range Top Heater Bottom Heater Convection Toast Middle 1-6 slices 2 slices Shade level 4 No Automatic Automatic ON ON OFF Bagel Middle 2,4, or 6 halves 4 halves Shade level 4 No Automatic Automatic ON OFF OFF Pizza Middle 6,9, or 12 inch 12 inch pizza 400°F No 300°F to 400°F Automatic ON ON ON Manual Cooking Modes The following cooking modes can be customized manually to prepare a wide range of foods and allow you to cook according to your favorite recipes. Both cook time and temperature may be adjusted for each mode. The convection fan may also be activated to speed up the cooking process. It is generally recommended to allow the oven to complete the preheating cycle before placing food in the oven. ROAST This mode is ideal for cooking foods that are generally solid before the cooking process, including a wide variety of meats and vegetables. Foods will be tender and moist on the inside, while developing a delicious crust on the exterior. BAKE This mode is ideal for cooking foods that generally lack structure before the cooking process, such as cakes, cookies,
PXႈQVSDVWULHVSLHVODVDJQDVDQGFDVVHUROHV)RRGZLOOEHFRRNHGWKRURXJKO\DQGHYHQO\ZKLFKDOVRPDNHVWKLV
mode ideal for packaged frozen meals. BROIL
7KLVPRGHLVLGHDOIRUTXLFNO\VHDULQJPHDWVHJVWHDNVRU¿VKFULVSLQJYHJHWDEOHVHJSRWDWRHVRUEURZQLQJWKH
top surface of foods (e.g. casseroles). KEEP WARM This mode is ideal for maintaining cooked foods at a hot temperature without cooking the foods further. To prevent bacterial growth and ensure food safety, it is recommended to keep foods at a temperature of 160F or above. For instructions on how to adjust the cooking settings for these modes, please refer to page 8. For recommended cooking settings based on food type, refer to the Cooking Guide on page 8. Mode Default Temp. Default Time Temperature Range Time Range Top Heater Bottom Heater Convection Roast 450°F 20 minutes 170°F-450°F 1 minute - 2 hours ON ON OFF Bake 350°F 25 minutes 170°F-450°F 1 minute - 2 hours OFF On OFF Broil 350°F 10 minutes 300°F-450°F 1 minute - 2 hours ON OFF OFF Keep Warm 180°F 1 hour 140°F-200°F 1 minute - 2 hours ON ON OFF8 49-9000003 Rev. 0 Using the Toaster Oven
USING THE TOASTER OVEN
Selecting the Cooking Mode To choose the cooking mode, rotate the upper "Mode" knob until the desired cooking mode is illuminated on
WKH/&'VFUHHQ,IXVLQJWKHRYHQIRUWKH¿UVWWLPHDIWHU
plugging in the power cord, the default settings will be displayed. Otherwise, the last used settings for the selected cooking mode will be displayed. Adjusting the Oven Settings The settings for each cooking mode can be adjusted by using the lower knob. The knob can be rotated clockwise to increase the setting value, or it can be rotated counter- clockwise to decrease the setting value. The lower knob also functions as a button. Pushing the button will toggle between the settings being adjusted (Slices/Shade or Temperature/Time). Oven Settings by Cooking Mode The last used settings for each cooking mode will be stored to memory and recalled each time the cooking mode is selected. TOAST/BAGEL Rotate the lower knob to select the number of bread slices or bagel halves. To adjust the shade/darkness, push the lower knob button once and then rotate the knob to select the desired shade level. The cooking time and oven temperature will be adjusted automatically to achieve the selected shade level. Note: For TOAST and BAGEL cooking modes, it is recommended that the food items be placed on the oven rack in the middle rack position. Bagel halves should be placed with the cut side facing upward. Note: The color of browning will vary depending on type, size, and thickness of the bread or bagels being toasted. ,IWKHEUHDGRUEDJHOVFRQWDLQDVLJQL¿FDQWDPRXQWRI toppings, butter, or sugar, it is recommended to select a lower shade level to avoid burning. PIZZA For PIZZA cooking mode, rotate the lower knob to select the size of the pizza (6", 9", or 12"). To adjust oven temperature, push the lower knob button once and then rotate the knob to select the desired oven temperature. The cooking time will be automatically adjusted. By default, the convection fan is activated for this cooking
PRGHEXWLWPD\EHPDQXDOO\WRJJOHGRႇXVLQJWKH
"Conv." button. Note: The required cooking time may vary depending on the pizza thickness or amount of toppings on the pizza. You may adjust both the cooking time and temperature at any time after the cooking cycle has been started.
ROAST/BAKE/BROIL/KEEP WARM
For ROAST, BAKE, BROIL, and KEEP WARM cooking modes, rotate the lower knob to select the desired oven temperature. To adjust the cooking time, push the lower knob button and then rotate the knob to select the desired cooking time. By default, the convection fan is deactivated for these cooking modes, but it may be manually toggled on using the "Conv." button. Toggling the Convection Fan For manual cooking modes, the convection fan may be
WRJJOHGRQRURႇE\SUHVVLQJWKH&RQYEXWWRQ:KHQ
convection is activated, the convection fan icon will display on the LCD screen. Starting the Cooking Cycle After selecting the desired cooking mode and adjusting the settings, place food in oven and press the "Start" button to begin the cooking cycle. Both the cooking timer and the target oven temperature will be displayed on the LCD screen. For automatic cooking modes, the cooking cycle will start immediately and timer will begin to count down. For manual cooking modes, the oven will begin to preheat to the selected oven temperature. The cooking timer will not begin to count down until the "Start" button is pressed again. To skip the preheat cycle, simply press the "Start" button. Preheating the Oven When using the manual cooking modes, it is generally recommended to allow the oven to preheat to the selected oven temperature. Pressing the "Start" button once will begin the preheat cycle automatically. The "Preheating" icon will display on the LCD screen and the progress bar will scroll from right to left. When the oven has reached the selected temperature, the oven alarm will sound to indicate that the preheat cycle is complete. The oven will continue to maintain the selected temperature for 10 minutes. Place food in the oven and press the "Start" button to begin the cooking cycle. The timer will immediately begin to count down. If the "Start" button is not pressed within 10 minutes after the oven has completed preheat, the oven will DXWRPDWLFDOO\VKXWRႇ Monitoring Oven Progress & Adjusting Settings During the cooking cycle, the LCD screen will display the remaining cooking time and the selected oven temperature. At any time, the cooking time and oven temperature may be adjusted using the lower knob. The progress bar at the bottom of the LCD screen will also provide a quick indication of how much of the current cook cycle has been completed. Ending the Cooking Cycle When the selected cooking time has elapsed, the oven alarm will sound to indicate that the cooking cycle is
FRPSOHWH7KHRYHQZLOOWKHQVKXWRႇDXWRPDWLFDOO\
The cooking cycle can also be ended at any time by pressing the "Cancel" button.49-9000003 Rev. 0 9 Special Features
USING THE TOASTER OVEN
Child Lock Mode This toaster oven features a Child Lock mode. When enabled, the oven will ignore any user input and the oven cannot be operated. To enable Child Lock mode, press and hold the "Cancel" button for 3 seconds. When enabled, a lock icon will appear in the LCD screen. If a button is pressed or a knob is turned when Child Lock is enabled, the oven will beep and the lock icon will blink. To disable Child Lock mode, press and hold the "Cancel" button for 3 seconds. Silent Mode This toaster oven features a Silent Mode. When enabled, the oven will mute all sounds and alarms. To enable Silent Mode, press and hold the "Conv." button for 3
VHFRQGV7KHZRUGRႇZLOOEHEULHÀ\GLVSOD\HGWR
indicate that Silent Mode is enabled. To disable Silent Mode, press and hold the "Conv." button
IRUVHFRQGV7KHZRUGRQZLOOEHEULHÀ\GLVSOD\HGRQ
the LCD screen to indicate that Silent Mode is disabled. Cooking Guide (Manual Mode) Mode Food Weight/ Quantity Suggested Accessory Rack Position Typical Cooking Time Suggested Temperature Preheat? Convection? Roast Beef Roast Up tp 3 lb. Roasting Pan and Oven Rack Middle )IRUWKH¿UVWPLQ- utes. Then 350°F for 20-30 minutes. Yes No Frozen Chicken Nuggets Up to 1 lb. 18-20 min- utes 450°F No No Bake White Cake 9" round pan Oven Rack Middle 20-30 min- utes 350°F Yes No Fruit Pie 9" pie pan Oven Rack IRU¿UVWPLQXWHV Then 380°F for next 60 minutes Yes No 0XႈQV PXႈQSDQ Oven Rack 10-13 min- utes 350°F Yes No Sugar Cookies 9" x 13" cookie sheet Oven Rack 8-13 min- utes 350°F Yes No Lasagna Casserole dish Oven Rack 30-45 min- utes 400°F Yes Yes Broil Steak 2 steaks (0.5lb. each) Roasting Pan and Oven Rack Upper 7-10 min- utes (each side) 450°F No No Fish Fillet 2 steaks (8 oz. each) 4-7 minutes (each side) 450°F Yes No Keep Warm Cooked Lasagna Casserole dish Oven Rack Middle --- 150°F-180°F No No10 49-9000003 Rev. 0 Troubleshooting Care and Cleaning Accessories
ACCESSORIES / CARE AND CLEANING / /TROUBLESHOOTING
Problem Solution The power indicator or display window does not turn on even though it is plugged in.Ensure that the power cord is properly plugged into a power outlet.Press any button to ensure oven is not in Sleep Mode. Oven fails to get hot There is a problem with the main unit. Call 1-800-GECARES (1-800-432-2737) for customer support. Oven omits a burnt smell Ensure that the cooking time is appropriately set and that food is not being overcooked. Fats, oils, and sauces that have dripped onto the lower heating elements may cause some smoke or burning smell during oven operation.Ensure that the baking tray, oven rack, and drip tray are thoroughly clean before each use.Heater tubes turn off during cooking.The heater tubes turn on/off to control temperature. It is not a malfunction. Smoke comes out. The fat from the food sticking to the heater may cause smoke during cooking especially using “Broil” menu. Set lower temperature if necessary.H01 or H02 appears on the display window.These error codes indicate a problem with the toaster oven. Call 1-800-GECARES (1-800-432-2737) for customer support. Save time and money! Review the charts on the following pages first and you may not need to call for service.
- Before cleaning, unplug from outlet and allow the unit to completely cool.
- Do not use benzine, thinner, alcohol, bleach, polishing powder, metal brush or nylon brush, otherwise the surface will be damaged.
- After every use, clean the main unit, crumb tray thoroughly. Exterior
- Wipe with a well - wrung cloth. Interior
- Wipe with a well - wrung cloth. When the interior is severely stained or dirty, wipe with a towel saturated with a diluted solution of a mild dishwashing liquid.
- Do not wipe the heating tubes to avoid damaging. Crumb tray
- Wash with diluted dish soap (neutral) and soft sponge.
'U\LWZHOODQGVHWLWEDFNWRWKHPDLQXQLW¿UPO\
Baking tray / cooking rack
- Wash with diluted dish soap (neutral) and soft sponge. Dry it well.
- Do not use a dishwasher. How to use "Removal Tool" Cooking rack Make sure the bottom hooks on both sides, and are stuck on the rack, then pull it out. Baking tray Make sure the upper hook stickstothetray then pull it out. Bottom hookBottom hookUpper hookUpper hook Holding rack removal tool49-9000003 Rev. 0 11 Ŷ Failure of the product if it is abused, misused, or used for other than the intended purpose or used commercially. Ŷ Replacement of house fuses or resetting of circuit breakers. Ŷ Damage caused after delivery. Ŷ Replacement of the light bulbs, if included. Ŷ Damage to the product caused by accident, fire, floods or acts of God. Ŷ Incidental or consequential damage caused by possible defects with this appliance. What GE Appliances Will Not Cover: For the Period of: GE Appliances Covers One Year From the date of the original purchase If the toaster fails due to a defect in materials or workmanship, during the limited one-year warranty, GE Appliances will either repair your product or replace your product with a new or remanufactured product, or refund the purchase price of the product at GE Appliances sole discretion. Staple your receipt here. Proof of the original purchase date is needed to obtain service under the warranty. GEAppliances.com Please have your serial number and your model number available when calling for service. Call 1.800.GE.CARES (1-800-432-2737) for service questions. LIMITED WARRANTY GE Appliances Limited Warranty
EXCLUSION OF IMPLIED WARRANTIES
Your sole and exclusive remedies are product exchange or refund as provided in this Limited Warranty. Any implied warranties, including the implied warranties of merchantability or fitness for a particular purpose, are limited to one year or the shortest period allowed by law. For sale in the 50 United States and the District of Columbia only: For US Customers: This limited warranty is extended to the original purchaser for products purchased for home use within the USA. Some states do not allow the exclusion or limitation of incidental or consequential damages. This warranty gives you specific legal rights, and you may also have other rights which vary from state to state. To know what your legal rights are, consult your local or state consumer affairs office or your state’s Attorney General. Warrantor: GE Appliances, a Haier company Louisville, KY 40225 For Customers in Canada: This limited warranty is extended to the original purchaser and any succeeding owner for products purchased in Canada for home use within Canada. In-home warrant service will be provided in areas where it is available and deemed reasonable by Mabe to provide. Warrantor Canada: MC Commercial, Burlington, Ontario, L7R 5B612 49-9000003 Rev. 0 Consumer Support CONSUMER SUPPORT Service and Registration Register your new appliance on-line at your convenience! Timely product registration will allow for enhanced communication and prompt service under the terms of your warranty, should the need arise. Register your appliance at GEAppliances.com/register. Contact Us If you are not satisfied with the service you receive from GE Appliances, contact us on our Website with all the details including your phone number, or write to: In the US: General Manager, Customer Relations | GE Appliances, Appliance Park | Louisville, KY 40225 GEAppliances.com/contact In Canada: Director, Consumer Relations, Mabe Canada Inc. | Suite 310, 1 Factory Lane | Moncton, N.B. E1C 9M3 GEAppliances.ca/en/contact-usFOUR GRILLE-PAIN 49-9000003 Rev. 0 06-20 GEA G9OCAASSPSS G9OCABSSPSS