Profile P9SBCAS6WBB - Oven GE - Free user manual and instructions
Find the device manual for free Profile P9SBCAS6WBB GE in PDF.
Download the instructions for your Oven in PDF format for free! Find your manual Profile P9SBCAS6WBB - GE and take your electronic device back in hand. On this page are published all the documents necessary for the use of your device. Profile P9SBCAS6WBB by GE.
USER MANUAL Profile P9SBCAS6WBB GE
P9SBAAS and P9SBCAS Series
ENGLISH/FRANÇAIS/ESPAÑOL
GE is a trademark of the General Electric Company. Manufactured under trademark license.
49-9000057 Rev. 5 04-25

Profile
THANK YOU FOR MAKING GE APPLIANCES A PART OF YOUR HOME.
Whether you grew up with GE Appliances, or this is your first, we're happy to have you in the family.
We take pride in the craftsmanship, innovation and design that goes into every GE Appliances product, and we think you will too. Among other things, registration of your appliance ensures that we can deliver important product information and warranty details when you need them.
IMPORTANT SAFETY INFORMATION 5
FCC/IC COMPLIANCE STATEMENT 9
COMPONENTS 10
CONTROLS 11
PROGRESS AND STATUS RING 13
GETTING STARTED. 14
Unpacking the Smoker 14
Positioning the Smoker 14
INSTALLING COMPONENTS 14
Removable Rack Supports. 14
Wire Racks. 15
Drip Pan 15
Counter Guard 15
Waste Bin & Carrier. 15
PREPARING THE INDOOR SMOKER 16
STEP 1) PREPARING YOUR SMOKER 16
Pre-Smoke Checklist 16
Loading Pellets 17
Priming the Auger 17
Preparing the Waste Bin. 17
Wi-Fi Connect - SmartHQ™ App. 17
Selecting a Cooking Mode 17
Toggling Between Probe Target & Cook Time 17
Selecting the Probe Target 17
Selecting the Cook Time 18
Selecting Smoker Temperature 18
Selecting Smoke Level 18
Installing Temperature Probe 18
The Four Phases of Cooking. 19
Starting Your Smoker 19
Option to Auto-Start Smoking. 19
Opening the Door While Smoking or Cooking 20
Clearing Smoke During Smoking. 20
Resuming Smoke 21
STEP 4) KEEPING WARM UNTIL READY TO EAT 21
Automatic Keep Warm 21
Toggling AUTO WARM 21
Adjusting AUTO WARM Temperature before Auto Warm Begins 21
STEP5)ENJOY! 22
Stopping the Smoker 22
Shutting Off the Smoker 22
Waking Up the Smoker 22
SMOKER SETTINGS MENU 22
AutoWarm 22
Pellet 22
SMOKER SETTINGS MENU 23
Auger 23
Brightness 23
Sound 23
Units 23
Info. 23
Reset. 23
LOCKING THE CONTROLS 24
SMOKING TIPS & TRICKS 24
General Smoking Tips 24
CONNECTING TO WIFI 26
Wi-Fi Connect - SmartHQ™ App 26
Connecting to WiFi 26
Disconnecting from WiFi 26
CARE & CLEANING 27
Cleaning Your Smoker 27
Cleaning the Smoker Exterior 27
Cleaning the Smoker Interior 27
Cleaning the Light Cover 28
Cleaning the Waste Bin 28
Cleaning the Racks 28
Cleaning the Temperature Probe 28
Smoke Chamber Light 29
TROUBLESHOOTING 30
NOTES 33
GE APPLIANCES LIMITED WARRANTY 34
CONSUMER SUPPORT 35
Product Registration
Write the model and serial numbers here:
Model #
Serial #
Find the model and serial numbers labeled on the back of the unit.
WARNING
- Read all safety information and operating instructions contained in this manual using the appliance. Save these instructions for reference.
IMPORTANT OPERATING SAFEGUARDS
- Read all instructions before operating the appliance.
- Do not use appliance for other than intended use.
- Close supervision is necessary when any appliance is used by or near children.
- The use of accessories not recommended or provided by the appliance manufacturer may cause injuries or damage to the appliance.
- Do not heat unopened food containers. Pressure could build up and the container could burst, causing injury.
- Avoid plugging in or operating other devices into the same circuit while operating the indoor smoke to help prevent circuit overload, nuisance trips of the breaker and/or fire hazards.
- To disconnect, turn control to Off, then remove plug from wall outlet.
- Do not let cord hang over edge of table or counter or touch hot surfaces.
- Do not use or store the appliance outdoors. This appliance is designed for household use only.
- Do not place on or near a hot gas or electric burner, or in a heated oven.
- Ensure the appliance is positioned on a level, stable, and heat-resistant surface whenever the appliance is in operation.
- Even if there is sufficient room in the smoker, avoid loading excessive amounts of food.
- Keep the pellet hopper door closed except when refilling the hopper. This will ensure the wood pellets are properly stored.
- Do not let cooking grease or other flammable materials accumulate in or near the smoker. Grease in or near the smoker may ignite.
- Clean the appliance regularly according to the cleaning and care instructions. Use only the recommended cleaning agents.
- Unplug from outlet when not in use and before cleaning. Allow to cool completely before removing or inserting parts or components.
- Do not touch hot surfaces. Use handles or knobs. To disconnect, press the Power button to turn off the smoker and then remove the plug from the wall outlet.
- Do not use harsh cleaning agents near the opening in the rear of the smoking chamber as this may damage internal components of the appliance.
- Never place cooking utensils, pizza or baking stones, or any type of foil or third-party liner on the floor of the smoker chamber. These items can trap heat or melt, resulting in damage to the product and risk of shock, smoke, or fire.
- To protect against electrical shock do not immerse cord, plugs, or appliance in water or other liquid.
- Do not operate any appliance with a damaged cord or plug, or after the appliance malfunctions or has been damaged in any manner. Disconnect appliance from power supply and have it serviced by a qualified technician. See page 35 to schedule service.
READ AND SAVE THESE INSTRUCTIONS
WARNING
CARBON MONOXIDE HAZARD
Burning wood pellets produces carbon monoxide. Carbon monoxide is a colorless, odorless, and poisonous gas. Inhaling it may lead to illness, serious injury, or death. The Profile Smart Indoor Smoker is specifically designed to convert byproducts of wood pellet combustion, including carbon monoxide. The appliance may be operated safely indoors. Failure to operate and maintain the appliance properly may compromise the ability of the appliance to function safely in your home.
Follow these guidelines to minimize the risk that carbon monoxide poses:
- Read all safety information and operation instructions before using the appliance. Always operate the appliance in strict accordance with these instructions.
- Always use the appliance with as much ventilation as possible. Avoid using the appliance in a small or enclosed space.
- When using the smoker, regularly inspect the door to ensure there are no foreign objects preventing the door from closing completely or otherwise interfering with the door seal. When using the temperature probe, ensure the probe cord is positioned so that it will not be pinched or trapped by the door as it closes. Gaps in the seal may permit smoke to escape the smoke chamber.
- Governmental and safety organizations generally recommend installing a battery-operated or battery back-up carbon monoxide detector in your home. Follow the detector manufacturer's instructions regarding the maintenance and replacement of the detector.
- Know the health risks of carbon monoxide. When inhaled, carbon monoxide reduces the ability of blood to carry oxygen. Low blood oxygen levels can result in loss of consciousness and death.
- Know the symptoms of carbon monoxide poisoning. The most common symptoms are headache, dizziness, weakness, nausea, vomiting, chest pain, and confusion. These symptoms are often described as "flu-like". If you or others develop such symptoms, stop using the appliance immediately, seek fresh air, and see a doctor.
- Alcohol consumption can increase the effect of carbon monoxide poisoning and reduce your ability to recognize symptoms.
- Certain individuals who are sensitive to airborne pollutants should take extra precaution when using the appliance. Infants, elderly, smokers, pregnant women, and people with chronic heart disease, anemia, or other breathing problems are more susceptible to the effects of carbon monoxide.
READ AND SAVE THESE INSTRUCTIONS
IMPORTANT SAFETY INFORMATION READ ALL INSTRUCTIONS BEFORE USING THE APPLIANCE
WARNING
PRE RISK
- Remove all packaging materials before operating the appliance to prevent ignition of these materials. Be sure to remove any packing materials found inside the smoke chamber, including on the ceiling of the smoke chamber.
- When operating the appliance, maintain a minimum of 4 inches (102 mm) of clearance on the left and right sides of the appliance.
- Do not use or store any flammable or combustible materials on, inside, or near the appliance.
- To reduce the risk of fire, do not place the smoker on any heating or cooking appliance.
- To reduce the risk of fire, do not store anything directly on top of the appliance surface when the appliance is in operation.
- Always replenish the waste bin with clean water before each use. The water ensures that the hot, used wood pellets are properly extinguished.
- Keep the appliance clean in accordance with the cleaning guidelines described in this manual. Failure to properly clean and maintain the smoker may result in grease fires.
- Always operate the appliance with the drip pan installed to collect fat and grease that may drop from the food. Clean the drip pan thoroughly after each use.
- Whenever possible, place food in the center of racks to ensure grease and fat drippings are captured by the drip pan.
- Do not place flammable substances inside of the smoker, such as alcohol or gasoline.
WARNING

THE EVENT OF A FIRE, TAKE THE
FOLLOWING STEPS TO PREVENT INJURY AND SPREAD OF FIRE
- If there is a fire in the smoker, smother the fire by keeping the door closed and cancel the cycle but do not unplug the smoker. Alternatively smother by using a multi-purpose dry chemical or foam type fire extinguisher. Do not use water on grease fires.
WARNING

CTRIC SHOCK RISK
- To protect against electrical shock, do not immerse cords, plugs, or appliance in water or any other liquid.
- Unplug the appliance from the power outlet when not in use. To unplug, grasp the plug and pull from the outlet. Never pull from the power cord.
- Do not operate any appliance with a damaged cord or plug or after the appliance malfunctions or has been damaged in any manner. Disconnect appliance from power supply and have serviced by a qualified technician. See page 35 to schedule service.
- Use only a 120V, 60 Hz standard electrical supply that is properly grounded in accordance with the National Electric Code and local codes and ordinances.
- Do not clean with metal scouring pads. Pieces can break off of the pad and contact electrical parts, introducing a risk of electrical shock.
READ AND SAVE THESE INSTRUCTIONS
IMPORTANT SAFETY INFORMATION READ ALL INSTRUCTIONS BEFORE USING THE APPLIANCE
WARNING
BURN RISK
- The exterior surfaces of the appliance may be very hot during and after operation. Always allow appliance to cool completely before handling, cleaning, or moving the appliance.
- Empty and clean the drip pan after each use. Exercise extreme caution when removing the drip pan and disposing of hot grease.
- Extreme caution must be used when moving an appliance containing hot oil or other hot liquids.
- Do not touch hot surfaces.
- To prevent burns or injury, always use proper protection, such as hot pads or oven mitts, when removing or handling items from the smoking chamber.
- Wire racks and temperature probes may be extremely hot when preheated. Use extreme caution when loading food onto racks and when inserting, removing, or adjusting temperature probes.
- Do not use wood chips with the smoker.
CAUTION
PELLET FUEL RESTRICTIONS
This unit generates smoke by smoldering wood pellets during operation. Although the smoke is catalyzed during operation, it is possible that the smell generated by the smoldering pellets may cause susceptible users to experience discomfort or an allergic reaction during use, even if they have not previously experienced such symptoms to smoke. To minimize this risk, follow the instructions in this manual for use, including only using the unit in a well-ventilated area, reducing the smoke level setting of the smoker, placing the smoker next to an open window, or using an air purifier during operation. Do not use the unit outdoors.
This appliance is designed for use with only food-grade hardwood pellets intended for pellet grills or smokers. To purchase the preferred pellets for the indoor smoker, please visit indoorsmokerpellets.com.
- Never us heating fuel pellets (pellets that burn to generate heat), as these may contain hazardous contaminants or additives that could be harmful to your health or the appliance.
- Do not use softwood pellets, such as pine, since the smoke generated by burning this type of wood contains dangerous phenols that are not safe for consumption.
- Use of any other type of fuel in this appliance will void the warranty and may lead to damage of the appliance and/or may create a safety hazard.
- Always store wood pellets in a dry location away from sources of heat. Do not allow water to enter the pellet hopper. Pellets exposed to water or high humidity may cause the smoker's auger to jam and may damage the auger motor.
CAUTION
APPLIANCE REPAIR OR MODIFICATION
Do not attempt to disassemble, repair, modify, or replace any part of the appliance. Do not install any parts or components not authorized by the manufacturer for use with the appliance. Any modification of the smoker or installation of unauthorized parts or components will void the warranty and may create a safety hazard. Disconnect appliance from power supply and have serviced by a qualified technician. See page 35 to schedule service.
READ AND SAVE THESE INSTRUCTIONS
CAUTION
A SHORT POWER-SUPPLY CORD IS PROVIDED TO THE RISK RESULTING FROM BECOMING ENTANGLED PING OVER A LONGER CORD.
Extension cords should not be used with this product.
CAUTION
FOOD SAFE INTERNAL TEMPERATURES
Cook food thoroughly to help protect against foodborne illness. Minimum safe food temperature recommendations are provided by the USDA and FDA. Use the provided temperature probe or a food thermometer to measure food temperatures and check several locations within the smoked product.
FCC/IC COMPLIANCE STATEMENT
FCC/IC COMPLIANCE STATEMENT:
This device complies with Part 15 of the FCC Rules. Operation is subject to the following two conditions:
- This device may not cause harmful interference, and
- This device must accept any interference received, including interference that may cause undesired operation.
Any changes or modifications not expressly approved by the party responsible for compliance could void the user's authority to operate the equipment.
INFORMATION TO USER
NOTE: This equipment has been tested and found to comply with the limits for a Class B digital device, pursuant to Part 15 of the FCC Rules. These limits are designed to provide reasonable protection against harmful interference in a residential installation. This equipment generates, uses, and can radiate radio frequency energy, and if not installed and used in accordance with the instructions, may cause harmful interference to radio communications. There is no guarantee that interference will not occur in a particular installation. If this equipment does cause harmful interference to radio or television reception, which can be determined by turning the equipment off and on, the user is encouraged to try to correct the interference by one or more of the following measures:
- Reorient or relocate the receiving antenna.
- Increase the separation between the equipment and receiver.
- Connect the equipment to an outlet on a circuit different from that to which the receiver is connected.
- Consult the dealer or an experienced radio/television technician for help.
This device complies with Industry Canada license-exempt RSS standard(s).
Operation is subject to the following two conditions: (1) This device may not cause interference, and (2) This device must accept any interference, including interference that may cause undesired operation of the device.
READ AND SAVE THESE INSTRUCTIONS
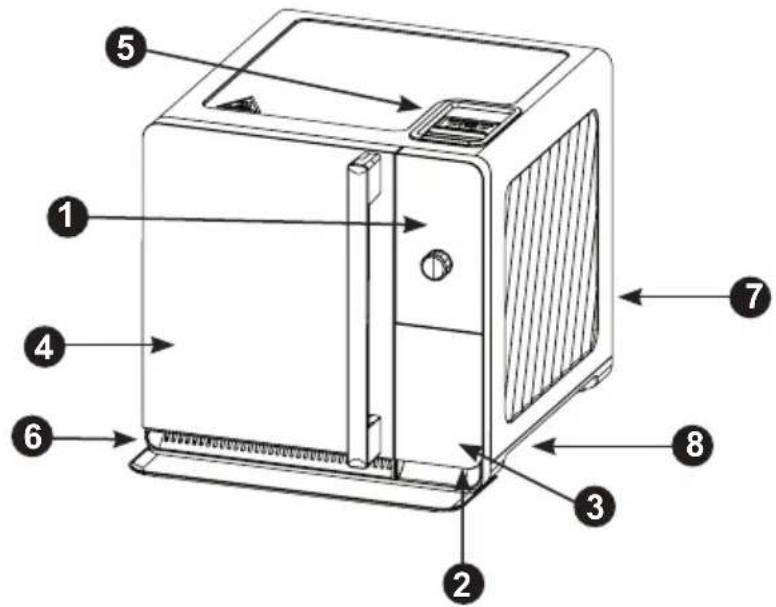
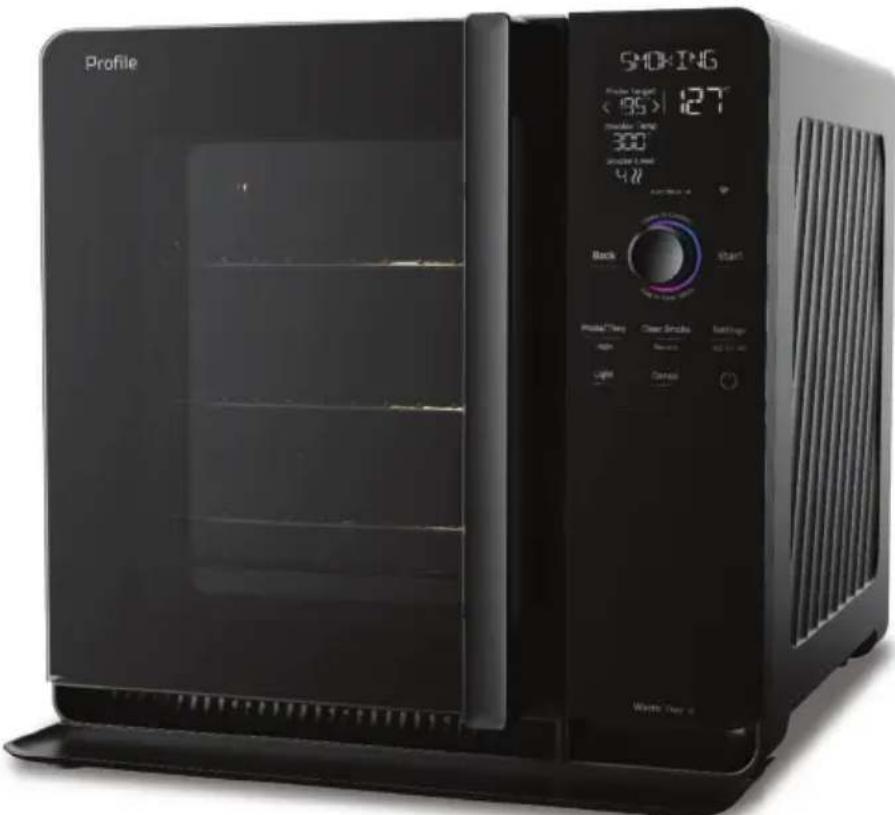
External Components
- Control Panel
- Waste Bin Carrier
- Waste Bin
- Smoker Door
- Pellet Hopper
- Exhaust Vent
- Power Cord
- Hand Grips
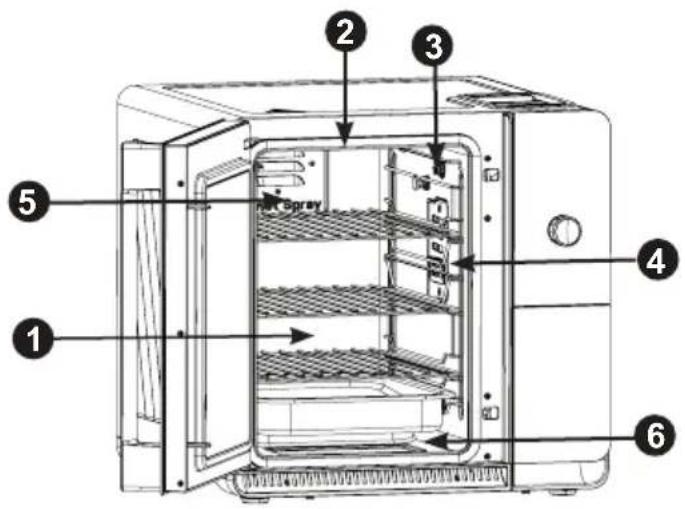
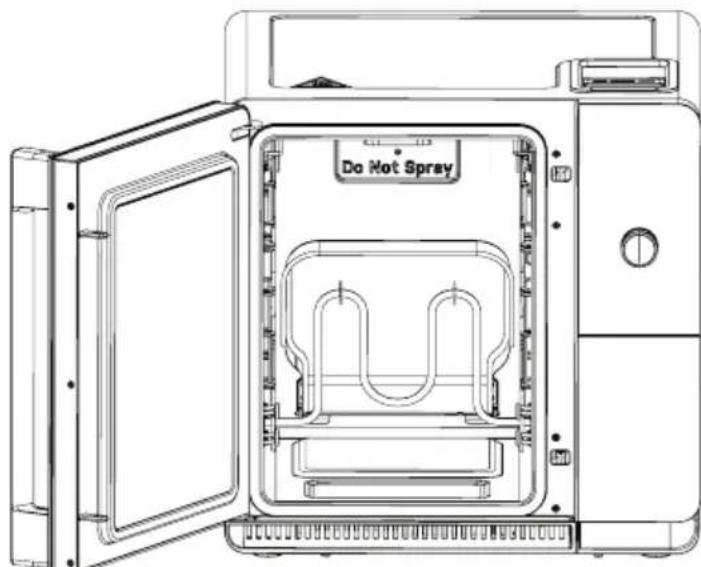
Internal Components
- Smoking Chamber
- Smoking Chamber Light
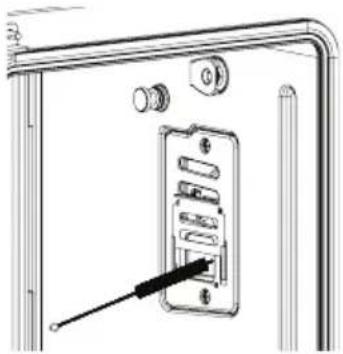
- Temperature Probe Socket
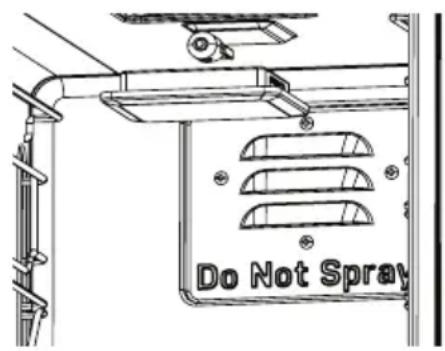
- Smoke Inlet Cover
- Active Smoke Filtering Inlet
- Pivoting Heater & Heater Guard
Included Accessories
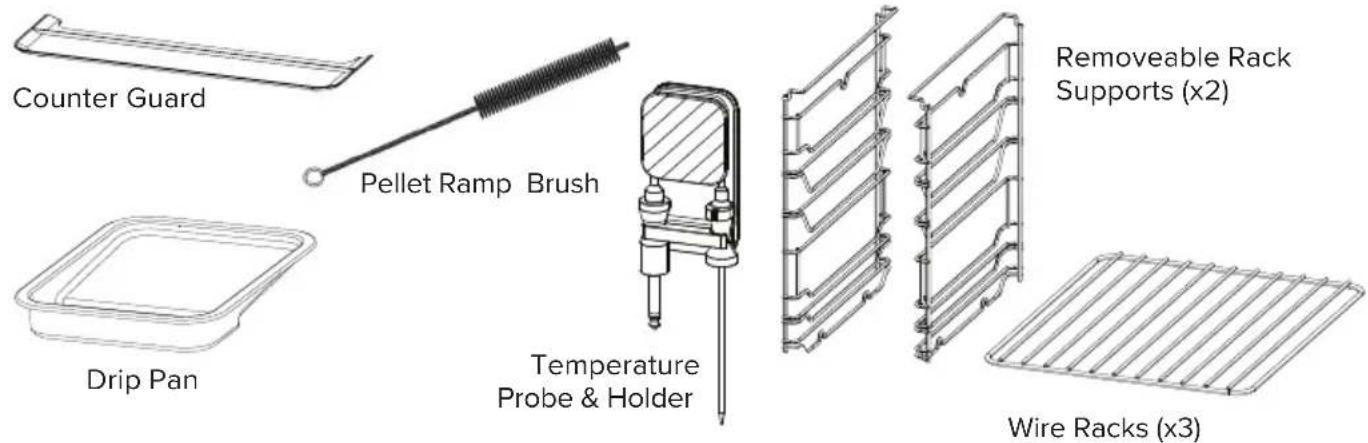
Counter Guard
Drip Pan
- Pellet Ramp Brush
Wire Racks (x3)
- Removeable Rack Supports (x2)
- Temperature Probe
- Temperature Probe Holder
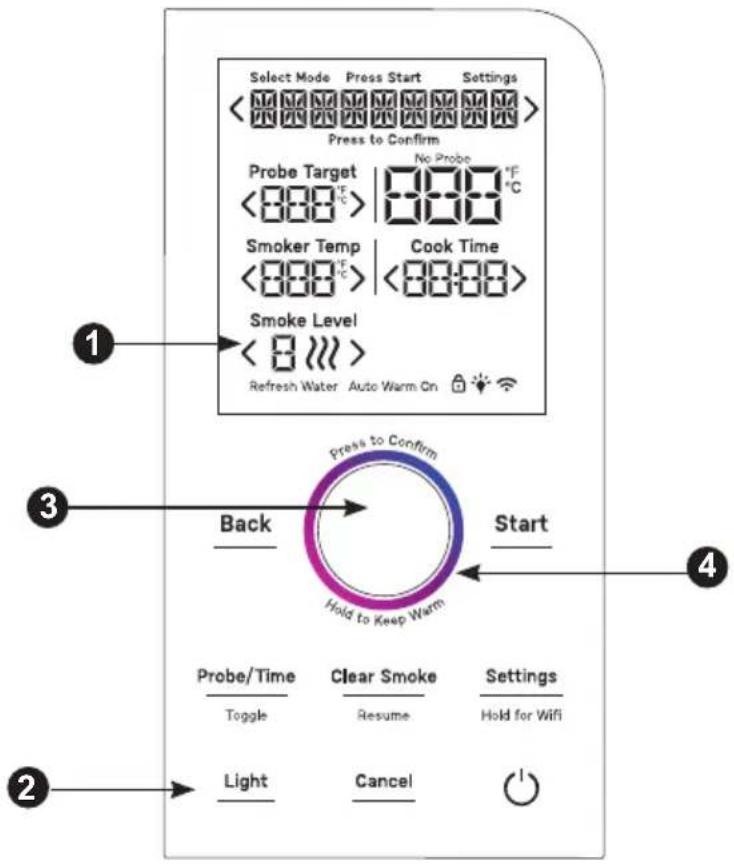
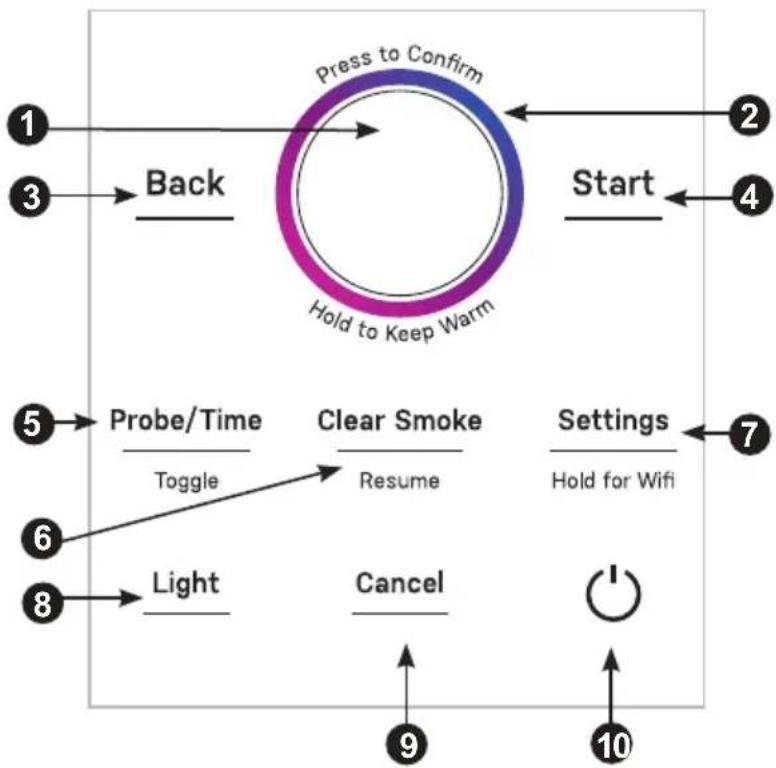
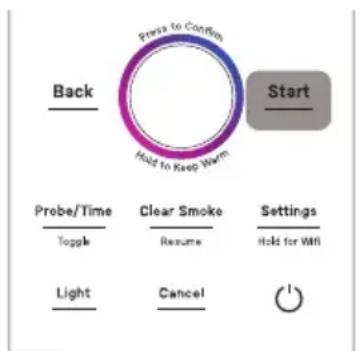
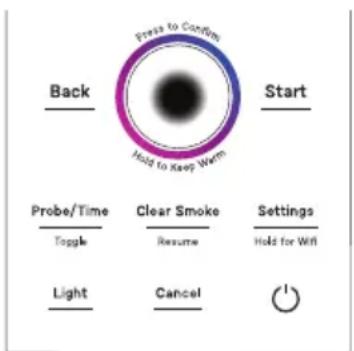
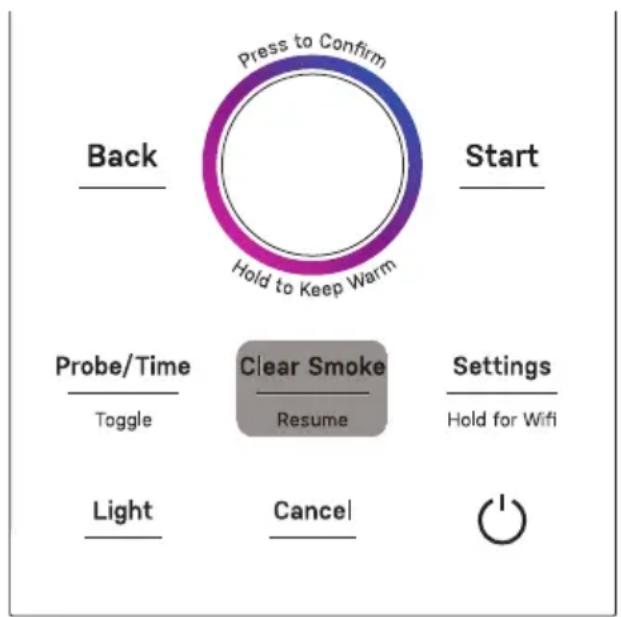
Controls
- Display
- Buttons
- Dial / Button
- Progress & Status Ring
Dials and Buttons
- Dial
- Progress and Status Ring
- Back Button
4.Start Button - Probe / Time Button
- Clear Smoke / Resume Smoke Button
- Settings Button
8.LightButton - Cancel Button
- Power Button
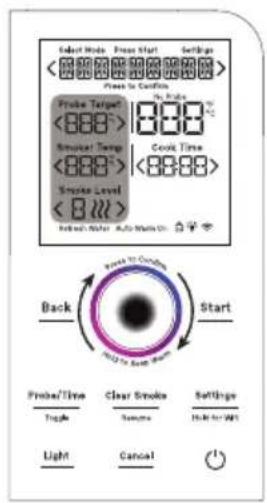
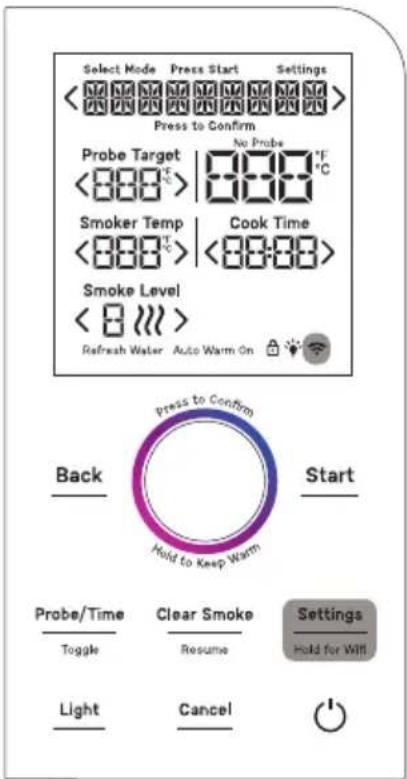
DISPLAY
Select Mode Indicator
The words "SELECT MODE" will illuminate while the user is navigating the cooking modes. Once the desired cooking mode is selected, this notification will disappear.
Press Start Notification
The words "PRESS START" will illuminate when the preheating cycle is complete, and the smoker is ready to begin smoking.
Settings Indicator
The word " SETTINGS" will illuminate while the user is navigating the appliance settings menu.
Message/Mode Display
During standby, selected Cook Mode will be displayed. After the smoker has started, the current cooking phase will be displayed. Other notifications or instructions may also be displayed.
Probe Target
When Probe Target is active, the smoker will smoke or cook the food until the internal temperature of the food reaches this Probe Target.
No Probe Notification
The words "NO PROBE" will illuminate if a probe target is selected but the temperature probe is not installed.
Current Probe Temperature
If the temperature probe is installed, the current probe temperature will be displayed. The probe temperature will be shown regardless of whether using probe target or cook time to control the cooking duration.
Cook Time
When Cook Time is active, the smoker will smoke or cook the food until the displayed time expires to zero. While keeping warm, the time will present elapsed time. When Cook Time is greater than 1 minute, the time will display Hours and Minutes. When Cook Time is less than 1 minute, the time will display Minutes and Seconds.
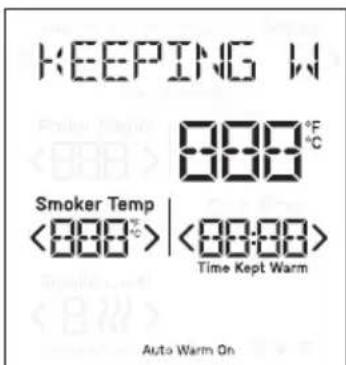
Time Kept Warm
The words "TIME KEPT WARM" will illuminate when the appliance is operating in Keep Warm mode. The time displayed will indicate how long the smoker has been operating in Keep Warm mode.
Smoke Level
The desired smoke intensity level will be displayed. If no smoke is desired, the smoke level will display "--".
Refresh Water Notification
The words "Refresh Water" will illuminate after food is finished to remind the user to discard the used pellets from the waste bin and refill with fresh water.
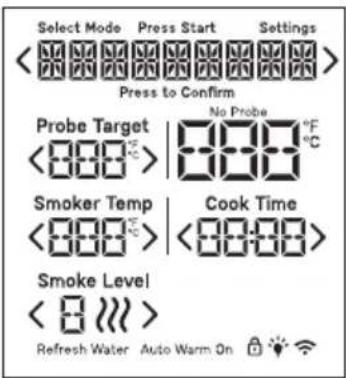
Auto Warm On Indicator
The words "AUTO WARM ON" will illuminate if the Auto Warm feature is enabled.
Control Lock Indicator
The control lock icon will illuminate when the control lock has been enabled.
Light Indicator
The light icon will illuminate when the smoking chamber light has been activated.
Wi-Fi Enabled Indicator
The Wi-Fi icon will illuminate when the Wi-Fi connectivity has been enabled.
NOTE: Remove the sticker on the display to reveal the controls.
Solid White: Standby Blinking White: Attention

Blinking Red: Error

Single Yellow to Filled Yellow: Preheating

Solid Yellow: Preheat Finished

Spinning Gradient: Smoking, Cooking

Blinking Gradient: Keeping Warm

Filled Yellow to Single Yellow: Smoke Clearing
Unpacking the Smoker
Remove and appropriately discard all packaging materials. Avoid using sharp tools that can damage the contents. Remove all tape and protective films before first use.
Refer to the "Components" section on page 10 of this manual to verify that all components are present.
Positioning the Smoker
Place the smoker on a level and stable surface indoors, such as a kitchen countertop.
The smoker should be positioned such that it has 4 inches of clearance to the left and right of the appliance, whenever possible. Position the smoker away from flammable materials and any items that may be sensitive to heat.
Installing Components
Removable Rack Supports
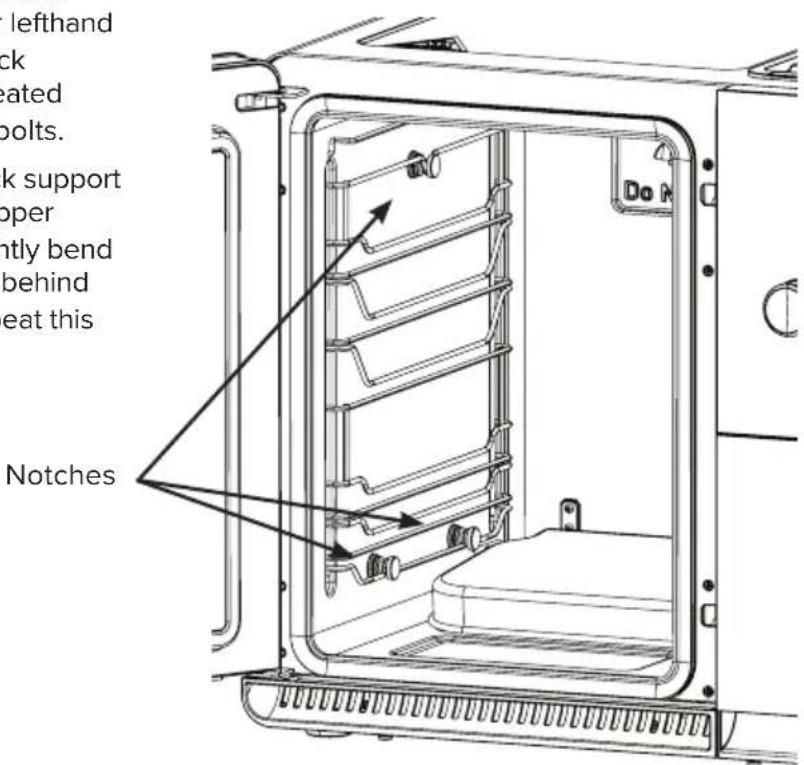
The rack supports are assembled to the side of the smoke chamber and support the wire racks on which food is placed. The rack supports are designed to be easily removed for cleaning purposes and are dishwasher-safe.
NOTE: The rack supports are designed to be symmetrical. Therefore, it is not important which rack is installed on the left or right side of the smoke chamber.
To assemble the left rack support, align the two notches in the bottom of the rack support with the shoulder bolts mounted on the lower lefthand side of the smoke chamber. Press the rack support downward so the notches are seated behind the head of the lower shoulder bolts.
Then align the notch in the top of the rack support with the shoulder bolt mounted on the upper lefthand side of the smoke chamber. Lightly bend the wire down to allow the notch to seat behind the head of the upper shoulder bolt. Repeat this process for the righthand side.

Wire Racks
The wire racks are used to support food within the smoke chamber. There are five positions in which the wire racks may be installed. The wire racks are dishwasher-safe.
To install each wire rack, slide the wire rack onto the rack supports at one of the designated rack positions.
NOTE: The maximum load capacity for each rack is 15 lbs. Placing more than 15 lbs on any rack poses a risk of the rack failing and creating an associated burn hazard and or damage to the smoker.
Drip Pan
The drip pan is used to collect any drippings, such as fat and grease, from food that is cooking above.
To install the drip pan, slide the drip pan onto the rack supports at one of the designated rack positions. The drip pan should always be installed in the closest rack position below the food. This will ensure the pan captures the most drippings and minimizes the cleanup needed.
NOTE: The drip pan must always be installed whenever cooking in the smoker. Otherwise, drippings will accumulate on the bottom of the smoke chamber, making cleanup significantly more difficult.
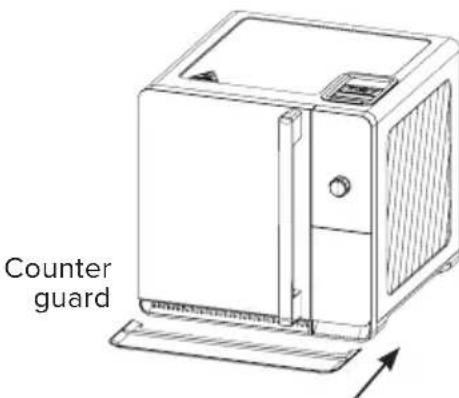
Counter Guard
The plastic counter guard is placed on the countertop in front of the smoker to collect any drippings, such as fat and grease, that may fall when opening the door of the smoker or when handling food in the smoker.
To install, align the cutout in the counter guard toward the front of the smoker. Slide the counter guard underneath the smoker until it is fully seated against the smoker. Make sure the counter guard does not obstruct the exhaust at the front of the unit.
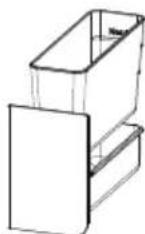
Waste Bin & Carrier
When filled properly with fresh water, the waste bin collects and extinguishes used pellets, making the pellet waste easier to discard safely.
To install the waste bin, place the metal waste bin inside of the plastic waste carrier. Make sure that the waste bin is oriented such that the fill lines in the waste bin are towards the back of the waste carrier.
Then slide the carrier into the open area below the controls. Push the carrier back until it is fully seated.
NOTE: Before each use of the smoker, fresh water should be added to the waste bin. The waste bin should be thoroughly cleaned after each use of the smoker. Refer to the "Care and Cleaning" section of this manual for cleaning instructions.

Wire racks

Drip pan

Correct
Wrong
STEP #1 Preparing Your Smoker
Pre-Smoke Checklist
- Perform pre-smoke maintenance
a. Clean drip pan
b. Clean waste bin
c. Clean smoking chamber
- Check smoker surroundings for hazards
a. Ensure nothing is obstructing the front exhaust below the smoker door
b. Ensure smoker is a safe distance from combustible items
- Perform pre-smoke operations
a. Load pellets into hopper
b. Prime the auger (if needed)
c. Refill clean water in waste bin
- Check that all necessary parts are installed properly
a. Internal drip pan installed below food
b. Waste bin properly seated in waste carrier
c. Waste carrier installed
d. External drip tray placed in front of smoker
e. Hopper door is closed
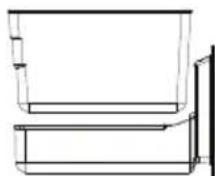
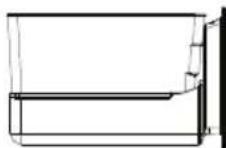
Loading Pellets
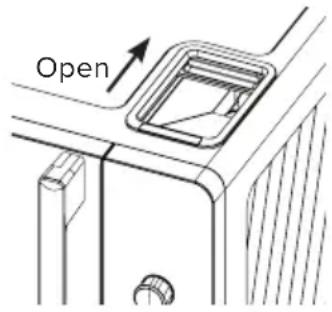
Open pellet hopper door by sliding it towards the back of the unit. Check that there are no foreign objects in the hopper before adding pellets.
Fill the hopper completely with pellets but ensure there is enough room for the hopper door to close.
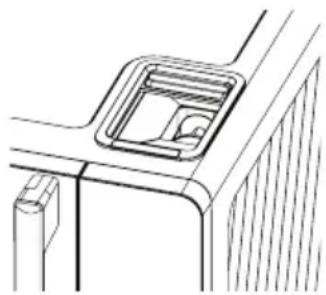
Close the hopper door completely. The hopper door should always be closed whenever the smoker is in operation. Failure to do so may lead to smoke escaping from the unit.
CAUTION
This appliance is designed for use with only food-safe hardwood pellets intended for
pellet grills or smokers. Refer to the "Safety Information" on page 8 of this manual for additional details.
NOTE: Load solid wood pellets only. Do not load the hopper with wood pellet particles or sawdust as this may cause the smoker to malfunction and present safety concerns.
Priming the Auger
To ensure proper smoking performance, the auger should be primed after filling the pellet hopper. This will minimize the time needed to start generating smoke.
NOTE: The auger priming process only needs to be performed before first use, or whenever the hopper has been completely emptied of pellets. As a general guideline, if the auger screw is visible at the bottom of the hopper, the auger should be primed after loading pellets in the hopper.
Before priming the auger, check that the waste bin is empty and dry, and the waste bin carrier is properly installed in the smoker.
To prime the auger, press the [Settings] button on the control panel. Rotate the dial until "AUGER" appears on the display. Push the dial to select.
The auger will then activate for a fixed duration. During this time, the auger will feed pellets through the appliance. Some pellets may be ejected into the waste bin, but these may be returned to the hopper.
Preparing the Waste Bin
When filled properly with fresh water, the waste bin collects and extinguishes used pellets, making the pellet waste easier to discard safely.
Preparing the Waste Bin (cont.)
To prepare the waste bin, pull out the waste bin carrier located below the control panel. Remove the waste bin from the waste bin carrier. Fill the waste bin with fresh water to the "MIN" fill line. Return the waste bin to the waste bin carrier and slide the waste bin carrier closed.
NOTE: When emptying used pellets and water from your waste bin, avoid putting used wood pellets down the drain. See the "Care and Cleaning" section on page 28 of this manual for more details.
STEP #2 Starting up Your Smoker
Selecting a Cooking Mode
The smoker includes eight built-in cook modes, including six presets with recommended settings for various foods. See the table below for a brief explanation of each cooking mode.
| Cooking Mode | Description |
| Brisket Provides suggested settings for smoking a beef brisket | |
| Pork Ribs Provides suggested settings for smoking pork ribs | |
| Pork Butt Provides suggested settings for smoking a pork butt or shoulder | |
| Wings Provides suggested settings for smoking chicken wings or thighs | |
| Chicken Provides suggested settings for smoking a whole chicken | |
| Salmon Provides suggested settings for smoking fish, such as salmon | |
| Keep Warm Gently heats food to keep it warm until you are ready to eat | |
| Customize Cooking Mode that can be tailored to a specific food or recipe | |
To select the cooking mode, rotate the dial until the desired mode is shown on the display. Press the dial to select the cooking mode.
NOTE: The last used settings for each cook mode will be saved to memory. The next time the cook mode is selected, the last used settings will be displayed. To restore the default values of preset cooking modes, press the [Settings] button and rotate the dial until "RESET" is displayed on the screen. Press the dial and turn the dial until the words "PRESETS ONLY" appear. Press the dial one more time and the word "COMPLETED" will be displayed, signifying the reset of all cooking mode values.

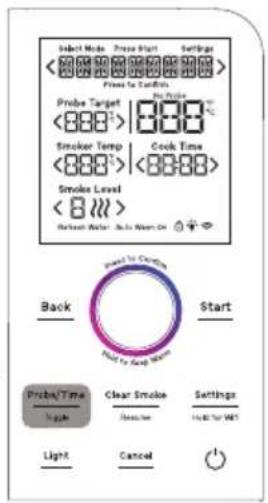
Toggling Between Probe Target & Cook Time
| Cooking Method | Description User Input | |
| Probe Target | Smoker will switch to Keep Warm or shut off* when the probe reaches the target temperature | Target internal temperature |
| Cook Time | Smoker will switch to Keep Warm or shut off* when the cook time expires | Total cook time |
The duration of cooking in the smoker can be controlled either by a selected cook time or by the internal temperature of the food as measured by the temperature probe.
To toggle between each control method, press the [Probe/Time] button.
- If Auto Warm is enabled, the smoker will automatically switch to Keep Warm mode using the configured keep warm time and temperature. If Auto Warm is disabled, the smoker will automatically shut off. See the "Cooking and Keeping Warm" section of this manual for more details.
Selecting the Probe Target
To select the desired target probe temperature, rotate the dial until the << indicators are highlighting
Selecting the Cook Time
To select the desired cook time, rotate the dial until the <> indicators are highlighting Cook Time . Press the dial to edit the time. Rotate the dial clockwise to increase the cook time or rotate the dial counterclockwise to decrease the cook time. Then press the dial again to confirm the selected cook time.
Selecting Smoker Temperature
To select the desired cooking temperature inside the smoking chamber, rotate the dial until the <> indicators are highlighting
Selecting Smoke Level
To select the desired smoke level, rotate the dial until the < indicators are highlighting < Smoke Level>. Press the dial to edit. Then rotate the dial clockwise to increase the level or rotate the dial counterclockwise to decrease the level. Then press the dial again to confirm the selected smoke level.
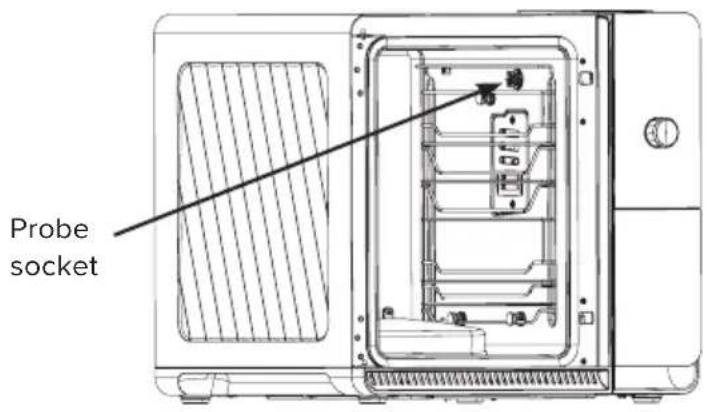
Installing Temperature Probe
To install the temperature probe, locate the probe socket in the upper righthand side of the smoke chamber. Pull open the metal cap of the probe socket and insert the plug into the probe socket. Push the plug into the socket until it is completely seated.
Insert the pointed end of the probe into the food. It is generally recommended to insert the probe into the thickest part of the food, or the center of the food if it is uniform in thickness.
Tip: Avoid inserting the probe such that it is contacting bone. Touching bone can yield an incorrect reading of the internal temperature of the food.
Before closing the smoker, ensure the probe cord is positioned so that it will not be pinched or trapped by the door as it closes.

CAUTION
FOOD SAFE INTERNAL TEMPERATURES
Cook food thoroughly to help protect against foodborne illness. Minimum safe food temperature recommendations can be found at IsItDoneYet.gov and fsis.usda.gov. Use the provided temperature probe or a food thermometer to measure food temperatures and check multiple locations.
The Four Phases of Cooking
Your Profile Smart Indoor Smoker will transition through different phases of cooking. The current cooking phase will be shown at the top of the display.
1. PREHEATING
The smoker is warming up in preparation for smoking.
2. SMOKING*
The smoker is currently smoking the food.
3. COOKING
The smoker is no longer smoking but is continuing to cook the food.
4. KEEPING WARM**
The smoker is gently heating the food to keep it warm until you're ready to eat.
- If smoke level is set to “—”, the Smoking phase will be skipped.
** If Auto Warm is disabled, the Keeping Warm phase will be skipped.
Starting Your Smoker
Once all the desired cook settings have been selected, start the smoker by pressing the [Start] button. The words "ADD WATER" will be displayed. Push the dial to confirm that the waste bin has been filled with clean water. The text "+" PELLETS" will be displayed. Push the dial to confirm that the hopper has been filled with pellets.
The smoker will then begin preheating. The word "PREHEATING" will start to scroll across the display. In addition, the Progress Ring around the dial will illuminate yellow light gradually from
bottom to top of the ring, indicating the progress of the Preheating phase.
Hold 3 sec to skip Preheat
NOTE: During the Preheating phase, the smoke chamber may not begin to heat immediately. The Active Smoke Filtering system at the rear of the appliance must be heated before the appliance can begin smoking or cooking.
Option to Auto-Start Smoking
It is generally recommended to wait until the Preheating phase is completed before placing food in the smoker. However, it is possible to Auto-Start smoking by pressing and holding the [Start] button for 3 seconds. The words "PREHEATING - AUTO START ENABLED" will be displayed.
NOTE: The appliance will still Preheat but will now automatically transition to the Smoking phase when Preheating is complete when initiating Auto-Start. Smoke will not be generated until the Active Smoke Filtering system has been heated properly. The intent of Auto-Start is to have the ability to insert food before starting the cycle and not having to interact with the appliance to transition to the smoking phase.
STEP #3 Smoking Your Food
When the preheating phase has completed, the appliance will emit an audible alert.
If Probe Target is active and the temperature probe is not inserted, "ADD PROBE" will be blinking on the display. Insert the probe and press the [Start] button to begin the Smoking phase.
If Cook Time is active or the Probe Target is active with probe inserted, "READY" will be shown on the display. Press the [Start] button to begin the Smoking phase.
NOTE: The appliance will automatically start the Smoking phase 15 minutes after the Preheating phase has completed.
If Cook Time is active, the cook timer will begin to count down.
If Probe Target is active, the actual probe temperature will be shown next to the target probe temperature.
NOTE: The smoker will automatically switch to the COOKING phase after six hours of SMOKING due to the pellet capacity of the hopper. Most foods will develop delicious smoke flavor within this time, without needing extra smoking time. However, the smoking time can be manually extended. To extend the smoking time, see the "Resuming Smoke" section in this manual.
Adjusting the Settings while Smoking or Cooking
At any time during operation, the PROBE TARGET, COOK TIME, SMOKER TEMP, and SMOKE LEVEL may be adjusted.
Rotate the dial to navigate to the desired setting and push the dial to select. Rotate the dial to make an adjustment and then push the dial to confirm the change.
Opening the Door While Smoking or Cooking
Whenever the smoker door is opened while smoking or cooking, the cook timer will pause, and the smoke chamber will stop heating. The cook timer and heater will automatically resume after the door is closed.
If the smoker door is left open for more than 15 minutes, the smoker will automatically turn off and return to standby mode.
NOTE: If the door is opened during SMOKING, the Active Smoke Filtering system will continue to operate. In addition, the auger may operate several times while the door is opened. These are normal functions of the appliance.
Clearing Smoke During Smoking
During the SMOKING phase, to clear the smoke from the chamber, press the [Clear Smoke] button. The display will show "SMOKE CLEARING" to indicate that the smoker is evacuating smoke from the chamber. The smoke clearing process will take 10 minutes to complete. After completion, the display will show "CLEARED" for 2 minutes. At this point, the smoker will continue to cook at the designated temperature until Probe Target or Cook Time is reached, or the smoke is resumed.
While the door of the smoker can be opened at any time, it is recommended to clear the smoke beforehand to prevent an undesired release of smoke into your home when opening the door.
STEP #3 Smoking & Cooking Your Food
Resuming Smoke
During the COOKING phase, to resume smoking or extend smoking time, press the [Clear Smoke] button. The words "ADD WATER" will be shown on the display. Check the water level in the waste bin. If the water level is above the "MAX" fill line, discard the waste bin contents and refill with fresh water to the "MIN" fill line. Push the dial to confirm that the waste bin has been properly inspected. The word "PELLETS" will then be displayed. Open the hopper door and refill the hopper with wood pellets. Close the hopper door. Push the dial to confirm that the hopper has been filled with pellets. The word "SMOKING" will appear on the display to indicate that the appliance has resumed smoking.
NOTE: Each time the SMOKING phase is resumed, the smoker will automatically switch to the COOKING phase after six hours of SMOKING.
STEP #4 Keeping Warm Until Ready to Eat
The smoker will automatically switch to the COOKING phase after six hours of smoking. To extend the smoking time, see the "Resuming Smoke" section in this manual.
During the COOKING phase, the appliance will stop smoking and continue to cook the food at the designated SMOKER TEMP until either the COOK TIME has expired, or the PROBE TARGET temperature has been achieved.
Automatic Keep Warm
By default, the AUTO WARM feature will be enabled and the words "Auto Warm On" will be shown on the display. When enabled, the smoker will automatically switch to the KEEPING WARM phase when either the COOK TIME has expired, or the PROBE TARGET temperature has been achieved.
During the KEEPING WARM phase, the appliance will continue to gently heat the food until the appliance is manually shut off, or after 24 hours of keeping warm. During this phase, the smoker temperature can be adjusted between 140F and 170F degrees.

Toggling AUTO WARM
To disable or enable the AUTO WARM feature, see the Smoker Settings Menu on page 22 of this manual.
Adjusting AUTO WARM Temperature before Auto Warm Begins
To adjust the smoker temperature prior to KEEP WARM starting, see the Smoker Settings Menu section on page 22 of this manual.
STEP #5 Enjoy!
When the food is ready to be removed from the smoker, open the door, and carefully remove the food using the appropriate protection, such as oven mitts.
The wire racks may be removed completely from the chamber to allow easy removal of the food.
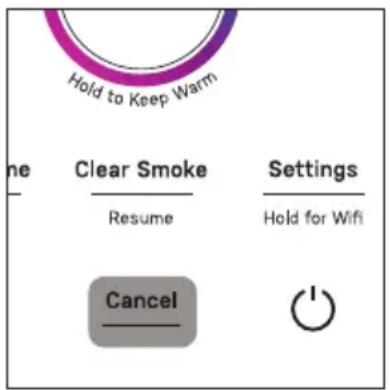
Stopping the Smoker
At any time during operation, the smoker may be stopped by pressing the [Cancel] button or the power button. If the appliance was smoking, the smoking chamber will be cleared of smoke first. Then the smoker will enter standby mode.
Shutting Off the Smoker
After 30 minutes of inactivity during standby, the display will automatically turn off and the smoker will go to sleep.
To manually shut off the smoker, press the power button.
NOTE: If the appliance was recently generating smoke, the Active Smoke Filtering system may continue to operate in the background for up to 10 minutes. This is to ensure the smoke has been properly cleared from the chamber before fully shutting off the appliance. During this time, the words "SMOKE CLEARING" will appear on the display. The fan
and rear heating system will continue to function until the smoke clearing process is completed.
Waking Up the Smoker
To wake up the appliance, press any button on the control panel or rotate the dial. The display will illuminate.
Smoker Settings Menu
Auto Warm
This setting is used to toggle the AUTO WARM feature.
To disable the AUTO WARM feature, press the [Settings] button and rotate the dial until "AUTO WARM" is displayed, then press the dial to confirm. Rotate the dial until "TURN OFF" is displayed. Press the dial to confirm. The AUTO WARM feature will be disabled and the words "Auto Warm On" will no longer be illuminated on the display.
To enable the AUTO WARM feature, follow the same steps above except select the "TURN ON" setting.
To edit the temperature of the AUTO WARM feature, follow the same steps above except select the "EDIT TEMP" setting. Rotate the dial to adjust the smoker temperature and press the dial to confirm. The setting is now saved and will return to Settings menu.
Pellet
This setting is used to empty the pellet hopper when switching out pellet type.
To empty the pellet hopper, first ensure that the waste bin is empty and completely dry. Then open the hopper door to observe the pellet level in the hopper.
Press the [Settings] button and rotate the dial to navigate to the "PELLETS" option. Press the dial to select. Then press the dial again to begin the hopper emptying process. The display will show "EMPTYING PELLETS - CANCEL TO STOP" and the auger will operate up to 20 minutes to eject the pellets in the hopper into the waste bin.
When the hopper is empty, press the dial once again to stop the auger.
Auger
This setting is used to prime the pellet feeding system.
NOTE: The auger priming process only needs to be performed before first use, or whenever the hopper has been completely emptied of pellets. As a general guideline, if the auger is visible at the bottom of the hopper, the auger should be primed after loading pellets in the hopper.
To prime the auger, first ensure that the waste bin is empty and completely dry.
Press the [Settings] button and rotate the dial to navigate to the "AUGER" option. Press the dial to select. Then press the dial again to begin the auger priming process. The auger will operate for 90 seconds before automatically shutting off. During this time, some unused pellets may be ejected into the waste bin. These pellets may be returned to the hopper.
Brightness
This setting is used to adjust the brightness of the display.
To adjust the brightness, press the [Settings] button and rotate the dial to navigate to the "BRIGHTNESS" option. Press the dial to select. Rotate the dial to change the display brightness between LOW, MEDIUM, or HIGH. Press the dial again to confirm the desired setting.
Sound
This setting is used to adjust the volume of the sounds emitted by the smoker.
To adjust the volume, press the [Settings] button and rotate the dial to navigate to the "SOUND" option. Press the dial to select. Rotate the dial to change the volume level between LOW, MEDIUM, HIGH, or OFF. Press the dial again to confirm the desired setting.
Units
This setting is used to toggle the displayed temperature units between Fahrenheit and Celsius.
To switch temperature units, press the [Settings] button and rotate the dial to navigate to the "UNITS" option. Press the dial to select. Rotate the dial to switch between Fahrenheit ("SELECT F") and Celsius ("SELECT C"). Press the dial again to confirm the desired setting.
Info
This setting is used to display the current firmware version installed on the smoker. You may be asked to provide this information when contacting Customer Service.
Reset
This setting is used to restore the default values for the presets list "PRESETS ONLY" or perform a complete factory reset "FACTORY RESET" of the appliance.
To restore preset default values, press the [Settings] button and rotate the dial to navigate to the "RESET" option. Press the dial to select. Rotate the dial until "PRESET ONLY" is displayed. Press the dial to confirm.
NOTE: If the default values of the presets have been adjusted and smoked with, the adjusted values will save to the designated preset. Use this setting option to restore default values.
To perform a factory reset, press the [Settings] button and rotate the dial to navigate to the "RESET" option. Press the dial to select. Rotate the dial until "FACTORY RESET" is displayed. Press and hold the dial for three seconds to complete the reset.
Locking the Controls
This appliance features a Control Lock to prevent accidental or unwanted use. When enabled, the appliance ignores any input from the user and the smoker cannot be operated.
To enable the Control Lock, simultaneously press and hold both the Back and Start buttons for three seconds. The display will show LOCKED to indicate the Control Lock has been enabled. The Control Lock icon will also be illuminated and all other display elements will turn off.
To disable the Control Lock simultaneously press and hold both the "Back" and "Start" buttons for three seconds. The display will show UNLOCKED, then return to the standby screen and the Control Lock icon will disappear.
Smoking Tips & Tricks
General Smoking Tips
- Use the probe to monitor the internal temperature and finish smoking when the desired temperature is reached.
- Hot holding or Resting: After smoking large fatty foods, wrap the food with aluminum foil, lower the ambient temperature, and keep the food warm for a longer duration. This process allows the fat to continue rendering and softens the meat for maximum moisture and flavor, while halting the active cooking process that may toughen the meat. See the "Auto Warm" section on page 21 of this manual for instructions on how to achieve this with your Profile Smart Indoor Smoker.
- Consider adding moisture to the food throughout the cooking period, either by spritzing or basting periodically. The added moisture will help the food absorb more smoke flavor.
- Avoid frequently opening the door or removing waste bin while smoking/cooking. This will cause the unit to stop generating smoke and may cause a rapidly loss of temperature, increase cooking time, or result in reduced or uneven flavor.
- Hotter doesn't always mean better. Depending on the food type, smoking at a low temperature for longer will result in better quality food, rather than smoking at a high temperature for a shorter time.
- Thin foods generally need higher smoker temperature and shorter cook time. Likewise, thicker foods usually need lower temperature and longer cook time.
- Large, fatty meats may run into a "stall" around 150-160F degrees. A stall is when the moisture inside fatty foods starts to evaporate, causing the internal temperature to remain steady or rise extremely slowly for a long time. This is normal. How long a stall remains depends on the size of the meat and temperature of the smoker. This is another reason we recommend cooking to a target probe temperature rather than a set time.
- Consider wrapping your food with aluminum foil mid-smoke to retain moisture. This may also help the food rise above the "stall" quicker by retaining the heat and moisture of the food.
- When cooking large cuts of meat (pork butt, brisket, etc), it is recommended to remove excess fat on the surface of the meat. Trim the "Fat Cap" to 14 thickness. Fat rendered at the surface does not penetrate the meat or moisturize it. Instead, the fats will drip from the food and increase difficulty of cleaning.
Indoor Smoker Tips
- Check that your smoker is connected to Wi-Fi and apply any firmware updates requested by the SmartHQ mobile application. This will ensure your smoker has the latest performance improvements and all available new features.
- Whenever possible, use the probe target control method. Using the temperature probe to measure internal temperature will help ensure your food is properly cooked.
- Avoid overloading the smoker chamber with food. Placing excessive amounts of food inside the smoker can interrupt airflow through the smoker chamber and hinder cooking performance.
- The smoker temperature can be changed at any time during smoking or cooking. However, allow some time for the smoker to adjust to the desired temperature before making additional temperature changes.
- The Keep Warm function is not designed to cook food. It is only intended to gently heat foods that have already been cooked properly.
- Keep your smoker clean! Regularly inspect the smoking chamber for accumulated fat and grease.
- When possible, place the food directly next to the smoke generation inlet. This will ensure closest contact from the smoldering pellets to the food for maximum smoke flavor.
- Although it is possible to add moisture and flavor aids to the drip pan (ex. Water, Apple cider vinegar, beer, etc), avoid adding these elements while smoking high-fat content meats, such as pork butt, to prevent overflowing the drip pan.
- For most accurate temperature probe readings, insert the tip of the probe into the thickest part, or in the center of the food while avoiding bone and fat.
- For best results, rotate the racks front to back and top to bottom mid-smoke.
Wi-Fi Connect - SmartHQ™ App
Your Profile Smart Indoor Smoker is WiFi Connect Enabled. A WiFi module is built into the product, allowing it to communicate with your mobile phone for remote monitoring, control, notifications, and appliance software updates. To take advantage of your appliance's connected features, please download the SmartHQ™ mobile application.
Please also visit GEAppliances.com/ge/connected-appliances to learn more about your appliance's connected features.
Connecting to WiFi
To connect the smoker to your WiFi network, press and hold the "Settings" button for three seconds. The Wi-Fi icon will begin to flash on the display to indicate the appliance is in pairing mode.
Follow the instructions in the SmartHQ™ mobile application to continue WiFi setup.
When the appliance has successfully connected to a WiFi network, the WiFi icon will stop flashing and stay illuminated.
NOTE: In case of loss of power or connection, the appliance may take up to five minutes to reconnect to Wi-Fi.
Disconnecting from WiFi
To disconnect the smoker from your WiFi network, press and hold the "Settings" button for three seconds. The Wi-Fi icon will disappear from the display.
NOTE: Disconnecting from WiFi will delete network settings from memory of the appliance. The WiFi setup process ("Connecting to WiFi") must be repeated to reconnect to WiFi.
Cleaning Your Smoker
WARNING
Allow smoker to cool completely and unplug the appliance prior to cleaning or servicing
the smoker.
Performing thorough cleaning of your smoker after each use will help maintain longevity and proper performance of your smoker. Each section below describes how to appropriately clean and maintain each area of the appliance.
Cleaning the Smoker Exterior
Check that the appliance is shut off and unplugged and all exterior surfaces are cool before cleaning.
If desired, the control panel may be disabled to ensure the appliance is not accidentally activated during cleaning. See "Locking the Controls" section on page 24 of this manual.
Clean the smoker exterior with a sponge or soft cloth and a solution of mild soap and water or vinegar and water. Rinse with clean water and dry with a soft cloth.
Spillage of marinades, sauces, and basting liquids containing acids should be wiped up immediately, as the acids may cause discoloration of the smokers surfaces.
Do not use oven cleaners, abrasive cleansers, strong liquid cleansers, steel wool, plastic scouring pads, or cleaning powders on the exterior of the smoker. To avoid scratching or marring the outside surfaces, do not scrub the appliance with a metal or nylon brush.
Cleaning the Smoker Interior
Remove all accessories and racks from the smoke chamber. To clean the bottom of the smoke chamber, rotate the Heater Guard and Heating Element upwards to access the bottom surface. Wipe all interior surfaces of the smoker with a sponge or soft cloth and a solution of mild soap and water or vinegar and water.
For heavy soils or buildup on the enameled surfaces of the smoke chamber, use a gentle abrasive cleaner with a non-scratch sponge.
Do not use oven cleaners, strong abrasive cleansers, strong liquid cleansers, steel wool, plastic scouring pads, or cleaning powders on the interior of the smoker.
Cleaning the Pellet Ramp
As pellets are ejected from the igniter, they fall onto the pellet ramp and slide down into the waste bin. Over time, the pellet ramp can accumulate buildup that prevents waste pellets from properly falling into the waste bin.
To clean the pellet ramp, locate the smoke inlet cover on the righthand wall of the smoking chamber. Open the inlet gate by sliding it upward. Then use the included pellet ramp brush to scrub the pellet ramp, which is located just behind the pellet inlet cover.
Clean the pellet ramp occasionally or if ash is found inside the smoking chamber.
Cleaning the Light Cover
Over time, a layer of grease and creosote can accumulate on the glass cover of the smoke chamber light. This buildup will darken the glass and cause the light to be dim.
It is recommended to clean the glass cover after each use by wiping the cover with a sponge or soft cloth and a solution of mild soap and water or vinegar and water.
For stubborn stains, use a gentle abrasive cleaner with a non-scratch sponge.
Cleaning the Waste Bin
After each use, the wastewater and pellets in the waste bin should be discarded. To clean the waste bin, pull the waste bin carrier out completely from the front of the smoker. Remove the waste bin from the carrier, taking care not to spill the wastewater.
Pour the wastewater through a strainer down the drain, taking care to separate any solid pellet waste. It is not recommended to use a garbage disposal to dispose of the waste pellets. The solid pellet waste may then be discarded in the trash.
To clean the waste bin, simply wash the waste bin with a sponge or soft cloth and soapy water. While it is recommended to wash the waste bin by hand, it may also be safely washed in an automatic dishwasher.
NOTE: It is normal to see unburnt wood pellets in the waste bin. Each smoke level consumes the same amount of pellets, but higher selected smoke levels will produce more charred pellets, whereas lower smoke levels will produce fewer charred pellets.
Cleaning the Racks
For light soiling, the wire racks and rack supports may be washed using a sponge and warm, soapy water. A soft polyester or nylon pad may be used to scrub more stubborn areas of soiling or buildup.
The wire racks and rack supports are also safe to be washed in an automatic dishwasher.
Cleaning the Temperature Probe
The temperature probe may be cleaned with soap and water or a soap-filled scouring pad. Cool the temperature probe before cleaning. Scour stubborn spots with a soap-filled scouring pad. Rinse and dry.
NOTE: Do not wash the temperature probe in an automatic dishwasher as this may damage the probe.
Smoke Chamber Light

SHOCK OR BURN HAZARD: Before replacing the smoker's light bulb, disconnect the
electrical power to the unit at the main fuse or circuit breaker panel or by unplugging the unit from the wall. Failure to do so may result in electric shock or burn.

BURN HAZARD: The glass cover and bulb should be removed when cool. Touching
hot glass with bare hands or a damp cloth can cause burns.
Make sure the glass cover and bulb are cool before attempting to remove them. For your safety, do not touch a hot bulb with a damp cloth, as the bulb may break.
To remove the glass cover, pull down on the edges of the glass cover. A flat-blade screwdriver may be used to carefully pry the cover open. Support the light cover to prevent the cover from falling to the bottom of the smoke chamber. Take care not to break the glass cover or chip the enamel coating on the smoking chamber.
Once the glass light cover is removed, remove the bulb by firmly grasping and slide the bulb straight out until the two prongs have cleared the socket.
Do not touch the glass of the new replacement bulb with your fingers. This may cause the bulb to fail prematurely. Grasp the replacement bulb with a clean towel or facial tissue with the prongs facing down. Align the two prongs with the socket and gently slide the prongs into the socket. Push firmly to ensure the bulb is fully seated.
Reinstall the glass light cover before reconnecting power to the smoker.
NOTE: Only replace the smoke chamber light with a 25-watt G9 halogen bulb.
| Problem Possible Solution(s) | |
| No heat in smoking chamber · Check | Check that the smoker is properly plugged into a power outlet. ·Confirm that the [Start] button was pressed after choosing the desired cooking settings. ·The heater in the smoking chamber may not activate immediately at start of preheat, since the Active Smoke Filtering system must warm up before the smoker is ready to operate. |
| Smoke smell · It is normal to detect | a smoke odor, but there should be no visible smoke exiting the unit. ·Ensure nothing is interfering with the door gasket closing ·Avoid operating smoker without food as this can lead to a more noticeable odor. ·Check that the smoker door is completely closed. If using the temperature probe, ensure the cord is not caught in the door. ·Check that the waste bin has been filled with fresh water and that the waste carrier is fully inserted. ·Check that the pellet hopper door is completely closed. ·Ensure that food in the chamber is not blocking the smoke inlet in the right side of the chamber or the vents in the rear of the smoke chamber. ·Ensure the smoker has been properly maintained and cleaned per the instructions in the “Care and Cleaning” section of this manual, with special attention paid to the Pellet Ramp. |
| Excessive smoke in the smoking chamber | ·Pellet waste and ash may have accumulated near the igniter. Clean the area behind the smoke inlet cover. See “Care and Cleaning” section of this manual for cleaning details. |
| No or low smoke in the smoking chamber | ·Check the hopper to ensure wood pellets have been loaded. ·Check that the smoke level is set to 1 or above. ·Prime the auger to ensure pellets have been fed into the igniter. See the Auger feature in the “Smoker Settings Menu” section of this manual. ·Check that the door is fully closed and the waste bin has been properly installed with the waste carrier fully pushed in. ·Check that the smoke inlet is clean, and no ash or residue is blocking the incoming smoke. See the “Care & Cleaning” section of this manual for further details. ·It may take up to 15 minutes after the preheat is complete to see visible smoke entering the cavity. |
| Food doesn't taste smoky | ·Ensure the auger is primed before beginning the smoke. ·Ensure the unit is finished preheating before loading the smoker with food. ·Do not open the door or waste bin unless necessary as this pauses smoke generation. ·Use pellets with stronger smoke profiles, such as hickory or mesquite. ·Keep the meat moist throughout the smoking session, such as through spritzing or basting. ·Meat placed into the smoker cold will take on a smokier flavor due to a longer cook time. ·Increase the smoke level. ·Add more smoke time as desired. ·When cooking on a single rack, position it in the center of the cavity. |
| Pellets in hopper are found moist | ·Empty the pellets prior to smoking and replace with new, dry pellets. ·Avoid storing smoker with pellets in high humidity environments. |
| Auger is noisy when feeding pellets | ·Open pellet hopper door and check for any foreign objects. Do not reach into hopper when auger is in operation. ·Consider emptying the hopper and reloading pellets to clear any jamming due to pellets or obstructions. |
| Ash in the smoking chamber | ·Pellet waste and ash has accumulated near the igniter. Clean the area behind the smoke inlet cover. See “Care and Cleaning” section of this manual for cleaning details. |
| Food is not evenly smoked/cooked | ·Avoid overloading the smoker with food or placing food items too close together. ·When cooking with multiple racks, we recommend rotating the racks front to back and top to bottom midway through the smoking session. |
| Controls not responsive · Check | that the control lock is not enabled. See “Smoker Settings Menu” section of this manual for details. ·Ensure the control panel is clean of grease, oil, or other soiling. ·Confirm the sticker is peeled off the display. |
| Visible smoke emitting from appliance | ·Check that the smoker door is completely closed. If using the temperature probe, ensure the cord is not caught in the door. ·Never unplug the smoker while in operation, as this will disable the Active Smoke Filtering system. ·Check that the waste bin has been filled with fresh water and that the waste carrier is fully inserted. ·Check that the pellet hopper door is completely closed. ·If visible smoke is still emitting from the unit, please call our support line at 1-833-4BODEWELL. |
| No sound | ·Check that the sound has not been disabled. Refer to the "Smoker Settings Menu" section of this manual. |
| Fan stops operating · The internal fan will turn on and off automatically depending on the phase of smoking or cooking. NOTE: When the display shows "COOKING" or "KEEPING WARM", the fan may turn off automatically. | |
| Waste carrier won't insert into smoker | ·Check for obstructions behind the waste carrier. ·Check the orientation of the waste bin. The "MAX" and "MIN" fill lines should be oriented towards the back of the smoker. |
| Smoke chamber light is dim | ·Clean the glass light cover. See the "Care and Cleaning" section of this manual for cleaning instructions. |
| Smoke chamber light won't turn on | ·Bulb has failed. Replace bulb by following instructions found in the "Care and Cleaning" section of this manual. |
GE Appliances Limited Warranty
If your appliance fails to operate properly while in use under normal household conditions within the warranty period, visit GEAppliances.com/contact or call 1-833-4BODEWELL for product care/ maintenance self-help.
To initiate a warranty claim, please visit GEAppliances.com/contact, or call 1-833-4BODEWELL. Please have your model number and serial number available. Return and packing instruction information will be provided at that time.
For the Period of: GE Appliances Covers
One Year
From the date of the original purchase
If the appliance fails due to a defect in materials or workmanship, during the limited one-year warranty, GE Appliances will either repair your product, replace your product with a new or remanufactured product, or refund the purchase price of the product at GE Appliances sole discretion.
What GE Appliances Will Not Cover:
Failure of the product if it is abused, misused, or used for other than the intended purpose or used commercially.
- Replacement of house fuses or resetting of circuit breakers.
Damage caused after delivery.
- Damage to the product caused by accident, fire, floods or acts of God.
- Incidental or consequential damage caused by possible defects with this appliance.
EXCLUSION OF IMPLIED WARRANTY
Your sole and exclusive remedies are product exchange or refund as provided in this Limited Warranty. Any implied warranties, including the implied warranties of merchantability or fitness for a particular purpose, are limited to one year or the shortest period allowed by law.
For sale in the 50 United States and the District of Columbia only: For US Customers: This limited warranty is extended to the original purchaser for products purchased for home use within the USA.
Some states do not allow the exclusion or limitation of incidental or consequential damages. This warranty gives you specific legal rights, and you may also have other rights which vary from state to state. To know what your legal rights are, consult your local or state consumer affairs office or your state's Attorney General.
Warrantor: GE Appliances, a Haier company Louisville, KY 40225
For Customers in Canada: This limited warranty is extended to the original purchaser and any succeeding owner for products purchased in Canada for home use within Canada. In-home warrant service will be provided in areas where it is available and deemed reasonable by Mabe to provide.
Warrantor Canada: MC Commercial, Burlington, Ontario, L7R 5B6
GE Appliances Website
Have a question or need assistance with your appliance? Try the GE Appliances website 24 hours a day, any day of the year! You can also shop for more great GE Appliances products and take advantage of all our online support services designed for your convenience.
In the US: GEAppliances.com
Register Your Appliance
Register your new appliance online at your convenience! Timely product registration will allow for enhanced communication and prompt service under the terms of your warranty, should the need arise. You may also mail in the pre-printed registration card included in the packing material.
In the US: GEAppliances.com/register
Remote Connectivity
For assistance with wireless network connectivity, visit our website at GEAppliances.com/connect, or call 800.220.6899 in the US.
Parts and Accessories
Individuals qualified to service their own appliances can have parts or accessories sent directly to their homes. Order online at your convenience, 24 hours every day.
In the US: GEApplianceparts.com, or by phone at 877.959.8688 during normal business hours.
Instructions contained in this manual cover procedures to be performed by any user. Other servicing should be referred to qualified service personnel. Caution must be exercised, since improper servicing may cause unsafe operation.
Contact Us
If you are not satisfied with the service you receive from GE Appliances, contact us on our Website with all the details including your phone number, or write to:
In the US:
General Manager, Customer Relations | GE Appliances, Appliance Park | Louisville, KY 40225
GEAppliances.com/contact
In Canada:
Director, Customer Relations | MC Commercial Inc. | Suite 300, 5420 North Service Road | Burlington, ON L7L 6C7
GEAppliances.ca/contact-us

Join the indoor smoking community to share tips, recipes, and pictures!

Profile
FUMOIR D'INTÉRIEUR INTELLIGENT
P9SBAAS and P9SBCAS Series
FRANÇAIS

Profile
NOUS VOUS REMERCIONS D'INTÉGRER GE APPLIANCES À VÔTURE DEMEURE.
CONNEXION AU WI-FI 26
Connectivite Wi-Fi - Application SmartHQ 26
Se connecter au Wi-Fi 26
Se déconnecter du Wi-Fi 26
ENTRETIEN ET NETTOYAGE 27
Your Profile Smart Indoor Smoker will transition through different phases of cooking. The current cooking phase will be shown at the top of the display.
1. PRECHAUFFAGE
Louisville, KY 40225
Director, Customer Relations | MC Commercial Inc. | Suite 300, 5420 North Service Road | Burlington, ON L7L 6C7
electromagersge.ca/contactez-nou

P9SBAAS and P9SBCAS Series
ESPAÑOL

Profile
GRACIAS POR HACER QUE GE APPLIANCES SEA PARTE DE SU HOGAR..
Garante: GE Appliances, a Haier company
Louisville, KY 40225
General Manager, Customer Relations | GE Appliances, Appliance Park | Louisville, KY 40225
GEAppliances.com/contact