5DB95761 - Basket BLAUPUNKT - Free user manual and instructions
Find the device manual for free 5DB95761 BLAUPUNKT in PDF.

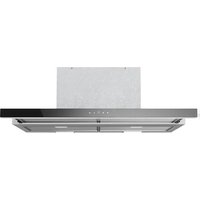
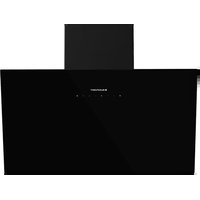
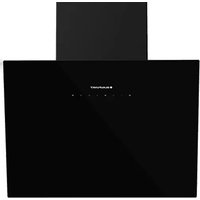
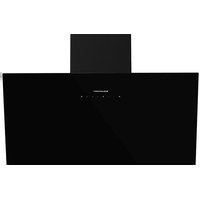
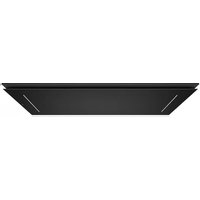
| Product type | Range hood |
| Brand | Blaupunkt |
| Model | 5DB95761 |
| Power supply | 220-240 V, 50 Hz |
| Power cable length | 1250 mm |
| Installation type | Wall-mounted (wall mounting) |
| Exhaust version | Extracting (external exhaust) or recirculating (recycling with optional charcoal filter) |
| Number of motor speeds | 4 (including 4th timed 7 minutes) |
| Lighting | LED, color temperature 4000 K |
| Remote control (optional) | Yes, for lighting control (receiver BLZ 501 and remote control BLZ 502) |
| Automatic shut-off | After 4 hours of inactivity |
| Grease filter | Metal, dishwasher safe (monthly cleaning recommended) |
| Charcoal filter (for recirculation version) | Replace every 6 months, not washable |
| Minimum distance above cooking surface | 65 cm (electric, induction or gas) |
| Required electrical protection | Residual current circuit breaker 30 mA |
| Certifications | Compliant with WEEE directive 2002/96/EC |
| Available languages of manual | FR, DE, EN, ES, IT, NL, SL, SV |
| Number of pages of manual | 72 |
| Important safety instructions | Do not flambé under the hood, do not use without grid, regular cleaning mandatory |
Frequently Asked Questions - 5DB95761 BLAUPUNKT
User questions about 5DB95761 BLAUPUNKT
0 question about this device. Answer the ones you know or ask your own.
Ask a new question about this device
Download the instructions for your Basket in PDF format for free! Find your manual 5DB95761 - BLAUPUNKT and take your electronic device back in hand. On this page are published all the documents necessary for the use of your device. 5DB95761 by BLAUPUNKT.
USER MANUAL 5DB95761 BLAUPUNKT
[en] Instructions on mounting an use
L= X-H-240


2 - Turn on the motor at the higher speed
3
natural_image
Diagram showing a square panel mounted on a circular base, with a grid panel being inserted and a separate panel labeled 'F' (no text or symbols on the panels themselves)4
natural_image
Diagram showing a square grid mounted on a circular base with an arrow indicating rotation or movement (no text or symbols present)Warnung
natural_image
Isometric diagram of a showerhead spraying blue light through a grid structure (no text or symbols)The appliance should not be used by children under 8 years of age and by persons with reduced physical, sensory and mental capabilities, or lack of experience and knowledge, unless they are supervised or have received instructions regarding the safe use of the appliance and are aware of the possible risks. Children must not play with the appliance. Any intended cleaning and maintenance by the user should not be carried out by children unless supervised. The hood should never be used without without the grid properly fitted! Never use the hood without the grill properly fitted!
The accessible components can overheat when the cooktop is in use.
The hood must not be connected to the flues of other appliances that run on gas or other fuels. When the hood is used at the same time as other appliances that run on gas or other fuels, provision must be made for an adequate supply of air. No food must be cooked flambé underneath the hood. The use of an unprotected flame could cause damage to the filters and could cause fires, so should be avoided. When frying food, never leave the pan unattended because the cooking oil could flare up. Please comply with the technical and safety provisions set forth by your local competent authorities regarding the ventilation of hoods.
This appliance conforms to European Directive 2002/96/EC, Waste Electrical and Electronic Equipment (WEEE). Please dispose of this product correctly in the interest of health and the environment.
The symbol 📁 on the product, or on the documents accompanying the product, indicates that this appliance may not be treated as household waste. Instead it shall be handed over to the applicable collection point for the recycling of electrical and electronic equipment. Disposal must be carried out in accordance with local environmental regulations for waste disposal. For more detailed information about treatment, recovery and recycling of this product, please contact your local city office, your household waste disposal service or the shop where you purchased the product. If the power cable is damaged you should, in the interest of safety, contact the manufacturer or the manufacturer's technical assistance service to request a replacement, or ask someone who is similarly qualified.
Check also the drawings on the initial pages with the alphabetical and numerical references in the explanatory text. Closely follow the instructions in this manual. We cannot accept liability for any faults, detriment or fire damage to the appliance due to non-compliance with the manual's instructions.
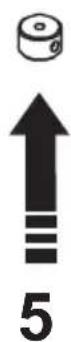
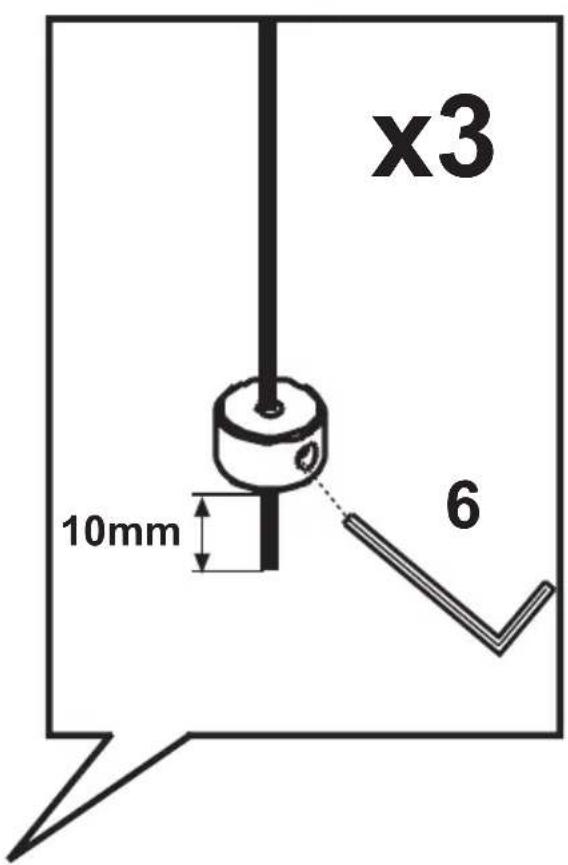
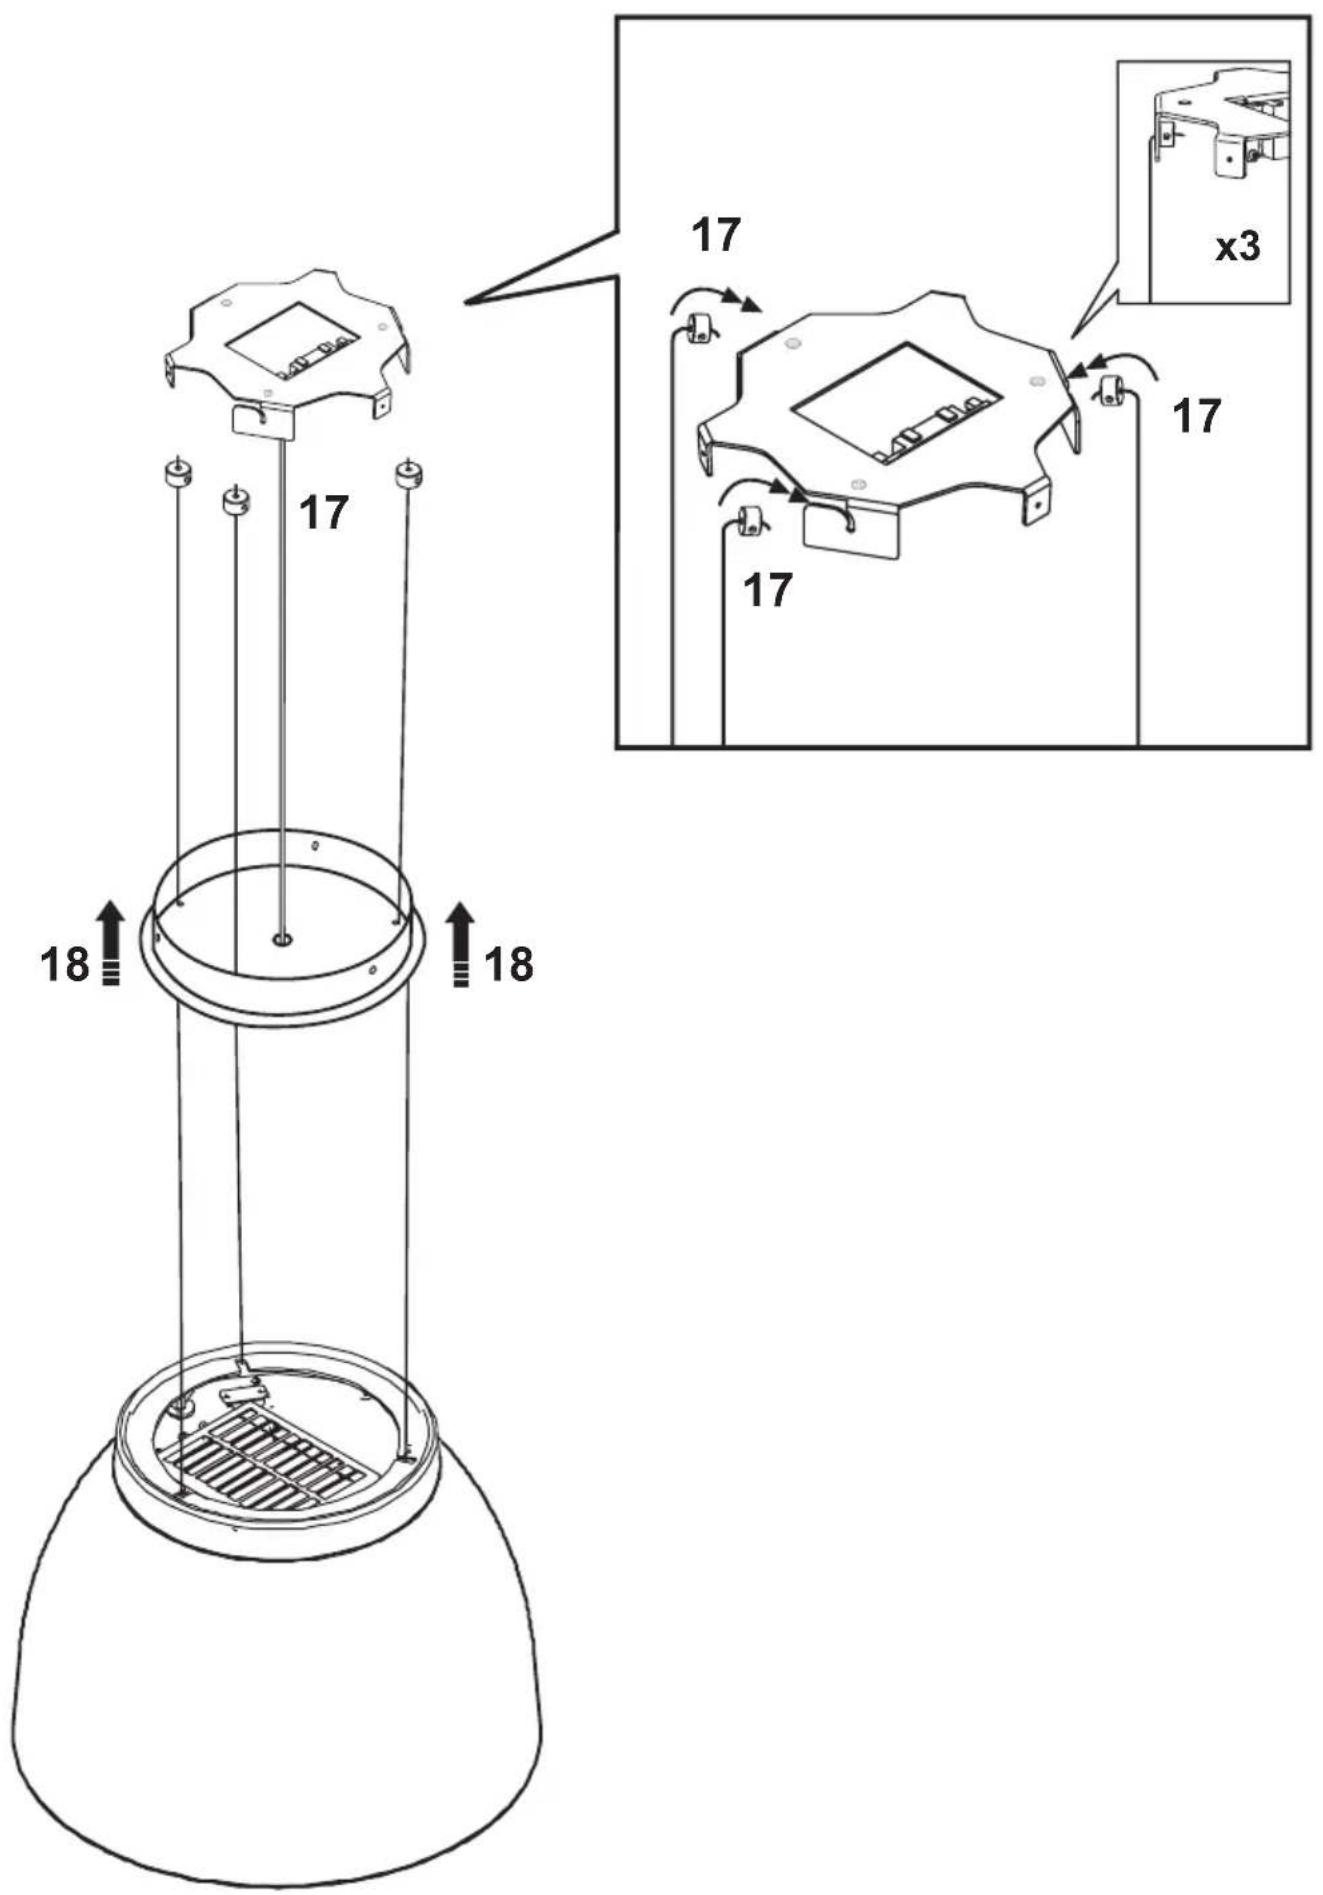
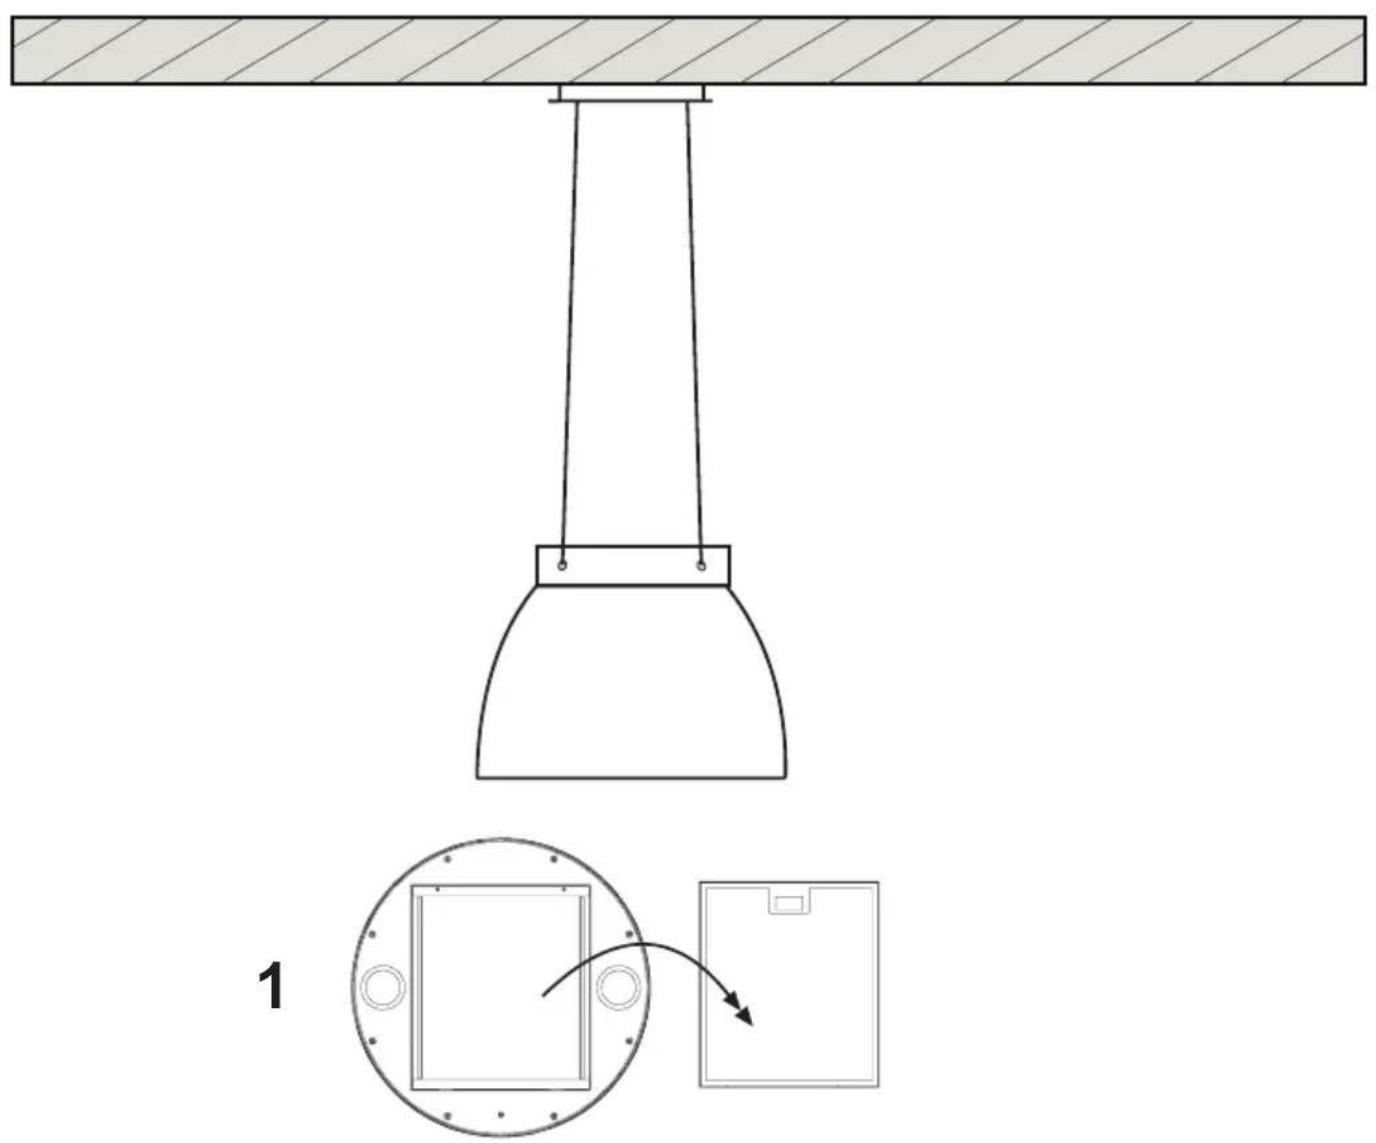
You should affix the hood to a wall of sufficient weight-bearing capacity, so not to one made of plasterboard.
The cooker hood must be placed at a minimum distance of 65 cm from the cooking plane for electric cookers and 65cm for gas or mixed cookers. If the instructions for installation for the gas hob specify a greater distance, this has to be taken into account. Do not tile, grout or silicone this appliance to the wall. Surface mounting only. Do not fix chimney flue to furniture or fly over shelves unless the chimney flue can be easily removed, in case maintenance is ever required.
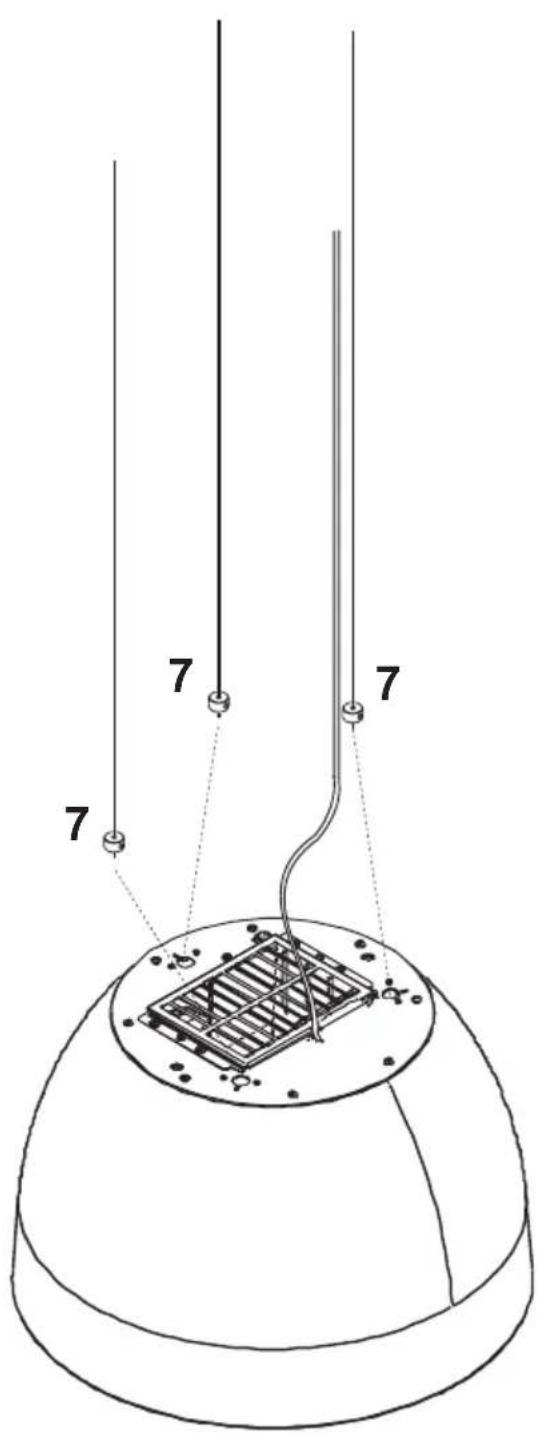
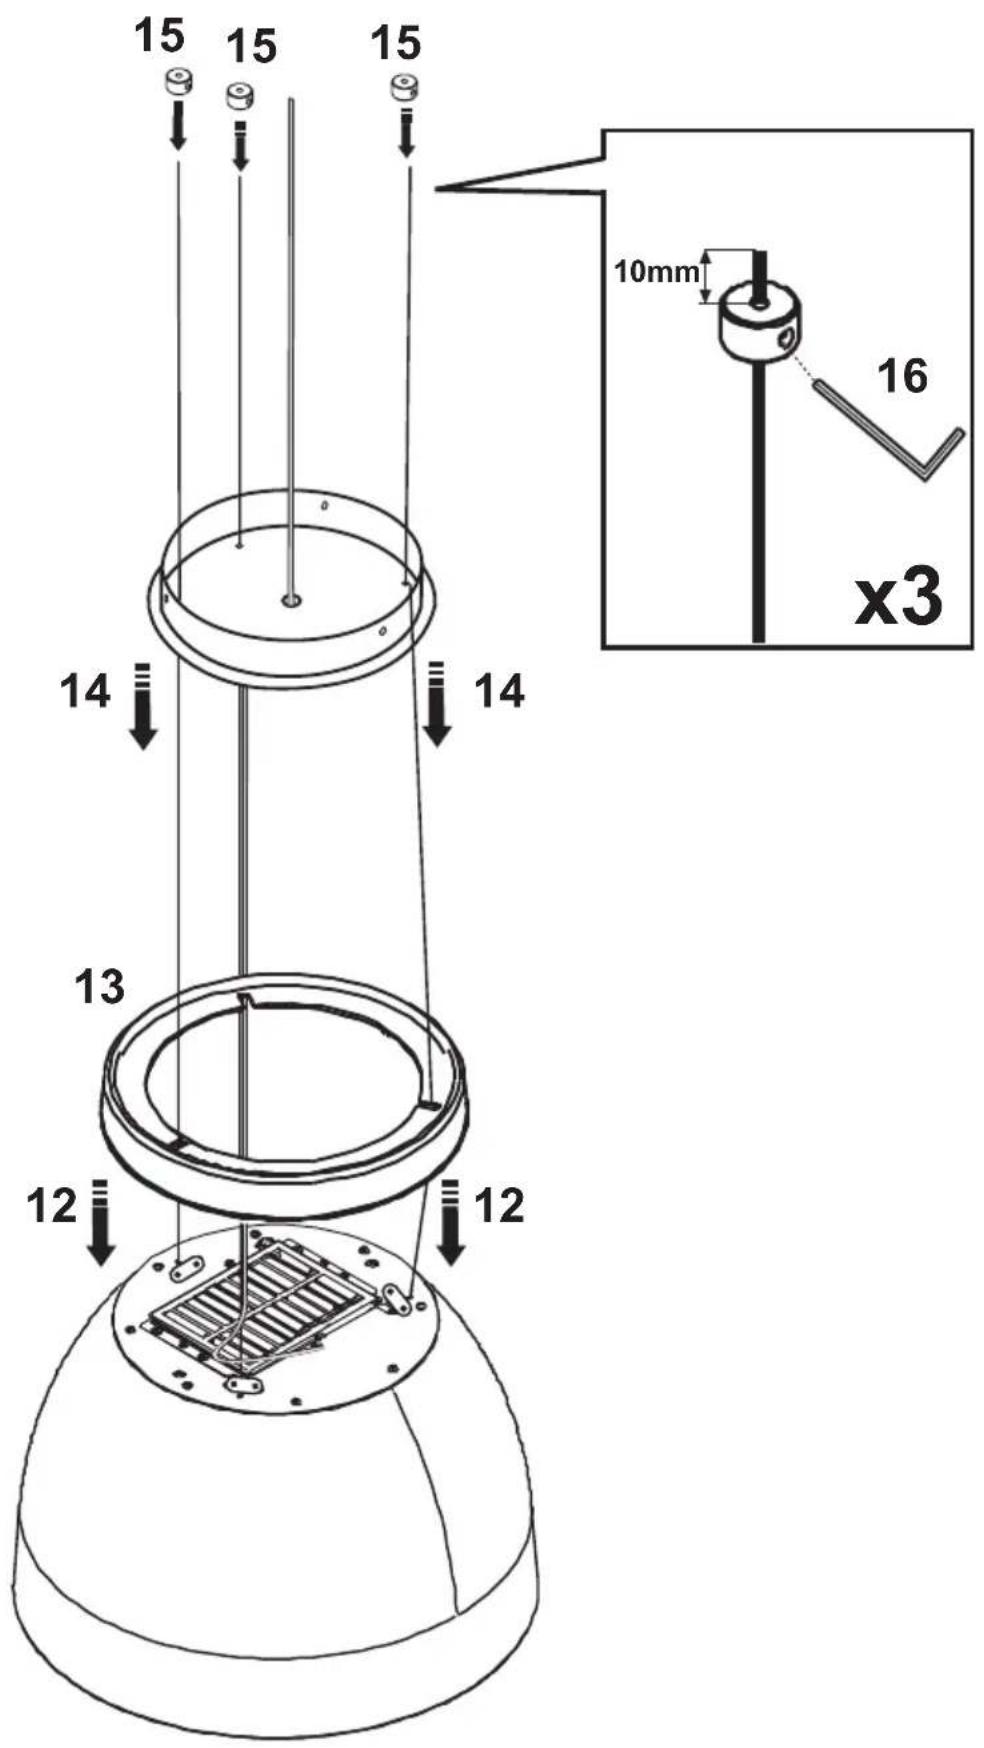
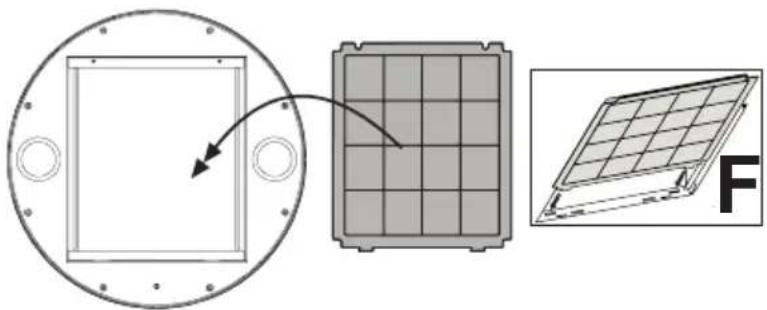
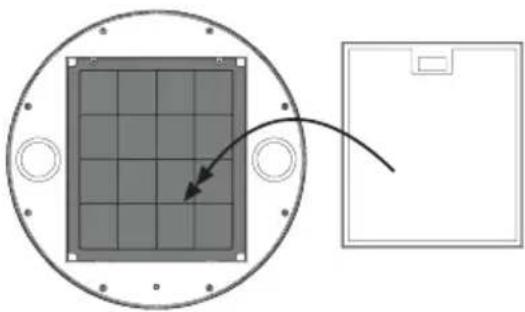
The cooker hood is provided with an upper air exit B for discharging fumes externally for models including chimney flue C (Suction Version A- exhaust pipe not supplied). If cooking fumes and vapours cannot be externally discharged, the cooker hood can be used in the recirculating version F: the installation of 1 active charcoal filter F allows the recirculation of fumes and vapours through the upper grid G.
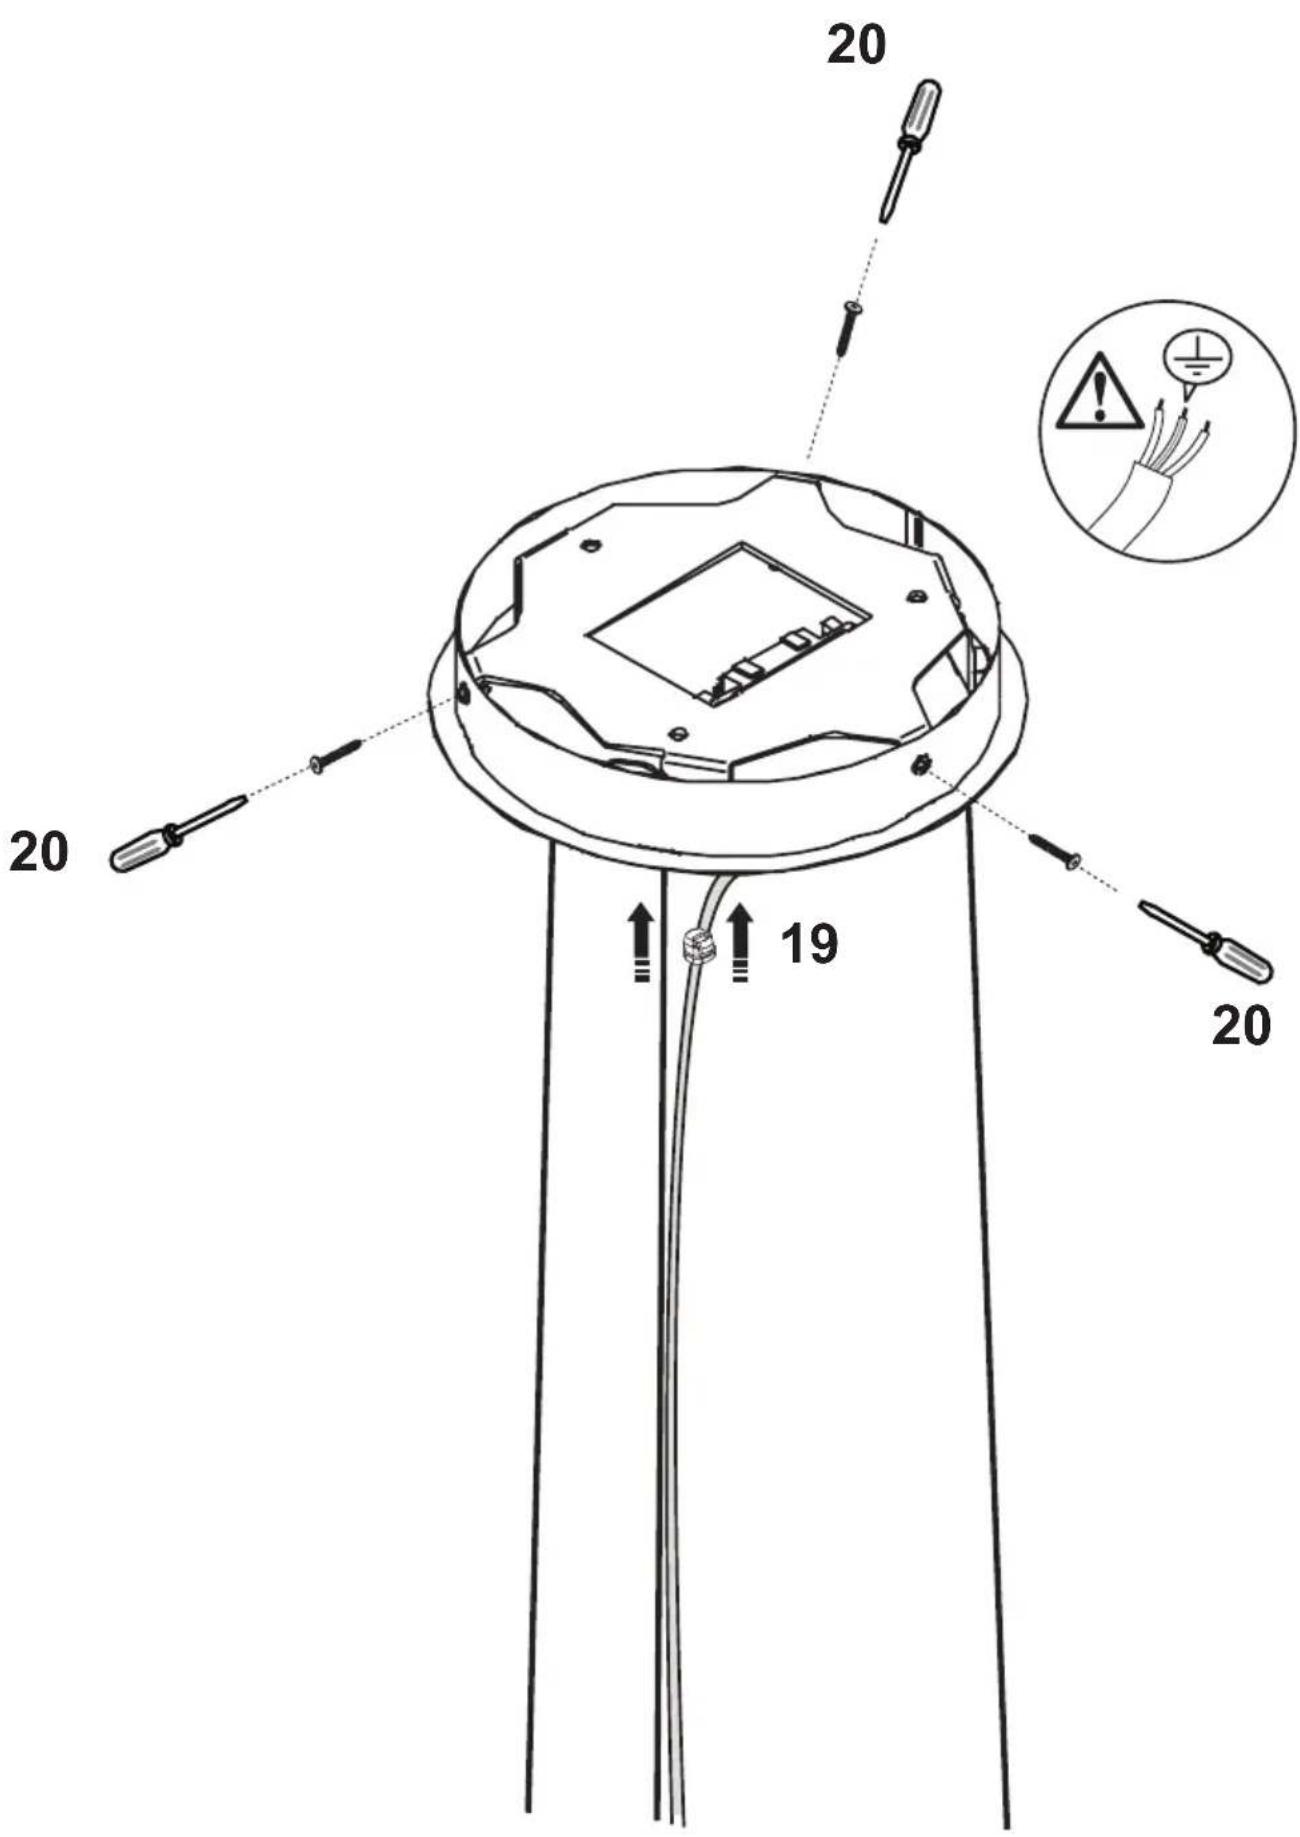
Make sure that there is a power socket near the hood and that the system has a 30 mA differential. The mains voltage must be the same as that on the label inside the hood. The hood has a 1250 mm power cable with or without plug: if it does have a plug, connect the hood to an accessible approved socket; or if it does not (connection direct to the mains), fit an approved bipolar switch with a minimum contact opening of no less than 3 mm (accessible). This installation and electrical connection must be executed by a qualified technician.
If the cooking top is in use, the cooker hood must always operate.
Product performance test carried out in accordance with standard (EU) No 65/2014-Ref: IEC 61591
Maximum performance is achieved by placing the mobile panels, if any, in the open position.
TLC
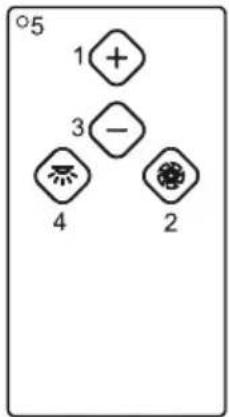
1: + motor
2: On/Off motor
3: - motor
4: On/Off light
5: Led
Note: the LED on the hood indicates the various speeds: green 1st speed, orange 2nd speed, red 3rd speed and flashing red 4th speed. All hoods with capacities exceeding 650 m3/h have the last timed speed; It lasts for 7 minutes, after which it automatically returns to the last non-timed speed.
Initialization procedure:
- Cut off power to the hood
- Power the hood again
- Within the first 5 sec, press the light button and release it after the lights turn on (the control must be turned on via key 3)
- Within 5 sec, press the motor key and release it
Now you have to wait for about 10 seconds – then you can use the hood normally.
Notes: after 4 hours from the last use of a key, the hood turns off automatically.
Should there be interferences with other nearby remote controls, carry out the code change procedure.
Should it be required to replace the radio control, the frequency of the electronic system of the new radio control must be calibrated again via the initialization procedure.
Procedure for generating a new code for the radio control.
The radio control is supplied with default codes. If you want to generate new random codes you need to follow the procedure below: simultaneously press the plus and minus keys for at least 10 seconds; the LED will turn on, then press the two buttons again (within 3 seconds). The LED flashes three times to indicate that the operation has been completed. Once you changed the radio control you must run again the initialization procedure.
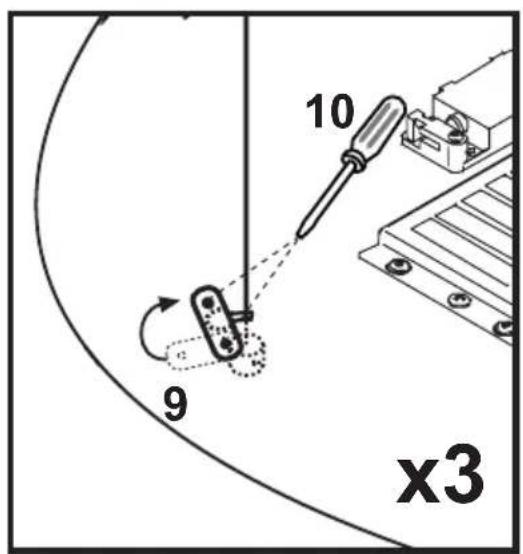
Connecting the receiver and programming the remote control for the optional, advanced multi-control feature (colour and brightness settings)
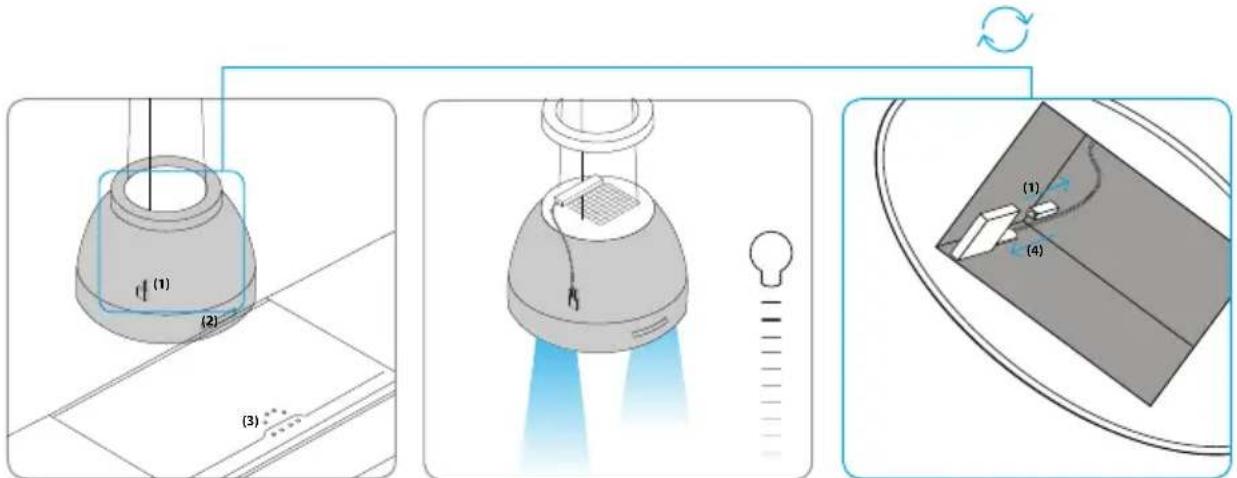
Fig. 1 Inserbeseh standard model using the stick (1) in the hood and control panel (2) Use the master switch for the cook surface (3) or the control panel on the hood for setting the hood. The colour temperature is 4,000 K.
Fig. 2 Installing the electrical control of additional lighting features is simple. Installing a receiver (Order Number: BLZ 501) and connecting it with the remote control (Order Number: BLZ 502) allows the colour temperature and brightness of the hood to be controlled.
Fig. 3 Simple receiver installation here. The receiver can be installed easily without additional tools. Remove the cover frame from the top of the hood and insert receiver.
Remove the stick (1) from the inside of the hood and insert the receiver (4).
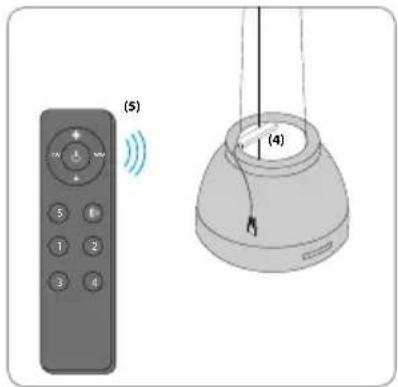
Fig. 4 Associating the optional and with the optional remote control:
- Remove the protective battery film.
-
Press the Learning button on the receiver (4) for 10 seconds to detect the remote control.
-
Tap the Learning button on the receiver (4), then press the desired zone ①②③④ on the remote control.
- The LED will blink once to indicate registration with the receiver.
- Press the Learning button on the receiver (4) for 10 seconds to disassociate the remote control.
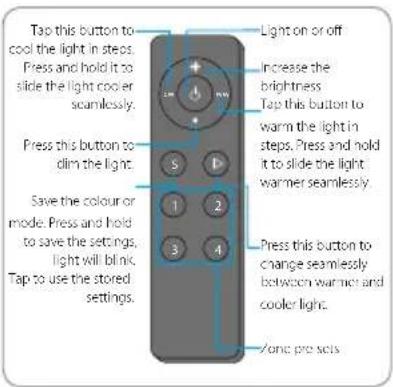
Fig. 5 Using the remate Rentbedienung
OPERATIONAL NOTES
The remote control controls the lighting features, but not the operation of the ventilation hood. Lights that have been turned off using the remote control can only be turned on by using the remote control.

natural_image
Isometric diagram of a showerhead spraying water onto a grid surface, with no text or symbols present.Fig.66 Applatinmitchikshetem der lighting systems If your kitchen also uses this technology, the hood and the kitchen lighting systems can be associated, which will harmonize the uniform colour and intensity of the lighting.
Mailtiterhance
Prior to any maintenance operation ensure that the cooker hood is disconnected from the electrical outlet.
Cleaning
The hood must be cleaned frequently both inside (apart from the area behind the grease filter) and outside. Use a cloth moistened with neutral liquid detergents. Never use products containing abrasives.
Warning
Failure to carry out the basic standards of the cleaning of the cooker hood and replacement of the filters may cause fire risks. Therefore we recommend observing these instructions.
Anti-grease Filter
must be cleaned once a month, with non abrasive detergents, by hand or in dishwasher on low temperature and short cycle. When washed in a dishwasher, the grease filter may discolour slightly, but this does not affect its filtering capacity.
Charcoal Filter - (only for filter version)
The active charcoal filters F are not washable nor regenerative. It should be changed every 6 months in normal use. The active charcoal filters capture unpleasant cooking odours.
Reducing environmental impact:
To reduce energy consumption, we recommend you always use the lowest suction speed among those suitable for the cooking mode currently active, avoid leaving the appliance running for more than 15 minutes after burner shutdown and switch off the lights if you leave the cooking area.
Replacing lightbulbs
Warning! Prior to touching the light bulbs ensure they are cooled down.
Led Light
If the lighting group LED does not work, please contact the technical service center in order to replace the whole group.
Attention
natural_image
Isometric illustration of a showerhead spraying water onto a tiled floor (no text or symbols)natural_image
Isometric diagram of a showerhead spraying water onto a tiled floor (no text or symbols)natural_image
Isometric diagram of a showerhead spraying through a tiled room with blue lighting (no text or symbols)natural_image
Isometric illustration of a showerhead spraying blue water onto a tiled floor (no text or symbols)natural_image
Isometric diagram of a showerhead spraying through a tiled room with blue light reflections (no text or symbols)natural_image
Isometric diagram of a showerhead spraying through a tiled room with blue lighting (no text or symbols)Sl.6 Polkepijanjg smitsujethniytsunstaler vom kuhinje Ako vaša kuhinja također ima tu tehnologiju, napa i svjetlosni sustav kuhinje mogu se upariti, što rezultira savršenom skladnom slikom s ujednačenom bojom i intenzitetom.
Väte informazioni ervauftivaupubistupinalab-goranaegroanofedomufedomutid-kontrol.html

OdTžavanje
Prije bilo kakve vrste održavanja isključite napu od struje.
Čišćenje
Napu treba učestalo čistiti, kako iznutra (s izuzetkom zone smještene iza filtra za masnoće) tako i izvana. Za čišćenje upotrijebiti krpu navlaženu denaturiranim alkoholom ili neutralnim tekućim deterdžentima. Izbjegavati korištenje proizvoda koji sadrže abrazive.
Oprez
natural_image
Isometric diagram of a showerhead spraying water onto a tiled floor (no text or symbols)Sl. 1 Ostraklasnir standardausstandardnoj verziji sa štapom (1) u unutrašnjosti aspiratora i upravljačkim panelom (2)
Upravljanje aspiratorom vrši se preko glavnog prekidača na ploči za kuvanje (3) ili preko upravljačkog panela aspiratora. Temperature boje iznosi 4.000 K.
montirati Ugradnja prijemnika (kataloški broj BLZ 501) i povezivanje sa daljinskim upravljačem (kataloški broj BLZ 502) omogućavaju kontrolu temperature boje i osvetljenosti aspiratora.
(1) u unutrašnjosti aspiratora ukloniti i ubaciti prijemnik (4).
natural_image
Isometric diagram of a showerhead spraying through a tiled room with blue lighting (no text or symbols)Sb6. Poduziplanje naitsLithetnsystem der osvetljenja kuhinje Ukoliko vaša
kuhinja takođe poseduje ovu
tehnologiju, moguće je povezati
aspirator i sistem osvetljenja kuhinje i
tako dobiti savršeno harmoničnu sliku sa
bojom i intenzitetom svetlosti koji su
ujednačeni.
Odřžavanje
natural_image
Close-up of blue fabric with a medical device labeled 'BLAUPUNKT' inserted into a clip (no other text or symbols visible)