MS140300 - Scale Brecknell - Free user manual and instructions
Find the device manual for free MS140300 Brecknell in PDF.

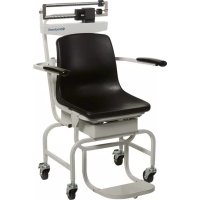
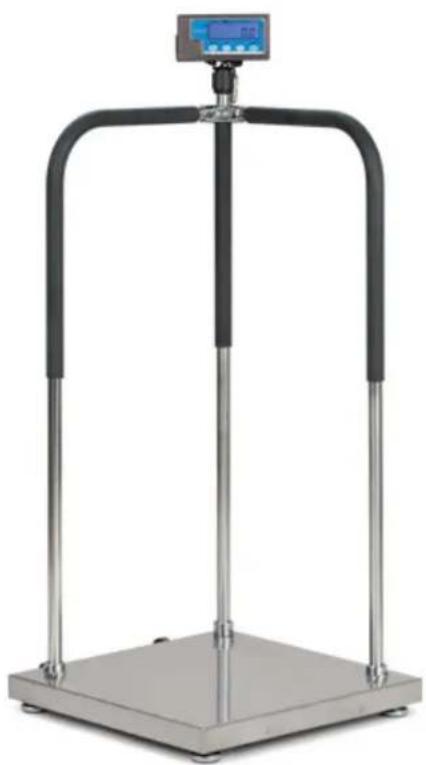
| Product Type | Portable medical electronic scale with ramp |
| Brand | Brecknell |
| Model | MS140300 |
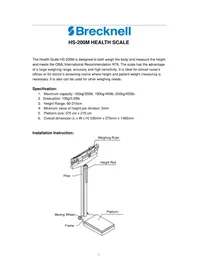
| Capacity | 300 kg / 660 lb / 660 lb:oz |
| Accuracy | ± 3 divisions (0.3 kg / 0.6 lb / 15 oz) |
| Platform Dimensions | 520 mm (L) x 520 mm (W) x 65 mm (H) |
| Indicator Dimensions | 164 mm (L) x 76 mm (W) x 64 mm (H) (approx.) |
| Power Supply | 4 AAA batteries (20 h battery life) or AC adapter 6 VDC, 500 mA |
| Display | LCD 5 digits, 7 segments, 16 mm |
| Keypad | 4 push buttons (ON/OFF/ZERO, TARE, UNIT, HOLD/PRINT) |
| Operating Temperature | 5 °C to 35 °C |
| Humidity | ≤ 95 % RH non-condensing |
| Communication | RS-232 (COM1 port, TXD, RXD, GND), baud rate 1200-19200 bps |
| Main Functions | Zero, tare, hold, print, unit change (kg, lb, lb:oz), adjustable auto-off |
| Calibration | Software calibration with EEPROM storage, requires standard weight > 25% of capacity |
| Configuration | 19 configurable parameters (resolution, units, delays, etc.) |
| Care and Cleaning | Wipe exterior with damp cloth and mild detergent; do not spray directly on display |
| Safety | Adjustable auto-off, ground fault protection (RCD/GFCI), EMC Class A compliance |
| Serviceability | Service by qualified personnel only; adjustable zero potentiometer on PCB |
Frequently Asked Questions - MS140300 Brecknell
User questions about MS140300 Brecknell
0 question about this device. Answer the ones you know or ask your own.
Ask a new question about this device
Download the instructions for your Scale in PDF format for free! Find your manual MS140300 - Brecknell and take your electronic device back in hand. On this page are published all the documents necessary for the use of your device. MS140300 by Brecknell.
USER MANUAL MS140300 Brecknell
Portable Medical Electronic Handrail Scale
User Instructions
Brecknell, LLC 2013. All rights reserved.
No part of this publication may be reproduced, stored in an electronic retrieval system, or transmitted in any form or by any means, electronic, mechanical, photocopying, recording or otherwise without the prior written consent of the copyright owner, or as permitted by law or under license. Full acknowledgment of the source must be given. Brecknell is a registered trade mark of the Brecknell, LLC. This publication was correct at the time of going to print however, Brecknell, LLC reserves the right to alter without notice the specification, design, price or conditions of supply of any product or service at any time.
All third party brands and product names used within this document are trademarks or registered trademarks of their respective holders.
Table of Contents
Chapter 1 General Information andWarnings 3
About this Manual 3
Text Conventions 3
Special Messages 3
Warnings 4
EMC Compliance 4
Routine Maintenance 5
Cleaning the Indicator 5
Sharp Objects 5
Chapter 2 Specifications 6
Scale Platform 6
Capacity 6
Accuracy 6
Dimension 6
Scale Indicator 6
Power Supply 6
Dimension 6
Display 7
Keypad 7
Environment 7
Load Cell Excitation 7
Communication 7
Chapter 3 Introduction 8
Indicator Mounting 8
Front Panel 8
Display 9
Keyboard 10
Navigating the Weigh Mode 11
Power the Indicator 11
Enter or Exit the HOLD Mode 11
Zero 11
Tare 11
Clear Tare Weight 11
Output Data (Print) 12
Change Weight Unit 12
Hold Function 14
Access the Hold Mode 14
p Mode 15
Entering the Setup Menu 15
Navigating the Setup Menu 15
Setup Menu Parameters 16
Relationship of Capacity and P7, P8 and P9 Settings 21
Exit the Setup Menu 24
Chapter 5 Calibration 25
Calibration Mode 25
Display ADC Code or Working Voltage Value 26
Chapter 6 Serial Communication 28
Com Port 1 28
Protocol 28
Transaction String 28
Commands and Response 30
Chapter 7 Troubleshooting 32
Display Characters 32
Display Symbols 33
Error Messages and Troubleshooting 33
1 General Information andWarnings
1.1 About this Manual
This manual is divided into chapters by the chapter number and the large text at the top of a page. Subsections are labeled as shown by the 1 and 1.1 headings shown above. The names of the chapter and the next subsection level appear at the top of alternating pages of the manual to remind you of where you are in the manual. The manual name and page numbers appear at the bottom of the pages.
1.1.1 Text Conventions
The keys used to interface with the PS-500 are located on the front panel of the indicator. The keystrokes are shown in BOLD incased between brackets. (e.g. [ZERO])
Displayed messages appear in LCD format (e.g. SELECTUP) type and reflect the case of the displayed message.
1.1.2 Special Messages
Examples of special messages you will see in this manual are defined below. The signal words have specific meanings to alert you to additional information or the relative level of hazard.

CAUTION!
This is a Caution symbol.
Cautions give information about procedures that, if not observed, could result in damage to equipment or corruption to and loss of data.
ELECTRICAL WARNING!
THIS IS AN ELECTRICAL WARNING SYMBOL.
ELECTRICAL WARNINGS MEAN THAT FAILURE TO FOLLOW
SPECIFIC PRACTICES OR PROCEDURES MAY RESULT IN
ELECTROCUTION, ARC BURNS, EXPLOSIONS OR OTHER HAZARDS
THAT MAY CAUSE INJURY OR DEATH.

NOTE: This is a Note symbol. Notes give additional and important information, hints and tips that help you to use your product.
1.2Warnings
- Read all operating instructions carefully before use.
- Avoid lengthy exposure to extreme heat or cold. Your scale works best when operated at normal room temperature. Always allow the scale to acclimate to a normal room temperature before use.
- Allow sufficient warm up time. Turn the scale on and wait for a few minutes if possible. This will give the internal components a chance to stabilize before weighing.
These electronic scales are precision instruments. Do not operate near an in-use cell phone, radio, computer or other electronic device. These devices emit RF and can cause unstable scale readings. - Avoid using in heavy vibration and airflow conditions.
- Read the weight shortly after loading. The output of the loadcell and A/D may be a little influenced after weight sits for a long time.
DANGER: FOR YOUR PROTECTION, ALL MAINS (110V OR 230V) EQUIPMENT USED WHERE DAMP OR WET CONDITIONS MAY OCCUR MUST BE SUPPLIED FROM A CORRECTLY FUSED SOURCE AND PROTECTED BY AN APPROVED GROUND FAULT PROTECTION DEVICE (RCD, GFCI ETC).

DANGER: RISK OF ELECTRICAL SHOCK. BE SURE TO UPLUG THE INDICATOR BEFORE REMOVIDING THE COVER OR OPENING THE UNIT. REFER TO QUALIFIED SERVICE PERSONNEL FOR SERVICE.
1.3 EMC Compliance
The following warning may be applicable to your machine.

CAUTION!
This is a Class A product.
In a domestic environment this product may cause radio interference in which the user may be required to take adequate measures.
United States
This equipment has been tested and found to comply with the limits for a Class A digital device, pursuant to Part 15 of the FCC Rules. These limits are designed to provide reasonable protection against harmful interference when the equipment is operated in a commercial environment. This equipment generates, uses, and can radiate radio frequency energy and, if not installed and used in accordance with the instruction manual, may cause harmful interference to radio communications. Operation of this equipment in a residential area is likely to cause harmful interference in which case the user will be required to correct the interference at his own expense.
Canada
This digital apparatus does not exceed the Class A limits for radio noise emissions from digital apparatus set out in the Radio Interference Regulations of the Canadian Department of Communications.
1.4 Routine Maintenance

IMPORTANT: This equipment must be routinely checked for proper operation and calibration. Application and usage will determine the frequency of calibration required for safe operation.
Always turn off the machine and isolate from the power supply before starting any routine maintenance to avoid the possibility of electric shock.
1.5 Cleaning the Indicator

Table 1.1 Cleaning DOs and DON'Ts
| DO DO NOT | |
| Wipe down the outside of standard products with a clean cloth, moistened with water and a small amount of mild detergent | Attempt to clean the inside of the indicator |
| Use harsh abrasives, solvents, scouring cleaners or alkaline cleaning solutions | |
| Spray the cloth when using a proprietary cleaning fluid | Spray any liquid directly on to the display window |
1.6 Sharp Objects
Do not use sharp objects such as screwdrivers or long fingernails to operate the keys.
2 Specifications
2.1 Scale Platform
2.1.1 Capacity
660 lb x 0.2 lb
-300 kg x 0.1 kg
660 lb x 5 oz
2.1.2 Accuracy
± 3 divisions (0.6 lb, 0.3 kg, 15 oz)
2.1.3 Dimension
20.5^ × 20.5^ × 2.5^ 0520mm(L)× 520mm(W)× 65mm(H)
2.2 Scale Indicator
- Input signal range: 0mV - +30mV
Sensitivity: >0.2 V / grad - Internal Resolution: Approximately 520,000 counts
Display Resolution: can be selected between 500-100,000
System Linearity: within 0.01% of Full Scale - Calibration Method: Software calibration with long-term storage in EEPROM
2.2.1 Power Supply
Alkaline batteries: 4 AAA size cells (20 hour battery life)
AC adapter: 6VDC, 500mA with central negative

Work current: .25mA
(when voltage in 5Vdc-8Vdc and not include load cell consumption)
2.2.2 Dimension
-6.5" L x 3.2" H x 1.2" W -164 mm (L) x 762 mm (W) x 64 mm (H)
2.2.3 Display
-5-digit,7-segment, 0.625" (16mm) LCD
2.2.4 Keypad
-4 push button keys
2.2.5 Environment
| Working temperature 5° to | 35°C |
| Storage temperature -10°C | to 70°C |
| Humidity ≤95% RH without condensation | |
2.2.6 Load Cell Excitation
Because more than one load cell can be used on a scale, the following are required for the load cell set to be used with this indicator.
| Voltage 4.4VDC | |
| Max. Current 55mA (can power 4-350 ohm loadcells) | |
| Signal connection 4 or 6 lead with sense leads | |
| Max Sensitivity 0.3mV/V to +3mV/V (must be fit to >0.2μV /display grad) | |
| Input Resistor ≥80 Ω | |
| Output Resistor <10 KΩ | |
2.2.7 Communication
| Mode Full-duplex or | only output mode can be selected |
| Baud Rate Selectable: 1200-2400-4800-9600-19200 bps | |
| Data Format 7 data | bits, even or odd parity, 1 stop bit8 data bits, non-parity, 1 stop bit |
| Protocol | 7 selected protocols (one compatible with NCI standard SCP-01) |
| Output Data | gross weight, net weight, tare weight, indicator displaying weight, weighing unit etc. |
3 Introduction
This chapter introduces indicator mounting, display and keypad operation in normal weigh mode.
3.1 Indicator Mounting
The PS-500 is supplied with an ABS plastic bracket. Wall mount vertically or bench mount horizontally depending on your needs.
3.2 Front Panel
The front panel incorporates the display and keypad.
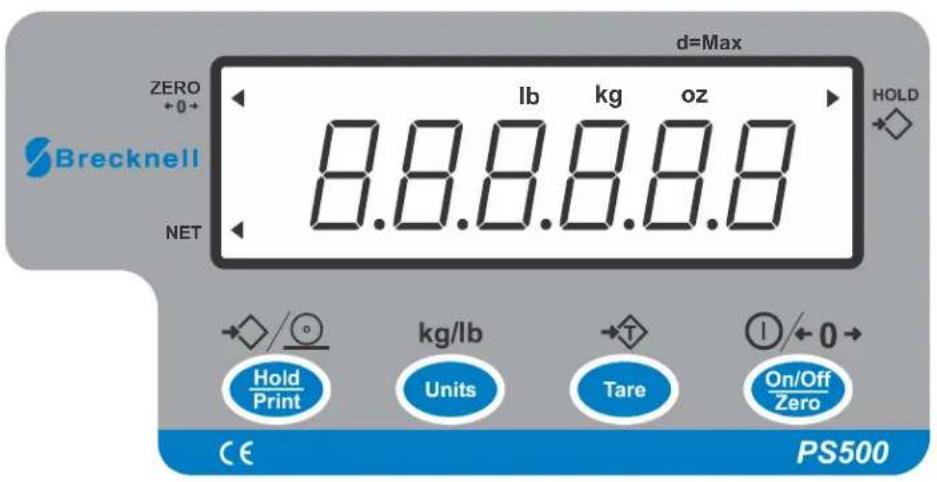
The PS-500 indicator utilizes a 7 segment LCD (Liquid Crystal Display) providing the weight and system information.
Arrows will illuminate to designate the current mode.
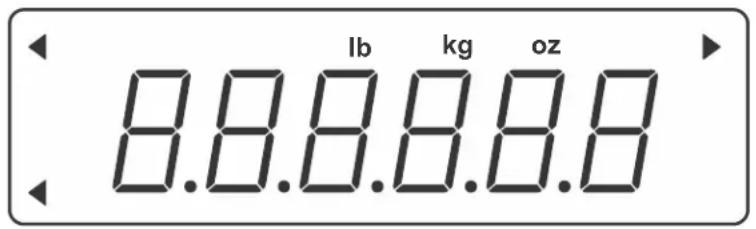
Figure 3.1 PS-500 Display
Table 3.1 LCD Display Annunciators and Definitions
| Display Symbol Description | |
| ZERO The scale | is at zero point and the gross weight is 0. |
| HOLD The scale | is in HOLD mode. The current live weight is being displayed when the arrow flashes. The current weight is locked when the arrow does not flash. |
| NET Indicates net | net mode and the tare weight is not 0. |
| lb Indicates the current unit of measure is lb. | |
| oz Indicates the current unit of measure is oz. | |
| kg Indicates the current unit of measure is kg. | |
The keyboard consists of four keys, some of which have multiple functions.
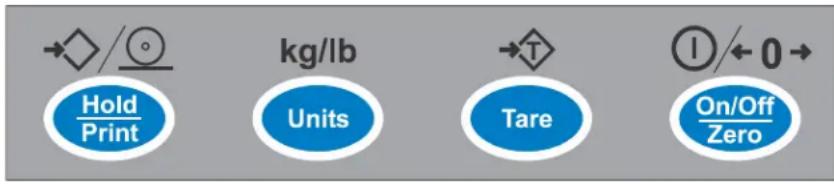
Figure 3.2 SBI-521 Keypad
Table 3.2 Function of the Keys (Normal Working Mode)
| Key Function | |
| Hold Print← | If this key is only set for HOLD (P2=0), press to enter or exit the HOLD mode. |
| If this key is only set for PRINT (P2=1), press to output the data according to P4 setting. | |
| If this key is only set for HOLD and PRINT (P2=2), press to output data according to P4 setting and hold the current weight. | |
| Units↑ | Choose weighing units; lb, kg, lb:oz |
| Note: The weighing units that can be used are restricted by display division, and calibration weight unit (restricted by P8, P9, and P10) | |
| For example, if the calibration unit is kg; calibration display resolution is 50kg (that means: P8=5, P9=0, P10=0). If the UNIT key is pressed to choose weighing units, lb or lb:oz are not allowed to choose since the display resolution of 100lb or 2000oz is not available to this indicator. | |
| Tare← | Tare function |
| This function can be activated only when the scale is in stable mode and the gross weight is not a negative value. | |
| On/Off Zero→ | Power on |
| Zero function: When the weight is within zero range, it will activate as ZERO function and clear the tare weight. When the weight is not within the zero setting range (P13), the scale will show 0---- (zero point is over the setting range) or 0_______ (zero is below the setting range). | |
| Power off | |
| ignore modification | |
| Prepare to exit from current working mode |
3.5.1 Power the Indicator
Turn the indicator on or off with the [ON/OFF] key.
3.5.2 Enter or Exit the HOLD Mode
Press the [HOLD] key.
3.5.3 Zero
When the weight is stable and within the zero range, press the [ZERO] key to set a new zero point. Refer to Table 3.3 for zero limitations.
3.5.4 Tare
When the gross weight is larger than zero and the scale is stable, press the [TARE] key. The indicator will show a net weight of zero and the arrow to the right of NET will be illuminated. Refer to Table 3.3 for hare limitations.
3.5.5 Clear Tare Weight
Remove any weight on platform and wait until the scale is stable. Press the [TARE] key.
Table 3.3 Zero and Tare Limitations
| Standard | Weight on platform | Data in TARE memory unit | key function | ||
| Tare key Zero key | |||||
| USA ≤0 no No action Zero | |||||
| yes Clear the tared weight | |||||
| >0 no Tare | |||||
| yes | |||||
| Canada ≤0 no No action Zero | |||||
| yes Clear the tared weight | |||||
| >0 | no | Tare | |||
| yes | No action | ||||
| Europe | ≤0 no No action Zero | ||||
| yes Clear the tared weight Zero and | clear the tared weight | ||||
| >0 no Tare Zero | clear the | ||||
| yes Zero and | tared weight | ||||
| None (same with Europe) | ≤0 no No action Zero | ||||
| yes Clear the tared weight Zero and | clear the tared weight | ||||
| >0 no Tare Zero | clear the | ||||
| yes Zero and | tared weight | ||||
3.5.6 Output Data (Print)
When scale is stable press the [PRINT] key.
3.5.7 Change Weight Unit
Press the [UNIT] key to select kg, lb or lb:oz. Note: under some conditions lb:oz is not available. Please refer the following tables.
Table 3.4 Use kg as Primary Unit
| Calibration Division Value | Display Division Value | ||
| kg lb | lb:oz | ||
| 0.0001kg | 0.0001kg | 0.0002lb | Not available |
| 0.001kg | 0.001kg | 0.002lb | Not available |
| 0.01kg | 0.01kg | 0.02lb | 0.5oz |
| 0.1kg 0.1kg | 0.2lb | Not available | |
| 1kg | 1kg 2lb | Not available | |
| 10kg | 10kg | 20 lb | Not available |
| 0.0002kg | 0.0002kg | 0.0005 lb | Not available |
| 0.002kg | 0.002kg | 0.005 lb | 0.1 oz |
| 0.02kg | 0.02kg | 0.05 lb | 1 oz |
| 0.2kg | 0.2kg | 0.5 lb | Not available |
| 2kg | 2kg | 5 lb | Not available |
| 20kg | 20kg | 50 lb | Not available |
| 0.0005kg | 0.0005kg | 0.001 lb | Not available |
| kg lb lb:oz | |||
| 0.005kg 0.005kg 0.01 lb 0.2 oz | |||
| 0.05kg 0.05kg 0.1 lb 2oz | |||
| 0.5kg 0.5kg 1 lb Not available | |||
| 5kg 5kg 10 lb Not available | |||
| 50kg 50kg Not available Not available | |||
Table 3.5 Use Ib as Primary Unit
| Calibration Division Value | Display Division Value | ||
| kg lb lb:oz | |||
| 0.0001lb | Not available | 0.0001lb | Not available |
| 0.001 lb 0.0005 kg 0.001 lb | Not available | ||
| 0.01 lb 0.005 kg 0.01 lb | 0.2 oz | ||
| 0.1 lb 0.05 kg 0.1 lb | 2 oz | ||
| 1 lb 0.5 kg 1 lb Not available | |||
| 10 lb 5 kg 10 lb Not available | |||
| 0.0002 lb | 0.0001 kg | 0.0002 lb | Not available |
| 0.002 lb 0.001 kg 0.002 lb | Not available | ||
| 0.02 lb 0.01 kg 0.02 lb 0.5 oz | |||
| 0.2 lb | 0.1 kg | 0.2 lb | Not available |
| 2 lb | 1 kg | 2 lb Not available | |
| 20 lb | 10 kg | 20 lb Not available | |
| 0.0005 lb | 0.0002 kg | 0.0005 lb | Not available |
| 0.005 lb 0.002 kg 0.005 lb | 0.1 oz | ||
| 0.05 lb | 0.02 kg | 0.05 lb 1 oz | |
| 0.5 lb | 0.2 kg | 0.5 lb | Not available |
| 5 lb | 2 kg | 5 lb Not available | |
| 50 lb | 20 kg | 50 lb Not available | |
3.6 Hold Function
HOLD function can be used to freeze a displayed number. In this mode, the scale can capture a dynamic number, hold a stable number, or average a unstable number and then HOLD (freeze) this number temporarily for the user to view or record.
The HOLD function can be used in normal weighing mode, counting mode and percent weighing mode. After entering HOLD mode, the speed of A/D converter can be increased to 80Hz (if USER-HOLD-AD.H.SPD is set to YES) from original 10Hz for some dynamic weighing applications.
It is possible to weigh restless weighing samples such as live animals or moving objects within the hold function. The indicator provides special mode settings to accommodate weight movements.
3.6.1 Access the Hold Mode
To enter the HOLD mode, press the [HOLD] key while in the normal weighing mode.
4 Setup Mode
To set up the indicator, you must first enter the appropriate menu mode. The front panel keys become directional navigators to move around in the menus. See Table 4.1 for details.
4.1 Entering the Setup Menu
- Press and hold the [ON/OFF/ZERO] and [UNIT] keys unit LEUP is displayed.
1a. This indicator offers 19 different setup parameters.
4.2 Navigating the Setup Menu
- Once SETUP is displayed, use the [UNIT] key to change the flashed digits and use the [HOLD/PRINT] key to shift the flashed position.
The parameter will be designated in the following format:
PN.x or PNN.xx - P is parameter; N or NN is the parameter number; x or xx is the choice within the parameter. Refer to Table 4.2 for parameters and the options for each parameter.
- Use the [TARE] key to confirm the entry, save the data and go to the next parameter.
Table 4.1 Key Functions in the Setup Mode
| Key Function | |
| Hold Print | Move cursor from right to left. |
| Units | Scroll selected digit (0 - 9). |
| Tare | Cycles through the parameters. Confirm parameter choice selection. |
| On/Off Zero | Exit from setup mode to normal work mode. |
This section provides more detailed descriptions of the selections found in the Setup Menu.
The menu table shows the options and default parameter in LCD display format to coincide with the actual display.
Table 4.2 Parameter Choices and Explanations
| SubMenu1 Option Default Parameter Description Comment | ||||
| P1 | UU-15 | U5 | Auto off time | 00 = no auto off01-15 = auto off time in minutes. The scale will automatically turn off after specified time when there has been no fluctuation of weight. |
| P2 | U-2 | 2 | Hold key function | 0 = only HOLD function1 = only PRINT function2 = HOLD and PRINT function. Short press for Print function and long press for Hold function. |
| P3 | U-2 | 2 | Hold mode function | 0 = no hold function1 = hold larger weight reading2 = auto release hold function when weigh is below 10d and auto hold new stable weigh (more than 10d) |
| 3-5U | 3-50 = unchangeable reading when the variety is within ±3-50d | |||
| P4 | U-1 | 2 | Output of print data | 0 = no RS232 function. Will not transmit or receive data.1 = output display data when PRINT is pressed and weight reading is stable.<LF><weight reading, minus sign, decimal point, unit><CR><EXT>2 = output gross, tare and net weight and weigh unit when PRINT pressed.<LF><Gross:weight reading, minus sign, decimal point, unit><CR><EXT>Tare:weight reading, decimal point, unit><CR><EXT><Net:weight reading, minus sign, decimal point, unit><CR><EXT>3 = continuously output displayed weight reading and unit. No data will be received.Output format same as choice 1.4 = continuously output gross, tare, net weight and weigh unit. No data will be received. Output formats same as choice 2.5 = output display data and weigh unit one time when scale is stable. Output format same as choice 1.6 = output gross, tare, net weight and weigh unit one time when scale become stable.Output formats same as choice 2.7 = Bio-RS232 data output, compatible to NCI-SP1 |
| SubMenu1 | Option | Default | Parameter Description | Comment |
| P5 | 0-4 | 3 | Baud rate for RS-232 | 0 = 1200 bps1 = 2400 bps2 = 4800 bps3 = 9600 bps4 = 19200 bps |
| P6 | 0-2 | 0 | RS-232 protocol | 0 = 8NO1 = 7O12 = 7E1 |
| P7 | 00-31 | 9 | Scale resolution select | Refer to Table 4.3 for resolution choices and values. |
| PB | 0-2 | 1 | Calibration division size | Refer to Table 4.4 and Table 4.50 = 11 = 22 = 5 |
| PG | 0-5 | 1 | Decimal point in calibration | Refer to Table 4.4 and Table 4.50 = 11 = 0.12 = 0.013 = 0.0014 = 0.00015 = 10 |
| P10 | 0=1 | 1 | Calibration unit | Refer to Table 4.4 and Table 4.50 = kg1 = lb |
| P110-65 Weigh units enable 0 = only kg | 1 = only lb2 = only lb:oz3 = kg or lb4 = kg or lb:oz5 = lb or lb:oz6 = kg, lb, or lb:oz | |||
| P12 | 0-7 | 3 | Power on zero range | 0 = calibration zero -point +1%FS1 = calibration zero -point +2%FS2 = calibration zero-point +5%FS3 = calibration zero-point +10%FS4 = calibration zero-point +20%FS5 = calibration zero-point +50%FS6 = calibration zero-point +100%FS7 = no limitation |
| P130-72 | Zero range for [ZERO] key | 0 = power-on zero-point +1%FS1 = power-on zero-point +2FS2 = power-on zero-point +5%FS3 = power-on zero-point +10%FS4 = power-on zero-point +20%FS5 = power-on zero-point +50%FS6 = power-on zero-point +100%FS7 = no limitation | ||
| P140-22 Weight signal within poweron zero point range | 0 = current weight1 = calibration zero-point2 = switch off zero point and power off tareweight as current tare weight | |||
| SubMenu1 | Option Default Parameter Description | Comment | ||
| P15 | Weight signal not within | power on zero point range | 0 = current weight1 = calibration zero-point2 = switch-off zero-point3 = continuously display 0---- | |
| P15 | 0-B | B | Zero tracking range | Choose the zero tracking range as per the stability of weighing system accuracy.0 = 0d, no tracking1 = +0.25d2 = +0.5d3 = +1d4 = +1.5d5 = +2d6 = +3d7 = +4d8 = +5d |
| P17 | Data filter intensity The larger the digit data filter intensity is | is stronger and the speed of data updating is lower.0 = very weak1 = weak2 = middle3 = strong | ||
| P18 | Range of weight stability | checking | 0 = +0.5d1 = ±1d2 = +2d3 = +3d4 = +4d5 = +5d6 = +6d7 = +7d8 = +8d9 = +9d | |
| P19 | 0-9 | / | Overload limit range | 0 = FS+0d1 = FS+9d2 = 101%FS3 = 102%FS4 = 105%FS5 = 110%FS6 = 120%FS7 = 150%FS8 = 200%FS9 = no limitation |
Table 4.3 Calibration Resolution (P7)
| Parameter Choice | Calibration Resolution | Parameter Choice | Calibration Resolution |
| 00 500 16 | 7500 | ||
| 01 600 17 | 8000 | ||
| 02 750 18 | 10000 | ||
| 03 800 19 | 12000 | ||
| 04 1000 20 | 15000 | ||
| 05 1200 21 | 20000 | ||
| 06 1500 22 | 25000 | ||
| 07 2000 23 | 30000 | ||
| 08 2400 24 | 35000 | ||
| 09 2500 25 | 40000 | ||
| 10 3000 26 | 50000 | ||
| 11 3500 27 | 60000 | ||
| 12 4000 28 | 70000 | ||
| 13 5000 29 | 75000 | ||
| 14 6000 30 | 80000 | ||
| 15 7000 31 | 100000 |
Table 4.4 Calibration Units (kg) per P8, P9 and P10
| Calibration Division Value | Display Division Value | ||
| kg lb lb:oz | |||
| 0.0001kg 0.0001kg 0.0002lb Not available | |||
| 0.001kg 0.001kg 0.002lb Not available | |||
| 0.01kg 0.01kg 0.02lb 0.5oz | |||
| 0.1kg | 0.1kg | 0.2lb Not available | |
| 1kg 1kg | 2lb Not available | ||
| 10kg | 10kg | 20 lb Not available | |
| 0.0002kg 0.0002kg 0.0005 lb | Not available | ||
| 0.002kg 0.002kg 0.005 lb | 0.1 oz | ||
| 0.02kg 0.02kg 0.05 lb | 1 oz | ||
| 0.2kg | 0.2kg | 0.5 lb Not available | |
| 2kg 2kg | 5 lb | Not available | |
| 20kg | 20kg | 50 lb Not available | |
| 0.0005kg 0.0005kg 0.001 lb Not available | |||
| kg | lb lb:oz | ||
| 0.005kg 0.005kg 0.01 lb 0.2 oz | |||
| 0.05kg 0.05kg 0.1 lb 2oz | |||
| 0.5kg 0.5kg 1 lb Not available | |||
| 5kg 5kg 10 lb Not available | |||
| 50kg 50kg Not available | Not available | ||
Table 4.5 Calibration Units (lb) per P8, P9 and P10
| Calibration Division Value | Display Division Value | ||
| kg | lb lb:oz | ||
| 0.0001lb | Not available | 0.0001lb | Not available |
| 0.001 lb 0.0005 kg 0.001 lb | Not available | ||
| 0.01 lb 0.005 kg 0.01 lb | 0.2 oz | ||
| 0.1 lb 0.05 kg 0.1 lb | 2 oz | ||
| 1 lb 0.5 kg 1 lb Not available | |||
| 10 lb 5 kg 10 lb Not available | |||
| 0.0002 lb | 0.0001 kg | 0.0002 lb | Not available |
| 0.002 lb 0.001 kg 0.002 lb | Not available | ||
| 0.02 lb 0.01 kg 0.02 lb 0.5 oz | |||
| 0.2 lb | 0.1 kg | 0.2 lb | Not available |
| 2 lb | 1 kg | 2 lb Not available | |
| 20 lb | 10 kg | 20 lb Not available | |
| 0.0005 lb | 0.0002 kg | 0.0005 lb | Not available |
| 0.005 lb 0.002 kg 0.005 lb | 0.1 oz | ||
| 0.05 lb | 0.02 kg | 0.05 lb 1 oz | |
| 0.5 lb | 0.2 kg | 0.5 lb | Not available |
| 5 lb | 2 kg | 5 lb Not available | |
| 50 lb | 20 kg | 50 lb Not available | |
Table 4.6 Capacity Unit is kg or lb (Count by 1)
| Resolution set by P7 | Division set by P8 (P8 = 0) and P9 | |||||
| 0.0001 | 0.001 | 0.01 | 0.1 | 1 | 10 | |
| 500 0.050 | 0.500 | 5.00 | 50 | 0 | 500 | 5000 |
| 600 0.060 | 0.600 | 6.00 | 60 | 0 | 600 | 6000 |
| 750 0.075 | 0.750 | 7.50 | 75 | 0 | 750 | 7500 |
| 800 0.080 | 0.800 | 8.00 | 80 | 0 | 800 | 8000 |
| 1000 0.100 | 1.000 | 10.00 | 100 | 0 | 1000 | 10000 |
| 1200 0.120 | 1.200 | 12.00 | 120 | 0 | 1200 | 12000 |
| 1500 0.150 | 1.500 | 15.00 | 150 | 0 | 1500 | 15000 |
| 2000 0.200 | 2.000 | 20.00 | 200 | 0 | 2000 | 20000 |
| 2400 0.240 | 2.400 | 24.00 | 240 | 0 | 2400 | 24000 |
| 2500 0.250 | 2.500 | 25.00 | 250 | 0 | 2500 | 25000 |
| 3000 0.300 | 3.000 | 30.00 | 300 | 0 | 3000 | 30000 |
| 3500 0.350 | 3.500 | 35.00 | 350 | 0 | 3500 | 35000 |
| 4000 0.400 | 4.000 | 40.00 | 400 | 0 | 4000 | 40000 |
| 5000 0.500 | 5.000 | 50.00 | 500 | 0 | 5000 | 50000 |
| 6000 0.600 | 6.000 | 60.00 | 600 | 0 | 6000 | 60000 |
| 7000 0.700 | 7.000 | 70.00 | 700 | 0 | 7000 | 70000 |
| 7500 0.750 | 7.500 | 75.00 | 750 | 0 | 7500 | 75000 |
| 8000 0.800 | 8.000 | 80.00 | 800 | 0 | 8000 | 80000 |
| 10000 | 1.0000 | 10.000 | 100.00 | |||
| 12000 | 1.2000 | 12.000 | 120.00 | |||
| 15000 | 1.5000 | 15.000 | 150.00 | |||
| 20000 | 2.0000 | 20.000 | 200.00 | |||
| 25000 | 2.5000 | 25.000 | 250.00 | |||
| 30000 | 3.0000 | 30.000 | 300.00 | |||
| 35000 | 3.5000 | 35.000 | 350.00 | |||
| 40000 | 4.0000 | 40.000 | 400.00 | |||
| 50000 | 5.0000 | 50.000 | 500.00 | |||
| 60000 | 6.0000 | 60.000 | 600.00 | |||
| 70000 | 7.0000 | 70.000 | 700.00 | |||
| 75000 | 7.5000 | 75.000 | 750.00 | |||
| 80000 | 8.0000 | 80.000 | 800.00 | |||
| 100000 | 10.0000 | 100.000 | 1000.00 | |||
Table 4.7 Capacity Unit is kg or lb (Count by 2)
| Resolution set by P7 | Division set by \( \mathrm{P}8\left( {\mathrm{P}8 = 1}\right) \) and \( \mathrm{P}9 \) | |||||
| 0.0002 0.0 | 02 0.02 0.2 2 | 20 | ||||
| 500 0.1000 | 1.000 10.00 | 100.0 1000 10000 | ||||
| 600 0.1200 | 1.200 12.00 | 120.0 1200 12000 | ||||
| 750 0.1500 | 1.500 15.00 | 150.0 1500 15000 | ||||
| 800 0.1600 | 1.600 16.00 | 160.0 1600 16000 | ||||
| 1000 0.2000 | 2.000 20.00 | 200.0 2000 20000 | ||||
| 1200 0.2400 | 2.400 24.00 | 240.0 2400 24000 | ||||
| 1500 0.3000 | 3.000 30.00 | 300.0 3000 30000 | ||||
| 2000 0.4000 | 4.000 40.00 | 400.0 4000 40000 | ||||
| 2400 0.4800 | 4.800 48.00 | 480.0 4800 48000 | ||||
| 2500 0.5000 | 5.000 50.00 | 500.0 5000 50000 | ||||
| 3000 0.6000 | 6.000 60.00 | 600.0 6000 60000 | ||||
| 3500 0.7000 | 7.000 70.00 | 700.0 7000 70000 | ||||
| 4000 0.8000 | 8.000 80.00 | 800.0 8000 80000 | ||||
| 5000 1.0000 | 10.000 100.0 | 1000.0 10000 100000 | ||||
| 6000 1.2000 | 12.000 120.0 | 1200.0 12000 120000 | ||||
| 7000 1.4000 | 14.000 140.0 | 1400.0 14000 140000 | ||||
| 7500 1.5000 | 15.000 150.0 | 1500.0 15000 150000 | ||||
| 8000 1.6000 | 16.000 160.0 | 1600.0 16000 160000 | ||||
| 10000 | 2.0000 | 20.000 | 200.00 | 20000.0 | 20000 | 200000 |
| 12000 | 2.4000 24.000 | 240.0 2400 24000 240000 | ||||
| 15000 | 3.0000 30.000 | 300.0 3000 30000 30000 | ||||
| 20000 | 4.0000 40.000 | 400.0 40000 40000 | ||||
| 25000 | 5.0000 50.000 | 500.0 50000 50000 | ||||
| 30000 | 6.0000 60.000 | 600.0 60000 60000 | ||||
| 35000 | 7.0000 70.000 | 700.0 70000 70000 | ||||
| 40000 | 8.0000 80.000 | 800.0 80000 80000 | ||||
| 50000 | 10.0000 | 100.000 | 1000.00 | 10000.0 | 100000 | 100000 |
| 60000 | 12.0000 | 120.000 | 1200.00 | 12000.0 | 120000 | 120000 |
| 70000 | 14.0000 | 140.000 | 1400.00 | 14000.0 | 140000 | 140000 |
| 75000 | 15.0000 | 150.000 | 1500.00 | 15000.0 | 150000 | 150000 |
| 80000 | 16.0000 | 160.000 | 1600.00 | 16000.0 | 160000 | 160000 |
| 100000 | 20.0000 | 200.000 | 2000.00 | 20000.0 | 200000 | 200000 |
Table 4.8 Capacity Unit is kg or lb (Count by 5)
| Resolution set by P7 | Division set by P8 (P8 = 2) and P9 | |||||
| 0.0005 0.005 0.05 0.5 50 | ||||||
| 500 0.2500 | 2.5000 25.00 | 250.0 | 2500 2500 | |||
| 600 0.3000 | 3.000 30.00 | 300.0 | 3000 30000 | |||
| 750 0.3750 | 3.750 37.50 | 375.0 | 3750 37500 | |||
| 800 0.4000 | 4.000 40.00 | 400.0 | 4000 40000 | |||
| 1000 0.5000 | 5.000 50.00 | 500.0 | 5000 50000 | |||
| 1200 0.6000 | 6.000 60.00 | 600.0 | 6000 60000 | |||
| 1500 0.7500 | 7.500 75.00 | 750.0 | 7500 75000 | |||
| 2000 1.0000 | 10.000 100.00 | 1000.0 | 100000 | |||
| 2400 1.2000 | 12.000 120.00 | 1200.0 | 120000 | |||
| 2500 1.2500 | 12.500 125.00 | 1250.0 | 125000 | |||
| 3000 1.5000 | 15.000 150.00 | 1500.0 | 150000 | |||
| 3500 1.7500 | 17.500 175.00 | 17500 | 175000 | 175000 | ||
| 4000 2.0000 | 20.000 200.00 | 20000 | 200000 | 200000 | ||
| 5000 2.5000 | 25.000 250.00 | 2500.0 | 250000 | |||
| 6000 3.0000 | 30.000 300.00 | 3000.0 | 300000 | |||
| 7000 3.5000 | 35.00 350.00 | 3500.0 | 35000 350000 | |||
| 7500 375.00 | 37.500 375.00 | 3750.0 | 375000 | |||
| 8000 4.0000 | 40.000 400.00 | 4000.0 | 400000 | |||
| 10000 5.0000 | 50.000 500.00 | 5000.0 | 500000 | |||
| 12000 6.0000 | 60.000 600.00 | 6000.0 | 600000 | |||
| 15000 7.5000 | 75.000 750.00 | 7500.0 | 750000 | |||
| 20000 | 10.0000 | 100.000 | 1000.00 | 10000.0 | 1000000 | 1000000 |
| 25000 | 12.5000 | 125.000 | 1250.00 | 12500.0 | 1250000 | 1250000 |
| 30000 | 15.0000 | 150.000 | 1500.00 | 15000.0 | 1500000 | 1500000 |
| 35000 | 17.5000 | 175.000 | 1750.00 | 17500.0 | 1750000 | 1750000 |
| 40000 | 20.0000 | 200.000 | 2000.00 | 20000.0 | 2000000 | 2000000 |
| 50000 | 25.0000 | 250.000 | 2500.00 | 25000.0 | 2500000 | 2500000 |
| 60000 | 30.0000 | 300.000 | 3000.00 | 30000.0 | 300000 | 3000000 |
| 70000 | 35.0000 | 350.000 | 3500.00 | 35000.0 | 350000 | 3500000 |
| 75000 | 37.5000 | 375.000 | 3750.00 | 37500.0 | 375000 | 3750000 |
| 80000 | 40.0000 | 400.000 | 4000.00 | 40000.0 | 400000 | 4000000 |
| 100000 | 50.0000 | 500.000 | 5000.00 | 50000.0 | 500000 | 5000000 |
4.5 Exit the Setup Menu
- Power off the indicator by pressing and holding the [ZERO/ON/OFF] key.
- Move the slide switch on the rear cover back to the left and replace the metal protective plate. Refer to section 4.2 for location.
- Turn the indicator back on by pressing the [ON] key. The display will go through a digit check, then settle into Normal Operating mode. All front panel keys will now return to their normal mode of operation.
5 Calibration
The config/cal switch must be set to the ON position in order to calibrate the indicator.

NOTE: More than 25% of the full scale weight is needed for calibration.
5.1 Calibration Mode
Before calibration, prepare the standard weight (more than 25% of full scale).
- Remove any weight on the scale.
- When in normal weighing mode, press and hold down [TARE] and [ON/OFF/ ZERO] keys to enter calibration mode.
- When the indicator displays CRL^- , the scale is ready for calibration. Press [TARE] to confirm and go to next step or press [ON/OFF/ZERO] to exit the calibration mode.
- The indicator will display RP - - .
4a. This means the following data is the full capacity according to your setting of display resolution (P7), display division value (P8), location of decimal point in calibration unit (P9) and capacity unit in calibration (P10).
4b. If the setting of full scale is more than 199999 (regardless of decimal point and weight unit), the full scale capacity will be shown by first four digits and last four digits: Hxxx and Lxxx. - Press [TARE] to go to next step directly, press [ON/OFF/ZERO] to exit the calibration mode or after a few seconds it will automatically to next step.
- The scale will automatically display the setting of division. Firstly it will display d . and then the data according to your setting of P8, P9 and P10. Refer to Table 5.1 to choose a division size.
Table 5.1 Divison Sizes
| 0.0001 kg/lb 0.002 kg/lb 0.0005 kg/lb |
| 0.001 kg/lb 0.002 kg/lb 0.005 kg/lb |
| 0.01 kg/lb 0.02 kg/lb 0.05 kg/lb |
| 0.1 kg/lb 0.2 kg/lb 0.5 kg/lb |
| 1 kg/lb 2 kg/lb 5 kg/lb |
| 10 kg/lb 20 kg/lb 50 kg/lb |
- Press [TARE] to go to next step directly, press [ON/OFF/ZERO] to exit the calibration mode or after a few seconds it will automatically to next step.
-
CRL.PQ is displayed. This is the scale zero point. Remove weight from scale and press the [TARE] key.
-
CRL.P will be displayed. This is the second calibration point. The default standard weight is 50% of full scale. Load weight from 12.5% to 100% of full scale.
- Use the [PRINT/HOLD] and [UNIT] keys to input the loaded weight.
10a. If the input data is larger than 199999 it will be shown by first four digits and last four digits: Hxxx and Lxxx.
10b. If the triangular symbol on the left bottom of LCD window appears, it means that the digit being changed is the displayed most significant bit which can only be 0/blank or 1. - Press the [TARE] key to confirm your setting and the indicator will flash the input standard weight. Wait till the scale comes steady and input A/D data as per the standard weight.
- [HL]P will be displayed. This is the third calibration point. When xxxx kg (or lb) is displayed (100% FS is default), you can press [ON/OFF/ZERO] to exit the calibration mode or place a standard weight (must be in the range of 25%-100% FS, and equal or larger than that for the second calibration point; this is also the range of your input number) on the scale.
- Use the [PRINT/HOLD] and [UNIT] keys to input the loaded weight.
- Use [TARE] key to confirm the standard weight and input number are correct.
14a. If the calibration weight for third point is same with that for second point and the calibration weight is more than 25% FS, input the standard calibration weight same as second point calibration and press [TARE] key to confirm the setting. The indicator will flash the input weight. If the indicator gets reasonable data (the input weight is correct, and the calibration weight of third calibration is more than equal to the calibration weight of second calibration), it will go to next step. - [CALPO] will be displayed again. Press [TARE]. The display will blink. If the calibration is good the data will be saved. The display will perform an auto reset and return to the working mode.
15a. If an error occurs during calibration, CRL.Er will be displayed. Start from step 1 and recalibrate.
5.2 Display ADC Code or Working Voltage Value
In this mode, you can examine the stability of weighing system and increment the ADC output code corresponding to the loaded weight.
Note:
- The increment of ADC code for full scale weight must be larger or equal to 2 times of selected display division. Otherwise, the calibration cannot be properly completed.
e.g. The display division is 0.1kg . Load 100kg standard weight on the platform, the increment of ADC code should be at least more than 2× 100kg / 0.1kg = 2× 1000 = 2000 . In this case, the scale can be calibrated. Otherwise, smaller division needs to be chosen.
The data should be stable. Otherwise, the calibration cannot be properly completed.
In this mode, the proper ADC data at zero point can be viewed by examining the A/D data for loaded weight.
If the ADC increase for full capacity is NFS, the power-on zero range is set to Zp% FS (P12 setting) and zero key range is set to Zk% FS (P13 setting). Then proper ADC data of zero point is larger than (Zp% + Zk%) x NFS.
- From the weigh mode press and hold the [ON/OFF/ZERO] and [HOLD/PRINT] key until is shown. The indicator will show the firmware version.
- ADC increase for full capacity (NFS) can be made by loading the weight (W) on the platform and the ADC increase for W weight is Nw. The ADC increase for full capacity WFS is (NFS) = (Nw)x (WFS)/W.
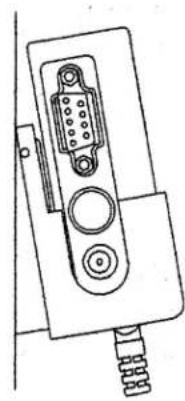
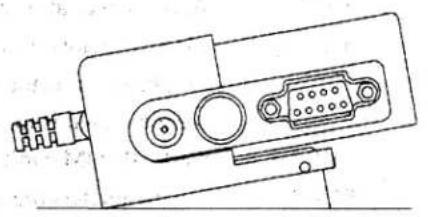
2a. It is possible a negative value will be displayed due to an error from the loadcell(s) or the position of the zero-point potentiometer on PCB. However, the software only deals with positive values. In this case the position of zero-point potentiometer will need to be adjusted to make the ADC data will be positive value and larger than (Zp% + Zk%)× NFS. Normally the indicator is factory-calibrated and adjustment is not necessary. Refer to Figure 5.1 for the zero point potentiometer location. Decrease ADC data by rotating clockwise, and increase ADC data by rotating counter-clockwise.
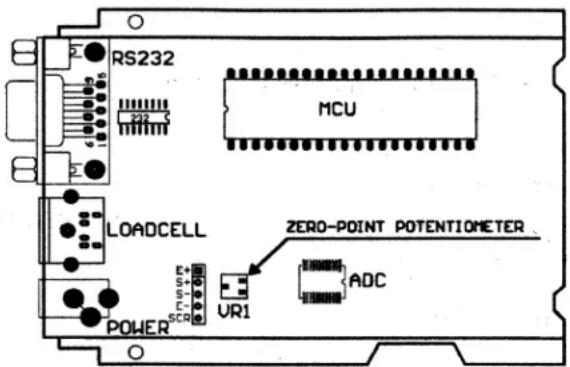
Figure 5.1 Zero Point Potentiometer Location
- Press the [UNIT] key to select the ADC weight inner code or input the inner working voltage value. When Ux.xx is displayed, the displayed digits are the voltage value. The proper working power voltage is between 5V - 8V.
- Press the [TARE] key to display filtered or unfiltered weigh A/D data. When is on the data is filtered.
- Press the [ON/OFF/ZERO] key to exit this mode and return to the normal weighing mode.
6 Serial Communication
6.1 Com Port 1
COM1 is a RS-232 bi-directional port. Communication wires are connected to the RS-232 connector using TXD1, RXD1 and GND.
Table 6.1 PS-500 Com1 Port
| Designation Description Pin | ||
| TXD transmit 2 | ||
| RXD receive 3 | ||
| GND ground/common 5 | ||
| DSR | data set ready | 4 |
| DTR | data terminal ready | 6 |
| CTS | clear to send | 7 |
| RTS | return to send | 8 |
| no connection no connection | 1 | |
| no connection no connection | 9 | |
NOTE: The indicator DB9 female connector has pin 4 and pin 6 shorted together. Pin 7 and pin 8 are also shorted together.
6.2 Protocol
The baud rate and byte format is fixed by P5 and P6 settings.
Responses to serial commands will be immediate or within one weight measure cycle of the scale. One second should be adequate for use as a time-out value by remote (controlling) device.
6.3 Transaction String
The length of the weight field will be 7 digits. One digit for minus sign, one for decimal point, 2 for unit of measure.
- If the unit is lb:oz, another two for Ib and on for a space after Ib. Units of measure abbreviations are always lower case.
- If the weight is over capacity, the scale will return nine "^" characters (the field of minus sign, decimal point, weight data is filled by "^").
- If the weight is under capacity, it will return nine "" characters (the field of minus sign, decimal point, and weight data is filled by " ").
- If the zero point is error, it will return nine "-" characters. The character will be "-" for negative weight or a space character for positive weight. Minus sign follow after the first digit.
Useless leading 0 before digits is suppressed.
Table 6.2 Symbols Used
Table 6.3 Bit Definition of H1H2H_3
| <LF> Line Feed character (hex 0AH) | |
| <CR> Carriage Return character (hex 0DH) | |
| <ETX> End of Text character (hex 03H) | |
| <SP> Space (hex 20H) | |
| H1H2H3 | Four current status bytes |
| <P> Polarity character: | "?" or " " |
| W1--W7 | Reading data, 1-7 bytes (seven digits) |
| <DP> Decimal point | |
| U1U2 | Measure units, kg, lb, lb:oz, % or pcs; 2-5 bytes |
| Bit | Byte 1 (H1) Byte | 2 (H 2) Byte | 3 (H 3) |
| 0 0 = stable 0 = not under capacity 00 = compare disable | |||
| 1 = not stable 1 = under capacity | 01 = lower limit10 = ok11= upper limit | ||
| 1 0 = not at zero point 0 = not over capacity | |||
| 1 = at zero point | 1 = over capacity | ||
| 2 always 0 always 0 0 = gross weight | |||
| 1 = net weight | |||
| 3 0 = eeprom OK always 0 always 0 | |||
| 1 = eeprom error | |||
| 4 always 1 always 1 always 1 | |||
| 5 always 1 always 1 always 1 | |||
| 6 always 0 always 1 always 0 | |||
| 7 parity parity parity | |||
Command: W
| Response |
| <LF>xxxxxxxxU1U2<CR><LF>H1H2H3<CR<ETX>---over capacity |
| <LF>__________U1U2<CR><LF>H1H2H3<CR<ETX>---under capacity |
| <LF>--------- U1U2<CR><LF>H1H2H3<CR<ETX>---zero-point error |
| Note: If the weigh unit is lb:oz, U1U2 oz in above responses |
| <LF><P=W1W2W3W4W5W6<DP=W7U1U2<CR><LF>H1H2H3<CR<ETX>---scale is stable and the current weigh unit is kg or lb. With or without decimal point and the position is as per the P9 setting. |
| <LF><P=W1W2W3lb<SP=W4W5lb<SP=W6W7oz<CR>H1H2H3<CR<ETX> |
| <LF><P=W1W2W3lb<SP=W4lb<SP=W5W6<DP=W7oz<CR>H1H2H3<CR<ETX> |
Command: S
| Response |
| <H1>H2H3<CR><ETX> |
Command: Z
| Response |
| Zero function is activated (simulate ZERO key) and it returns to current scale status. |
| <H1H2H3<CR><ETX> |
If ZERO function cannot be activated, it will return to current scale status.
Command:T
| Response |
| TARE function is activated (simulate TARE key), and then returns scale status. |
| <H1>H2H3<CR><ETX> |
If TARE function cannot be activated, it will return to current scale status.
Command: U
| Response |
| Changes units of measure (simulate UNIT key) and return scale status with new units, The new measure unit should be allowed to use |
| <LF> U1U2 <CR><LF> H1H2H3 <CR><ETX> |
Command:L
| Response |
| If Hold function can be activated, it will enable/disable hold function (simulate HOLD key) and returns scale status. |
| <H1H2H3<CR><ETX> |
Command:X
| Response |
| Power off the scale, just like press down the ON/OFF key to turn off the scale. |
Command: all others
Table 6.4 Summary of Command and Response:
| Response |
| Unrecognized command |
| <LF?> <CR></ETX> |
| Command Response | |
| ASCII HEX | |
| W<CR> 57 0d Read scale weight: <LF>xxxxxxxxU1U2 U3U4U5<CR><LF>H1H2H3 H4<CR><ETX>---over capacity ?<LF> U1U2U3U4U5<CR><LF>H1H2H3 H4<CR><ETX>---under capacity ?<LF>-------- U1U2 U3 U4U5<CR><LF>H1H2H3 H4<CR><ETX>---zero-point error ?<LF><p=W1W2W3W4W5<dp=W6U1U2U3U4U5<CR><LF>H1H2H3H4<CR><ETX>---normal data | |
| S<CR> 53 0d <LF>H1H2H3H4<CR><ETX>; read scale status | |
| Z<CR> 5a 0d <LF>H1H2H3H4<CR><ETX>; simulate ZERO key | |
| T<CR> 54 0d <LF>H1H2H3H4<CR><ETX>; simulate TARE key | |
| U<CR> 55 0d <LF> U1U2 U3 U4U5<CR><LF>H1H2H3H4<CR><ETX>; simulate UNIT key | |
| L<CR> 4c 0d <LF>H1H2H3H4<CR><ETX>; simulate HOLD key | |
| X<CR> 58 0d power off the scale, simulate OFF key | |
| others <LF>? <CR><ETX> | |
7 Troubleshooting
This chapter gives explanations on commonly seen errors, display characters and display symbols.
7.1 Display Characters
| ASCII | Display Character | ASCII | Display Character | ASCII | Display Character |
| 0 | 8. | A | 8. | N | 8. |
| 1 | 8. | B | 8. | O | 8. |
| 2 | 8. | C | 8. | P | 8. |
| 3 | 8. | D | 8. | Q | 8. |
| 4 | 8. | E | 8. | R | 8. |
| 5 | 8. | F | 8. | S | 8. |
| 6 | 8. | G | 8. | T | 8. |
| 7 | 8. | H | 8. | U | 8. |
| 8 | 8. | I | 8. | V | 8. |
| 9 | 8. | J | 8. | W | 8. |
| K | 8. | X | 8. | ||
| L | 8. | Y | 8. | ||
| M | 8. | Z | 8. |
| Symbol Description | |
| U----Zero is over the setting range | |
| U----Zero point is below the setting range | |
| Hd----Signal to ADC is over maximum range | |
| Hd----Signal to ADC is below minimum range | |
| --- Weight is over upper limitation or display data is over limitation | |
| --- Weight is below lower limitation | |
| EEPROM can't be accessed. | |
| EEPROM The parameters are not the same as the backup data | |
| EEPROM The setting parameter(s) is not in normal range | |
| L bHE Battery voltage is below 4.7V | |
| LHP.- - The setting full capacity will be displayed | |
| LHL.PIT Calibration on point (x) | |
| CALER Calibration error, maybe input data or loaded weight is incorrect, unstable, non-linear | |
| d.- - The division will be displayed | |
| PIT The x = parameter, y = parameter choice |
7.3 Error Messages and Troubleshooting
| Symptom Probable Cause Remedy | ||
| Hd- - - - - - Loadcell wires to indicator are incorrectly connected, shorted, opened, ADC or loadcell(s) are damaged. | Make sure wires are ok and correctly connected. Replace loadcell or ADC chip, Service required. | |
| D - - - - - - | Weight reading exceeds Power On Zero limit. | Make sure scale platform is empty. Perform zero calibration. |
| D - - - - - - | Weight reading below Power On Zero limit. | Install platform on scale. Perform zero calibration. |
| - - - - - - Weight reading exceeds Overload limit or the weight value cannot be displayed in the current unit of measure because it exceeds 6 digits. | Reduce load on scale until weight value can be displayed. Use a more appropriate unit of measure. | |
| - - - - - - | Weight reading below under load limit. | Install platform on scale. Perform zero calibration. |
| EEPE2 | Parameter is not correctly set. | Re-set parameter |
| CRLFer | Calibration error. Input data or loaded weight is too small, too big, unstable, non-linear. | Input correct data, load correct weight onto platform, Service required. |
| Will not turn on. | Power cord not plugged in or properly connected. Power outlet not supplying electricity. Battery discharged. Other failure. | Check power cord connections. Make sure power cord is plugged into the power outlet. Check power source. Replace batteries. Service required. |
| Cannot zero the display or will not zero when turned on. | Load on scale exceeds allowable limits. Load on scale is not stable. Load cell damage. | Remove load on scale. Wait for load to become stable. Service required. |
Brecknell
Brecknell USA
1000 Armstrong Dr.
Fairmont MN 56031
Tel:507-238-8702
Fax:507-238-8271
Email: sales@brecknellscales.com
http://www.brecknellbases.com
Brecknell UK
Foundry Lane,
Smethwick, West Midlands,
England B66 2LP
Tel:+44 (0) 8452 46 6717
Fax:+44 (0) 8452 46 6718
Email:
sales@brecknellbases.co.uk
http://www.brecknellbases.com
MS140/300
Smethwick, West Midlands,
England B66 2LP
Tél.: +44 (0) 8452 46 6717
Telc.:+44(0)8452466718
Courriel: sales@brecknellscales.co.uk
http://www.brecknellbases.com