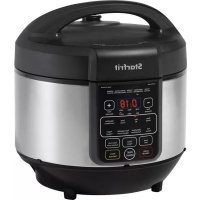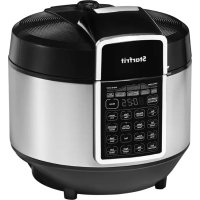
0246000020000 - Saucepan Starfrit - Free user manual and instructions
Find the device manual for free 0246000020000 Starfrit in PDF.


User questions about 0246000020000 Starfrit
0 question about this device. Answer the ones you know or ask your own.
Ask a new question about this device
Download the instructions for your Saucepan in PDF format for free! Find your manual 0246000020000 - Starfrit and take your electronic device back in hand. On this page are published all the documents necessary for the use of your device. 0246000020000 by Starfrit.
USER MANUAL 0246000020000 Starfrit
text_image
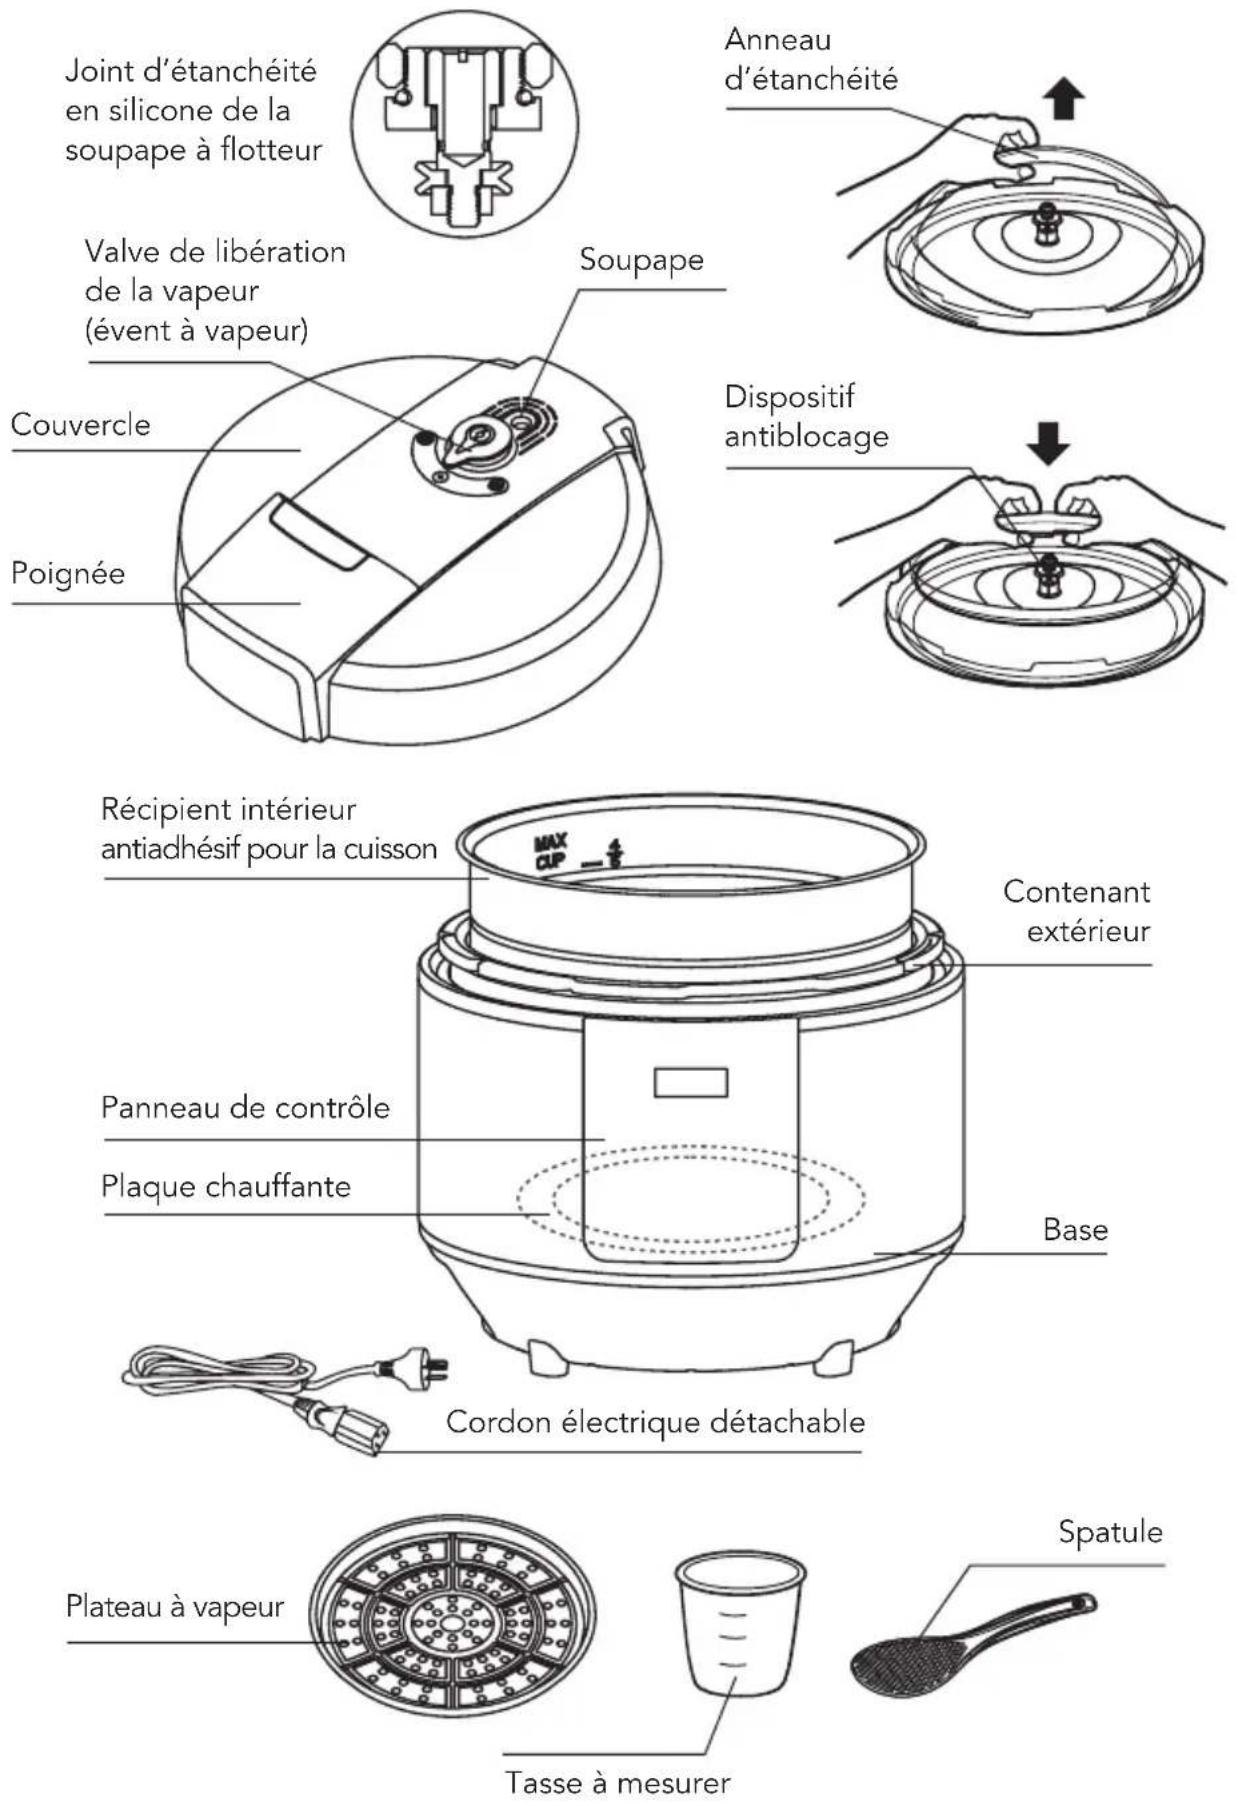
Float valve silicone gasket Pressure release valve (steam vent) Lid Lid handle Sealing ring Anti-blocking nut Non-stick inner cooking pot Digital control panel Heating plate Outer pot Base Detachable power cord Steaming tray Measuring cup Serving spoonOPERATING AND SAFETY INSTRUCTIONS
| Item no. Voltage (V) Wattage | (W) Frequency (Hz) | |
| 024600 120 1200 60 |
IMPORTANT SAFEGUARDS
READ THE INSTRUCTIONS BEFORE USE
WARNING: To reduce the risk of fire, electrical shock, serious personal injury and/or property damage:
- To protect against electric shock, do not immerse power cord, plug or product in water or any other liquid.
- Do not touch hot surfaces. Use protective oven mitts or gloves to avoid burns or serious personal injury. Always use lid handle or side handles.
- Keep the product out of the reach of children and pets. This product is not intended for use by children. Close adult supervision is necessary when any appliance is used near children.
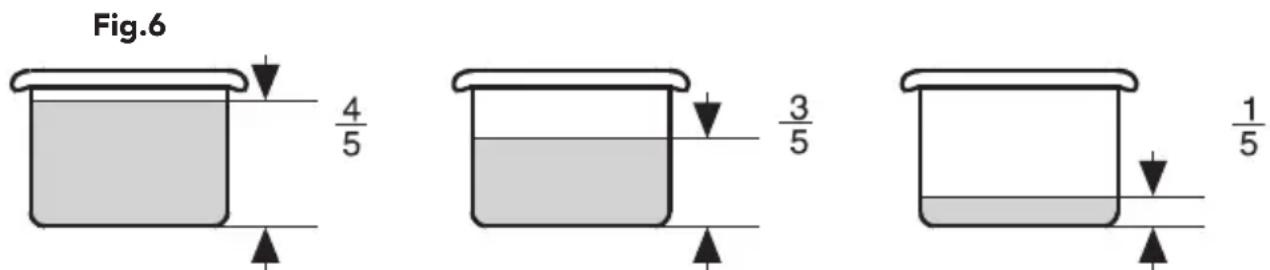
- This appliance cooks under pressure. Ensure the minimum quantity of food and liquid is at least 1/5 full. Do not fill the appliance over 4/5 full. Refer to markings inside the cooking pot. Do not overfill the appliance as it may clog the pressure release valve and develop excess pressure.
- Before operating, ensure the sealing ring and pressure release valve are properly installed. Ensure the lid is tightly closed before operating.
- Always check, pressure release valve, anti-blocking nut, float valve for clogging before use.
- Allow the appliance to completely cool down and make sure internal pressure is released before opening the lid. If the lid is difficult to turn, it is an indication that the appliance is still pressurized. DO NOT force it open as it may cause serious injuries
- DO NOT use the appliance to pressure fry with oil. This may cause serious injuries.
- Unplug from electrical outlet before cleaning or when not in use. Allow the unit to cool down completely before assembling, disassembling, relocating.
- Do not operate the product if it has a damaged power cord or plug, or after the appliance malfunctions or has been damaged in any manner. Do not attempt to examine or repair this product yourself. Please call the customer service number provided in this user manual.
-
Do not leave the product unattended while it is in use. DO NOT move the appliance while in use.
-
Do not touch, cover or obstruct the pressure release valve as it is extremely hot and may cause scalding.
- Use extreme caution when opening the lid and releasing steam manually as hot steam will escape and may cause scalding. Use protective oven mitts or gloves to avoid burns or serious personal injury. Always use utensils to handle hot food.
- The cooking pot is designed for use with this appliance only. It must never be used on a stovetop, range top, hot gas or electric burner or in a heated oven. It may warp and result in injuries. To avoid serious injuries, always cook inside the removable cooking pot.
- Always make sure the outside of the cooking pot is dry prior to use. If the pot is returned to the appliance when wet, it may damage or cause the product to malfunction.
- Do not plug or unplug the product into/from the electrical outlet with a wet hand.
- Use the product in a well-ventilated area. DO NOT operate the appliance directly under kitchen cabinets.
- Do not use attachments not recommended or sold by the product manufacturer. The use of accessory attachments not recommended by the appliance manufacturer may cause injuries.
- This product is intended for indoor, non-commercial use. Do not use outdoors or for anything other than its intended use. This appliance is intended for countertop use only.
- Do not let the cord hang over edge of a table or counter or touch hot surfaces, as you may trip and fall or cause the hot contents of the appliance to spill and possibly cause burns or injuries
- Do not place the product on or near a hot gas or electric burner, or in heated oven as it may cause this appliance to melt.
- Always place the product on a flat, stable surface – it is not recommended to use the appliance on temperature sensitive surfaces.
- Always attach plug to appliance first, then plug cord into wall outlet. To disconnect, turn any control to "off", then remove plug from wall outlet. Connect the power plug to an easily accessible outlet so the appliance can be unplugged immediately in the event of an emergency.
- Do not use the appliance with a programmer or timing device that switches it on automatically. The use of such devices is dangerous and can cause a fire risk.
- While in use, provide adequate space above and around the appliance for air circulation. Do not operate this appliance while it is near or touching curtains, wall coverings, dish towels, clothing or other flammable materials.
-
If this appliance begins to malfunction during operation, immediately unplug the cord from the outlet. Do not attempt to repair or use a malfunctioning appliance.
-
Extreme caution must be used when moving an appliance containing hot oil or other hot liquids.
SAVE THESE INSTRUCTIONS FOR FUTURE REFERENCE
GROUNDED PLUG: As a safety feature, this appliance is equipped with a grounded plug, which will only fit into a three-prong outlet. Do not attempt to defeat this safety feature. Improper connection of the grounding conductor may result in the risk of electric shock. Consult a qualified electrician if you are in doubt as to whether the outlet is properly grounded.
SPECIAL INSTRUCTIONS: A short power supply cord used to reduce the risk resulting from it being grabbed by children, becoming entangled in, or tripping over a longer cord.
DO NOT alter the plug. DO NOT attempt to defeat the safety purpose of the grounded plug.
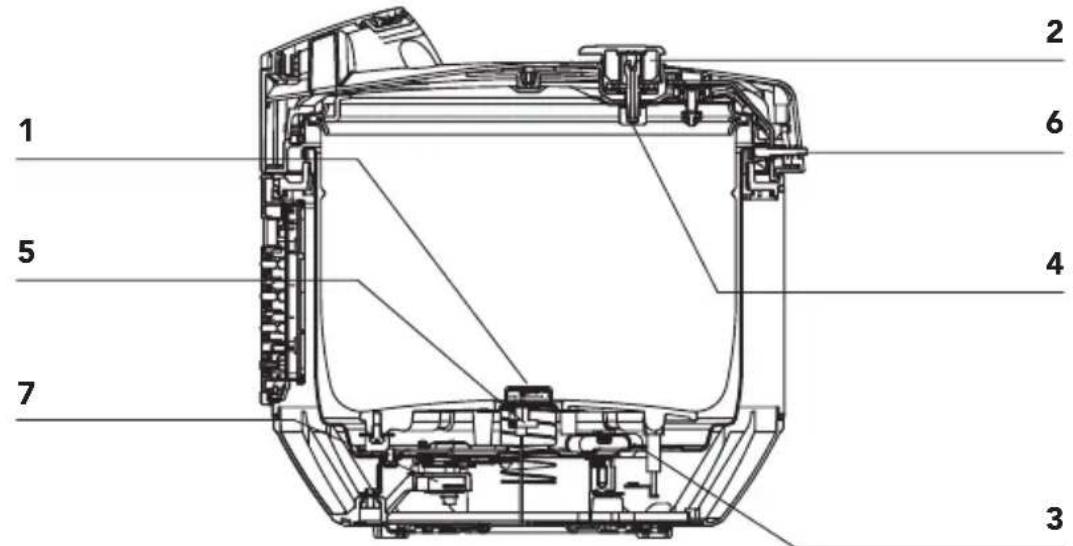
BUILT-IN SAFETY MECHANISMS
text_image
1 2 3 4 5 6 7-
Automatic temperature control: Appliance will automatically stop heating, if the cooking pot is missing / empty or operating without enough liquids.
-
Automatic pressure control: If the internal pressure exceeds maximum pressure value, the appliance will automatically start releasing pressure through the pressure release valve.
-
Extreme pressure protection: If the automatic temperature and pressure control safety devices become invalid and the pressure inside the pot reaches maximum value, the appliance will automatically start releasing pressure from the lid.
-
Anti-blocking steam vent device: A specially designed cover avoids food particles from blocking the pressure release valve (under the lid) while in operation and ensure steam exhausts smoothly during the cooking process.
-
Overheat safety device: The appliance will automatically disconnect if excessive temperature is build up inside the cooking pot.
-
Special safety lid mechanism: The appliance is equipped with a locking lid mechanism that prevents the appliance from operating if lid is not properly locked. Locking mechanism also prevent the lid from opening when appliance is pressurized.
-
Extreme pressure control: The appliance will automatically disconnect if it reaches extreme pressure level.
BEFORE FIRST USE
READ THE INSTRUCTIONS BEFORE USE
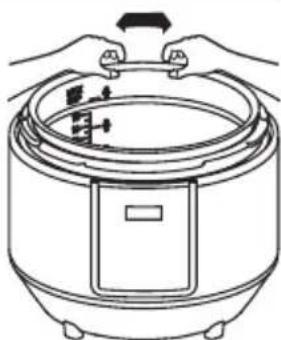
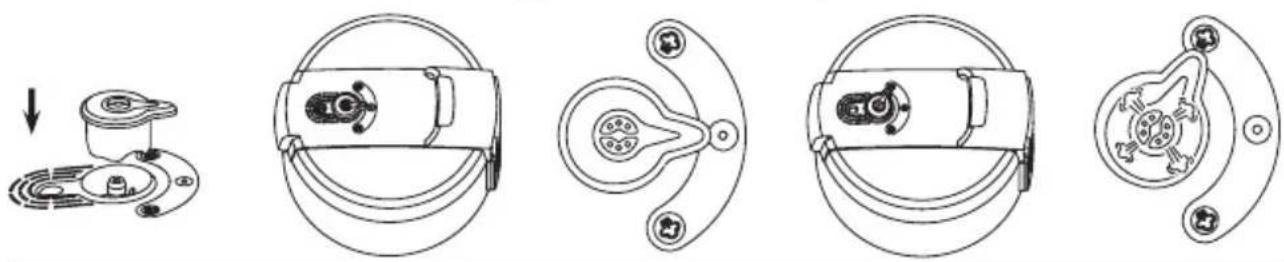
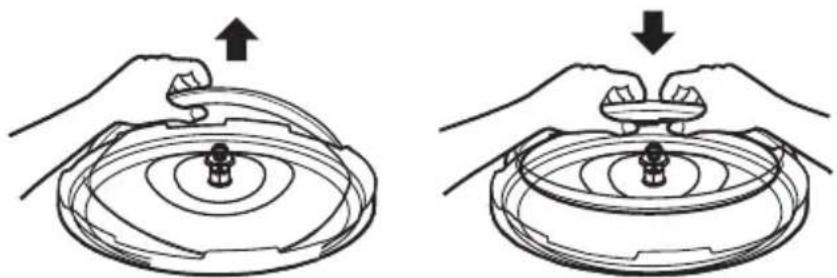
A. Remove all packaging material. Dispose of packaging. B. Open the lid using the lid handle (Fig 1). C. Remove the inner cooking pot (Fig 2), the pressure release valve (Fig 3), the sealing ring (Fig 4) and wash in hot soapy water with all other accessories. Dry thoroughly.
WARNING: Do not immerse body, electrical cord or plug in water or any other liquid. D. Rinse the lid with hot water and dry thoroughly. E. Wipe body with a damp cloth and dry thoroughly. F. Reassemble the appliance (Fig 5).
NOTE: ALWAYS ensure the sealing ring is properly reinstalled under the lid and the pressure release valve is back in the outlet.
NOTE: During first use of the appliance, smoke or light vapors may occur from the appliance because of the initial warming process of the materials. This is normal and will quickly disappear.
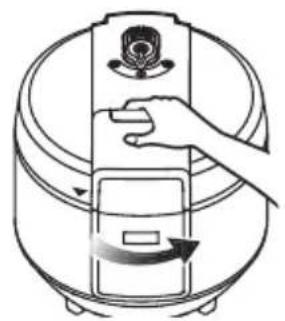
FIG 1 How to open the lid
Rotate the lid counter clockwise and lift upward.
natural_image
Line drawing of a hand pressing down on a cylindrical device with a rose icon, showing motion arrows (no text or symbols)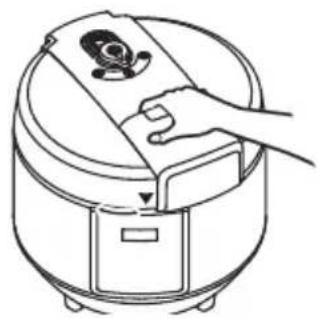
natural_image
Line drawing of a hand operating a portable rice cooker (no text or symbols)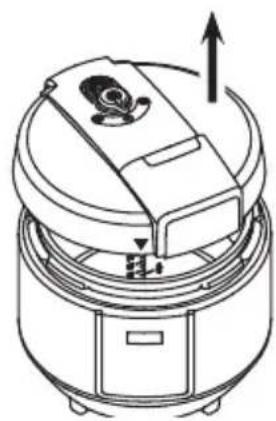
natural_image
Line drawing of a vacuum cleaner with rotating top and side-mounted base (no text or symbols)FIG 2 How to remove / replace the cooking pot inside the base
Lift the inner cooking pot from the outer pot to wash or fill with food. Insert the cooking pot back inside the appliance and rotate left and right to make sure it is in contact with the heating plate. Always ensure the outside of the cooking pot is dry before replacing inside the appliance.
natural_image
Line drawing of hands operating a rice cooker with a handle and control panel (no text or symbols)FIG 3 How to remove/install the pressure release valve
To remove, lift the valve upward. Insert the pressure release valve back into the outlet. It is normal that the valve fits loose it is required for pressure and temperature regulation. Always point the valve to "sealing" position when operating and to "release" position to manually release the pressure. Pressure won't build inside the appliance if pressure valve is not sealed properly.
Sealingposition Release position
natural_image
Technical line drawings of mechanical components, showing exploded and assembled views (no text or symbols)FIG 4 How to remove/install the sealing ring
The sealing ring is located under the lid. Remove the sealing ring from the rack section by section. Ensure the sealing ring is properly reinstalled back into the rack before operating the appliance. Never operate the appliance with a damaged sealing ring.
natural_image
Illustration showing two hands performing a circular mechanical device with a knob, one upward and the other downward (no text or symbols)FIG 5 How to close the lid
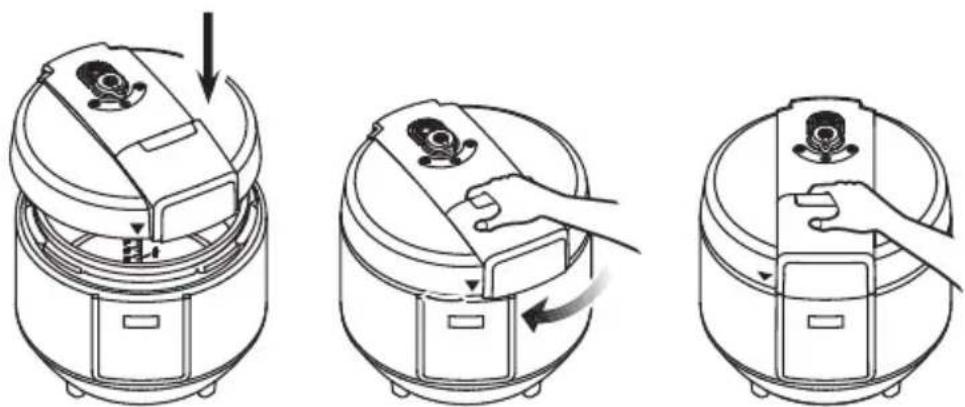
Place the lid on the appliance and align the symbol with the "open" mark on the body and turn clockwise to align with the "close" mark. Close the lid securely until a "click" is heard. The appliance is equipped with a locking lid mechanism that prevents the appliance from operating if lid is not properly locked.
natural_image
Three-step diagram showing a kitchen appliance being opened, with arrows indicating the process (no text or symbols present)COOKING PROGRESS DISPLAY
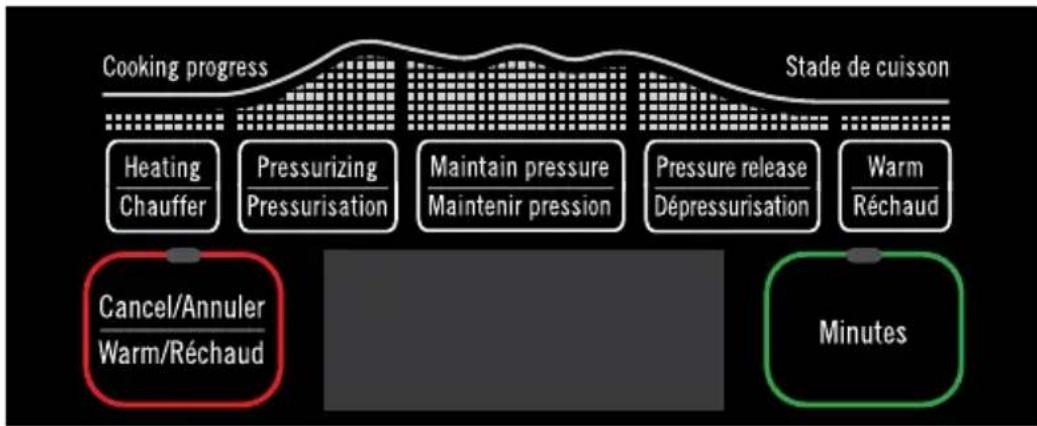
The Starfrit electric pressure cooker is designed with a unique feature that allows you to cook any meal with peace in mind. The digital cooking progress display helps you monitor the cooking stages every step of the way.
flowchart
graph LR
    A["Heating Chauffer"] --> B["Pressurizing Pressurisation"]
    B --> C["Maintain pressure Maintenir pression"]
    C --> D["Pressure release Dépressurisation"]
    D --> E["Warm Réchaud"]
    F["Cancel/Annuler Warm/Réchaud"] --> G["Minutes"]
    style A fill:#f9f,stroke:#333
    style B fill:#ccf,stroke:#333
    style C fill:#cfc,stroke:#333
    style D fill:#fcc,stroke:#333
    style E fill:#cff,stroke:#333
    style F fill:#ffc,stroke:#333
    style G fill:#cfc,stroke:#333
HEATING: Heating will start immediately after a cooking function is selected. Heating stage will light up and display will show rolling bars [indigating that the heating stage has started. During the heating stage the appliance will gradually reach maximum temperature. Heating time may vary depending on food and quantity as well as external factors such as ambient temperature.
PRESSURIZING: Pressurizing stage will light up and pressure will start to build inside the appliance. Display will continue showing rolling bars. Pressurizing time may vary depending on food and quantity as well as external factors such as ambient temperature (between 8-10 min). Pressure release valve will go up indicating the appliance is pressurized.
MAINTAIN PRESSURE: The appliance will switch to maintain pressure once maximum pressure temperature is reached. Display will show total pressure cooking time (0:00). Each cooking function has a pre-set cooking time. Cooking time displayed represents pressure cooking time not total cooking time. Total cooking time may vary depending on food and quantity. Pressure release valve will remain up indicating the appliance is pressurized. Do not try to force the lid open while the appliance is in use.
PRESSURE RELEASE: The appliance will beep 5 times when pressure cooking time is over and automatically switch to pressure release mode. The pressure release stage will light up and the appliance will naturally start releasing internal pressure. This may take 10-15 minutes depending on food and quantity. For a quick release, carefully turn the steam release vent to the "release" position Do not try to force the lid open allow the appliance to cool down completely. Always use protective oven mitts.
WARM: Once the pressure inside the appliance is completely released, pressure release valve will drop down and appliance will automatically switch to Warm mode. Warm stage will light up and timer will start counting up by incrementing of 1 minute for up to 10 hours. Once maximum time is reached, appliance will automatically turn OFF. Use extreme caution when opening the lid to avoid scalding.
PRESSURE COOKING TIME CHART
| Cooking function | Pre-set Pressure cooking time (min) | Adjustable cooking time range (min) | Pressure & temperature | Warm |
| Rice 13 10-60 50 kPa | 10 hours | |||
| Whole grain 20 10-60 60 kPa | ||||
| Pasta 8 5-60 96- 98 °C | ||||
| Oatmeal 25 10-60 96- 98 °C | ||||
| Fish 5 5-60 50 kPa | ||||
| Poultry 15 10-60 60 kPa | ||||
| Beef stew 25 10-60 60 kPa | ||||
| Beans/chili 30 10-60 60 kPa | ||||
| Soup 20 10-60 60 kPa | ||||
| Potatoes 17 10-60 60 kPa | ||||
| Pilaf 25 10-60 50 kPa | ||||
| Sauté | 15 | 5-60 | 150-155 °C | |
| Steam | 30 5-0 | 50 kPa | ||
| Bake | 45 10-60 | 120 -130 °C | ||
| Yogurt | 480 | Not adjustable | 35-40 °C | - |
| Cake | 40 30-60 | 105-120 °C | 10 hours |
HOW TO USE (READ THE INSTRUCTIONS BEFORE USE)
NOTE: Always use plastic, rubber, wooden, or silicone cooking utensils inside the cooking pot to avoid scratching the cookware.
NOTE: Do not operate the appliance directly under kitchen cabinets. Provide adequate space above and around the appliance for air circulation.
- Place the product on a flat, stable, heat-resistant surface.
- Open the lid, take out the cooking pot and add all ingredients inside the inner cooking pot. Refer to Fig 1.
NOTE: Ensure the minimum quantity of food and liquid is at least 1/5 full. Do not fill the appliance over 4/5 full. Refer to markings inside the cooking pot. Do not fill the appliance over 3/5 full when cooking food that expands such as grains and dried vegetables. Refer to Fig.6
text_image
Fig.6 4/5 3/5 1/5-
Place the inner cooking pot inside the appliance. Refer to Fig 2.
-
Close the lid securely until a "click" is heard. Refer to Fig 5.
NOTE: The appliance is equipped with locking lid mechanism that will prevent the pressure from building into the appliance if the lid is not securely locked.
NOTE: Ensure the sealing ring is properly installed before operating. Do not operate the sealing ring is damaged. Refer to Fig 4.
-
Position the pressure release valve to the "sealing" position Refer to Fig 3.
-
Plug the power cord into a 120V AC wall outlet. Appliance will beep and display will show 00:00.
-
Select the desired cooking function. Light indicator will blink 5 times (standby mode) and display will show pressure cooking time. Rolling bars will appear indicating that the heating process has started.
NOTE: Refer to the following section for more details on each cooking functions. Use the "minutes" function during the standby mode to adjust cooking time (refer to "Minutes" section).
-
Refer to the "Cooking Progress Display" section to help you monitor every cooking stage.
-
Once cooking time is over, appliance will beep 5 times and automatically switch to WARM mode. Let the appliance cool down completely before opening the lid. Pressure release valve will drop down indicating that the pressure is released. For a quick release, carefully turn the steam release vent to the "release" position ⚙️.
NOTE: Do not try to force the lid open as it may cause serious injuries.
-
Warm function can be used for a maximum of 10 hours after the appliance will automatically shut off.
-
Turn off the appliance by pressing the CANCEL button and unplug from electrical outlet.
WARNING: Use extreme caution when opening the lid and releasing steam manually as hot steam will escape and may cause scalding. Use protective oven mitts or gloves to avoid burns or serious personal injury. Always use utensils to handle hot food.
WARNING: DO NOT attempt to open the lid before cooking time is over and pressure is completely released from the appliance. This may cause serious injuries.
WARNING: Always unplug the product when not in use or when it will be left unattended
PRE-SET COOKING FUNCTIONS
MINUTES: This function is programmed to be used for all cooking functions except yogurt. Once a desired cooking function is selected, light indicator will blink 5 times indicating that the appliance is on standby mode. Use the “minutes” function during the standby mode to adjust pressure cooking time. Each press will increase the cooking time timer by increment of 1 minute for up to 60 minutes. Holding down on the button will increase the timer faster. After 60 minutes, timer will start over.
WARM/CANCEL: Press the Cancel button once at any moment while the appliance is in use to stop operation. Display will show "00:00" indicating cooking time is canceled. Press the Cancel button again to switch to Warm mode. Display will show "0:00" and timer will start counting up by increment of 1 minute for up to 10 hours. Appliance will beep indicating the time is up and will automatically turn OFF. No pressure is used during the Warm setting.
RICE, WHOLE GRAIN, PASTA, OATMEAL: Rice function is programmed to cook regular or parboiled rice. Whole grain is programmed to cook a mix of wild grains such as brown/black rice, barley, quinoa, buckwheat. Use the provided measuring cup to add ingredients. To cook rice, use equal amounts of water/liquid and rice. Close the lid until a "click" is heard, plug the appliance and select the desired cooking function. Appliance will beep, light indicator will blink 5 times (standby mode) and display will show pressure cooking time. After standby mode, rolling bars will appear indicating the appliance is heating. Use the "minutes" function during the standby mode to adjust cooking time (refer to Minutes section). No pressure is used to cook pasta and oatmeal. DO NOT use the quick release pressure method for Oatmeal as liquid will splatter through the steam vent. Allow the appliance to cool down completely on its own.
FISH: This function is programmed to cook whole fish, fish steak and seafood such as lobster, crab and mussels. Add all ingredients and liquid inside the cooking pot. Ensure there is enough liquid (water or broth). Close the lid until a "click" is heard, plug the appliance and select fish. Appliance will beep, light indicator will blink 5 times (standby mode) and display will show pressure cooking time 0:05. After standby mode, rolling bars will appear indicating the appliance is heating. Use the "minutes" function during the standby mode to adjust cooking time (refer to Minutes section).
POULTRY, BEEF STEW & BEANS/CHILI: You may use the Sauté function to brown meat prior to cooking. Refer to Sauté section. Add all ingredients and liquid inside the cooking pot. Ensure there is enough liquid (water or broth). Close the lid until a “click” is heard, plug the appliance and select the desired cooking function. Appliance will beep, light indicator will blink 5 times (standby mode) and display will show pressure cooking time. After standby mode, rolling bars will appear indicating the appliance is heating. Use the “minutes” function during the standby mode to adjust cooking time to your personal preference (refer to Minutes section).
SOUP: This function is programmed to cook wide variety of soup and broth. Close the lid until a "click" is heard, plug the appliance and select Soup. Appliance will beep, light indicator will blink 5 times (standby mode) and display will show pressure cooking time 0:20. After standby mode, rolling bars will appear indicating the appliance is heating. Use the "minutes" function during the standby mode to adjust cooking time (refer to Minutes section). DO NOT use the quick release pressure method as liquid will splatter through the steam vent. Allow the appliance to cool down completely on its own.
POTATOES: This function is programmed to cook 5-6 medium sized potatoes at a time. Ensure there is enough liquid (water or broth). Close the lid until a "click" is heard, plug the appliance and select Potatoes. Appliance will beep, light indicator will blink 5 times (standby mode) and display will show pressure cooking time 0:17. After standby mode, rolling bars will appear indicating the appliance is heating. Use the "minutes" function during the standby mode to adjust cooking time (refer to Minutes section).
PILAF: This function is programmed to cook pilaf rice. Plug the appliance and select Pilaf. Appliance will beep, light indicator will blink 5 times (standby mode) and display will show pressure cooking time (0:25). Rolling bars will appear indicating the appliance is heating. Add butter and onions to the cooking pot and sauté for about 5 minutes. Other chopped vegetables can also be added. Operate the appliance without the lid while sautéing. No pressure will be build inside the appliance. Add the rice and sauté for 2 minutes, and then add broth into the cooking pot. Close the lid until a "click" is heard. Use the "minutes" function during the standby mode to adjust cooking time (refer to Minutes section).
SAUTÉ: This function is programmed to sauté vegetables or brown meat. Plug the appliance and select Sauté. Appliance will beep, light indicator will blink 5 times (standby mode) and display will show cooking time (0:15). Rolling bars will appear indicating the appliance is heating. Operate the appliance without the lid. No pressure will be build inside the appliance. Add butter or oil, chopped vegetables or meat inside the cooking pot. Cook to your personal preference. Cooking progress will remain at heating stage and switch to warm once cooking time is over. Use the "minutes" function during the standby mode to adjust cooking time (refer to Minutes section).
STEAM (VEGETABLES AND FISH): This function is programmed to steam vegetables and fish. Using the provided measuring cup fill cooking pot with water until line 1/5 marking inside the pot is reached. Insert the provided steam tray inside the appliance and place the food to be steamed on the tray. Close the lid until a “click” is heard, plug the appliance and select steam. Appliance will beep, light indicator will blink 5 times (standby mode) and display will show pressure cooking time (00:30). After standby mode, rolling bars will appear indicating the appliance is heating. Use the “minutes” function during the standby mode to adjust cooking time (refer to Minutes section).
YOGURT: This function is programmed to prepare yogurt. Place a large cooking pot on the stovetop and boil milk to at least 180°F. Stir the milk occasionally to prevent a skin from forming. Allow the milk to cool down between 110°F to 115°F. Use a thermometer to monitor the temperature. Pour the milk inside the cooking pot and add your starter (powdered or fresh yogurt). If using powdered starter, incorporate the mixture inside the cooking pot. If using fresh yogurt, use a separate bowl to incorporate a small amount of warm milk and yogurt starter. Add the mixture to the rest of the warm milk and stir. Close the lid until a “click” is heard, plug the appliance and select Yogurt. Appliance will beep, light indicator will blink 5 times (standby mode) and display will show cooking time 8:00. After standby mode, rolling bars will appear indicating the appliance is heating. Cooking time can’t be adjusted. No pressure is used to prepare yogurt.
BAKE: This function is programmed to cook dishes that require prolonged heat (meat and root vegetables). You may use the Sauté function to brown meat prior to cooking. Refer to Sauté section. Add all ingredients and liquid inside the cooking pot. Ensure there is enough liquid (water or broth). Close the lid until a “click” is heard, plug the appliance and bake. Appliance will beep, light indicator will blink 5 times (standby mode) and display will show cooking time 0:45. After standby mode, rolling bars will appear indicating the appliance is heating. Use the “minutes” function during the standby mode to adjust cooking time to your personal preference (refer to Minutes section). No pressure is used for baking.
CAKE: This function is programmed to bake a moist type of cake such as sticky toffee pudding. Prepare your cake mixture in a separate bowl and transfer inside the cooking pot once ready. Do not fill over the 3/5 mark, if your cake mixture will expand. Close the lid until a "click" is heard, plug the appliance and select Cake. Appliance will beep, light indicator will blink 5 times (standby mode) and display will show cooking time 0:40. After standby mode, rolling bars will appear indicating the appliance is heating. Use the "minutes" function during the standby mode to adjust cooking time (refer to Minutes section). No pressure is used for baking cakes.
CLEANING
WARNING: Ensure the appliance is unplugged from the electrical outlet and allow it to cool down completely before handling or cleaning it.
WARNING: Never put cold water into a hot cooking pot. Sudden changes of temperature may cause metal to warp, resulting in an uneven bottom.
- Remove the inner cooking pot and pressure release valve and wash in hot soapy water. Rinse and dry thoroughly. Wash after each use.
WARNING: Do not immerse body, electrical cord or plug in water or any other liquid.
- Remove the sealing ring from under the lid. Rinse in hot water. Rinse and dry thoroughly. Refer to Fig.4
NOTE: Ensure the pressure release valve and sealing ring are properly reinstalled before storing the appliance.
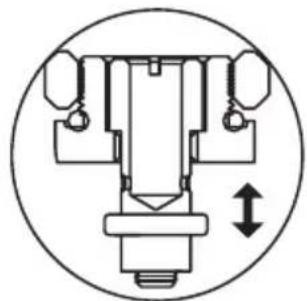
- Use a cleaning brush to clean the float valve (under the lid). Move the float valve up and down to dislodge any food debris. If necessary, remove the silicone gasket from the float valve end.
NOTE: Reinstall the silicone gasket to the float valve, making sure the silicone sits in the groove.
natural_image
Mechanical assembly diagram showing a central component with attached parts, enclosed in a circle (no text or symbols)Fig.7
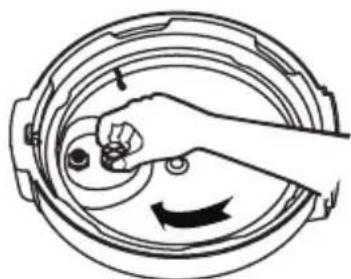
- Remove the anti-blocking nut by rotating counterclockwise. Rinse it to dislodge any food debris and replace tightly.
NOTE: Ensure the anti-blocking nut is properly reinstalled before storing the appliance
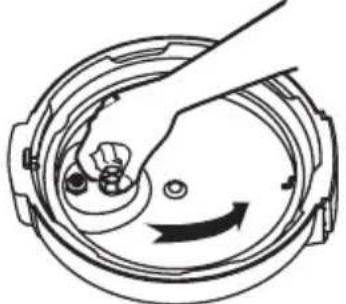
natural_image
Diagram of a mechanical component with a lever and curved arrow indicating rotation (no text or symbols)Fig.8
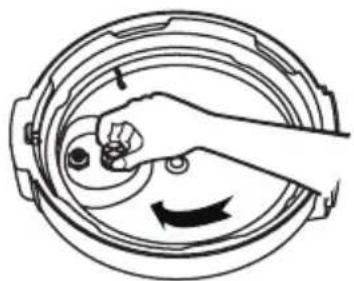
natural_image
Line drawing of a hand pressing down on a circular mechanical component with a curved arrow indicating motion (no text or symbols)- Rinse the lid with hot water and dry thoroughly.
- Wipe body with a damp cloth and dry thoroughly.
- To store, place the inner cooking pot inside the appliance.
MAINTENANCE
- Store the product in a cool, dry place.
- Never cut anything in the cookware or use utensils with sharp edges as to avoid piercing the non-stick surface.
- Never put cold water into a hot cooking pot. Sudden changes of temperature may cause metal to warp, resulting in an uneven bottom. Let cookware cool down on its own or place in lukewarm soapy water.
• Always use trivets or oven mitts when handling the pot. - DO NOT place the hot pot on counter top, as it will stain or burn the countertop. Use a protective trivet.
- DO NOT place the pot on any range top burner, under a broiler, microwave browning element, or in a heated oven.
- DO NOT strike utensils against rim of pot to dislodge food, as it will scratch it.
- DO NOT use metal utensils with this appliance. Use the provided rice measure (or recommended utensil) to prevent chipping of the cooking pot.
- DO NOT use scouring pads, abrasive cleaners, or any object that will scratch the cookware or accessories.
WARRANTY
1-YEAR LIMITED WARRANTY.
This warranty covers any defects in materials and workmanship for a period of one (1) year from the date of the original purchase. Please retain your original receipt as a proof of the purchase date. Any complaints must be registered within the warranty period. The product will be repaired, replaced (parts or entire appliance) or refunded at our sole discretion. Shipping charges may apply.
This warranty does not cover normal wear of parts or damage resulting from any of the following:
Negligent use or misuse of the product including failure to clean the product regularly, use for commercial purposes, accident, use on improper voltage or current, use contrary to the operating instructions, disassembly, repair or altercation by anyone other than a STARFRIT authorized service agent.
Stains, discoloration and minor scratches on the inside and outside of the utensil constitute normal use, do not affect performance, and are not covered by this warranty.
Decisions as to the cause of damage are the responsibility of Starfrit. All decisions will be final.
RECIPES
BEEF AND BEANS CHILI
FUNCTION: Sauté and Beans/Chili
SERVINGS: 8 servings
INGREDIENTS:
• 1 tbsp. (15 ml) olive oil
• 2 lb (907 g) ground beef
- 1 onion, chopped
• 4 garlic cloves, finely chopped
• 1 green bell pepper, diced
• 1 can (540 ml) kidney beans
• 1/4 cup (60 ml) chili powder
• 2 tbsp. (30 ml) ground cumin
• 2 tbsp. (30 ml) fresh coriander
• 2 tbsp. (30 ml) oregano
• 14 tsp (1 ml) ground cloves
• 1 cup (250 ml) water
• 1 can (828 ml) crushed tomatoes
- Salt and pepper
PREPARATION: Refer to the "HOW TO USE" section to operate the appliance
- Press "Sauté" function and let the appliance preheat for 2 minutes.
- Add olive oil and sauté onions, ground meat and garlic for about 5 minutes.
- Once meat is browned, press "Cancel" and switch to "Beans/Chili".
- Add all ingredients to the cooking pot and add water. Stir to combine.
- Close the lid. Once cooking time is over, the appliance will beep 5 times and automatically switch to WARM mode.
Note: Refer to the "COOKING PROGRESS DISPLAY" section to monitor cooking stages.
- Let the appliance cool down completely. For a quick release; carefully turn the steam release vent to the "release" position Do not try to force the lid open.
BEEF STEW
FUNCTION: Sauté and Beef stew
SERVINGS: 8 servings
INGREDIENTS:
• 3 tbsp. (45 ml) olive oil
• 2 lb (907 g) beef, cut into 1-inch cubes
• 1 onion, finely chopped
• 4 potatoes, cut into chunks
• 1 cup (250 ml) peas
• 1 cup (250 ml) celery, diced
• 2 cups (500 ml) beef broth
• 1 tbsp. (15 ml) paprika
• 1 tsp (5 ml) dried rosemary
- 1 bay lea
• 1 tbsp. (15 ml) fresh coriander, finely chopped
• 2 garlic clove, finely chopped
- Salt and pepper
PREPARATION: Refer to the "HOW TO USE" section to operate the appliance
- Press "Sauté" function and let the appliance preheat for 2 minutes.
- Add olive oil and sauté the onions and garlic until soften. Add beef cubes
- Once meat is browned, press "Cancel" and switch to "Beef stew".
- Add all ingredients to the cooking pot and add beef broth. Stir to combine.
- Close the lid. Once cooking time is over, the appliance will beep 5 times and automatically switch to WARM mode.
Note: Refer to the "COOKING PROGRESS DISPLAY" section to monitor cooking stages.
- Let the appliance cool down completely. For a quick release; carefully turn the steam release vent to the "release" position ⚙ Do not try to force the lid open.
PILAF RICE
FUNCTION: Pilaf
SERVINGS: 6 servings
INGREDIENTS:
• 1 onion, finely chopped
• 2 tbsp. (30 ml) butter
• 3 measures* (525 ml) white rice
• 3 measures* (525 ml) chicken broth
- Salt and pepper
*Use the provided measuring cup.
PREPARATION: Refer to the "HOW TO USE" section to operate the appliance
- Press "Pilaf" function and let the appliance preheat for 1-2 minutes.
- .Add butter and brown the onion for about 3-5 minutes.
- Add the rice and sauté for about 2 minutes.
- Add chicken broth and season with salt and pepper.
- Close the lid. Once cooking time is over, the appliance will beep 5 times and automatically switch to WARM mode.
Note: Refer to the "COOKING PROGRESS DISPLAY" section to monitor cooking stages. - Let the appliance cool down completely. For a quick release; carefully turn the steam release vent to the "release" position Do not try to force the lid open.
STICKY TOFFEE PUDDING
FUNCTION: Cake
SERVINGS: 8 servings
INGREDIENTS:
- 12 cup (125 ml) brown sugar
- 1 14 cup (310 ml) flour
• 1 tsp (5 ml) baking powder
• 3 tbsp. (45 ml) butter, softened - 12 cup (125 ml) milk
• 1 egg
• 1 tsp (5 ml) vanilla extract
• 1 cup (250 ml) dates, chopped
PREPARATION: Refer to the "HOW TO USE" section to operate the appliance
- In a large mixing bowl, combine brown sugar, flour and baking powder.
- In a separate bowl, incorporate the egg, milk, butter and mix well.
- Pour the liquid mixture over the sugar and flour. Mix with a wooden spoon.
- Fold in the dates and pour into the cooking pot.
- Press "Cake" function and close the lid. Once cooking time is over, the appliance will beep 5 times and automatically switch to WARM mode.
Note: Refer to the "COOKING PROGRESS DISPLAY" section to monitor cooking stages.
Note: No pressure is used for baking cakes.
COCONUT CURRY BUTTERNUT SQUASH SOUP
FUNCTION: Sauté and Soup
SERVINGS: 6-8 servings
INGREDIENTS:
• 2 tbsp. (30 ml) coconut oil
• 2 tbsp. (30 ml) red curry paste
• 4 garlic cloves, finely chopped
• 1 onion, finely chopped
- 4 cups (1 L) butternut squash, peeled, and cut into small 1-inch pieces
• ¼ tsp (1 ml) red pepper flakes
• 1 tbsp. (15 ml) lemon juice
• 4 cups (1L) vegetable broth
- 12 cup (125 ml) coconut milk (for serving)
- Salt and pepper
PREPARATION: Refer to the "HOW TO USE" section to operate the appliance
- Press "Sauté" function and let the appliance preheat for 2 minutes.
- Add coconut oil, curry paste, onions, garlic and sauté for 2-3 minutes.
- Press "Cancel" and switch to "Soup".
- Add all ingredients to the cooking pot (except lemon juice) and add vegetable broth.
- Close the lid. Once cooking time is over, the appliance will beep 5 times and automatically switch to WARM mode.
Note: Refer to the "COOKING PROGRESS DISPLAY" section to monitor cooking stages.
-
Do not use the manual pressure release mode " when cooking soup. Let the appliance naturally cool down before opening the lid. Do not try to force the lid open.
-
Transfer the soup into a blender, add lemon juice and blend until smooth.
-
Serve with coconut milk on top.
natural_image
Line drawing of a hand pressing down on a cylindrical device with a scroll wheel (no text or symbols)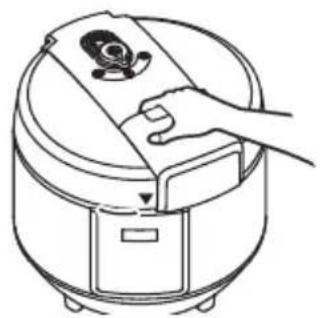
natural_image
Line drawing of a hand placing a small object into a cylindrical device (no text or symbols)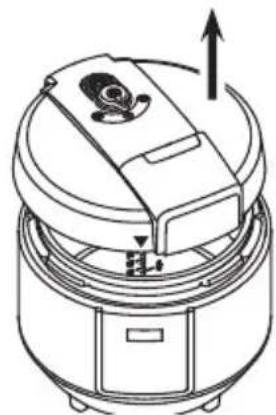
natural_image
Line drawing of a mechanical device with an upward arrow indicating motion or force (no text or symbols)natural_image
Line drawing of hands operating a rice cooker with a lid and control panel (no text or symbols)natural_image
Two-step diagram showing hands performing a mechanical or electrical operation on a circular component, with no text or symbols present.natural_image
Three-step diagram showing a kitchen appliance being adjusted, with arrows indicating the process (no text or symbols present)AFFICHAGE DE PROGRESSION DE LA CUISSON
natural_image
Mechanical assembly diagram showing a central component with attached weights and a directional arrow (no text or labels)Fig.7
natural_image
Diagram of a hand turning a circular component with arrows indicating rotation (no text or symbols)Fig.8
natural_image
Diagram of a hand pressing down on a circular mechanical component with arrows indicating motion (no text or symbols)SUBSCRIBE TO THE NEWSLETTER TO LEARN MORE ABOUT OUR PROMOTIONS!
www. Starfrit.com
INSCRIVEZ-VOUS À L'INFOLETTRE POUR CONNAÎTRE NOS PROMOTIONS !

www.facebook.com/starfrit
FOR HOUSEHOLD USE ONLY POUR UN USAGE DOMESTIQUE SEULEMENT