
MM 008 - Receiver THORENS - Free user manual and instructions
Find the device manual for free MM 008 THORENS in PDF.
| Product type | Phono preamplifier |
| Brand | Thorens |
| Model | MM 008 |
| Cartridge compatibility | MM and MC (switchable) |
| Gain at 1 kHz | 40 dB (MM) / 60 dB (MC) |
| MM input impedance | 47 kΩ + 220 pF |
| MC input impedance | 47 kΩ + 1 nF (adjustable with loading plugs) |
| Frequency response | 20 Hz - 20 kHz ±0.3 dB |
| Total harmonic distortion+noise | <0.013% (MM) / <0.055% (MC) |
| Signal-to-noise ratio | >86 dB (MM) / >72 dB (MC) |
| RIAA conformity | ±0.3 dB |
| Inputs | 3 pairs RCA (MM, MC, MC loading) |
| Outputs | 1 pair RCA (line level) |
| USB output (ADC model) | USB 2.0, 24 bits/96 kHz |
| Power supply | 24 V DC, mains adapter included |
| Power consumption | 3.4 W (MM 008) / 3.5 W (MM 008 ADC) |
| Dimensions (W x H x D) | 150 x 50 x 117 mm |
| Weight | 504 g (MM 008) / 511 g (MM 008 ADC) (power adapter not included) |
| Maintenance and cleaning | Clean with a dry, soft cloth. Do not open the chassis. |
| Safety | Do not expose to rain or moisture. Disconnect before any handling. |
| Spare parts and repairability | Contact Thorens support service or an authorized dealer. |
| General information | Warranty and support at www.thorens.com/support |
Frequently Asked Questions - MM 008 THORENS
User questions about MM 008 THORENS
0 question about this device. Answer the ones you know or ask your own.
Ask a new question about this device
Download the instructions for your Receiver in PDF format for free! Find your manual MM 008 - THORENS and take your electronic device back in hand. On this page are published all the documents necessary for the use of your device. MM 008 by THORENS.
USER MANUAL MM 008 THORENS
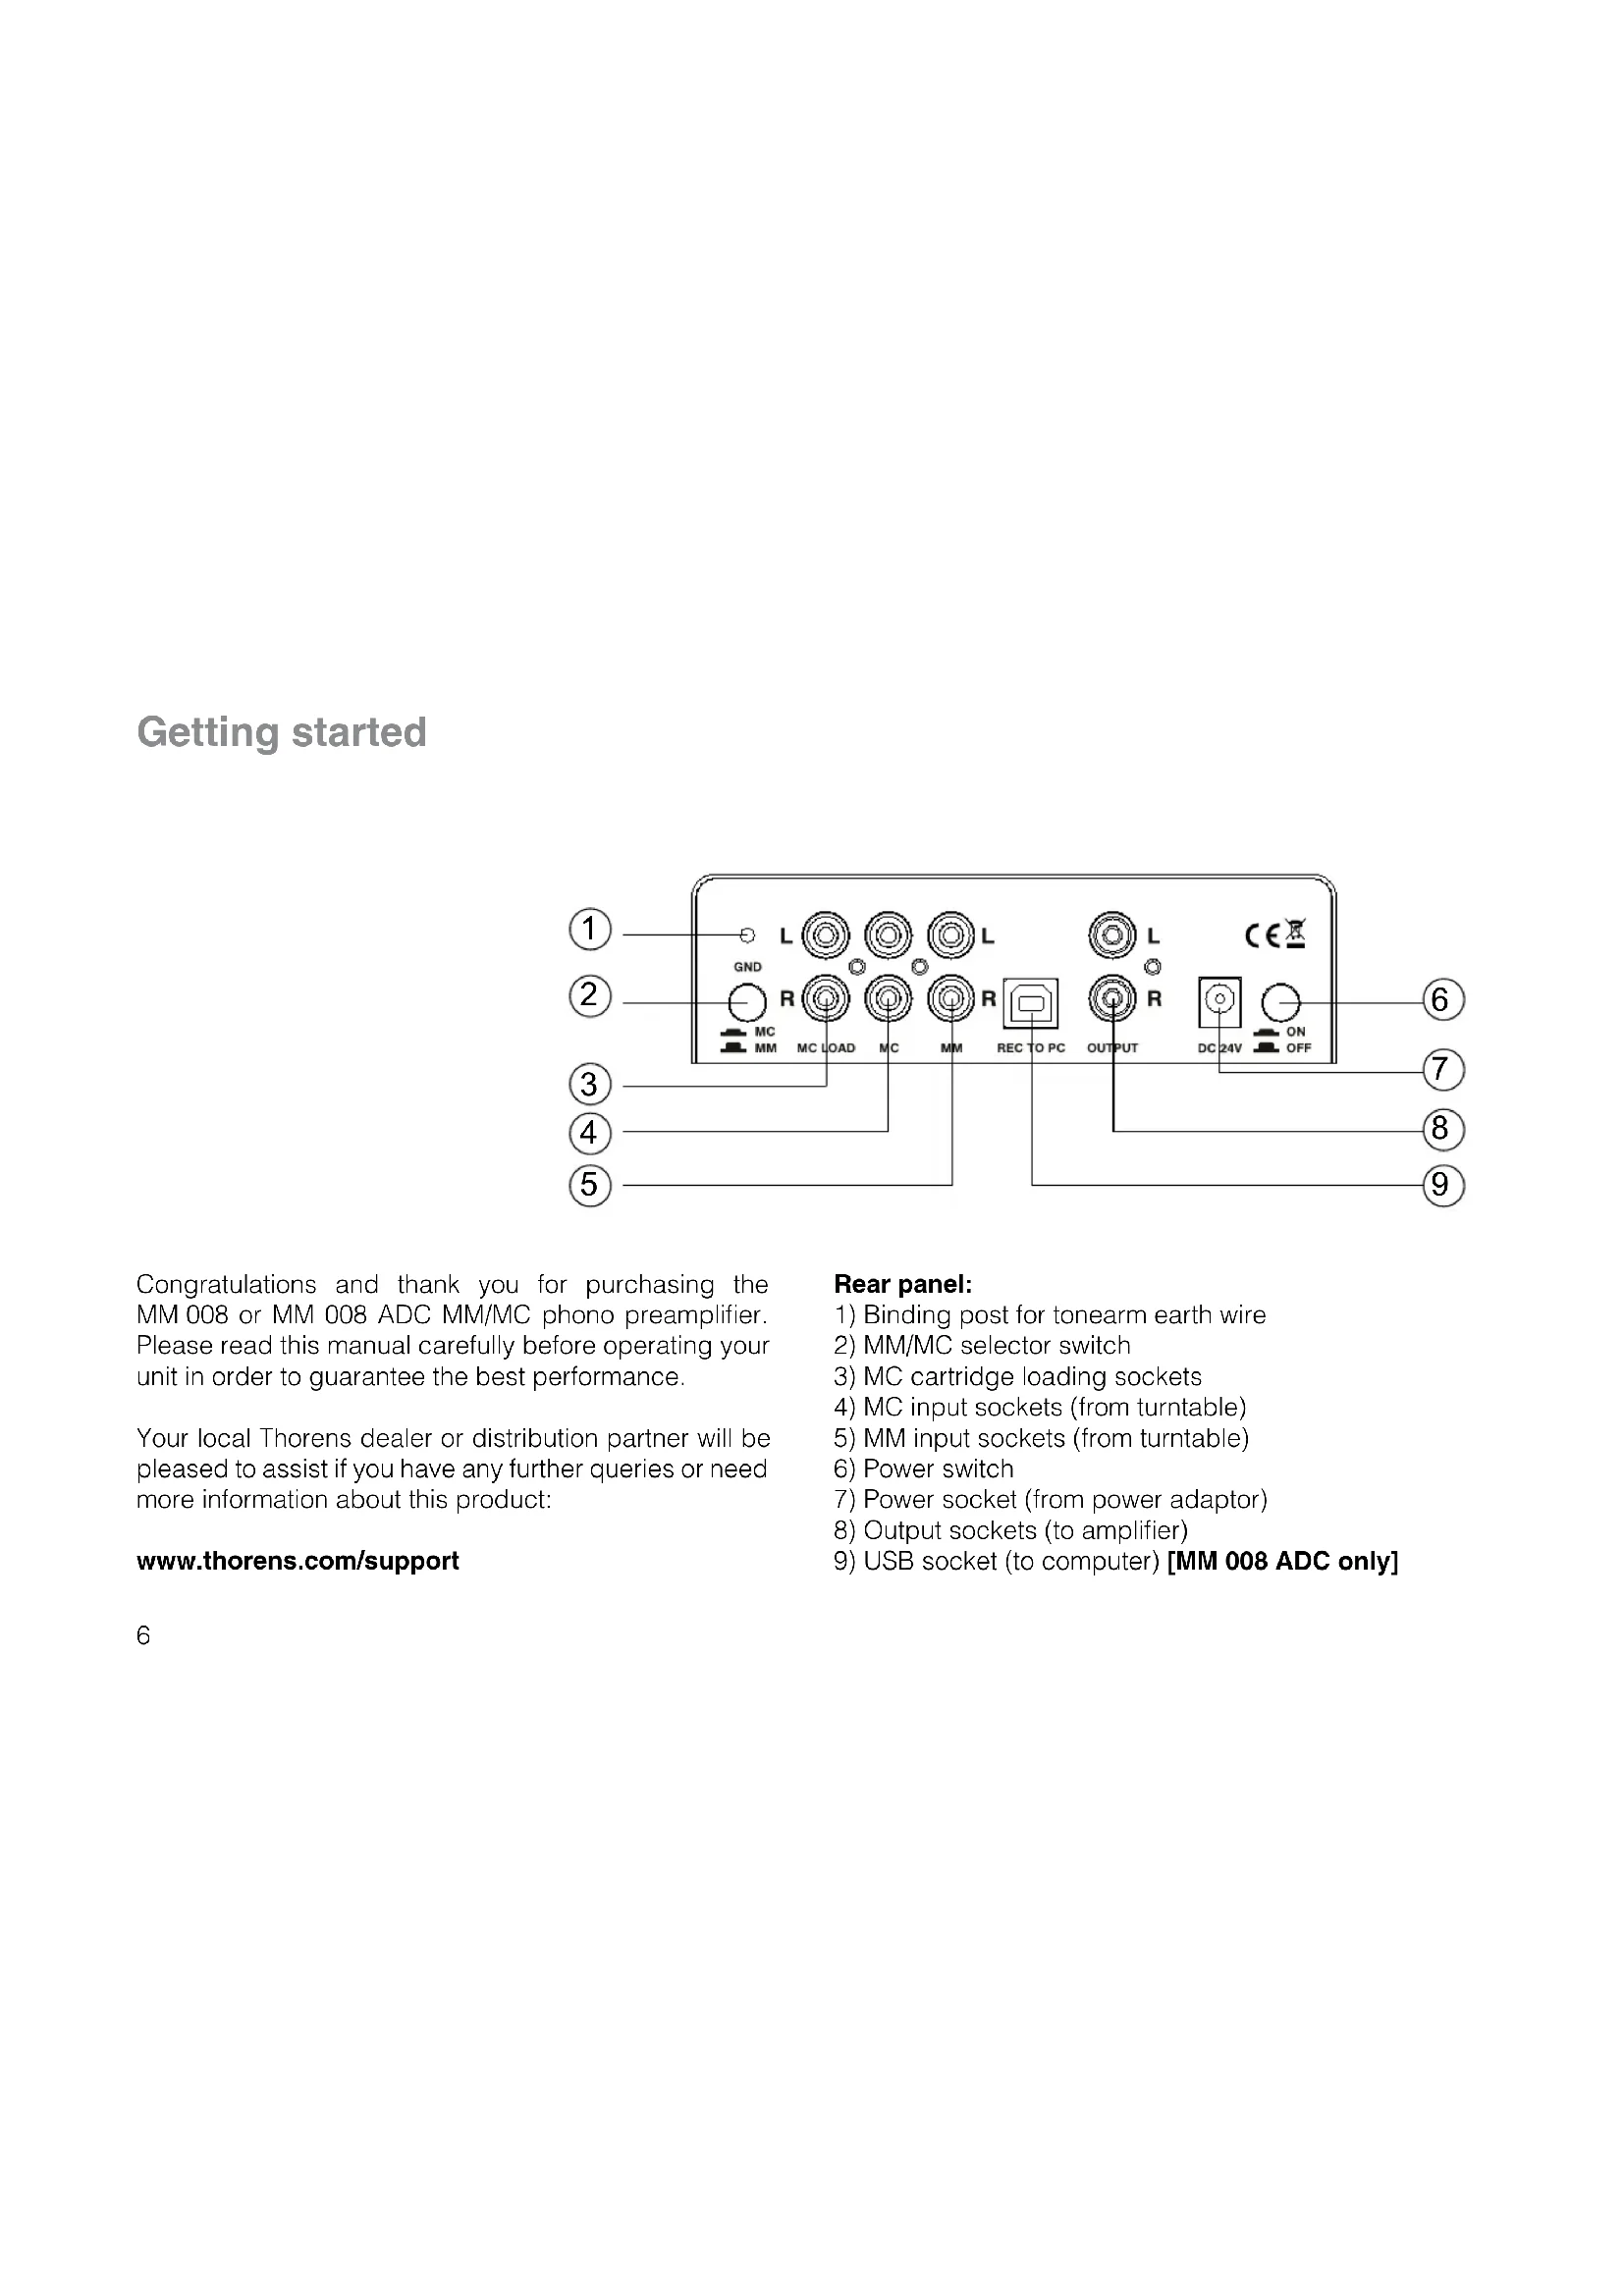
Congratulations and thank you for purchasing the MM 008 or MM 008 ADC MM/MC phono preamplifier. Please read this manual carefully before operating your unit in order to guarantee the best performance.
Your local Thorens dealer or distribution partner will be pleased to assist if you have any further queries or need more information about this product:
www.thorens.com/support
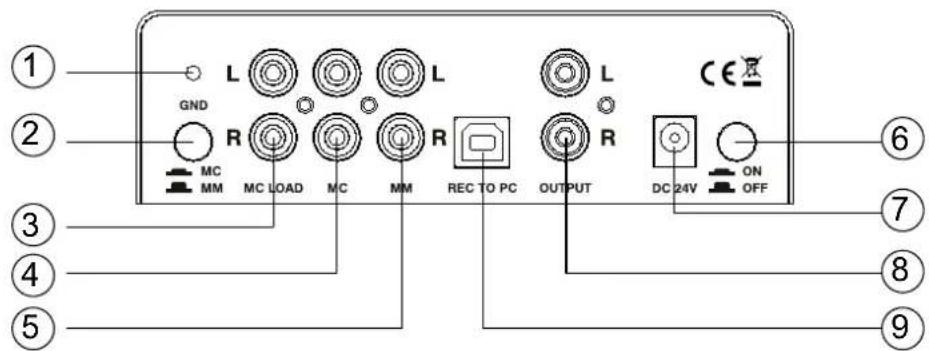
Rear panel:
1) Binding post for tonearm earth wire
2) MM/MC selector switch
3) MC cartridge loading sockets
4) MC input sockets (from turntable)
5) MM input sockets (from turntable)
6) Power switch
7) Power socket (from power adaptor)
8) Output sockets (to amplifier)
9) USB socket (to computer) [MM 008 ADC only]
Connecting your turntable
For the following steps, your amplifier should be powered off or muted and the MM 008's power supply should be disconnected.
1. Connect earth wire
If your tonearm has a separate earth wire for shielding purposes, connect it to the earth binding post (1) on the rear panel of the MM 008.
2. Connect RCA cables
For use with MM or high-level MC cartridges:
Make sure the MM/MC selector switch (2) is in the MM (outer) position.
Plug the leads from your turntable's cartridge to the MM input sockets (5) on the back of the MM 008: the right channel (red) cable into the right input and the left channel (white) into the left input.
For use with MC cartridges:
Make sure the MM/MC selector switch (2) is in the MC (inner) position.
Checking the manufacturer's specifications of your phone cartridge, choose which value of RCA loading resistance is most suitable. The MM 008 comes with three pairs of RCA loading plugs which are to be connected to the "MC LOAD" sockets (3) on the rear panel. Two RCA loading plugs of the same value must be fitted, one per channel. The default MC loading resistance is 47k with no RCA plugs inserted; if the cartridge manufacturer recommends a different load, you can choose between 10 , 100 and 1k with the RCA loading plugs provided. Please note that these plugs only refer to the MC inputs, not the MM inputs, which have a fixed internal load resistance of 47k .
Plug the leads from your turntable's cartridge to the MC input sockets (4) on the back of the MM 008: the right channel (red) cable into the right input and the left channel (white) into the left input.
Connecting your amplifier
Use high-quality RCA interconnect cables to connect the MM 008 to an auxiliary line-level input on your amplifier (Aux, Tape in, CD, Tuner, etc.).
Ensure that the right channel output is connected to the right channel input on your amplifier, and the left channel output is connected to the left channel input on your amplifier.
If your amplifier is already equipped with a phono stage and you are upgrading your system with the MM 008, do not connect the output of the MM 008 to the phono input: it is intended for connection to a turntable's cartridge output only, not to a line level output such as that of the MM 008.
Important:
Do not change the position of the MM/MC selector switch, connect or disconnect cables from the cartridge or connect or disconnect the MC loading plugs while the MM 008 is connected to the input of a preamplifier or amplifier and switched on as this can cause a loud abrupt noise in the loudspeakers with possible damage to the drive units. Always lower or mute the amplifier's volume, or switch it off entirely before making any connections.
Connecting the power adapter
Make sure the power switch is in the OFF (outer) position and the power adaptor is not connected to a mains socket.
Connect the Thorens power supply cable to the power socket on the rear panel (7).
After choosing and installing the correct snap-in mains plug for your country, connect the power adaptor to a live mains socket and engage the power button on the rear panel (6).
Always use the supplied mains power adaptor or an original Thorens spare part!
If you prefer, the MM 008 can be left powered on thanks to its very low power consumption levels. If you plan to leave it unused for a prolonged period of time, we suggest disconnecting the power adaptor from the mains socket.
The MM 008 is now ready for use. Switch on or un-mute your amplifier and enjoy your favourite music!
Connecting your computer and recording audio tracks (ADC)
The MM 008 ADC is equipped with a high-resolution analogue-to-digital converter allowing you to record vinyl tracks directly onto your computer's hard disk. It will work both with Microsoft® Windows® and Apple® Mac OS® based computers.
Connect the USB socket (9) on the rear panel to a free USB socket on your computer using the cable supplied or any other approved USB cable. The computer's new hardware device assistant should recognise the MM 008 ADC, which will show on the screen as "Thorens MM-008ADC" while the installation is in progress. Once the hardware installation is complete, you can start recording.
Please ensure that your recording software is set up to accept audio from USB and that it recognises "Thorens MM-008ADC" as its audio source.
Recording software:
Both Microsoft® Windows® and Apple® Mac OS® come with very simple audio recording software pre-installed. However, to take full advantage of the high-resolution recording facilities offered by the MM 008 ADC, we recommend recording software that can record at 24 bits/96 kHz and save lossless high-resolution audio files such as FLAC or Apple® Lossless.
Please visit www.thorens.com/adc for a list of recommend third-party recording software available for download from the internet.
Note: When downloading files from the internet, you should always use up-to-date anti-virus software. Thorens accepts absolutely no responsibility and provides no support for third-party software.
Technical Specifications (MM 008)
Mode
Gain at 1 kHz
Input impedance (MM)
Input impedance (MC)
Frequency response (flat)
Frequency response (-3 dB)
RIAA curve accuracy
THD+N
Signal-to-noise ratio
Crosstalk
Input sensitivity (MM)
Input sensitivity (MC)
Max. output voltage
Output impedance
Input connections
Output connections
Power supply
Power consumption
Weight
Dimensions (W× H× D)
MM/MC (switchable)
40 dB (MM)/60 dB (MC)
47 kΩ + 220 pF fixed
47 kΩ + 1 nF (modifiable with external load plugs)
20 Hz - 20 kHz ±0.3 dB
10 Hz - 50 kHz
± 0.3 dB
<0.013% (MM)/<0.055% (MC)
86 dB (MM)/>72 dB (MC)
40 dB
3.29 mVrms for -10 dBV output (316 mVrms)
0.325 mVrms for -10 dBV output (316 mVrms)
482 mVrms at 5 mVrms input (1 kHz)
47Ω
3 pairs of RCA sockets (left/right)
1 pair of RCA sockets (left/right)
24 V DC
3.4 W/15 mA
504 g (not including power supply)
150 × 50 × 117 mm
Technical specifications subject to change without notice.
Technical Specifications (MM 008 ADC)
Mode
Gain at 1 kHz
Input impedance (MM)
Input impedance (MC)
Frequency response (flat)
Frequency response (-3 dB)
RIAA curve accuracy
THD+N
Signal-to-noise ratio
Crosstalk
Input sensitivity (MM)
Input sensitivity (MC)
Max. output voltage
Output impedance
Input connections
Output connections
Power supply
Power consumption
Weight
Dimensions (W× H× D)
A/D converter
Sampling rates
USB output
Operating systems
MM/MC (switchable)
40 dB (MM)/60 dB (MC)
47 kΩ + 220 pF fixed
47k +1 nF (modifiable with external load plugs)
20 Hz - 20 kHz ±0.3 dB
10 Hz - 50 kHz
±0.3 dB
<0.013% (MM)/<0.055% (MC)
86 dB (MM)/>72 dB (MC)
40 dB
3.29 mVrms for -10 dBV output (316 mVrms)
0.325 mVrms for -10 dBV output (316 mVrms)
482 mVrms at 5 mVrms input (1 kHz)
47Ω
3 pairs of RCA sockets (left/right)
1 pair of RCA sockets (left/right)
24 V DC
3.5 W/15 mA
511 g (not including power supply)
150 × 50 × 117 mm
Tenor TE7022L 24Bit Delta Sigma
8,16,32,44.1,48,96kHz
USB 2.0, fully backward-compatible with USB 1.1
Windows® 8, Windows® 7, Vista, XP, Mac OS®
Technical specifications subject to change without notice.
Erste Schritte
Dimensions (L x H x P)
Convertisseur A/N
8,16,32,44,1,48,96 kHz
To reduce risk of electric shock, do not remove the cover (or back). No user-serviceable parts inside.
WARNING
TO PREVENT FIRE OR SHOCK HAZARD, DO NOT EXPOSE THIS APPLIANCE TO RAIN OR MOISTURE.

This product was tested and complies with all the requirements for the CE Mark.
Compliant to 2002/95/EC (RoHS)

IMPORTANT: DISPOSAL OF WASTE EQUIPMENT BY USERS IN PRIVATE HOUSEHOLDS IN THE EUROPEAN UNION
This symbol on the product or on its packaging indicates that this product must not be disposed off with your other household waste. Instead, it is your responsibility to dispose of your waste equipment by handling it over to a designated collection point for the recycling of waste electrical and electronic equipment. The separate collection and recycling of your waste equipment at the time of disposal will help to conserve natural resources and ensure that it is recycled in a manner that protects human health and the environment. For more information about where you can drop off your waste equipment for recycling, please contact your local city office, your household waste disposal service or the shop where you purchased the product.
VORSICHT

- Rear panel:
- Connecting your turntable
- Connect earth wire
- Connect RCA cables
- For use with MM or high-level MC cartridges:
- For use with MC cartridges:
- Connecting your amplifier
- Important:
- Connecting the power adapter
- Connecting your computer and recording audio tracks (ADC)
- Recording software:
- Technical Specifications (MM 008)
- Mode
- Technical Specifications (MM 008 ADC)
- Erste Schritte
- WARNING
- VORSICHT
Brand : THORENS
Model : MM 008
Category : Receiver