Plancha 229002 - Grill plate LAGRANGE - Free user manual and instructions
Find the device manual for free Plancha 229002 LAGRANGE in PDF.



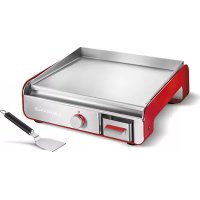
| Product type | Grill plate (plancha) |
| Brand | LAGRANGE |
| Model | 229002 |
| Power supply | 230 V ~ 50 Hz |
| Power | 2000 W |
| Plate material | Aluminum cast iron |
| Plate coating | Non-stick |
| Heating element | Overmolded in aluminum |
| Handles | Varnished wood |
| Juice collecting tray | Removable, stainless steel with spout |
| Connection block | Removable with regulation knob |
| Power cord | With grounding plug, unwind completely before use |
| Dimensions (L x W x H) | Approximately 60 x 40 x 10 cm |
| Weight | Approximately 8 kg |
| Protection | Do not immerse the base or the connection block |
| Cleaning the plate | Absorbent paper then damp sponge with dish soap, rinse and dry |
| Cleaning the tray | Sponge and dish soap, rinse under running water |
| Cleaning the handles | Damp cloth, dry immediately |
| Warranty | 2 years (1 additional year upon registration) |
| Included accessories | Juice collecting tray, connection block |
| Standards | CE, WEEE, RoHS, food contact |
Frequently Asked Questions - Plancha 229002 LAGRANGE
User questions about Plancha 229002 LAGRANGE
0 question about this device. Answer the ones you know or ask your own.
Ask a new question about this device
Download the instructions for your Grill plate in PDF format for free! Find your manual Plancha 229002 - LAGRANGE and take your electronic device back in hand. On this page are published all the documents necessary for the use of your device. Plancha 229002 by LAGRANGE.
USER MANUAL Plancha 229002 LAGRANGE
Plancha
Ref: 229 001
Ref: 229 002
- DESCRIPTION DE L'APPAREIL -
natural_image
Close-up of a mechanical component with a metallic rod inserted, showing a zigzag arrow indicating motion (no text or symbols)
natural_image
Diagram showing a cable being inserted into a device with a downward arrow indicating compression (no text or symbols present)natural_image
Close-up of a mechanical component with a metallic rod and a zigzag arrow indicating motion (no text or symbols)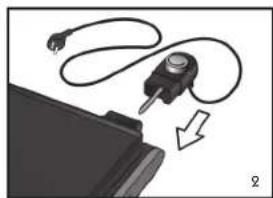
natural_image
Diagram showing a cable being inserted into a device with a downward arrow indicating compression (no text or symbols present)natural_image
Close-up of a mechanical component with a metallic rod inserted, showing a zigzag arrow indicating motion (no text or symbols)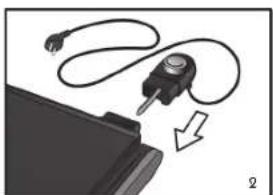
natural_image
Diagram showing a plug inserted into a device with a cable, indicating compression or disassembly (no text or symbols present)PLANCHA MO:LAGRANGE 25/03/09 9:29 Page 17
Plancha
Ref: 229 001
Ref: 229 002
ACCENSIONE ED UTILIZZO
Primo utilizzo
natural_image
Close-up of a mechanical component with a metallic rod and a black housing, showing a force arrow (no text or symbols)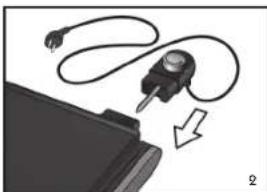
natural_image
Diagram showing a plug inserted into a device with cables, indicating cable routing or connection (no text or symbols present)natural_image
Close-up of a mechanical component with a metallic rod inserted, showing a zigzag arrow indicating motion (no text or symbols)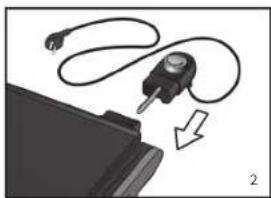
natural_image
Diagram showing a plug inserted into a device with a downward arrow indicating compression or disassembly (no text or symbols present)• Heating plate made of cast aluminium with non-stick coating
• Resistor cast moulded into the aluminium
• Large cooking surface: 43 x 28 cm
- Bakelite feet
• Varnished wooden handles
- Removable stainless steel drip tray with pouring spout
- Removable terminal block with control button
• 230V 50Hz 2,000W
Cord
You must examine the power supply cable carefully before using it. If it is damaged, you must not use the appliance. In order to avoid any danger to the user, the cable should only be replaced by Lagrange, its after-sales service, or a person either approved or qualified by Lagrange.
These appliances conform to directives 2006/95/CE, 2004/108/CE, DEEE 2002/96/CE, RoHs 2002/95/CE, CE 1935/2004.
Environmental Protection - DIRECTIVE 2002/96/CE
To protect the environment and people's health, it is important for everyone, including all suppliers and users, to follow specific guidelines for the disposal of any electrical appliance at the end of its useful life.
For this reason, the appliance at hand bears the marking on its data plate to remind you never to dispose of it in any public or private bin meant, for household rubbish.
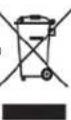
Instead, you should return it to your retail shop or drop it off at a collection site that uses selective sorting to redirect items for recycling and eventual reuse in other applications.
BEFORE USING THE APPLIANCE
Carefully read these user instructions and keep them so you can consult them at a later date.
• Always completely unroll the cable.
- Make sure that the cable does not come in contact with the hot parts of the appliance.
- Place your appliance on a flat surface.
- Never place your appliance on a hot surface, or near a flame.
- Connect the cable's plug to a 10/16 A socket fitted with an earth contact.
- If using an extension cable, you must use a model fitted with an earthed connector and wiring with a section equal to or greater than 1mm^2 .
- You should watch children to make sure that they do not play with the appliance.
- People (including children) who are unfit to use the appliance under conditions of complete safety either due to their physical, sensorial or mental capacities, or due to their lack of experience or knowledge, may not use this appliance under any circumstances unless they are watched by, or receive instructions from, a responsible person.
- It is recommended that you connect the appliance to an installation featuring a residual differential current device with atripping current not exceeding 30mA.
- Neverimmersetheheatingbaseortheterminalblockin water.
- Beforeanycleaningoperation, disconnecttheapplianceand leaveittocooldowncompletely.
- Foryoursafety, it is recommended that you never use or leave your appliance in placethatis exposed to bad weather or humidity.
- Neverusetheapplianceforadditionalheating.
- Neverleaveyourapplianceconnectedwithoutusingit.
- Nevertouchthehotplatewhenitisonbecauseitis veryhot.
• Nevermovetheappliancewhileitison. - Neveruseaconnectorotherthantheonedeliveredwiththe appliance.
- Onlyconnecttheappliancewhentheconnectoriscorrectly hookedup.
- Nevercoverthecookingsurfaceortheworktopwith aluminiumfoil.
- Neverflushfittheappliance.
- Neverleavedishes, platesorothercontainer sonthecooking surface.
• These appliances are not intended to be operated within an external timer or separater remote control system.
SET-UP AND USE
Firstuse
Before using the appliance, clean the cookings surface and the drip tray (seethesection on cleaning).
Somefumesmaybereleasedthefirsttimeitisused.
Set-upanduse
- Placetheapplianceonaflatsurface.
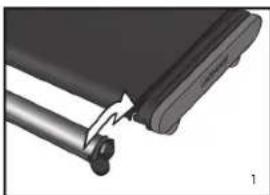
- Placethedriptray(seelmage1)onthefrontofthe appliance.
• Completelyunrollthecable. - Putthecontrolbuttonontheminimumsettingandthen connecttheconnectortotherearoftheproduct,making surethatitisfullyinserted(seelmage2).
- Then, connectt hecabletothemainssupplyandturnthe controlbuttontothemaximumsetting.
- LetyourPlanchapreheatfor5to10minutes.
- Once your appliance is preheated, adjust the thermostat to the position of your choice and leave the food to cook until it has been cooked to the desired extent.
natural_image
Close-up of a mechanical component with a zigzag arrow indicating a motion or force, no visible text or symbols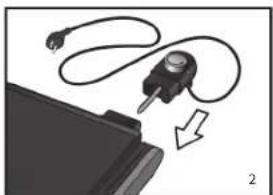
natural_image
Diagram showing a cable being inserted into a device with a pointer, no text or symbols present- NB: Do not cut anything directly on top of the plate or you will run the risk of damaging the non-stick coating.
- If you want to use the juice in the drip tray while the appliance is on, all you have to do is carefully take hold of the two handles on the ends of the drip tray and then pour the juice into a bowl using the pouring spout.
CLEANING
NB: Make sure that the appliance is always disconnected before performing any cleaning operations.
NB: Make sure that the appliance is always disconnected before performing any cleaning operations.
- Disconnect the cable and then remove the connection terminal from the appliance.
- Wait until the appliance has completely cooled down before cleaning it.
Cooking surface: Clean the cooking surface using absorbent paper and then a damp sponge with some washing up liquid, and then rinse it with a damp sponge and dry it.
Drip tray Clean the drip tray with a sponge and some washing up liquid, then rinse it in running water and dry it.
Wooden handles: Clean the wooden handles using a damp cloth and then dry them immediately.
NB: Never immerse the base of the appliance or the connection terminal in water. Do not use steel wool or scouring powder or harsh cleaning products (such as oven cleaners) on the appliance's hot plate as they could permanently damage your appliance. Do not place either the plate or the drip tray in a dishwasher.
NB: Never immerse the base of the appliance or the connection terminal in water.
Do not use steel wool or scouring powder or harsh cleaning products (such as oven cleaners) on the appliance's hot plate as they could permanently damage your appliance.
Do not place either the plate or the drip tray in a dishwasher.
GENERAL WARRANTY CONDITIONS
Your appliance is subject to a 2-year warranty.
In order to benefit from an additional year of warranty coverage free of charge, register on the LAGRANGE Web site (www.lagrange.fr)
The warranty covers parts and labour and also covers manufacturing defects.
The warranty excludes deterioration due to misuse or failure to follow the user instructions, or due to dropping the product and breaking the enamel.
THIS WARRANTY APPLIES TO DOMESTIC USE; UNDER NO CIRCUMSTANCES DOES IT COVER PROFESSIONAL USE.
The vendor's legal warranty obligations in no way exclude the Manufacturer's legal warranty obligations relating to faults or manufacturing defects in accordance with Article 1641 and subsequent articles of the French Civil Code.
In the event of a breakdown or malfunction, contact your retailer.
In the event of a technical fault occurring within 8 days of purchase, the appliance may be exchanged. After this period, it is repaired by LAGRANGE's after-sales service
RECIPES
PLANCHA LAGRANGE RECIPES
FISH AND SHELLFISH
Prawns on skewers (for 2 people)
175g of prawns with their shells removed - 2 tablespoonfuls of lemon juice - 1 tablespoonful of fresh cut parsley 1 tablespoonful of olive oil - 35g of butter - 1 clove of cut garlic salt and pepper.
Place the prawns, parsley, lemon juice, and the salt and pepper in a dish and leave them to marinate for 30 minutes.
Melt the butter in a saucepan with the olive oil and garlic. Add the prawns to the preparation. Stir and place the buttered prawns on skewers.
Place the prawns on the preheated Plancha and leave them to cook for 5 minutes.
King prawns
12 fresh king prawns with their shells still on - oil - 1 lemon.
Slightly oil the king prawns with a brush. Preheat the Plancha and then place the king prawns on the plate. Wait until the shells begins to grill and then turn them over. Carry out the same operation for the other side.
Serve with lemon wedges.
2 kg of mussels - parsley
Scrape the mussels and wash them in order to remove any impurities. Place them on the Plancha once you have oiled it and made sure it is properly heated up. Remove them when they crack open. Season them with raw parsley or chopped parsley.
Salmon with dill (for 6 people)
6 pieces of salmon steak - 3 teaspoonfuls of chopped dill - salt and pepper
Butter sauce: 100g of melted butter - 3 lemons - 4 pinches of chives - salt.
Cook the salmon steaks on the Plancha (5 minutes for each side). Sprinkle with chopped dill. Add salt and pepper. Serve with lemon butter sauce.
Grilled trout in mustard cream (for 4 people)
4 pieces (150g) of trout steak - 5 courgettes - 4 tablespoonfuls of traditional mustard - 4 tablespoonfuls of fresh cream soup - olive oil - salt and pepper.
Brush the trout steaks with mustard, and keep them chilled. Cut the courgettes into slices (lengthwise). Brush oil on once side and then place the slices on the Plancha, having slightly oiled it beforehand. Leave to cook for 10 minutes.
Set them aside. Then place the trout steaks on your Plancha and leave them to cook for 5 minutes (for each side).
Mustard sauce: Mix the cream with a bit of mustard, and add salt and pepper.
Serve the trout steaks with courgettes and mustard cream.
MEATS
Chicken breasts in chopped parsley (for 8 people)
8 chicken breasts - 3 cloves of garlic - 1 bunch of parsley - olive oil - salt and pepper.
Cut the chicken breasts into strips and sprinkle olive oil on them. Chop up the garlic and the parsley.
Impregnate the strips with the chopped garlic and parsley, and then cook them on the Plancha, turning them over frequently for 6 minutes. Add salt and pepper before serving.
Chicken breast fillet with tomato and peppers (for 4 people)
2 pieces of chicken breast fillet - 2 tomatoes - 1 red pepper 1 green onion - 2 tablespoonfuls of grated parmesan cheese salt - Ground pepper - dried oregano.
Cut the tomatoes into slices and the pepper into strips. In a dish, place the tomato slices and the pepper strips in alternating circular layers. Lay out the green onion cut into slivers on this bed, and then the chicken breast fillets cut in half. Season them. Slightly oil the Plancha. Cook for 15 minutes on the Plancha.
Grilled chicken in lemon (for 4 people)
4 chicken breasts (150 g) -3 tablespoonfuls of oil - 3 lemons - salt - pepper.
Mix the lemon juice and the oil. Leave the chicken breasts to marinate in the mix for 30 minutes. Cook them on the Plancha (making sure it has been properly heated up) for 5 minutes (each side).
Grilled chicken with sesame seeds (for 6 people)
6 chicken breasts - 150g of sesame seeds - salt and pepper
Marinade: 50g of butter - 3 tablespoonfuls of soy sauce - 3 tablespoonfuls of dry white wine - 1 tablespoonful of tarragon - 1 tablespoonful of mustard
Mix the butter, mustard, white wine, soy sauce and the tarragon. Place the chicken breasts in this marinade, stir slowly and then leave to macerate for 2 hours. Then grill the chicken breasts on your Plancha (4 minutes each side).
Sprinkle with a bit of marinade during cooking. Remove the chicken breasts and place them in the sesame seeds. Grill them for 1 minute on your Plancha.
Spanish-style pork fillet (for 4 people)
800 g of sliced pork fillets
Marinade: 2 squeezed lemons - 4 cloves of cut garlic - 3 tablespoonfuls of olive oil - 1 teaspoonful of thyme 1 teaspoonful of red pepper - 1 teaspoonful of cinnamon 1 tablespoonful of balsamic vinegar - 1 dose of saffron - salt
Marinate the thinly sliced pork fillets for 1 hour in the preparation and then grill them for 10 minutes on your Plancha.
VEGETABLES
Grilled tomatoes in ginger and honey (for 4 people)
5cm of fresh ginger - 6 tablespoonfuls of honey - 4 green lemons - 4 tomatoes - 1 piece of candied ginger.
Peel the fresh ginger and grate it finely. In a container, mix the honey, the lemon juice and two tablespoonfuls of fresh grated ginger.
Once you have washed them, cut the tomatoes into large slices and place them in the marinade for 15 minutes. On your Plancha, seal the tomato slices for 1 minute (each side). Place them on a dessert plate with the cooking juice, and sprinkle the tomatoes with candied ginger cut into sticks.
Grilled aubergines (for 6 people)
6 aubergines - 3 shallots - 3 cloves of garlic - 4 tablespoonfuls of olive oil - 2 tablespoonfuls of shredded thyme 1 teaspoonful of Espelette chilli pepper - salt.
Peel and cut the shallots and the cloves of garlic. Place them in a container with a teaspoonful of Espelette chilli pepper, salt, shredded thyme and oil. Mix them all.
Wash the aubergines, remove the stalks and cut them into fine slices (lengthwise). Place the slices in the container. Leave them to marinate for 30 minutes. Preheat your Plancha and oil it slightly. Then cook your aubergine slices for 5 minutes (each side).
Small goat cheese pieces on skewers (for 6 people)
6 small goat cheeses - 3 small sweet yellow peppers - 12 slices of smoky bacon - 6 cherry tomatoes - 3 white onions salt - pepper.
Cut the peppers and the onions into pieces, blanch them in boiling water for 5 minutes. Cut the bacon slices in half and cut the small goat cheeses into four pieces.
Wrap the pieces of cheese with the bacon, and garnish the skewers by putting a piece of cheese on them followed by a piece of each vegetable, and so on. Pepper them, and then finish with a cherry tomato on the end of the skewer. Leave the skewers on your oiled Plancha for 5 minutes.
Mix of peppers
2 sweet yellow peppers and 2 orange peppers - pure sea salt - balsamic vinegar - olive oil
Cut the peppers lengthwise and remove the pips. Cut them into fine slices. Sprinkle them with olive oil and with pure sea salt.
Cook them on a high flame on the Plancha for a few minutes, possibly whilst sprinkling them with a bit of hot water.
When the slices are golden brown, place them on a dish and season them with pure sea salt and balsamic vinegar.
PLANCHA MO:LAGRANGE 25/03/09 9:30 Page 40
- - DESCRIPTION DE L'APPAREIL -
- ACCENSIONE ED UTILIZZO
- Primo utilizzo
- Cord
- Environmental Protection - DIRECTIVE 2002/96/CE
- BEFORE USING THE APPLIANCE
- SET-UP AND USE
- CLEANING
- GENERAL WARRANTY CONDITIONS
- RECIPES
- PLANCHA LAGRANGE RECIPES
- FISH AND SHELLFISH
- Prawns on skewers (for 2 people)
- King prawns
- Salmon with dill (for 6 people)
- Grilled trout in mustard cream (for 4 people)
- MEATS
- Chicken breasts in chopped parsley (for 8 people)
- Chicken breast fillet with tomato and peppers (for 4 people)
- Grilled chicken in lemon (for 4 people)
- Grilled chicken with sesame seeds (for 6 people)
- Spanish-style pork fillet (for 4 people)
- VEGETABLES
- Grilled tomatoes in ginger and honey (for 4 people)
- Grilled aubergines (for 6 people)
- Small goat cheese pieces on skewers (for 6 people)
- Mix of peppers
Brand : LAGRANGE
Model : Plancha 229002
Category : Grill plate