USER MANUAL Purista F230101 MELITTA
1 Overview of the appliance 31
1.1 Appliance at a glance 31
1.2 Overview of the control panel 32
2 For your safety. 33
2.1 Proper use 33
2.2 Danger from electric current 33
2.3 Risk of burns and scalds 34
2.4 Other dangers 34
3 First steps. 34
3.1 Unpacking the appliance 34
3.2 Installing the appliance 34
3.3 Connecting the appliance 35
3.4 Switching on the appliance for the first time 35
4 Basic operation 35
4.1 Switching the appliance on and off 35
4.2 Filling coffee beans into the bean container 36
4.3 Filling with water 37
4.4 Adjusting the outlet for coffee beverages 37
4.5 Emptying the drip tray and coffee grounds container 37
5 Preparing beverages 38
5.1 Setting the coffee strength 38
5.2 Setting the coffee quantity 38
5.3 Preparing the coffee beverage 39
5.4 Programming your favourite coffee 39
5.5 Stopping coffee preparation 39
5.6 Preparing two coffee beverages simultaneously 39
6 Changing basic settings 40
6.1 Service mode 1.40
6.2 Setting Auto OFF 40
6.3 Setting the water hardness 41
6.4 Activating/deactivating switch-off rinsing 41
6.5 Setting the brewing temperature 42
6.6 Service mode 2. 42
6.7 Resetting the appliance to the factory settings 43
6.8 Setting the grinding fineness 43

7 Care and maintenance 44
7.1 General cleaning 44
7.2 Cleaning the brewing unit 44
7.3 Running the cleaning programme 45
7.4 Running the descending programme 46
7.5 Using a water filter 48
8 Transport, storage and disposal 49
8.1 Venting the appliance 49
8.2 Transporting the appliance 50
8.3 Disposing of the appliance 50
9 Technical data. 51
10 Troubleshooting 51
1 Overview of the appliance
1.1 Appliance at a glance
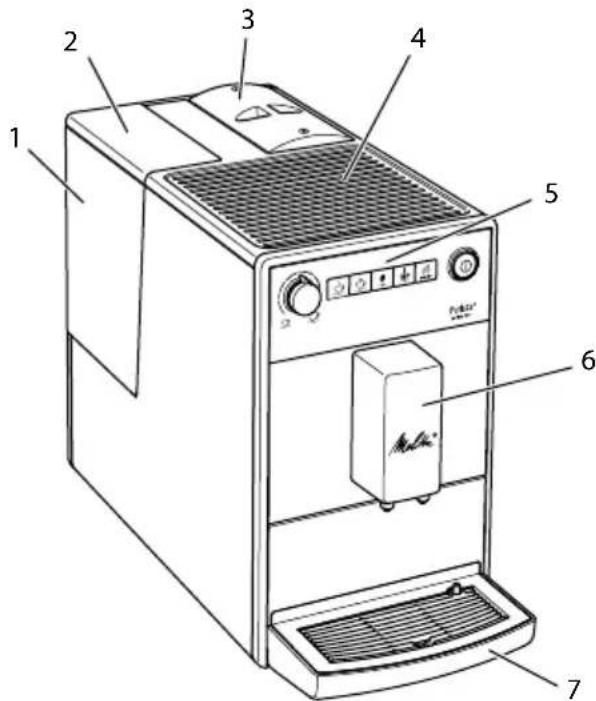
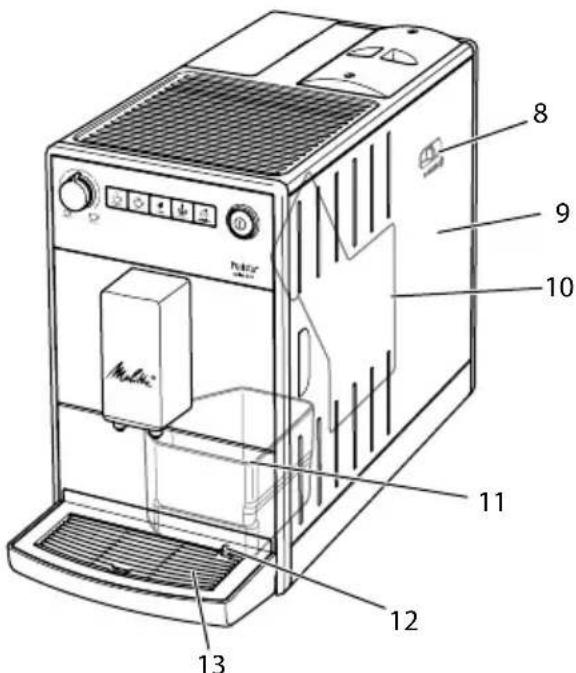
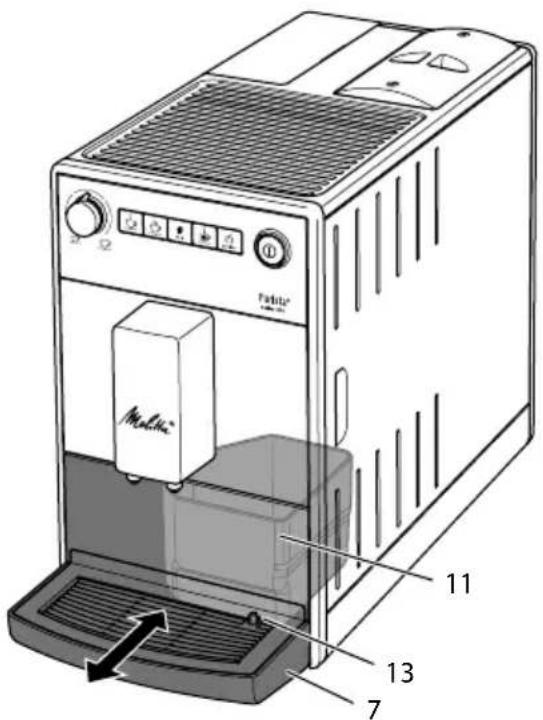
Fig. 1: Front left of the appliance
Fig.2:Front right of the appliance
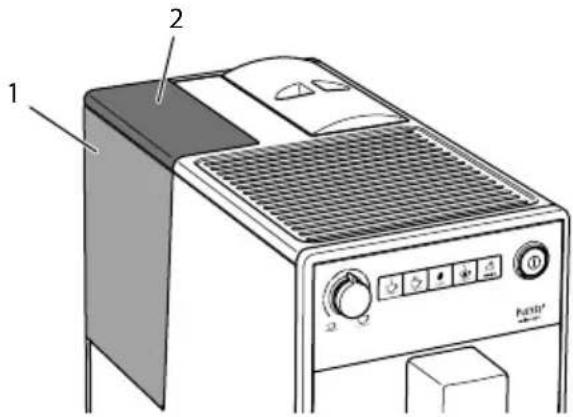
1 Water tank
2 Water tank lid
3 Bean container with lid
4 Cup rest
5 Control panel
6 Outlet with 2 coffee nozzles for coffee beverages
7 Drip tray
8 "Grinding fineness adjustment" lever (inner)
9 Cover
10 Brewing unit (inner)
11 Coffee grounds container (inner)
12 Float
13 Cup plate


1.2 Overview of the control panel
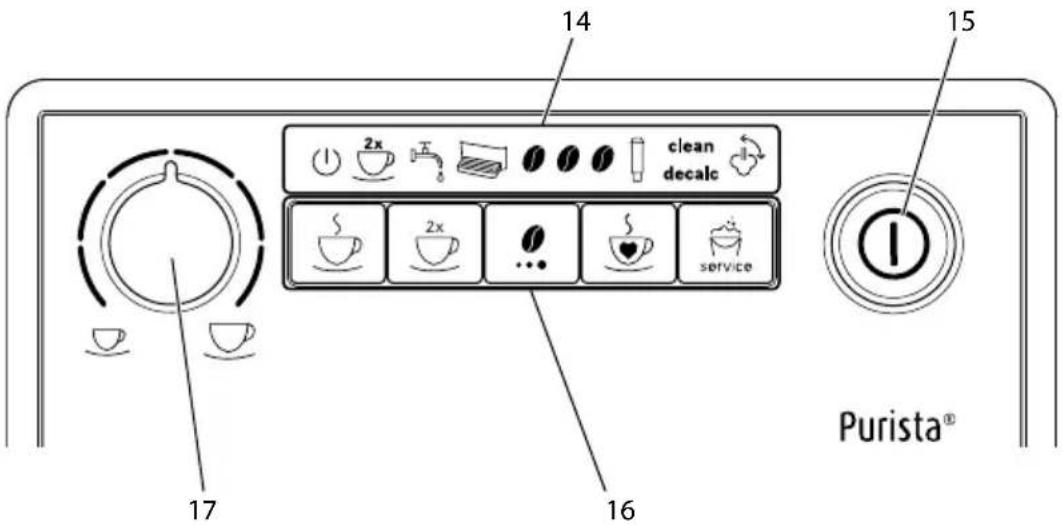
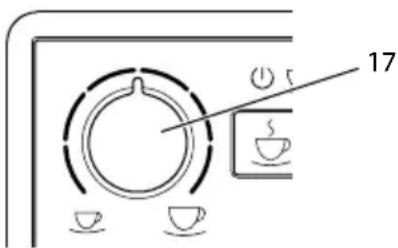
Fig.3: Control panel
14 Indications
15 ON/OFF button
16 Buttons
17 "Coffee quantity" rotary regulator
| Display Designation |
| 1 | Ready display |
| 2x | 2 cups display |
| 5 | Water display |
| Drip tray display |
| Coffee beans display |
| Filter display |
| clean | Clean display |
| decalc | Descaling display |
| Venting display |
| Control Designation |
| "Coffee" direct key |
| "2 cups" button |
| "Coffees strength" button |
| "Favourite coffee" button |
| "Service" button |
Dear Customer,
Thank your for purchasing the Melitta® Purista® fully automatic coffee maker.
The operating instructions will help you discover the diverse options offered by the appliance and enjoy your coffee to the full.
Read through the operating instructions carefully. This helps avoid personal injury and material damage. Store the operating instructions carefully. If you pass on the appliance, include the operating instructions with it.
Melitta accepts no liability for damage caused by failure to observe the operating instructions.
If you require further information or have any questions on the appliance, contact Melitta or visit our website at: www.international.melitta.de/
We hope you enjoy using your appliance.
2 For your safety
The appliance conforms to the relevant European directives and has been built using the latest technology. Nevertheless, some residual dangers remain.
Observe the safety instructions to avoid dangers. Melitta accepts no liability for damage caused by failure to observe the safety instructions.
2.1 Proper use
The appliance is used to prepare beverages made from coffee beans.
The appliance is intended for use in private households.
Any other use is regarded as improper and may lead to personal injury and material damage. Melitta accepts no liability for damage that arises due to improper use of the appliance.
2.2 Danger from electric current
If the appliance or the power cable is damaged, there is a risk of fatal electric shock.
Observe the following safety instructions to avoid danger from electric current:
Do not use a damaged power cable.
A damaged power cable may only be replaced by the manufacturer or its customer service or service partner.
Do not open any covers firmly screwed onto the appliance housing.
Only use the appliance when it is in a technically flawless condition.
A defective appliance may only be repaired by an authorised workshop. Do not repair the appliance yourself.
Do not make any changes to the appliance, its components or its accessories.
Do not immerse the appliance in water.
Do not let the power cable come into contact with water.

2.3 Risk of burns and scalds
Escaping fluids and steam may be very hot. Parts of the appliance can also become very hot.
Observe the following safety instructions to avoid scalds and burns:
Avoid escaping fluids and steam coming into contact with the skin.
Do not touch the nozzles on the outlet during and immediately after dispensing a beverage. Wait until the components have cooled down.
2.4 Other dangers
Observe the following safety instructions to avoid personal injury and material damage:
Do not operate the appliance in a cabinet or similar.
Do not reach into the interior of the appliance during operation.
Keep the appliance and its power cable out of the reach of children under 8 years of age.
This appliance may be used by children over 8 years of age and by persons with reduced physical, sensory or mental capabilities or a lack of experience and knowledge if they are supervised or have been instructed in using the appliance safely and understand the resulting risks.
Children must not play with the appliance. Cleaning and maintenance must not be undertaken by children younger than 8 years of age.
Children over 8 years of age must be supervised during cleaning and maintenance.
Disconnect the appliance from the power supply when left unsupervised for a long time.
The appliance must not be operated at altitudes over 2000m
Please observe the instructions in the corresponding section when cleaning the appliance and its components (Care and maintenance on page 44).
3 First steps
This chapter describes how to prepare your appliance for use.
3.1 Unpacking the appliance
- Unpack the appliance. Remove the packaging material, the adhesive strips and the protective films from the appliance.
- Keep the packaging material for transport and any return shipments.
The appliance may contain traces of coffee and water. The appliance has been tested in the factory to ensure that it functions perfectly.
3.2 Installing the appliance
Observe the following instructions: Do not install the appliance in damp rooms.
Install the appliance on a stable, flat and dry surface.
Do not install the appliance in the vicinity of sinks or the like.
Do not install the appliance on hot surfaces.
Install the appliance at a sufficient distance (approx. 10~cm ) from the wall and other objects. The space above the appliance should be at least 20~cm .
Route the power cable so it cannot be damaged by edges or hot surfaces.
3.3 Connecting the appliance
Observe the following instructions:
Check that the supply voltage matches the operating voltage specified in the technical data (see table Technical data on page 51).
Only connect the appliance to a properly installed earthing contact socket. If in doubt, consult a specialist electrician.
The earthing contact socket must have a fuse of at least 10 A.
3.4 Switching on the appliance for the first time
Once you switch on the appliance for the first time, the appliance performs automatic rinsing. Hot water flows out of the outlet. The appliance is vented.
We recommend pouring away the first two cups of coffee after initial start-up. If you want to use a water filter, only insert this after starting up for the first time.
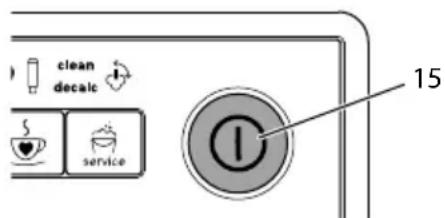
Fig.4:ON/OFF button
Requirement: The appliance has been installed and connected.
- Place a vessel beneath the outlet.
- Press the ON/OFF button (15).
The Ready display lights up briefly.
The Water display lights up and requests you to fill the water tank.
- Open the lid of the water tank and pull the water tank upwards out of the appliance by the handle.
- Rinse out the water tank with clean water. Fill the water tank with fresh water.
- Insert the water tank into the appliance from above and close the lid.
The Vent display lights up and requests you to vent the appliance.
- Press the "Coffee strength" button.
Water flows into the drip tray.
The appliance heats up and hot water flows out of the outlet.
- Once no more water flows out of the outlet, the Coffee bean display lights up.
» The appliance is vented.
- Fill coffee beans into the bean container (see section 4.3 Filling coffee beans into the bean container on page 11).
- As required, you can now either
a) set the water hardness (see section 6.3 Setting the water hardness on page 41) or
b) screw in a water filter (see section 7.5 Using a water filter on page 48).
4 Basic operation
4.1 Switching the appliance on and off
Before switching on after starting up the appliance for the first time, read section 3.4 Switching on the appliance for the first time on page 35.

When switched on and off, the appliance performs automatic rinsing.
During rinsing, rinsing water is also conducted into the drip tray.
Switching on the appliance
- Place a vessel beneath the outlet.
- Press the "ON/OFF" button (15).
The appliance heats up and performs automatic rinsing.
The appliance is ready for operation.
If the appliance was only switched off briefly, there is no automatic rinsing after switching on.
Switching off the appliance
- Place a vessel beneath the outlet.
- Press the "ON/OFF" button (15).
The appliance performs automatic rinsing.
The appliance switches off.
The appliance switches off automatically when it is not operated for a long time. Automatic rinsing is also carried out in this case.
You can set the off time in Service mode 1 (see section 6.2 Setting Auto OFF on page 40).
If no beverage has been prepared since switching on or if the water tank is empty, no rinsing takes place.
4.2 Filling coffee beans into the bean container
Roasted coffee beans lose their aroma. Only fill the bean container with as many coffee beans as you will consume over the next 3 to 4 days.
ATTENTION
The use of unsuitable types of coffee can lead to clogging of the grinder.
- Do not use freeze-dried or caramelised coffee beans.
- Do not use any coffee powder or instant products.
When changing the type of beans, remains of the old type of beans can still be in the grinder.
Even if the bean container runs empty and a new type of bean is filled in, there are still remains of the old type of bean in the grinder. For this reason, the first two coffees dispensed can contain remains of the old type of bean.
The flashing Coffee bean display requests you to refill coffee beans.
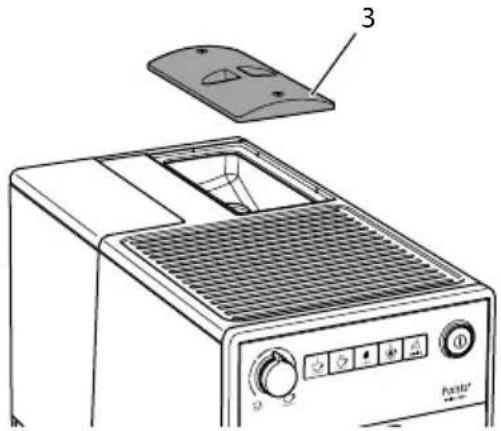
Fig. 5: Opening the lid of the bean container
- Open the lid of the bean container. (3).
- Fill coffee beans into the bean container.
- Close the lid of the bean container. The next time a coffee is dispensed, the display no longer flashes.
If the bean container runs empty during beverage preparation, output is interrupted and the Coffee bean display flashes. When you fill the bean container with coffee beans, the display will initially continue to flash. After pressing a direct key, coffee beans fall into the grinder. Coffee is
prepared and the display stops flashing. The Ready display and the Coffee beans display light up.
4.3 Filling with water
Only use fresh, cold water without carbon dioxide for optimum coffee enjoyment. Change the water daily.
The quality of the water largely determines the flavour of the coffee. Therefore, use a water filter (see section 6.3 Setting the water hardness on page 41 and section 7.5 Using a water filter on page 48).
The Water display lights up and requests you to refill water.
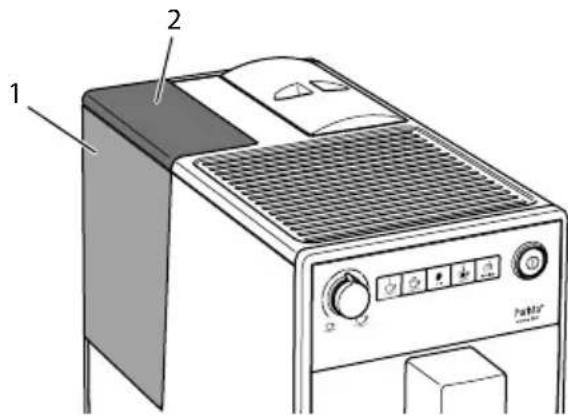
Fig. 6: Removing the water tank
- Open the lid (2) of the water tank (1) and pull the water tank upwards out of the appliance by the handle.
- Fill the water tank with water.
- Insert the water tank into the appliance from above and close the lid.
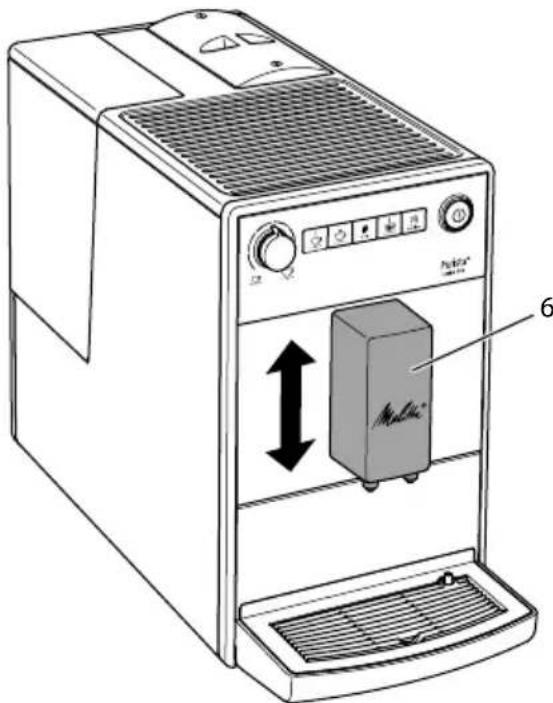
4.4 Adjusting the outlet for coffee beverages
The outlet (6) is height-adjustable. Set the greatest possible distance between the outlet and the vessel. Depending on the vessel, push the outlet up or down.
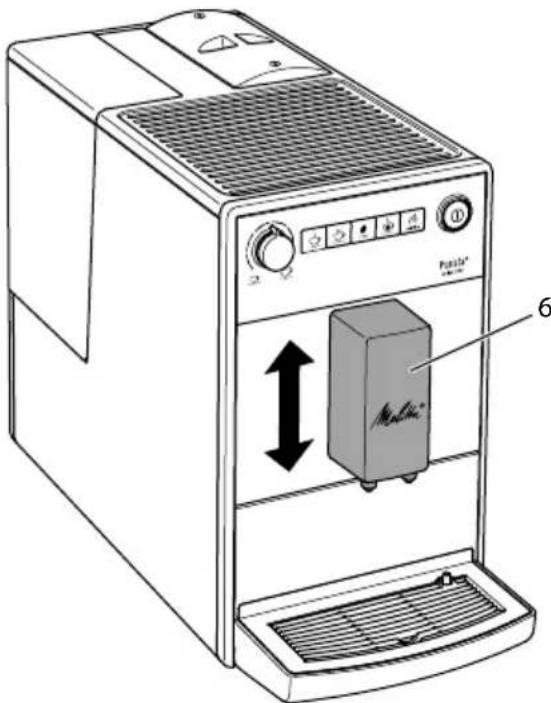
Fig.7: Adjusting the outlet for coffee beverages
4.5 Emptying the drip tray and coffee grounds container
When the drip tray (7) and the coffee grounds container (11) are full, the Drip tray display lights up and requests you to empty the container. The display appears after preparing approx. 8 beverages.
The projecting float (12) also indicates that the drip tray is full.
Always empty both containers. When the drip tray is pulled out, the Drip tray display flashes.


Fig.8: Emptying the drip tray and coffee grounds container
- Pull the drip tray (7) forwards out of the appliance.
- Remove the coffee grounds container (11) and empty it.
- Empty the drip tray.
- Insert the coffee grounds container.
- Push the drip tray into the appliance up to the stop.
If you empty the drip tray and the coffee grounds container while the appliance is switched off, the appliance does not register this process. Therefore, it is possible that you are requested to empty the containers although the drip tray and the coffee grounds container are not yet full.
5 Preparing beverages
Please note:
There should always be sufficient water in the water tank. If the filling level is too low, the appliance requests you to refill it.
There should always also be sufficient coffee beans in the bean container. If
there are no longer any coffee beans present, the appliance stops the preparation of a coffee beverage.
The vessels for the beverages should be sufficiently large.
The maximum coffee quantity is 220ml
5.1 Setting the coffee strength
As soon as the appliance is ready for operation, it displays the current setting of the coffee strength.
The following settings for the coffee strength are possible:
| Display Coffee strength |
| 0 | Mild |
| 1 0 | Normal |
| 1 0 0 | Strong |
0 You can adjust the coffee strength by pressing the "Coffee strength" button one or more times.
You can adjust the coffee strength before the beverage is dispensed or during the grinding process.
When switching off the appliance, the last set coffee strength is stored.
5.2 Setting the coffee quantity

Fig. 9: Setting the coffee quantity
You can set the coffee quantity with the "Coffee quantity" (17) rotary regulator.
You can adjust the coffee quantity before the beverage is dispensed or during the grinding process.
Coffee quantities are continuously adjustable between 25ml and 220~ml .
5.3 Preparing the coffee beverage
Requirement: The appliance is ready for operation.
-
Place a vessel beneath the outlet.
-
Press one of the direct keys.
The grinding process and beverage dispensing start.
Beverage dispensing ends automatically.
- Remove the vessel.
5.4 Programming your favourite coffee
You can permanently store your preferred coffee strength and quantity using the "Favourite coffee" button.
The settings are made during the preparation of a coffee.
Requirement: The appliance is ready for operation.
- Press the "Favourite coffee" direct key for more than 2 seconds.
The Ready display and the Coffee beans display flash rapidly.
-
Press the "Coffee strength" button one or more times to set your preferred coffee strength.
-
Press the "Favourite coffee" direct key.
The grinding process starts. You can change the coffee strength again during the grinding process.
» Beverage dispensing starts.
- Press the "Favourite coffee" button during beverage dispensing when your
preferred coffee quantity has been reached.
» Beverage dispensing stops.
The settings are stored.
If beverage preparation is stopped with the "Coffee" direct key, the coffee quantity and the coffee strength are not stored.

Press the "Favourite coffee" button to prepare a coffee with the stored coffee length and quantity.
5.5 Stopping coffee preparation
If you want to stop the preparation of a coffee beverage prematurely, press the direct key again.
5.6 Preparing two coffee beverages simultaneously
You can prepare two coffee drinks simultaneously with the "2 cups" button. For two-cup dispensing, the appliance carries out two grinding processes.
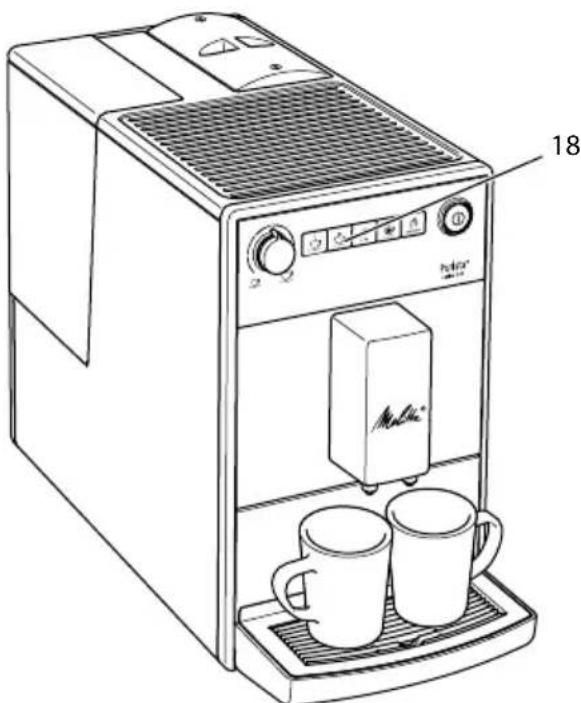
Fig. 10: Two-cup dispensing
- Place two vessels beneath the outlet.
- Press the"2 cups" button (18).

2x The 2 cups display lights up.
- Press a direct key.
The grinding process and beverage dispensing start.
Beverage dispensing ends automatically.
- Remove both vessels.
The setting only applies to the single beverage that is prepared.
If a coffee beverage is not prepared within 1 minute, the appliance switches to single-cup dispensing.
6 Changing basic settings
You can change the basic settings of the appliance with several functions. The functions are divided into two service modes.
6.1 Service mode 1
Each function is assigned a display.
| Service mode 1 |
| Display function |
| 2x | Auto OFF |
| Water hardness |
| Switch-off rinsing |
| Filter programme |
| clean | Cleaning programme |
| decalc | Descaling programme |
| Brewing temperature |
To call up Service mode 1, proceed as follows:
Requirement: The appliance is ready for operation.
- Press the "Service" button for more than 2 seconds to call up Service mode 1.
TheReadydisplay flashes rapidly and the 2 cups button lights up.
- Press the "Service" button one or more times to access the desired function.
A display lights up according to the function selected, see Service mode 1 table.
The number of lit bean symbols indicates the current setting of the function.
Press the "Coffee" direct key to exit the service mode without saving the settings.
If no further input is made within 1 minute, the appliance returns to Ready mode.
6.2 Setting Auto OFF
If you do not operate the machine for a long time, it initially switches to energy save mode. After a further preset time, the appliance switches off.
The following settings are possible:
| Display Energy save mode after: | Switch off after: |
| 0 | 3 minutes | 30 minutes |
| 00 | 10 minutes | 1 hour |
| 000 | 20 minutes | 4 hours |
| 000 flash | 30 minutes | 8 hours |
Press any button to exit Energy Save mode.
Requirement: The appliance is ready for operation.
-
Press the "Service" button for more than 2 seconds to call up Service mode 1.
-
Press the "Service" button repeatedly until the display for the Auto Off function appears.
- Press the "Coffee strength" button repeatedly until the desired time is set.
- You can call up the next function or exit Service mode:
a) Briefly press the "Service" button to navigate to the next function.
b) Press the "Service" button for more than 2 seconds to save the setting and exit the service mode.
6.3 Setting the water hardness
Setting the water hardness regulates how frequently you are requested to descale the appliance. The harder the water, the more frequently the appliance has to be descaled.
Water hardness cannot be set while using a water filter (see section 7.5 Using a water filter on page 48).
Determine the water hardness with the enclosed test strip. Observe the instructions on the test strip packaging and in the table Water hardness range on page 51.
The following settings are possible:
| Display Water hardness |
| 0 | soft, descale after 150 litres |
| 00 | medium, descale after 100 litres |
| 000 | hard, descale after 70 litres |
| 000 flash | very hard, descale after 30 litres |
| no coffee beans | A water filter is used. No adjust-ment is possible. |
Requirement: The appliance is ready for operation.
- Press the "Service" button for more than 2 seconds to call up Service mode 1.
- Press the "Service" button repeatedly until the display for the Water hardness function appears.
- Press the "Coffee strength" button repeatedly until the desired water hardness is set.
- You can call up the next function or exit Service mode:
a) Briefly press the "Service" button to navigate to the next function.
b) Press the "Service" button for more than 2 seconds to save the setting and exit the service mode.
6.4 Activating/deactivating switch-off rinsing
Rinsing is always carried out immediately after switching on the coffee system. Only switch-off rinsing can be activated/deactivated. If it is activated, the coffee system is rinsed after being switched off.
We recommend that you do not permanently deactivate switch-off rinsing, because switch-off rinsing cleans the coffee system.
The following settings are possible:
| Display Switch-off rinsing |
| activated |
| no coffee beans deactivated |
Requirement: The appliance is ready for operation.
- Press the "Service" button for more than 2 seconds to call up Service mode 1.

- Press the "Service" button repeatedly until the display for the Switch-off rinsing function appears.
- Press the "Coffee strength" button repeatedly until switch-off rinsing is activated or deactivated.
- You can call up the next function or exit Service mode:
a) Briefly press the "Service" button to navigate to the next function.
b) Press the "Service" button for more than 2 seconds to save the setting and exit the service mode.
6.5 Setting the brewing temperature
The brewing temperature influences the flavour of the coffee beverage.
The following settings are possible:
| Display Brewing temperature |
| Low |
| Medium |
| High |
Requirement: The appliance is ready for operation.
- Press the "Service" button for more than 2 seconds to call up Service mode 1.
- Press the "Service" button repeatedly until the display for the Brewing temperature function appears.
- Press the "Coffee strength" button repeatedly until the desired brewing temperature is set.
- You can call up the next function or exit Service mode: a) Briefly press the "Service" button to navigate to the next function.
b) Press the "Service" button for more than 2 seconds to save the setting and exit the service mode.
6.6 Service mode 2
Each function is assigned a display.
| Service mode 2 |
| Display function |
| Factory settings |
| Venting |
To call up Service mode 2, proceed as follows:
Requirement: The appliance is ready for operation.
- Press the "Service" button as well as the "Coffee" direct key for more than 2 seconds to enter Service mode 2.
The Ready display and the 2 cups display flash rapidly.
- Press the "Service" button one or more times to access the desired function.
A display lights up according to the function selected, see Service mode 2 table.
The number of lit bean symbols indicates the current setting of the function.
Press the "Coffee" direct key to exit the service mode without saving the settings.
If no further input is made within 1 minute, the appliance returns to Ready mode.
6.7 Resetting the appliance to the factory settings
The appliance can be reset to the factory settings. When resetting, your settings in the functions will be lost. The coffee strength and quantity stored with the Favourite coffee function will also be lost.
Requirement: The appliance is ready for operation.
- Press the "Service" button as well as the "Coffee" direct key for more than 2 seconds to enter Service mode 2.
- Press the "Service" button repeatedly until the display for the Factory settings function appears.
- Press the "Coffee strength" button repeatedly until the display of one coffee bean appears.
- Press the "Service" button for more than 2 seconds to reset the appliance to the factory settings and exit the service mode.
6.8 Setting the grinding fineness
The grinding fineness of the coffee powder influences the flavour of the coffee.
If the grinding fineness is set finer, the coffee flavour is stronger.
ATTENTION
Very finely ground coffee powder can clog the brewing unit.
The grinding fineness has been optimally set prior to delivery. Adjust grinding fineness at the earliest after about 100 coffees are dispensed (after approx. 1 month, depending on coffee consumption).
- Do not set the grinding fineness too fine. The grinding fineness is optimally set when the coffee flows evenly out of the outlet and a fine, dense crema appears.
Adjust the grinding fineness while the grinder is running.
Requirement: The appliance is ready for operation.

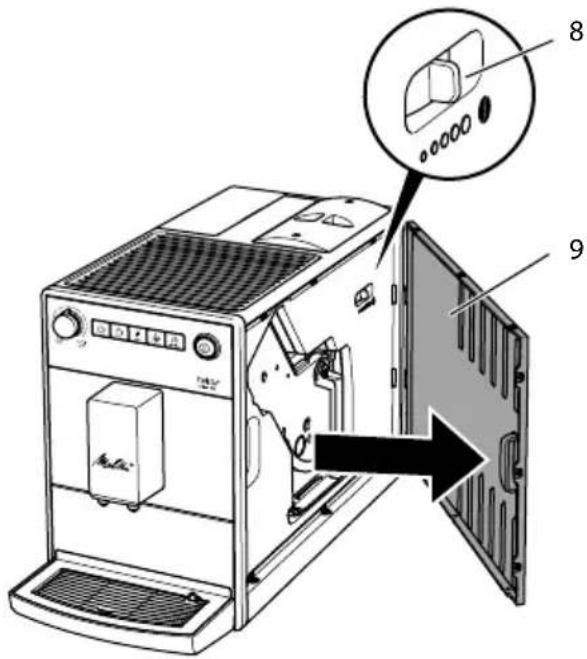
Fig. 11: Setting the grinding fineness
- Open the cover (9). To do this, reach into the recess on the right of the appliance and pull the cover off sideways.
- Prepare a coffee.
- Move the lever (8) to the left or right while the grinder is running. To the left = grinding fineness finer To the right = grinding fineness coarser
- Insert the cover (9) sideways until it engages.

7 Care and maintenance
Regular care and maintenance of the appliance ensure the consistent high quality of your beverages.
7.1 General cleaning
Clean the appliance regularly. Immediately remove external soiling caused by coffee.
ATTENTION
The use of unsuitable cleaning agents may lead to scratched surfaces.
- Do not use any abrasive cloths, sponges or cleaning agents.
Requirement: The appliance is switched off.
Clean the outside of the appliance with a soft, damp cloth and normal washing-up liquid.
Rinse off the drip tray, the coffee container and the cup plate. Use a soft, damp cloth and normal washing up liquid for this.
The coffee container is dishwasher-safe.
Clean the bean container with a soft, dry cloth.
7.2 Cleaning the brewing unit
To avoid damage to the appliance, we recommend cleaning the brewing unit once a week.
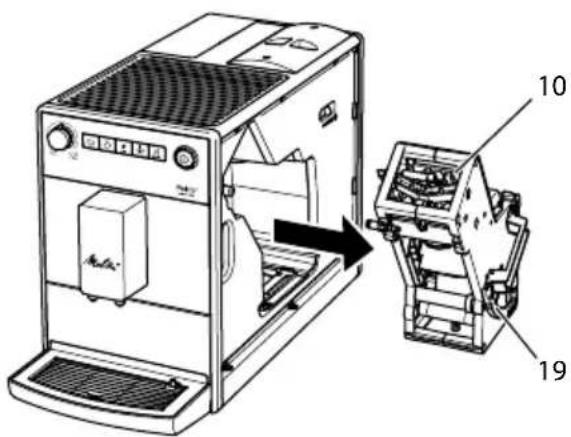
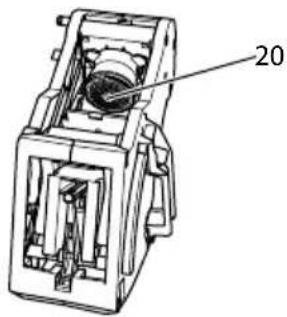
Fig. 12: Removing the brewing unit

Fig. 13: Cleaning the brewing unit
Requirement: The appliance is switched off.
- Open the cover (9). To do this, reach into the recess on the right of the appliance and pull the cover off sideways.
- Press and hold the red lever (19) on the brewing unit handle (10) and turn the handle clockwise until it engages at the stop.
- Pull the brewing unit out of the appliance by the handle.
- Rinse the entire brewing unit thoroughly from all sides under running water. In particular, make sure that coffee residues are removed from the sieve (20).
- Allow the brewing unit to drip dry.
- Use a soft, dry cloth to remove coffee residues from the surfaces inside the appliance.
- Insert the brewing unit into the appliance. Press and hold the red lever on the handle of the brewing unit and turn the handle anticlockwise until it engages at the stop.
- To do this, insert the cover sideways until it engages.
When the appliance is switched on, an alternating flashing of the Ready display and the Clean display indicates a missing brewing unit. After the brewing unit has been inserted, the appliance switches to Ready mode.
7.3 Running the cleaning programme
This cleaning programme is used to remove residues and coffee oil residues with the aid of fully automatic coffee maker cleaning agents.
To avoid damage to the appliance, we recommend running the cleaning programme every 2 months or as requested by the appliance.
clean The Clean display light requests you to clean the unit.
CAUTION
Contact with fully automatic coffeemaker cleaning agent may lead to eye and skin irritation.
- Observe the processing instructions on the packaging of the fully automatic coffee maker cleaning agent.
ATTENTION
The use of unsuitable fully automatic coffee maker cleaning agent can damage the appliance.
Only use Melitta® PERFECT CLEAN cleaning tablets for fully automatic coffee machines.
The cleaning programme takes approx. 15 minutes and should not be interrupted.
The cleaning programme runs in several stages. Progress is indicated by the number of coffee beans displayed.
The appliance performs several rinsing operations during the cleaning programme. The drip tray is also rinsed.
Requirement: The appliance is ready for operation.
- Press the "Service" button for more than 2 seconds to call up Service mode 1.
- Presclear service" button repeatedly until the display for the cleaning programme appears.
- Press the "Service" button for more than 2 seconds to start the cleaning programme.
clear display flashes until the cleaning programme is finished.
The first stage of the cleaning programme starts. One coffee bean lights up.
The Drip tray display lights up and requests you to empty the drip tray and the coffee grounds container.
- Empty the drip tray and the coffee grounds container.
- Insert the drip tray without the coffee grounds container.
- Place the coffee grounds container beneath the outlet.
The appliance rinses twice.
clear an display flashes rapidly and requests you to remove the brewing unit and insert a cleaning tablet.
- Remove the brewing unit. Do not switch off the appliance.
- Rinse the brewing unit under running water (see section 7.2 Cleaning the brewing unit on page 44).
- Place a cleaning tablet in the brewing unit. Insert the brewing unit into the appliance.

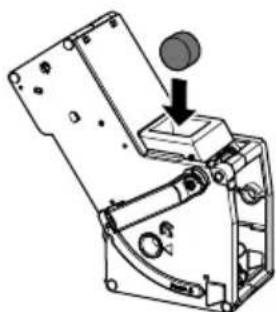
Fig. 14: Placing a cleaning tablet in the brewing unit.
The second stage of the cleaning programme starts. Two coffee beans light up.
The appliance performs several rinsing operations.
The Drip tray display lights up and requests you to empty the drip tray and the coffee grounds container.
the third stage of the cleaning programme starts. Three coffee beans light up.
- Empty the drip tray and the coffee grounds container.
11.Insert the drip tray without the coffee grounds container.
the fourth stage of the cleaning programme starts. The three coffee beans flash.
12. Place the coffee grounds container beneath the outlet.
The appliance performs several rinsing operations.
The Drip tray display lights up and requests you to empty the drip tray and the coffee grounds container.
- Empty the drip tray and the coffee grounds container.
- Insert the drip tray and the coffee grounds container.
The cleaning programme is finished.
» The Clean display goes out.
The appliance is ready for operation.
If the cleaning programme has been interrupted, e.g. because you unintentionally switched off the appliance, you must switch the appliance on again and follow the instructions from step 10. The appliance is then ready for operation, even if it has not been completely cleaned. For complete cleaning, you must run the cleaning programme from the beginning.
7.4 Running the descaling programme
The descending programme is used to remove limescale deposits in the interior of the appliance with fully automatic coffee maker descending agents.
To avoid damage to the appliance, we recommend running the descending programme every 3 months or as requested by the appliance, unless you regularly use a water filter.
decalc The Descalging display light requests you to descale the appliance.
CAUTION
Contact with descending agent may lead to eye and skin irritation.
- Observe the processing instructions on the packaging of the descaling agent.
ATTENTION
Use of unsuitable descending agents and failure to observe the processing instructions may damage the appliance.
Only use Melitta® ANTI CALC liquid descaling agent for fully automatic coffee machines.
- Observe the processing instructions on the packaging of the descaling agent.
ATTENTION
A water filter may be damaged if it is screwed in during the descaling programme.
Remove the water filter (see Fig.15 on page 48).
- Place the water filter into a vessel filled with tap water during the descaling programme.
The water filter can be reinserted and reused when the descending programme is complete.
The descending program lasts approx. 25 minutes and should not be interrupted.
The descending programme runs in several stages. Progress is indicated by the number of coffee beans displayed.
The appliance performs several rinsing operations during the descaling programme. The drip tray is also rinsed.
Requirement: The appliance is ready for operation.
- Press the "Service" button for more than 2 seconds to call up Service mode 1.
- Presed service" button repeatedly until the display for the Descaling function appears.
- Press the "Service" button for more than 2 seconds to start the descending programme.
dealscaling display flashes until the descending programme is finished.
The first stage of the descending programme starts. One coffee bean lights up.
The Drip tray display lights up and requests you to empty the drip tray and the coffee grounds container.
- Empty the drip tray and the coffee grounds container.
- Insert the drip tray.
The Water display lights up and requests you to fill the water tank with descending fluid.
- Remove the water tank.
- Fill 0.5 litres of descending fluid into the water tank. Observe the corresponding instructions for use of the fully automatic coffee maker descending agent.
- Insert the water tank again.
The second stage of the descending programme starts. Two coffee beans light up.
The descaler needs approx. 20 minutes to take effect, Several rinsing operations are carried out during this time.
The Drip tray display lights up and requests you to empty the drip tray and the coffee grounds container.
-
Empty the drip tray and the coffee grounds container.
-
Insert the drip tray.
The Water display lights up and requests you to fill the water tank.
- Remove the water tank.
- Thoroughly rinse out the water tank and fill it with fresh water.
- Insert the water tank.
the third stage of the descending programme starts. Three coffee beans light up.
Hot water flows into the drip tray.
The Drip tray display lights up and requests you to empty the drip tray and the coffee grounds container.
-
Empty the drip tray.
-
Insert the drip tray and the coffee grounds container.
The descending programme is finished.
The Descalging display goes out.
The appliance is ready for operation.
If the descending programme has been interrupted, e.g. by unintentionally switching the appliance off, you must switch the appliance on again and follow the instructions from step 9. The appliance is then ready for operation, even if it has not been completely descaled. For complete descending, you must run the descending programme from the beginning.
7.5 Using a water filter
The use of a water filter extends the service life of the appliance and the appliance has to be descaled less frequently. The water filter filters calcium and other pollutants out of the water.
Only use Melitta Pro Aqua filter cartridges for fully automatic coffee machines. Observe the processing instructions on the packaging of the water filter.
When using and regularly replacing the Melitta® Pro Aqua filter cartridge, the appliance only needs to be descaled once a year.
This information is based on an average of 6 coffee beverages with 120ml per day and 6 filter changes per year.
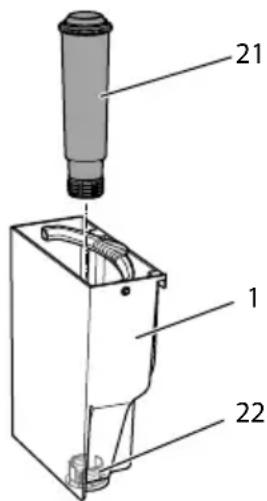
Fig. 15: Screwing/Unscrewing the water filter
The water filter (21) is screwed into and unscrewed from the thread (22) on the base of the water tank (1).
The water filter should not be left standing dry for a long period of time. When it is not used for a long time, we recommend storing the water filter in a vessel filled with tap water in the refrigerator.
Inserting the water filter
Requirement: The appliance is ready for operation.
- Press the "Service" button for more than 2 seconds to call up Service mode 1.
- Press the "Service" button repeatedly until the display for the Filter function appears.
- Pres the "Coffee strength" button until one bean lights up.
- Follow the instructions from step 3 in section Changing the water filter.
Changing the water filter
In order to maintain a constant effect of the water filter, we recommend changing the water filter every 2 months - or when the device requests you to do so.
The Filter display light requests you to change the water filter.
The water hardness cannot be set if you use a water filter. The water hardness is automatically set to soft (see section 6.3 Setting the water hardness on page 41).
Place the water filter into a vessel filled with fresh tap water for a few minutes before inserting it.
Requirement: The appliance is ready for operation.
- Press the "Service" button for more than 2 seconds to call up Service mode 1.
- Press the "Service" button repeatedly unit the display for the filter programme appears.
One bean lights up.
- Press the "Service" button for more than 2 seconds to start the filter programme.
The Filter display flashes until the filter programme is finished.
The Drip tray display lights up and requests you to empty the drip tray and the coffee grounds container.
- Empty the drip tray and the coffee grounds container.
- Insert the drip tray without the coffee grounds container.
- Place the coffee grounds container beneath the outlet.
The Water display lights up and requests you to remove the water tank and insert the water filter.
- Remove the water tank.
- Empty the water tank.
- Insert a new filter in the water tank (see Fig. 15).
- Fill the water tank.
11.Insert the water tank again.
» The filter is rinsed with water.
Water flows into the drip tray.
- Empty the drip tray and the coffee grounds container.
- Insert the drip tray and the coffee grounds container.
The filter programme is finished.
The Filter display goes out.
The appliance is ready for operation.
Permanently de-registering the water filter
If you have removed an inserted water filter and want to continue operating the appliance without a water filter, deactivate the water filter on the appliance:
- Remove the water tank.
- Empty the water tank.
- Remove the water filter (see Fig. 15).
- Fill the water tank.
- Insert the water tank again.

- Press the "Service" button for more than 2 seconds to call up Service mode 1.

- Press the "Service" button repeatedly until the display for the Filter function appears.

- Press the "Coffee strength" button repeatedly until no coffee beans are lit.

- Press the "Service" button for more than 2 seconds to save the setting and exit the service mode.
The water filter is de-registered.
The water hardness is reset to the water hardness that the appliance had stored prior to inserting a water filter.
- Adjust the water hardness if necessary (see section. 6.3 Setting the water hardness on page 41).
8 Transport, storage and disposal
8.1 Venting the appliance
We recommend venting the appliance when it is not used for a long period, prior to transport and when there is a risk of frost.
During venting, residual water is removed from the appliance.
If you put the appliance back into operation, automatic rinsing is carried out after switching on and the appliance vented

(see section 3.4 Switching on the appliance for the first time on page 35).
Requirement: The appliance is ready for operation.
- Press the "Service" button as well as the "Coffee" direct key for more than 2 seconds to enter Service mode 2.
- Press the "Service" button repeatedly until the display for the Venting function appears.
- Press the "Service" button for more than 2 seconds to start venting.
The Ready display flashes until venting is ready to start.
The Water display lights up and requests you to remove the water tank.
- Remove the water tank and empty it.
The appliance is vented and switches off automatically.
8.2 Transporting the appliance
ATTENTION
Freezing residual water can damage the appliance.
Prevent the appliance from being exposed to temperatures below 0^
Transport the appliance in the original packaging. This avoids damage in transit.
Before transporting the appliance, carry out the following activities:
- Vent the appliance (see section 8.1 Venting the appliance on page 49).
- Empty the drip tray and the coffee grounds container.
- Empty the water tank.
- Empty the bean container.
- Clean the appliance (see section 7.1 General cleaning on page 44).
- Package the appliance.
When sending the appliance to Melitta's service centres, it is not necessary to send in the cup plate. This prevents scratches during transport.
Do not use commercially available adhesive and packing tapes to attach loose parts. When detached, adhesive residues remain on the appliance which are difficult to remove.
8.3 Disposing of the appliance
Appliances marked with this symbol are subject to European Directive 2002/96/EC for WEEE (Waste Electri
cal and Electronic Equipment).
Electrical appliances do not belong in domestic waste.
Dispose of the appliance in an environmentally friendly manner via suitable collection systems.
9 Technical data
| Technical data |
| Operating voltage 220 V - 240 V, 50 Hz - 60 Hz |
| Power consumption 1450 W |
| Pump pressure max. 15 bar |
| Dimensions |
| Width | 200 mm |
| Depth | 460 mm |
| Height | 334 mm |
| Capacity |
| Bean container | 125 g |
| Water tank | 1.2 l |
| Weight (empty) 7.9 kg |
| Ambient conditions |
| Temperature |
| Relative humidity | 10 °C - 32 °C |
| 30 % - 80 % (non-condensing) |
| Water hardness range | °dH °e °fH |
| Soft 0 to 100 to 130 to 18 |
| Medium 10 to 15 13 to 19 18 to 27 |
| Hard 15 to 20 19 to 25 27 to 36 |
| Very hard | >20 >25 >36 |
10 Troubleshooting
If the actions listed below fail to rectify the problems or other problems not listed here occur, contact our hotline (local rate).
You will find the hotline number in the lid of the water tank or in the Service section on our website.


| ProblemCauseAction |
| Coffee only emerges from the outlet in drips. | Grinding fineness is too fine. | ■ Set a coarser grinding fineness (see section 6.8 on page 43). |
| Appliance is soiled. | ■ Clean the brewing unit (see section 7.2 on page 44).■ Run the cleaning programme (see section 7.3 on page 45). |
| Appliance is covered inside with limescale. | ■ Run the descaling program (see section 7.4 on page 46). |
| Coffee does not flow. Water tank is not filled or is not correctly inserted. | ■ Fill the water tank and ensure it is positioned correctly (see section 4.3 on page 37). |
| Brewing unit is clogged. | ■ Clean the brewing unit (see section 7.2 on page 44). |
| Although the bean container is full, the appliance indicates that coffee beans must be filled. | Coffee beans do not drop into the grinder. | ■ Press a direct key.■ Tap lightly on the bean container.■ Clean the bean container.■ Coffee beans are too oily. Use different coffee beans. |
| Loud grinder noise. Foreign objects in the grinder. | ■ Contact the hotline. |
| Brewing unit cannot be inserted after removing. | Handle for the locking mechanism of the brewing unit is not in the correct position. | ■ Check that the handle for the locking mechanism is correctly engaged (see section 7.2 on page 44). |
| Drive is not in the correct position. | ■ Press the "Coffee" direct key and the "2 cups" button simultaneously for more than 2 seconds. The appliance initialises. |
| Rapid alternate flashing of the displays: | Software problem. | ■ Switch the appliance off and on again (see section 4.1 on page 35).■ Contact the hotline. |
| Rapid alternate flashing of the displays: | Brewing unit is not inserted. | ■ Insert and lock the brewing unit. |
| The display lights up without having been activated: | Appliance is not fully vented. | ■ Vent the machine, fill the water tank necessary and then press the "Coffee" and "Favourite coffee" direct keys simultaneously. Water flows into the drip tray when doing so. The appliance is ready for operation.■ Clean the brewing unit (see section 7.2 on page 44). |
Sommaire
Chere cliente, cher client,
(Waste Electrical and Electronic Equipment).
www.melitta.nl of www.melitta.be
8.2 Transport of maskinen
OBS
Frossent restvand kan medfore skader pa maskinen.
(Waste Electrical and Electronic Equipment).
Sette inn vannfilter
Forutsetting: Apparatet er driftsklart.
Unngå a utsette apparater for temperaturer under 0^
Transporter apparatet i originaemballa-sjen. Dermen unngar du transportskader.
for WEEE (Waste Electrical and Electronic Equipment).
Ybaxkaemblnokynatelb,
u He donyckaTe norgyKeHna annapata B Body.
He onyckaIte KOHTaKta ceTeBOro npOBoda C BODoJ.
2.3 Onacnoctb noIyueHn oKoRa
Iodabaemajxndkoctb n nap MOryT 6bITb OueHb TOpaUMN. DeTaN annapata TaKke MOryT HArpeBaTbCra Do OueHb BbICOKOJ TemnepaTypbI.
CobioaTe cJeDyUoJne yka3aHnnoTexnke 6e3OpaCHOCTn, UTObI npeODTbPATAOTb ONaHOCtB NOyueHnOxORA:
He donyckaTe nonadHnnaIPOdaBaembIX rOpayx KndKOCTeN npapa Ha KoJy.
U Bo Bpemn HnncpeDCTBeHNO nOcNe npiroTOBHeHnHaNTKOB He
Heo6xoJnmoe ycNoBne: annapat yctaHOBJIeH I NOKJIIOUeH.
- ПОДСТаБТе EMКОCTь NOД ВВИСКHOЕ OTВЕРСТУ.
- HaxmTe KhoNkY «BKn./BbIKI.» (15).
KpaTKOBpeMeHHo 3aropaetc HnDnKaTOp TomOBHocmb K pa6ome.
3aropaetcHnDnKatopBoda, cnHaHn3upyo Heo6xOIMocTn HanoHHTb KOHTeHep DnBOnbl.
- OTKpoIte KpbIshky KOHTeHepa IJn BODbI N BbIHbTe erO 3a pyUKy BBepx n3 annapata.
4.ПомоTe erO uHcToB BOIo.HaONHHTe KOHTeHep CBexeB BOIOI.
- BcTaBbTe KOHTeHep IaBbI BaanpaPat CBepxu 3akpoTKePbIkuy.
3aropaeTcHnDnKatOp Bbinyck 603dyxa, CnHaNn3npyo Heo6xOaMocTN BBInycka BO3dyxa n3 aannapata.
- HAMMTE KONKy «KpeNoctb Kofoe>.
Boda cInBaetcB noDOnd nna c6opa Kaenb.
AnnapaT HarpeBaetc n ropray BODa BbITEKaet n3 BbIpyCKHOrO OTBepCTn.
- Korda Boda npeKpaaaet Teyb N3 BbIpyCKHOrO OTBepCTn, 3arOpaeTcN INHdkaTop KofeuHoe 3epHo.
Bo3nyx n3 annapata ydaeneH.
- HanoJIHnTe 3epHaMu KOHTeHep dIa KaOeHbIX 3epeH (cM. rIaBy 4.3 3acblnaHue KoFeuHbIX 3epeH B KOHmeHep Ha cTp.11).
- Пи Нeo6хоДиМоCTи Tepeь Вbl MOжete
a) HAcTPONTb XeCTKOcTB BOdBi (CM. rnaBy 6.3 Hacmpouka XecmKocmu BOdbHa cTp.242) nn
b) yCTaHOBtB fHbTp dIy BOdbI (cM. rIaby 7.5 IcnoNb3ObaHue fUmbpa BOdbHa cTp.250).
4 OchoBhIe npHcInbI ynpaBHeHn
4.1 Bкlioуени n Вькlioуене annapapa
IpeepnepBbIM BkIIOueHneMaannapata npouTte rnaBy 3.4 Iepoe BkIOueHue annapama Ha ctp.235.
UHΦopMaζη
u Pn BKnIOueHnn N BbIKIOueHnn annapaT BbINOJIHReT aBTOMaTNUeCKyIO npombibKy.
U IcnoIb3yEma npn npomblke Boda BBIOUNTCB NOdON DnA C6opa KaJIb.
BkIoueHne annapata
IЯ ONTMaJIbHOrO Bkyca HAnITKa IcNoJIb3yIte TOnbKO CBexKyIO XONOHyIO Hera3nPoBaHHyIO BODy. MeHЯTe BOdy KaJdbI DeHb.
iHΦopMaζηa
KaueCTBO BO B3HaunTeJbHOJ CTeNEHn OnpedJeT BKc HAnNTka. PoToTomy IcNoJIb3yIte fNJIbTp dJa BObl (CM. rIaby 6.3 Hacmpouka JecmKocmu BObl Ha cTp.242 n rIaby 7.5 Ucnolb3ObaHue fUInbmpa dna BObl Ha cTp.250).
TopuHn HnKaTop Boda cnHaHn3nyeTo Heo6xOAnMOCTn DOHTb BODy.
Puc.6: IV38eueHue KOHmeuHepa dna 60dbI
- OTKpoIe KpbIuKy (2) KOHTeHepa dny BObI (1) n BbInbTe erO 3a pyuKy BBepx u3 aannapata.
- HanonHnTe KOHTeHep BDOJ.
- BctabTe KOHTeHep IJIa BObl B anpaT CBepxU 3aKpOte KpbIshky.
4.4 HactpoKa BbInyckHoro OTBepCTnДЯHaNTKOB
BbInyckHoe OTBepCTne (6) perynpyetcno BBICOTE. YCTaHOBtE MNHMajbHoe pacCToHnE MExNy BblNcKHBIM OTBepCTnEM n EMKOCTbIO. OtperynpyTe BBICOTy BblNcKHOTo OTBepCTnB 3aBNCmOCTN OT EMKOCTn.
Puc.7:Hacmpouka bbynckHo2o ombepcmu 4 Hanumko8
4.5 OuNTka POnDoHa IJn c6opa KaIeJIb n EMcKoCTn IJn KoΦeHOrO JxMbIxA
Ecnn noDOnH dJa c6opa Kaenb (7) n EMKoCTb dJa KoFeHOrO XMbixa (11) 3aONHeHbI, 3aRopaetc INHdkaTOp IooDoH dJa c6opa Kaenb, CnHann3npy O Heo6xOIMOCtN IX ONOPOXHeHn. 3TOT INHdkaTOp 3aRopaETc Nocne npuroTOBJIeHn npImepHo 8 qaWeK HAnrKa.
YpoBeH HAnOpHeHn IOnDoHa IInc6opa KaIeJIb TaKKe MoXHo ONpeJeNITb N0 NonoJxHnIO NOnlaBka (12).
Bcerda ouuuaTe o6e emkocn. Ecnn noDOnH dJa c6OpKa Kanelb BblBnHyT, Mnaet HndkaTop Ioddoh dJa c6opa Kanenb.

Puc.8:Ouucmka nodoha dna c6opa Kanenb u emkocmu dna kofeuHOzo XMbIXa
- N3BneKeTe noDoH (7) n3 annapata, NOTaHyB erO Bneped.
- CHIMITE eMKoCTb IJI KOFeHORO XMbIXa (11) u ydaIte XMbIX.
- CnTe XnIkoCTb IV3 NOIOHa dIa c6opa KaIeIb.
- BctabTe emKoCTb dIa KoOeHOrO XMbIXa Ha MeCTO.
- 3aBnHbTe nOdoH Baannapat do ynpa.
UHΦopmaçnA
PnOnopoxKHeHnNoDHOHaIa c6opa KaJIb n EMKoCTn IJIa KOFeHOrO XMbIXa BTOBpeM, Ka aIpaT BblIOueH, OH He perNCTpnpyET 3OT npoucc. NToTomy CnHaj O Heo6XoIMOCtN ONOpOXHeHn MOKeT NOABnTbC HECMOTpHa To, YTO NoDoH dJa c6opa KaJIb n EMKoCTb IJIa KOfeyHOrO XMbIXa eIe He NOnHOCTbIO 3aONJHeHb.
5 ПпuroTOВлЕнеHaNTKOB
06patnte BHMmaHne:
U B KOHTeHHepe dIa BObI Bcerda DOJIxHO HAXOITbCS AOCTaTOH OBObl. EcIn yPOBeHb HAnOIHeHn HeIOCTaTOueH, aIInapaT NOdAcT CnHaN O Heo6xoDIMOCr N Do6aBHeHn.
B KOHTeHHepe dJa KofoeHbIX 3epe TaKKe Bcerda DOJXHO IMEtbcra DOCTaToOHoe KOJIueCTBO KofoeHbIX 3epeH. Ecn6OJbWe He NMeETcRA KofoeHbIX 3epeH, To aNnapaT npepbIbaet npiroTOBJIeHne KofoeHoro HAnNTka.
U EMKOCn nI HaNtKOB dONXHbI 6bITb DOCTaTOuHO 6OJbShmM. MakcImaJIbHO KOnueCTBO KOfe coCTaBnre 220 mI.
5.1 Hac trojka kpenoctn kofoe
KaK TOnbko annapaT roTOB, OH OTo6paXaETekyUIO HaCTpoIky KpeNoCTN KoFe.
Bo3MOxHbI CneDyUoUne HacTpoKn KpeNoCTN KoΦe:
Kpenocb Kofoe MOxHO HAcTpOuTb Do npuroTOBJIeHn HaNTka NIn BO BpeMa npoucecca NOMOA.
UHΦopMaζηa
Pn BbIKIOueHnn annapaTa nocJeHna HAcTpoEHHa KpeNoCTb KoFe coXpaHReTcB NAMrN.
5.2 Hac troika koliuecTba kofoe
Puc.9:HacmpokaKoluecmba Kofoe
KoJIuYeCTBO KoOe MoXHo HaCTpOHTb C NOMOUsIIO NOBOpOTHOpeYJrTopa «KoJIuYeCTBO KoOe》(17).
KoIuYeCTBO KoOe MoXHo HaCTpOnTb Do npuroToBJeHnHaNtKa NIn BO BpeM Hero.
Bo3moXHa 6ecctyneHuaTaN HacTpoiKa KOJIueCTBa Kofoe ot 25 do 220 mI.
IcnoJb3ObaHne HEnoJXoJxNx YnCTaXnX CpeDCTB MoKeT CTaTb PnUHOn INoBJIeHn UapanHH Ha NOBepXHOCTAx.
He nCnoIb3yIte a6pa3nBhble TkaHn, ry6kn n uNCTaUne cpeDCTBa.
Heo6xodmoe ycnoBne: annapat BblKIO-ueH.
BbINONHnIte HApxKHyIO uNCTky annpaTApn NOMOuMgKO, BnaXHOITKaHN I CTaHdAPTHbIX CpeDCTB dJaMbITbI NOcYDbI.
BbIMOnTe NOdOH dIa c6opa Kaenb, emKoCTb dIa KOFeHOrO XMbIXa N NOCTABKy NOd Yaukky. Pn 3OM nCNoIb3yIte MArKyIO, BnaXHyIO caΦeTKy IN CTaHdApTHoe CpeIcTBO dJIa MbITbIPOcybl.
EmkocTb nJa KofoeHOrO XMbIXa MOxHO MbITb B NOCyDOMoeuHOM MaunHe.
ДячNTК KOHTeHepaДЯЗернИСПОЛБ3yIteМЯrKyIO,CyXyIO TkaHb.
Puc.13:Yucmka6noka3aabpuabaHua
Heo6xodmoe ycnoBne: annapat BblKIO-ueH.
- OtkpoTe CbeMHyIO nAHeIb (9).ДЯ 3TOrO BO3bMITEcB 3a yrIy6JIeHne C npaBoI CTOpOHbl aAnpapaTa N NotAHnITe CbeMHyIO nAHeIb B CTOpOHy.
- Haxmte u ydepKnBaTne HaxaTbim KpaChbI pyuar (19) Ha puYe 6IoKa 3aBapuBaHnA (10), NOBepHnTe pykoTky No YacOBoN CTpeNKe Do ynpa co UeJyKom.
- BbTaunTe 6nok 3aBapnbHnna 3a pyky n3 aannapaTa.
- OchOBaTeJIbHO npOMoIte 6Jok 3aBapuBaHnA ueNkOM NOI npOTouHO BODOc BCex CTOpOH.B nepByIO oupeDbCJeNTe 3a TEM, UTO6bIB CnTe (20) He 6blNO OCTaTKOB Kofoe.
5.ПоJOxДиTe,пOKaс6лOKaЗавapиВанЯСteчETВODa.
- C nOMOJIbIO MЯrKoI cyXoI TkaHn ydaJIte oCTaTKI KOe C NOBepXHOCTe BHyTpN aIInapaTa.
- BCTaBbTe 6nok 3aBapuBaHnB aannapat. Haxmnte n ydepxkBaIte haxaTbIM KpaChbI pbIar Ha pyUke 6noka 3aBapuBaHnA, NOBepHnTe pyUky npOTnB YacOBoI CTpeIKN Do yNopa Co UeJyKOM.
- BCTaBbTe cBeMHyIO nAHeNb c6Oky Do ee _UKcau
Pn BkIIOeHOM annapaTe nonepemHoe MInraHne INdkaTopoB TomoBocmb Kpa6ome n Ouccmka yka3bBaIoT HaOTcyTCTBne 6loka 3abapnbAHn. NocJe yctahOBKn 6loka 3abapnbAHn annpat nepexoDNT B peKIM rTOBHOCTN.
7.3 BbInOpHeHne npoRpaMMbIOuNCTKn
PpOrpaMa YnCTKn N03BOJAreT ydaJIaTb
IHTHa N OCTaTKN KOeHOrO MaCna C
NOMoUbIO CpeDCTBa DJIa YnCTKn KOeH
HbIX aBTOMaTOB.
Bo n36exaHne noBpeXdEHHa annapata peKOMeHdyetcBbIIOJHrTb npoRpaMMy ouNCTKN kaxDbIe 2 MeCya nn npn NOBJIeHN COOTBeTCTByUoSei INDnKaun Ha annapate.
clean Topaunn HndkaTOp Oucmka cnHaun3npyeTo Heo6xOIMocTu BbINHHTb OuNCTKy aannapaTa.
A OCTOPOXHO
KoHTaKT CO cpeIcTBOM IJIЯ YNCTKN KofoeHbIX aBTOMaTOB MOKeT CTAb npuHnOH pa3dpaXeHnA CIn3nCTbIX 06OJOnueK rJa3 N KOxN.
Co6IIOJaIte INHCTpyKcNn NO npImeHeHNIO, yKa3aHHbIe Ha yNaKOBKe cpeIcTba DnIyNCTkN.
BHIMMAHVE
IcnoIb3OBAHHe HEnoIxOJaIux CpeICTB IaIyNCTKIOKeiHBIX aBTOMaTOB MoKeT CTaTb npuHoi NOBpeXeHnAannapata.
IcnoB3yIte TOnbKO uNCTaUne Ta6JIeTKn Melitta PERFECT CLEAN dJa KoΦeHbIX aBTOMaTOB.
BbInonHeHne nporpaMMbl OunchKn 3aHmMaet OKoNo 15 MmHyT n erO HeIb3r npepbBaTb.
PporpaMa OunchKn BbINOJHareTcB HeckoJIbKO 3TaIOB. Ha BblONHeHne yKa- 3bIbaeT KOJIInueCTBO CBETaUHXcKoΦeH HbIX 3epeH.
Bo BpeMa nporpaMMbI ouNCTKn annapaT BblONHReT HeCKOJIbKO npOMbIBOK. Pn3TOM BOda TaKKe CInBaETcB INoDIOH dJa c6Op Kaenb.
Heo6xOaMoe ycNoBne: annapaT roTOB K pa6ote.
- HaxmTe KhoNky «O6cnyKnBaHne» n ydepKnBaIte ee 6oJee
2cekyH,HTO6bI npeuTN B peKIM 06cnyKuBaHn1.
- Hecpepa3 HaKMnTe
KhoNky «O6cnyxNbAHne», noka He NOBNTc3HaQOK npOrpaMMbl ONUCTKN.
- HaxMMTe KHOJKNy «O6cnyKnBaHne» u ydepxBaIte ee 6oJee
2 cekyH, yTo6bI 3aynCTnTb nporpaMMy OUNCTK.
cleanaTop Oucmka Muraetdo 3aBepseHn nporpaMMbIOOuNCTKN.
Haunhaetc npBbI 3Tan nporpaMMbOuNCTKn. TOpNT ODoHO KofoeHoe 3epHo.
3aopaeTcHnukatOpNooDoH
dna c6opaKanenb,CnHnN3npyO
Heo6XoIMOCTNOnOPOXHNtB
noDOnH dJa c6opa Kaenb n
EMKOCTb DnKoEeHORO XMbIXa.
- CneTe JnKoCTb N3 NOdoHa dIa c6opa KapeJIb N EMKOCTb IJIa KOeHHO XMbIXa.
- YctaHOBnte nOdoH dIa c6opa KapeJIb 6e3 emKoCTn dIa KofoeHoro JxMbIXa.
- Повставытей EMКОCTь Дя КофeinHOrO KMbIXa NOД BыINyCKHoe OTBepCTne.
»AnnapaT BbINOJIHReT DByKpaTHyIO npOMblBky.
cleanatop Oucmka 6bictpo Mnraet, CnHann3npy o Heo6xOIMOCTN CHrTb 6Iok 3aBapuBaHnI N IIOJXHTb YNCTA- yuTo Ta6NeTKy.
- CHIMITE 6IOK 3aBapNBaHn. Ipn 3TOM He BKNIOUaIte aannapaT.
- ПомоITE 6лOK 3abapubahnno pod npotouho BOIO (CM. rnaBy 7.2 Yucmka 6loka 3abapubahnHa CTp. 246).
- Пложитустую tabletky B 6лok 3аварваши. Всtabte 6лok 3аварваши в попapат.

Puc.14: yIoxumb yucmuyo ma6nemky 8 6nok 3abapubahur.
HaHaeTcBToPOn 3tan npOrgaMMbOuNCTKn. TOpNT DaKoFeinHbIX3epHa.
AnnapaT BbINHReT HeCKoJIbKO npombibOK.
3aopaeTcHnDnKaTOp NODOH
dna c6opa Kaenb, CnRHaN3npy O
Heo6XoDMOCTN ONOPOXHNTb
NOdoH dna c6opa Kaenb IN
EMKOCTh DnRA KOeHORO XMbIXa.
OuHaETcTpeTn 3tan npo- rpaMMbl Ounchk. TOpNT TpN KofoeHbIX 3epHa.
10.CneITe KNDKOCb N3 NOdOHa dJa c6opa Kaenb N EMKOCTb dJa KOeHHO XMbIXa.
11.YCTaHOBNTe NOdoH dJa c6opa Kaenb 6e3 emKoCTn dJa KofoeHOrO XMbixa.
12.ПОДСТАБТЕ EMКОCTь ДЯ KOFeHORO KMbIXa ПОД ВВИСКHOE OTBEPCTNe.
OHaunHaeTcayetBepTbI 3TaI nporpamMbOuNCTKn.Mnrae TprN Koehhbx 3epHa.
Annapat BbINHReT HeCKoJIbKO npOMbIbOK.
3aopaeTcHnDnKaTOp Noooh
dna c6opa Kaneb, CnHnN3npy O
Heo6xOIMOCTN ONOPOXHTb
NoDOn Hnn C6opa Kaeneb n
EMKOCTh DnKoEeHOrO XMbixa.
13.CneITe KNDKOCb N3 NOdOHa dJa c6opa Kaenb N EMKOCTb dJa KofoeH HOro XMbIXa.
14.YctaHOBNTe NOdoH JIa c6opa Kaneb nEMKoCTb JIA KOeHORO XMbIXa.
》BbIOJIHeHne npoIpaMMbl OuNCTK3aBepweHo.
》INHnKaTOpOucmka rachet.
AnnapaT roTOB pa6Ote.
iHΦopMaζη
EcnBbIOpHHeHne npOrpaMMbI OChCTKn 6blIO npepBaHo (Haepmep, n3-3a CnyuayHoro BbIKIOueHn), CHOBA BKIOUHTe annapaT nCleDyIte yKa3aHnM HaunHa C WaRa 10. Pocne 3To annapat ChOBa rOtOB K pa6Ote, daxe ecIn oUcCTka 6bla BbIOpHeHa He nonHOCTbIO. JnnoHOn OUcCTKn nporpaMMy Tpe6yeTcBbINOHNHTb C camoro Hauana.
7.4 BbINOJIHeHne npoIpaMMbl IydaJIeHnHaKnPi
IporpamMa ydaHnHaKnN n03BOJareydaTb OTNOKeHn N3BcTn BHyTpN aPapata C NOMOsbIO CpeCTBa DnY ydaHeHnHaKnN dN KoEeHbIX aBTOMaTOB.
Bo n36exkHne NOBpeXdEHHa annapatapeKOMeHdyETcBAIIOJHrTb npoRpaMMy ydaJIeHnHaKuIIN KAKDbIe 3 MecaIuIN npi NOBHeHH COOTBeTCTByUOe INHnKaun Ha aannapate. 3TO He Tpe6yETc,ecn Bbl peryIrpHO IcNoIb3yIte fNlbTp dIra BObl.
decalc TopuHn HnKaTOp ydaJeHue HAKUNCnHaHn3npyTe O Heo6xOumocTN BbINONHTb ydaJeHne HaKUnn n3 anpaPata.
OCTOPOXHO
KoHTaKT CO cpeIcTBaMn IydaJIeHnaHaKNIM MoKeT Bbl3BaTb pa3dpaXKeHne CIn3NCTOJ O6OIOUKn rla3 N KOxHbIX NOKPOBOB
Co6IouaTe HNCTpyKcHn No npImeHeHnU, yKa3aHHbIe Ha yNaKOBKe cpeDCTBa IJydaJIeHnHaKuII.
BHIMMAHVE
IcnoIb3OBAHne HenoIxOaIuX CpeICTB Ira ydaJIeHnaKnII N Heco6IIOJeHne
HNCPTpyKcnn NO npIMeHnIO MOKeT CTaTb npuHNo nobpeXdEHN aannapata.
Icnoj3ynte TJIbKO JnKoe cpeCTBO dny ydaenHaKnuN Melitta ANTI CALC nkaoehhbx aBTOMaTOB.
Co6IIOaIte HNCTpyKcHn NO npImeHnIO, yKa3aHHbIe Ha yNaKOBKe cpeIcTBa dJa ydaJIeHnHaKIN.
BHIMMAHVE
3aBnHcHbI ΦNlbTp dIy BODbl B npOceCBe BbINOpHeHn IporpaMMbl NO ydaJIeHIO HaKUN MoXeT CTAb IpnuHn IOBpeXdEHN aannapata.
CHIMITEΦnIbTpДЯBOdBi(CM.Puc.15 Ha cTp.250).
B npouece BbINHeHn nporpaMMbl NO ydaJIeHIO HaKUN NOMeCTNTe 0nIbTp IJRA BObI B EMKOCTb C BOOnpoBOHOB ODoI.
Iocne 3aBepseHn nporpaMMbI NO ydaJIeHIO HaKINMOxHO CHOBA BCTaBNTbΦNlTpДЯ BObl NcNoJb3OBaTbe O daJIbWe.
BbInonHeHne nporpaMMby ydaJeHnHaKnn 3aHmMaet OKoJ0 25 MnHyT n erO HeNb3r npepbIBaTb.
IporpamMa ydaJeHnHaKuNn BbINOJHaeTcB HeckoNbKO 3TaNoB.Ha BblOnHeHne yKa3bIbAeT KOInueCTBO CBETaUHXcKoEINbIX 3epeH.
Bo Bpem nporpaMMbl ydaJIeHnHaKUNn annapaT BbINOJHReT HeCKOJIbKO IpomblBOK. Pn3tOM BOa TaKKe CInBaETcB IPOdoH dIra c6Op Kaenb.
Heo6xoJnMoE ycNoBne: annapaT roTOB K pa6ote.
- Haxmte KhoNky «O6cnyKuBaHne» uyepeKuBaIte ee 6oJee 2 cekyHd, yTo6bI nepeiTu B pexnM o6cnyKuBaHna 1.
- Heccepa3 HaKMnTe KhoNky «O6cnyKbHne», noka He NOBNTc3HaQOK yHKuIN YdaJeHue HAKUN.

- Haxmte KhoNky «O6cnyKuBaHne» n ydepxuBaIte ee 6oJee 2 cekyHd, YTO6bI 3aNyCTnTb nporpaMMy ydaJIeHnHaKnII.
decaTOp ydaeneHue HAKUNu Mnraetdo 3aBepseHnnpoPamMbI ydaeneHnaKUnn.
Haunhaetc npBbI 3Tan nporpaMMbl ydaJIeHnHaKnn. TOpNT OJHO KofoeHoe 3epHo.
3aopaeTcHnDnKaTOp Noooh
dra c6opa Kanelb, CnHnHaN3npy O
Heo6XoDMOCTn ONOPOXHNTb
NoDOH dJa c6opa Kaenb n
EMKOCTB JRA KOeHNO XMbIXa.
- CneTe XnIDKOCTb N3 NOdOHa dIa c6opa KaIeJIb I eMKoCTb dJIa KoΦeHHO KMBIXa.
- YcTaHOBnTe nOДоH nIЯ c6opa KaIeJIb.
3aropaeTcHnDnKaTopBoda, cnHaJIIN3npyO Heo6xOIMOCtN 3aIITb pAcTBOp CpeICTBa IJyUdAJIeHnHaKInB KOHTeHep IJRA BOIbl.
- CHIMMTE KOHTeHep JIy BOJbl.
- 3aeneTe 0,5 nItpa pactbopa cpeCTBa dIydaIeHnaHKnB KOHTeHep dIy BOdbI. PnI 3TOM CO6IOaIte COOTBeTCTBYUOu INHCTpyKcNIO NO pPIMHeHIO cpeCTBa dJIydaJIeHnaHKnIN dJI KofoHbIX aBTOMaTOB.
- YctaHOBtKe KOHTeHep IJa BOJbHa MecTo.
HaHaeTcBToPoi 3Tan npo- rpaMMbl ydaIeHnHaKuIIrTopIT Dba KoEINbIX 3epHa.
CpeCTByIydaJIeHnHaKnnTpe6y-etcOko 20 MHyT,HTo6bI NOeICTBOBaTb Ha HauKnB. B TeueHne 3TORo BpeMeHn BblONHReTcHeCKOJIbKO IpOMbIBOK.
3aTopaetcHnDnKaTOp NODoH
dra c6opa Kanenb, cnHann3npy O
Heo6XoIMOCTN ONOPOXHNTb
NoDon dJa c6opa Kaenb n
EMKocTb DnKoEeHOrO XMbixa.
- CnneTe XnIDKOCTb N3 NOIIOHa dIa c6opa KaIeJIb N EMKOCTb dIy KoΦeHHO JXMbIXa.
- YcTaHOBuTe nOdoN dIa c6opa KaIeNB.
3aropaetcHnDnKaTOpBoda, cnHaN3npyOHeo6xOIMOCTN HANOHNb KOHTeHepIJI BOnbl.
- CHIMMTE KOHTeHep JIy BOJbl.
- TuaTeNbHO npOMoIte KOHTeHep dJa BObI HAnOJIHnTe erO CBExe BDoI.
13.YcTaHOBnte KOHTeHep DJI BODJI.
OHaunHaeTc TpeTn 3Tan npo- rpaMMbl ydaJIeHnHaKuIIn. TOpNT Tpu KoEINbIX 3epHa.
》TopyaBODa CnBaetcB NOdoH dna c6opa Kaenb.
3aopaeTcyaHdNkaTop Poooh
dna c6opa Kaneb, cnHann3npy O
Heo6xOIMOCTN ONOPOXHNTb
noDnOH dJa c6opa Kaeneb n
EMKocTb DnKoEeHORO XMbIXa.
- CneTe KnIkoCTb n3 noIOnHa IJn c6opa kaneB.
- YctaHOBnte nOdoH dJa c6opa Kaenb N emKoCTb dJa KofoHoro XMbIXa.
》BbIIOJIHeHne nporpaMMbl nny ydaJeHHaKnN 3aBepseHo.
INdNkaTop ydaJeHue Hakunu rachet.
AnnapaT roTOB pa6Ote.
HOpMaun
EcIn BbINOJIHeHne npOrpaMMbl ydaJIe- Hnra HAKIN6bIIO npepBaHO (HaPnMep, n3-3a ClyuahHO BbIKNoUeHnra), CHOBA BKIOUHTe aannapAT nCleDynte Yka3aHnMa HauHHa c 7ara 9. Pocne 3To aannapAT CHOBa rOToB K pa6OTe, DaXke ecIn ydaJIeHnne HAKIN6bIIO BbINOJIHeHO He NOnHOCTbIO.ДЯ NOIHorO ydaJIeHnra HAKINn npOrpaMMy Tpe6yeTcBbINOJHtBc Camoro HaçaJa.
2ceKyH,HTo6bHaayaTbBbInapnBaHne.
HnKatop TomoBocmb K pa6ome Muraet Do Tex nop, noka annapaT He 6ydt RotOB K BblapuBaHIO.
3aropaetcHnNkatopBoda, cnHaun3npyO Heo6xmoCTN CHrTb KOHTeHep DnBODbl.
- CHINMTe KOHTeHep n CneIte N3 HeRo BOdy.
»AnnapaT BbInapeH n aBTOMaTnueckn BbIKJIIOuAeTcR.
8.2 TpaHcnpTnpoBka annapata
BHIMMAHVE
3aMep3aHHe OCTaTKOB BObI B aPapate MoKet PnBecT N NOBpeKdEHNIO aPnpapaTa.
He ocTabnIe annapat npu TemnepaType Hxke 0^
TpaHcnpTpyuTe aannapatB opnunhaB-HoynyaKOBKe.3To nomoxet npedotbpaTHTb NOBpeXdEHe aannapaTa BO Bpemr TpaHCnpTnpOBKn.
IpeTeK KaK TpaHcnpTupoBaTb anpa- paT, BblONHnTe CneDyIOUne DeNCTBnA:
- BbInonHnTe BbInapuBaHne BoBb n3 annapata (cM. rIaby 8.1 BbInapuBaHue annapama Ha cTp. 252).
- CneIe XnKoCTb n3 POnDoHa dJa c6opa KapeJIb n EMKoCTb dJa KoPeiHoro KMBIXa.
- CneTe Body n3 KOHTeHepa JIy BObl.
- OuNTe KOHTeHep IJIa KoOeHbIX 3epen.
- BbINOJIHnTe OUInCTky annapaTa (cM. rnaBy 7.1 ObuaJyucmka Ha cTp. 246).
- YnakyuTe annapaT.
UHΦopmaçnA
üПи OTnpaBke annapaTb CepBnchblu cHTp KOMpaHm Melitta He Tpe6yETcra TaKke OTnpaBnAe Tb NOdCTaBky NOD YaShKy.3TO N03BOJNT n36ExKaTb BO3MOxHbIX ZaPaHn INPn TpaHCnOpTnPOBKe.
u He nCnoB3yIte cTaNdapTHyIO KJeNkyU O yNaKOBOuyHOJIeHTy dIaΦnKcaun HezakpeHnEHbIX DeTaIe.Ipn Cnrtnn IeHTbl Ha aannapaTe OCTaOTcra CneDbI KJEA, KOtOpbie OueHb CLOXHO ydaIITb.
8.3Утллзацьannapata
Длг OTмочьданчимсumbolom annapaTOB DeIcTByeT Ebponeckay dinpeKtnBa 2002/96/ECdЯWEEE
(otpapotahHoe 3neKtpnueckoe n 3neKtpoHHoe 6opdyobAHne).
3neKtpnp6opbyytuHn3npyOTcOTdJIbHOOT6bITOBbIXOTXoIDOB.
Ytuiu3npyute annapaT 6e3oNaChbIM dny OkpykaIooie CpeBIO6pa3OM c NOMOIO CneuaJIbHbIX CNCTEMc6opa.
9 TexHnueckne xapaKTepeNCTnKN
Division Household Products
Ringstr. 99
D-32427 Minden
Germany
www.melitta.de
Editorial department:
ZINDEL AG
www.zindel.de