PCST 1092 - Croque monsieur clip PROFICOOK - Free user manual and instructions
Find the device manual for free PCST 1092 PROFICOOK in PDF.
| Product type | Electric sandwich press |
| Brand | ProfiCook |
| Model | PCST 1092 |
| Power supply | 220-240 V~, 50/60 Hz |
| Power | 900 W |
| Net weight | Approximately 1.6 kg |
| Protection class | I |
| Plate material | Non-stick |
| Control lights | Red (power) and Green (temperature) |
| Lid lock | Yes |
| Insulated handle | Yes |
| Number of simultaneous sandwiches | 2 (estimated) |
| Preheating required | Yes, approximately 10 minutes |
| Cleaning | Damp cloth, do not immerse |
| Oiling after cleaning | Recommended (a few drops of cooking oil) |
| Usage | Household use only |
| Safety | Do not use with external timer or remote control |
| Stopping | Unplug the power plug |
| Recommended utensils | Wood or plastic, avoid metal |
| Chassis maintenance | Slightly damp cloth |
Frequently Asked Questions - PCST 1092 PROFICOOK
User questions about PCST 1092 PROFICOOK
0 question about this device. Answer the ones you know or ask your own.
Ask a new question about this device
Download the instructions for your Croque monsieur clip in PDF format for free! Find your manual PCST 1092 - PROFICOOK and take your electronic device back in hand. On this page are published all the documents necessary for the use of your device. PCST 1092 by PROFICOOK.
USER MANUAL PCST 1092 PROFICOOK
natural_image
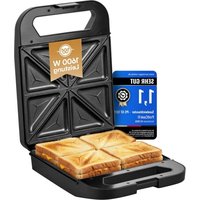
Black and silver photo of a PEPOL 1000 grater with a red and green button on top (no text or symbols visible on the device body)Sandwichtoaster PC-ST 1092
Automatische broodrooster • Grille-Pain Sandwich • Sanduicheira • Tostapanini Sandwich Toaster • Toster do kanapek • Sendvičovač • Szendvics-kenyérpirító Toster • Toster Для Сандвичей • محصة الشطائر
Bedienungsanleitung
Thank you for choosing our product. We hope you will enjoy using the appliance.
Symbols in these Instructions for Use
Important information for your safety is specially marked. It is essential to comply with these instructions in order to avoid accidents and prevent damage to the machine:

WARNING:
This warns you of dangers to your health and indicates possible injury risks.

CAUTION:
This refers to possible hazards to the machine or other objects.

NOTE:
This highlights tips and information.
Contents
Overview of the Components ....3
Instruction Manual 31
General Notes ......31
Special safety information for this unit ....32
Overview of the Components ....33
Unpacking the Appliance ....33
Starting-up the unit 33
Using the unit ....34
Cleaning 35
Technical Data....35
Disposal....35
General Notes
Read the operating instructions carefully before putting the appliance into operation and keep the instructions including the warranty, the receipt and, if possible, the box with the internal packing. If you give this device to other people, please also pass on the operating instructions.
- The appliance is designed exclusively for private use and for the envisaged purpose. This appliance is not fit for commercial use.
- Do not use it outdoors. Keep it away from sources of heat, direct sunlight, humidity (never dip it into any liquid) and sharp edges. Do not use the appliance with wet hands. If the appliance is humid or wet, unplug it immediately.
- When cleaning or putting it away, switch off the appliance and always pull out the plug from the socket (pull the plug itself, not the lead) if the appliance is not being used and remove the attached accessories.
- Do not operate the machine without supervision. If you leave the room you should always turn the device off. Remove the plug from the socket.
- The device and the mains lead have to be checked regularly for signs of damage. If damage is found the device must not be used.
- Use only original spare parts.
- In order to ensure your children's safety, please keep all packaging (plastic bags, boxes, polystyrene etc.) out of their reach.

WARNING!
Do not allow small children to play with the foil. There is a danger of suffocation!
Special safety information for this unit
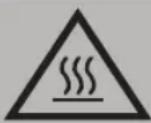
WARNING: Hot surface! Risk of burning!
The temperature of accessible surfaces can get very hot during use.
- Do not touch the hot parts of the device. If necessary, you should use an oven cloth and hold the device only by the handle or the recessed grip.

WARNING:
- Do not operate the device with an external timer or separate remote control system.
- When baking or opening the baking areas, pay attention to escaping steam. Risk of burning!

CAUTION:
- Place the unit on a flat and heat-resistant surface. In the case of sensitive surfaces please place a heat-resistant board under the device.
- In order to prevent heat from building up, do not put the unit directly underneath a cupboard. Ensure that there is enough space all around!
- Do not move the device when it is working.
- Bread is combustible. Therefore the device should never be used in the vicinity of or below curtains and other combustible materials!
- Please ensure that the mains lead does not come into contact with the hot sections of the device.
- Allow the device to cool down before cleaning it and putting it away.
- This appliance can be used by children aged from 8 years and
above and persons with reduced physical, sensory or mental capabilities or lack of experience and knowledge if they have been given supervision or instruction concerning use of the appliance in a safe way and understand the hazards involved.
• Children shall not play with the appliance.
- Cleaning and user maintenance shall not be made by children unless they are older 8 years and supervised.
- Keep the appliance and its cord out of reach of children less than 8 years.
- Do not try to repair the appliance on your own. Always contact an authorized technician. To avoid the exposure to danger, always have a faulty cable be replaced only by the manufacturer, by our customer service or by a qualified person and with a cable of the same type.

CAUTION:
This device is not intended for being immersed in water during cleaning. Observe all instructions provided in the chapter “Cleaning”.
Overview of the Components
1 Lid catch
2 Upper lid handle
3 Control lamps
4 Baking surfaces
5 Feet
6 Lower handle
Unpacking the Appliance
- Remove the appliance from its packaging.
- Remove all packaging materials such as films, padding, cable holders, and cardboard.
- Check the packaging contents for completeness.
- Check the appliance for any transport damage in order to avoid hazards.
i NOTE:
If there is any visible transport damage, contact your dealer immediately. Do not operate the device if damaged!
Starting-up the unit
Instructions for Use
Before you make the first sandwiches for consumption...
- Remove any packaging that is still present. Unwind the mains lead completely.
- Clean the housing and the baking surfaces with a damp cloth.
Non-stick coating
- Lightly grease the baking surfaces before the unit is used for the first time.
- Use the appliance for about 10 minutes with the toasting surfaces closed (see "Using the unit").
- Remove the mains plug from the socket and allow the device to cool down.
- Bake 3–4 sandwiches as a test.
i NOTE:
- Any smoke or smells produced during this procedure are normal. Please ensure sufficient ventilation.
-
Do not eat the first sandwich.
-
After the device has cooled down, wipe the baking surfaces off with a paper towel.
Electrical connection
- Check whether the mains voltage that you want to use matches the one of the device. You will find the information about this on the type plate.
- Insert the plug in a duly installed protective contact socket. The red control lamp will light up.
Using the unit
i NOTE:
- Keep the baking surfaces closed while heating.
- When the heating-up phase has finished, the green control lamp goes off.
-
The red control lamp remains on to show that the device is working.
-
Release the lid catch and fold the lid up until it remains open.
- Insert a double sandwich into each side.
- Gently close the lid. Close the lid catch.
i NOTE:
- The green control lamp switches on and off during baking in order to maintain the baking temperature.
- The baking time depends on your individual taste. The longer the sandwiches remain in the device, the greater the level of browning.
- The baking section should always be closed in the intervals between baking.
WARNING:
- Pay attention to escaping steam. Risk of burning.
-
Open the lid catch carefully and then fold up the lid.
-
Remove the toasted sandwiches with a wooden fork or similar item.
CAUTION:
Do not use pointed or sharp objects to avoid damaging the coating of the baking surfaces.
Switching Off
If you would like to interrupt operation or switch the device off, remove the plug from the socket. The red control lamp goes off.
Cleaning
WARNING:
- Always pull out the plug from the mains socket before cleaning and wait until the unit has cooled down.
- Do not immerse the device in water! It could result in an electric shock or fire.
CAUTION:
- Do not use any wire brush or other abrasive objects.
- Do not use any acidic or abrasive detergents.
Baking Surfaces
- Remove any food residues while they are still warm with a damp cloth or paper towel.
- Wash off the baking surfaces with a soft sponge and soapy water; then wipe with clean water and dry thoroughly with a soft cloth. After drying please apply a thin film of edible oil to the surface.
Housing
Clean the housing after use with a slightly damp cloth.
Technical Data
Model: PC-ST 1092
Power supply: 220 - 240 V\~, 50/60 Hz
consumption: 900 W
Protection class: ....I
Net weight: .... approx. 1.6 kg
The right to make technical and design modifications in the course of continuous product development remains reserved.
This device has been tested according to all relevant current CE guidelines, such as electromagnetic compatibility and low voltage directives, and has been constructed in accordance with the latest safety regulations.
Disposal
Meaning of the "Dustbin" Symbol
Protect our environment: do not dispose of electrical equipment in the domestic waste.
Please return any electrical equipment that you will no longer use to the collection points provided for their disposal.
This helps avoid the potential effects of incorrect disposal on the environment and human health.
This will contribute to the recycling and other forms of reutilisation of electrical and electronic equipment.
Information concerning where the equipment can be disposed of can be obtained from your local authority.
Instrukcja obsługi
CTC Clatronic Sp. z o.o