
PowerEdge R805 - Server DELL - Free user manual and instructions
Find the device manual for free PowerEdge R805 DELL in PDF.
| Brand | Dell |
| Model | PowerEdge R805 |
| Product Type | 2U rack server |
| Processor | Two AMD Opteron dual-core or quad-core processors |
| Memory | Registered DDR2 with parity, 667 MHz, up to 128 GB (16 slots, 8 per processor) |
| Memory module capacities | 512 MB, 1 GB, 2 GB, 4 GB, or 8 GB (single or dual rank) |
| Hard drives | Up to two hot-swappable 2.5-inch SAS or SATA hard drives |
| Optical drive | Optional slim SATA drive (DVD-ROM, DVD-RW, or CD-RW/DVD combo) |
| Network connectors | Four integrated Gigabit Ethernet NICs (10/100/1000 Mbps) |
| USB connectors | Two front, two rear (USB 2.0), one internal |
| Video | ATI ES1000 controller, 32 MB, maximum resolution 1600x1200 |
| Power supply | One or two 700 W hot-swappable power supplies, 1+1 redundant |
| Cooling | Six hot-swappable fans |
| Dimensions (H x W x D) | 8.67 cm x 44.4 cm x 71.26 cm |
| Weight (max) | 20.23 kg |
| Operating temperature | 10 °C to 35 °C |
| Operating humidity | 20% to 80% (non-condensing) |
| Maintenance and cleaning | Disconnect power before cleaning. Use a dry, lint-free cloth. Regularly check fans and air filters. |
| Safety | Follow the instructions in the product information guide. Do not open the cover without discharging static electricity. Use a grounded outlet. |
| Spare parts and repairability | Hard drives, power supplies, and fans are hot-swappable. Memory and processors are replaceable. System board and expansion cards available. |
| Supported operating systems | Windows Server 2003 R2, Red Hat Enterprise Linux 5, SUSE Linux Enterprise Server 9/10, VMware ESX Server 3 |
| Remote management | Optional remote access controller (RAC), standard BMC with serial and network access |
| General information | Dell PowerEdge R805, model EMS01. User manual available in PDF. Technical support at support.dell.com. |
Frequently Asked Questions - PowerEdge R805 DELL
User questions about PowerEdge R805 DELL
0 question about this device. Answer the ones you know or ask your own.
Ask a new question about this device
Download the instructions for your Server in PDF format for free! Find your manual PowerEdge R805 - DELL and take your electronic device back in hand. On this page are published all the documents necessary for the use of your device. PowerEdge R805 by DELL.
USER MANUAL PowerEdge R805 DELL
Getting Started With Your System
Getting Started With Your System
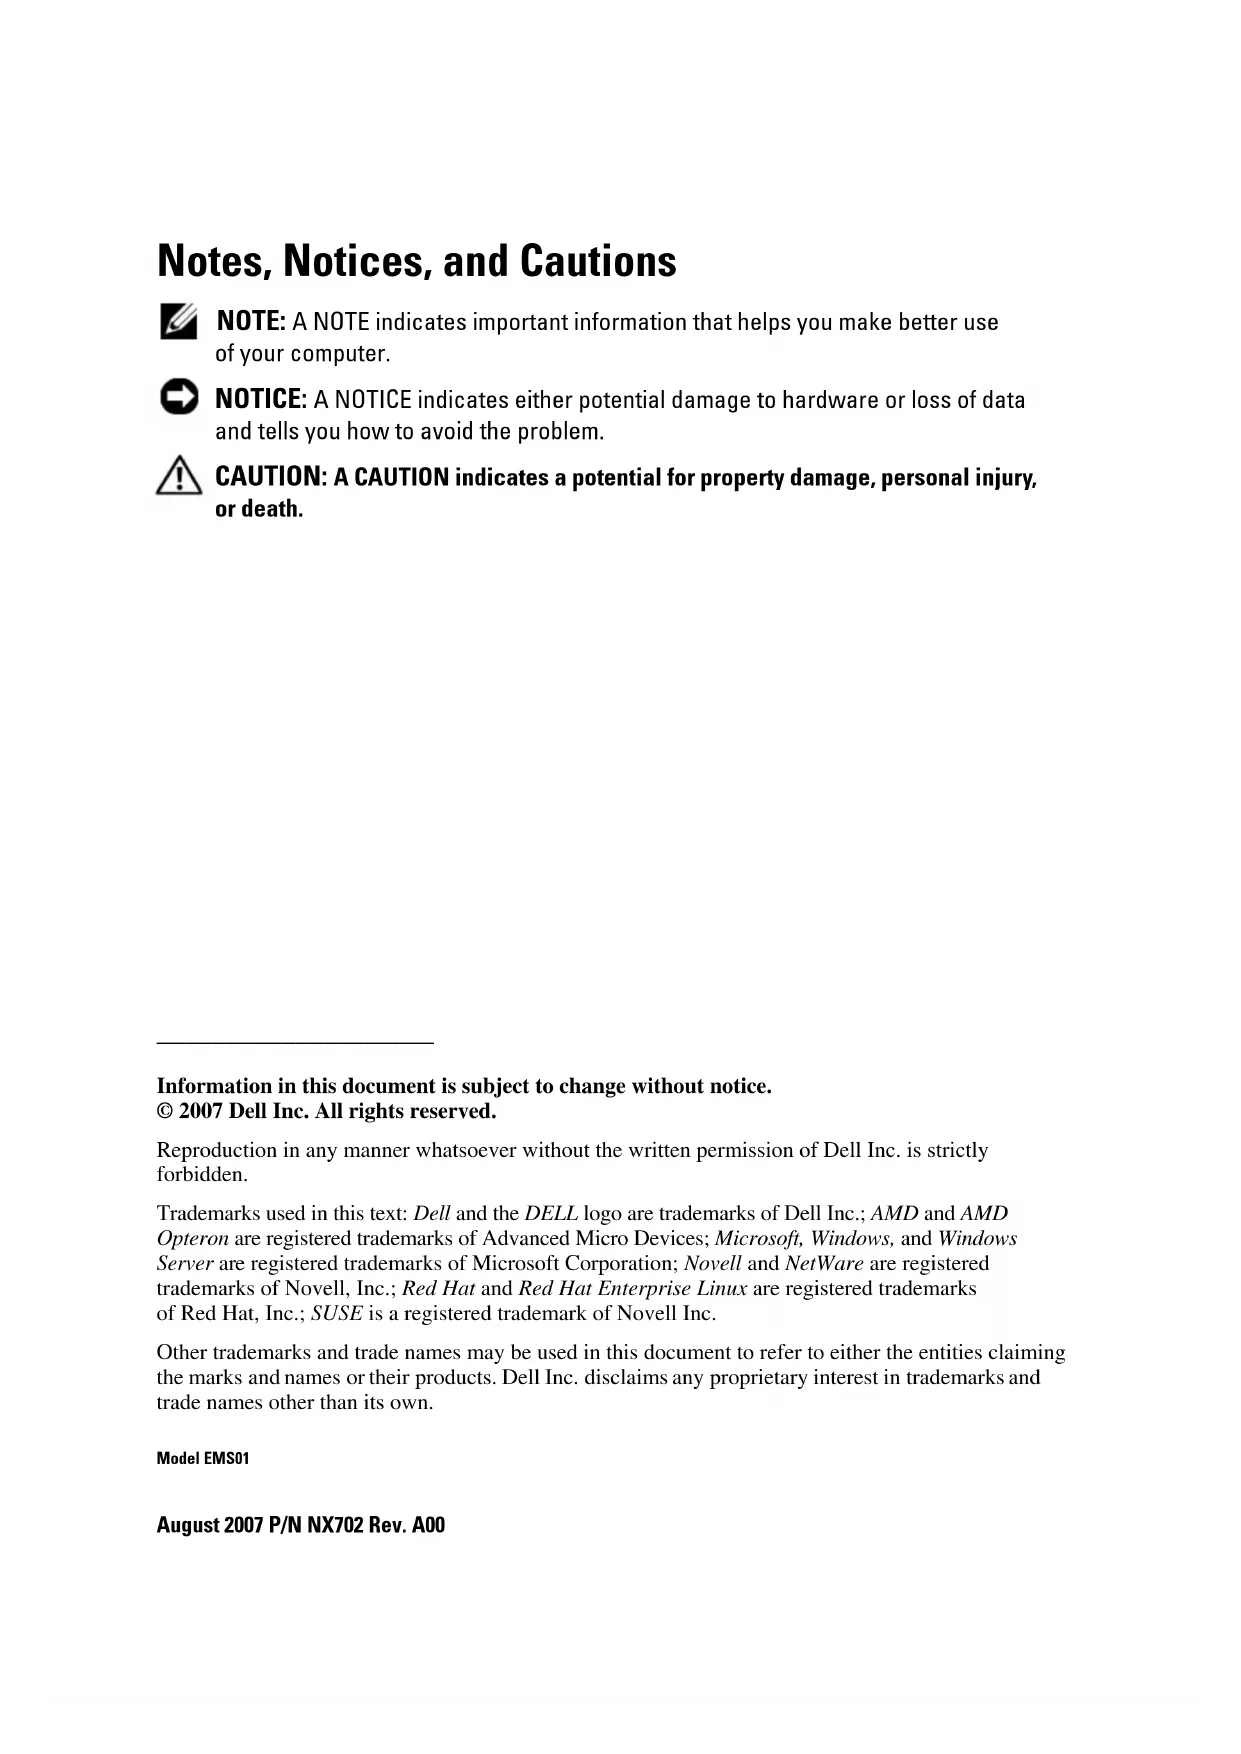
Notes, Notices, and Cautions

NOTE: A NOTE indicates important information that helps you make better use of your computer.

NOTICE: A NOTICE indicates either potential damage to hardware or loss of data and tells you how to avoid the problem.

CAUTION: A CAUTION indicates a potential for property damage, personal injury, or death.
Information in this document is subject to change without notice.
© 2007 Dell Inc. All rights reserved.
Reproduction in any manner whatsoever without the written permission of Dell Inc. is strictly forbidden.
Trademarks used in this text: Dell and the DELL logo are trademarks of Dell Inc.; AMD and AMD Opteron are registered trademarks of Advanced Micro Devices; Microsoft, Windows, and Windows Server are registered trademarks of Microsoft Corporation; Novell and NetWare are registered trademarks of Novell, Inc.; Red Hat and Red Hat Enterprise Linux are registered trademarks of Red Hat, Inc.; SUSE is a registered trademark of Novell Inc.
Other trademarks and trade names may be used in this document to refer to either the entities claiming the marks and names or their products. Dell Inc. disclaims any proprietary interest in trademarks and trade names other than its own.
Model EMS01
August 2007 P/N NX702 Rev. A00
System Features
This section describes the major hardware and software features of your system. It also provides information about other documents you may need when setting up your system and how to obtain technical assistance.
- Two dual-core or quad-core AMD Opteron™ processors.
- A minimum of 2 GB single- or dual-ranked 667-MHz DDR2 (PC2-5300) memory modules (installed in two sets of pairs). Memory is upgradable to a maximum of 128 GB by installing combinations of 512-MB, 1-GB, 2-GB, 4-GB, or 8-GB memory modules in the 16 memory module sockets (eight per CPU) on the system board.
- Support for up to two 2.5-inch, internal hot-pluggable Serial Attached SCSI (SAS) or SATA hard drives.
- An optional slim-line SATA DVD-ROM drive, slim-line SATA DVD-RW drive, or combination CD-RW/DVD drive (when available).
NOTE: DVD devices are data only.
- An intrusion switch that signals the appropriate systems management software if the cover is opened.
- Up to two hot-pluggable, 700-W power supplies in an optional 1 + 1 redundant configuration.
- Six hot-pluggable system cooling fans.
- Optional support for iSCSI boot.
The system board includes the following features:
- A right riser card (riser 1) containing two PCIe (x4 and x8) slots. The right riser card also contains an SD (Secure Digital) slot for embedded OS support.
- A left riser card (riser 2) containing one full-length PCIe (x8) slot and one half-length PCIe (x8) slot.
- An integrated SAS controller card (via a dedicated PCIe slot on the sideplane board) supporting both SAS 6i/R and PERC 6/i adapters.
- Optional integrated PERC controller (PERC 6i) with integrated cache and battery backup.
-
Four integrated Gigabit Ethernet NICs, capable of supporting 10-Mbps, 100-Mbps, and 1000-Mbps data rates.
-
Four external USB 2.0-compliant connectors (two on the front and two on the back) supporting a diskette drive, a DVD-ROM drive, a keyboard, a mouse, or a USB flash drive.
- One internal USB 2.0-compliant connector supporting an optional bootable USB flash drive or USB security key.
- Optional remote access controller (RAC) for remote systems management.
- An integrated VGA-compatible video subsystem based on an integrated ATI ES1000 33-MHz PCI video controller. The video subsystem includes 32MB of graphics memory and supports various 2D graphics video modes. Maximum resolution is 1600 × 1200 with 65,536 colors. (When the optional RAC is installed, the maximum resolution of the integrated video subsystem is 1280 × 1024 .)
- Systems management circuitry that monitors operation of the system fans as well as critical system voltages, temperatures, and system power consumption. The systems management circuitry works in conjunction with the systems management software.
- Standard Baseboard Management Controller (BMC) with serial and LAN access.
- Back-panel connectors include one serial, one video, two USB, and four NIC connectors.
- Front-panel connectors include a video and two USB connectors.
- Front-panel 1x5 LCD for system ID and error messaging.
- System ID button on the front and back panels.
For more information about specific features, see Technical Specifications.
Supported Operating Systems
- Microsoft Windows Server 2003 R2 Standard and Enterprise Editions (SP1 and later)
- Microsoft Windows Server 2003 R2 Standard and Enterprise x64 Editions (SP1 and later)
- Red Hat Enterprise Linux Server 5 (x86)
- Red Hat Enterprise Linux Server 5 (x86_64)
-
Red Hat Enterprise Linux Server ES (Version 4.5) (x86)
-
Red Hat Enterprise Linux Server ES (Version 4.5) (x86_64)
S U E SinuEx Enterprise Server 9 (x86_64)
SUSE Linux Enterprise Server 10 (x86_64)
V M wESX Server 3 (including embedded versions)

NOTE: For the latest information on supported operating systems, see www.dell.com.

NOTE: SUSE Linux Enterprise Server 9, prior to SP4, does not support SATA optical devices. Installation must be performed using other methods, such as an external USB CD-ROM drive.
Other Information You May Need

CAUTION: The Product Information Guide provides important safety and regulatory information. Warranty information may be included within this document or as a separate document.
- The Rack Installation Guide or Rack Installation Instructions included with your rack solution describes how to install your system into a rack.
- The Hardware Owner's Manual provides information about system features and describes how to troubleshoot the system and install or replace system components.
- CDs included with your system provide documentation and tools for configuring and managing your system.
- Systems management software documentation describes the features, requirements, installation, and basic operation of the software.
- Operating system documentation describes how to install (if necessary), configure, and use the operating system software.
- Documentation for any components you purchased separately provides information to configure and install these options.
- Updates are sometimes included with the system to describe changes to the system, software, and/or documentation.

NOTE: Always check for updates on support.dell.com and read the updates first because they often supersede information in other documents.
- Release notes or readiness files may be included to provide last-minute updates to the system or documentation or advanced technical reference material intended for experienced users or technicians.
Obtaining Technical Assistance
If you do not understand a procedure in this guide or if the system does not perform as expected, see your Hardware Owner's Manual.
Dell™ Enterprise Training and Certification is available; see www.dell.com/ training for more information. This service may not be offered in all locations.
Installation and Configuration

CAUTION: Before performing the following procedure, read and follow the safety instructions and important regulatory information in your Product Information Guide.
This section describes the steps to set up your system for the first time.
Unpacking the System
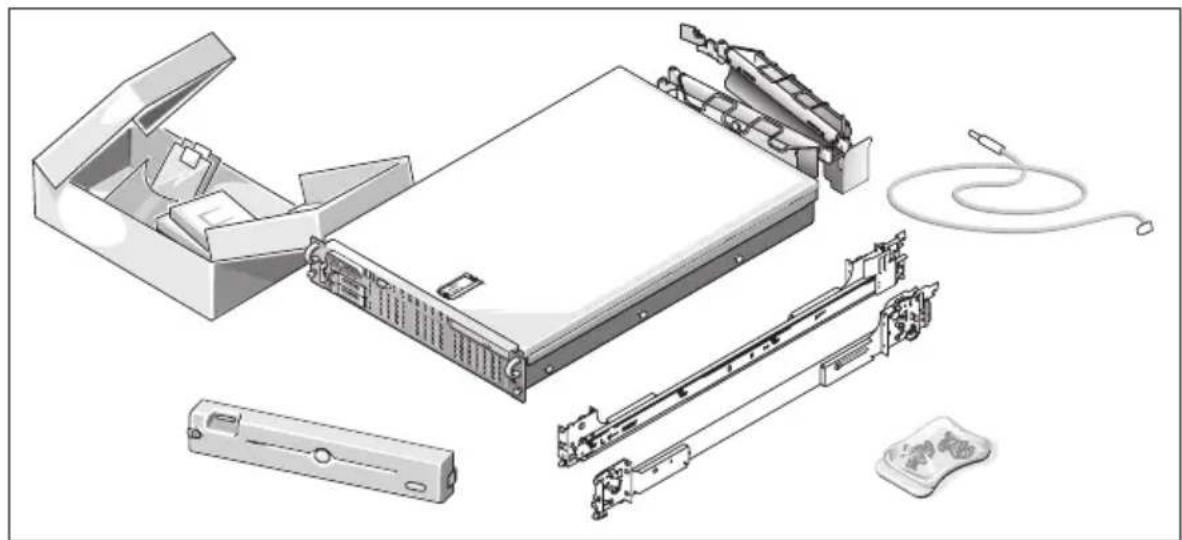
Unpack your system and identify each item.
Keep all shipping materials in case you need them later.

NOTE: Depending on options ordered, not all components shown may be included.
Installing the Rails and System in a Rack
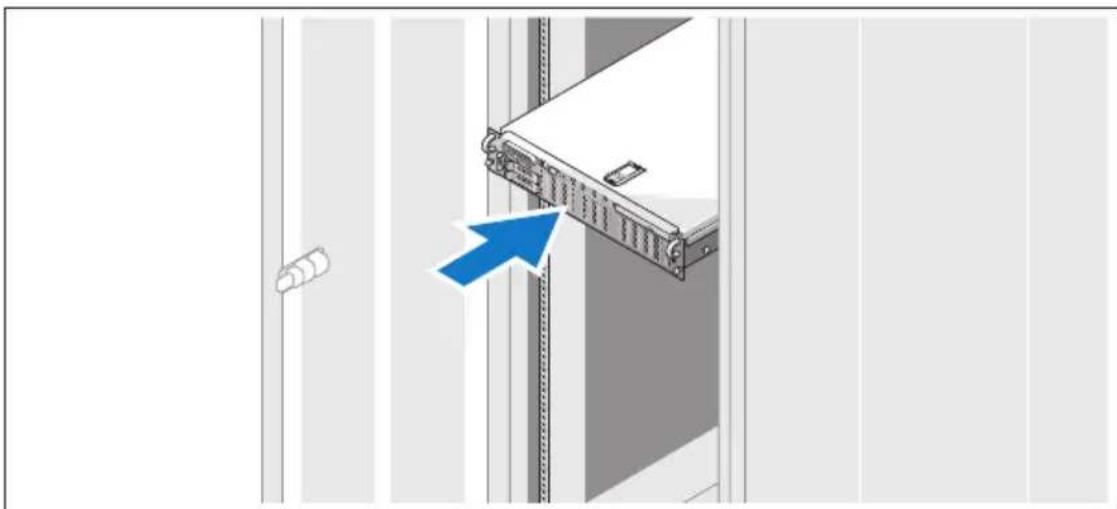
Once you have read the "Safety Instructions" located in the rack installation documentation for your system, install the rails and the system in the rack.
See your rack installation documentation for instructions on installing your system in a rack.
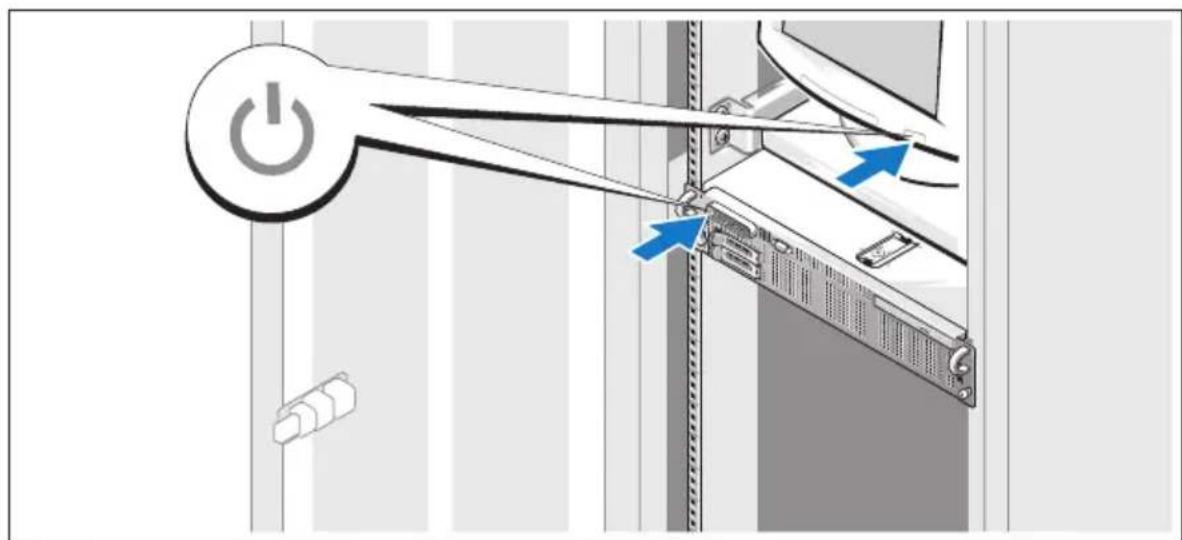
Connecting the Keyboard, Mouse, and Monitor
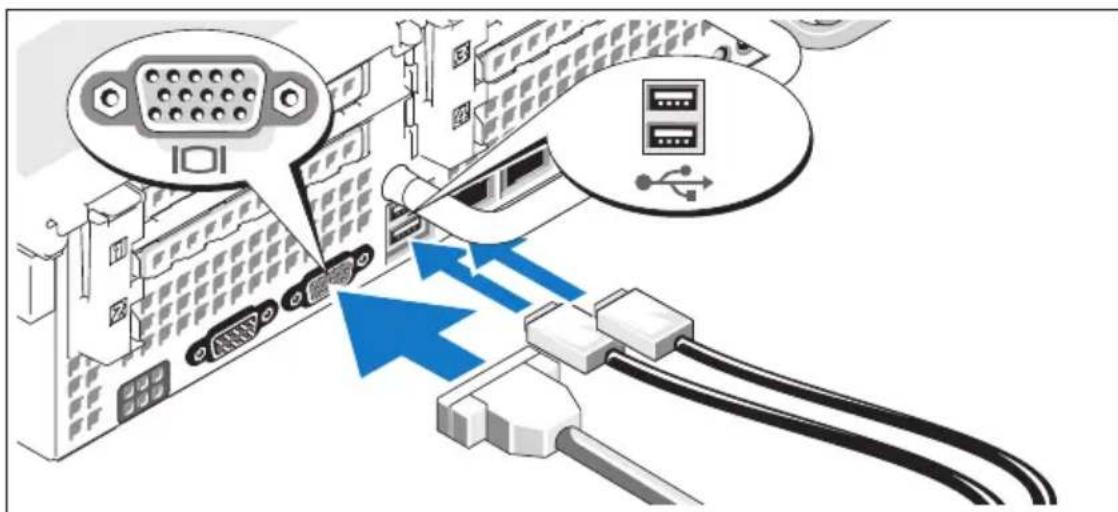
3 Connect the keyboard, mouse, and monitor (optional).
The connectors on the back of your system have icons indicating which cable to plug into each connector. Be sure to tighten the screws (if any) on the monitor's cable connector.
Connecting the Power
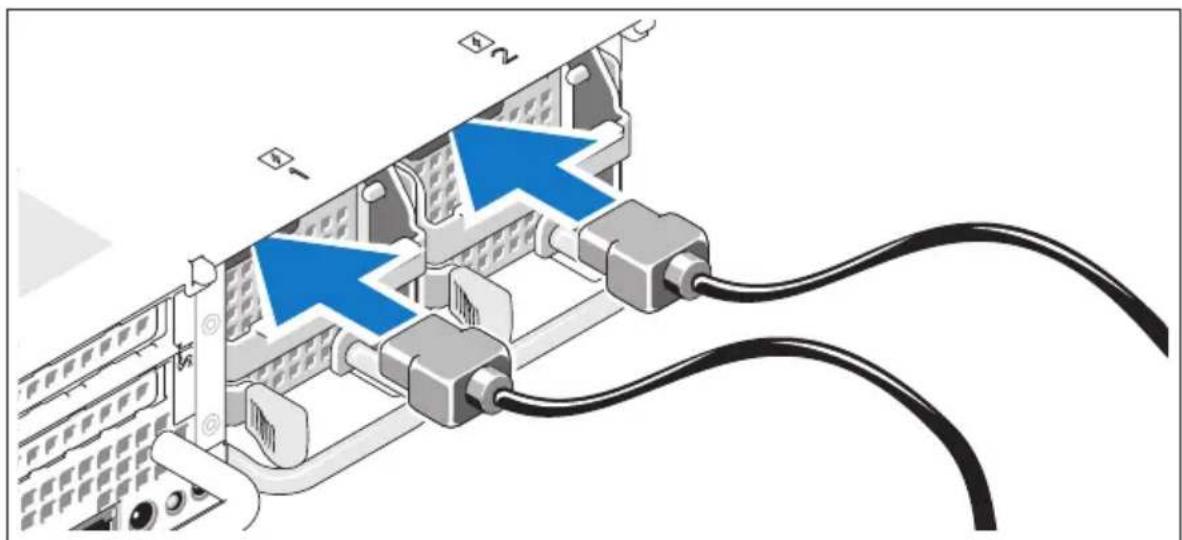
4 Connect the monitor's power cable to the monitor (optional), and connect the system's power cable(s) to the system.
Installing the Power Cord Retention Bracket
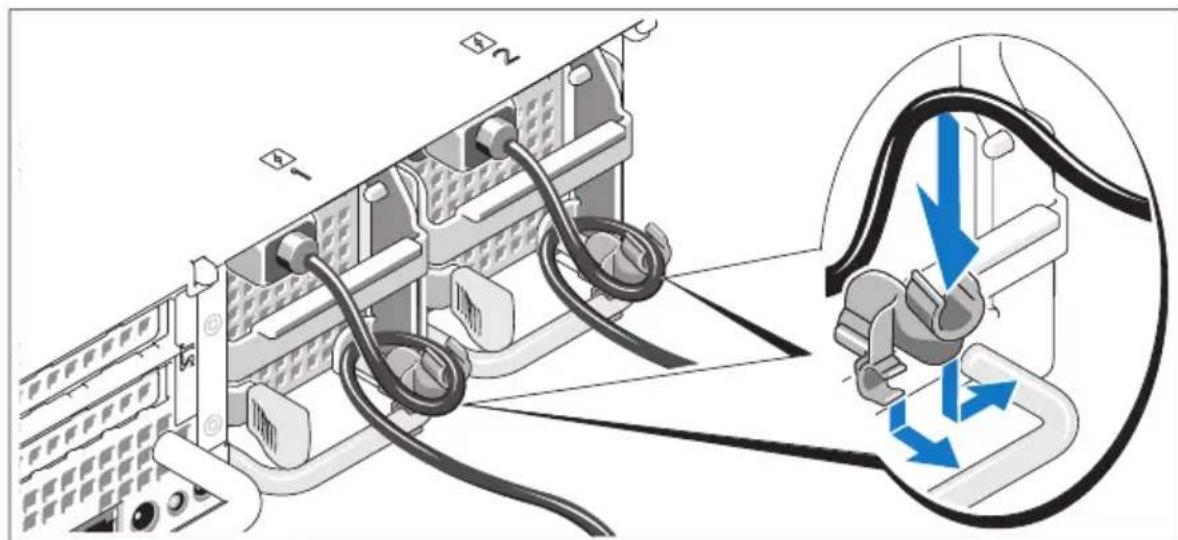
Attach the power cord retention bracket on the right bend of the power supply handle. Bend the system power cable into a loop as shown in the illustration and attach to the bracket's cable clasp. Repeat the procedure for the second power supply.
Plug the other end of the power cables into a grounded electrical outlet or a separate power source such as an uninterrupted power supply (UPS) or a power distribution unit (PDU).
Turning on the System
Turn on the system and monitor (optional).
With the bezel removed, press the power button on the system and the monitor. The power indicators should light. Adjust the monitor's controls until the displayed image is satisfactory.
Installing the Bezel

8 Install the bezel (optional).
Complete the Operating System Setup
If you purchased a preinstalled operating system, see the operating system documentation that ships with your system. To install an operating system for the first time, see the Quick Installation Guide. Be sure the operating system is installed before installing hardware or software not purchased with the system.
Technical Specifications
Processor
Processor type Two dual- or quad-core AMD Opteron processors
Expansion Bus
Bus type PCIe
Expansion slots
Right riser (riser 1):
PCIe
One x8 full-height, full-length slot (top)
One x4 full-height, half-length slot (bottom)
One internal SD (Secure Digital) card slot
One x8 full-height, full-length slot (top)
One x8 full-height, half-length slot (bottom)
One internal USB key socket
Memory
Architecture 667-MHz registered parity DDR2 memory
modulcs
Memory module sockets 16240-pin
Memory module capacitics 512 MB, 1 GB, 2 GB, 4 GB, or 8 GB (single
or dual-rank only, quad-rank not supported)
Minimum RAM
2 GB (1 GB cach processor, 2 DIMMs
installed in two sets of pairs)
per processor)
Maximum RAM 128 GB (64 GB cach processor)
Drives
| Hard drives Up to two 2.5-inch, hot-plug SAS or SATA internal drives | |
| Optical drive One optional slim-line SATA DVD-ROM drive or DVD-RW drive, or combination CD-RW/DVD drive (when available) | |
| NOTE: DVD devices are data only. External optional USB DVD | |
| Flash drive External optional USB | |
| Internal optional USB | |
| Internal optional SD card | |
Connectors
| Back | |
| NIC | Four RJ-45 10/100/1000 |
| Serial | 9-pin, DTE, 16550-compatible |
| USB | Two 4-pin, USB 2.0-compliant |
| Video | 15-pin VGA |
| Front | |
| Video | 15-pin VGA |
| USB | Two 4-pin, USB 2.0-compliant |
| Internal | |
| USB | One 4-pin, USB 2.0-compliant |
| SD | One flash memory card slot on right PCIe riser (riser 1) |
| Video | |
Video type ATI ES1000 video controller; VGA connector
Video memory 32 MB
Power
AC power supply (per power supply)
Wattage 700 W
Voltage 85-264 VAC, autoranging, 47 - 63Hz
I Icat dissipation 2697 BTU/hr maximum
Maximum inrush current Under typical line conditions and over the entire system ambient operating range, the inrush current may reach 55 A per power supply for 10ms or less.
Batteries
System battery CR 2032 3.0-V lithium ion coin cell
RAID battery (optional) 4.1-V lithium ion
Physical
Height 8.67 cm (3.41 in)
Width 44.4 cm (17.5 in)
Depth 71.26 cm (28.05 in)
Weight (maximum 20.23 kg (44.6 lb) configuration)
Environmental
NOTE: For additional information about environmental measurements for specific system configurations, see www.dell.com/environmental_datasheets.
Temperature
| Operating | 10° to 35°C (50° to 95°F) with a maximum temperature gradation of 10°C per hour |
| NOTE: For altitudes above 2950 feet, the maximum operating temperature is derated 1°F/550 ft. | |
| Storage | -40° to 65°C (-40° to 149°F) with a maximum temperature gradation of 20°C per hour |
| Relative humidity | |
| Operating | 20% to 80% (noncondensing) with a maximum humidity gradation of 10% pcr hour |
| Storage | 5% to 95% (noncondensing) with a maximum humidity gradation of 10% pcr hour |
| Maximum vibration | |
| Operating | 0.26 Grms at 5–350 Hz in operational orientations |
| Storage | 1.54 Grms at 10–250 Hz in all orientations |
| Maximum shock | |
| Operating | One shock pulse in the positive z axis (one pulse on each side of the system) of 31 G for 2.6 ms in the operational orientation |
| Storage | Six consecutively executed shock pulses in the positive and negative x, y, and z axes (one pulse on each side of the system) of 71 G for up to 2 ms |
| Altitude | |
| Operating | -16 to 3048 m (-50 to 10,000 ft) |
| NOTE: For altitudes above 2950 feet, the maximum operating temperature is derated 1°F/550 ft. | |
| Storage | -16 to 10,600 m (-50 to 35,000 ft) |
Systèmes Dell™
PowerEdge™ R805
Specifications techniques
- Getting Started With Your System
- Notes, Notices, and Cautions
- System Features
- Supported Operating Systems
- Other Information You May Need
- CAUTION: The Product Information Guide provides important safety and regulatory information. Warranty information may be included within this document or as a separate document.
- Obtaining Technical Assistance
- Installation and Configuration
- Unpacking the System
- Installing the Rails and System in a Rack
- Connecting the Keyboard, Mouse, and Monitor
- Connecting the Power
- Installing the Power Cord Retention Bracket
- Turning on the System
- Installing the Bezel
- Complete the Operating System Setup
- Technical Specifications
- Processor
- Expansion Bus
- Memory
- Drives
- Connectors
- Power
- AC power supply (per power supply)
- Batteries
- Physical
- Environmental
- Temperature
- Systèmes Dell™
- PowerEdge™ R805
- Specifications techniques
Brand : DELL
Model : PowerEdge R805
Category : Server