
GDK6470X - Range hood GRUNDIG - Free user manual and instructions
Find the device manual for free GDK6470X GRUNDIG in PDF.
| Brand | Grundig |
| Model | GDK6470X |
| Product type | Decorative kitchen hood (chimney) |
| Power supply | 220-240 V ~ 50 Hz |
| Motor power | 275 W |
| Lighting power | 6-7 W (LED) |
| Maximum airflow | 615 m³/h |
| Insulation class | I |
| Speed levels | 3 levels + Boost (intense) |
| Automatic shut-off | Yes (15-minute timer) |
| Air outlet diameter | 120 / 150 mm (adapter included) |
| Minimum distance to cooking surface | 65 cm |
| Grease filter | Washable aluminum metal filter (dishwasher safe) |
| Charcoal filter (recirculation) | Optional, manual installation |
| Exhaust mode | External exhaust or recirculation (with charcoal filter) |
| Material | Stainless steel |
| Recommended fuse | MAX 6 A |
| Lighting type | LED (do not look directly for more than 100 s) |
| Service life (spare parts availability) | 10 years |
| Warranty | Manufacturer's warranty (see terms) |
Frequently Asked Questions - GDK6470X GRUNDIG
User questions about GDK6470X GRUNDIG
0 question about this device. Answer the ones you know or ask your own.
Ask a new question about this device
Download the instructions for your Range hood in PDF format for free! Find your manual GDK6470X - GRUNDIG and take your electronic device back in hand. On this page are published all the documents necessary for the use of your device. GDK6470X by GRUNDIG.
USER MANUAL GDK6470X GRUNDIG
natural_image
Simple line drawing of a house with ventilation system and checkmark (no text or symbols)Abbildung 10
Important safety and environmental instructions
General safety
- This appliance can be used by children aged 8 and above and by persons who have sufficient physical, sensory or mental capacity and have adequate experience and knowledge, on the condition that they are supervised or informed about the safe use of the appliance and the risks involved.
• Children should not tamper with the appliance. Cleaning and user maintenance procedures should not be performed by children unless they are controlled by their elders.
- This appliance is intended for domestic use.
- The operational voltage of your product is 220-240 Volt\~50 Hz.
- A grounded plug is connected to the power cable of your appliance. This cable should be inserted in a grounded socket.
- Electrical installation should be carried out by a qualified electrician.
• Installation performed by unauthorised individuals may cause operation with low performance, damage in the appliance and accidents.
- It must be made sure that the supply cable of the appliance is not squeezed or crushed anywhere during the installation. The supply cable should not be placed near the hob. In such cases, the cable may melt and cause fire.
- Do not plug in before the product is installed.
- Ensure that the plug is in a place where it can be easily accessed to cut off the power in case of any danger.
- Do not touch the lamps if they have operated for a long time. They can burn your hands since they will be hot.
- Kitchen extractor hoods are manufactured for normal cooking and domestic use. In case of using for other purposes, the product might break down and the warranty will be void.
- Follow the regulations set out by competent authorities on discharge of the exhaust air (this warning is not applicable for use without flue).
- Flammable food should not be cooked under the appliance.
- Operate your appliance after putting a pot, pan etc. on the hob. Otherwise, high heat may
Important safety and environmental instructions
cause deformation in some parts of your product.
- Turn off the hob before taking the pot, pan etc. from it.
- Do not leave hot oil on the hob. Pans with hot oil may cause self-combustion.
- Pay attention to your curtains and covers since oil may catch fire while cooking food such as fries.
- Ensure that the filters are replaced on time. There is the risk of fire due to the oil building up on the filters that have not been changed on time.
- Do not use non-fire-resistant filtering materials instead of the current filter.
- Do not operate the product with out the filter and do not remove the filters while the product is running.
- In case of fire, cut off the power of the hood and cooking appliances. (Unplug the appliance or turn off the main switch).
- There is a risk of fire if the periodical cleaning is not performed properly.
- Cut off the power of your appliance before maintenance works. (Unplug the appliance or turn off
the main switch).
- The negative pressure in the environment should not exceed 4 Pa (4 x 10 bar) while the hood for electric hob and appliances running on another type of energy but electricity operate simultaneously.
- In the environment where the appliance is being used, the exhaust of devices running on fuel oil or gas, such as room heater must be absolutely isolated or device must be hermetical type.
- When connecting the flue, use pipes with a diameter of 120 or 150 ~mm . Pipe connection must be as short as possible and have as few elbows as possible.
• Children should not tamper with the appliance. - For your safety, use a fuse of "MAX 6 A" in the hood assembly.
- Keep the packaging materials away from children since they may pose a danger to them.
- If the supply cable is damaged, it must be replaced by the manufacturer, its service agent or similarly skilled personnel to avoid any danger.
- In case of fire, cut the power of the hood and hob and cover the flame. Never use water to put
Important safety and environmental instructions
out the fire.
- When cooking appliances running, their accessible parts may become hot.
- This product is not intended use by persons (including children) with reduced physical, sensory or mental capabilities, or lack of experience and knowledge, unless they have been given supervision or instruction concerning the use of the product by a person responsible for their safety.
- When the installation of hood is complete, there should be a minimum distance of 65 cm between the product and the hob.
- The hood outlet must not connected to air channels that include other smoke.
- Care must be taken when appliance is used with devices that use air and fuel (e.g. heaters, water heaters that operate on Be careful when using them together. This may adversely affect combustion since the hood discharges the air in the environment.
- This warning does not cover use without flue.
Compliance with the WEEE Directive and Disposing of the Waste Product:
This product complies with EU WEEE Directive (2012/19/EU). This product bears a classification symbol for waste electrical and electronic equipment (WEEE).
This symbol indicates that this product shall not be disposed with other household wastes at the end of its service life. Used device must be returned to official collection point for recycling of electrical and electronic devices. To find these collection systems please contact to your local authorities or retailer where the product was purchased. Each household performs important role in recovering and recycling of old appliance. Appropriate disposal of used appliance helps prevent potential negative consequences for the environment and human health.
be Compliance with RoHS Directive
The product you have purchased complies with EU RoHS Directive (2011/65/EU). It does not contain harmful and prohibited materials specified in the Directive.
Package information
Packaging materials of the product are manufactured from recyclable materials in accordance with our National Environment Regulations. Do not dispose of the packaging materials together with the domestic or other wastes. Take them to the packaging material collection points designated by the local authorities.
Important safety and environmental instructions
- The ventilation in the room may be insufficient when the hood for electric hob is used simultaneously with the devices operating on gas or other fuels (this may not apply to appliances that only discharge the air back into the room)
Vital Risk Poisoning Risk
natural_image
Simple line drawing of a house with checkmark and airflow indicators (no text or symbols)Pic. 1: Poisoning Risk
natural_image
Simple line drawing of a house with airflow indicators and a checkmark (no text or symbols)Pic. 2: Poisoning Risk

DANGER! Warning - Risk of Suffocation
Packaging materials are dangerous to children. Do not allow children to tamper with the packing materials.

DANGER! Warning - Danger of Death
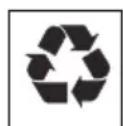
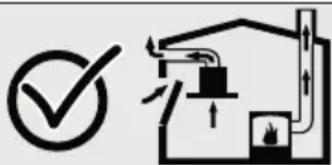
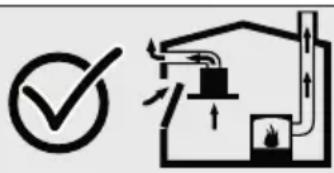
Vital risk, poisoning risk occurs due to the reabsorbed combustion gases. For use with an air outlet, do not use the appliance simultaneously with objects that expel poisonous gases, such as stoves with air circulation, which operates with gas, oil, wood or charcoal, bath stoves, water heaters, etc., unless sufficient air is supplied. Pic. 3
Objects with air circulation (e.g. stoves that are operated with gas, oil, wood or charcoal, bath stoves, water heaters) retrieves the air from the installation place and expel the waste gas by means of a waste gas system (e.g. flue). Air is absorbed by the appliance during operation from the kitchen and neighboring rooms. Vacuuming occurs if sufficient amount of air is not supplied. In this case, poisonous gases are absorbed backed from the flue and waste gas duct and return into the home. Pic. 3
For this reason, it should be ensured that the clean air is always supplied sufficiently. Pic. 4
Important safety and environmental instructions
WARNING! Risk of fire!
Oil sediments on the oil filter may catch fire. Clean the oil filter every month. Do not operate the appliance without the oil filter.
Oil sediments on the oil filter may catch fire. Never work with flame near the appliance (e.g. flambé) It is only allowed to install the appliance near a heating equipment that is heated via solid fuel (e.g. wood or coal) provided that a closed cover that is not removable is available. There should be no sparks caused.
Hot vegetable oils and fat catch fire easily. Attention should always be paid to hot vegetable oils and fats. Do not try to put out the fire with water.
Turn off the hob. Carefully cover the flame with a lid, fire blanket or a similar object.
Gas hobs that have no cooking utensils on them generate high heat during operation. A ventilation device placed on the hob may therefore get damaged or burn. Operate gas hobs only when there is a cooking utensil on them.
Operating more than one gas hob simultaneously causes high heat. A ventilation device placed on the hob may therefore get damaged or burn. Do not operate two gas hobs at a high flame setting for more than 15 minutes. A burner with over 5kW (Wok) power is equal to the burner with two gas levels.

WARNING!
Risk of electric shock!
A faulty appliance may cause electric shock. Do not operate any faulty appliance. Unplug it or shut down the fuse from the fuse box. Call the customer service centre.
Repairs that do not comply with the instructions pose a threat. Repairs and change of faulty electric cables should only be performed by a customer services technician trained by our company. If the appliance is faulty, unplug it or shut down the fuse from the fuse box. Call the customer service centre.
Water leaking into the appliance may cause electric shock. High pressure or steam cleaner
Important safety and environmental instructions

DANGER!
Risk of injury!
There is a risk of injury during installation due to the sharp edges. Always use protective gloves during installation of the appliance.
All safety bolts and safety covers should be installed as stated in the user manual due to the risk of falling of the appliance.
The objects on the appliance may fall down. Do not put any objects on the appliance.
The LED light is too bright and may harm your eyes (hazard group 1). Do not directly look at the LED light for more than 100 seconds.

CAUTION
Accessible parts may get hot when used with the cooking equipment.

In case of repair procedures that have not been performed appropriately or according to the rules, please shut down the fuse or unplug the appliance. Repair works may only be carried out by the authorised service or authorised skilled personnel.
In case of repair procedures that have not been performed appropriately or according to the rules, please shut down the fuse or unplug the appliance. Repair works may only be carried out by the authorised service or authorised skilled personnel.

DANGER!
Risk of burning, risk of electric shock!
Wait for the appliance to cool down before cleaning or maintenance works. Shut down the fuse or unplug the appliance.
Risk of damage occurs due to the humidity intrusion into the electronics. Never clean the controllers with a wet cloth.
Surface may be damaged due to improper cleaning. Clean the stainless steel surfaces only in the direction of brushing. Do not use stainless steel cleaner for controllers.
The surface may be damaged due to abrasive or rubbing cleaning agents. Never use abrasive or rubbing cleaning agents.

NOTE:
If the appliance breaks down or gets damaged, shut down the fuse or unplug the appliance and call the authorised service agent.

NOTE:
If the supply cable is damaged, it must be replaced by the manufacturer, its service agent or similarly qualified personnel to avoid any danger.

NOTE:
Shut down the fuse or unplug the appliance in case of breakdown of the lamps of the appliance. Replace immediately the faulty lamps in order to prevent other lamps from being overloaded (wait for the lamps to cool down first).
General appearance
Overview
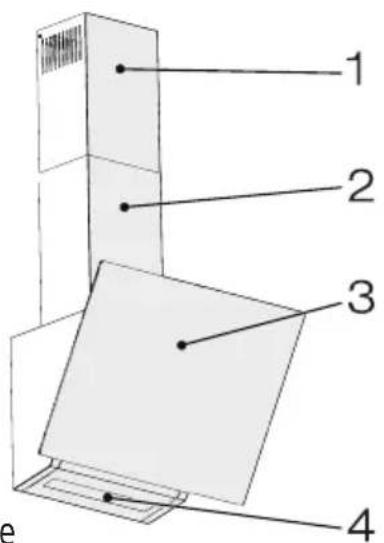
- Inner Flue
- Outer Flue
- Side Suction Glass
- Hob Lighting
Technical Data
| Model GDK6470X | |
| Supply Voltage 220-240V 50 Hz. | |
| Lamp Power (W) 6,7 W | |
| Motor Power (W) 275 W | |
| Debl (m3/h) 615 m3/h | |
| Motor Insulation Class F | |
| Insulation Class CLASS I | |
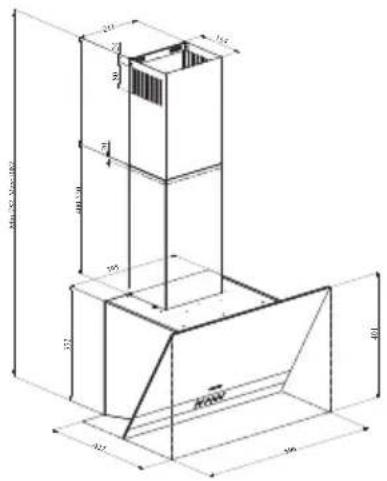
Technical and design modifications are reserved.
The dimensions presented in the technical drawings are in mm.
This image is only provided to inform about the parts of the appliance. Parts may vary according the model of the appliance. Pictures are provided in a representative manner.
Scaled Technical Drawing
Package Content
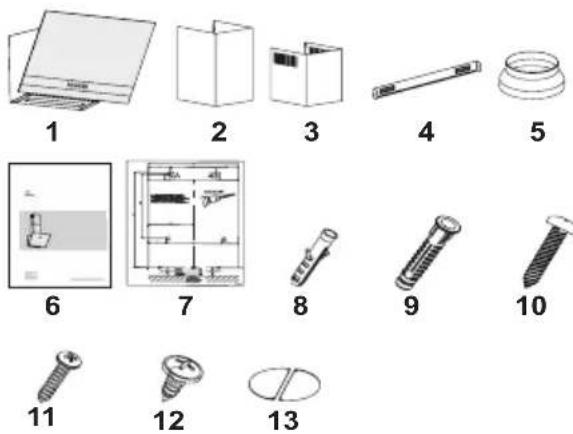
- Kitchen Hood
- Outer Flue
- Inner Flue
- Inner Flue Connection Plate
- ∅150/120mm Plastic Flue Adapter
- User Manual
- Installation Draft
- 2x ∅ 6 mm Plastic Insert
- 4x ∅ 8mm Plastic Insert
- 4x 4.8 x50 Screws
- 2x 3.9 x22 Screws
- 4x 3,5 x9,5 Screws
- Chimney Clamp
Installation and Use of the Appliance
Position of the Appliance
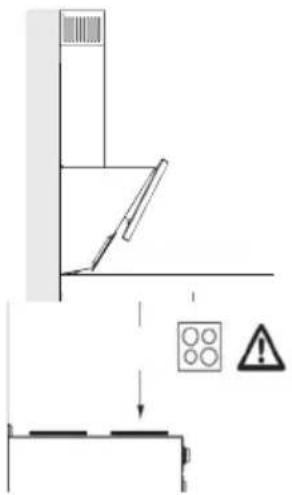
- Attention should be paid to the distance between the hob and hood before installation. This distance should be 65 cm.
• For gas hobs, from the grill surface, - The measure must be taken from the glass surface on electric hobs.

Your new appliance is especially energy efficient. You will find here some advises on how to save more energy while using the appliance, and required to destroy the appliance in a proper way.
Things to do for energy saving;
- Ensure sufficient air intake to make the hood operate efficiently and with low operation noise during cooking.
- Set the fan level according to the density of steam in kitchen. Use the high level only when needed. A lower fan level means less energy consumption.
- If dense smoke is expected in the kitchen, select a higher level of fan in advance. It is required to operate the hood much longer to remove the smoke already spread all over kitchen.
• Turn off the hood when not in use.
- Clean or replace the filter at intervals stated, thus, the efficiency of the ventilation is increased and the risk of fire is eliminated.
Installation of the Appliance
- Checking the Wall

NOTE:
Use protective gloves and glasses while performing drilling and cutting operations.
The wall must be flat, vertical and have sufficient strength to bear the product.
- Depth of the drill holes must be in conformity with the bolt length.
- Bolts and pins are suitable for use on brick walls. For other types of construction (e.g. plasterboard, porous concrete etc.), please use suitable fixing pins and bolts.
NOTE:
Before drilling the wall, make sure that there are no electricity, gas or water pipes around the points you are planning to drill.
Installation and Use of the Appliance
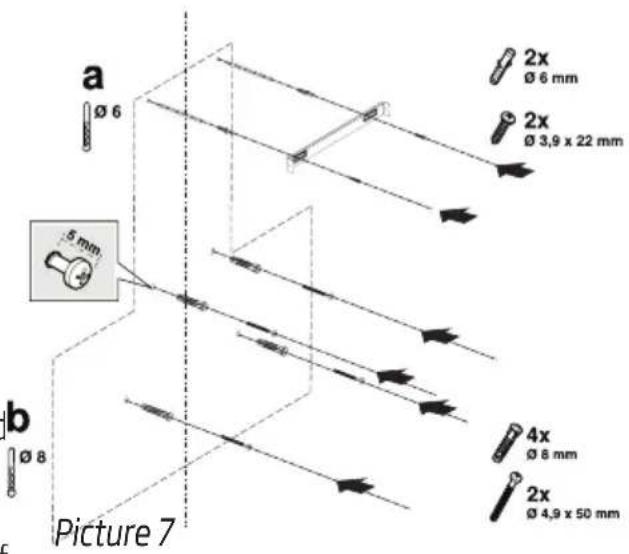
- Draw a central point line on the wall, from the ceiling to the lower side of the hood (Picture 7).
- There is a notch in the middle of the flue connection plate. Place the central point of this notch, which is found on the flue connection plate, on the vertical line you drew on the wall. Align it vertically and use a pen to mark the holes to which the flue connection plate will be installed (Picture 7 / a).
- Drill the marked points with a ∅6mm drill and insert 2x ∅6mm plastic pins in these holes (Picture 7 / a).
- Fix the flue connection plate to the wall with Picture 9 3.9x22 screws (Picture 7 / a).
- To drill hang holes for the hood, stick the installation template to the surface to which the product will be installed and mark the installation holes (Picture 7 / b).
- Drill hang holes with ∅8mm drill and insert the pins (Picture 7 / b).
- Insert 2x 4.8x50 hang screws, ensuring that there is a 5 mm space between the screw head and the wall (Picture 7 / b).
Preparing the Appliance
Picture 8
- Hanging Plate
- Hanging Plate Connection Screw
Loosen the connection screws to pull up the hanging plates found on the body of the appliance and then tighten the screws (Picture 8 / a).
- Open the filter cover.
- Remove the metal oil filter.
- If the diameter of the air discharge pipe is lower than 150 mm, install ∅150/120 mm flue adapter.
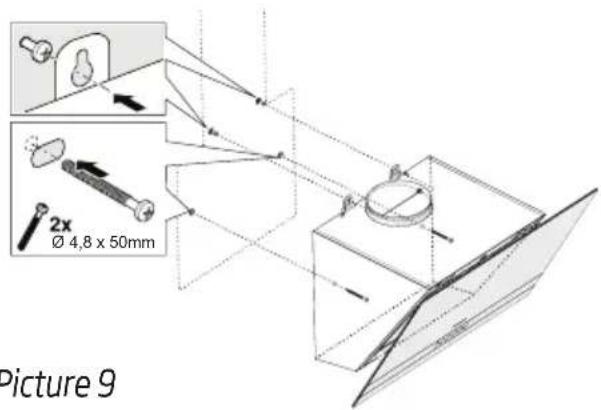
Holding the appliance from its body, attach it to the previously-installed hanging screws and tighten the screws well (Picture 9).
Fix the appliance to the wall through the mounting holes inside it, using the two 4.8x50 screws (Picture 9).
Install the aluminium oil filter of the appliance. If you are going to use the appliance without a carbon filter, install the air outlet pipe.
WARNING
As the bends and elbows in the aluminium pipe will cause decrease in the air suction power, using these must be avoided as much as possible.
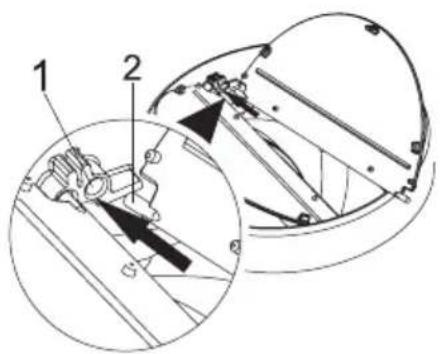
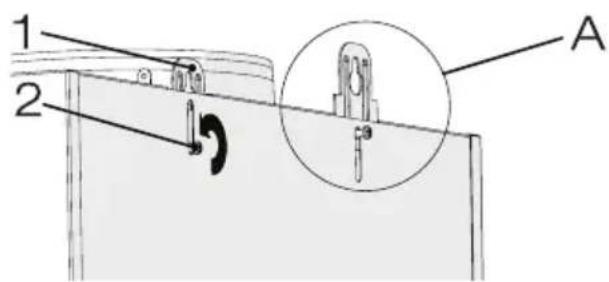
1- Chimney Clamp
2- Flap Socket
Installation and Use of the Appliance
The device mounting accessories include two hood flaps. Attach these flue flaps to the motor exhaust as seen below.
Insert the plastic pin (Figure 10) on the pin socket on the motor exhaust (Figure 10). Then bend the flap lightly to insert the other pin on the flap and insert the other pin to its socket (Figure 10).
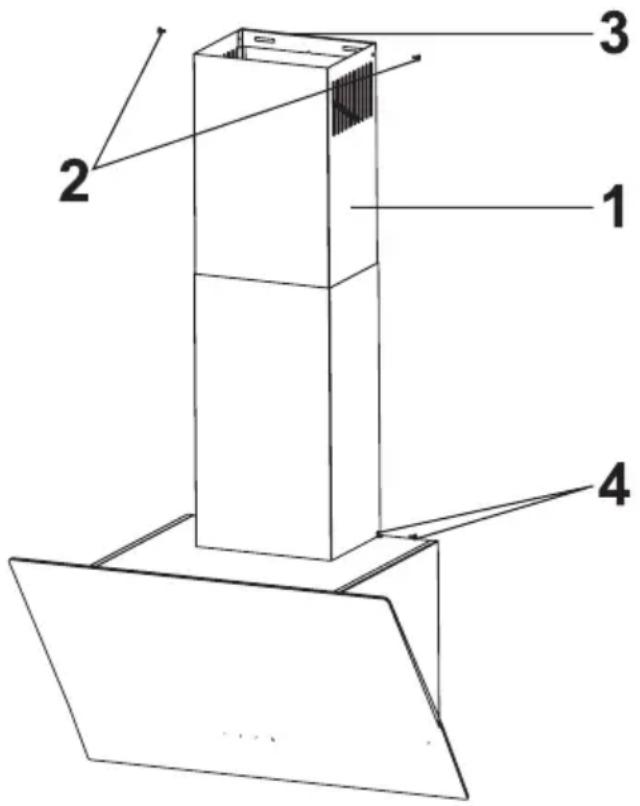
Inner Flue use (1) screw to (2) pull upper-left and screw onto the flue connection plate (3) from left and right. Affix with two screws (4) the outer flue to the left and right connection plates at the back of the cooker hood's body, from the bottom.
Using the Appliance
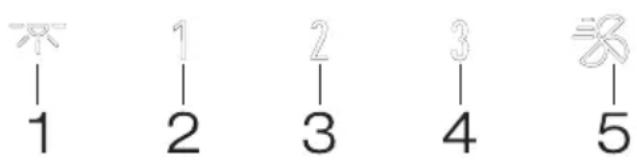
- Lamp On/Off Button
2.1.Level Button
3.2.Level Button
4.3.Level Button - Boost Button
Key Functions
- Lamp On/Off Button: You can illuminate the cooking area by pressing this button.
- The hood operates in 1st speed level by pressing this button. Press this button again to switch off the appliance.
- The hood operates in 2nd speed level by pressing this button. (Shown on the display) The display and hood turn off when you press this button again to switch off the appliance.
- The hood operates in 3rd speed level by pressing this button. (Shown on the display) The display and hood turn off when you press this button again to switch off the appliance.
- High Level Button: When the appliance is switched to high level in use, the high level light indicator will blink. This indicates that the high level ventilation mode is active. Appliance will operate 7 minutes in this mode and will switch to one lower level after 7 minutes and will continue to operate at the switched mode.
Automatic Stop 15 mins.
- The appliance has an automatic stop feature to eliminate the odour, to discharge the steam after cooking is complete, and to have the appliance stopped automatically while ventilating the environment for a while.
- To enable the automatic stop function, press and hold any of the speed
- level buttons (2, 3 or 4) on the control panel for more than 2 seconds. The 15-minute timer will then be enabled.
- Automatic stop feature will be deactivated and the motor of the appliance will stop when you press the same button corresponding to the speed level while the automatic stop feature is active. This feature will be deactivated when you switch to different speed levels. If you want the appliance to stop automatically,
Installation and Use of the Appliance
you need to reactivate the automatic stop function of the appliance.
Cleaning Periods for Metal Filters:
- Filter must be cleaned every \~60 hours or every 4 weeks, depending on use.
Cleaning and Maintenance

CAUTION
Risk of damage due to the corrosion damage. Always operate the appliance while cooking in order to prevent condensate formation. Condensate may cause corrosion damage. Replace immediately the faulty lamps in order to prevent other lamps from being overloaded. The risk of damage occurs due to the humidity intrusion to the electronics. Never clean the controllers with a wet cloth. Surface may be damaged due to improper cleaning. Clean the stainless steel surfaces only in the direction of brushing. Do not use stainless steel cleaner for controllers. The surface may be damaged due to abrasive or rubbing cleaning agents. Never use abrasive or rubbing cleaning agents. There is the risk of damage due to backflow of condensate. Install the air outlet duct with a slope of 1°, slightly downwards the appliance.

CAUTION
You can use this appliance in waste air mode and in air circulation mode.

Waste air mode
Absorbed air is cleaned by oil filters and expelled by means of a piping system. (Pic. 3) If you want to transfer the waste air to a disabled smoke or waste gas flue, you have to obtain permission from an authorised flue cleaning specialist. If the waste air is expelled over the outer wall, a telescopic wall frame should be used. Circulating air mode

Absorbed air is cleaned by oil filters and an active carbon filter and retransferred to the kitchen. Pic. 4

To seal the materials causing odour in the circulating air mode, you should install an active carbon filter. Consult your authorised dealer to learn different opportunities for operating the appliance in the circulating air mode. You can buy accessories necessary for this procedure from relevant points of sale, authorised service agents or online sales centre.
The appliance you have purchased is suitable for use with carbon filter. To attach the carbon filter;
1- Place the carbon filter into its housing. Pic. 5
2- Turn the carbon filter clockwise to make sure that it is tightly inserted. Pic. 5
Picture 13 Picture 14 Picture 15


If the carbon filter is not properly attached, it can fall and damage your product.

CAUTION
Never wash the carbon filters. Keep the carbon filters away from children.

CAUTION
Cleaning and user maintenance should not be performed by children without supervision.
Cleaning and Maintenance
The surface may be damaged due to abrasive or rubbing cleaning agents. Never use abrasive and rubbing cleaning agents. Acquire the cleaning agents and protective materials suitable for your appliance form your authorised service. The surface of the appliance and the controllers are sensitive to scratching.
- Clean the surfaces with a soft and damp cloth, dishwashing liquid or a soft glass cleaning agent. Soften the dried and adhered dirt with a damp cloth. Do not scratch out!
- Dry cloths, sponges that may scratch, materials that require rubbing, sand and the other effective cleaning agents containing mineral water, acid or chloride are not suitable.
- Clean the stainless steel surfaces only in the direction of grinding.
- Do not use stainless steel cleaning agent or wet cloths for control units. Cleaning the metal oil filters. Used metallic oil filters hold the humidity generated in the kitchen and the oily particles contained within the steam. In case of regular use (1 to 2 hours per day), clean the metal oil filters about every month.
- Do not use over-effective, acidified or corrosive cleaning agents.
- For the cleaning of the metal oil filters, use a damp cloth to clean holding parts of metal oil filters inside the appliance.
- You can clean the metal oil filters in the dishwasher or by hand.
- Do not apply spray cleaning agents directly on the appliance.
Washing in the Dishwasher
- In case of washing in the dishwasher, slight discoloration may occur. This does not affect the function of the metal oil filter.
- Do not wash heavily soiled metal oil filters together with the dishes.
- Place the metal oil filters in the dishwasher loosely or freely. Metal oil filters should be placed in the dishwasher without being
jammed.
Washing By Hand
- You can use a special oil dissolving agent for stubborn dirt. You can get this agent from the authorised sales center.
- Soften the metal oil filter in hot water containing dishwashing liquid.
- Use a brush for cleaning and wait for the liquid on the metal oil filter to be drained well. Rinse the filters well after cleaning.
- Technical specifications and this manual may be changed without prior notice.
- This appliance complies with the Regulation for Supervision of the Waste Electric and Electronic Equipment.
- This hood is designed to be used over the hob. Make sure that the wall can bear the weight of the hood. Cost of crushing, cutting and similar procedures to be carried out on the wall or cabinet during installation should be covered by the consumer. The hood may be used with a flue system that discharges the air, or without a flue (by attaching the carbon filter). Pay attention to the matters that may be encountered before or during the installation. Installation should be performed by the authorised service agent. Installation should be carried out by an authorised specialist who has knowledge of ventilation. Service life of the appliance identified by the Ministry of Industry (period of availability for the spare parts required for the performance of functions of the appliance) is 10 (ten) years.
- Your appliance must be kept in its original packaging to avoid damage to its components during handling and transportation.
- Keep the appliance in its normal position during handling.
- Do not drop the appliance and protect it against damage during transportation. Warranty does not cover the faults and damages occurred during transportation after delivery of the appliance to the customer.
natural_image
Simple line drawing of a house with airflow indicators and a checkmark (no text or symbols)image 10
1- Clapet
2- Fente de Clapet
natural_image
Simple line drawing of a house with a checkmark and airflow indicators (no text or symbols)Imagine 1: Pericol de otrăvire
natural_image
Simple line drawing of a house with airflow indicators and a checkmark (no text or symbols)Imagine 2: Pericol de otrăvire

PERICOL!
Avertisment - Pericol de sufocare
Rysunek 10
1- Clapă
2- Carcasa Clapei
natural_image
Close-up of modern white rectangular panels with black borders, no visible text or symbolsGRUNDIG
WHERE HOME IS
VÂNZĂTOR
Nr. factură: Data:
natural_image
Interior kitchen scene showing a bowl of green vegetables and a cooking pan with meat inside (no visible text or symbols)natural_image
Simple line drawing of a house with airflow indicators and a checkmark (no text or symbols)natural_image
Simple line drawing of a house with airflow indicators and a checkmark (no text or symbols)1- Скоба за комин
2- Гнездо за клапа
natural_image
Simple line drawing of a house with airflow indicators and a checkmark (no text or symbols)natural_image
Simple line drawing of a house with airflow indicators and a checkmark (no text or symbols)- Important safety and environmental instructions
- General safety
- Compliance with the WEEE Directive and Disposing of the Waste Product:
- be Compliance with RoHS Directive
- Package information
- Vital Risk Poisoning Risk
- DANGER! Warning - Risk of Suffocation
- DANGER! Warning - Danger of Death
- WARNING! Risk of fire!
- WARNING!
- Risk of electric shock!
- DANGER!
- Risk of injury!
- CAUTION
- Risk of burning, risk of electric shock!
- NOTE:
- General appearance
- Overview
- Technical Data
- Scaled Technical Drawing
- Package Content
- Installation and Use of the Appliance
- Position of the Appliance
- Things to do for energy saving;
- Installation of the Appliance
- WARNING
- Using the Appliance
- Key Functions
- Automatic Stop 15 mins.
- Cleaning Periods for Metal Filters:
- Cleaning and Maintenance
- Waste air mode
- Washing in the Dishwasher
- Washing By Hand
- PERICOL!
- Avertisment - Pericol de sufocare
- VÂNZĂTOR
Brand : GRUNDIG
Model : GDK6470X
Category : Range hood