
WK 8680 - Kitchen appliance GRUNDIG - Free user manual and instructions
Find the device manual for free WK 8680 GRUNDIG in PDF.
| Product type | Electric kettle |
| Brand | Grundig |
| Model | WK 8680 |
| Power supply | 220-240 V~, 50-60 Hz, 2520-3000 W |
| Capacity | 1.7 L (estimated) |
| Body material | Plastic |
| Descaling filter material | Stainless steel |
| Adjustable temperature range | 40 °C to 100 °C |
| Keep warm function | Yes, up to 30 minutes (50 °C to 90 °C) |
| Automatic shut-off | Yes |
| Dry-boil protection | Yes |
| Maintenance | Clean with a damp cloth and mild detergent; descale regularly with vinegar or lemon juice |
| Included accessories | Base with cable storage, removable descaling filter |
Frequently Asked Questions - WK 8680 GRUNDIG
User questions about WK 8680 GRUNDIG
0 question about this device. Answer the ones you know or ask your own.
Ask a new question about this device
Download the instructions for your Kitchen appliance in PDF format for free! Find your manual WK 8680 - GRUNDIG and take your electronic device back in hand. On this page are published all the documents necessary for the use of your device. WK 8680 by GRUNDIG.
USER MANUAL WK 8680 GRUNDIG
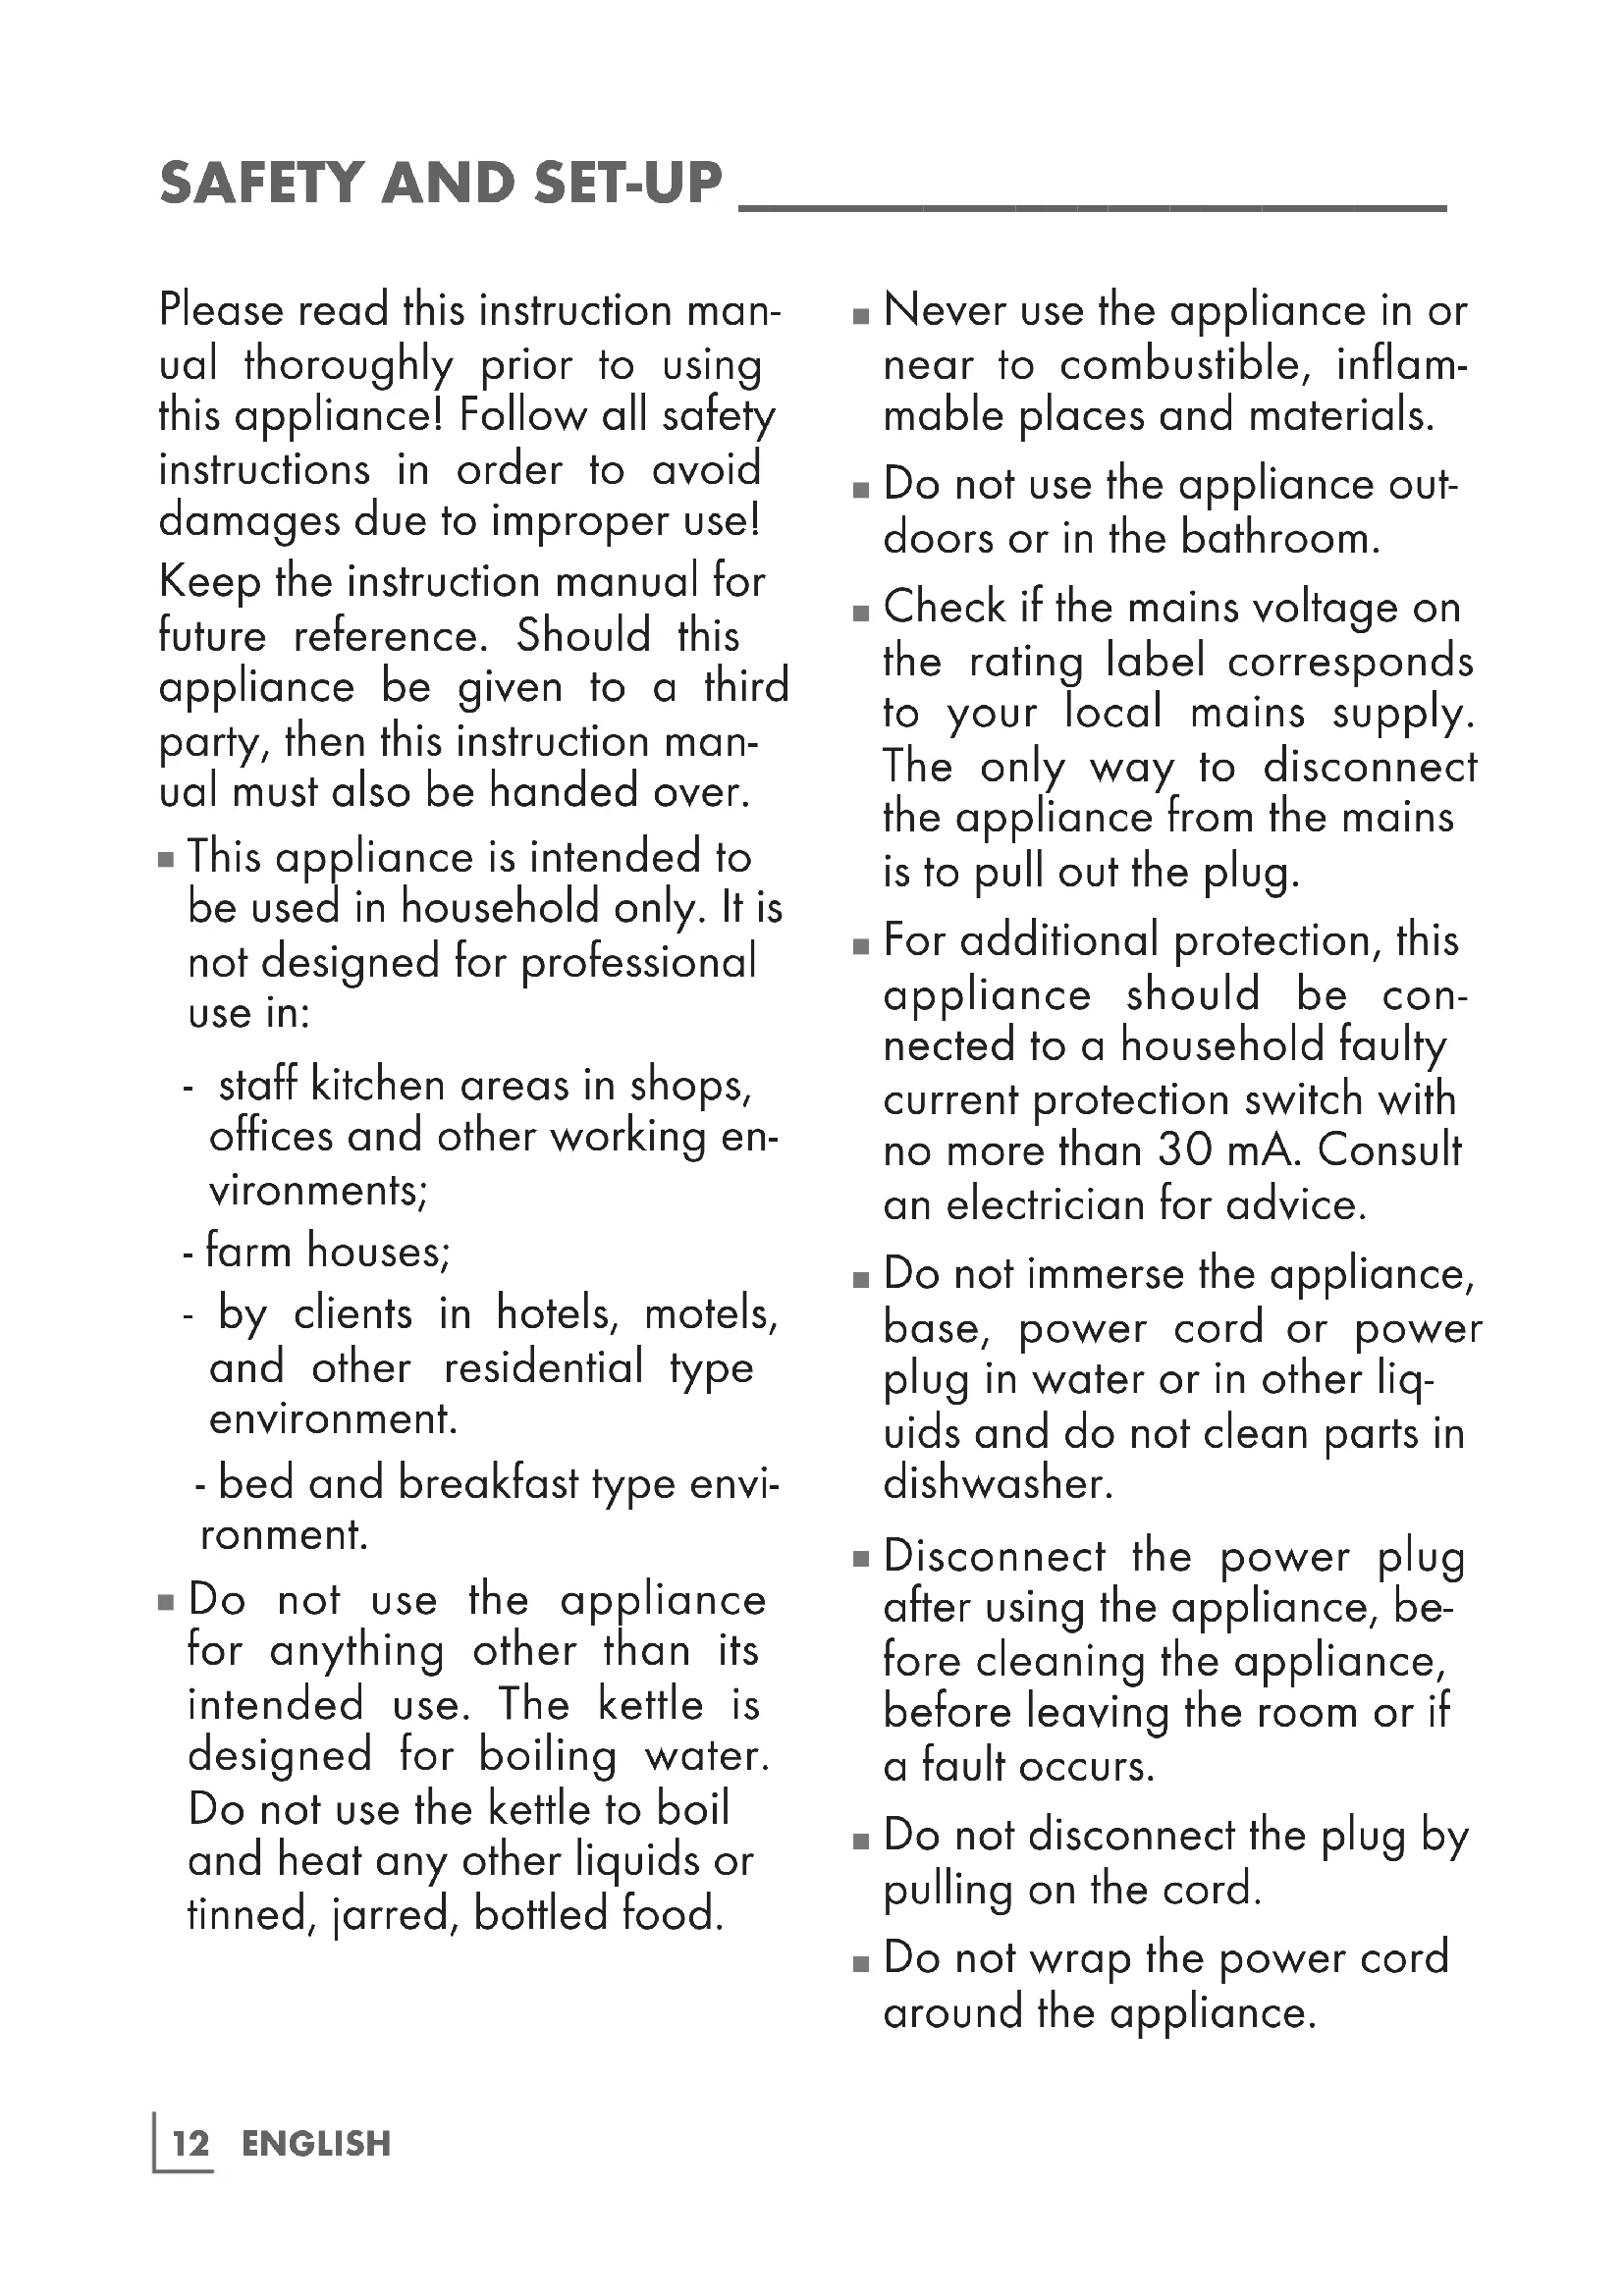
Please read this instruction manual thoroughly prior to using this appliance! Follow all safety instructions in order to avoid damages due to improper use! Keep the instruction manual for future reference. Should this appliance be given to a third party, then this instruction manual must also be handed over.
This appliance is intended to be used in household only. It is not designed for professional use in:
- staff kitchen areas in shops, offices and other working environments;
-farm houses;
-
by clients in hotels, motels, and other residential type environment.
-
bed and breakfast type environment.
-
Do not use the appliance for anything other than its intended use. The kettle is designed for boiling water. Do not use the kettle to boil and heat any other liquids or tinned, jarred, bottled food.
-
Never use the appliance in or near to combustible, inflammable places and materials.
- Do not use the appliance outdoors or in the bathroom.
- Check if the mains voltage on the rating label corresponds to your local mains supply. The only way to disconnect the appliance from the mains is to pull out the plug.
For additional protection, this appliance should be connected to a household faulty current protection switch with no more than 30mA . Consult an electrician for advice. - Do not immerse the appliance, base, power cord or power plug in water or in other liquids and do not clean parts in dishwasher.
- Disconnect the power plug after using the appliance, before cleaning the appliance, before leaving the room or if a fault occurs.
- Do not disconnect the plug by pulling on the cord.
-
Do not wrap the power cord around the appliance.
-
Do not squeeze or bend the power cord and do not rub it on sharp edges in order to prevent any damage. Keep the power cord away from hot surfaces and open flames.
- Do not use an extension cord with the appliance.
- Never use the appliance if the power cord or the appliance is damaged.
- Our GRUNDIG Household Appliances meet applicable safety standards, thus if the appliance or power cord is damaged, it must be repaired or replaced by a service centre to avoid any dangers. Faulty or unqualified repair work may cause danger and risks to the user.
- Do not dismantle the appliance under any circumstances. No warranty claims are accepted for damage caused by improper handling.
Always keep the appliance and its cord out of reach of children aged less than 8 years.
This appliance can be used by children aged from 8 years and above and persons with reduced physical, sensory or mental capabilities or lack of experience and knowledge if they have been given supervision or instruction concerning use of the appliance in a safe way and understand the hazards involved. Children shall not play with the appliance. Cleaning and user maintenance shall not be made by children without supervision.
- Do not leave the appliance unattended as long as it is in use. Extreme caution is advised when the appliance is being used near children and people with limited physical, sensory or mental capabilities.
Before using the appliance for the first time, clean all parts which come into contact with water carefully. Please see full details in the "Cleaning and Care" section.
Dry the appliance before connecting it to the mains supply.
- Never operate or place any part of this appliance near hot surfaces such as gas burner, hotplate or heated oven.
- Operate the appliance with delivered parts only.
- Operate the appliance with its original base. Do not use the base for any other purpose.
- Do not use the appliance with damp or wet hands.
Always use the appliance on a stable, flat, clean and dry surface.
Make sure that there is no danger that the power cord could be accidentally pulled or that someone could trip over it when the appliance is in use.
- Position the appliance in such a way that the plug is always accessible.
- Hold the appliance by the handle only. There is a danger of burns. Avoid contact with hot surfaces as well as with the emitting steam.
Position the lid so that the hot steam is directed away from you.
- Do not open the lid while the water is boiling. Be careful while you are opening the lid after the water has boiled. The steam which comes out of the kettle is very hot.
Make sure that the lid always remains closed properly when using the kettle.
- The warming plate is hot after usage. Please do not touch heating element after usage. Please wait till cool down.
- Never fill the appliance above the maximum level indicator. If it is overfilled, then boiling water may splash out.
- Avoid spillage on the connector.
- Do not fill the kettle below the minimum level indicator.
- Never operate the appliance without any water inside it.
- Do not fill the kettle when it is fitted on its base.
- Do not stick any foreign objects on the appliance.
Dear Customer,
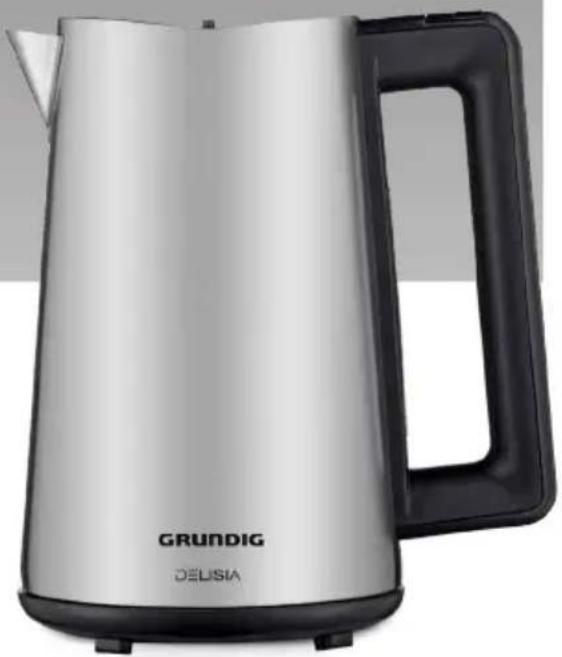
Congratulations on the purchase of your new GRUNDIG kettle WK 8680 / WK 8681.
Read the following user notes carefully to ensure full enjoyment of your quality Grundig product for many years to come.
A responsible approach!

GRUNDIG focuses on contractually agreed social working conditions with fair wages for both internal employees and suppliers. We also attach great importance to the efficient use of raw materi
als with continuous waste reduction of several tonnes of plastic every year. Furthermore, all our accessories are available for at least 5 years.
For a future worth living.
For a good reason. Grundig.
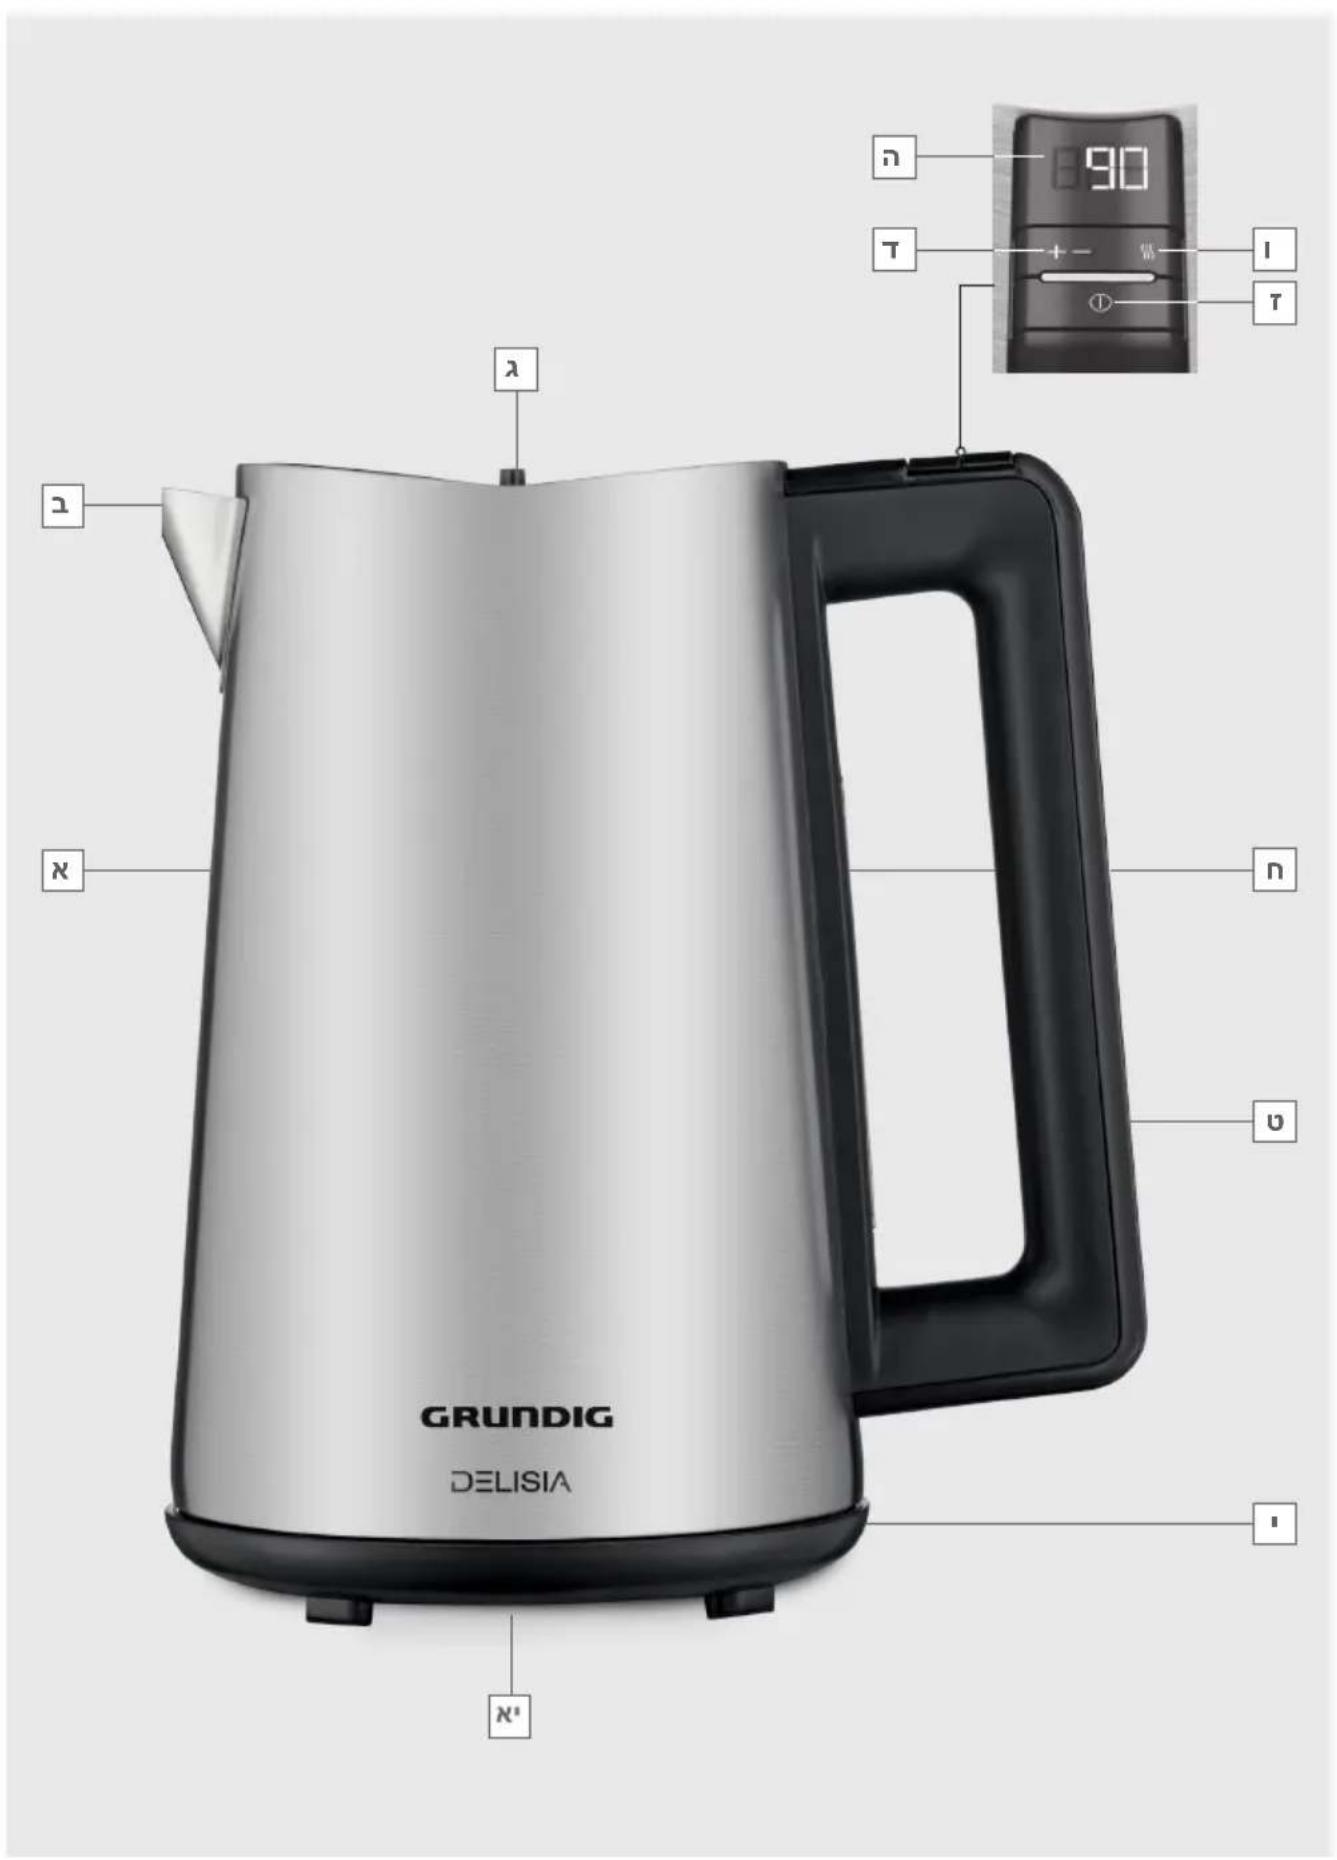
Controls and parts
See the figure on page 3.
A Water tank
B Spout / Stainless steel lime-scale filter
C Lid / Lid release button
D Temperature setting button
E Temperature indicator
F Simmer function button
G On/Off button
H Water level indicator
1 Handle
J Base unit
K Cable winding unit (beneath base unit)
Preparation
1 Remove all packaging and sticker materials and dispose of them according to the applicable legal regulations.
2 Before using the appliance for the first time, clean all parts which come into contact with water carefully. (See the "Cleaning and care" section).
3 Completely roll out the power cord from the cable coil J on the bottom of the base. Pass the power cord through the slot on the base.
4 Clean the kettle well before initial use and discard water of first two boiling cycles.
Operation
1 Push the lid release button on the kettle to open the lid .
2 Fill the water tank with water.
Notes
- Do not place the water tank A on the base J while filling it with water.
- Never fill the water tank A above the maximum level indicator or below the minimum level indicator.
3 Close the lid until it clicks into place.
4 Place the water tank on the base. Make sure that it is placed in an upright and stable position.
5 Insert the plug into the wall socket.
The actual temperature of water will be shown on the display.
6 Set the water temperature to any desired value (40-100) by pressing the temperature setting button (+ / -) .
7 Push On/Off button G.A warning beep will be heard once. The button's light will be on during operation. Once the desired temperature is attained, the light disappears and the operation is finished. You will hear 3 warning (beep) sounds.
8 If desired, the simmer function can be activated by pressing button F. - Indicator light of button F lights on.
If the simmer function is activated, the kettle will restart the boiling process when the temperature falls below the desired temperature. After 30 minutes, simmer function will be cancelled automatically.
Warm-keeping button F operates in a range from 50^ to 90^
Note
- Lid should always be closed during the boiling process; otherwise the kettle will not switch off automatically.
Note
If you want to stop the boiling process manually, push the On/Off button G.
9 Disconnect the plug from the wall socket.
10 Take the water tank from the base. Only hold it by the handle.
Caution
- Do not open the lid as hot water could splash out. Make sure that no water splashes onto the base.
11 Pour the water from the spout to the cup or glass you want to use.
Hints and Tips
If you want to continue the boiling process, repeat the procedure from 1 to 10.
- Let the kettle cool down between each heating process.
The kettle is equipped with a water filter B which filters out limestone and other residues when the water is being poured out.
Use softened or filtered water to prevent lime build-up.
Cleaning and care
Caution
- Never use petrol, solvents or abrasive cleaners, metal objects or hard brushes to clean the appliance.
- Never put the appliance, base or power cord in water or any other liquid.
1 Turn the appliance off and disconnect it from the wall socket.
2 Let the appliance cool down completely.
3 Use a damp soft cloth and a little mild cleanser to clean the exterior of the appliance.
4 The lime-scale filter can be detached for cleaning purpose. To detach the filter:
- Remove the filter latch by holding and gently pulling it upwards.
Depending on the level of lime build-up, clean the filter with water and a little lemon juice or white vinegar. Use a soft brush. - Insert the filter again from above until it clicks into place.
Note
Before using the appliance after cleaning, dry all parts carefully using a soft towel.
Dscaling the kettle
Descaling extends the life of your kettle. Descal ing period depends on the water hardness in your area.
1 Fill the kettle with water, up to three quarters of the maximum level.
2 Add white vinegar or lemon acid in the kettle up to the maximum level.
3 Boil the solution (refer to Operation section).
4 After the kettle has switched off, unplug the appliance.
5 Leave the solution in the kettle for a few hours.
Pour out the solution and rinse the inside thoroughly.
7 Fill the kettle with clean water and boil the water.
Empty the kettle and rinse it with water again.
Notes
If there is still some limescale, repeat the procedure.
- You can also use a descaler which is appropriate for kettles. If you use a descaler, please follow the instructions of that descaler.
Warning
If you do not descale the kettle after a long time you use it, the bottom at the inside of the water tank fully gets covered with limescale and the appliance will get damaged. In that case, it requires to be repaired by a service centre.
No warranty claims are accepted for damage caused by improper handling.
Storage
If you do not plan to use the appliance for a long period of time, please store it carefully.
Make sure the appliance is unplugged and completely dry.
Store the appliance in a cool, dry place.
Make sure the appliance is kept out of the reach of children.
Environmental note
This product has been made from high-quality parts and materials which can be reused and are suitable for recycling.
Therefore, do not dispose of the product with normal domestic waste at the end of its service life. Take it to a collection point for the recycling of electrical and electronic equipment.
This is indicated by this symbol on the product, in the operating manual and on the packaging.
Please consult your local authorities to find out where the nearest collection point is.
Help protect the environment by recycling used products.
Technical data

Power supply: 220 - 240V 50 - 60Hz
Power:
WK 8680:2520-3000W
WK 8681:2000-2400W
Technical and design modifications reserved.
- Antes de utiliser de nuevo el aparato tras una limpieza,SEO,SEO,SEO,SEO,SEO,SEO,SEO,SEO,SEO,SEO,SEO,SEO,SEO,SEO,SEO,SEO,SEO,SEO,SEO,SEO,SEO,SEO,SEO,SEO,SEO,SEO,SEO,SEO,SEO,SEO,SEO,SEO,SEO,SEO,SEO,SEO,SEO,SEO,SEO,SEO,SEO,SEO,SEO,SEO,SEO,SEO,SEO,SEO,SEO,SEO, SEO, SEO, SEO, SEO, SEO, SEO, SEO, SEO, SEO, SEO, SEO, SEO, SEO, SEO, SEO, SEO, SEO, SEO, SEO, SEO, SEO, SEO, SEO, SEO, SEO, SEO, SEO, SEO, SEO, SEO, SEO
Descalcificacion del hervidor
N,7wnn N 1N |N|NIO Oo
wnnn nn nix nn won nn n 1
y
2.1017n
3 17
W,17n7 7 Wn 7
Dipn nn nnn
n 179 .Dn n "n nn nn nnn nnn nnn nnn nnn nnn nnn nnn nnn nnn nnn nnn nnn nnn nnn nnn nnn nnn nnn nnn nnn nnn nnn nnn nnn nnn nnn nnn nnn nnn nnn nnn nnn nnn nnn nnn nnn nnn nnn
.1777777777
yun oyn
1
2 TvIn
- (nvy)
- yun
5 79on
.
nyn
NNNT,NTDINNNN 097
nyn 977 n/nynn 709n
77ywnnnn
INX TINX. OOONN DNNN NNX 9
□
#
nnn nn, noon nn ninn7
yin 1n x7y 197n nn nnn y
□002n
007 7907 nnnn nn 10
wnnnn
nnyn
yinnnnnnn nn nnnn
10 1-n
nannnnnnnnnnnnnnnnnnnnnnnnnnnnnnnnnnnnnnnnnnnnnnnnnnnnnnnnnnnnnnnnnnnnnnnnnnnnnnnnnn
nixnni
yIN
JINNINIOY
#
.7nn pinn npn7 oxnn
1 DNNX
2 n,
.0n nn nn nn nn nn nn nn nn nn nn nn nn nn nn nn nn nn nn nn nn nn nn nn nn nn nn nn nn nn nn nn nn nn nn nn nn nn nn nn nn nn nn nn nn nn nn nn nn nn nn nn nn nn nn nn nn nn nn nn nn nn nn nn nn nn nn nn nn nn nn nn nn nn nn nn nn nn nn nn nn nn nn nn nn nn nn nn nn nn nn nn nn nn nn nn nn
.("1901 17" 1y02 D79
1 3
ynn nn nyn . 0oynnnny
.0000 77
4 1
n nn nnnnnnnnnnnnnnnnnnnnnnnnnnnnnnnnnnnnnnnnnnnnnnnnnnnnnnnnnnnnnnnnnnnnnnnnnnnnnnnnnnnnnnnnnnnnnnnnnnnnnnn
#
noonnnnyyyn7yyn71
. noonnn nn ninn7
nONUNN
2.
nyn
n 1000 nnnn nn
.
yni n nn n 1n iN D
oannnnn nn nnnn nnnn nn
Jinnnn
noonnnn 3.
0oan y dipn nn n4 xinu
5.
□n/nynnynyn76
,N 国 1/nyn p09n
nannnnn
myn
nnonnnn nunuiin nnaiy
nnnnnnnnnnnnnnnnnnn
ninnnnnnnn 7
709n nniin
.0nnn
7yynnnn nn
D77NI D779
.3TINyN
nn nn
7n-7x n79n nnX pON
noonnnnyn7/ noon
nnonnnn nn7
nunnnnn
inn nnw
1
n nn nn nnn
T
O'OJ nT'n
n n
(o0an nTn7nnnn)
n
n nn nnnnnnnnnnnnnnnnnnnnnnnnnnnnnnnnnnnnnnnnnnnnnnnnnnnnnnnnnnnnnnnnnnnnnnnnnnnnnnnnnnnnnnnnnnnnnnnnnnnnnnnnn
n 109nn nnnn nn nnnn nnnn nnnn nnnn nnnn nnnn nnnn nnnn nnnn nnnn nnnn nnnn nnnn nnnn nnnn nnnn nnnn nnnn nnnn nnnn nnnn nnnn nnnn nnnn nnnn nnnn nnnn nnnn nnnn nnnn nnnn nnnn nnnn nnnn nn
.ning97
12 17 17 17
.
D'XIN D'TN INN D'YNU TIN D'NN DIPN
Tnn nn nnnn 197n nn nn nn nn nn nn nn nn nn nn nn nn nn nn nn nn nn nn nn nn nn nn nn nn nn nn nn nn nn nn nn nn nn nn nn nn nn nn nn nn nn nn nn nn nn nn nn nn nn nn nn nn nn nn nn nn nn nn nn nn nn nn nn nn nn nn nn nn nn nn nn nn nn nn nn nn nn nn nn nn nn nn nn nn nn nn nn nn nn nn nn nn nn nn nn nn nn nn nn nn aan
N X N N JX IIXI D D U O7nn IINN 7yn DnIn n Y nn Xn nx .y n Dinnn n ,Tnn .xinn
nnn nn n nn n nn .nnnn nn nn
yinjx |IX |IXI D9 DIU .nnn nn nnnn
XINUO DIJIIN JN X7n7 |X .10'027 1JIN
DnVyWONN Y TIN7 X .OnuO
nX7 on dinn nn ynn
nXn .wn.
nn .wn nX7 nn nn
nY
y nn nn nn nn nn nn nn nn nn nn nn nn nn nn nn nn nn nn nn nn nn nn nn nn nn nn nn nn nn nn nn nn nn nn nn nn nn nn nn nn nn nn nn nn nn nn nn nn nn nn nn nn nn nn nn nn nn nn nn nn nn nn nn nn nn nn nn nn nn nn nn nn nn nn nn nn nn nn nn nn nn nn nn nn nn nn nn nn nn nn nn nn nn nn nn nn nn nn nn nn
IX yonix 1X 19XI DIOIy Iynn nn nynn nn ,nn nn noun nn .x nn nn .n nn
y nn nn nn yon .nX nIynn D7nn
y nn nn nn nn yon .x .17w nn o0n nn nn nn nn nn nn nn nn nn nn nn nn nn nn nn nn nn nn nn nn nn nn nn nn nn nn nn nn nn nn nn nn nn nn nn nn nn nn nn nn nn nn nn nn nn nn nn nn nn nn nn nn nn nn nn nn nn nn nn nn nn nn nn nn nn nn nn nn nn nn nn nn nn nn nn nn nn nn nn nn nn nn nn nn nn nn nn nn nn nn nn nn nn nn nn.
TJWONNNN7IX .NIIOININ
YWON TNNUNW .NIOU ,NNO NNO
NTO O XU NTI
NIYU INN WUNN
WONU INWU
IXI YON N X
. TNN UYN YNNU
. TNN YON N X TINX
ynn .NIO O N"7
dyi D'NN D'NUO ynn
. D'09n D'TN
TINU NOONN NNN TAN IITINI DNNN .
nno nn nnn 1n nnn .nnnn nn nn nn nn nn nn
nwnw7 nwnn
TNIY GRUNDIG nnnn
DUNNNN NINNNN
X WNNN X ,07
IX DNNN ,IINNN
,NNW TINNN
NTNYY INO OINN
NONIOIN INN
JN JN NNN 7177 1111 1111 1111 1111 1111 1111 1111
wnnnn7IX|9NXD9D1
Dninn,nni7nTn
IX,0n7nNIX D7T .n7
yinn nn nn nnnn .nnn nn nnnn nn nn nn nn nn nn nn nn nn nn nn nn nn nn nn nn nn nn nn nn nn nn nn nn nn nn nn nn nn nn nn nn nn nn nn nn nn nn nn nn nn nn nn nn nn nn nn nn nn nn nn nn nn nn nn nn nn nn nn nn nn nn nn nn nn nn nn nn nn nn nn nn nn nn nn nn nn nn nn nn nn nn nn nn nn nn nn nn nn nn nn nn nn nn nn nn nn nn nn nn.
n7 w' ,n901 n7
n7 n7 097 n7 w7
n7 w' ony n7
n9 .nX-30-n n7
TIOIIXDINN 10OJN,UNNNX NYN INN NNNN NNNN
nN7 nwnywn nn
,197,wnwninwn
X IN Tnnn Nxyn 197
.ynnyn
77 won nnwn 1X
nwnn nXw nnx nn
Tyn Dnna .Tyn nnnu
wnwn 1X .Dn nnnn
7ninn nnnnn Dnna
tnnx IN DnN Dn
IN nnX ,NIN017
.
HEBREW 05-11

AUS GUTEM GRUND
GRUNDIG
KETTLE
WK 8680
WK 8681


- A responsible approach!
- Controls and parts
- Preparation
- Operation
- Notes
- Note
- Caution
- Hints and Tips
- Cleaning and care
- Dscaling the kettle
- Warning
- Storage
- Environmental note
- Technical data
- Descalcificacion del hervidor
- Dipn nn nnn
- nyn
- #
- nnyn
- myn
- D77NI D779
- AUS GUTEM GRUND
- GRUNDIG
- KETTLE
- WK 8680
- WK 8681
Brand : GRUNDIG
Model : WK 8680
Category : Kitchen appliance